Hello my dear Hive community, greetings to all those who take a few minutes to read my posts. In this installment, I'm sharing something essential for sewers: pincushions are an indispensable tool because they prevent us from losing pins and needles.
> Hola mi querida comunidad de Hive, saludos a todas esas personas que dedican unos minutos para leer mis post, en esta entrega traigo algo que es muy fundamental para las personas costureras, los alfileteros son una herramienta indispensable porque con esto evitamos que se nos pierdan alfileres y agujas.
These are very small and thin and are easily lost. A few days ago, I made this beautiful pincushion for my mother-in-law as a nice gift, because we both share a passion for sewing.
> Estos son muy pequeños y finos y se nos pierden fácilmente, hace días le hice este hermoso alfiletero a mi suegra como lindo detalle, porque las dos compartimos el gusto por la costura.
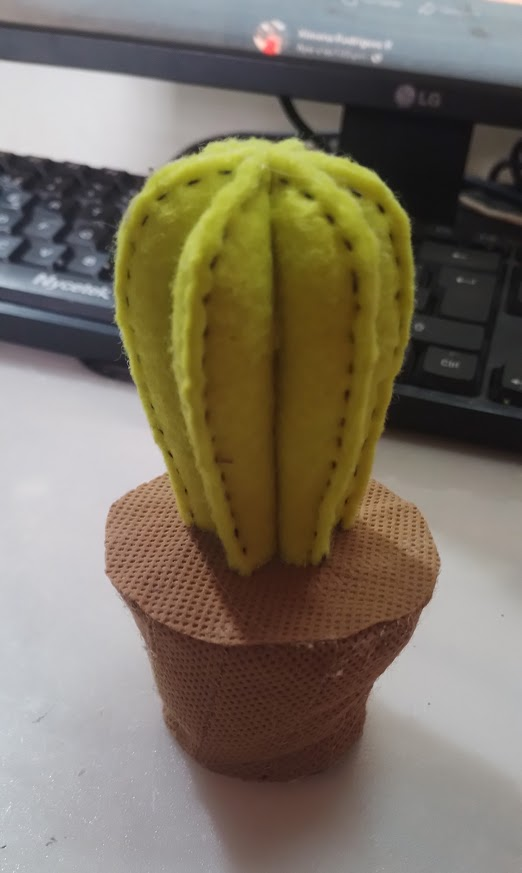
Well, those who have been reading my previous posts will know that cacti are my favorite plant, so I decided to replicate this project. I wanted to make one for myself and one for my mom, who was also delighted when she saw it.
> Bueno, los que vienen leyendo mis post anteriores sabrán que los cactus son mi planta favorita, así que decidí replicar este trabajo, quise hacer uno para mí y otro para mi mamá que también quedo encantada cuando lo vio.
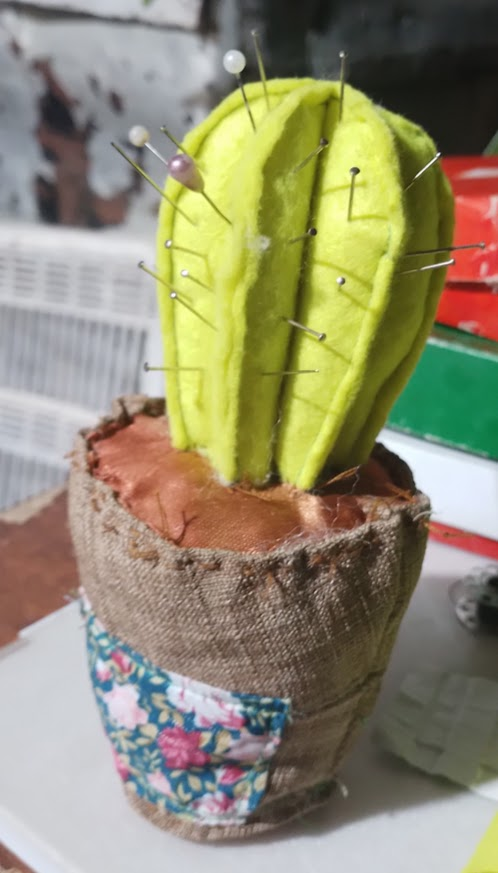
And since I have some leftover material, I wanted to make one for myself because my pincushion is somewhat improvised and not really my cup of tea. Another one for my mom, who was also delighted when she saw it. The materials I used were the following:
* Felt
* Stuffing. I used pillow stuffing. Alternatively, if you don't have this, you could use cotton, small fabric scraps, or some other soft material.
* Small fabric scraps in the color of your choice.
* Silicone glue stick.
* Cardboard.
* Eco-friendly POP fabric.
>Y como me quedo material me quise hacer uno para mí porque mi alfiletero es algo improvisado, no es muy de mi agrado y otro para mi mamá que también quedo encantada cuando lo vio. Los materiales que utilice fueron los siguientes:
>* Fieltro,
>* Relleno, yo usé relleno de almohada, como alternativa, si no >tienen esto podrían usar algodón, retrasos pequeños de tela o algún >material suave y blando.
>* Retrasos pequeños de tela del color de tu preferencia.
>* Silicon en barra.
>* Cartón.
>* Tela POP ecológica.

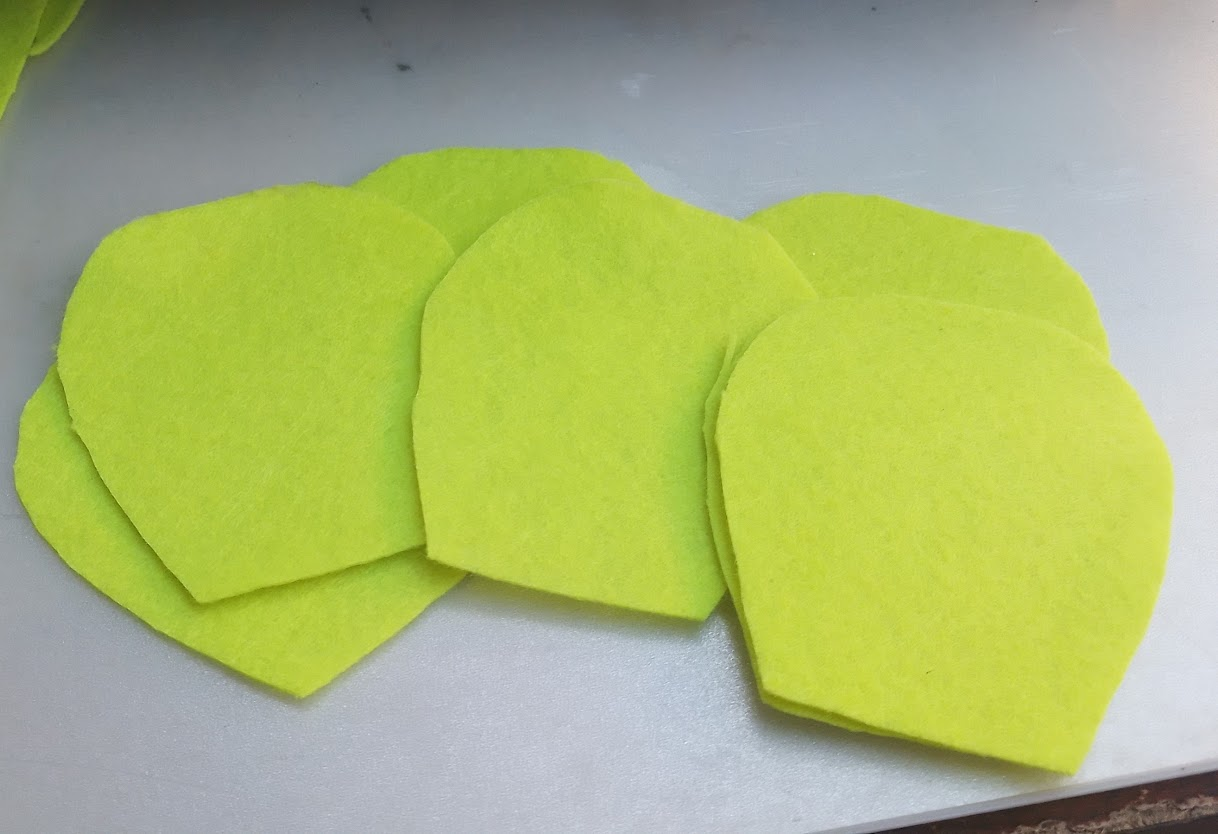
### Step 1: Cut out. / Paso 1: Recortar.
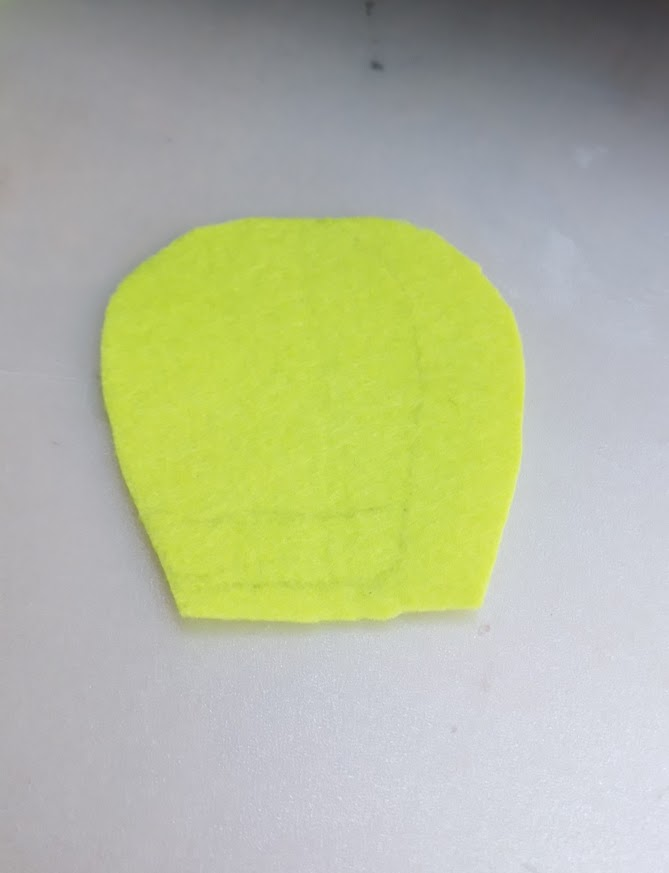
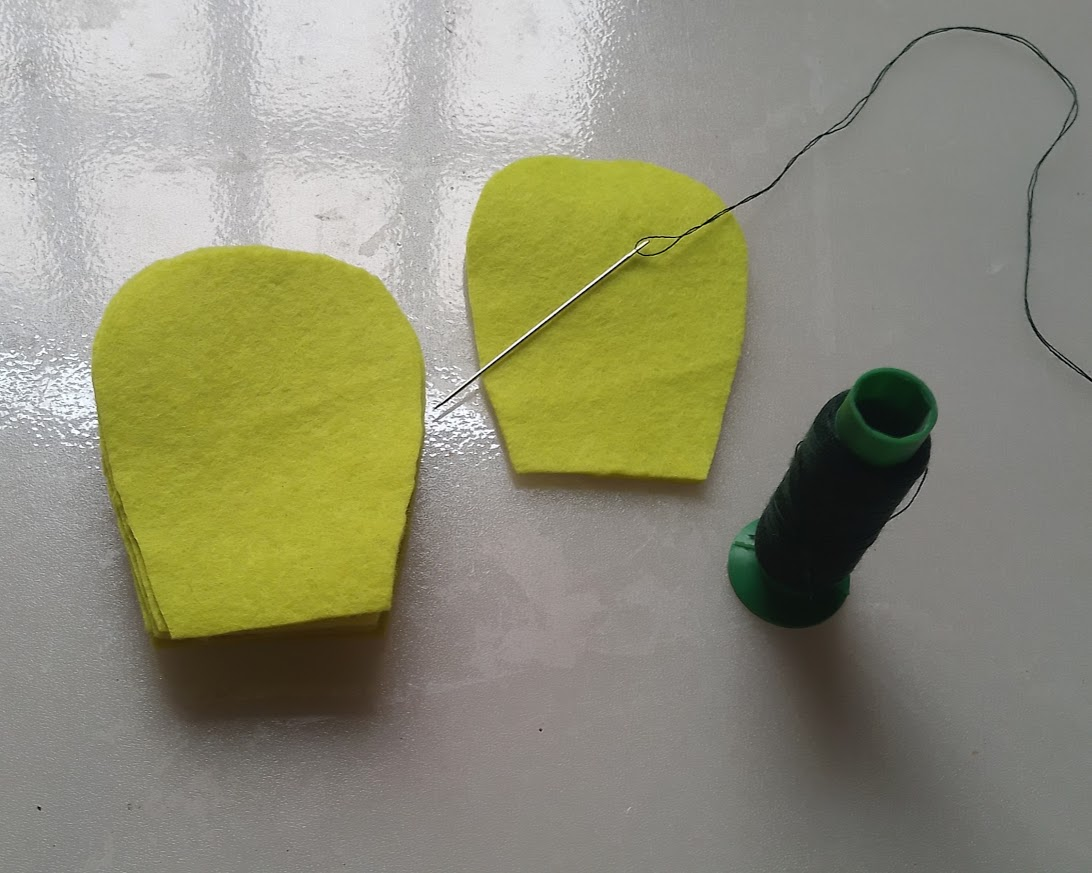
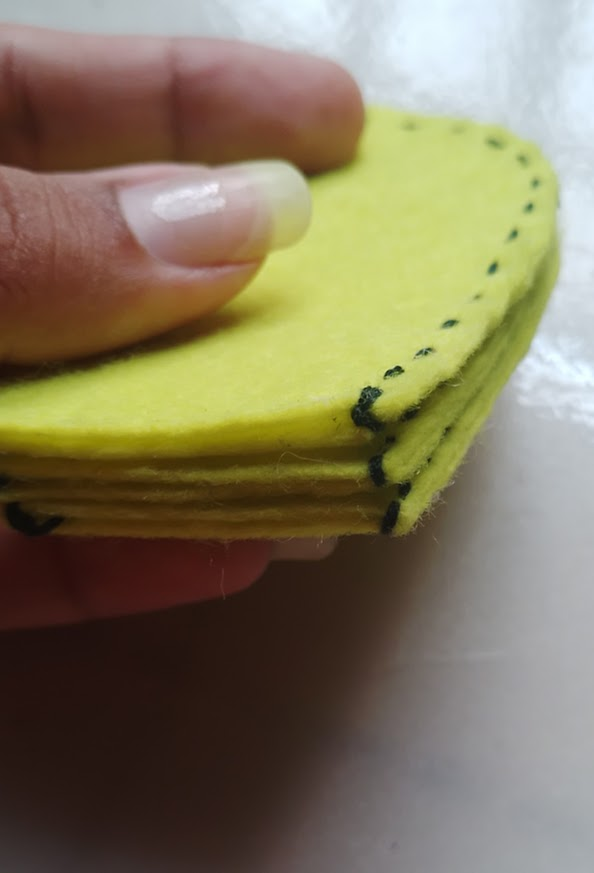
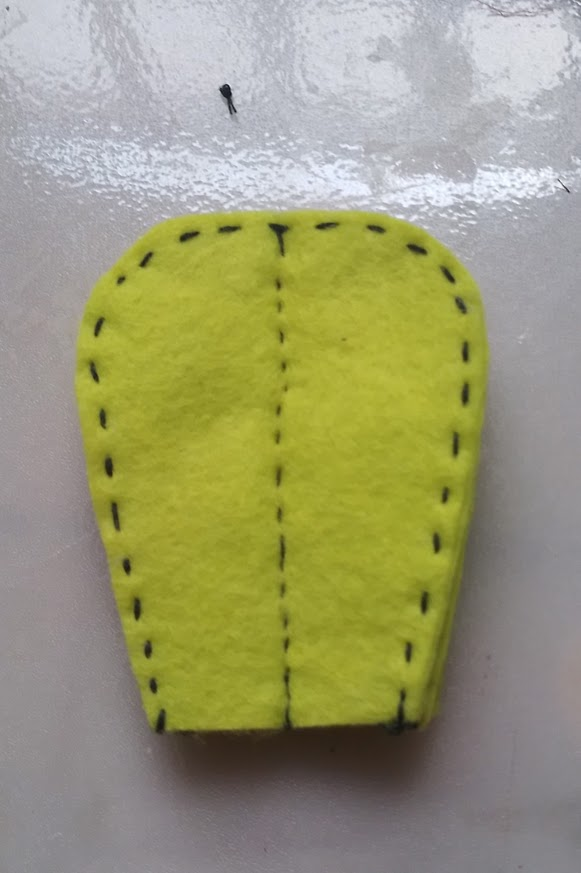
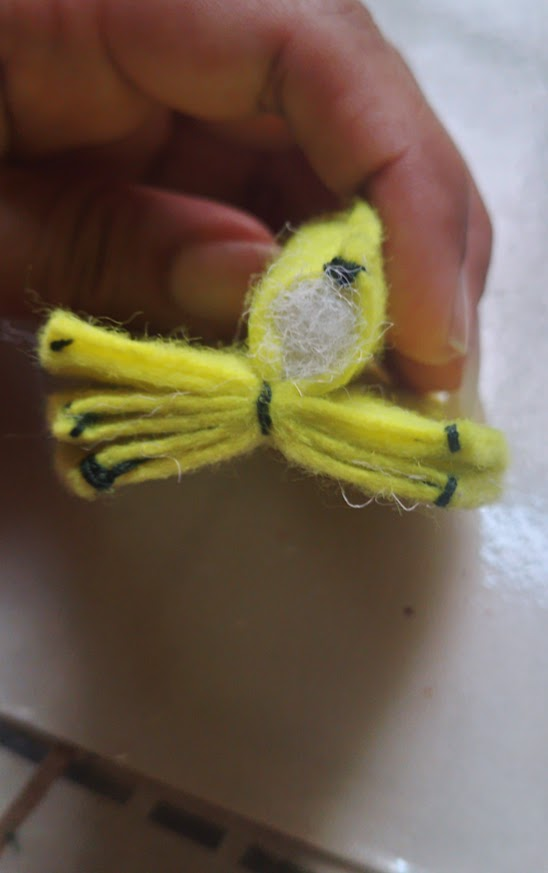
We cut a petal-like shape, from this petal we will cut the others, in total we will cut 6 petals.
> Cortamos una forma parecida a un pétalo, a partir de este pétalo cortaremos los demás, en total cortaremos 6 pétalos.
We looked for some circular measurements to make and measure the planter. In my case, I looked for a roll of toilet paper and a potato chip container. The large circle will be for the top and the small circle for the bottom of the planter.
> Buscamos unas medidas circulares para ir haciendo y tomando las medidas para el matero. En mi caso busqué un rollo de papel y un envase de unas papitas, la circunferencia grande será para la parte de arriba y la circunferencia pequeña es para la parte de bajo del matero.
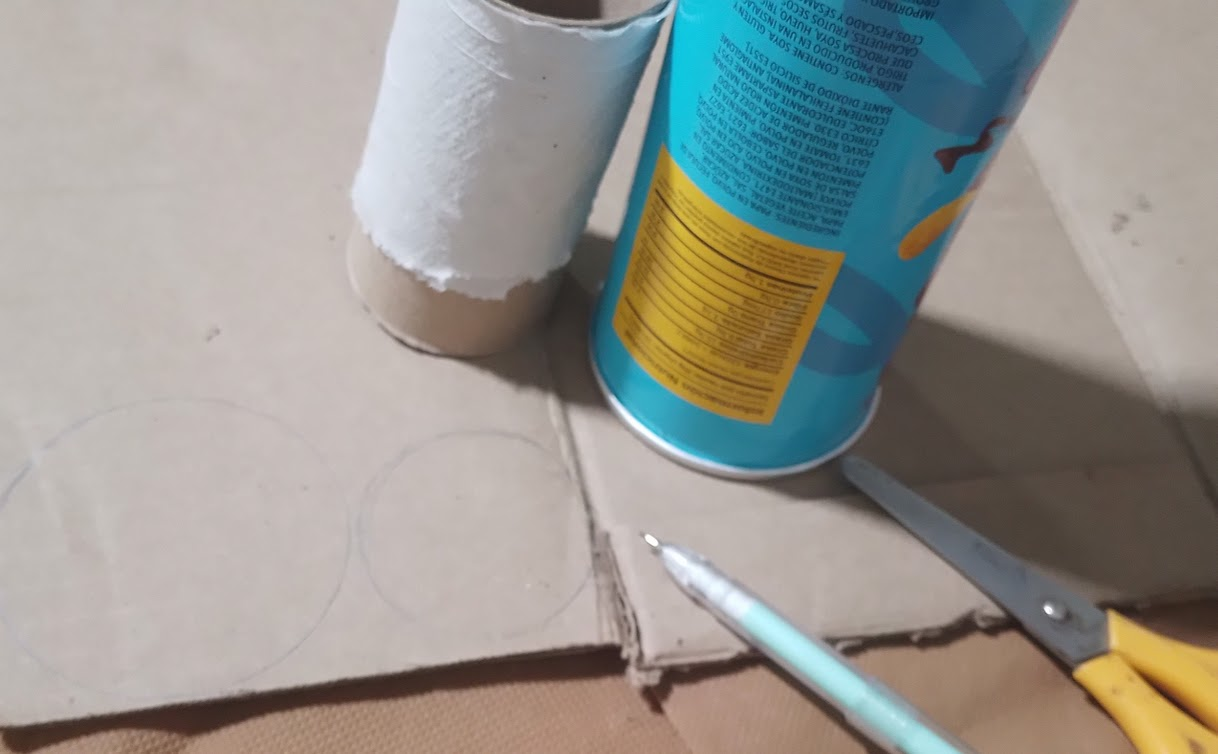
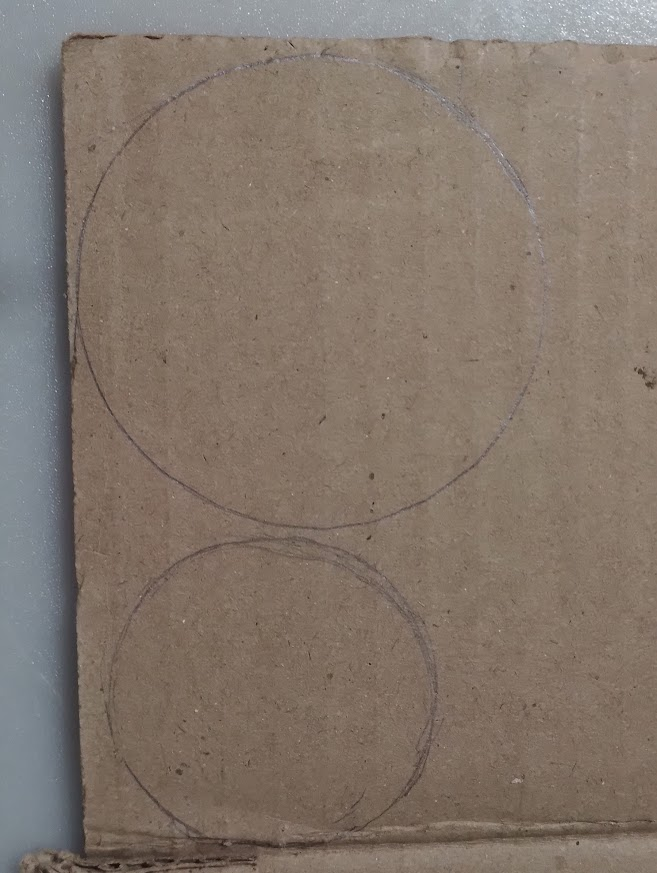
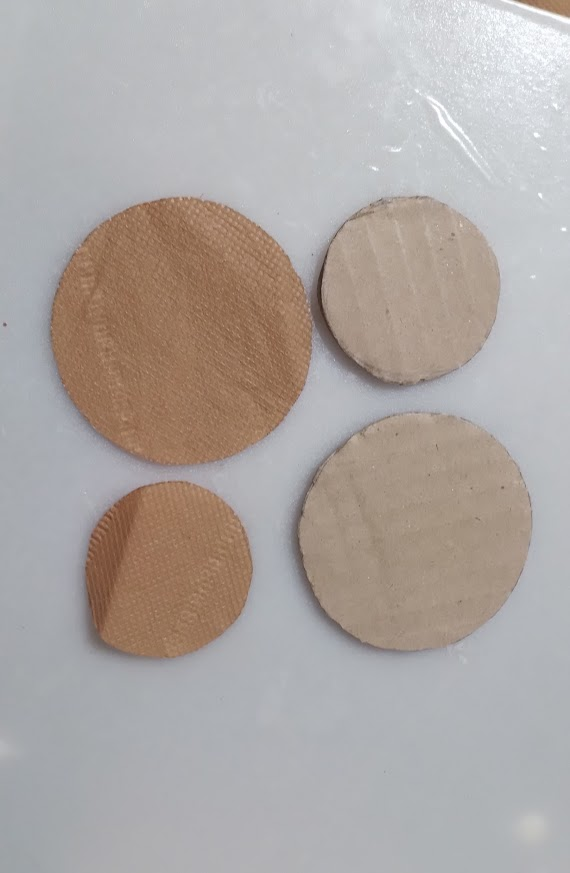
Since I was going to make two pincushions, I made two small circles and two large circles on cardboard. This will help give the pot firmness and a better shape.
> Como yo iba a hacer dos alfileteros, hice dos círculos pequeños y dos círculos grandes sobre cartón, esto servirá para darle firmeza y una mejor forma al matero.
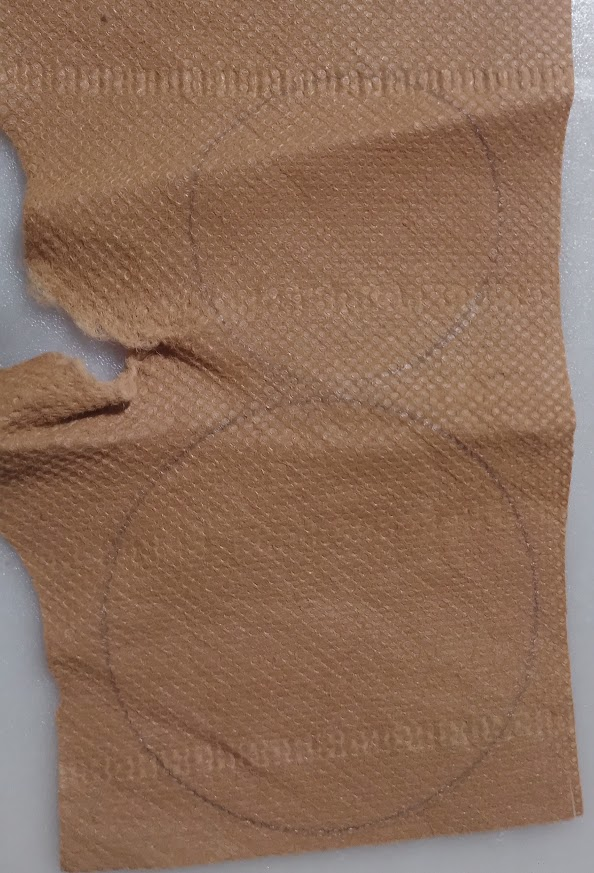
Then, using this type of fabric I chose, called eco-friendly POP, we make circles of the same circumference and size as the ones I made on the cardboard.
> Luego sobre este tipo de tela que escogí que se llama POP ecológico hacemos círculos de la misma circunferencia y tamaño de lo que hice sobre el cartón.
I decided to use this fabric because it's not thick and is very firm. The idea behind the fabric you choose is to make sure it's not too sagging, that's my recommendation, but if you want, try another type of fabric.
> La decidí usar esta tela porque no es gruesa y es muy firme, la idea de la tela que escojas es que no sea tan flácida, esa es mi recomendación, pero si quieres intentar con otro tipo de tela.
This is what we will use for a single pot, we do the same for another pot.
>Esto es lo que usaremos para un solo matero, hacemos lo mismo para otro matero.
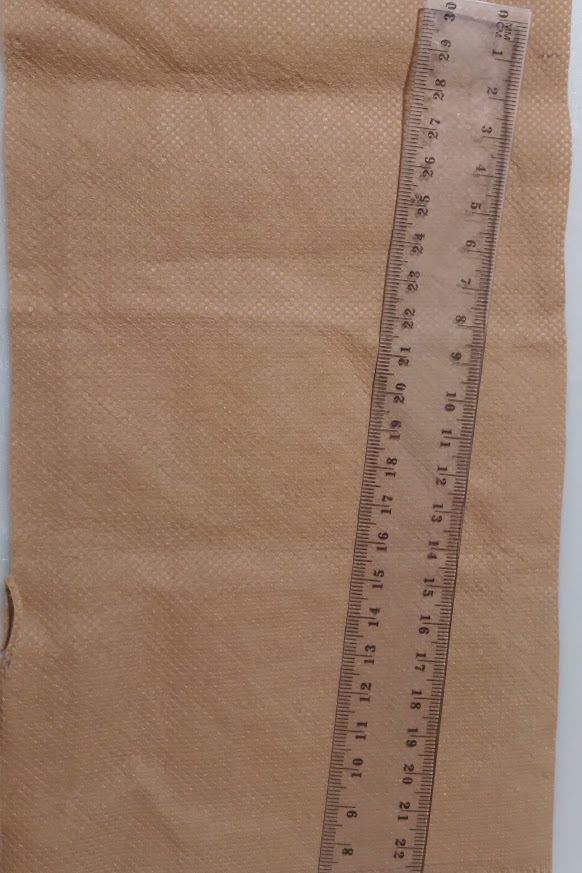
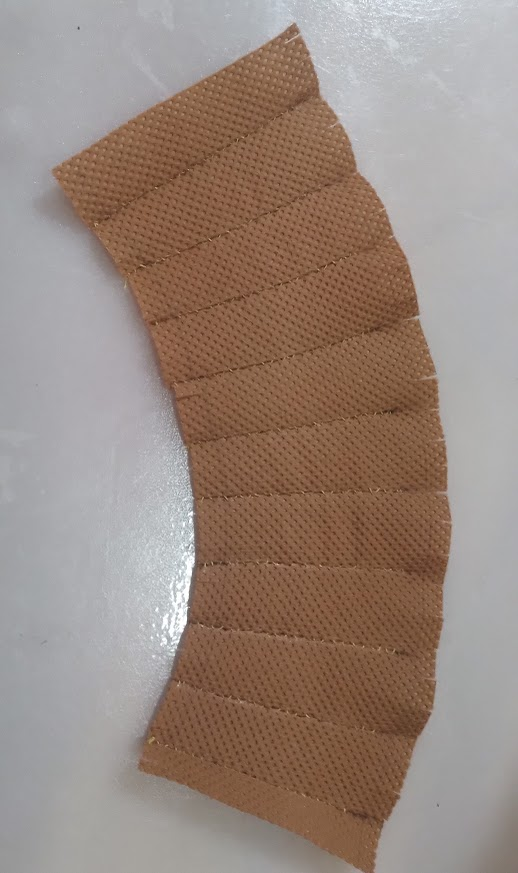
Next, we find a large scrap to make the rim of the planter. This gets a little complicated because we have to do some calculations, but don't worry; it's simple and not complicated at all.
> Luego buscamos un retaso grande para hacer el borde del matero, aquí se complica un poco porque hay que sacar unos cálculos, pero no te asustes, es algo simple no es nada complicado.
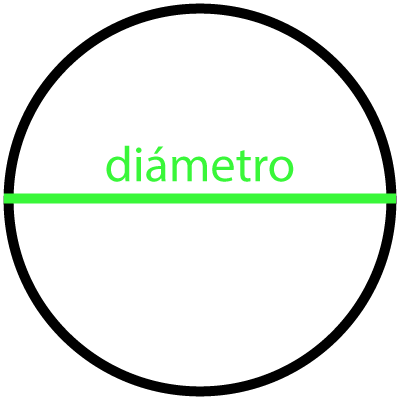
First, we need to find the circumference. You can do this by finding a tape measure, but for me, it's easier to measure the diameter of the circle.
> Primero tenemos que sacar el tamaño de la circunferencia que puedes hacerlo buscando una cinta métrica, pero para mí es más fácil medir el tamaño del diámetro del círculo.
[referencia original](https://www.decagono.com/circulo-diametro.php)
In my case the distance of the diameter of the circle, large is 6.9cm and that of the small circle is 5cm, we are going to multiply these measurements by the number pi (π) which has a numerical value of 3.14, that is 6.9cm by pi (6.9 cmXπ) and 5cm by pi (5 cmXπ) which gives a circumference of 21cm and 15.7cm.
> En mi caso la distancia del diámetro del círculo, grade es de 6.9 cm y la del círculo pequeño es de 5 cm, estas medidas las vamos a multiplicar por el número pi (π) que tiene un valor numérico de 3.14, es decir 6.9 cm por pi (6.9 cmXπ) y 5 cm por pi (5 cmXπ) que dan una circunferencia de 21 cm y 15.7 cm.
Based on this data we must cut the distance of the perimeter or circumference that we took that gave us 6.9 cmXπ=21.6769893098 that we are going to round to 26.6 cm, 26.6 is the length that we are going to take to make the circumference of the flowerpot.
> Basados en estos datos debemos cortar la distancia del perímetro o circunferencia mayo que tomamos que no dio 6.9 cmXπ=21.6769893098 que vamos a redondear a 26.6 cm, 26.6 es el largo que vamos a tomar para hacer la circunferencia del matero.
We measure and cut, now we have a problem to solve because the planter I want to make is shaped like a truncated cone, that is, it looks like a funnel that is wide at the top and narrow at the bottom. This is solved with another calculation.
> Medimos y cortamos, ahora tenemos un problema que resolver porque el matero que quiero hacer tiene forma del tronco de cono, es decir que parece un embudo ancho arriba y fino abajo, esto se resuelve con otro cálculo.
We take the centimeters of the circumferences 15.7 cm and 21.6 cm and subtract this, which gives a result of 5.9 cm. These are the centimeters left over from the circle above to the one below. Now, we have to take into account how much the centimeters will be divided by and the spaces between them.
> Tomamos en los centímetros de los perímetros de las circunferencias 15.7 cm y 21.6 cm hacemos una resta de esto que da un resultado de 5.9 cm. Esos son los centímetros que están de sobra en relación del círculo de arriba con el de abajo, ahora bien, hay que tomar en cuenta en cuanto se van a dividir los centímetros y los espacios que habrán entre ellos.
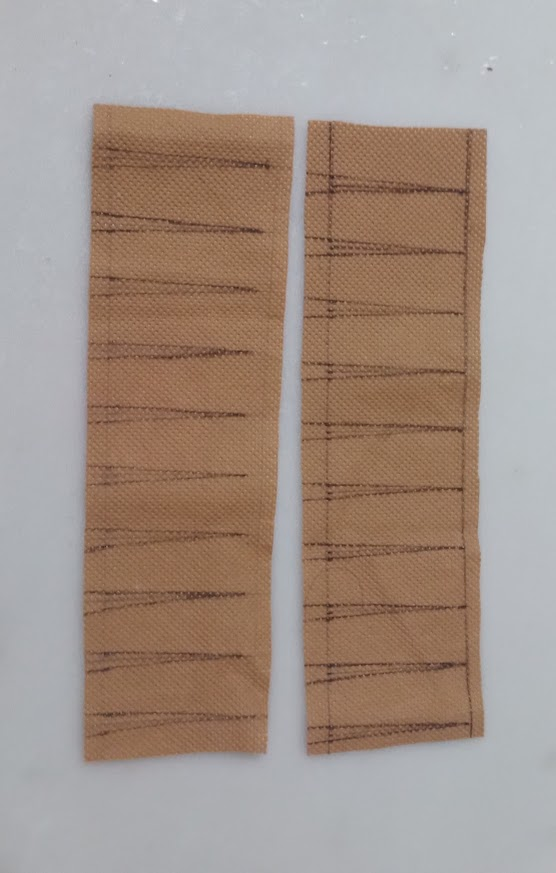
We draw a top and bottom line. These will create a double top and bottom line.
>Hacemos una línea superior e inferior, estos serán para crear uno dobles superiores e inferior.
In my case, I wanted to divide this into 10 segments, so I divided 21.6 by 10, which gave me 2.16 cm. This means we're going to draw straight lines every 2.1 cm. After this, we divide 5.9 by 10, which gives us 0.59, which we'll round to 6 millimeters.
> En mi caso yo quise dividir esto en 10 segmentos, así que dividí 21.6 entre 10 que me dio 2.16 cm, esto significa que vamos a hacer unas líneas rectas cada 2.1 cm, después de esto dividimos 5.9 entre 10 que nos da 0.59 que vamos a redondear a 6 milímetros.
We'll mark this between the 2.1 cm lines. Then, taking the points we measured, we place a ruler from the 6-millimeter side point to the upper center point of the 6-millimeter line, and then with the other side.
> Esto lo vamos a marcar entre las líneas de 2.1 cm luego tomando los puntos que medimos colocamos una regla desde el punto lateral de los 6 milímetros al punto central superior de los 6 milímetros y luego con el otro lateral.
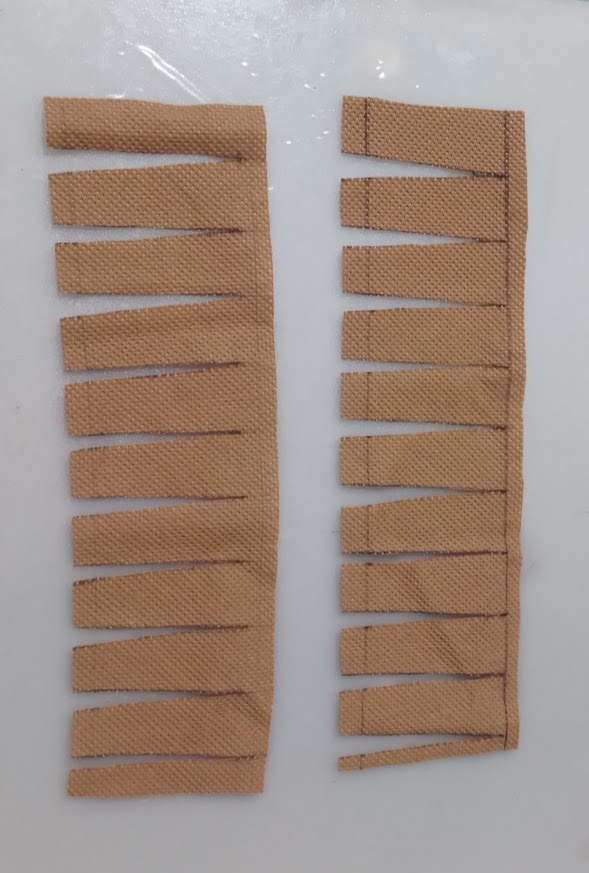
This will show us some angles that will help us reduce the size so that it has that funnel shape. After marking these angles, we cut and we have everything ready to move on to the next phase.
> Esto nos va a mostrar unos ángulos que nos ayudaran a reducir el tamaño para que tenga esa forma de embudo, luego de marcar estos ángulos recortamos y tenemos todo listo para pasar a la siguiente fase.

### Step 2: Assembly / Paso 2: Armado
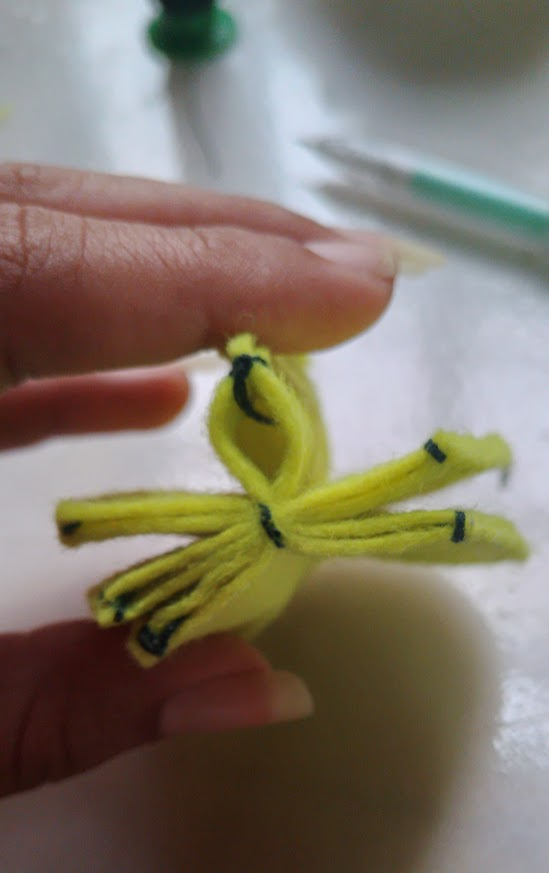
We take a pair of petals and sew them until we make about three pairs of petals per cactus, as I made two, I sewed six pairs of petals, the thread can be whatever you want as long as it suits, for my part I chose this dark green.
>Agarramos un par de pétalos y lo cosemos hasta hacer unos tres pares de pétalos por cactus, como yo hice dos, cosí seis pares de pétalos, el hilo puede ser el que tú quieras siempre y cuando convine, por mi parte escogí este verde oscuro.
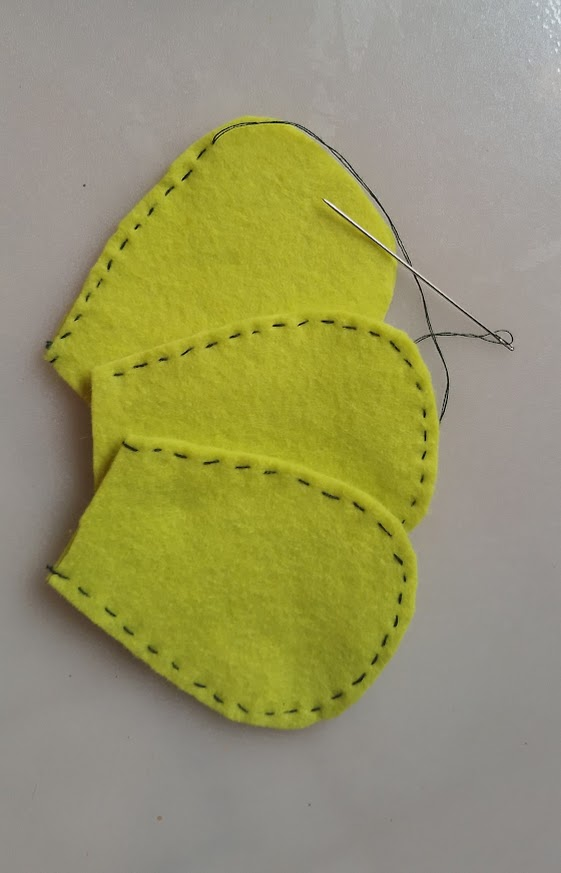
The petals should be sewn along the edge. I would have liked to have embroidery thread for a better result. I solved this with the other cactus by threading two strands of thread instead of one so that the thread looks thicker.
> Los pétalos deben coserse por el borde, me hubiese gustado tener hilo de bordar para un mejor resultado, esto lo resolví con el otro cactus enhebrando dos fibras de hilo en vez de una para que la hebra se vea más gruesa.
|||
|-|-|
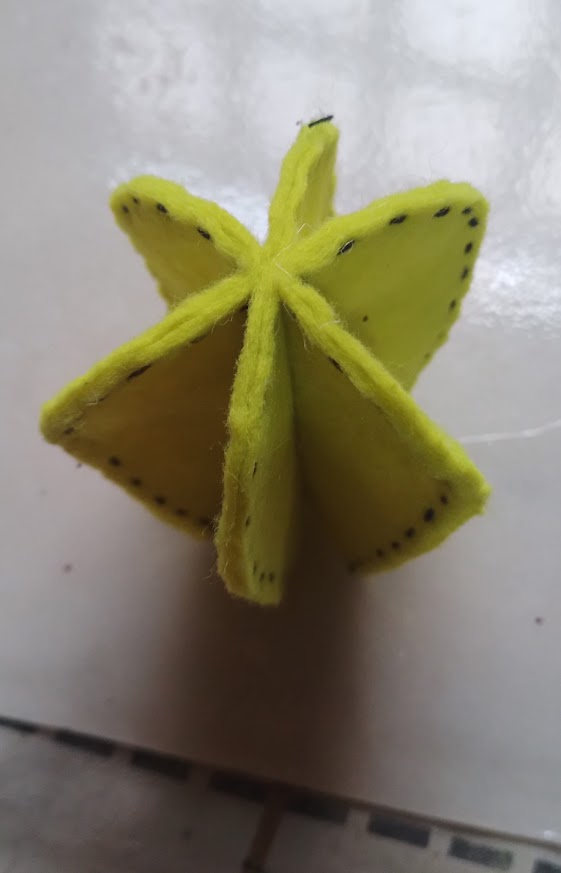
After sewing all the petals in pairs, we choose three pairs and align them to sew them in the middle. You can do the seams by hand or with a sewing machine, whichever way you feel best or like it best.
> Luego de coser todos los pétalos en pares escogemos tres pares y los alineamos para coserlos por el medio, las costuras las puedes hacer a mano o con una máquina de coser como mejor se sientan o como más les guste.
||||
|-|-|-|
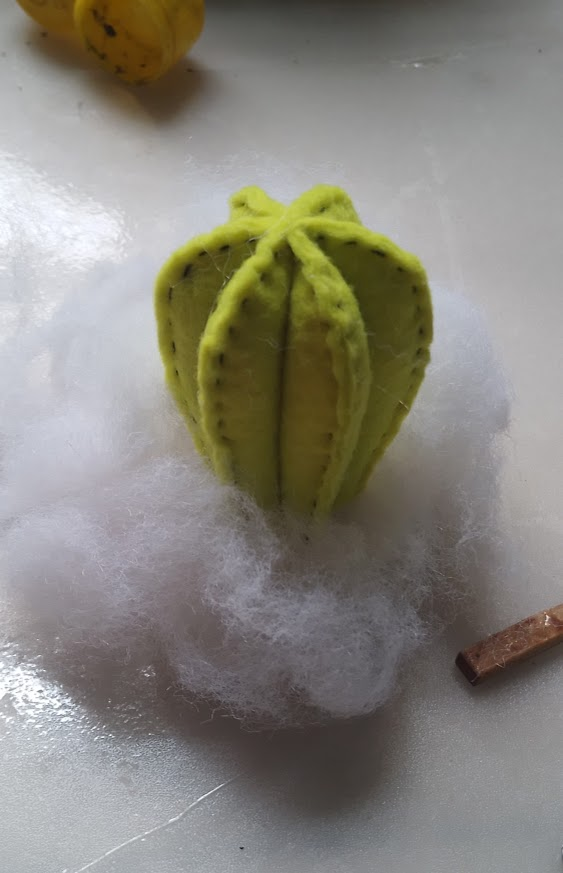
After sewing the three pairs of petals, we open them as follows. At this point, the cactus body begins to take shape. Each segment leaves a space that allows for filling.
> Después de coser los tres pares de pétalos abrimos de la siguiente manera, ya a este punto el cuerpo del cactus empieza a tomar forma, en cada segmento queda un espacio que da abertura para que se rellene.
Find pillow stuffing and fill it until it looks like this. We attach the cactus body to a circle, sewing it carefully so that it fits in the center and the seams aren't too noticeable.
> Buscamos relleno de almohada, rellenan hasta que quede de la siguiente forma. El cuerpo de cactus lo unimos a un círculo cociéndolo con cuidado de que quede en el centro y que las costuras no se vayan a notar mucho.
|||
|-|-|
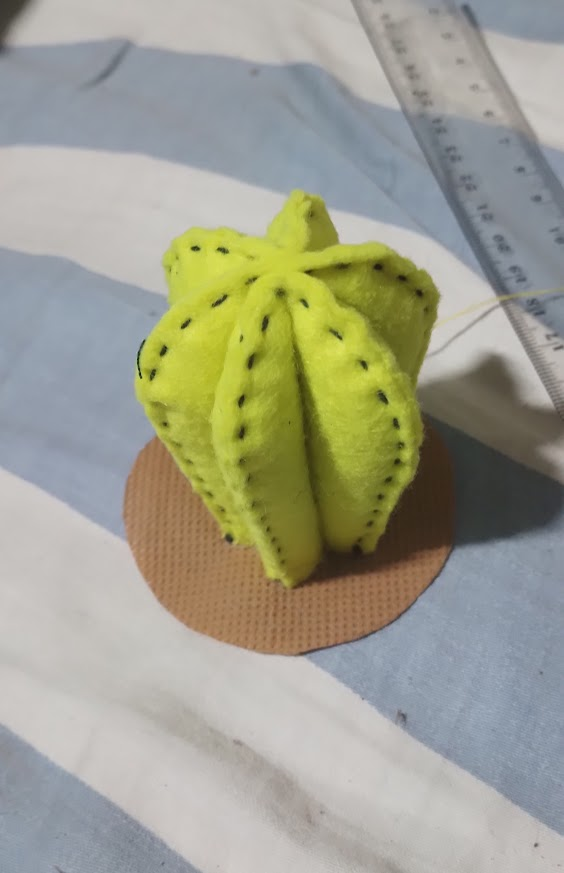
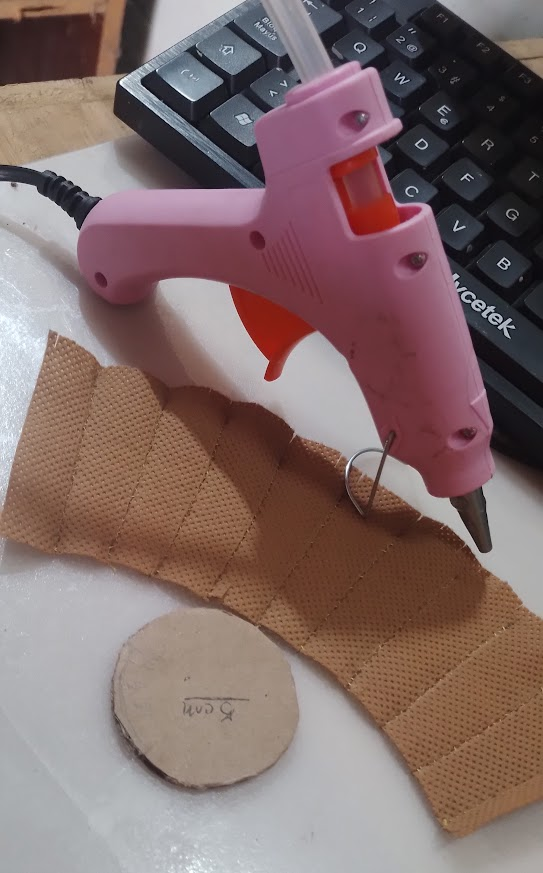
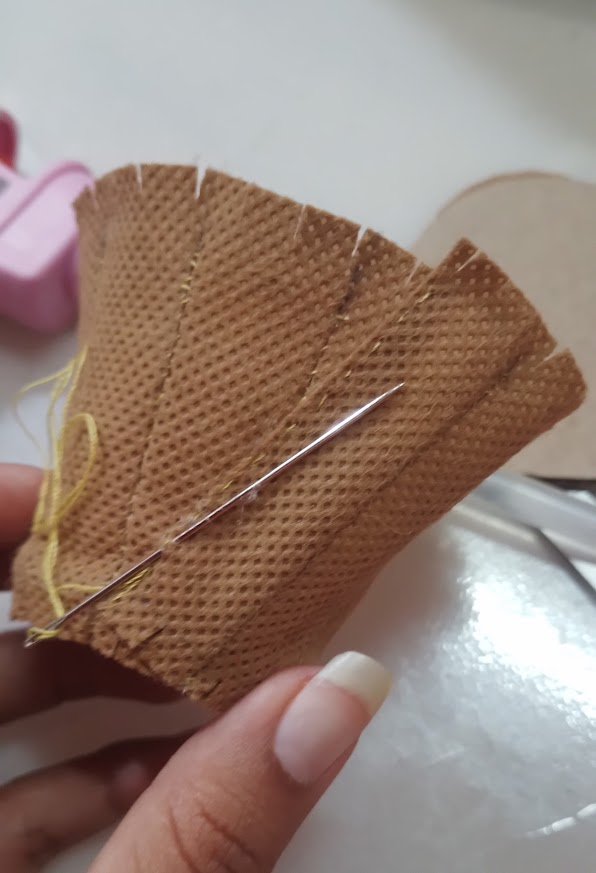
I started sewing the pot with fine stitches. If you feel confident, you can do this step with a sewing machine. However, since I'm not very agile with the machine, I preferred to do it little by little to ensure a good job. You have to go tooth by tooth until you complete the shape.
> Empecé a coser el matero con costuras finas, si se sienten muy seguros pueden hacer este paso con una máquina de coser, pero como yo aún no soy muy ágil con la máquina preferí hacerlo poco a poco para asegurarme de hacer un buen trabajo, hay que ir diente por diente hasta completar la forma.
|||
|-|-|
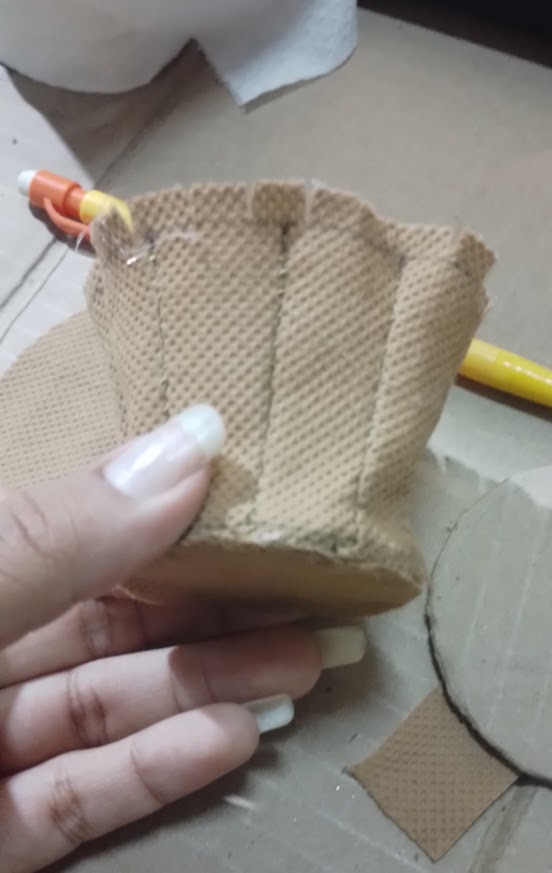
After that, use hot silicone to glue the bottom edge to the small circle. Once it's completely dry and secure, you'll see that it now has that characteristic flowerpot shape.
> Después de eso con silicon caliente se le pega la orilla de abajo al círculo pequeño, luego de que quede bien seco y fijado verán que ya tiene esa forma tan característica de un matero.
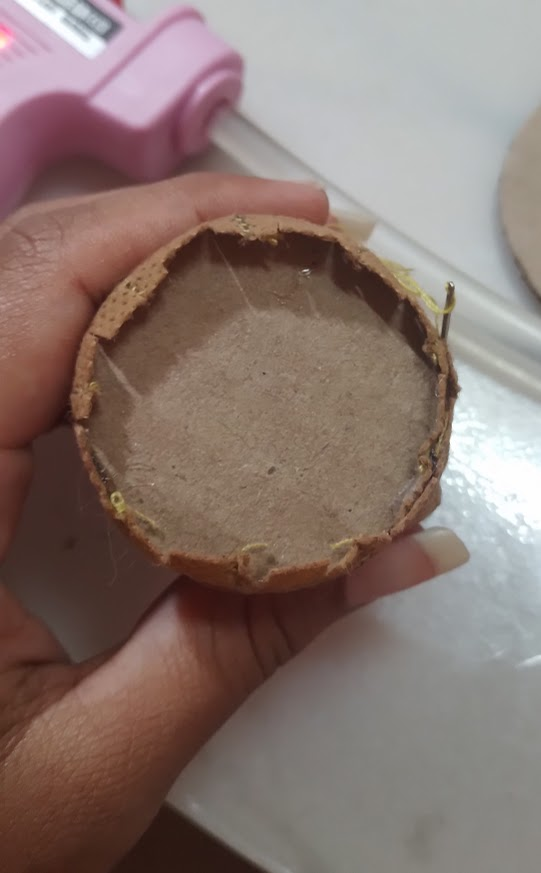
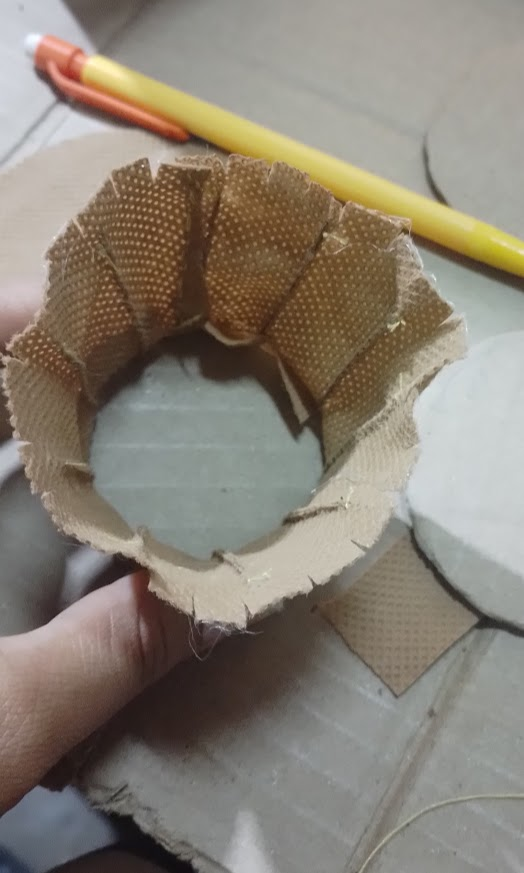
Before sewing it properly, we seal the bottom, or base, by closing the notches we made earlier with hot silicone. If you prefer, you can also use cold or liquid silicone. To hide the ugly bottom, we glue the small circle of eco-friendly fabric to it.
> Antes de coserlo bien, sellamos la parte de abajo ósea la base cerrando lo dientes que le hicimos con anterioridad con silicon caliente, si lo prefieren también se puede con silicon frío o líquido y para que no se vea el fondo feo le pegamos el círculo pequeño de tela ecológica.
||||
|-|-|-|
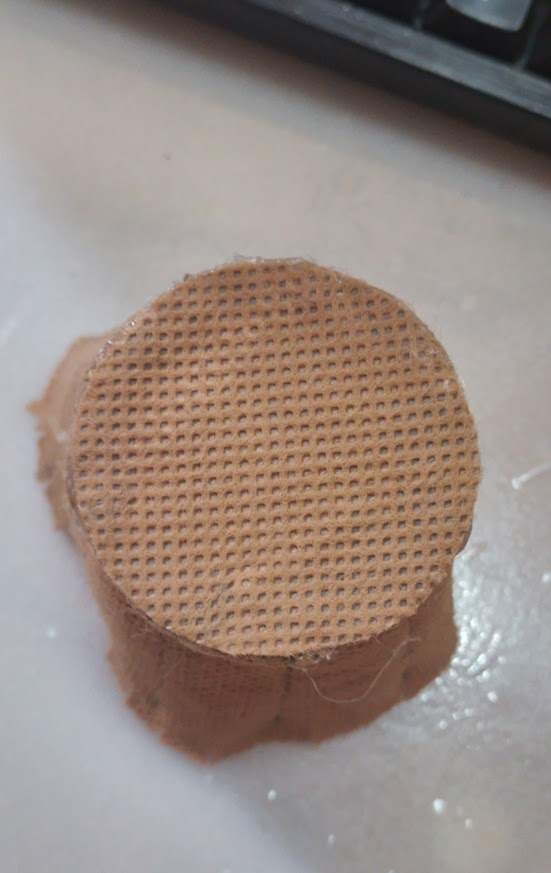
Then we sew the edge of the fabric to close the figure and cut off the excess, and on this side we also cut the teeth.
> Luego ahora sí cosemos la orilla de la tela para cerrar la figura y recortamos el excedente, y a este lado también le cortamos los dientes.
||||
|-|-|-|
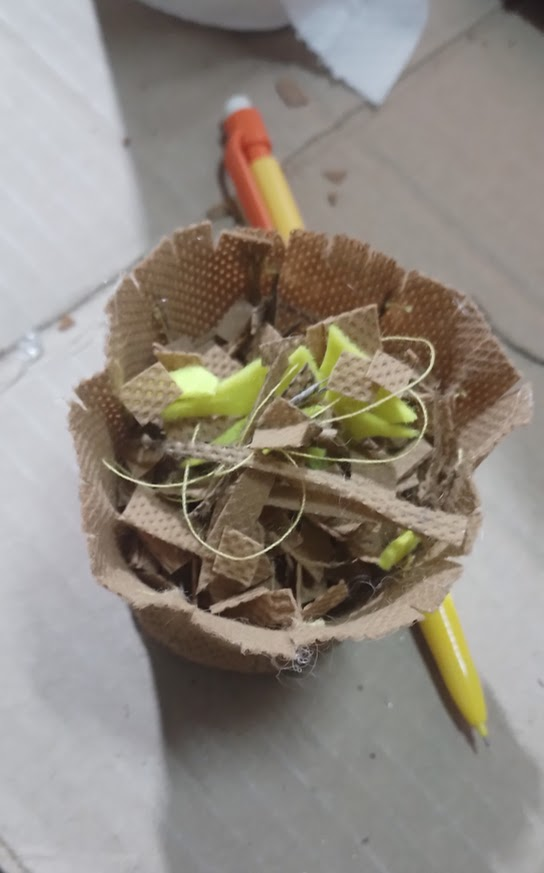
We can use the clippings and scraps from other previous projects, we cut them into small pieces, as it wasn't enough for both I filled it with pillow stuffing, after it was full I did the same process as with the bottom base, we placed the cardboard circle, closed the teeth and placed the circle with the cactus sewn on.
> Podemos aprovechar los recortes y retazos de otros proyectos anteriores, los cortamos en pequeños trozos, como no fue suficiente para los dos lo complete con relleno de almohada, luego de que estuvo lleno hice el mismo proceso que con la base de abajo colocamos el círculo de cartón cerraos los dientes y colocamos el círculo con el cactus cosido.
||||
|-|-|-|
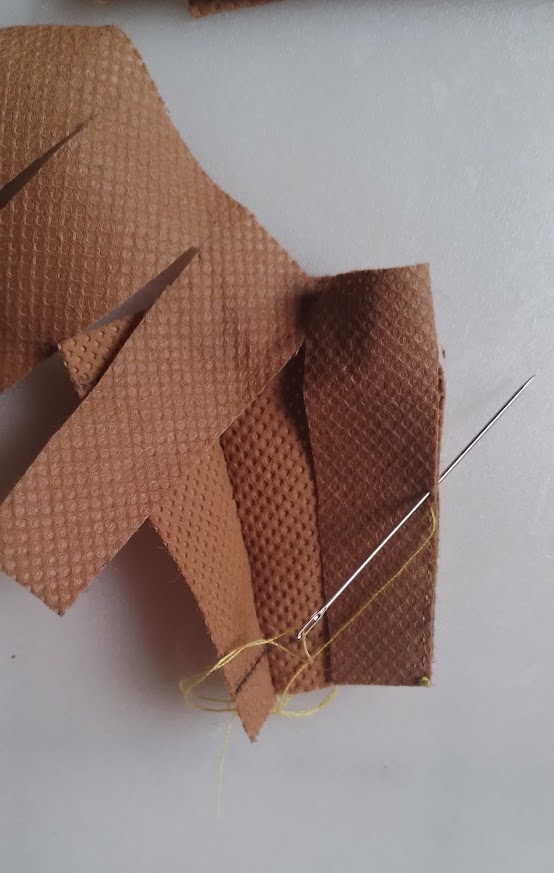
Finally, we cut a straight piece of fabric, fold it so the fabric is inside out, and make sure it's at least 1.5 cm wide. We secure it and sew it together. We turn it over and fold it so the seam isn't visible.
>Ya para ir finalizando cortamos un retazo de tela recto, lo doblamos buscando que la tela este al revés y buscamos que tenga al menos 1.5 cm lo fijamos y le pasamos una costura, lo volteamos y lo doblamos de manera de que no se vea la costura.
Then we sew the ends to make a ring for the edge of the pots. I glued it with silicone, but if you're patient enough and want it that way, you can sew it.
> Después cosemos las puntas
#hive-189641
#diy
#needle
#creativecoin
#neoxian
#neonstrike
#enlace
#entropia
#waiv
#waivio
Payout: 0.000 HBD
Votes: 291
More interactions (upvote, reblog, reply) coming soon.