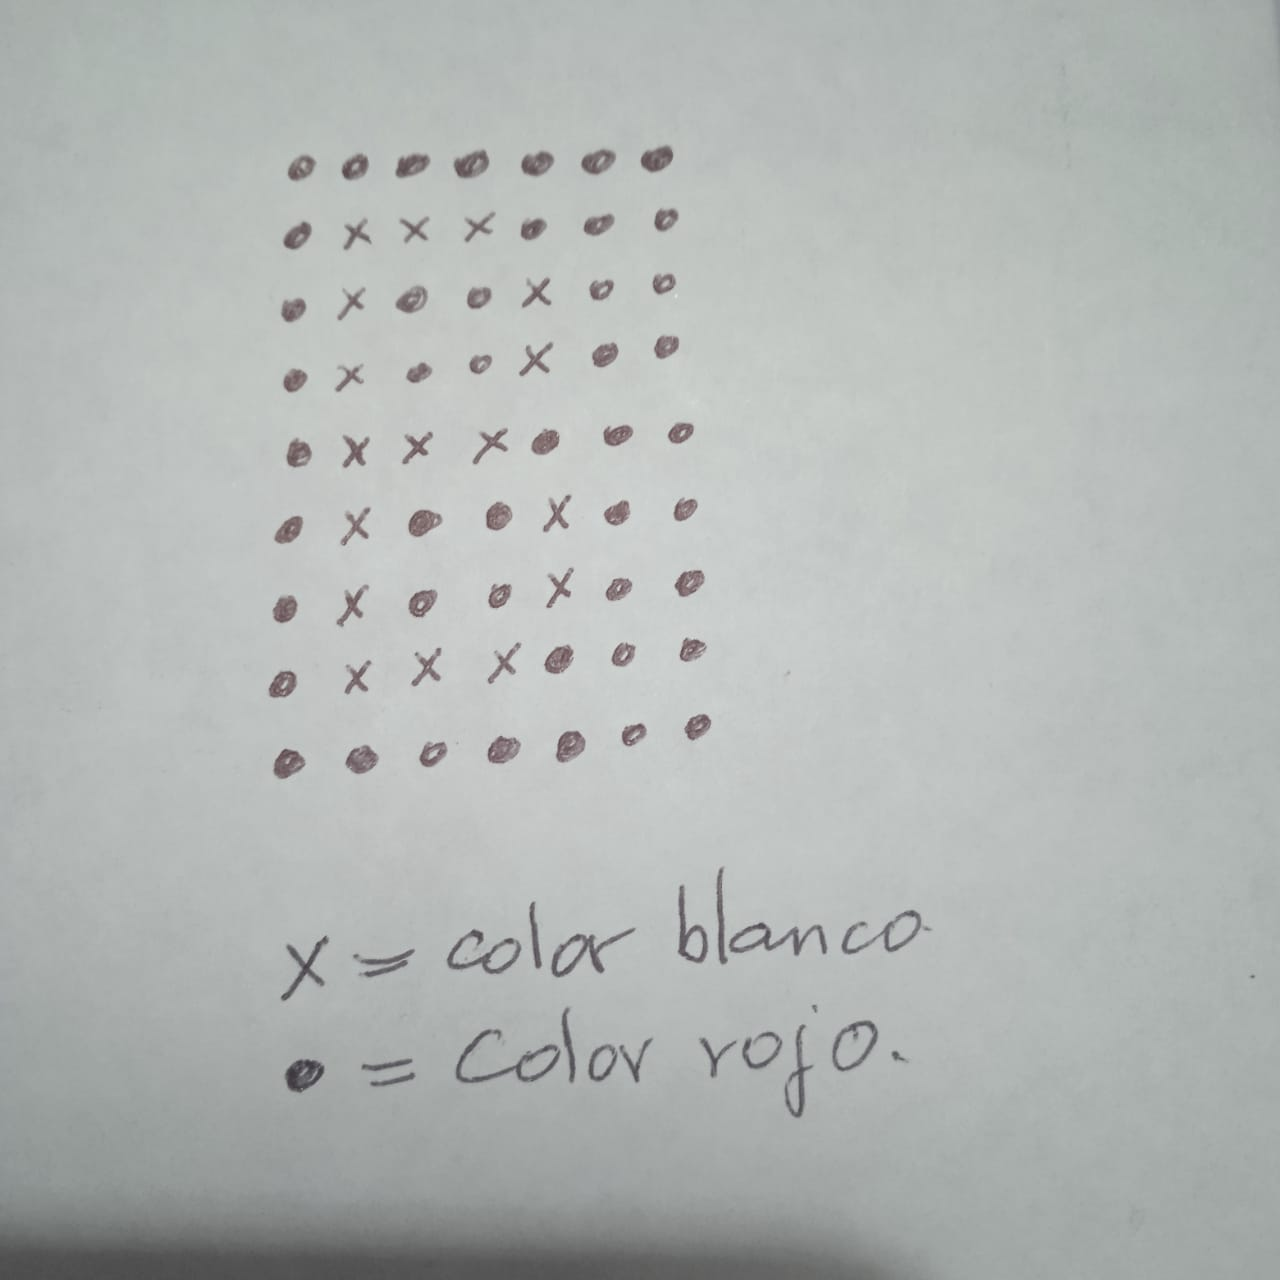
>Hola querida comunidad, hoy quiero compartir un proyecto fácil y muy útil para mantener las llaves organizadas. Comparto con mis seguidores una idea que se me vino a la cabeza de hacer un llavero con mostacillas grandes y en dos colores para formar un contraste y destacar el diseño de la inicial de mi nombre. Una de las ventajas de un llavero personalizado, son únicos y no hay derecho a confundirse con otro, hay como una conexión con el usuario. En cuanto a la elaboración del llavero con la inicial son realmente muy económicos, fáciles de hacer, tiene un tamaño ideal, ya que mide 3,5 de largo por 2,5 de ancho, es liviano, resistente, puedes combinar los colores que mas te gusten. Me apoyé en un pequeño patrón para ir colocando las piezas en forma precisa, se invierte menos tiempo para llegar al resultado final. Dicho patrón si usas mostacillas pequeñas puedes hacer un dije con la inicial B. A continuación te explico los detalles del paso a paso. #
Hello dear community, today I want to share an easy and very useful project for keeping your keys organized. I'm sharing with my followers an idea that came to mind to make a keyring with large beads in two colors to create contrast and highlight the design of the initial of my name. One of the advantages of a personalized keyring is that they are unique and there is no chance of confusing them with another; there is a connection with the user. As for making the keychain with the initial, they are really inexpensive, easy to make, and have an ideal size, measuring 3.5 inches long by 2.5 inches wide. They are lightweight, durable, and you can combine the colors you like best. I used a small pattern to place the pieces precisely, which saves time in achieving the final result. If you use small beads, you can make a charm with the initial B using this pattern. Below, I will explain the details step by step.
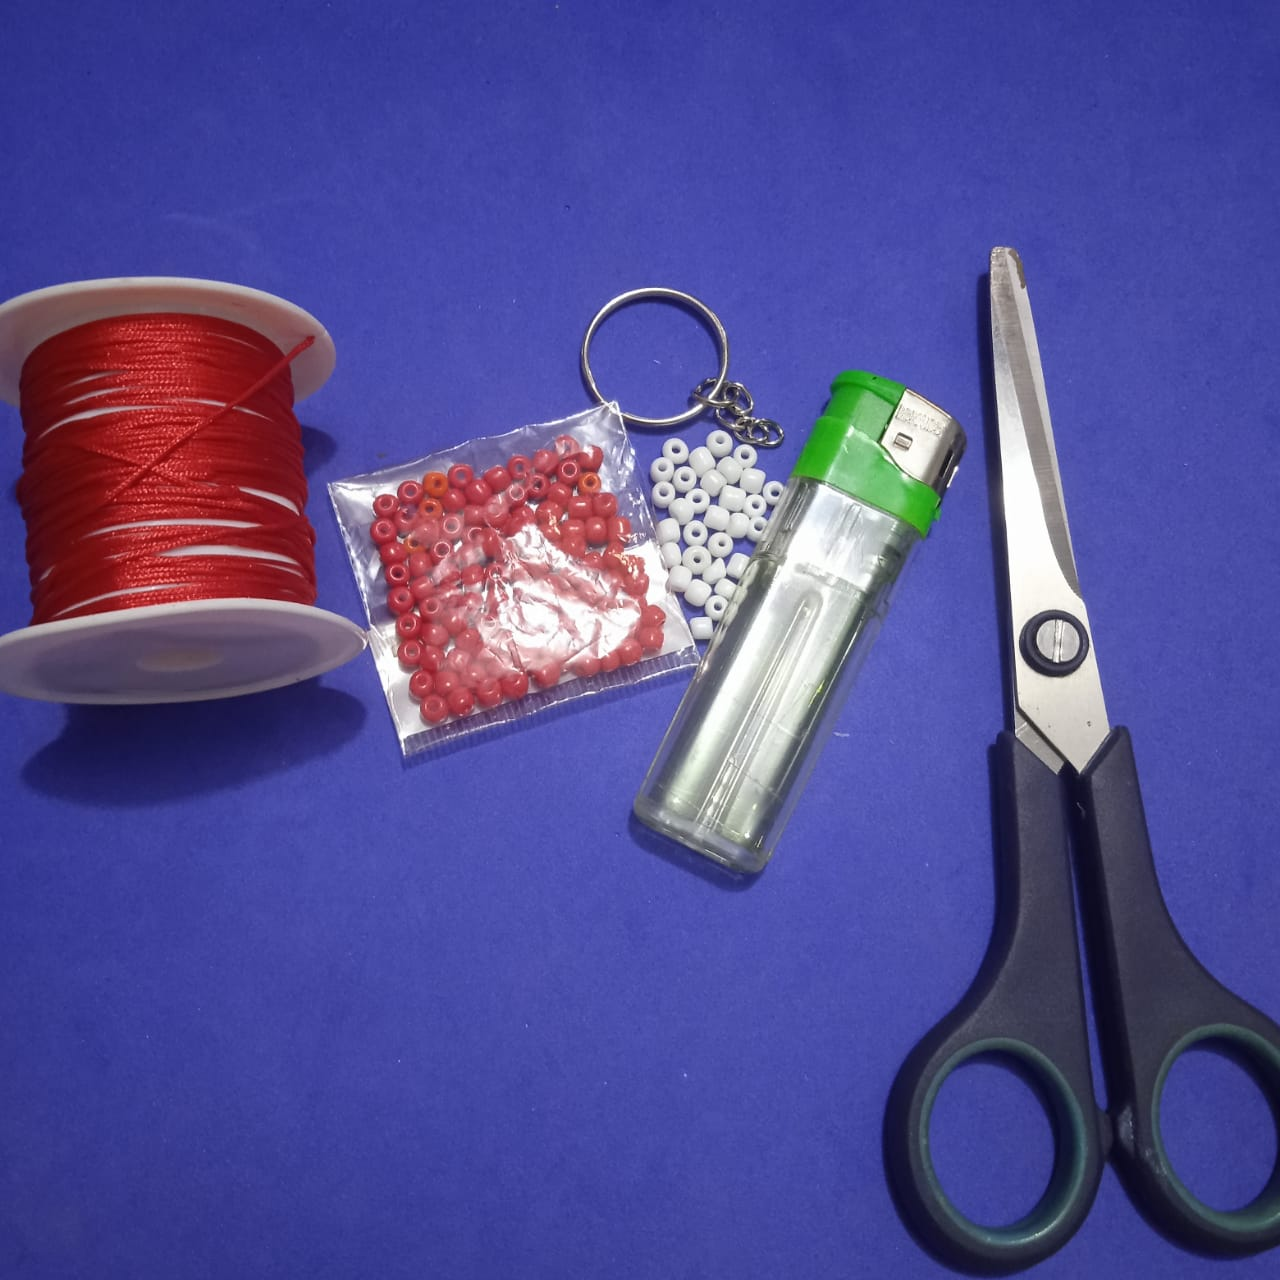
✨***MATERIALS//MATERIALES***✨
* Red Chinese thread.
* Large red and white beads.
* Keyring ring.
* Lighter.
* Scissors.
>* Hilo chino color rojo.
>* Mostacillas grandes de color rojo y blanco.
>* Aro de llavero.
>* Encendedor.
>* Tijera.
# ✨***STEPS//PASOS***✨
* I am sharing the pattern with the initial B so you can make your own keyring. Saving time and achieving precision is what we aim for when working from a pattern. Here I specify the color of the beads to be used.
>* Comparto el patrón con la inicial B para que pueden elaborar su propio llavero. Ganar tiempo y precisión es lo que buscamos cuando trabajamos siguiendo un patrón. Aquí específico color de las mostacillas a utilizar.
* After measuring and cutting the Chinese thread, join the two ends to find the middle, then pass it through the last link of the keyring chain. Separate the threads into right and left to make the work easier.
>* Después de medir y cortar el hilo chino, juntar las dos puntas para buscar la mitad luego pasar por el último eslabón de la cadena del llavero. Separar los hilos en derecho e izquierdo para facilitar el trabajo.

* For the fifth row, thread 3 red beads onto the right-hand thread, followed by 3 white beads, then 1 red bead, and repeat the process.
>* Para la quinta fila, introducir por el hilo de la derecha 3 mostacillas de color rojo, más 3 blancas seguir con 1 de color rojo, repetir el proceso.
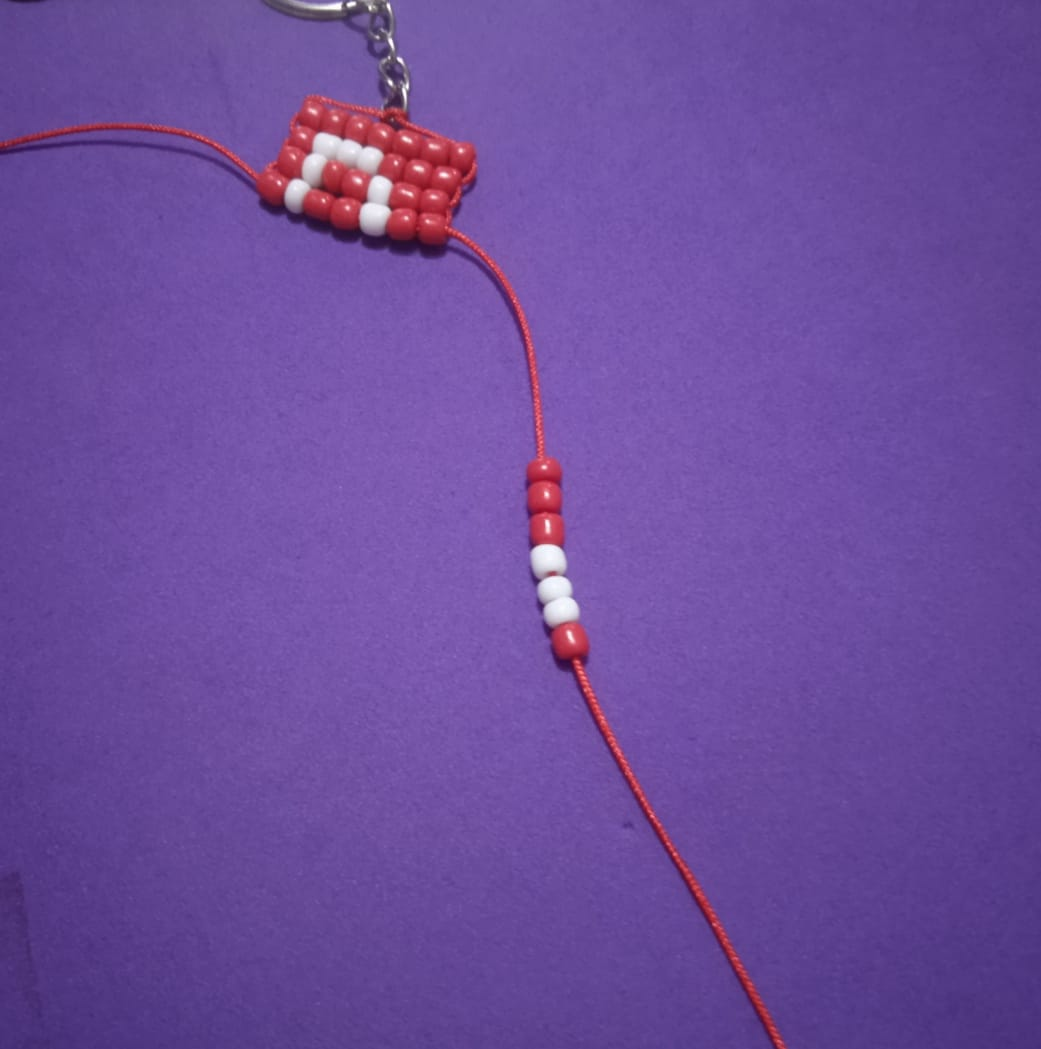
* For the sixth and seventh rows, thread the right-hand thread with 2 red beads, then 1 white bead, followed by 2 red beads, then 1 white bead and 1 red bead. Repeat the process.
>* Para la sexta y séptima fila, introducir por el hilo de la derecha 2 mostacillas de color rojo, más 1 blanca, continuar con 2 rojas, luego 1 blanca y 1 roja. Repetir el proceso.
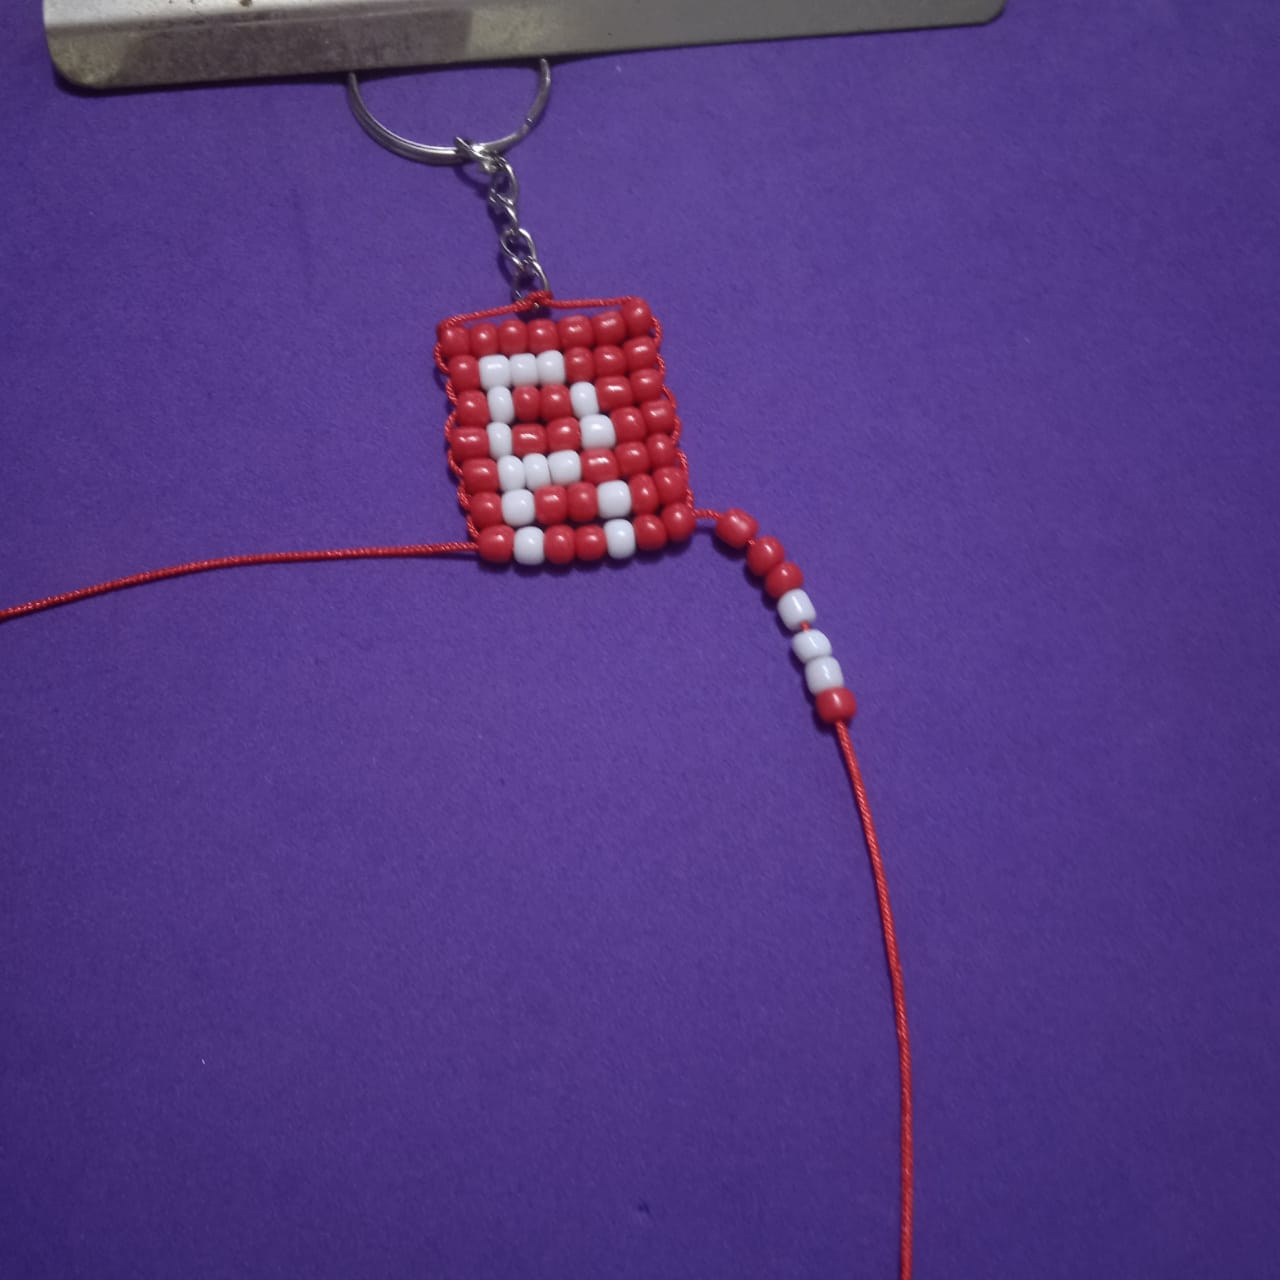
* Let's move on to the eighth row. Insert 3 red, 3 white, and 1 red beads through the right thread, then cross them with the left thread.
>* Vamos con la octava fila, introducir por el hilo de la derecha 3 rojas, 3 blancas y 1 rojo, atravesar con el hilo de la izquierda.
* This brings us to the ninth row, where we insert 7 red beads and then pass through with the thread on the left.
>* Así llegamos a la novena fila, donde introducimos 7 mostacillas rojas y luego atravesar con el hilo de la izquierda.
* Tie a simple knot on each side. Then cut off the excess material and seal it with a lighter.
>* Hacer un nudo sencillo en cada lado. Luego cortar el material sobrante y sellar con el encendedor.
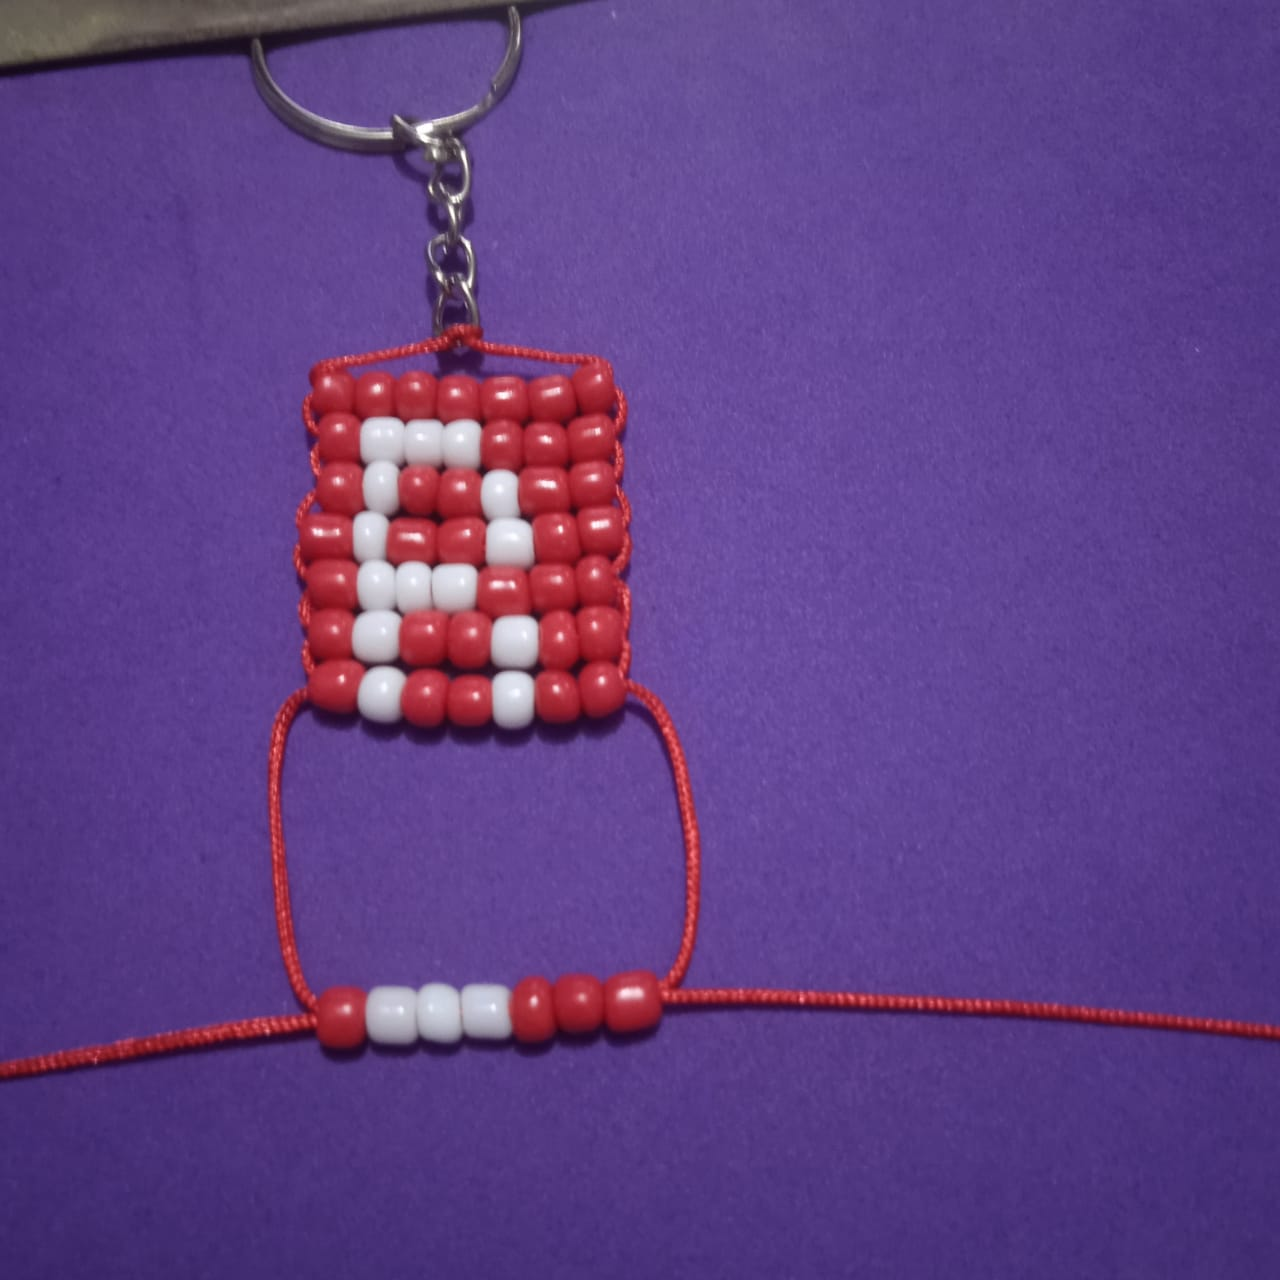
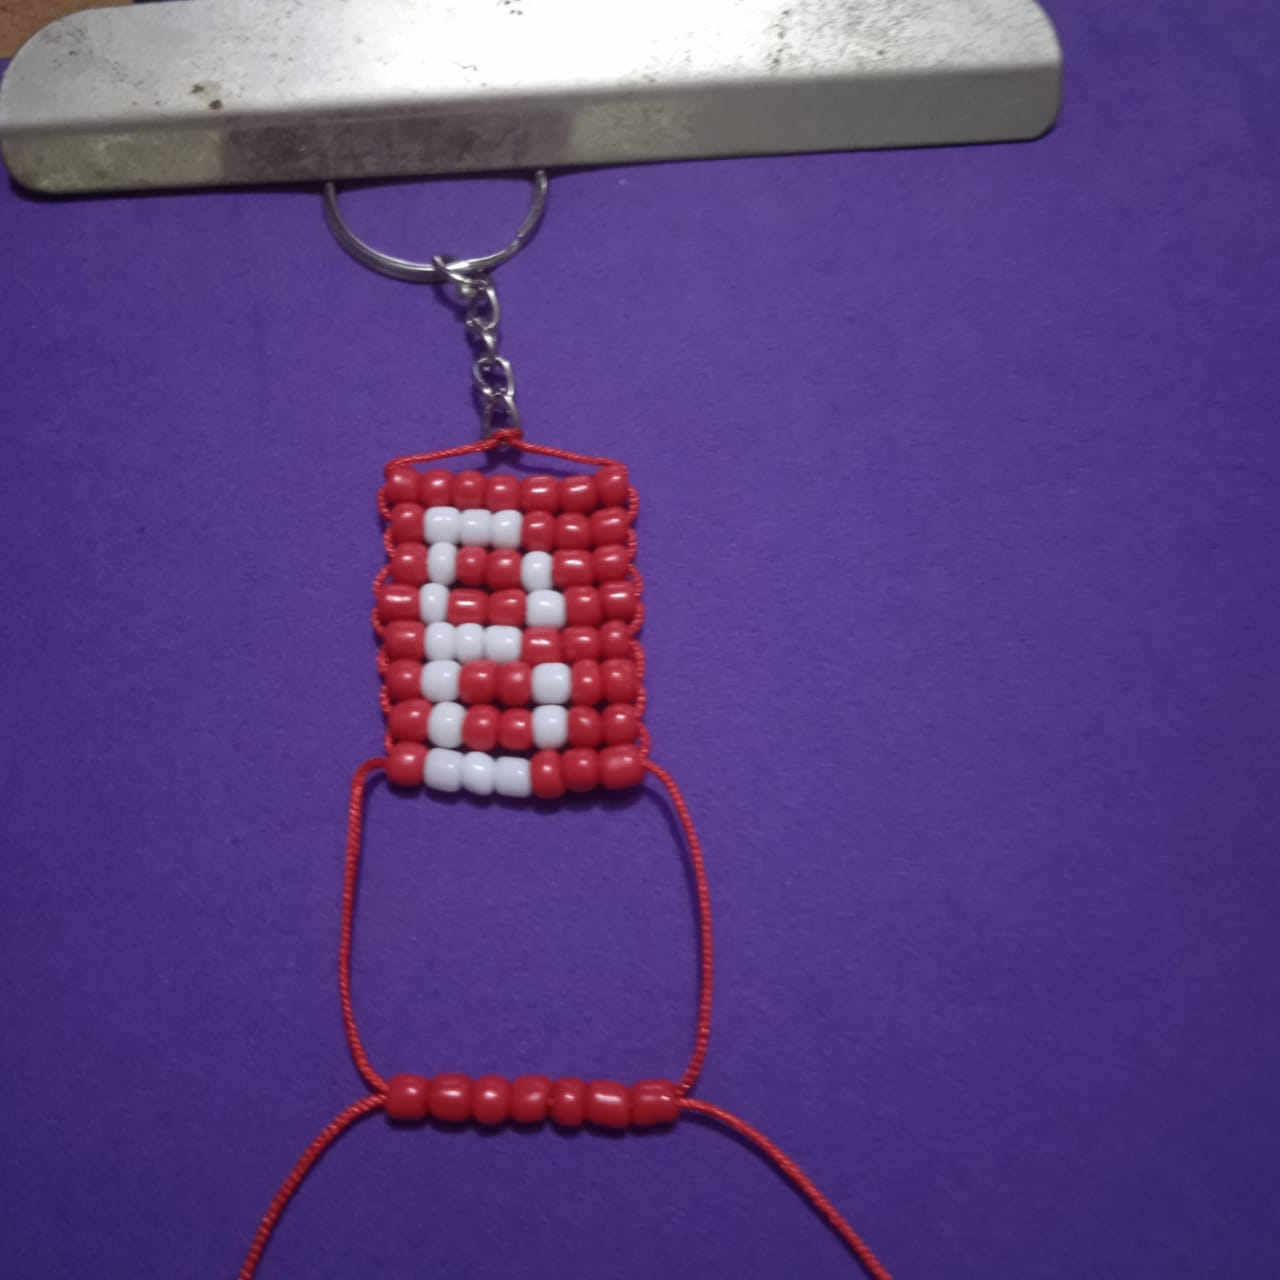
✨***FINAL RESULT/ RESULTADO FINAL***✨
* A keyring is an essential accessory, and if we personalize it, even better, because it will be difficult to confuse with others. I liked the result of the keyring with the initial of the name using large beads. I bid you farewell 🖐️ and thank you for your visit and comments.
>* Un accesorio que nunca falta es un llavero y si lo personalizamos mejor aún porque será difícil de confundir, me gustó el resultado del llavero con la inicial del nombre usando mostacillas grandes. Me despido 🖐️ agradeciéndoles su visita y comentarios.
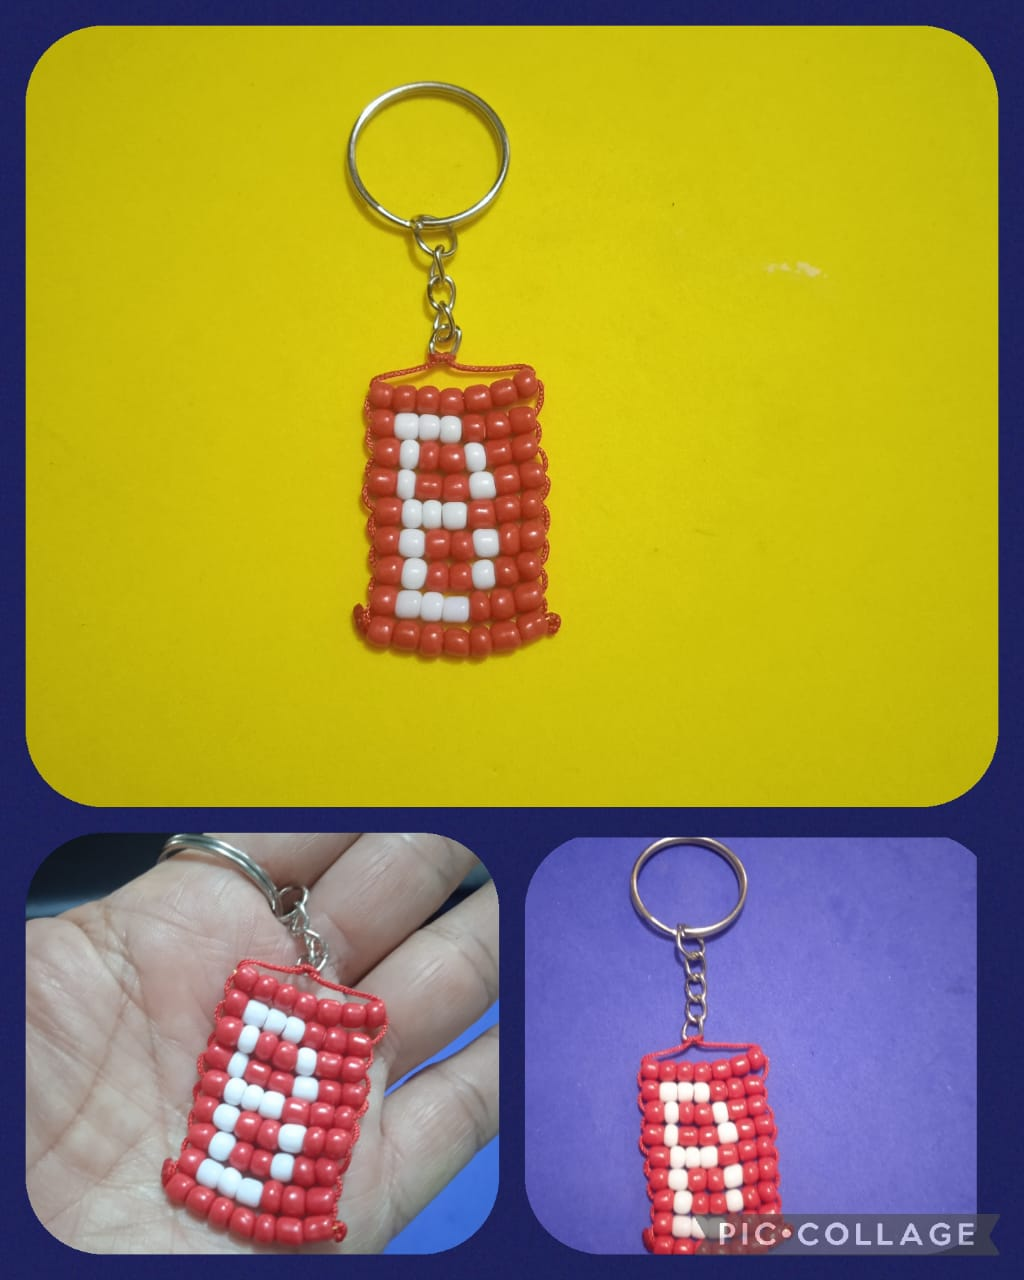

Photos taken with my Xiaomi Redmi 9C. /Fotos tomadas con mi Xiaomi Redmi 9C.
Translated with / Traducido con: DeepL Translator.
Photo collage made with the PicCollage application./Collage de fotos hecha con la aplicación PicCollage.


https://images.hive.blog/DQmU4XNQroqA4Q6kUFHZFkLKJ85D5b8aHndiYJPRVLPUWyC/image.png
https://images.hive.blog/DQmRw3j1pSNpdUtVyNCk2KsPhxtyzdyodpLBwEWw67kWMZ3/image.png
* Thread 7 large red beads onto the right-hand thread.
* Using the left-hand thread, pass through the 7 beads from back to front, pulling the threads at the same time and bringing them to the start of the keyring.
>* Por el hilo de la derecha introducir 7 mostacillas grandes de color rojo.
>* Con el hilo de la izquierda atravesar de atrás hacia delante las 7 mostacillas, tirar al mismo tiempo los hilos y llevar hasta el inicio del llavero.
https://images.hive.blog/DQmbkFJxY1ex9m43552WRVRzkA5gZG6zdR6JuW2z13wVa9i/image.png
https://images.hive.blog/DQmSK6jDNAFLv6cgXvHgCGA7sqXsuS7VTEaiKR4W8xpyhdq/image.png
* Insert 3 red beads, then 3 white beads, continue with 1 red bead on the right thread and cross with the left thread.
>* Introducir 3 mostacillas rojas, más 3 blancas, seguir con 1 mostacilla roja por el hilo de la derecha y atravesar con el hilo de la izquierda.
https://images.hive.blog/DQmbgMxejFSd5VVSwcjqv9FZQ1s9sXCDGY4oumEV1zk26Vr/image.png
https://images.hive.blog/DQmRRrWXrkyszLsH7gfLivuPvU8DUckB7r9HfUnihXgMmVJ/image.png
* For the third row, insert 2 red beads, 1 white bead, 2 more red beads, followed by 1 white bead, and finish with 1 red bead.
* For the fourth row, thread the right-hand thread with 2 red beads, followed by 1 white bead, continue with 2 red beads, plus 1 white bead, and finally 1 red bead. Thread the left-hand thread through.
>* Para la tercera fila, introducir 2 mostacillas de color rojo, 1 blanca, más 2 de color rojo, seguido de 1 blanca y terminar con 1 mostacilla roja.
>* Para la cuarta fila, introducir por el hilo de la derecha 2 mostacillas de color rojo, seguido de 1 blanca, continuar con 2 rojas, más 1 blanca y por último 1 mostacilla de color rojo. Atravesar con el hilo de la izquierda.
https://images.hive.blog/DQmeqsKc4zP9ML9av79AUsMY9MFxyfL1bgpcp6m4qNGNpte/image.png
https://images.hive.blog/DQmPjyiRs2DTLdtk7nE1h1GGM1SgYkiRYLDFVUPGHJUCGuj/image.png
#
#hive-130560
#spanish
#hivediy
#build-it
#diyhub
#handmade
#doityourself
#tutorial
Payout: 0.000 HBD
Votes: 13
More interactions (upvote, reblog, reply) coming soon.