
Last season I returned to the Wild format to get the new reward cards from the Conclave Arcana set, and something that surprised me was the few teams with cards from the main Conclave Arcana set. But then I thought it was normal because most of the cards from that set would be played in the Modern format. But at the end of last season I had a battle that excited me a lot, being almost the last of the season, I was able to face a team from the Modern format with most of the cards from Conclave Arcana, the rest from Rebellion, and most importantly, all of them max level.
La temporada pasada volví al formato Wild para conseguir las nuevas tarjetas de recompensas del conjunto Conclave Arcana, y algo que me sorprendió fue los pocos equipos con tarjetas del conjunto principal de Conclave Arcana pero después. Pensé que era normal porque la mayoría de las tarjetas de ese conjunto estarían jugándose en el formato Modern. Pero al final de la temporada pasada tuve una batalla que me emociono mucho siendo casi la última de la temporada, pude enfrentarle a un equipo del formato Modern con la mayoría de tarjetas del Conclave Arcana, las demás tarjetas de Rebellion y lo más importante todas de máximo nivel.
Rulesets

- 'Tis But Scratches: All units have Cripple (-1 to target's max health after each successful attack; does not affect units with Immunity).
- Born Again: All units have Rebirth (self-resurrects once per battle with 1 health and 100% of armor; all magic debuffs are removed, and all magic buffs are reapplied; skips turn).
- Close Range: All units have Close Range (can use ranged attacks from the first position).
- 'Tis But Scratches: Todas las unidades tienen Cripple (-1 a la salud máxima del objetivo después de cada ataque exitoso; no afecta a las unidades con Inmunidad).
- Born Again: Todas las unidades tienen Rebirth (se resucitan a sí mismas una vez por batalla con 1 punto de salud y el 100% de la armadura; se eliminan todas las penalizaciones mágicas y se vuelven a aplicar todas las mejoras mágicas; se salta el turno).
- Close Range: Todas las unidades tienen Close Range (pueden usar ataques a distancia desde la primera posición).
A battle without limiting Rulesets and instead with Close Range which removes the limitation of cards with ranged attack to be able to attack from the first position and benefiting teams that attack several times per Round by weakening enemies with 'Tis But Scratches, in addition to Born Again which makes the effects that are activated with some elimination, when eliminated, or are reset when returning to the fight makes the battle more interesting.
Una batalla sin Rulesets limitantes y al contrario con Close Range que quita la limitación de las tarjetas con ataque a distancia para poder atacar desde la primera posición y beneficiando a los equipos que ataquen varias veces por Round al debilitar a los enemigos por 'Tis But Scratches, además de Born Again hace que los efectos que se activan con alguna eliminación, al ser eliminados, o se reinician al volver al combate hace que la batalla sea más interesante.
TEAM
For my team I made a fairly common 2-outside formation with a tank in the first position and a Taunt in the last position to draw as much damage as possible with the rest of the team focused on healing allies and dealing as much damage as possible to enemies with a lot of the damage based on magic attack that even though my enemy used a team with Void thanks to the Cripple from 'Tis But Scratches reduced their health until they could be eliminated.
Para mi equipo, hice una alineación bastante común de 2 extremos con un tanque en la primera posición y un Taunt en la última posición para atraer la mayor cantidad de daño posibles con el resto del equipo concentrado en sanar a los aliados y causar el mayor daño posible a los enemigos con mucho del daño basado en ataque mágico, que a pesar de que mi enemigo usé un equipo con Void gracias al Cripple de 'Tis But Scratches, reduse su salud hasta poder ser eliminados.
Immortalis

I used Immortalis to resist magic damage with Void, destroy enemy armor with Shatter which, combined with Cripple who has all equipment through a Ruleset, makes elimination easier.
Usé a Immortalis para resistir el daño mágico con Void, destruir la armadura enemiga con Shatter que combinado con Cripple que tiene todos los equipos por una Ruleset facilita la eliminación.
Arkemis the Bear
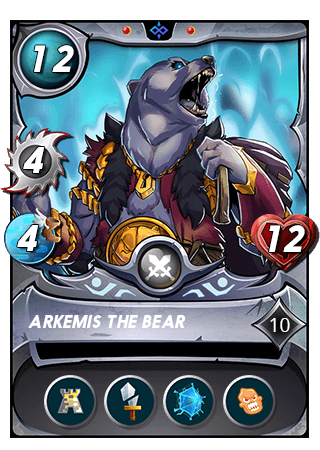
As a tank, due to its high maximum health and with Protect to support my team and reset the team's armor upon being eliminated and activate the Born Again effect.
Como tanque, por su buena cantidad de salud máxima y con Protect para apoyar a mi equipo y reiniciar la armadura del equipo al ser eliminado y activar el efecto de Born Again.
Junker

To be able to attack from the second position and restore the team's armor.
Para poder atacar desde la segunda posición y restaurar la armadura del equipo.
Queen Mycelia
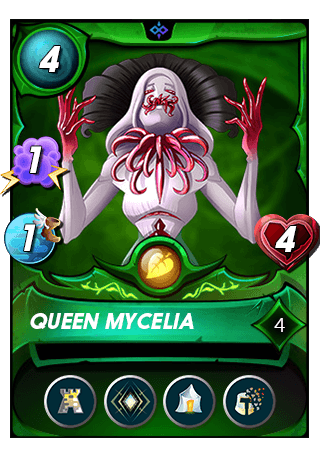
To reduce enemy armor, increase ally armor, and with Triage to heal the Taunt in the last position.
Para reducir la armadura enemiga, aumentar las armaduras de los aliados, y con Triage para sanar al Taunt de la última posición.
Doctor Blight
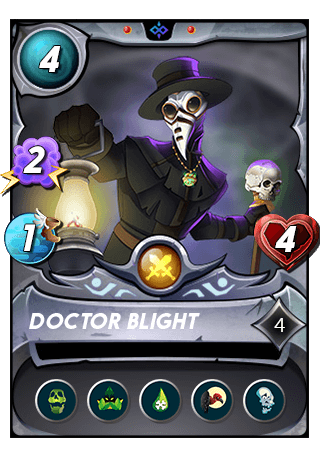
To harm the enemy by reducing the enemy's maximum health and negating healing, in addition to increasing your own maximum health with double the elimination done by Born Again.
Para perjudicar al enemigo reduciendo la salud máxima de enemigo y negar sanaciones además de aumentar su propia salud máxima con el doble de eliminación que se hacen por el Born Again.
Goblin Psychic

To reduce enemy magic damage, heal the tank and negate enemy heals, plus its Dispel will remove enemy buffs.
Para reducir el daño mágico enemigo, sanar al tanque y negar las sanaciones enemigas además por su Dispel eliminara los buffs enemigos.
Mycelic Slipspawn
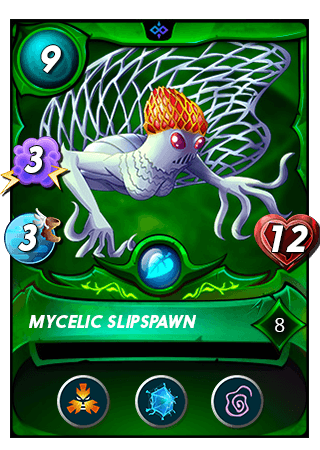
To deflect as many enemy attacks as possible with your Taunt and try to gain the initiative.
Para desviar la mayor cantidad de ataques enemigos posibles con su Taunt e intentar ganar la iniciativa.
ENEMY TEAM
My enemy uses a curious strategy based on the lineage of his Archon to empower his team combined with Born Again and Gramel the Hunger, a card with all 3 attack types, and I wanted to face him and see his interactions with the best abilities of Bloodline.
Mi enemigo usa una estrategia curiosa basada en el linaje de su Archon para potenciar a su equipo combinado con Born Again y con Gramel the Hunger una tarjeta con los 3 tipos de ataque y que yo quería enfrentar y ver sus interacciones con las mejores de habilidades de Bloodline.
Round 1
The first round began following my opponent's plan, with **Moribund Arrowbait** being eliminated several times to empower his units with the same Bllodline, while my team did not lose any units. > El primer round empezó siguiendo el plan de mi oponente siendo **Moribund Arrowbait** eliminado varias veces para potenciar a sus unidades con su mismo linaje, pero mientras mi equipo no perdió ninguna unidad.
Round 2
In the second round I lost my **Mycelic Slipspawn** and my enemy lost his **Commander Goff** and my enemy had more damage per round. > En el segundo Round perdí a mi **Mycelic Slipspawn** y mi enemigo perdió a su **Commander Goff** y tenía mi enemigo más daño por Round.
Round 3
In this round, despite the amount of damage my enemy inflicted, he was the one who lost his **Mystic Mudbinder** while I didn't lose anyone from my team. > En este Round, a pesar de la cantidad de daño de mi enemigo, él fue el que perdió a su **Mystic Mudbinder**, mientras yo no perdí a nadie de mi equipo.
Round 4
Another round in a row where I didn't lose any units, but my enemy did lose one, but each time he got closer to losing my units with more damage while my enemy kept them. > Otro round seguido donde yo no perdí a ninguna unidad, pero mi enemigo si perdió otra, pero cada vez se acercada a perder a mis unidades con más daño mientras mi enemigo las conservaba.
Round 5
At this point in the battle my enemy had 2 units, but in this round I lost my **Arkemis the Bear** and I saw my team being reduced without my **Arkemis the Bear** reducing enemy damage. > En este punto de la batalla mi enemigo tenía 2 unidades, pero en este Round perdí a mi **Arkemis the Bear** y veía a mi equipo siendo reducido sin que mi **Arkemis the Bear** que reduzca el daño enemigo.
Round 6
In this round my enemy lost their **Arcane Skinwalker** but several of my units lost their **Rebirth**. > En este Round mi enemigo perdió a su **Arcane Skinwalker**, pero varias de mis unidades perdieron su **Rebirth**.
Round 7
In this round I lost my **Junker** and my **Queen Mycelia** against the enemy **Gramel the Hunger**, but I was able to remove the buffs thanks to my **Goblin Psychic**. > En este Round perdí a mi **Junker** y a mi **Queen Mycelia** contra el **Gramel the Hunger** enemigo, pero pude eliminar los Buffs gracias a mi **Goblin Psychic**.
Round 8
**Gramel the Hunger** in this Round hit my **Doctor Blight** with all his attacks, but thanks to his large amount of health from his **Scavenger** boosted by **Bron Again** and being able to eliminate him with **Goblin Psychic** to activate his Rebirth. > **Gramel the Hunger** en este Round golpeó con todos sus ataques a mi **Doctor Blight**, pero gracias a su gran cantidad de salud por su **Scavenger** potenciado por **Bron Again** y pudiendo eliminar con **Goblin Psychic** para activar su Rebirth.
Round 9 | Final
In this last round my **Doctor Blight** eliminated the **Gramel the Hunger** enemy to give me the victory. > En este último round mi **Doctor Blight** eliminó al **Gramel the Hunger** enemigo para darme la victoria.
Posted using Splintertalk