
🎅🎄
🎄🎅

Espero les guste!
Vas a necesitar:
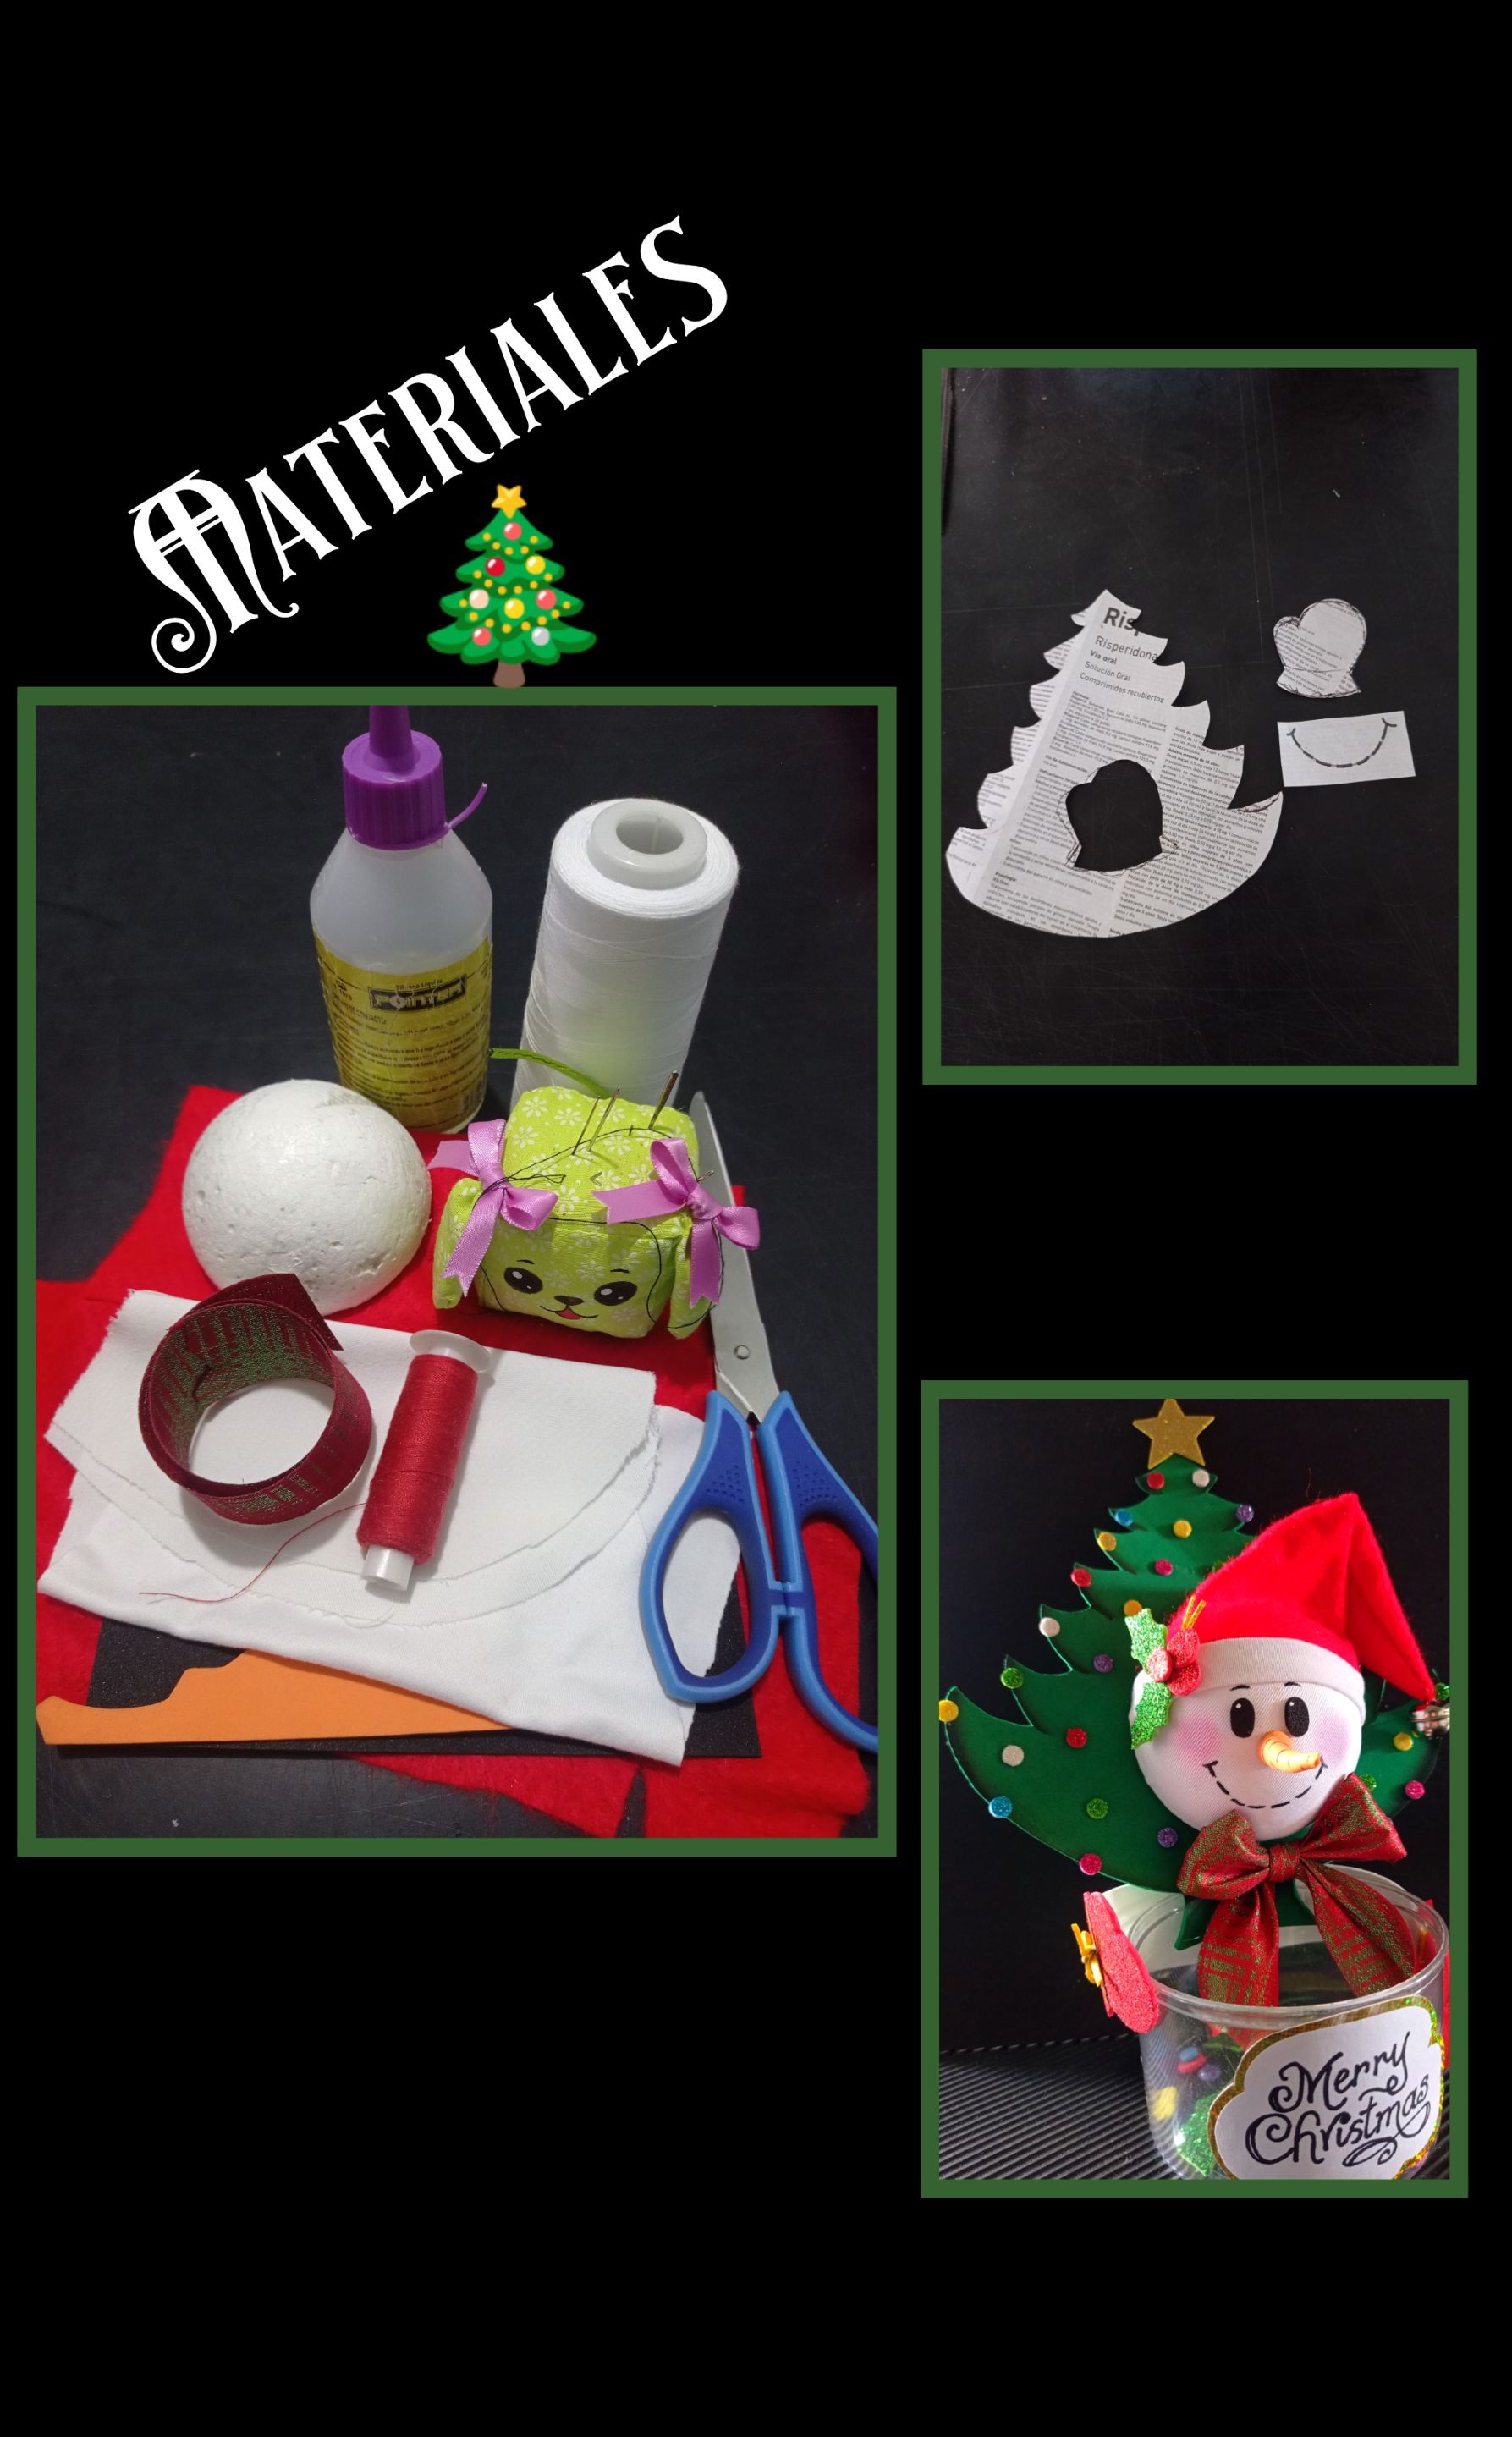
| Cilindro | Media esfera de icopor o tapa de bombillo |
|---|---|
| Retazo Fieltro o tela Roja | Cinta de tela |
| Retazo de tela blanca | Hilos y aguja |
| Foami de colores mate y escarchado | Cascabel |
| Pinturas y pinceles | Tijera |
| Marcador y lápiz | Cartulinas |
| Silicón | Moldes |
Es hora de comenzar !
Paso 1:
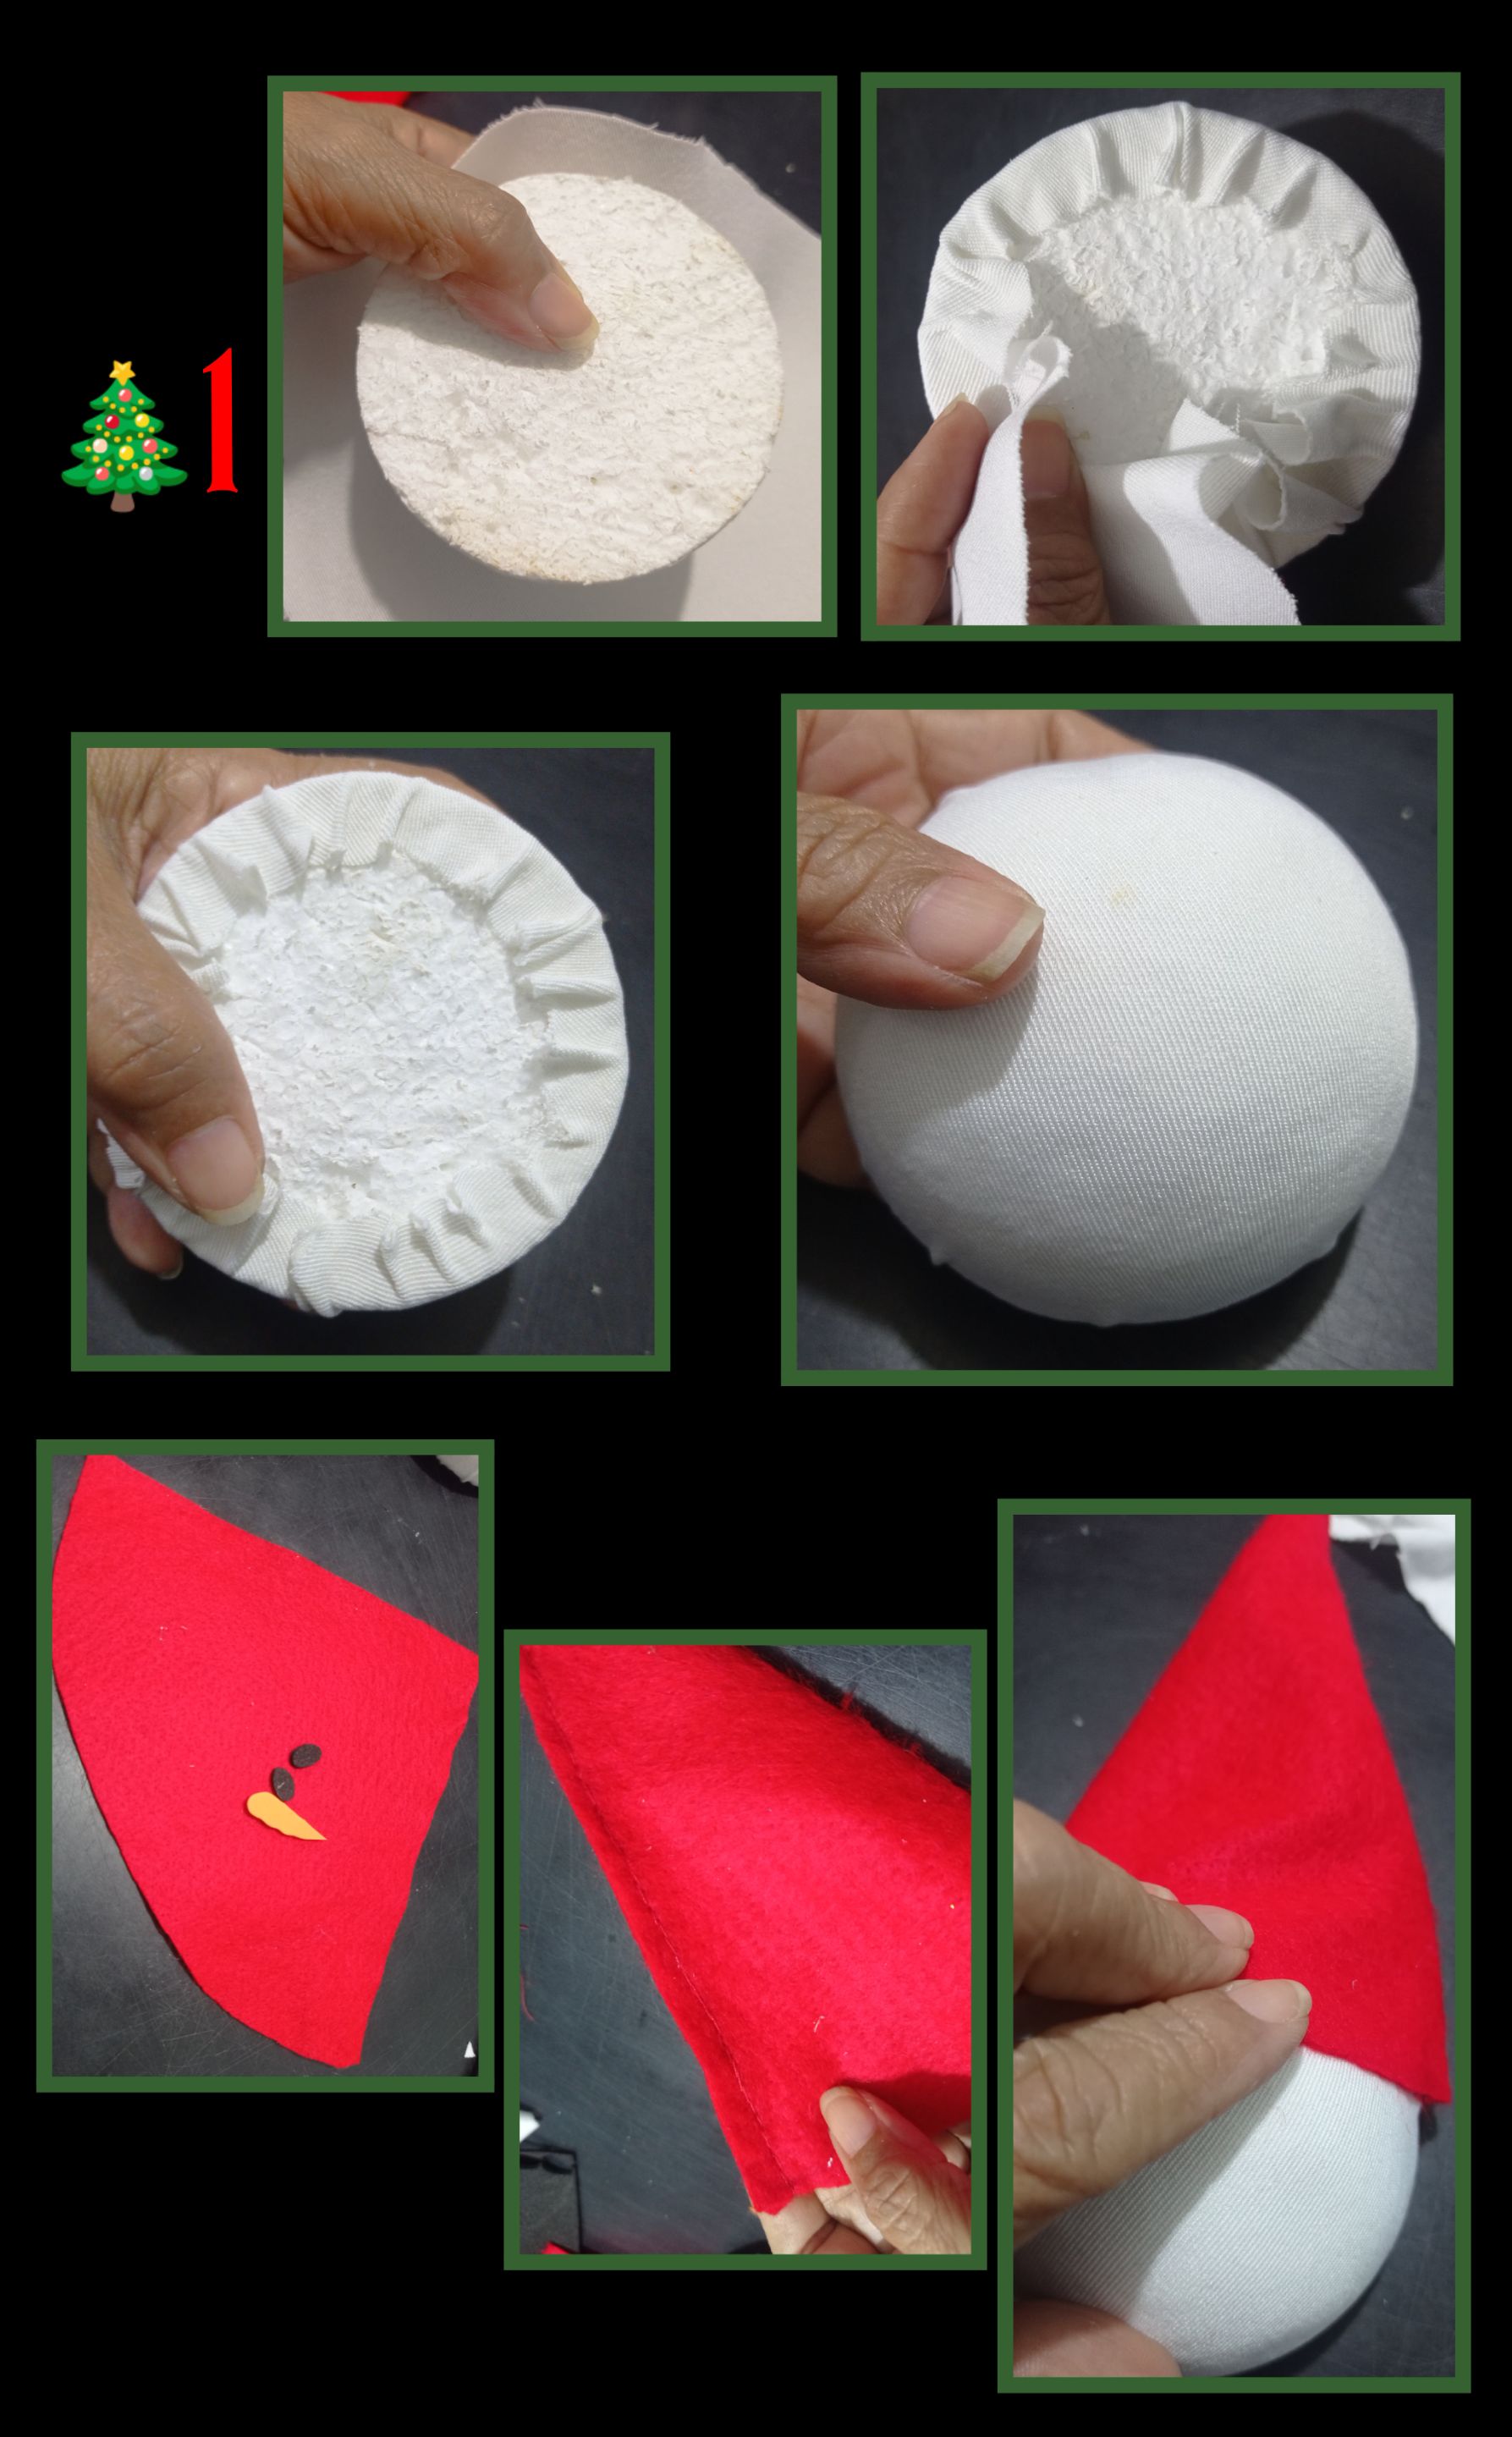
- Mide la media esfera y recorta en la tela blanca, un círculo 2,5 veces más grande, luego aplica silicón por la orilla y comienza a doblar y pegar haciendo pequeños pliegues como se ve en la foto hasta forrarla y luego recorta el exceso de tela sobrante.
- Aparte recorta en fieltro o tela roja un triángulo y redondea la parte más ancha, después comienza a coser por los extremos para formar el gorro, voltea y pega a la cabeza con silicón.
Paso 2:
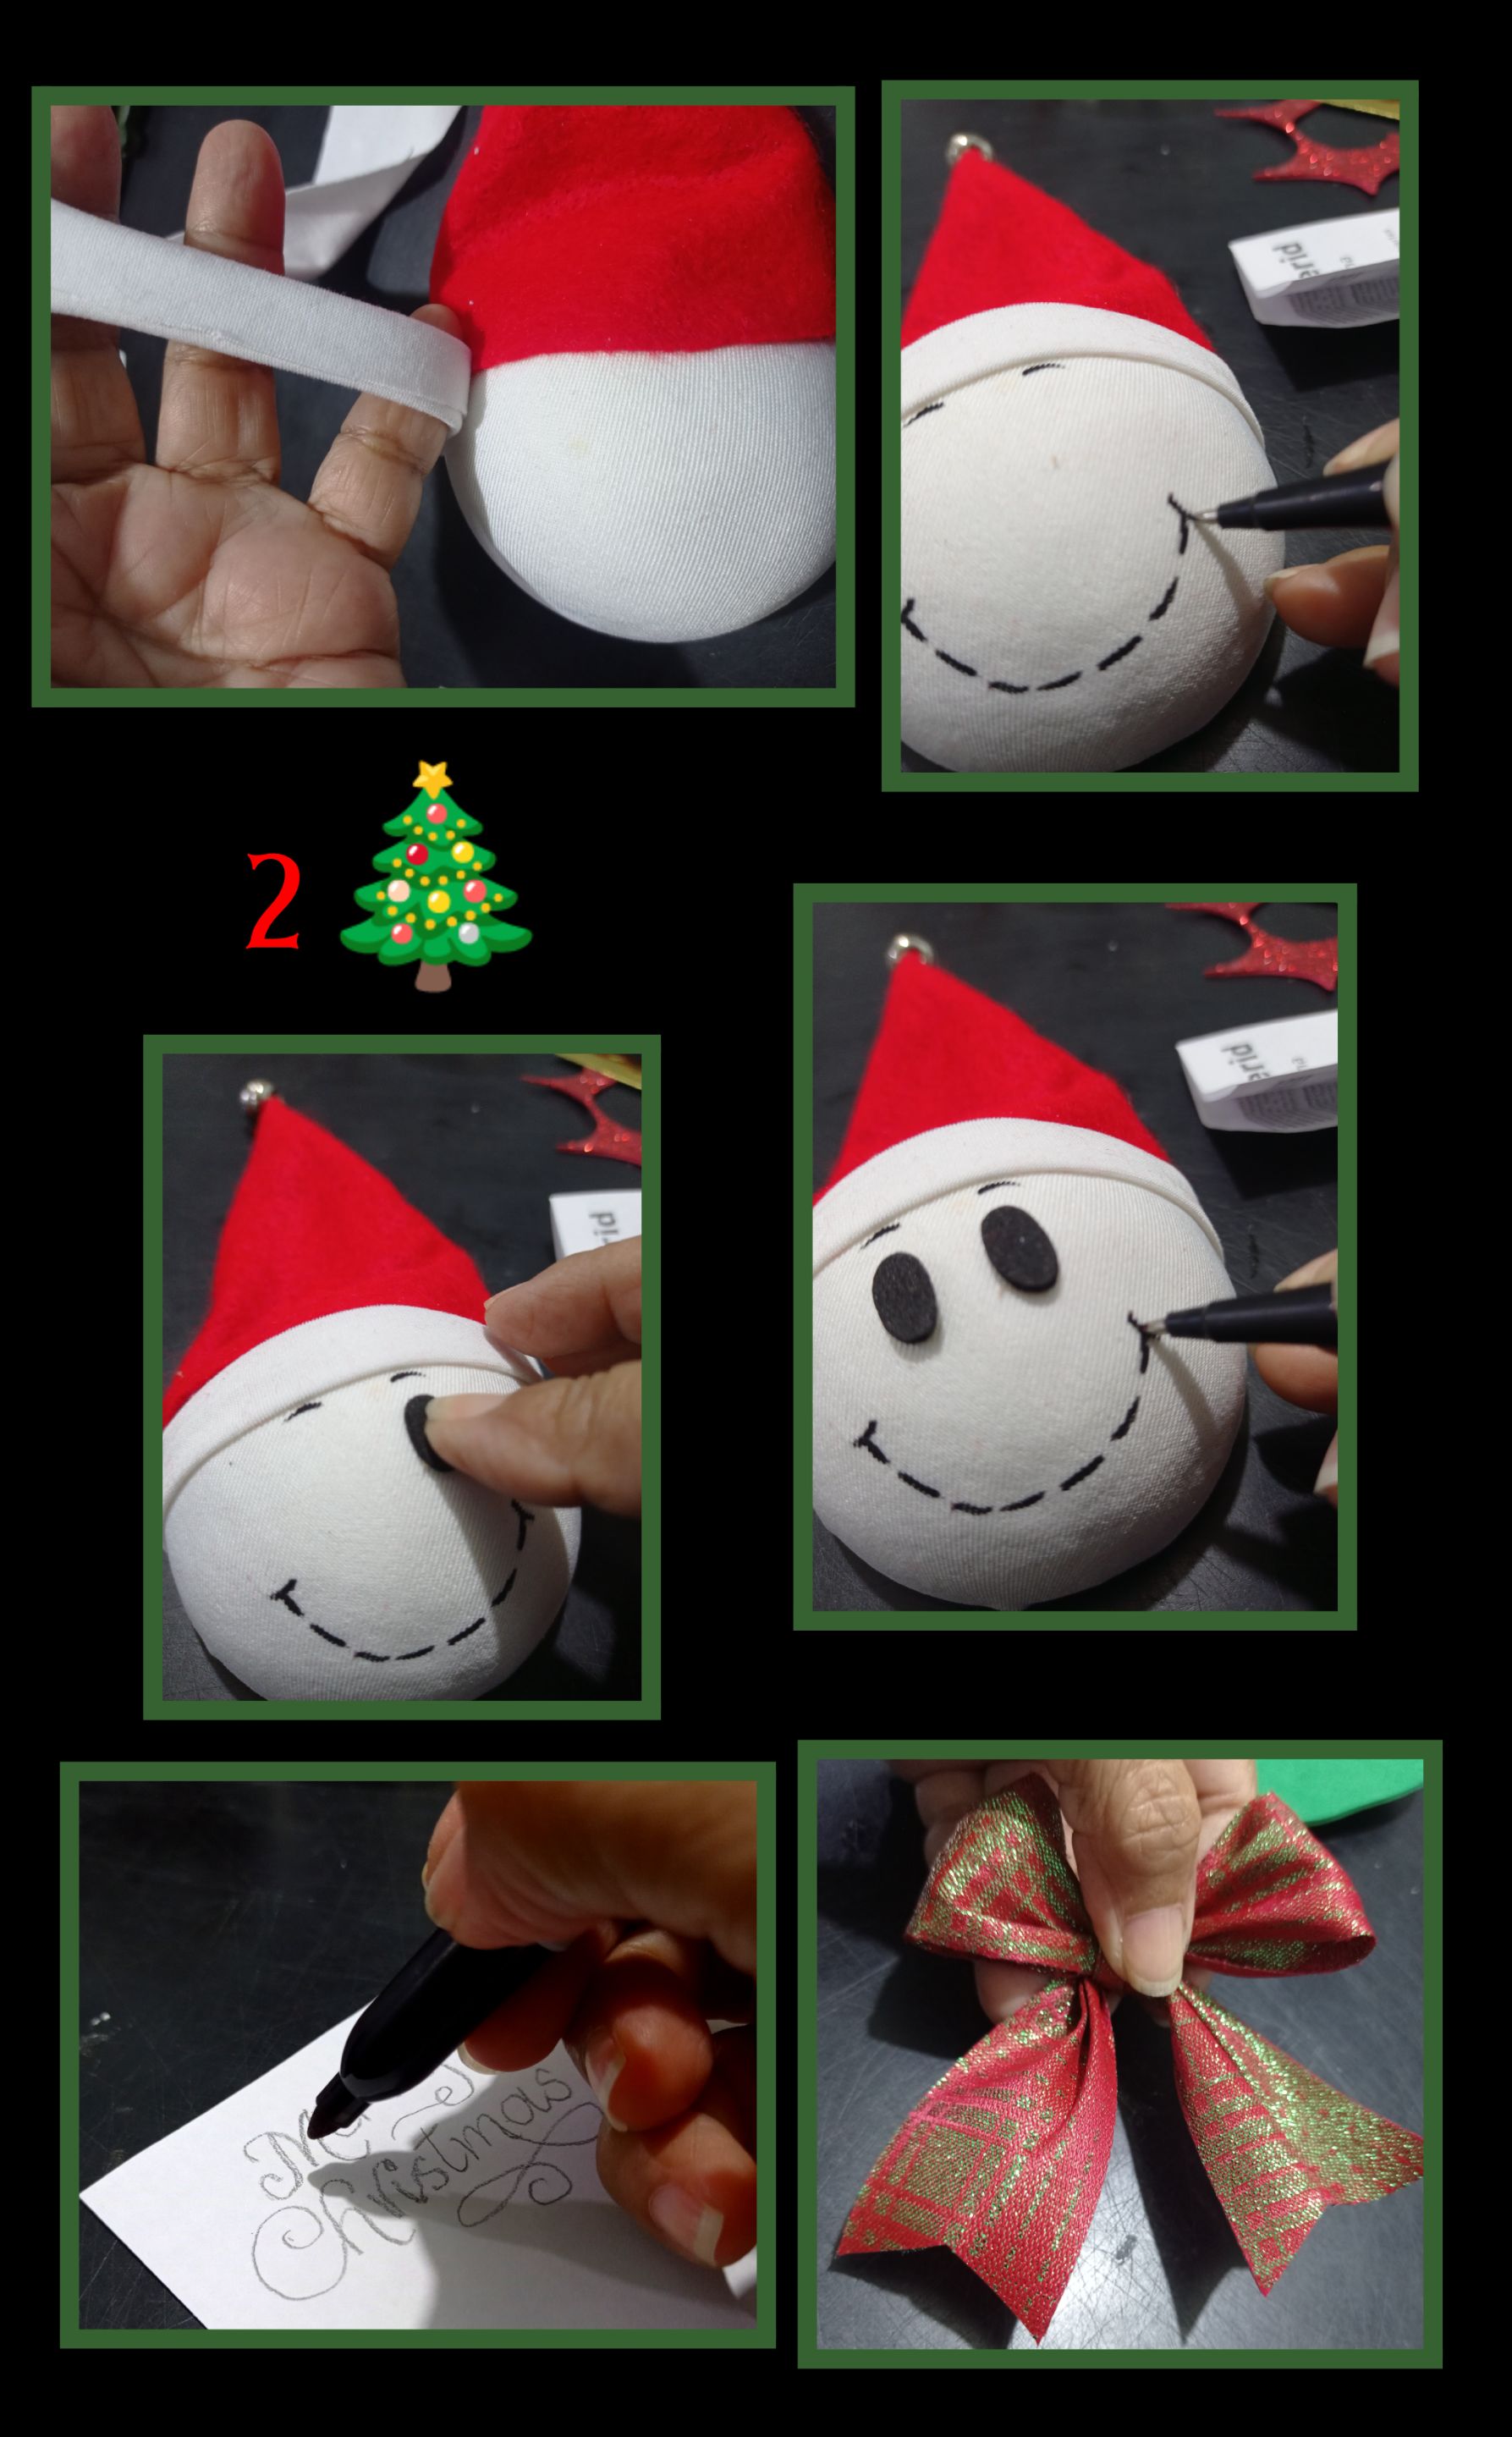
- Recorta una tira en tela blanca, aplica silicón y pega en la orilla del gorro.
- Con marcador o bolígrafo, dibuja las cejas y la forma de la boca.
- Recorta y pega los ojitos en foami o pinta.
- Aparte escribe el mensaje con marcador y haz un lazo con la cinta.
Paso 3:
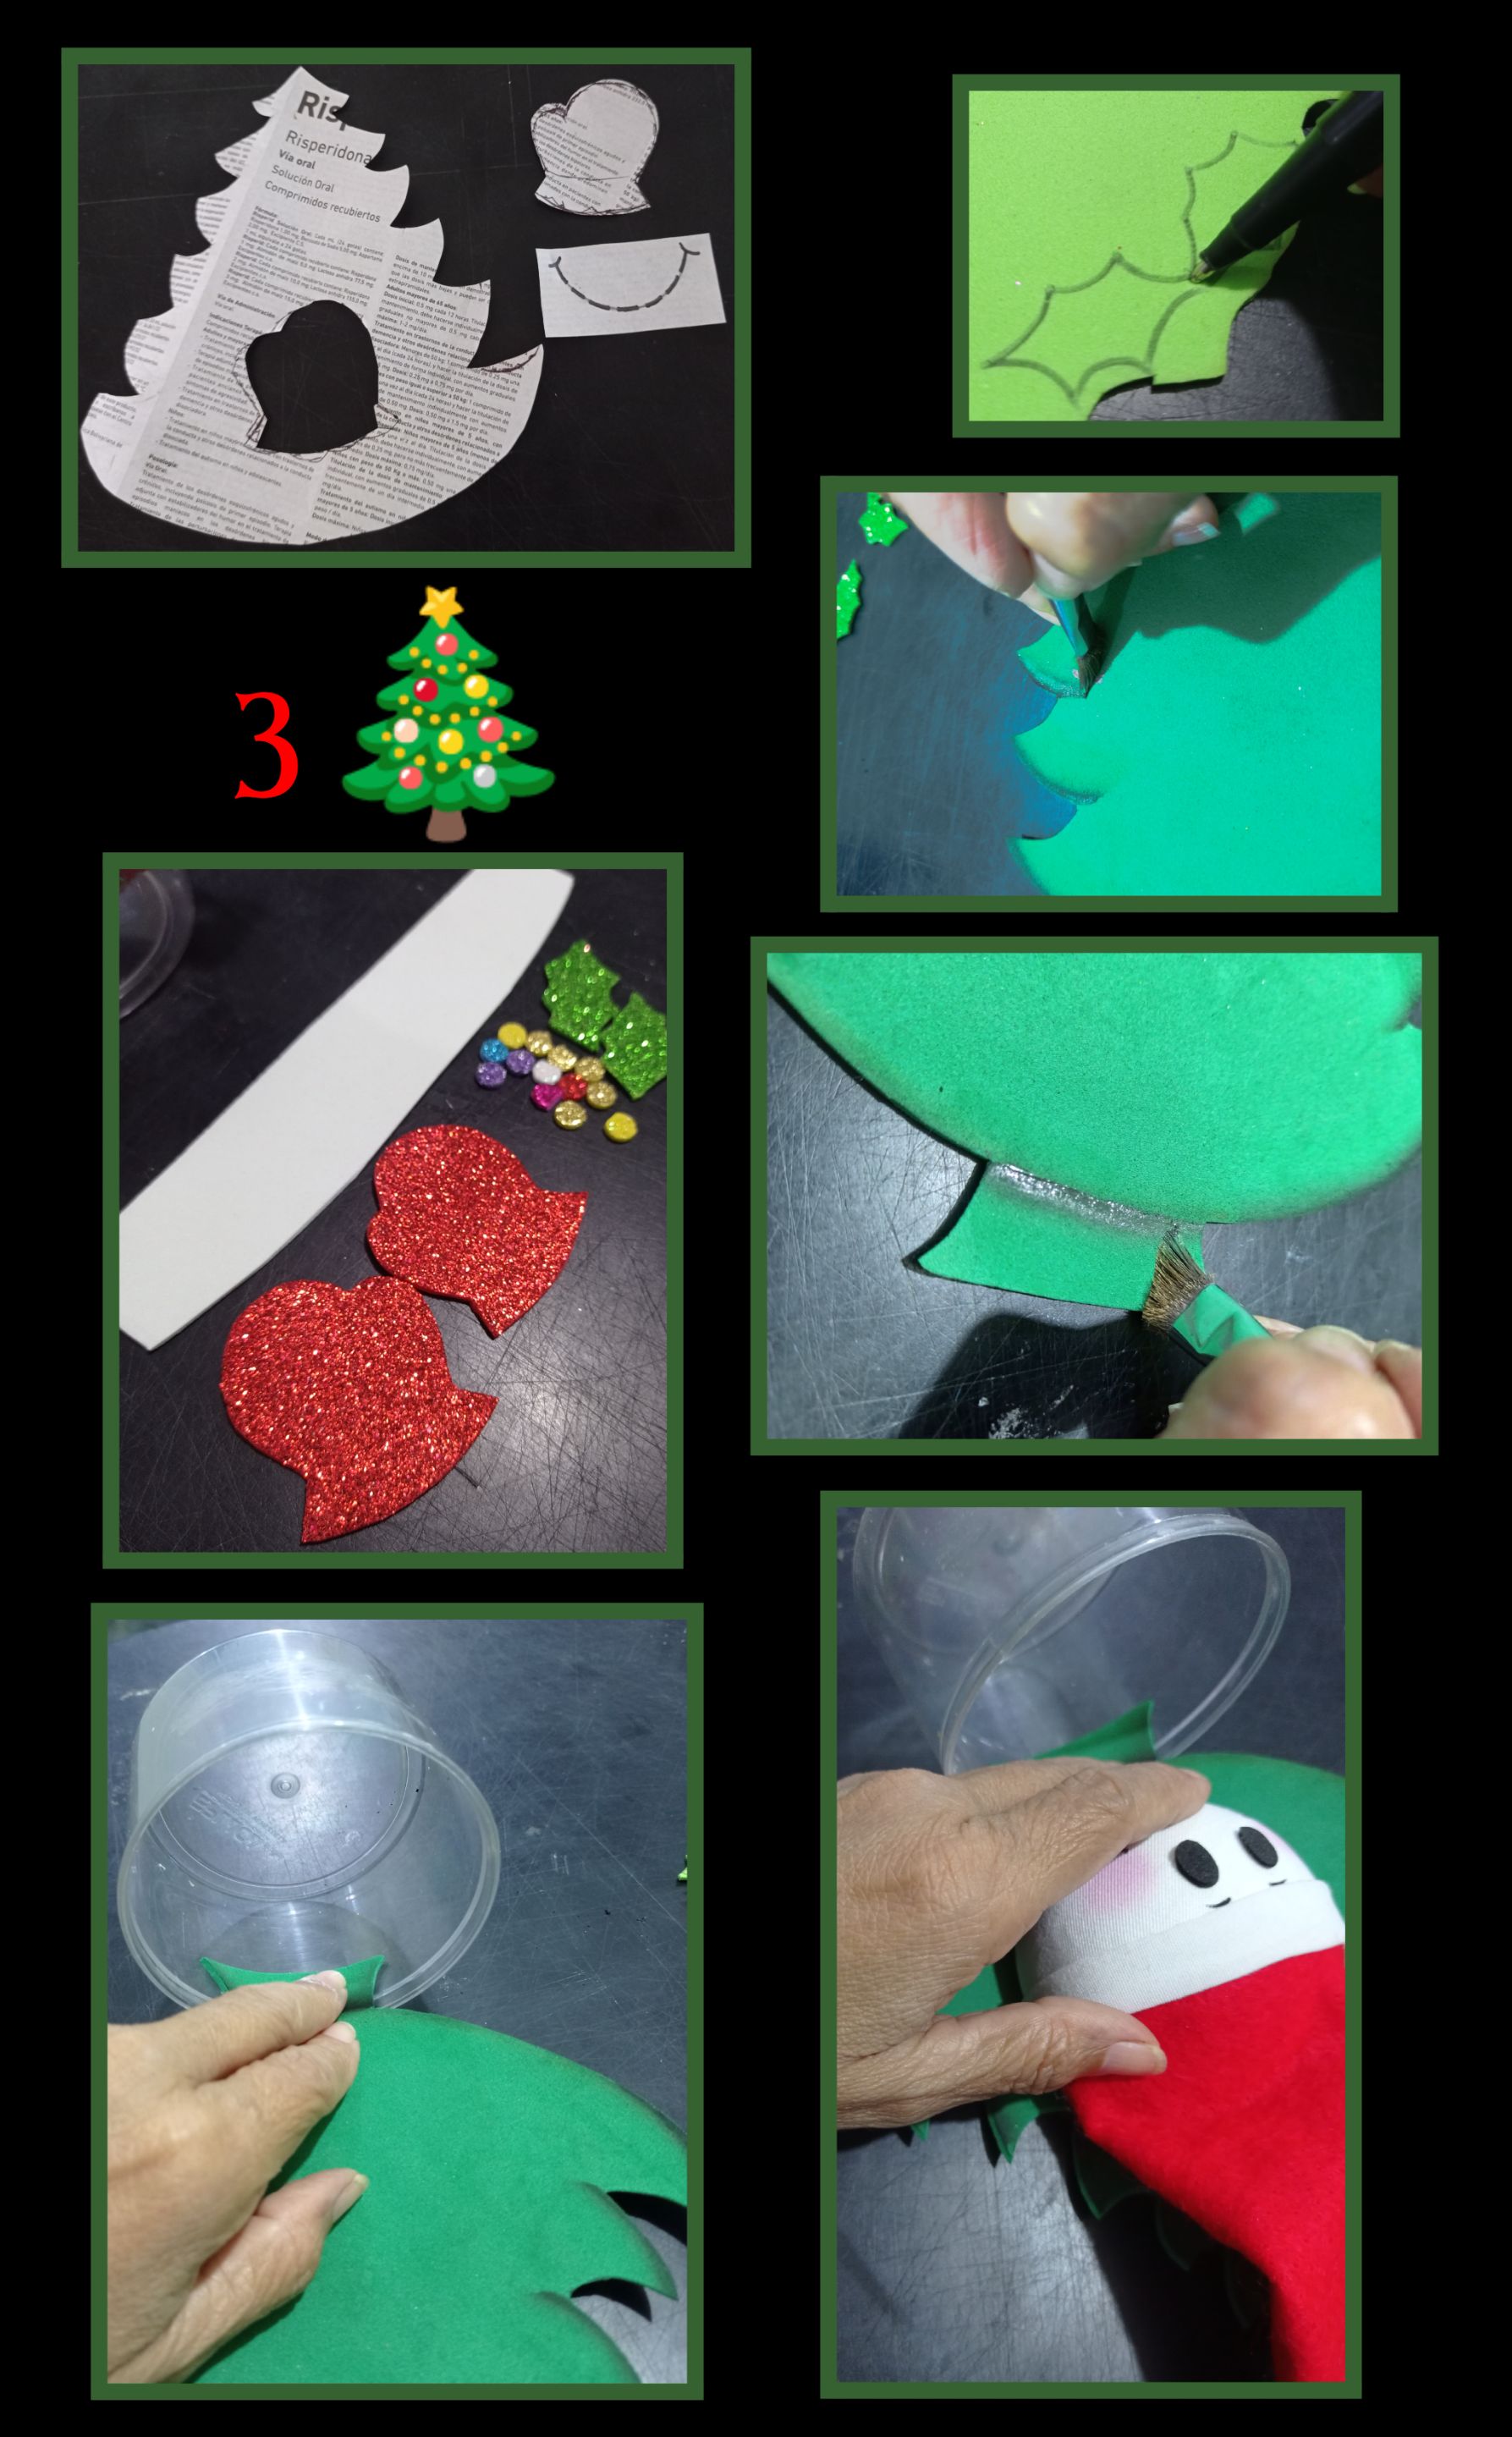
- Dibuja, imprime o calca árbol y guante de navidad, hojas, círculos de colores y una tira de foami blanco y recorta todas estas piezas.
- Luego pinta la orilla del árbol o sombrea con tiza y deja secar.
- Ahora aplica silicón a la base del árbol y pega al cilindro haciendo presión como se observa en la foto.
- Igual aplica silicón a la carita y pega al árbol.
Paso 4:
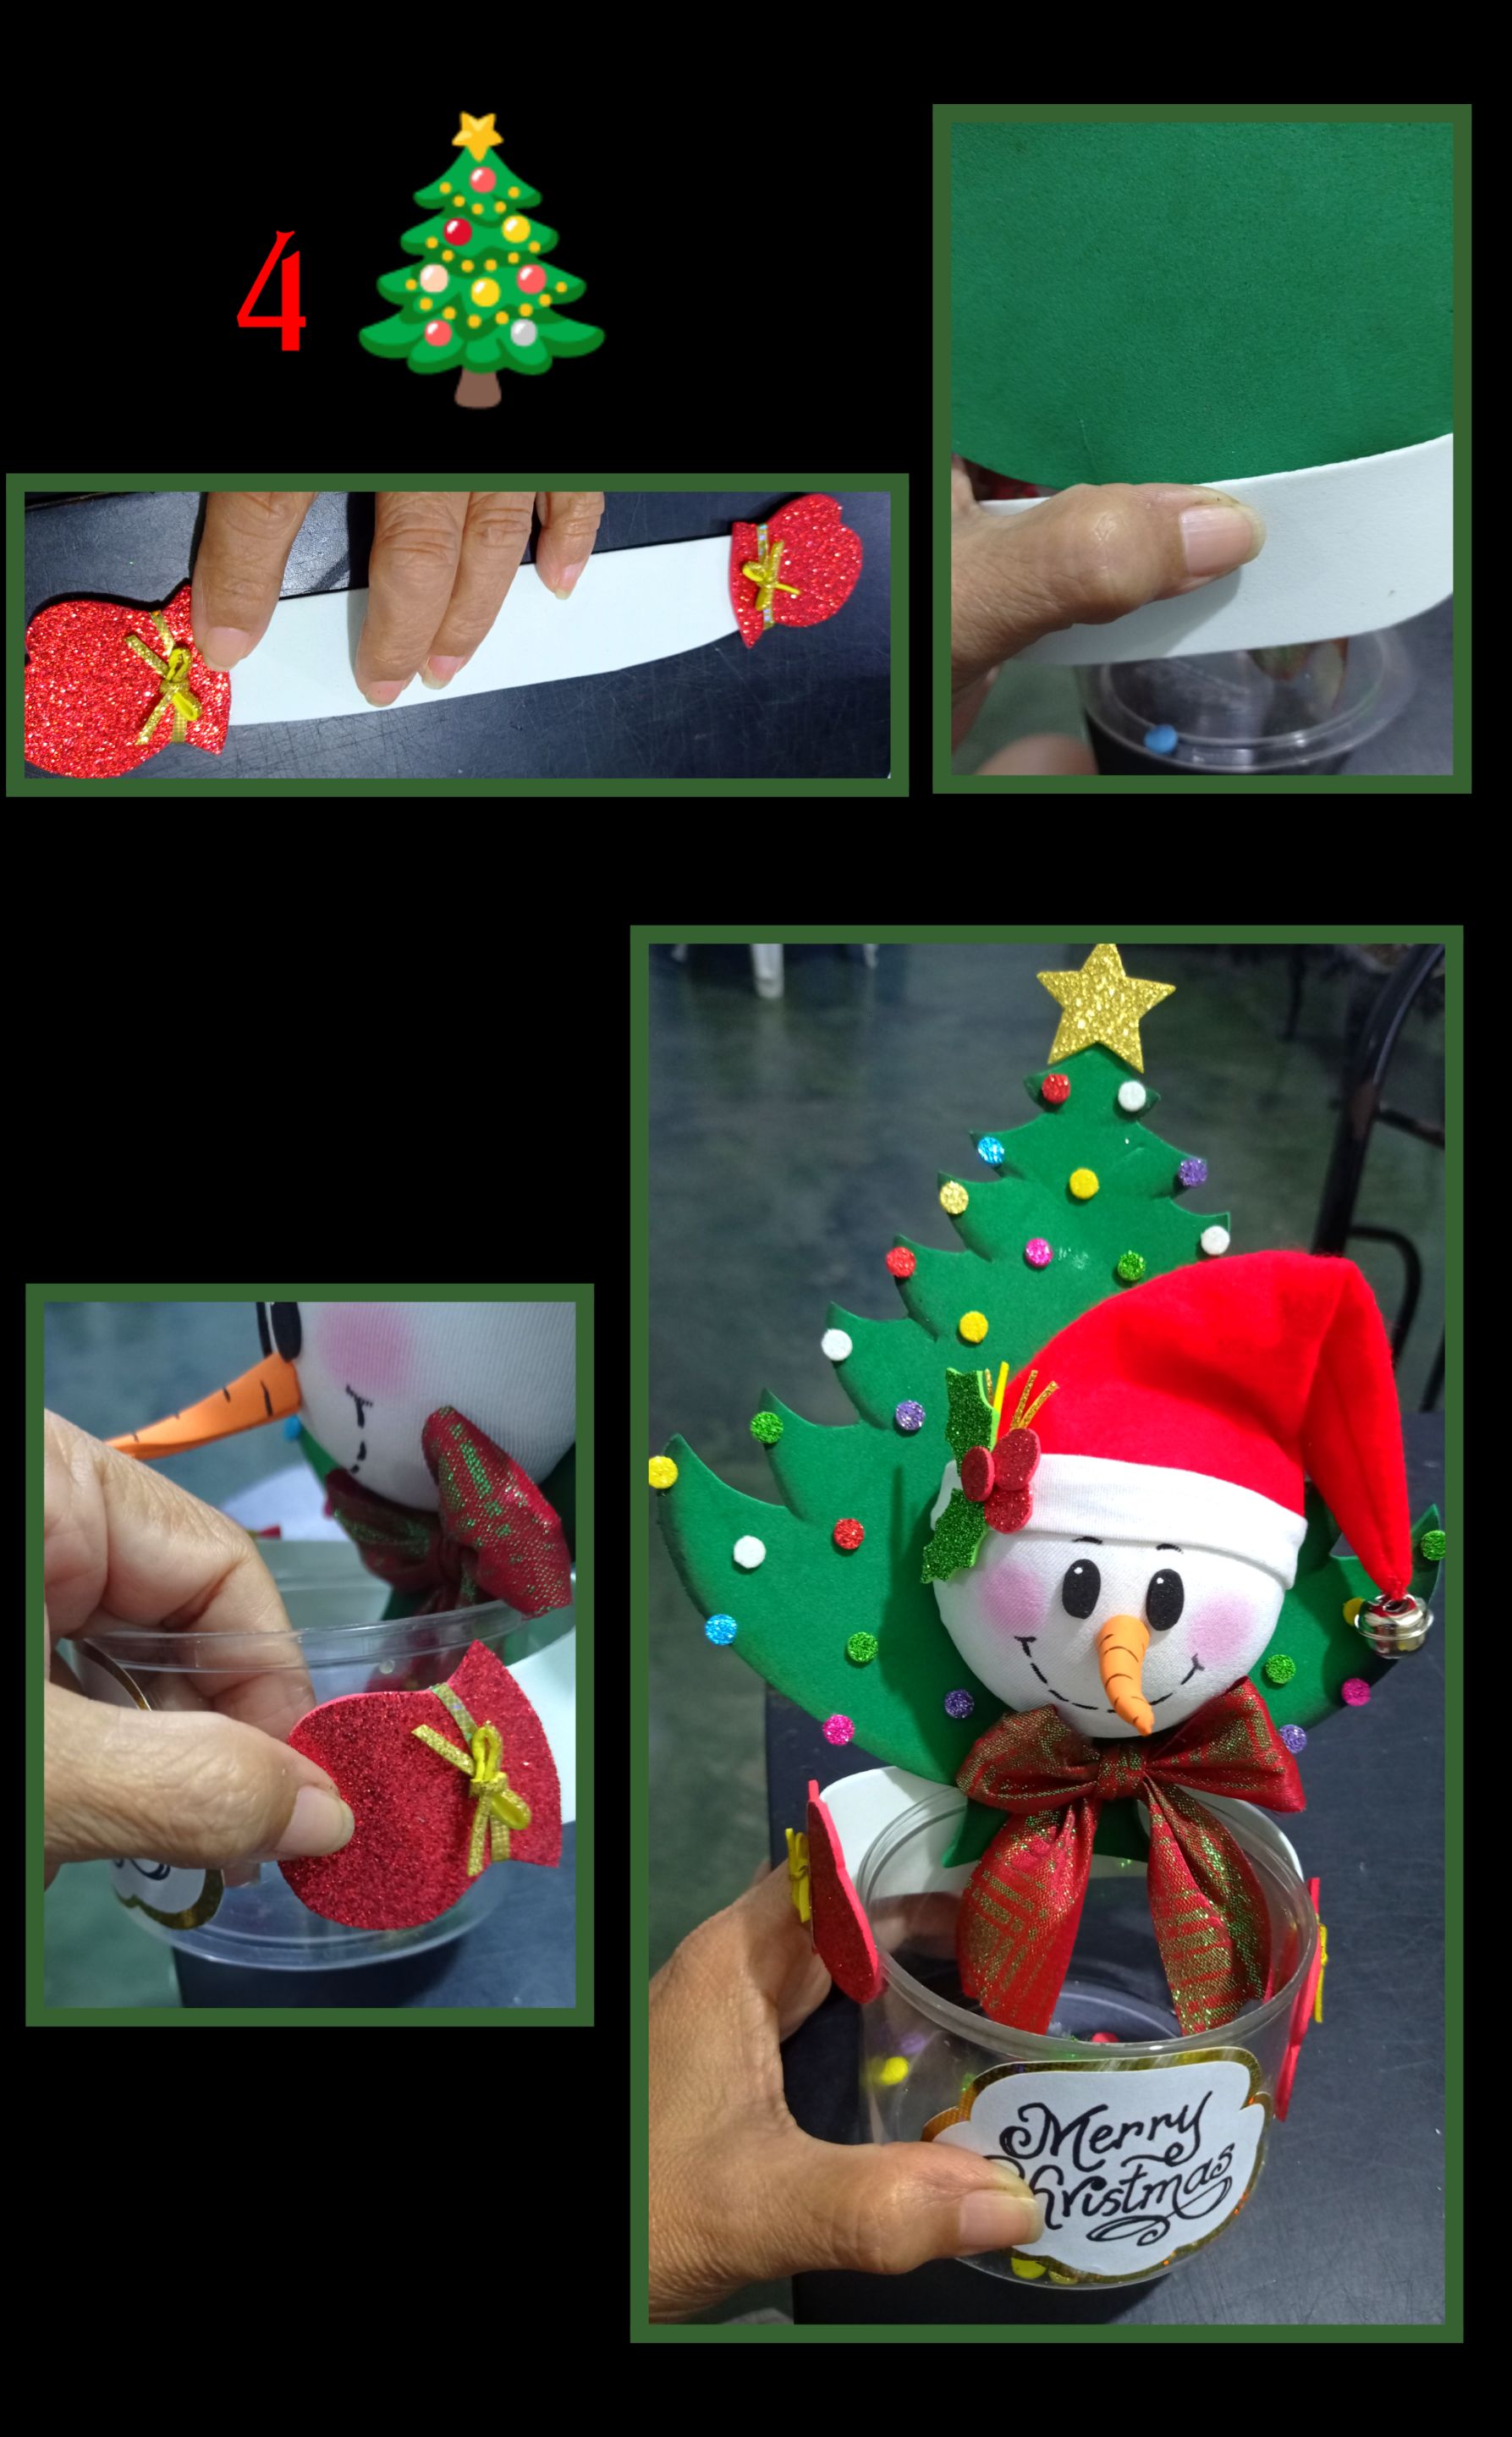
- Haz unos mini lazos y pega en los guantes rojos.
- Haz la nariz con un cono de foami naranja y pinta listas negras semejando una zanahoria y paga a la carita.
- También pega el lazo debajo de la carita.
- Ahora pega en la parte trasera del cilindro los brazos y los guantes a los lados del cilindro y decora el arbolito con las bolitas de colores y una estrella en la punta.
- Por último, recorta el mensaje con la forma deseada, pega sobre un pedazo de cartulina dorada, recorta dejando un pequeño borde y pega al frente del cilindro.
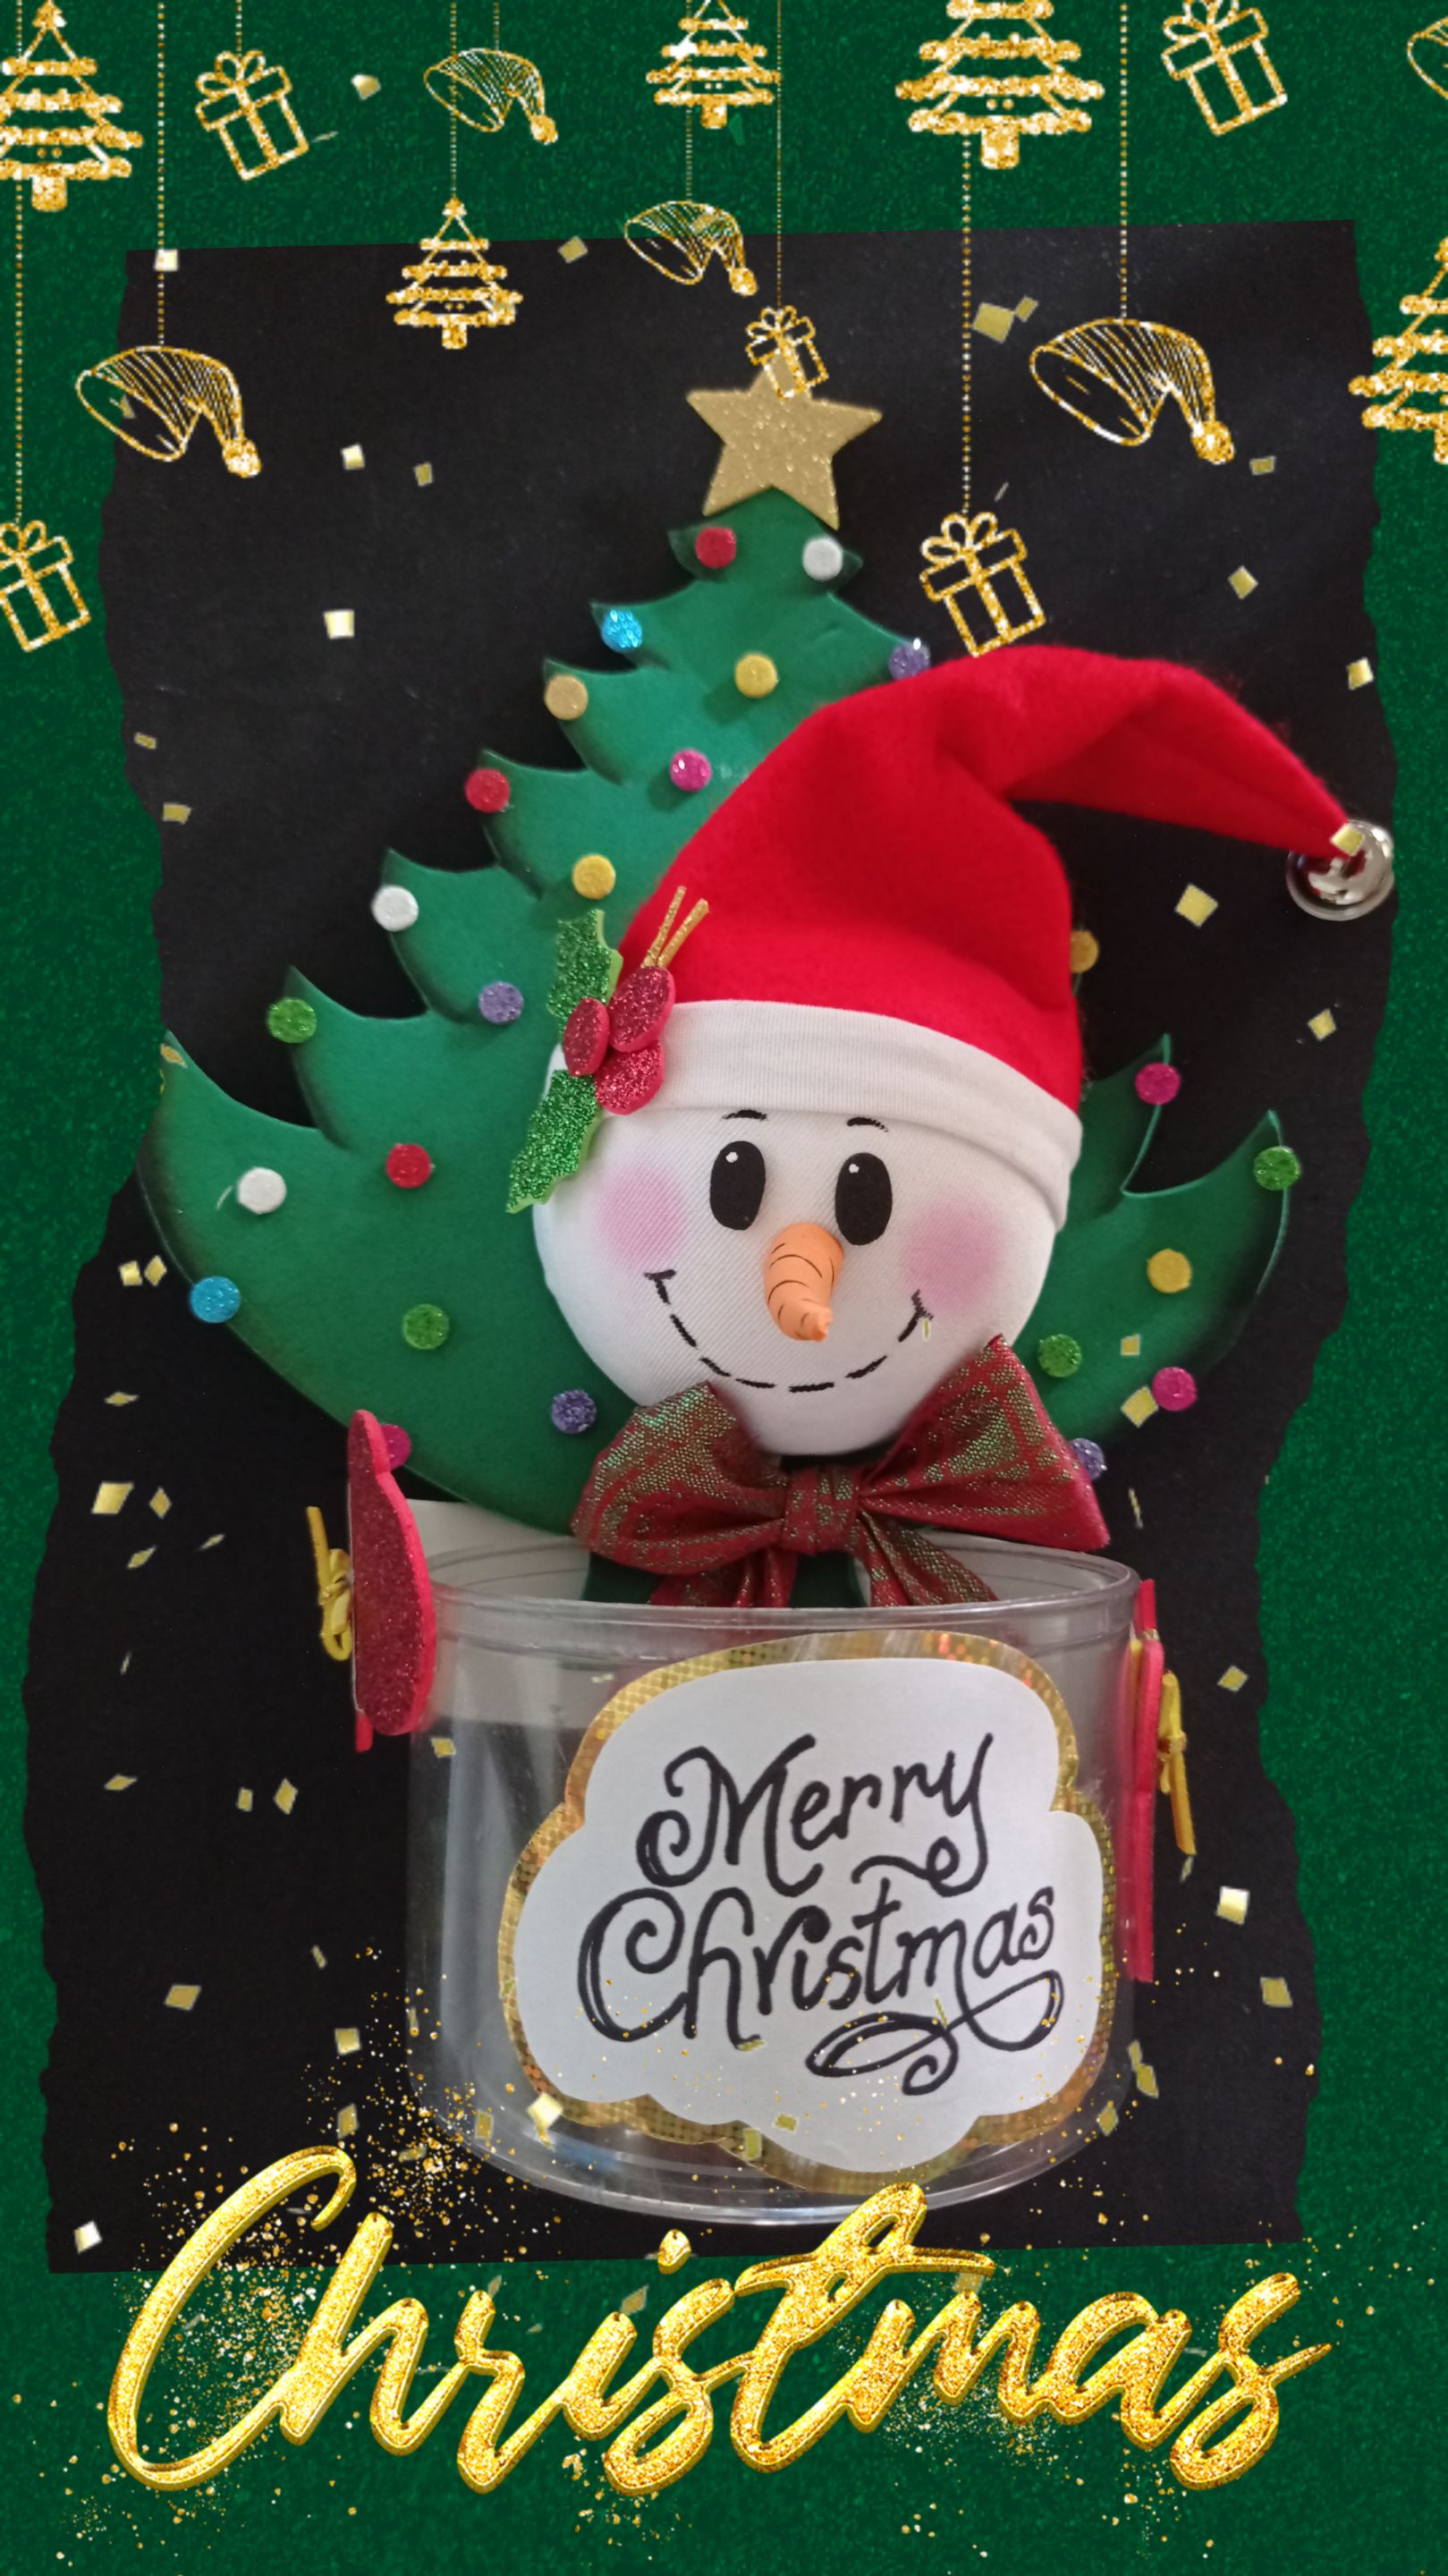
Así quedará terminado este lindo y fácil Adorno navideño!.
Esta publicación está traducida con DeepL, las fotos las capturé con mi Redmi Note 9 y editadas con GridArt.
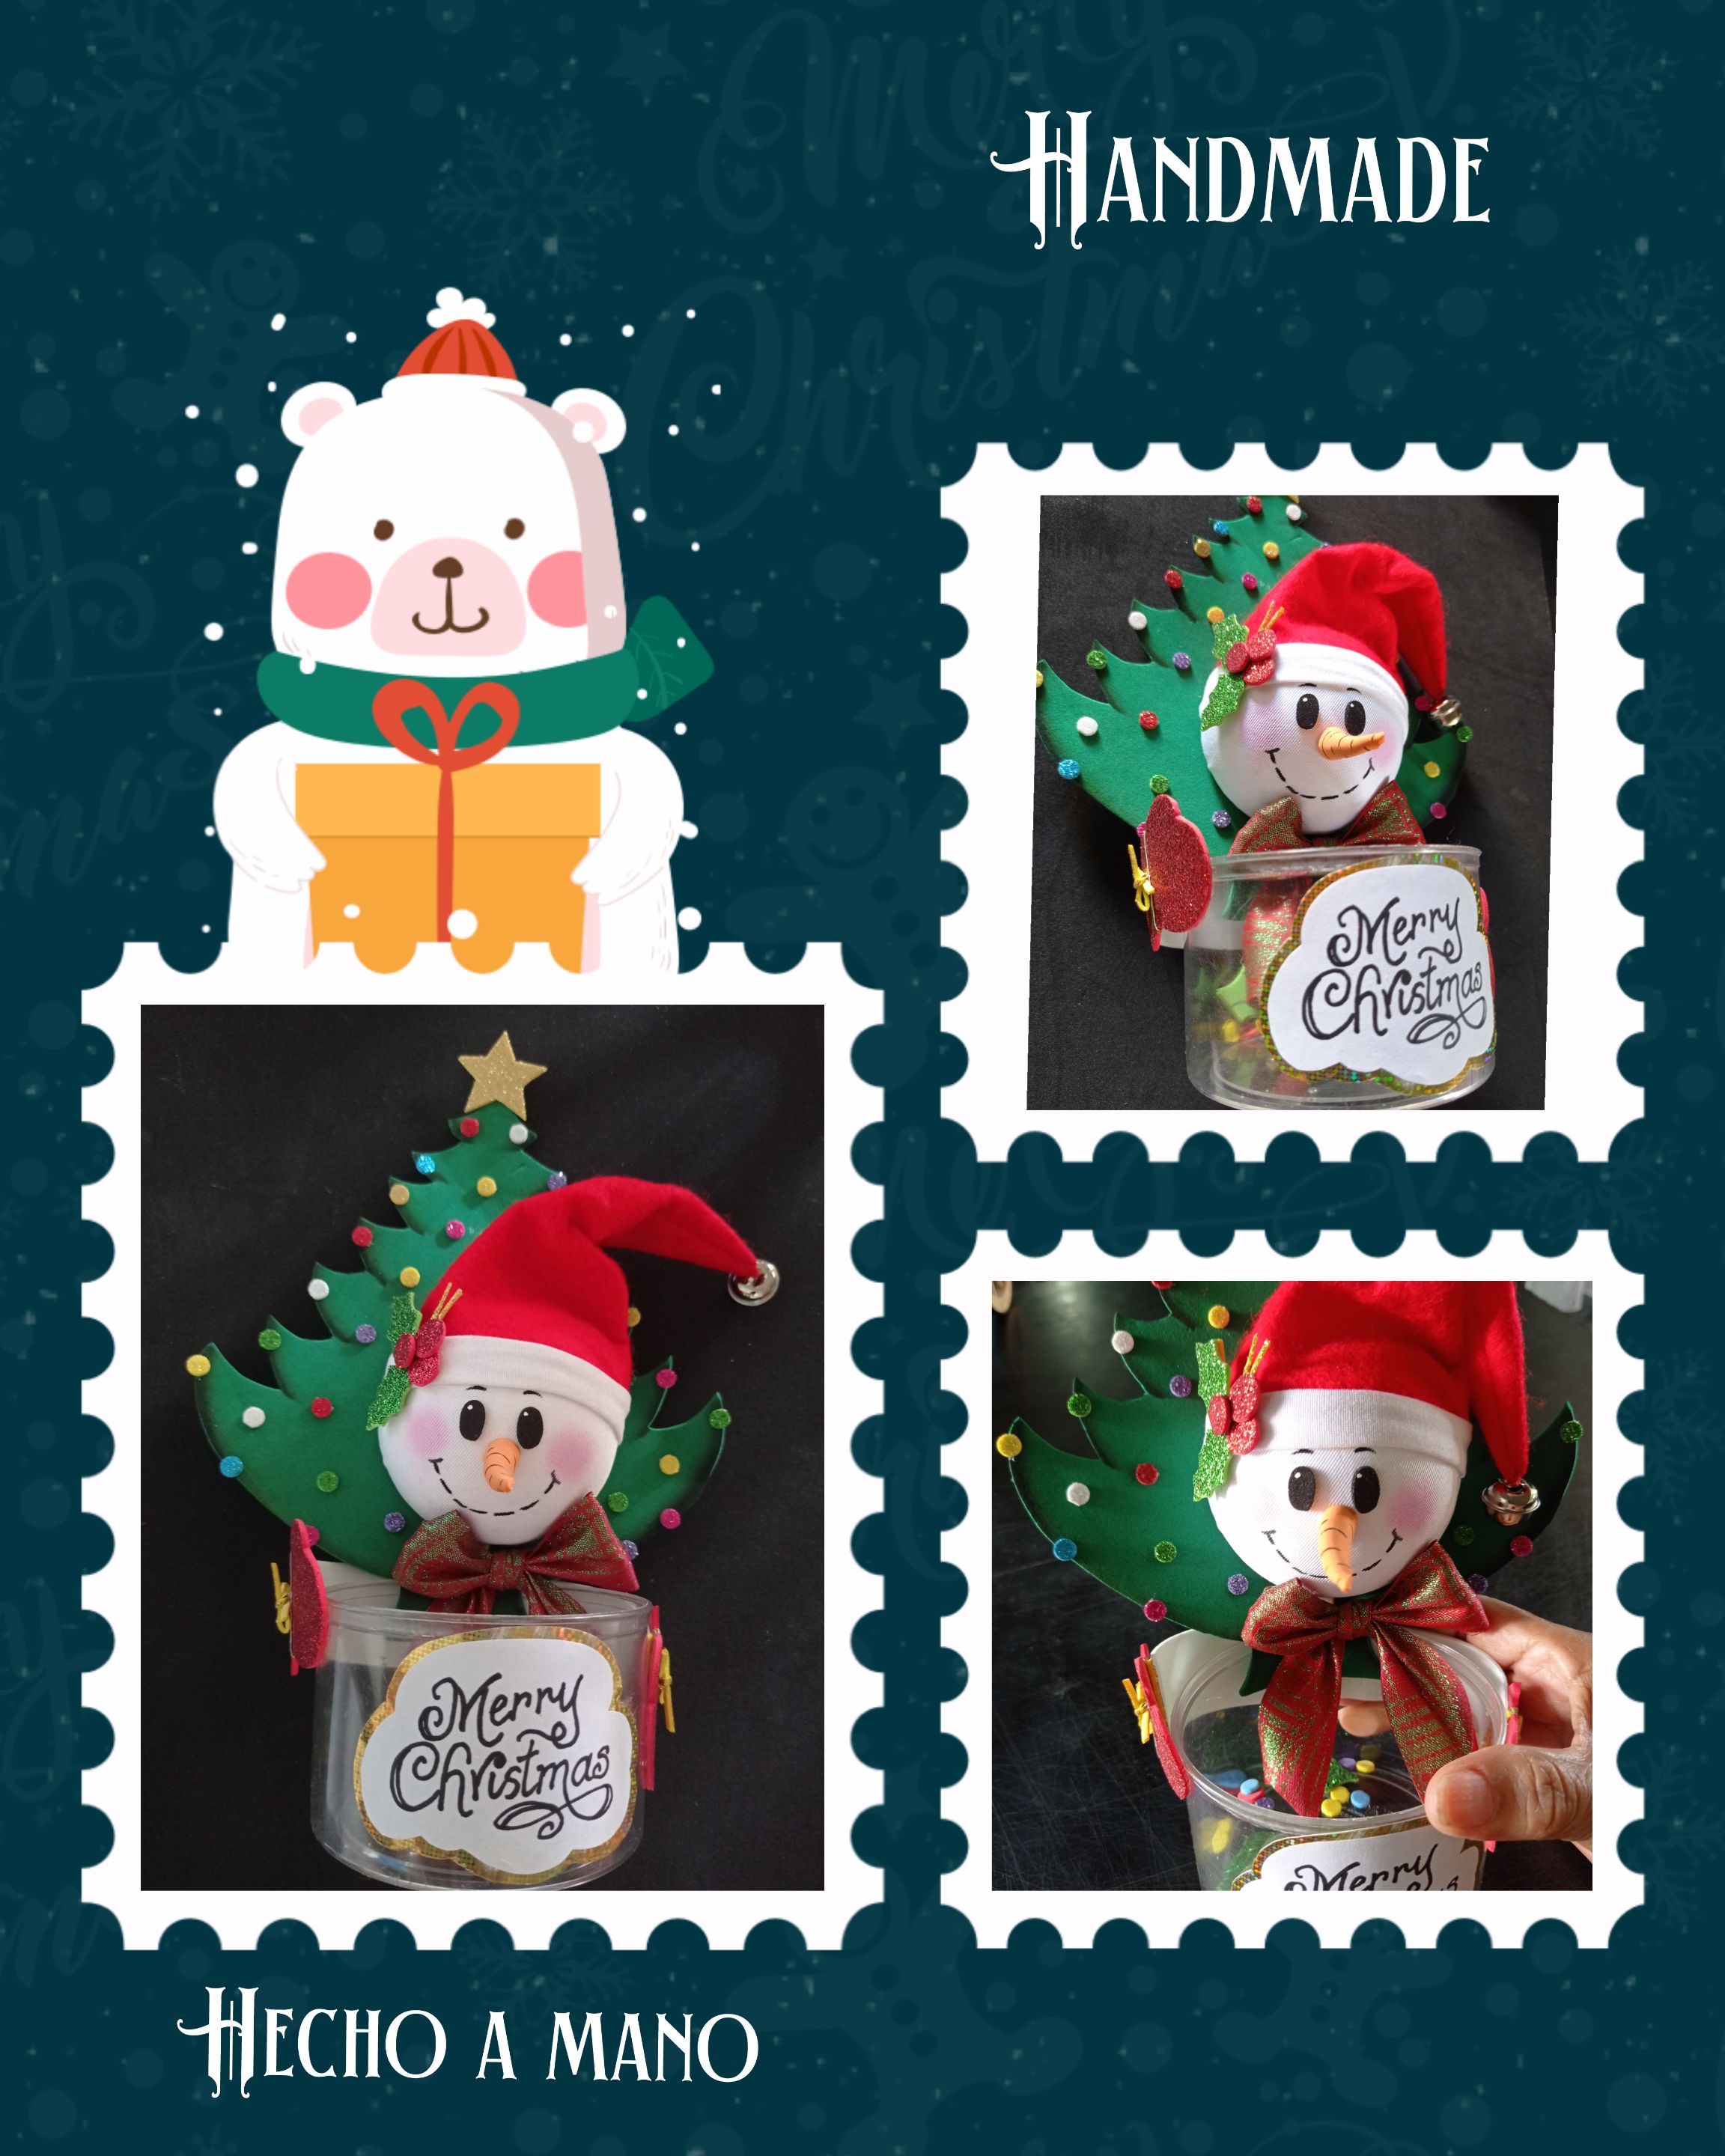
Ahora les muestro unas fotos del resultado de mi tutorial.
 Me despido feliz de haber compartido contigo este lindo paso a paso y espero te sea útil ya que para realizarlo no necesitas muchas cosas, creo que con tu creatividad y un poco de ideas podrás realizar cosas muy lindas para adornar tu casa en esta navidad.
Muchas gracias por tu visita, apoyo y si te es grato comentar, gustosa responderé. Saludos
English
You will need:
| Cylinder | Half a sphere of icopor or light bulb lid |
|---|---|
| Red felt or cloth | Red fabric |
| White fabric | Threads and needle |
| Frosted and matte colored Foami | Cascabel |
| Paints and paintbrushes | Scissors |
| Marker and pencil | Cardboard |
| Silicone | Molds |
It's time to begin!
Step 1:
- Measure the half sphere and cut a circle 2.5 times bigger out of the white fabric, then apply silicone around the edge and start folding and gluing making small folds as shown in the picture until it is covered and then cut off the excess of fabric.
- Cut out a triangle in felt or red fabric and round the widest part, then start sewing at the ends to form the hat, turn it over and glue it to the head with silicone.
Step 2:
- Cut out a strip of white fabric, apply silicone and glue to the edge of the hat.
- With a marker or pen, draw the eyebrows and the shape of the mouth.
- Cut out and glue the eyes in foami or paint.
- Write the message with marker and make a bow with the ribbon.
Step 3:
- Draw, print or trace Christmas tree and glove, leaves, colored circles and a strip of white foami and cut out all these pieces.
- Then paint the edge of the tree or shade with chalk and let dry.
- Now apply silicone to the base of the tree and glue it to the cylinder by applying pressure as shown in the photo.
- Apply silicone to the face and glue to the tree.
Step 4:
- Make mini bows and glue on the red gloves.
- Make the nose with an orange foami cone and paint black stripes resembling a carrot and pay to the face.
- Also glue the bow under the face.
- Now glue the arms and gloves to the back of the cylinder and decorate the tree with colored balls and a star on the top.
- Finally, cut out the message in the desired shape, glue on a piece of gold cardboard, cut out leaving a small border and glue to the front of the cylinder.
This is how this cute and easy Christmas ornament will be finished.
This publication is translated with DeepL, the photos were captured with my Redmi Note 9 and edited with GridArt.
Now I show you some pictures of the result of my tutorial.
***I say goodbye happy to have shared with you this nice step by step and I hope you find it useful because to do it you don't need many things, I think that with your creativity and a little ideas you can make very nice things to decorate your home this Christmas.
Thank you very much for your visit, support and if you like to comment, I will gladly respond. Greetings