

#### *Greetings creative, artisan and artistic community, I have brought some beautiful paper flowers that you can use to decorate spaces, I hope you like them a lot and I encourage you to do it.*

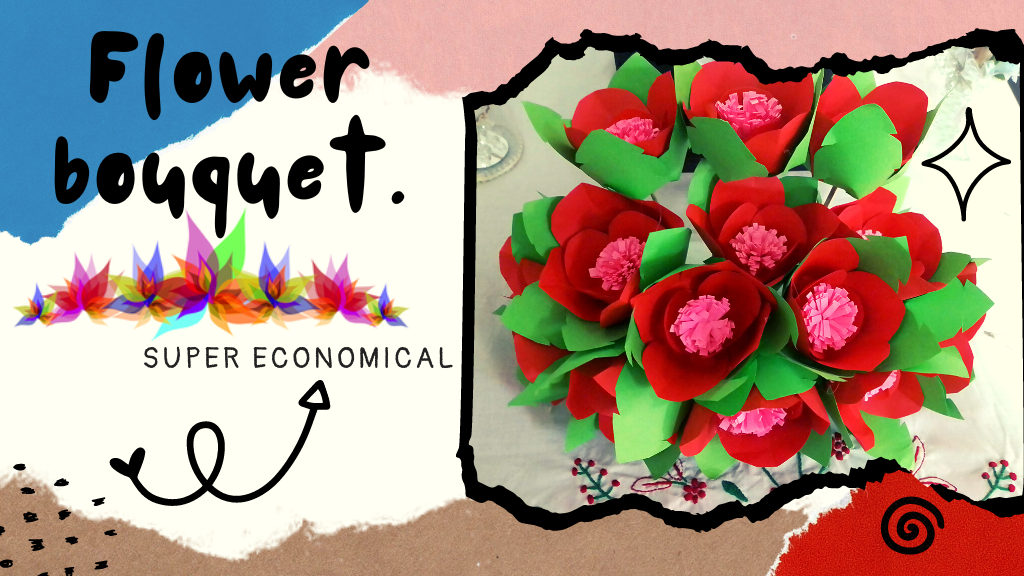
# Good, nice and cheap.
After having made my previous centerpiece with the fomi material which I spent a lot of money, I thought about making more flowers for decoration, I did not want to make the same format of centerpiece, so I chose to make a floral arrangement, but with something more economical, I had some unused colored leaves of which I thought to give a nice use and decorate the table. So this inspiration led me to create this beautiful arrangement that I share with you today. It is super economical and easy to make, you need very few materials, the rest I used is the usual stuff I have at home and the rest of scrap. I invite you to see the step by step, so you can create with me, something super creative and beautiful. It captured the attention of all my family and visitors to my house. In the materials you can use the color of leaves that is of your preference, I had chosen red and yellow but then I changed to pink because I thought it would look better. You can adapt it to your style and what you have on hand.
  
#### *Greetings creative, artisan and artistic community, I have brought some beautiful paper flowers that you can use to decorate spaces, I hope you like them a lot and I encourage you to do it.*

# Good, nice and cheap.
After having made my previous centerpiece with the fomi material which I spent a lot of money, I thought about making more flowers for decoration, I did not want to make the same format of centerpiece, so I chose to make a floral arrangement, but with something more economical, I had some unused colored leaves of which I thought to give a nice use and decorate the table. So this inspiration led me to create this beautiful arrangement that I share with you today. It is super economical and easy to make, you need very few materials, the rest I used is the usual stuff I have at home and the rest of scrap. I invite you to see the step by step, so you can create with me, something super creative and beautiful. It captured the attention of all my family and visitors to my house. In the materials you can use the color of leaves that is of your preference, I had chosen red and yellow but then I changed to pink because I thought it would look better. You can adapt it to your style and what you have on hand.
  

#### *Saludos comunidad creativa, artesana y artística, he traído unas bellas flores de papel que puedes usar para decorar espacios, espero que te gusten mucho y te animes hacerlo.*

# Bueno, bonito y barato.
Después de haber hecho mi centro de mesa anterior con el material fomi del cual gasté mucho dinero, pensé en realizar más flores para decoración, no quería hacer el mismo formato de centro de mesa, así que opté por hacer un arreglo floral, pero con algo más económico, tenía unas hojas de colores sin uso de las cuales pensé darle un lindo uso y decorar la mesa. Así que esta inspiración me llevó a crear este hermoso arreglo que hoy comparto contigo. Es super económico y fácil de hacer, necesitas muy pocos materiales el resto que usé es el de costumbre que tengo en casa y lo demás de deshecho. Te invito a ver el paso a paso, para que puedas crear conmigo, algo super creativo y bonito. Capturó el centro de las miradas de toda mi familia y visitantes a mi casa. En los materiales puedes usar el color de hojas que sea de tu preferencia, había escogido rojo y amarillo pero luego cambié a rosado pues pensé que se vería mejor. Puedes adaptarlo a tu estilo y lo que tengas a mano.

| https://steemitimages.com/58x56/https://www.mundoprimaria.com/wp-content/uploads/2020/04/EEUU-Bandera-America.png | https://steemitimages.com/58x56/https://www.mundoprimaria.com/wp-content/uploads/2020/04/Espa%C3%B1a-Bandera-Europa.png |
|---|---|
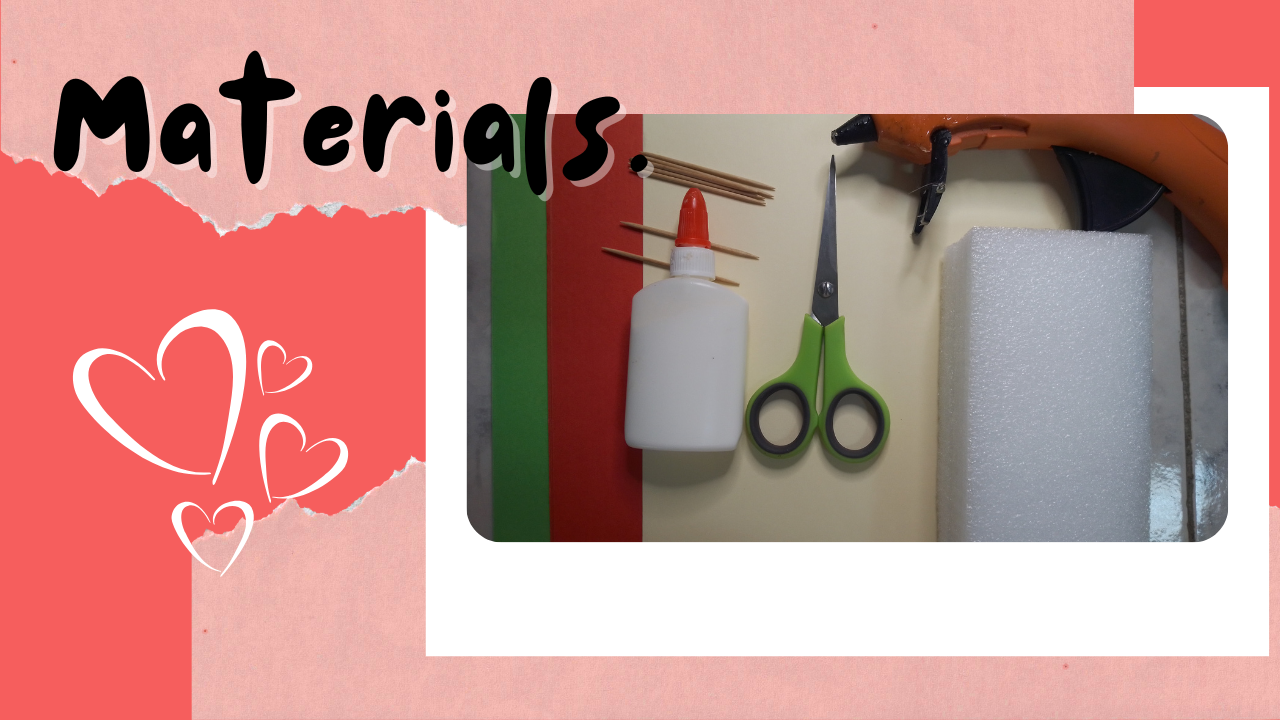
| - Sticks of height.- Scissors.- Colored paper. - Silicone gun.- Anime cube or floral foam block. | - Palitos de altura.- Tijera. - Papel de colores - Pistola de silicón.- Cubo de anime o bloque de espuma floral.- |


# Step 1️⃣
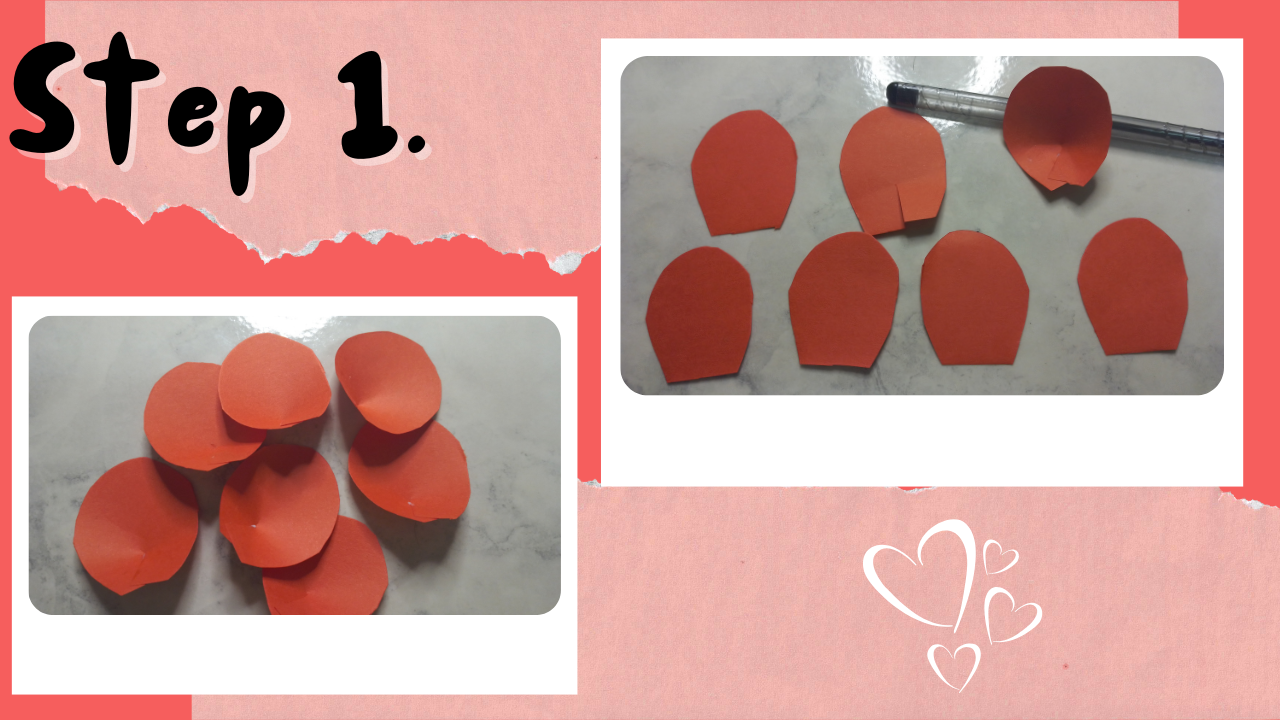
We need to make two leaf shapes of different sizes for the petals. Make one and cut out several of the same size for each. To these petals we need to make a small cut in the center. Put some glue in the opening and glue, let dry a little, these should take a somewhat concave shape.

# Step 1️⃣
We need to make two leaf shapes of different sizes for the petals. Make one and cut out several of the same size for each. To these petals we need to make a small cut in the center. Put some glue in the opening and glue, let dry a little, these should take a somewhat concave shape.

# Paso 1️⃣
Necesitamos hacer dos forma de hoja de diferente tamaño para los pétalos. Realiza uno y recorta varios del mismo tamaño para cada uno. Ha estos pétalos debemos hacer un pequeño corte en el centro. Coloca un poco de pegamento en la abertura y pega, deja secar un poco, estos deben tomar una forma algo cóncava.

# Step 2️⃣
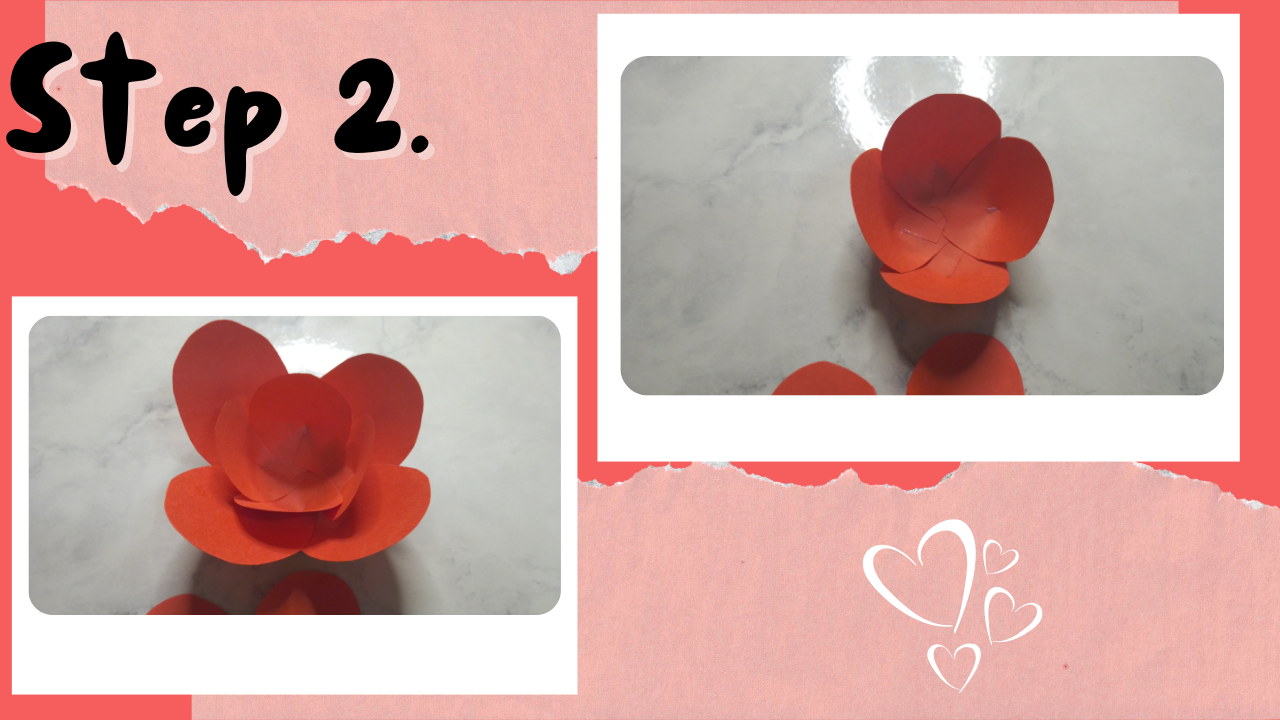
Time to create the first flower, for this we begin to join the largest petals, for this we need 4 of these. We join with the glue one by one in the shape of an X or cross, let dry. Repeat the previous step but with the smaller petals to join the petals inside. Glue the petals already formed, the big one with the small one remaining right in the center.
Time to create the first flower, for this we begin to join the largest petals, for this we need 4 of these. We join with the glue one by one in the shape of an X or cross, let dry. Repeat the previous step but with the smaller petals to join the petals inside. Glue the petals already formed, the big one with the small one remaining right in the center.

# Paso 2️⃣
Hora de crear la primera flor, para ello empezamos a unir los pétalos más grandes, para ello necesitamos 4 de estos. Unimos con el pegamento uno a uno en forma de X o cruz, dejamos secar. Repetimos el paso anterior pero con los pétalos más pequeños para unir los pétalos del interior. Pegamos los pétalos ya formados el grande con el pequeño quedando justo en el centro.
 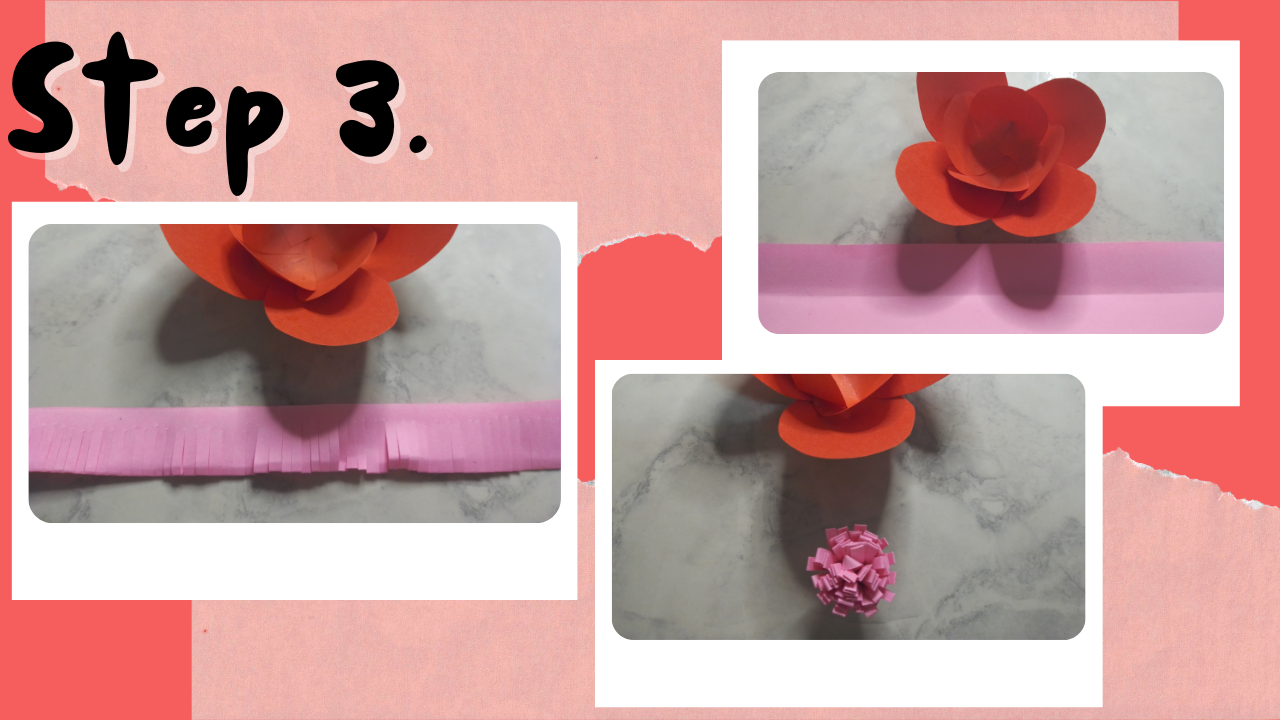
 # Step 3️⃣
Cut a strip of paper of another color, the longer size of a letter sheet for example and the strip of a width of about 4 centimeters. Fold lengthwise into equal halves, apply a little glue on the edge lengthwise. With the scissors cut without reaching the end to make several cuts very close to each other, with this we will make the center of the flower, that is to say the pistils. Put glue on the height stick and begin to roll the strip you just cut, this should always be glued on top of the other. Let it dry. Carefully open the pistils by hand to shape them.

# Paso 3️⃣
Recorta una tira de papel de otro color, el tamaño más largo de una hoja carta por ejemplo y la tira de un ancho de 4 centímetros aproximadamente. Dobla a lo largo en mitades iguales, aplica un poco de pegamento en el borde a lo largo. Con la tijera recorta sin llegar al final para hacer varios cortes muy cercanos uno a otro, con esto haremos el centro de la flor, es decir los pistilos. Coloca pegamento en el palito de altura y comienza a enrollar la tira que acabas de recortar, esta debe quedar siempre pegada sobre la otra. Deja secar. Abre con la mano y cuidadosamente los pistilos para darle forma.

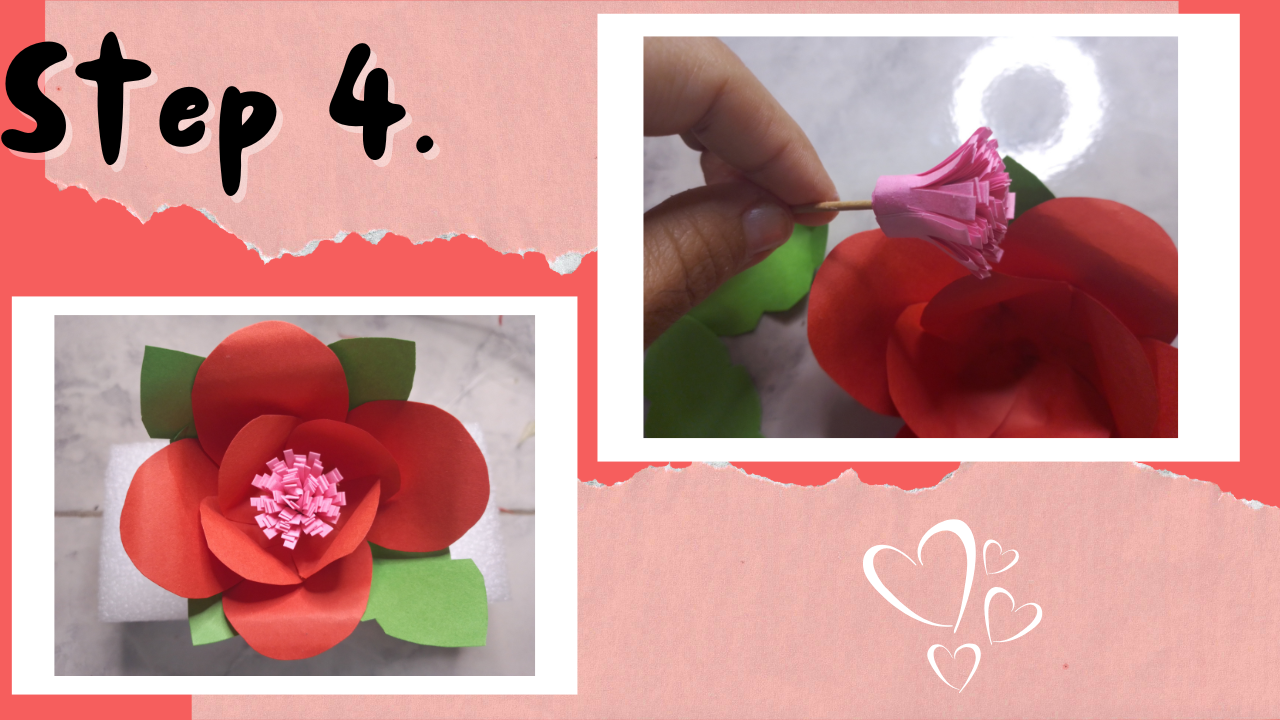
# Step 4️⃣
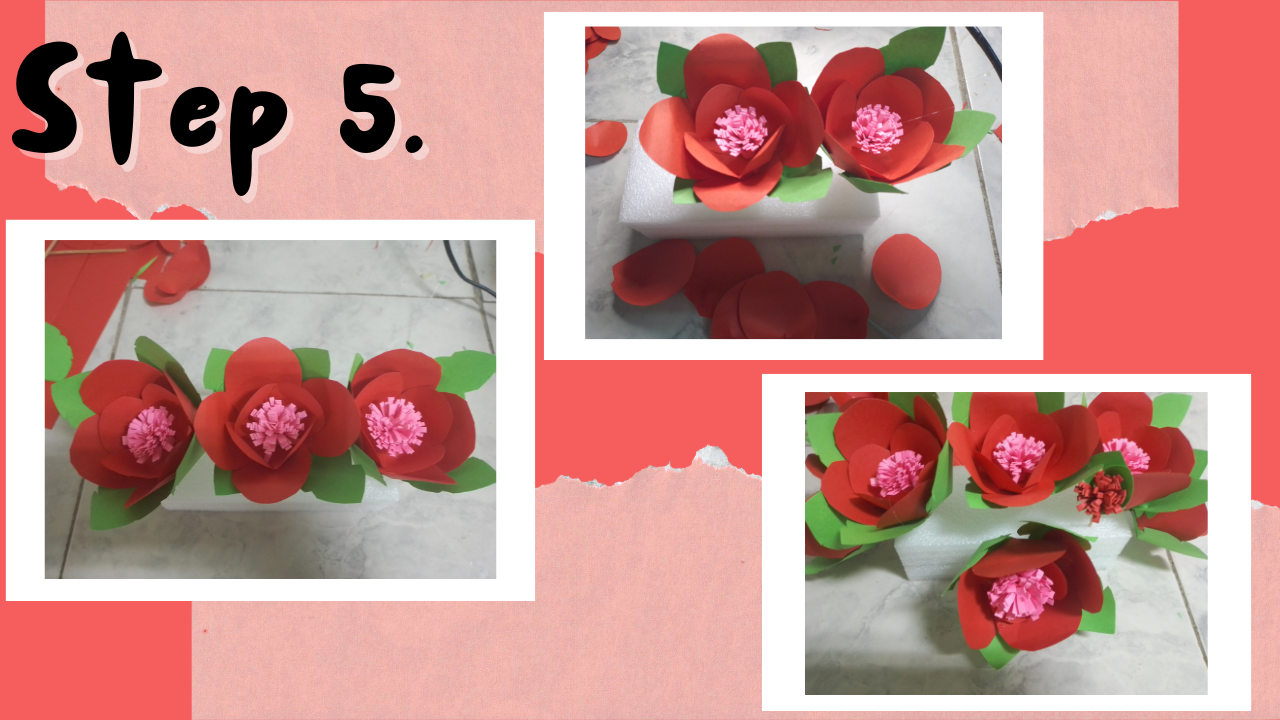
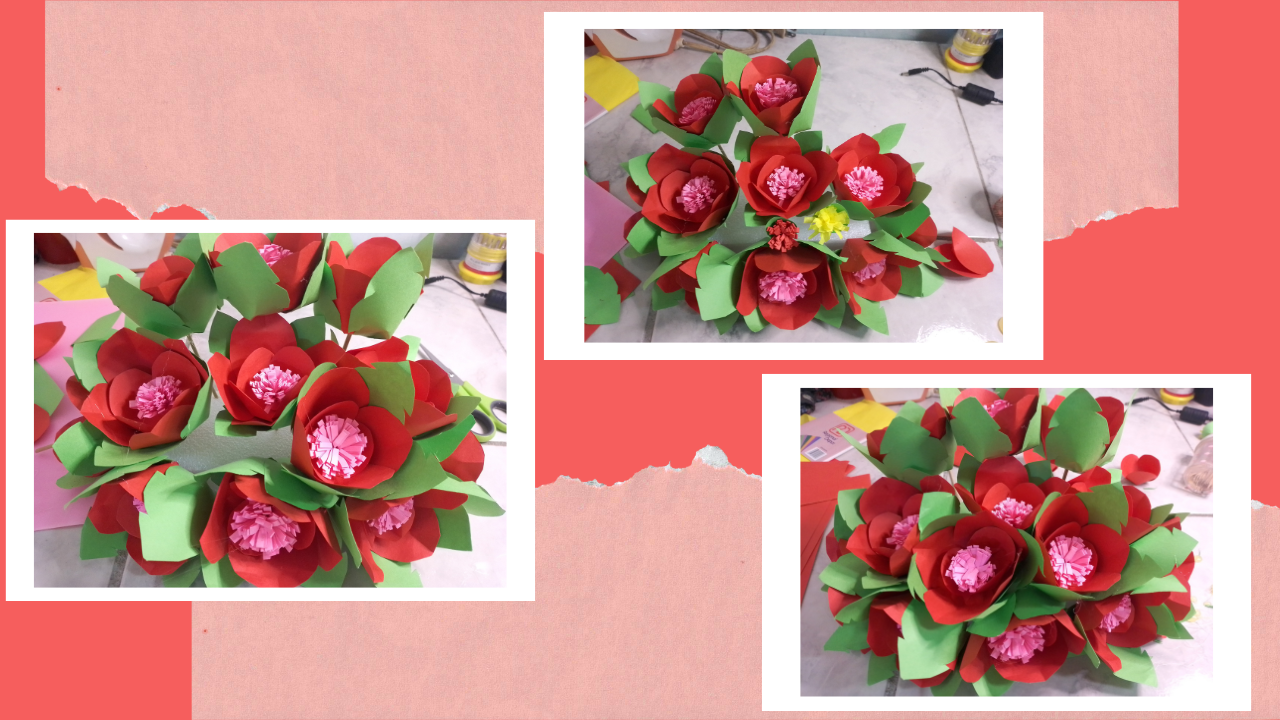
Cut out several green leaf shapes for the foliage. You will apply the procedure from step one, where you should cut out the center of it a little bit and then glue and attach. Take the pistil and apply some glue to it. Go through the center of the flower and adjust so that it is glued. Once dry shape with your hand very carefully. Glue the 4 leaves on the outside of the flower. Now we can start placing them on our anime or floral foam base.

# Paso 4️⃣
Recorta varias formas de hoja color verde para el follaje. Aplicaras el procedimiento del paso uno, donde debes cortar el centro de la misma un poco y luego pegar y unir. Toma el pistilo y plica un poco de pegamento en él. Atraviesa el centro de la flor y ajusta para que quede pegado. Una vez seco da forma con tu mano muy cuidadosamente. Pega las 4 hojas en el exterior de la flor Ya podemos comenzar a colocarlas en nuestra base de anime o espuma floral.