Double strand pearl bracelet - Brazalete con doble línea de perlas

@gabimramirez · 2025-09-21 23:07 · Jewelry

Brazalete con doble línea de perlas.jpg


Brazalete con doble línea de perlas (2).jpg


Hello, dear Hive friends! 
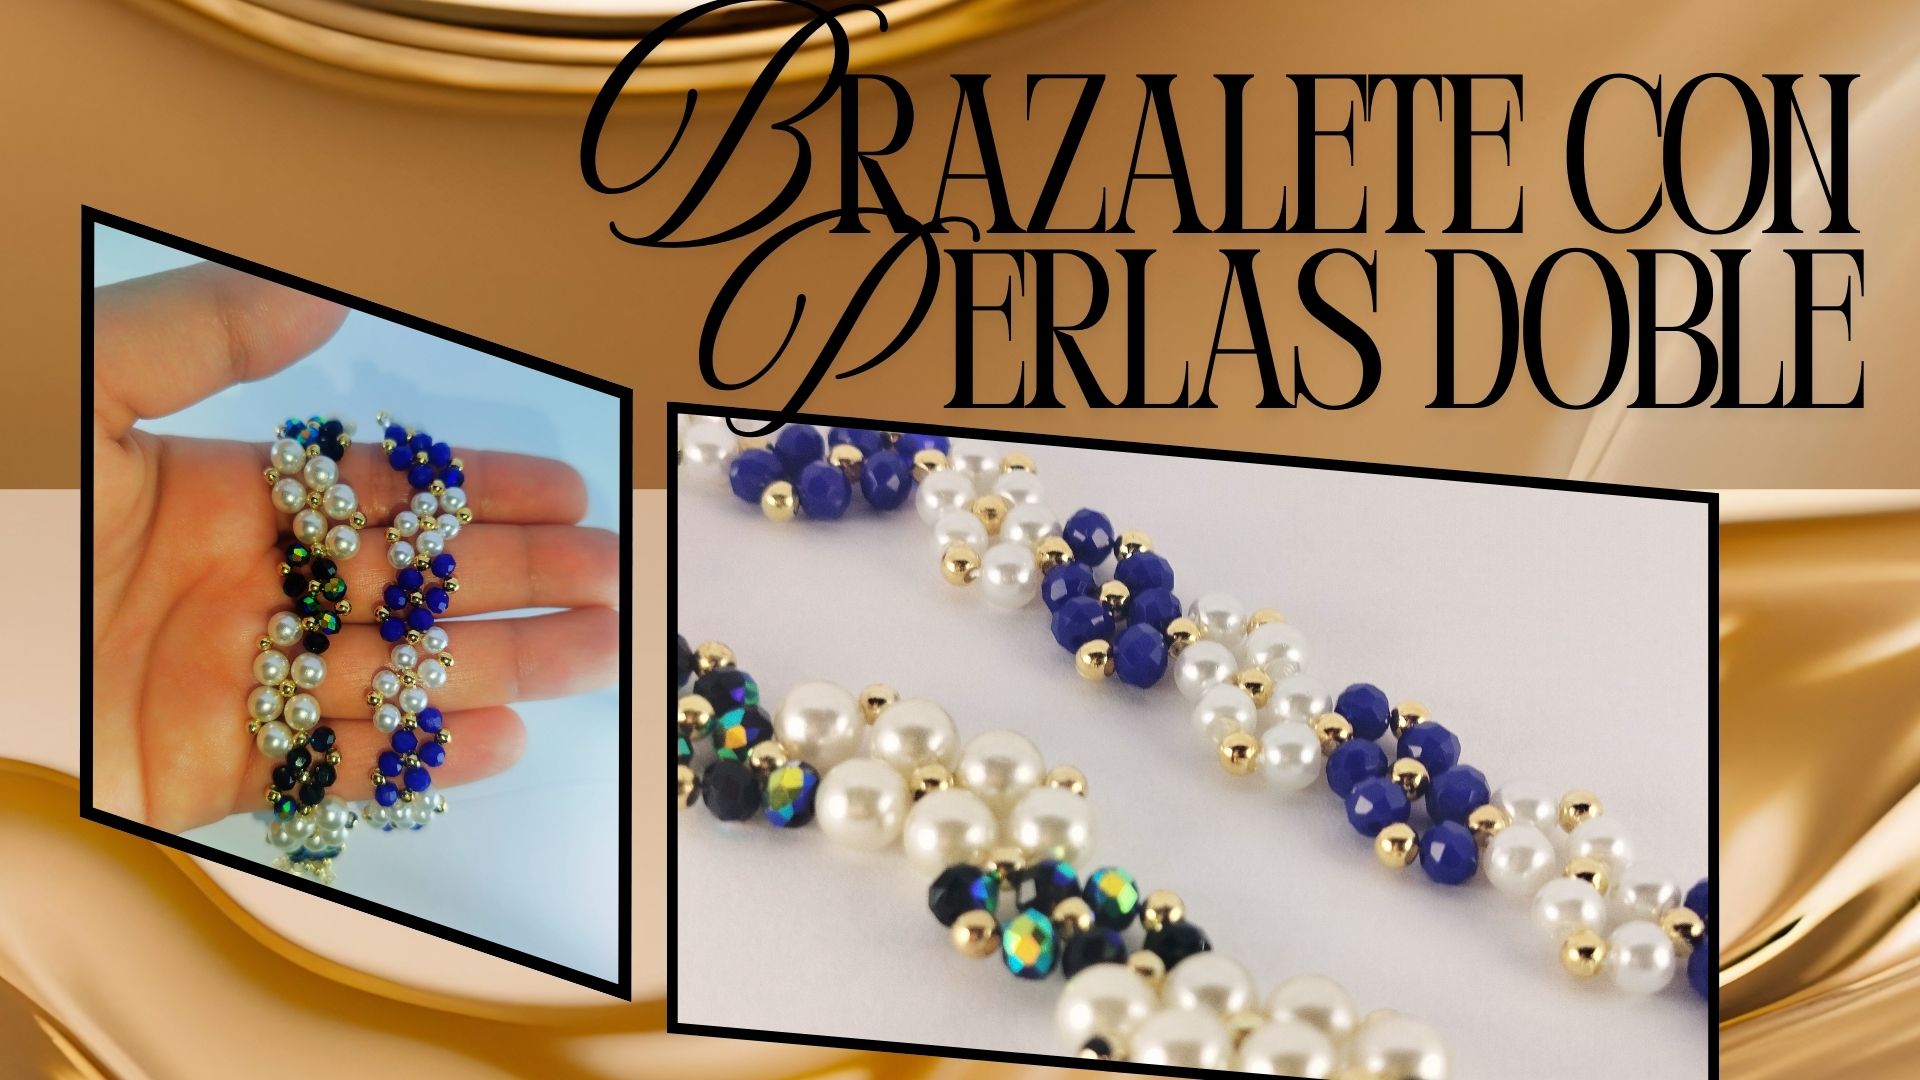
Would you like to create a unique and elegant piece of jewelry? Today I'm going to teach you how to make a beautiful bracelet with pearls and Swarovski or Murano crystals, using a new weaving technique that is double but still simple and fascinating. It's a perfect project for those who love delicate, elegant, and of course handmade accessories. 
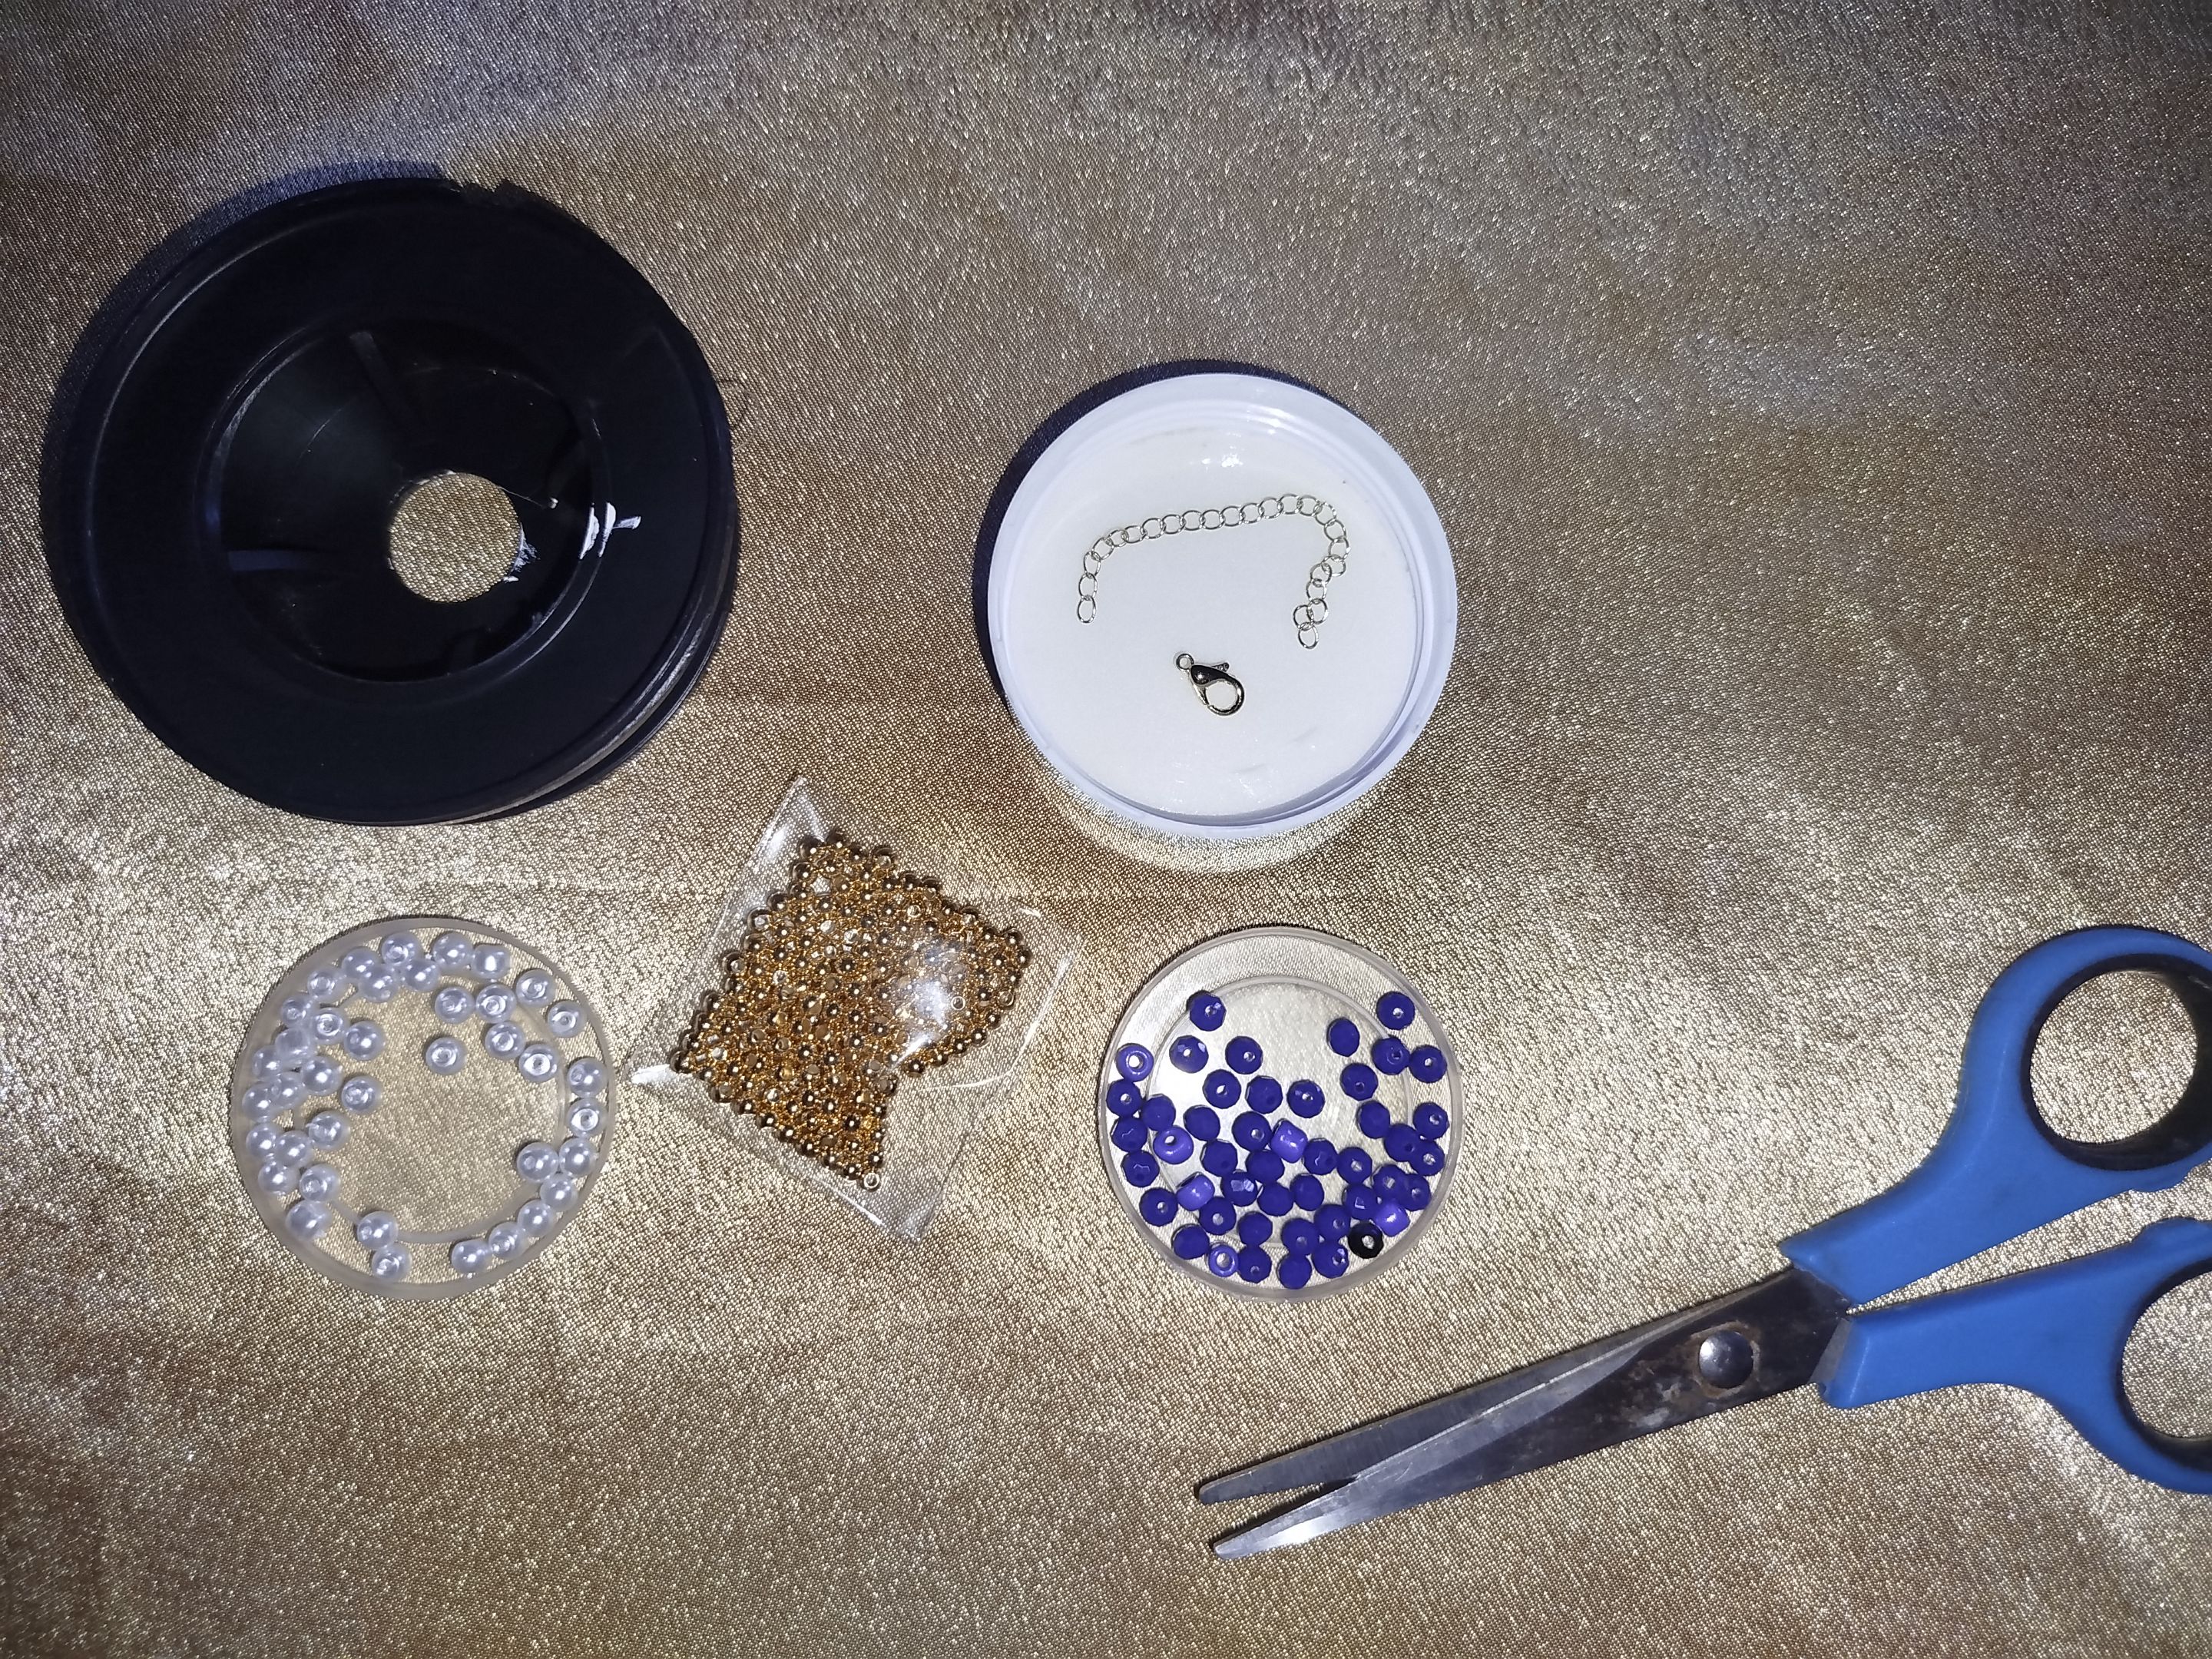
Without further ado, here are the materials you'll need. Let's get started! - - - ![Brazalete con doble línea de perlas (5).jpg](https://files.peakd.com/file/peakd-hive/gabimramirez/23xevCREBhqh78hQE6g6Te89XMstwg8vbMepn43JHikYnGsAkcLV2F9aWaJQvoiMRKtYY.jpg) - - -
- Swarovski or Murano glass stones (in the color of your choice). Pearls. - 4 mm metal beads or balls, preferably gold-filled for greater durability. - Jewelry needles. - Rigid nylon thread. - Clasp (parrot beak) and extension chain.
![IMG_20250921_125951.jpg](https://files.peakd.com/file/peakd-hive/gabimramirez/EoGyM6bPXCcHiRfs3ayqarSoD6wxoBJjpejrJdFoLyixQXvSNXcypYvhvWGHv9ynUMQ.jpg)
- - - ![Brazalete con doble línea de perlas (1).jpg](https://files.peakd.com/file/peakd-hive/gabimramirez/EouC8X1R9j66kNGvpKAnK5hHip5rdtGX5AzFBTKT6TdEBui18cTGeJEaZ1eu8xnbR8p.jpg) - - - 
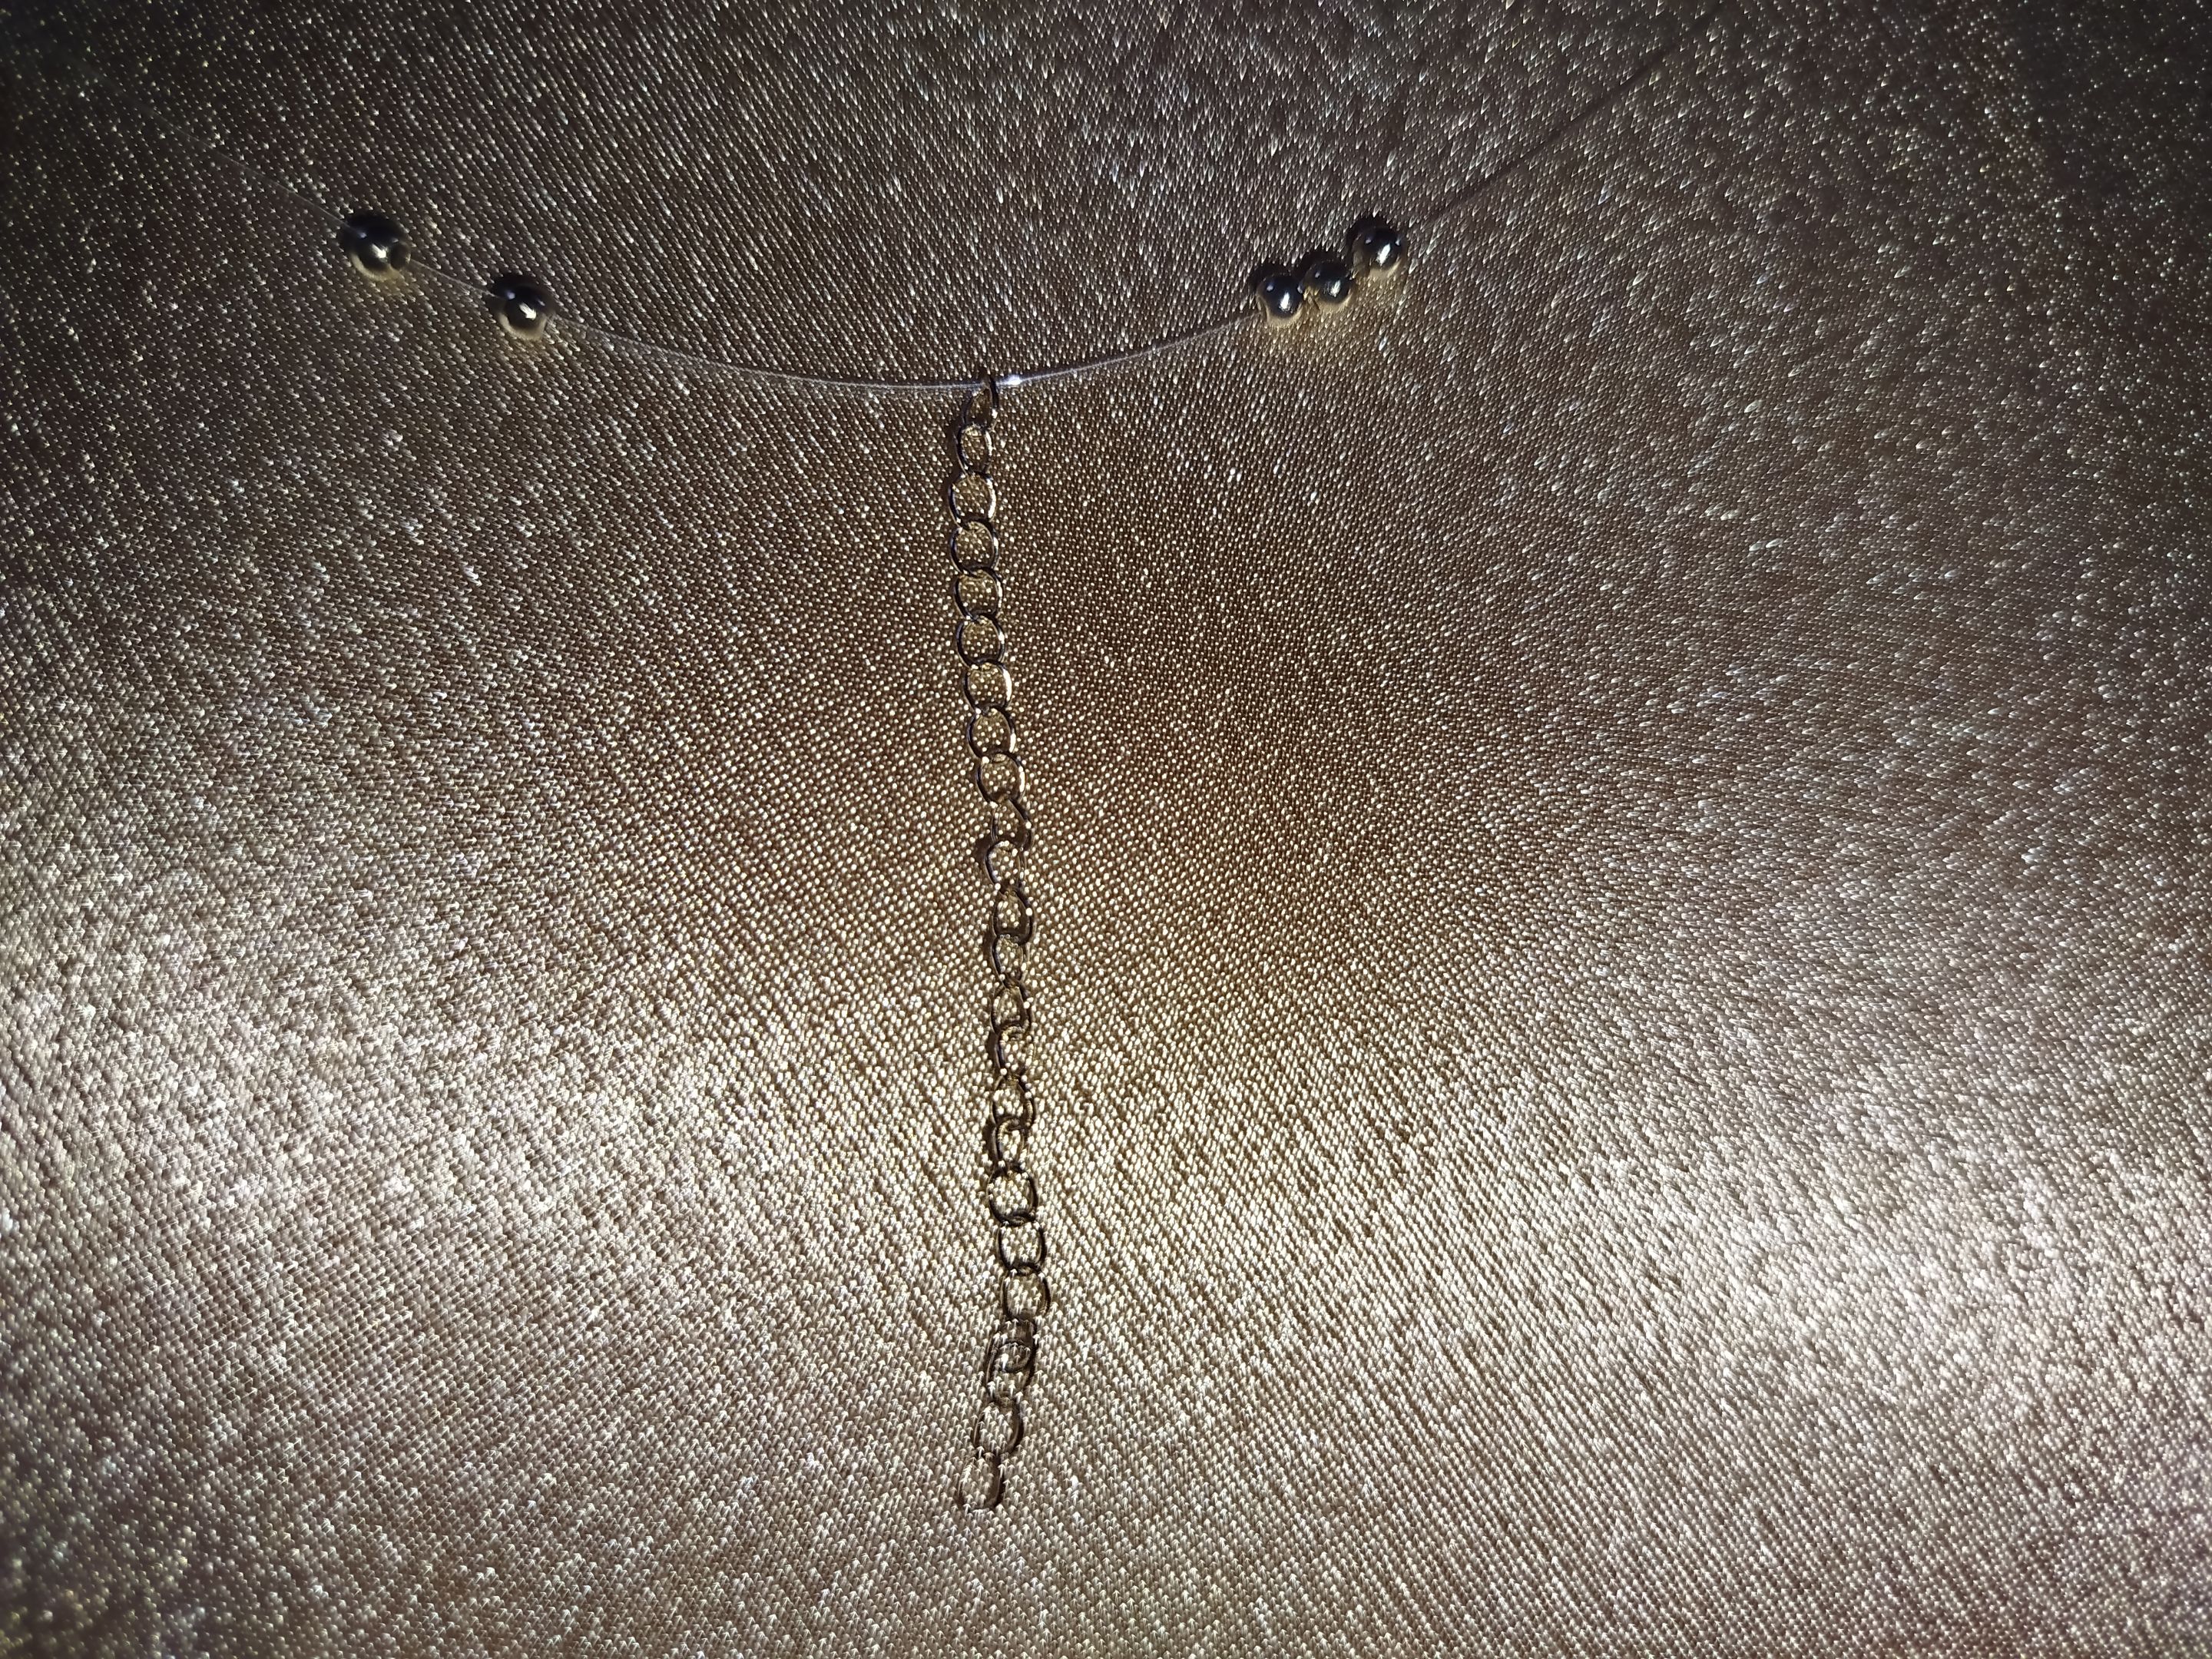
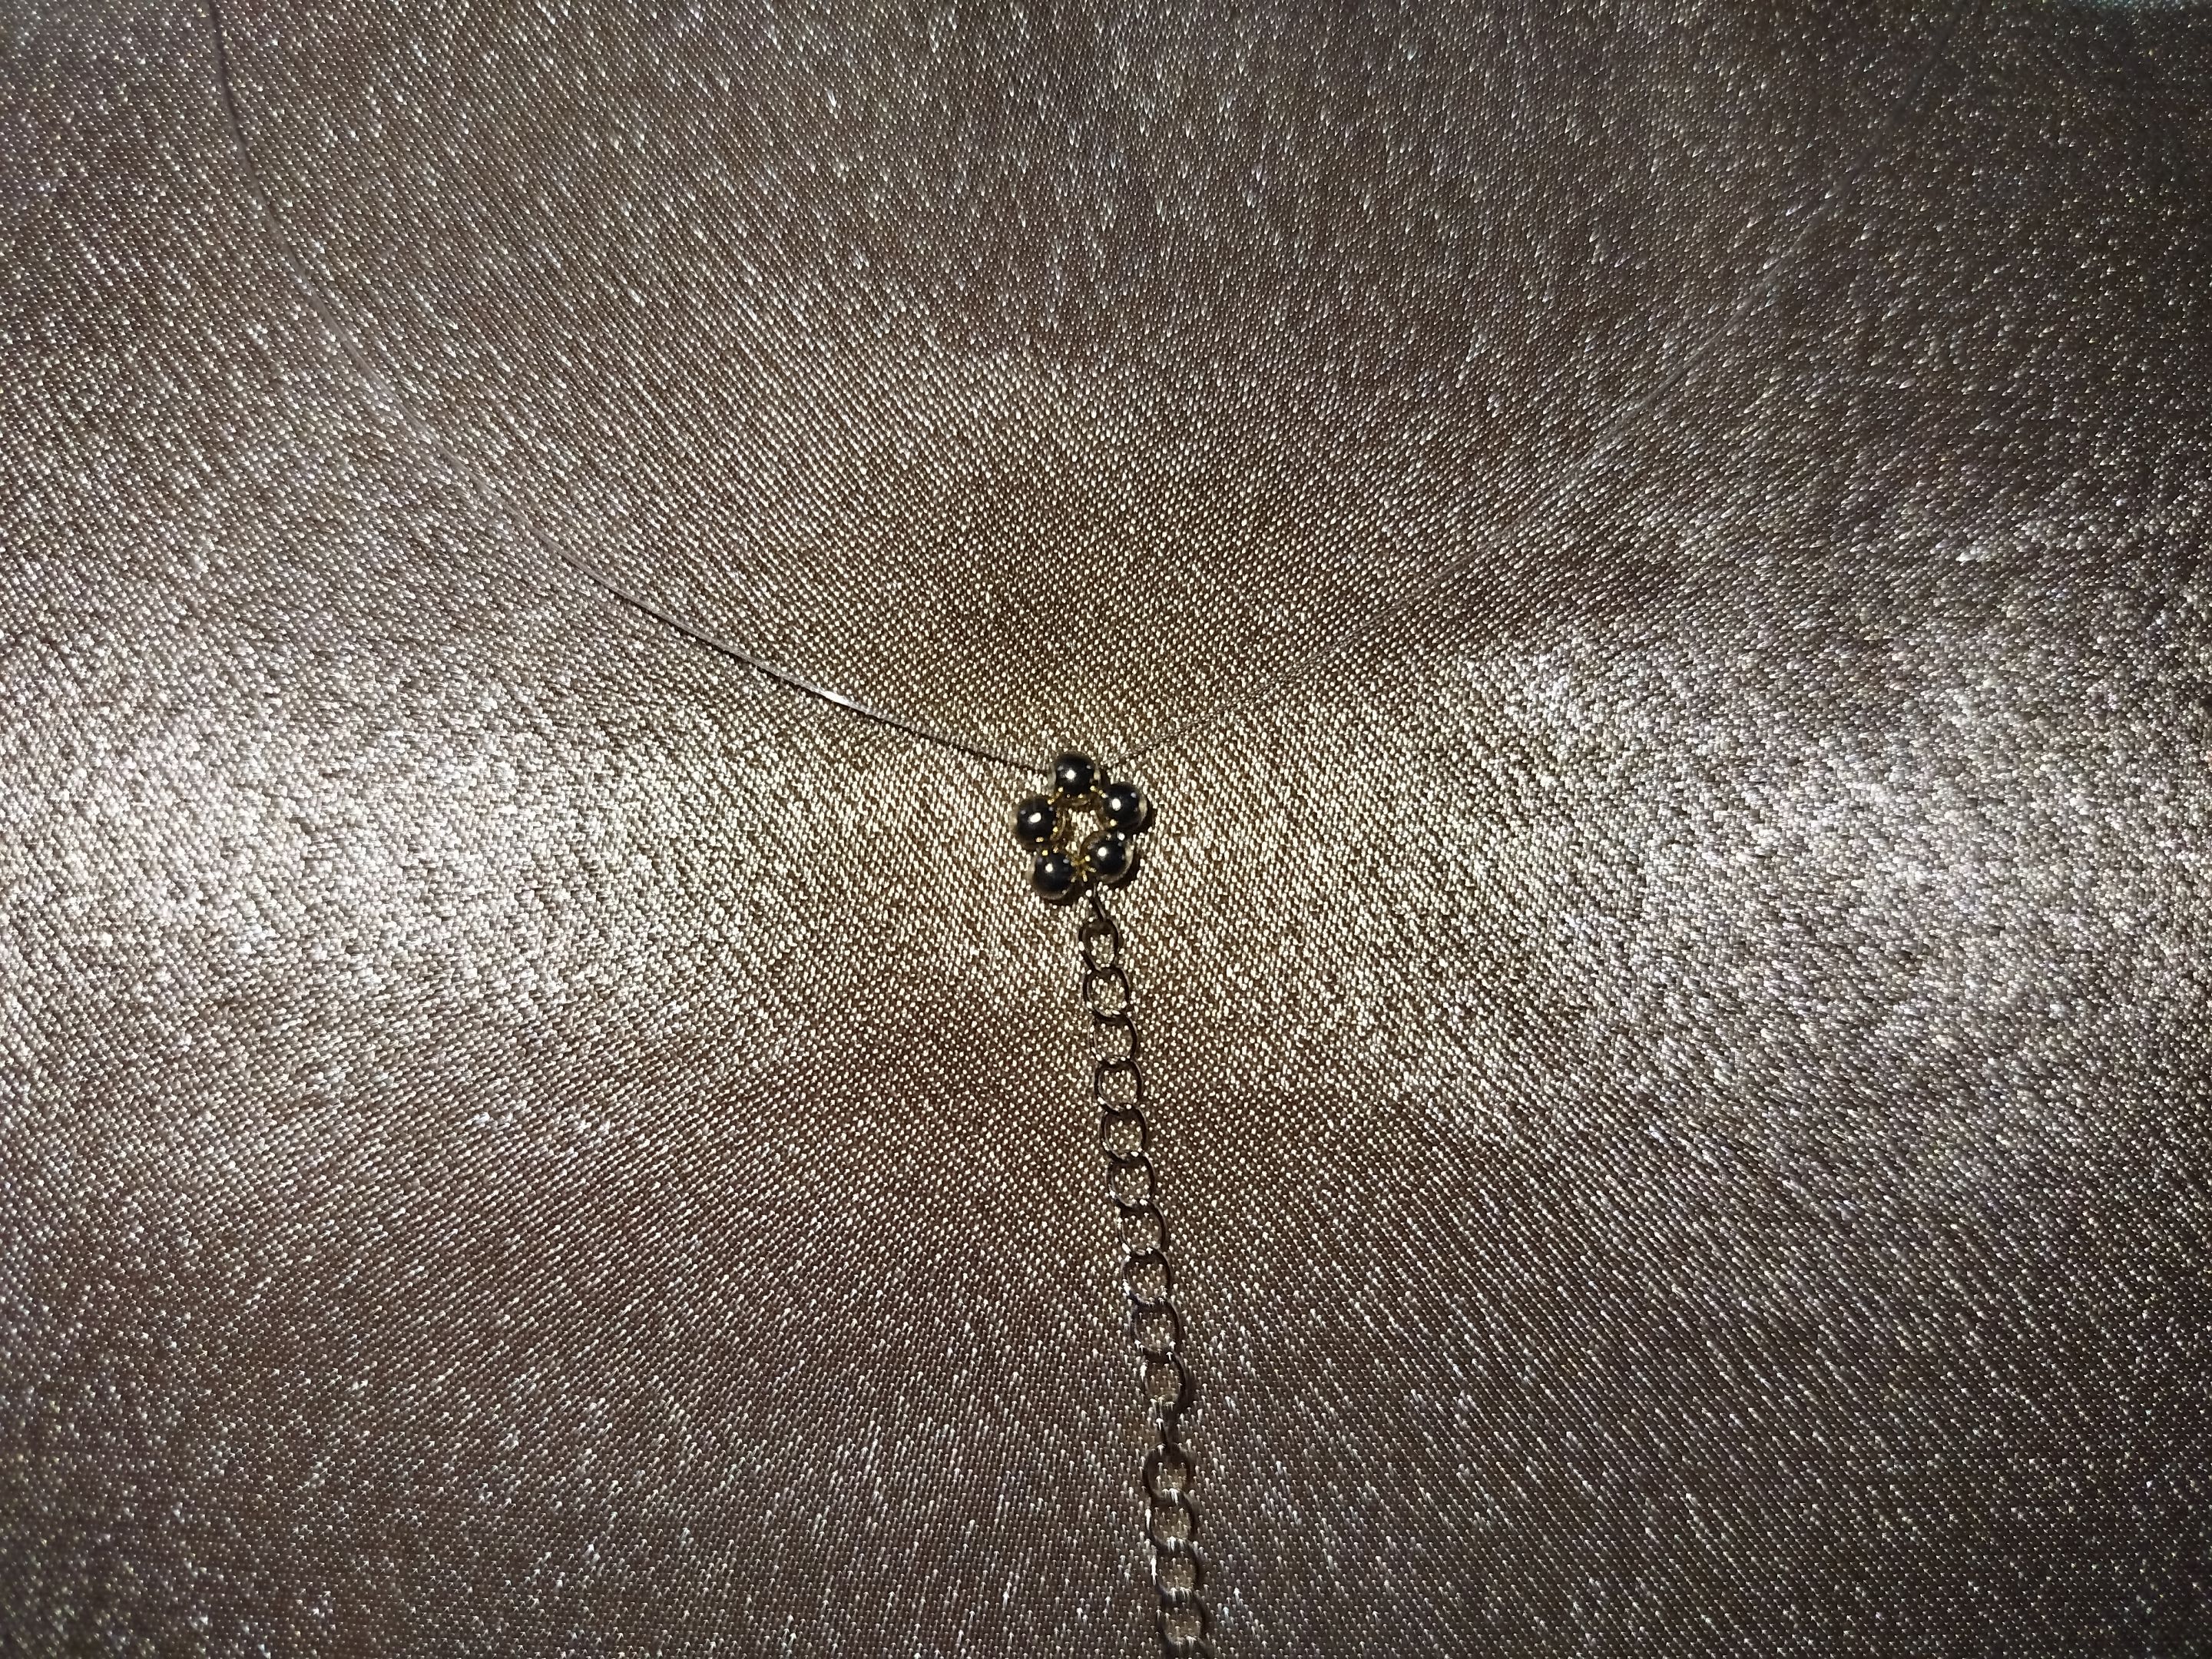
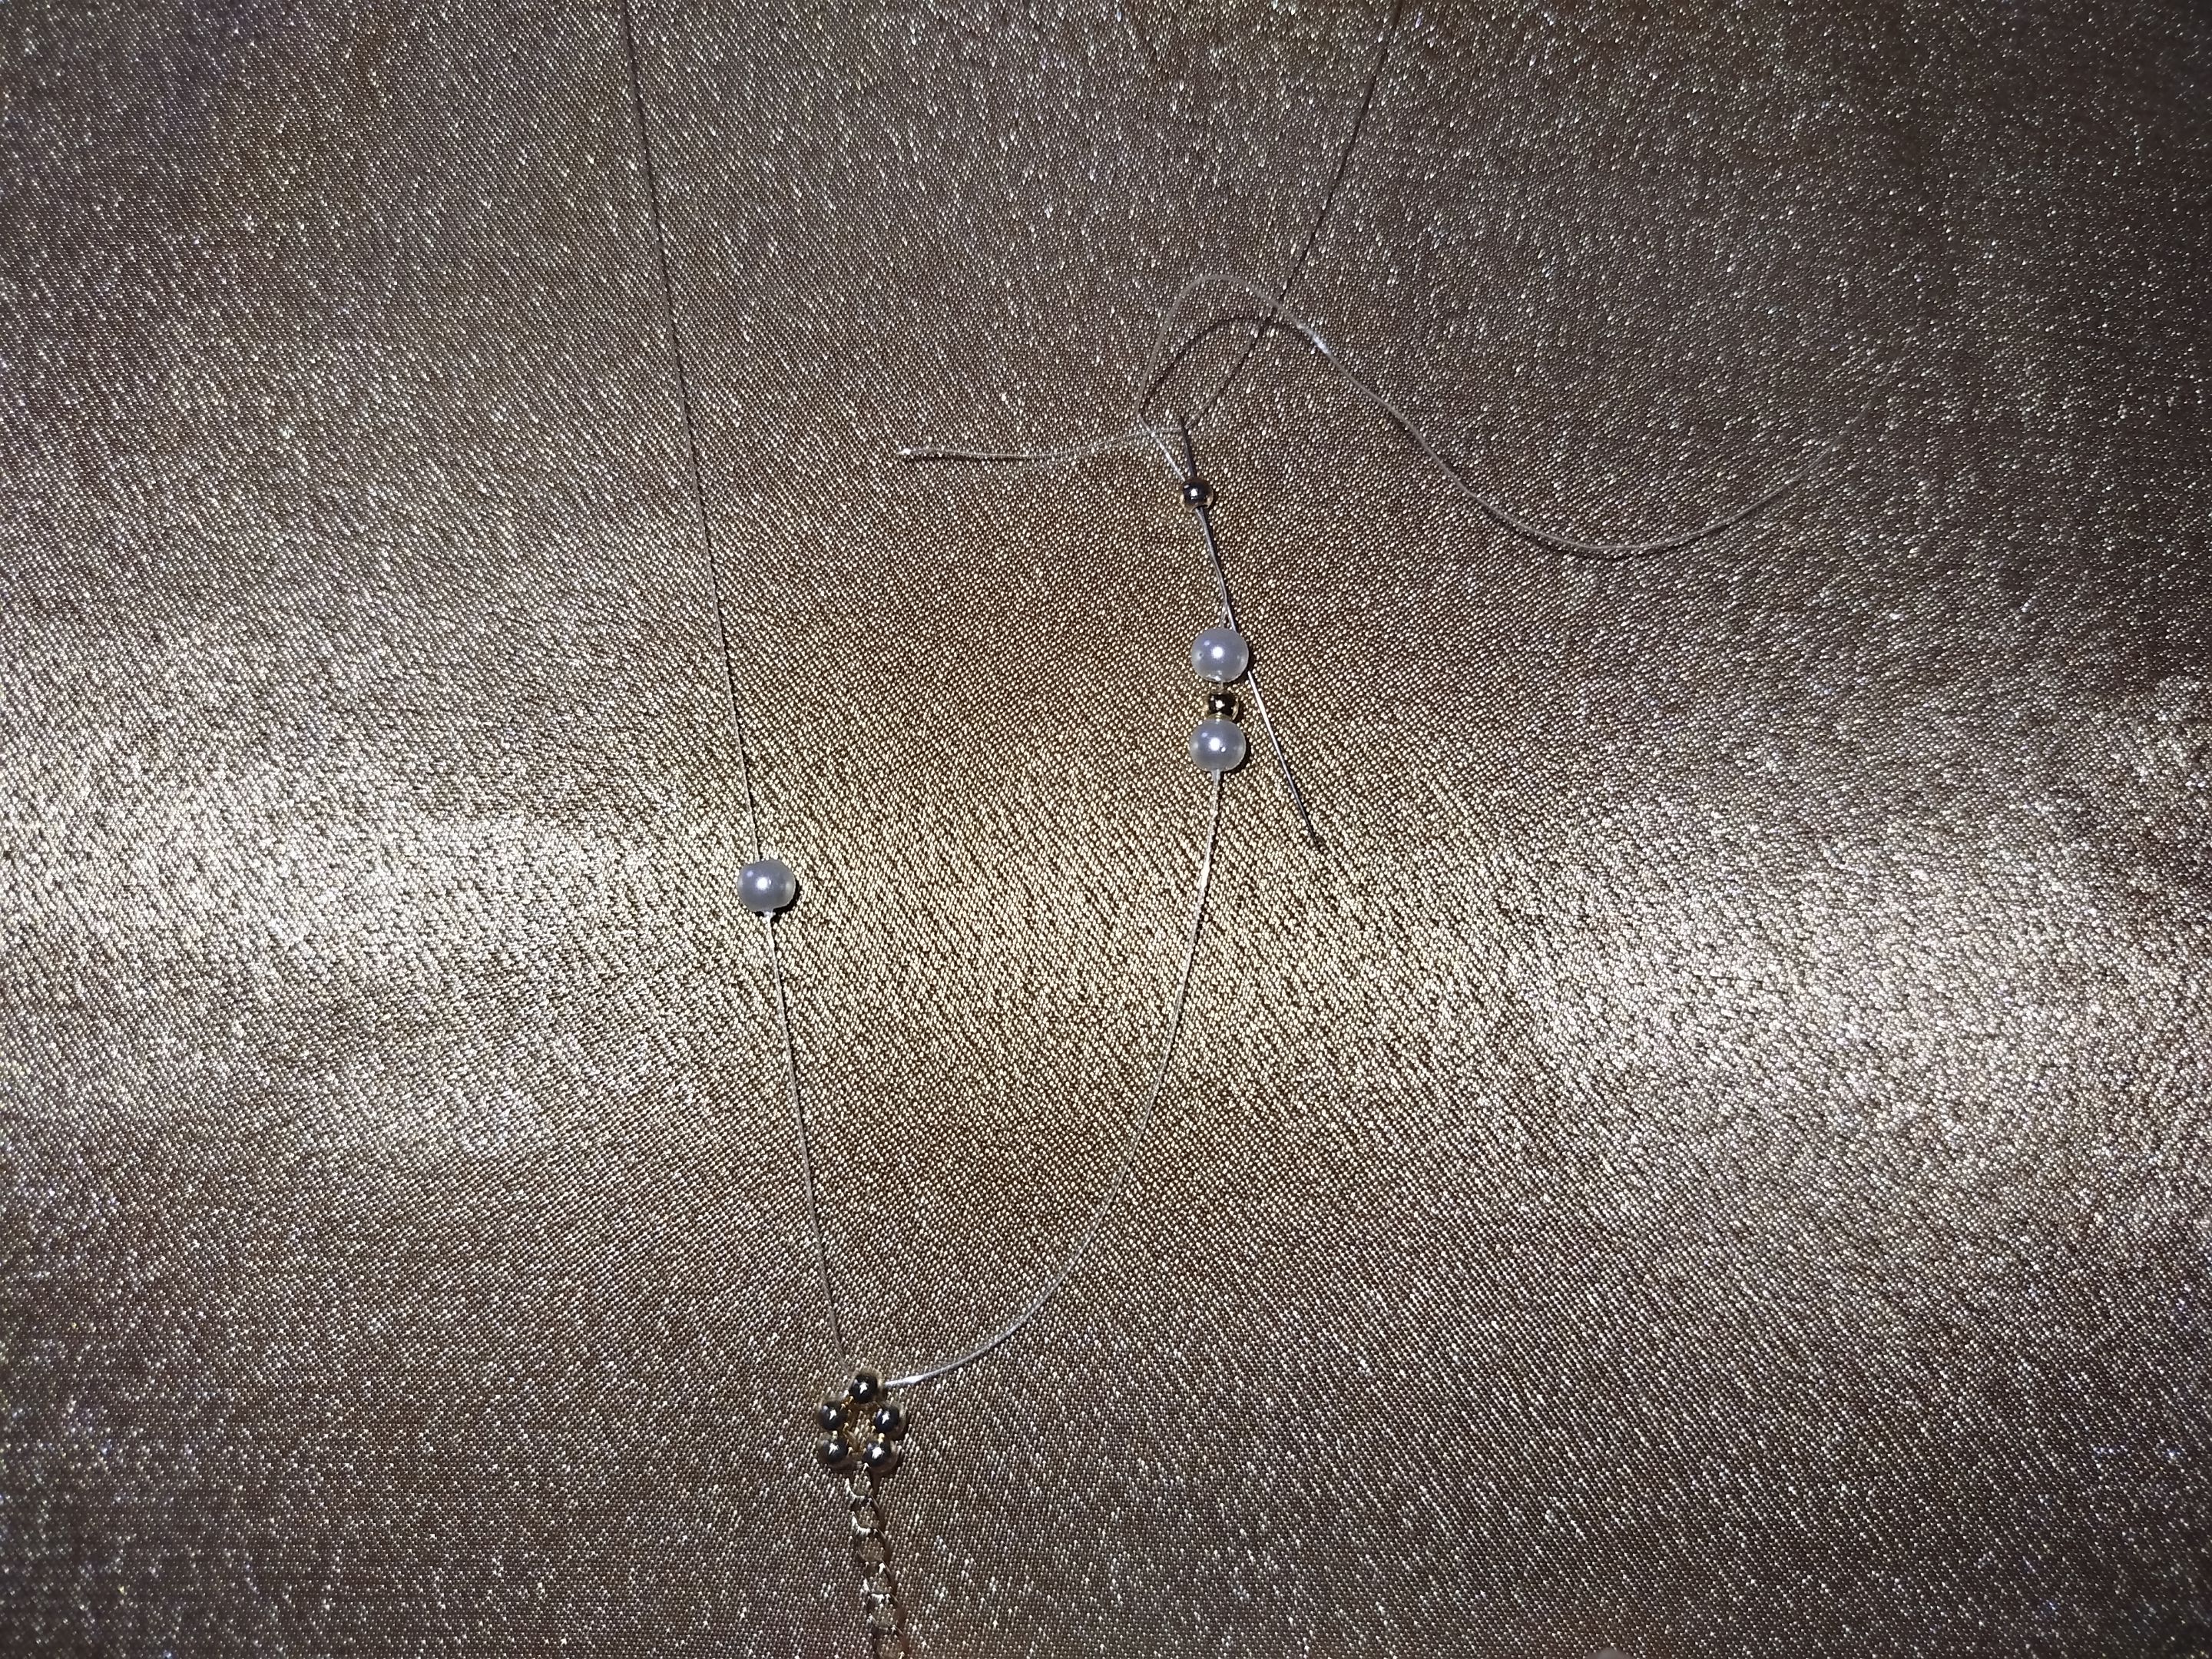
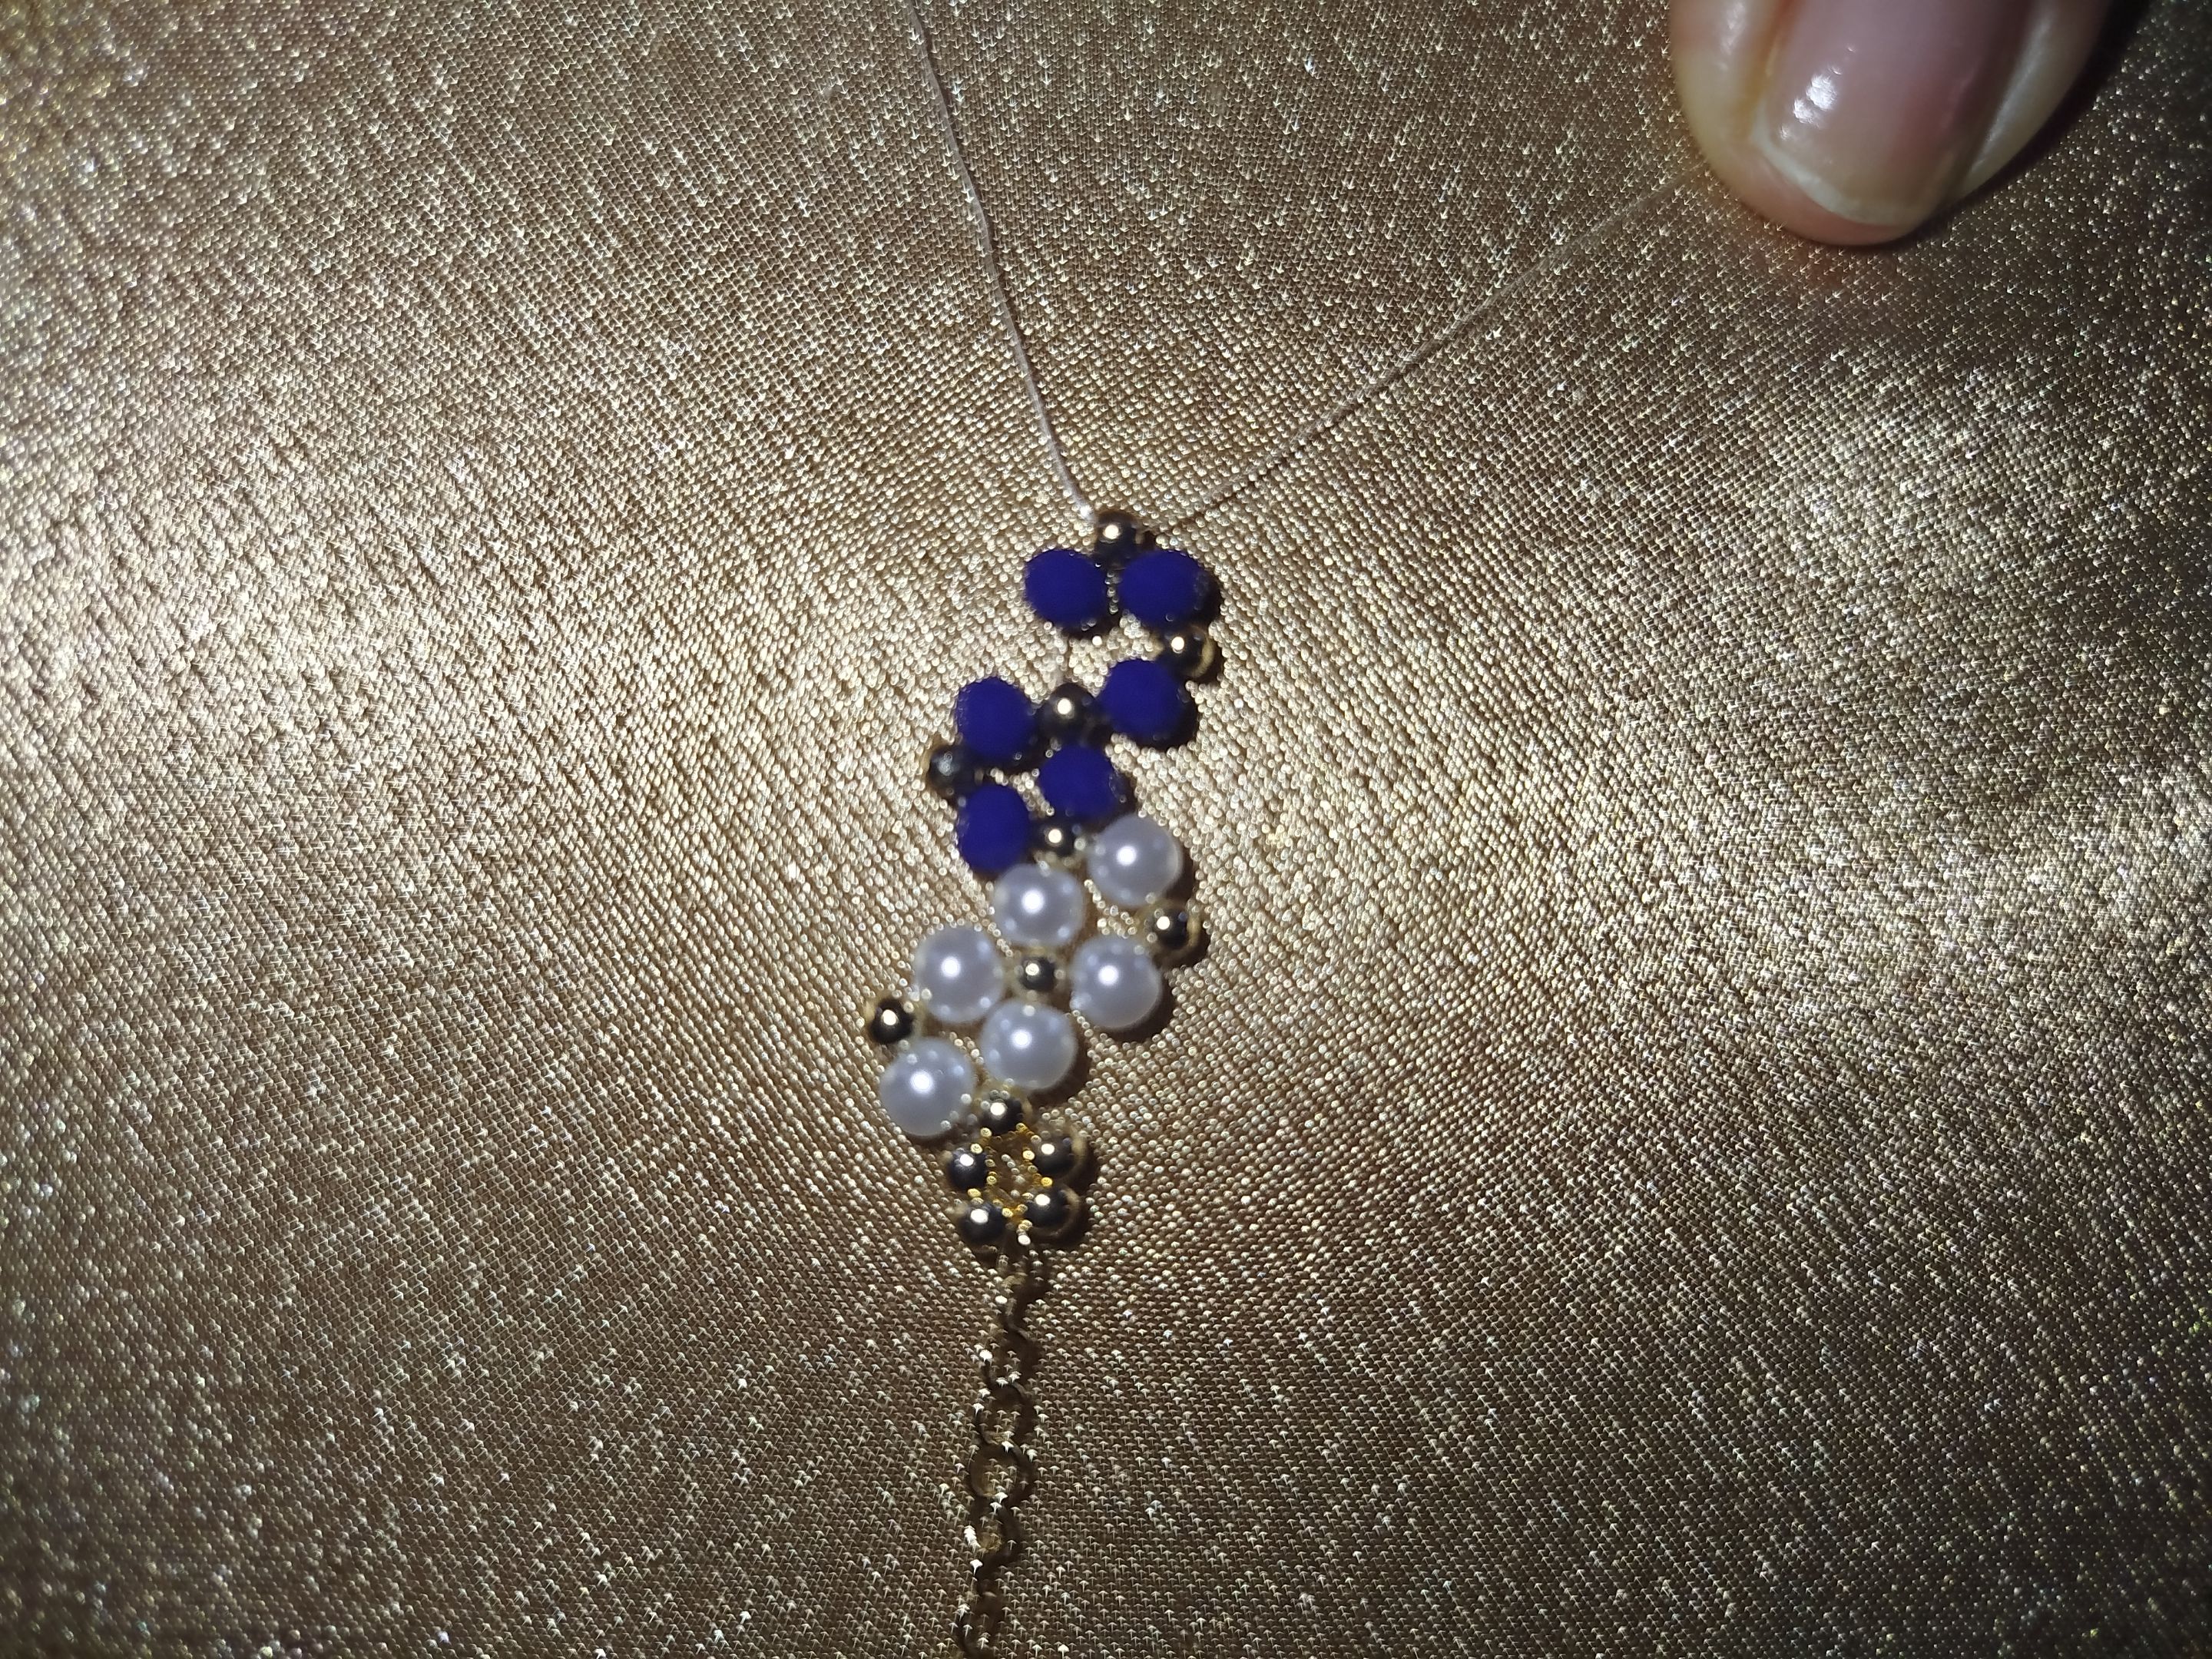
To begin, cut a one-meter-long piece of nylon thread. Then, thread a needle through each end and fold the thread in half. At the exact center (this is important), insert the extension chain and three pellets into one of the strands of thread. - - - ![IMG_20250921_131631.jpg](https://files.peakd.com/file/peakd-hive/gabimramirez/EogNHpDi3En2YGKMmv34gPgfqDgHY3NXpGtU7vaEHLBDm9mN5gCArYZ3CBM5EzCKcNc.jpg) - - - 
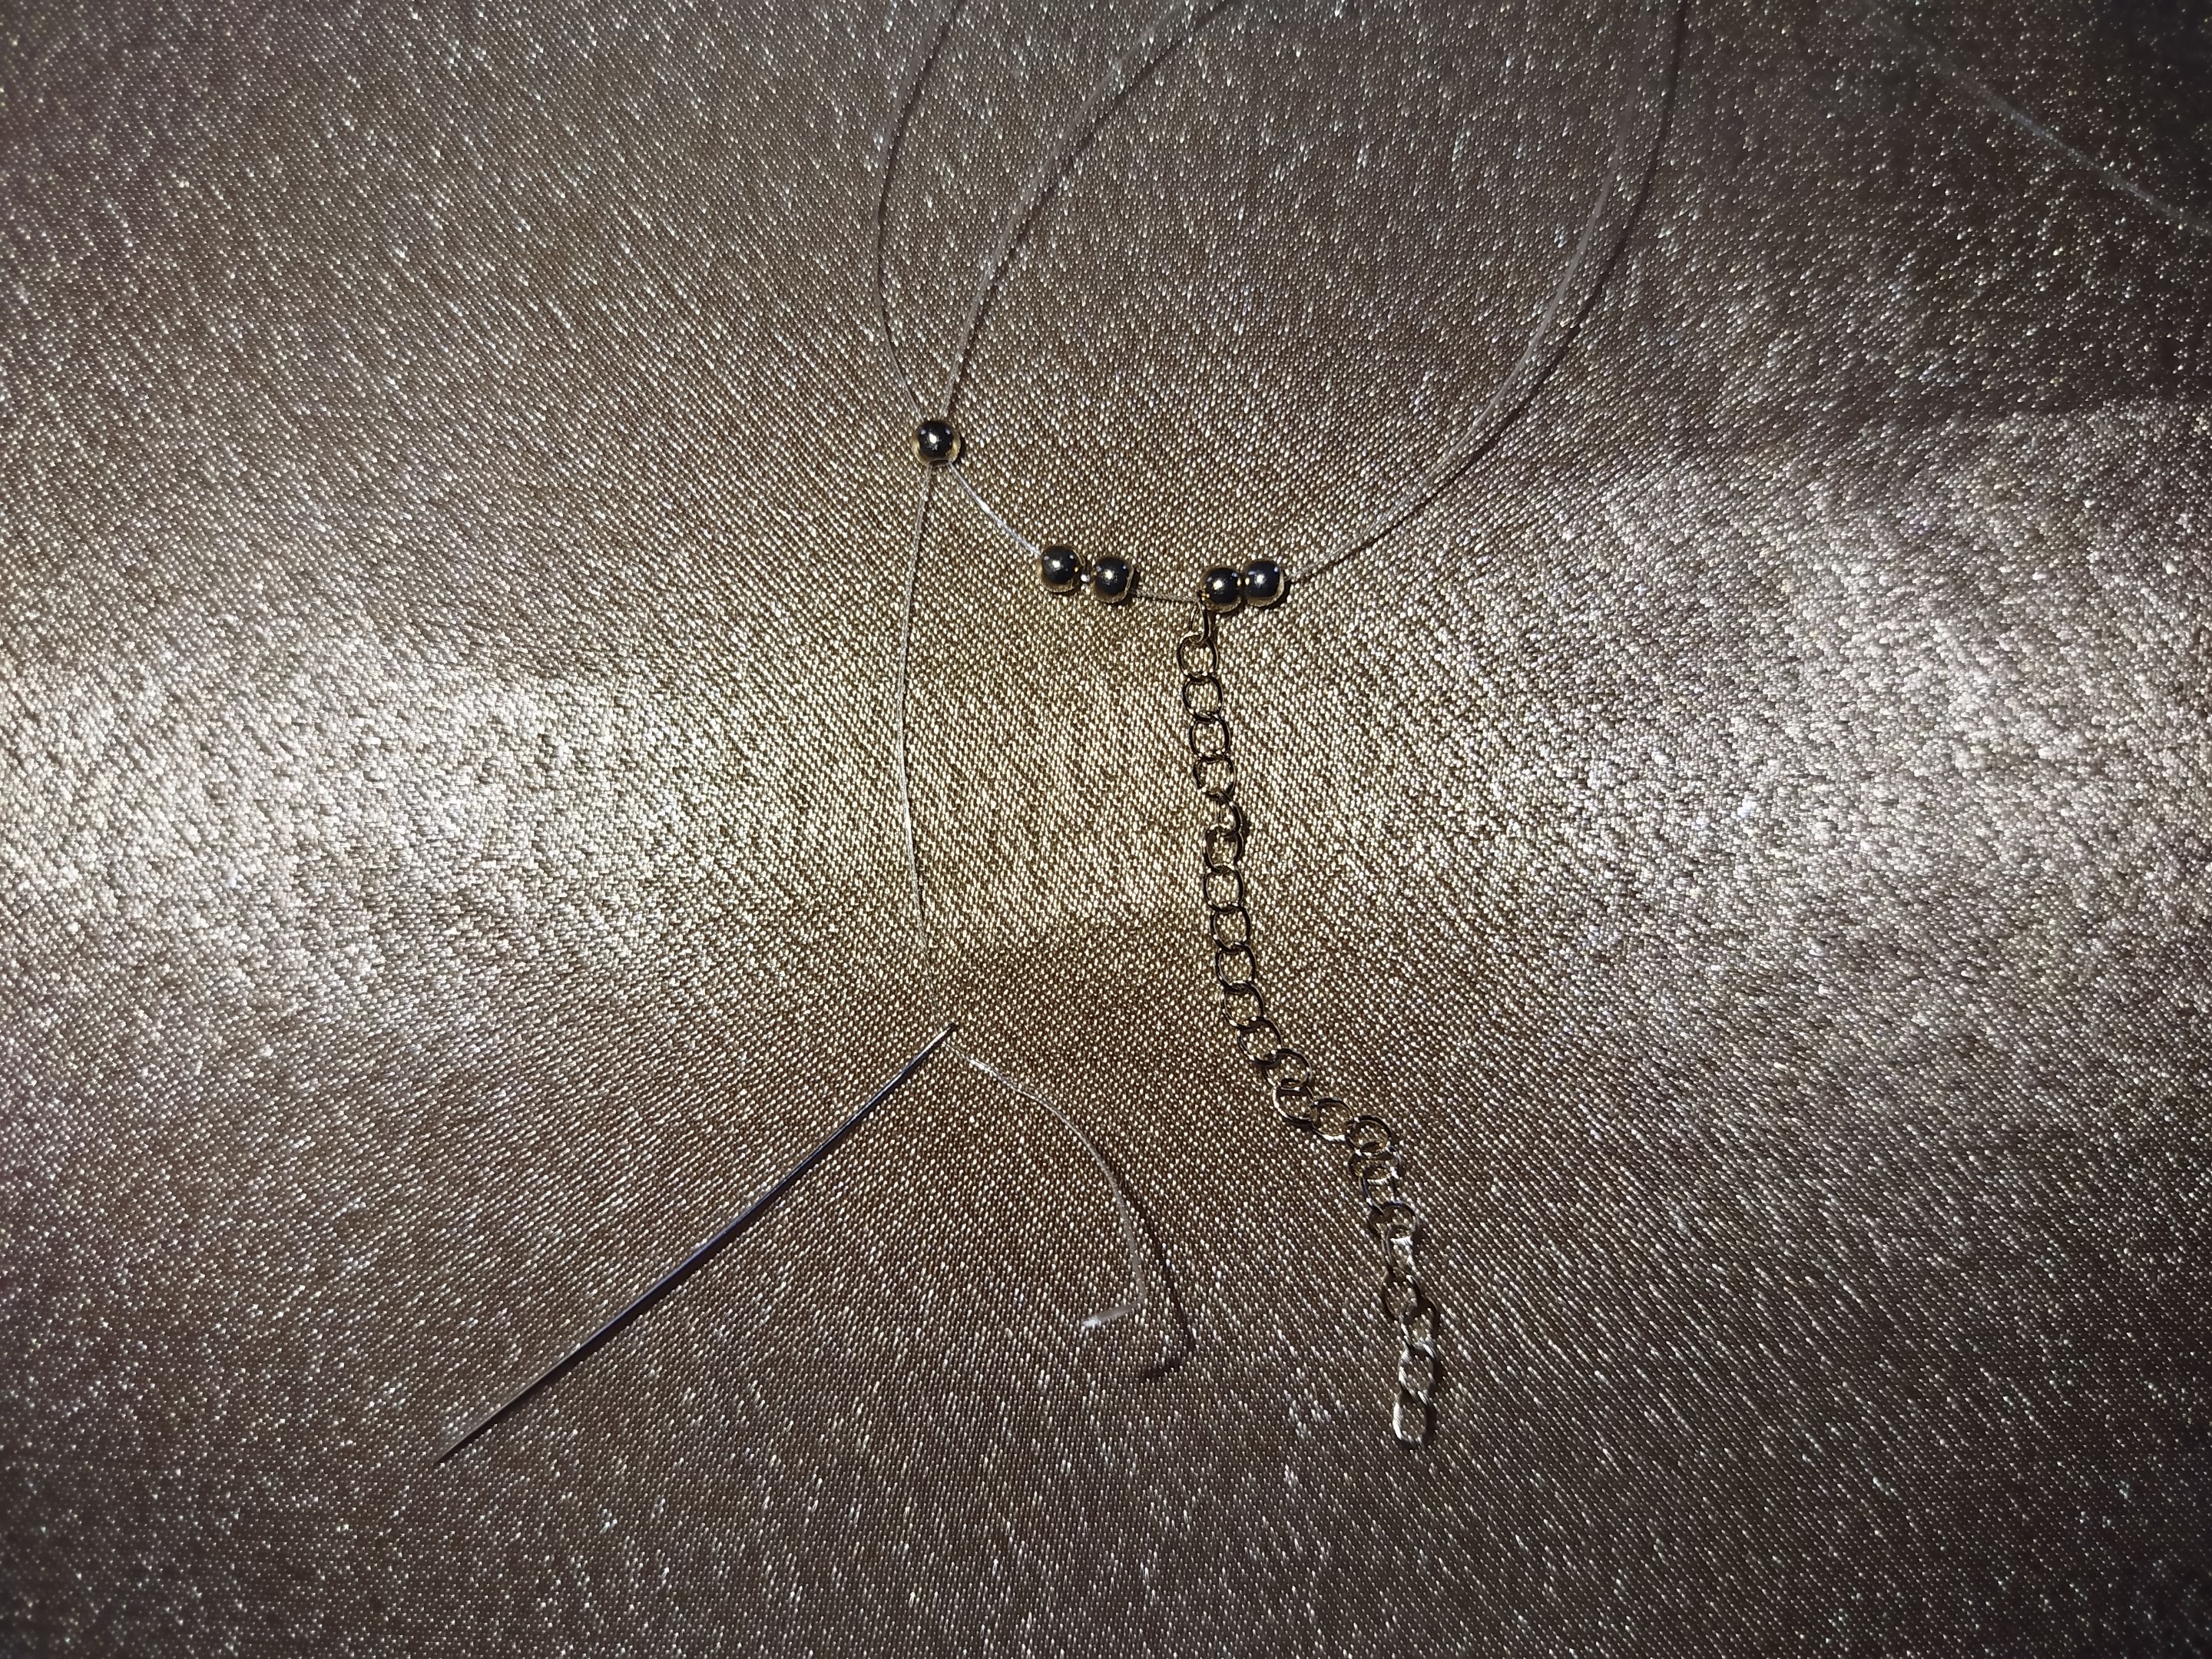
Now, take the other needle and insert it into the last bead, intertwining the two strands of thread. Tighten well so that this bead is secure. The goal is for the chain and beads to be exactly in the middle of the nylon thread, with two strands or extensions of thread of equal size. - - -
![IMG_20250921_131747.jpg](https://files.peakd.com/file/peakd-hive/gabimramirez/EoEq2CvGoZPudMDHBeU4Y7MNqyHL5Q13UrysQJn6zHzzcEJpbtRyTeQKrHuHZLRn14a.jpg)
![IMG_20250921_131900.jpg](https://files.peakd.com/file/peakd-hive/gabimramirez/EoK5pae9E8CNbRQJNenDLj2hqvND5eD4nqJ9oW7pyJof8on4oR88VWdpW4spKwcft2Z.jpg)
- - -
![IMG_20250921_132203.jpg](https://files.peakd.com/file/peakd-hive/gabimramirez/EoK6G16qviH2GhnDnAnaVsKB9UYY1LBZ5WDSw59WoVUyhcHa65vd8frcVnSUy2nA76G.jpg)
![IMG_20250921_134109.jpg](https://files.peakd.com/file/peakd-hive/gabimramirez/EoEqZD7YYfY2dmUyqyVEwBvjPLvKJcWVFkTmmC4ovbFeSmVef5eewxhwEaxA6tXXR8B.jpg)
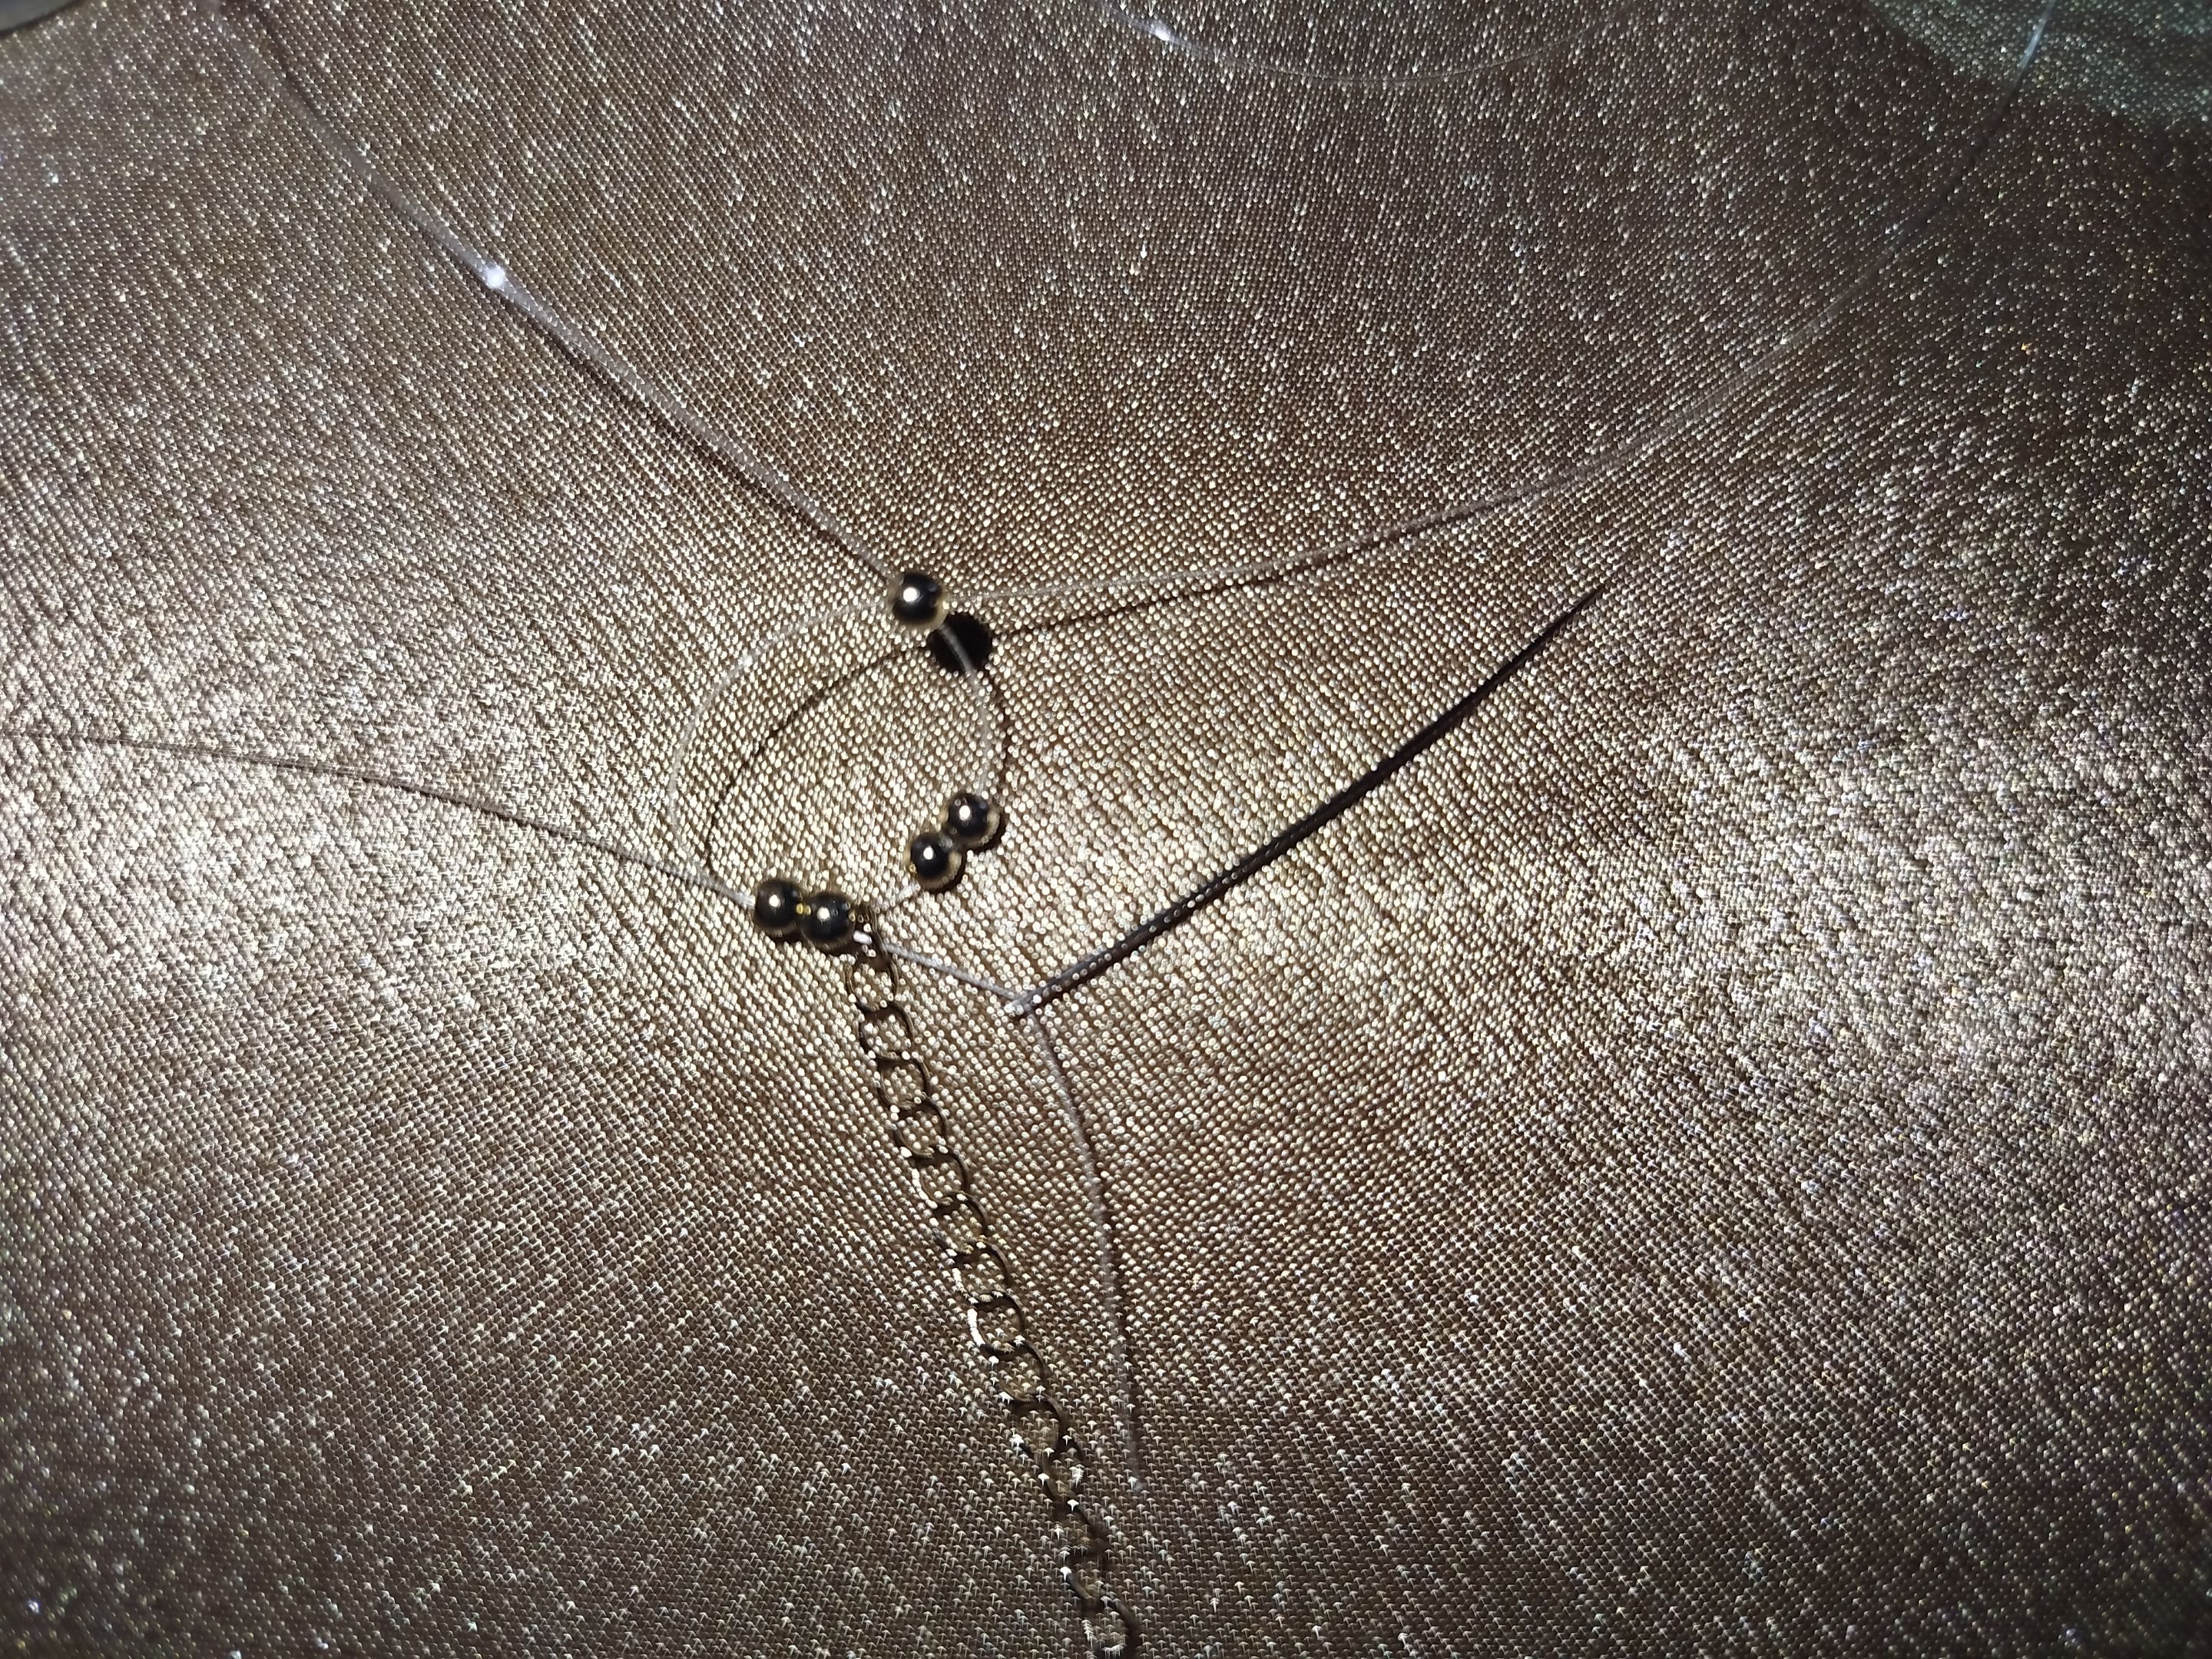
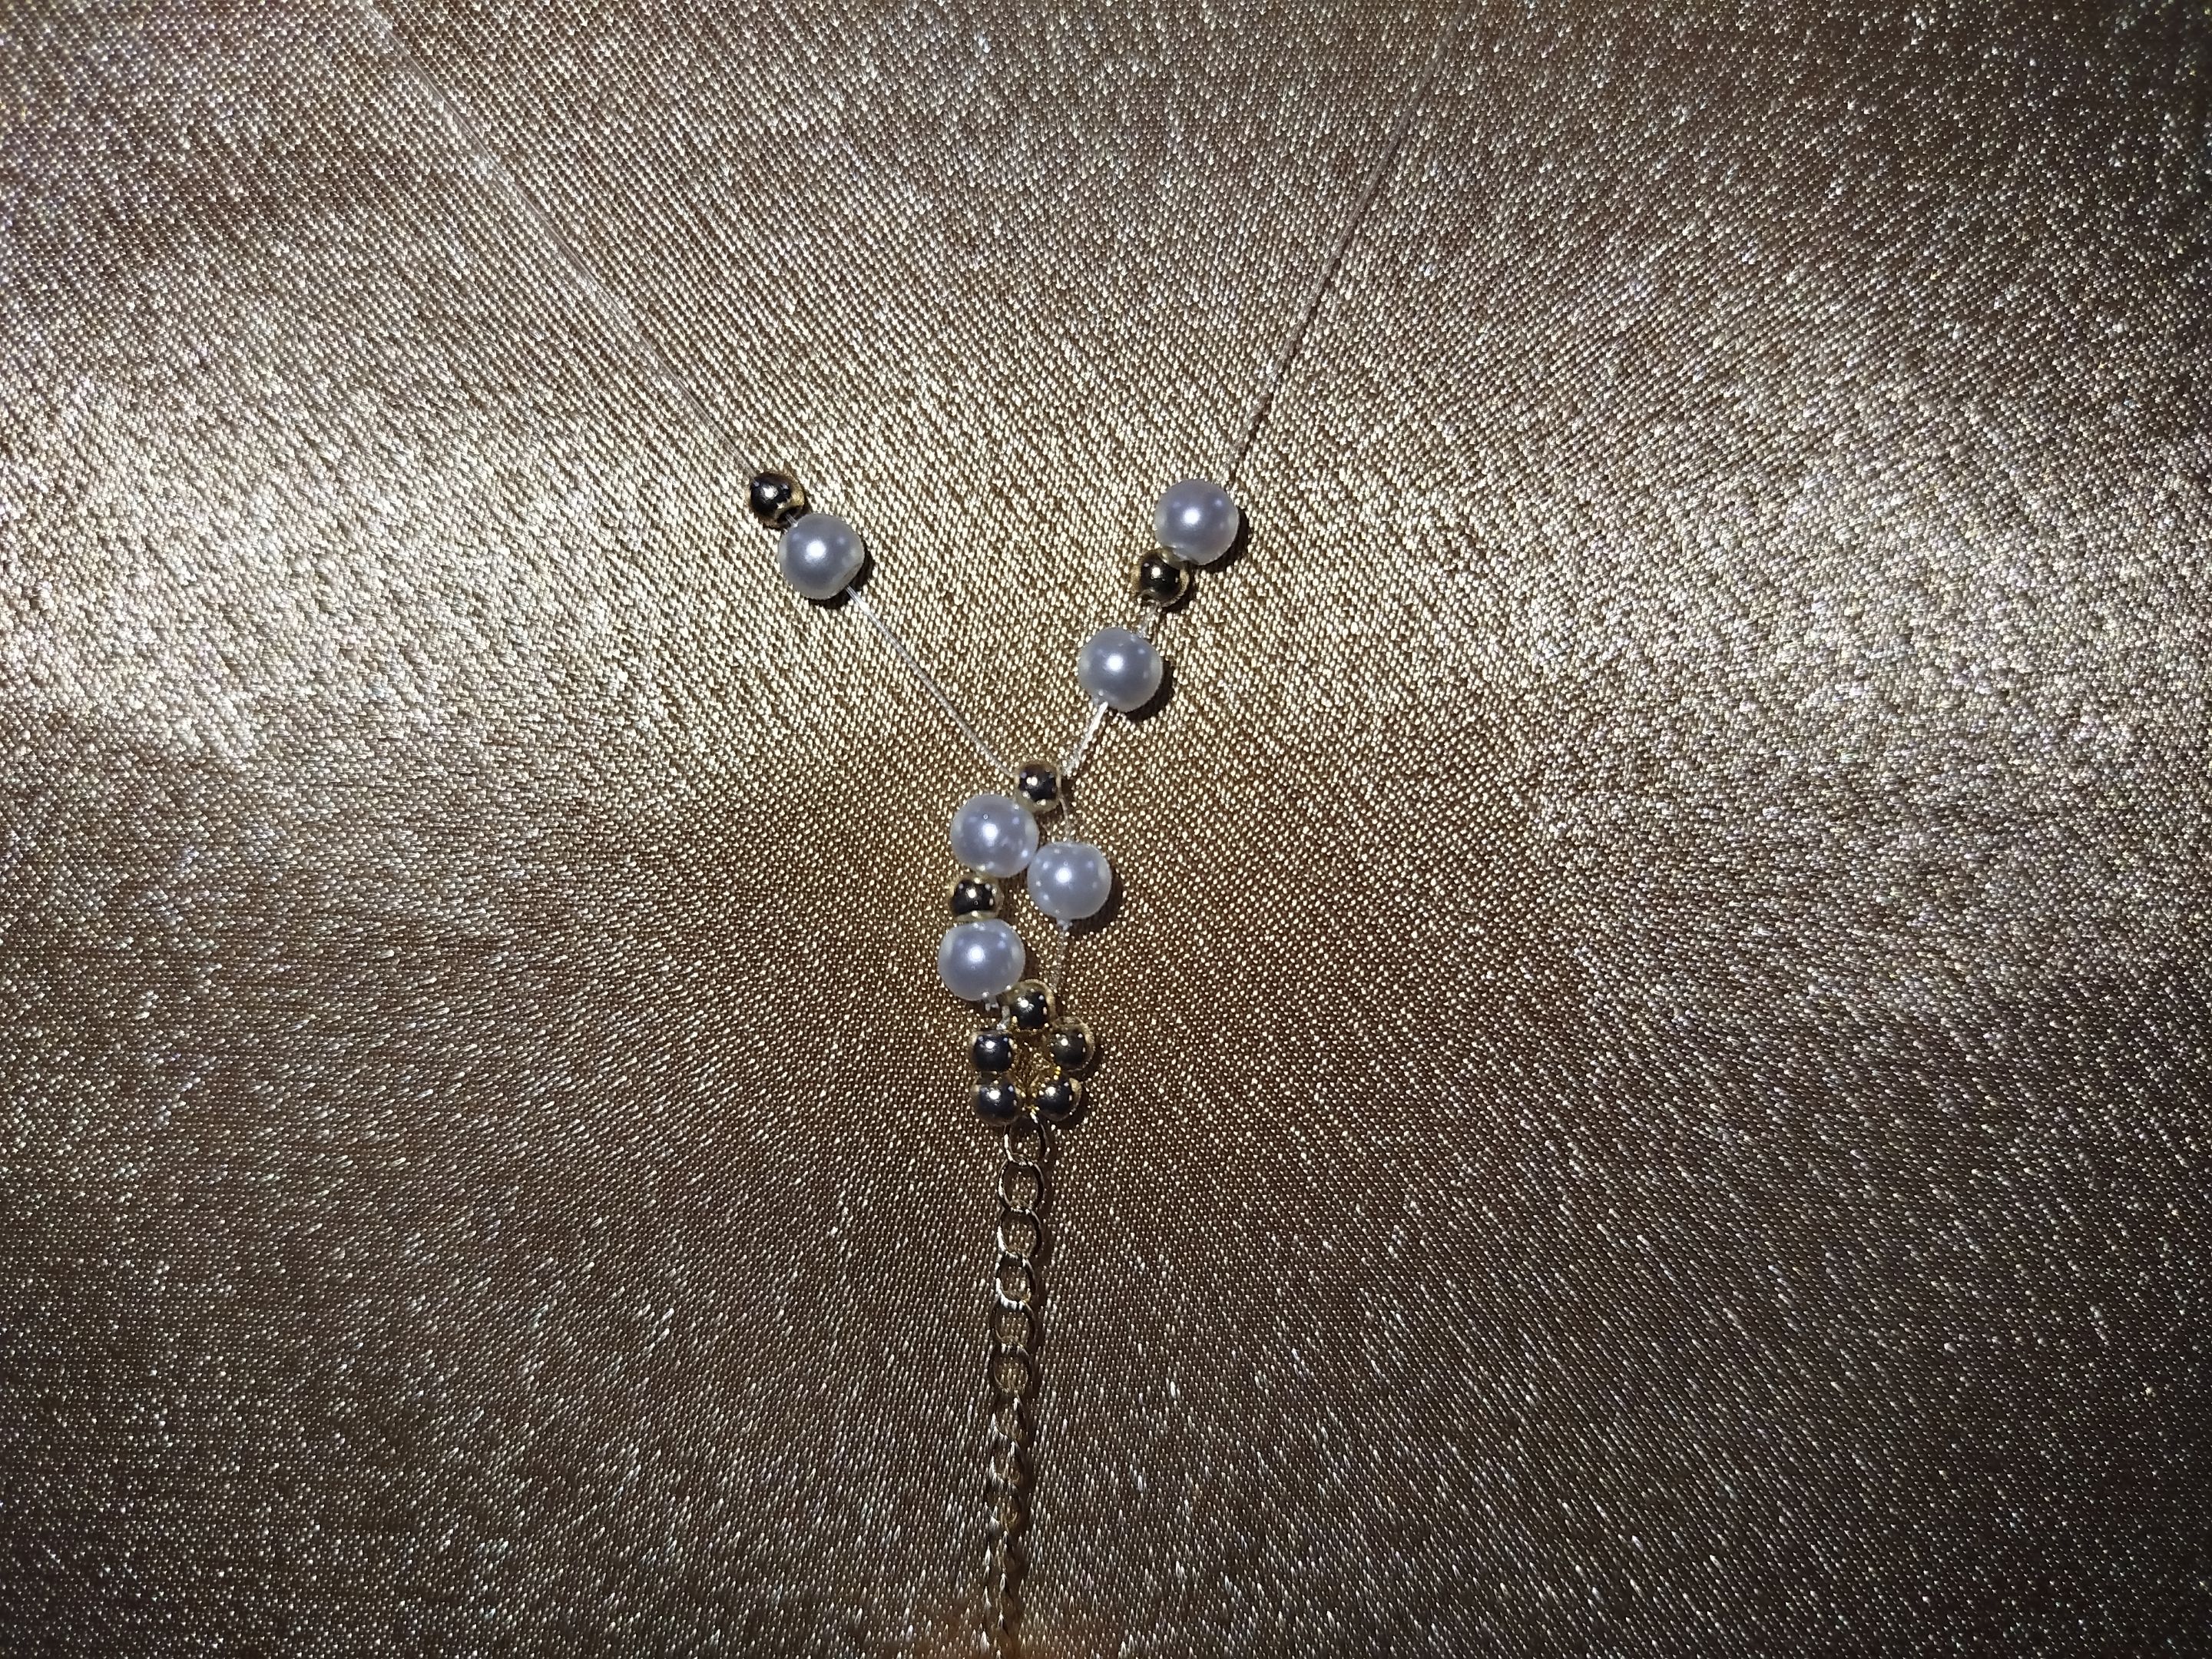
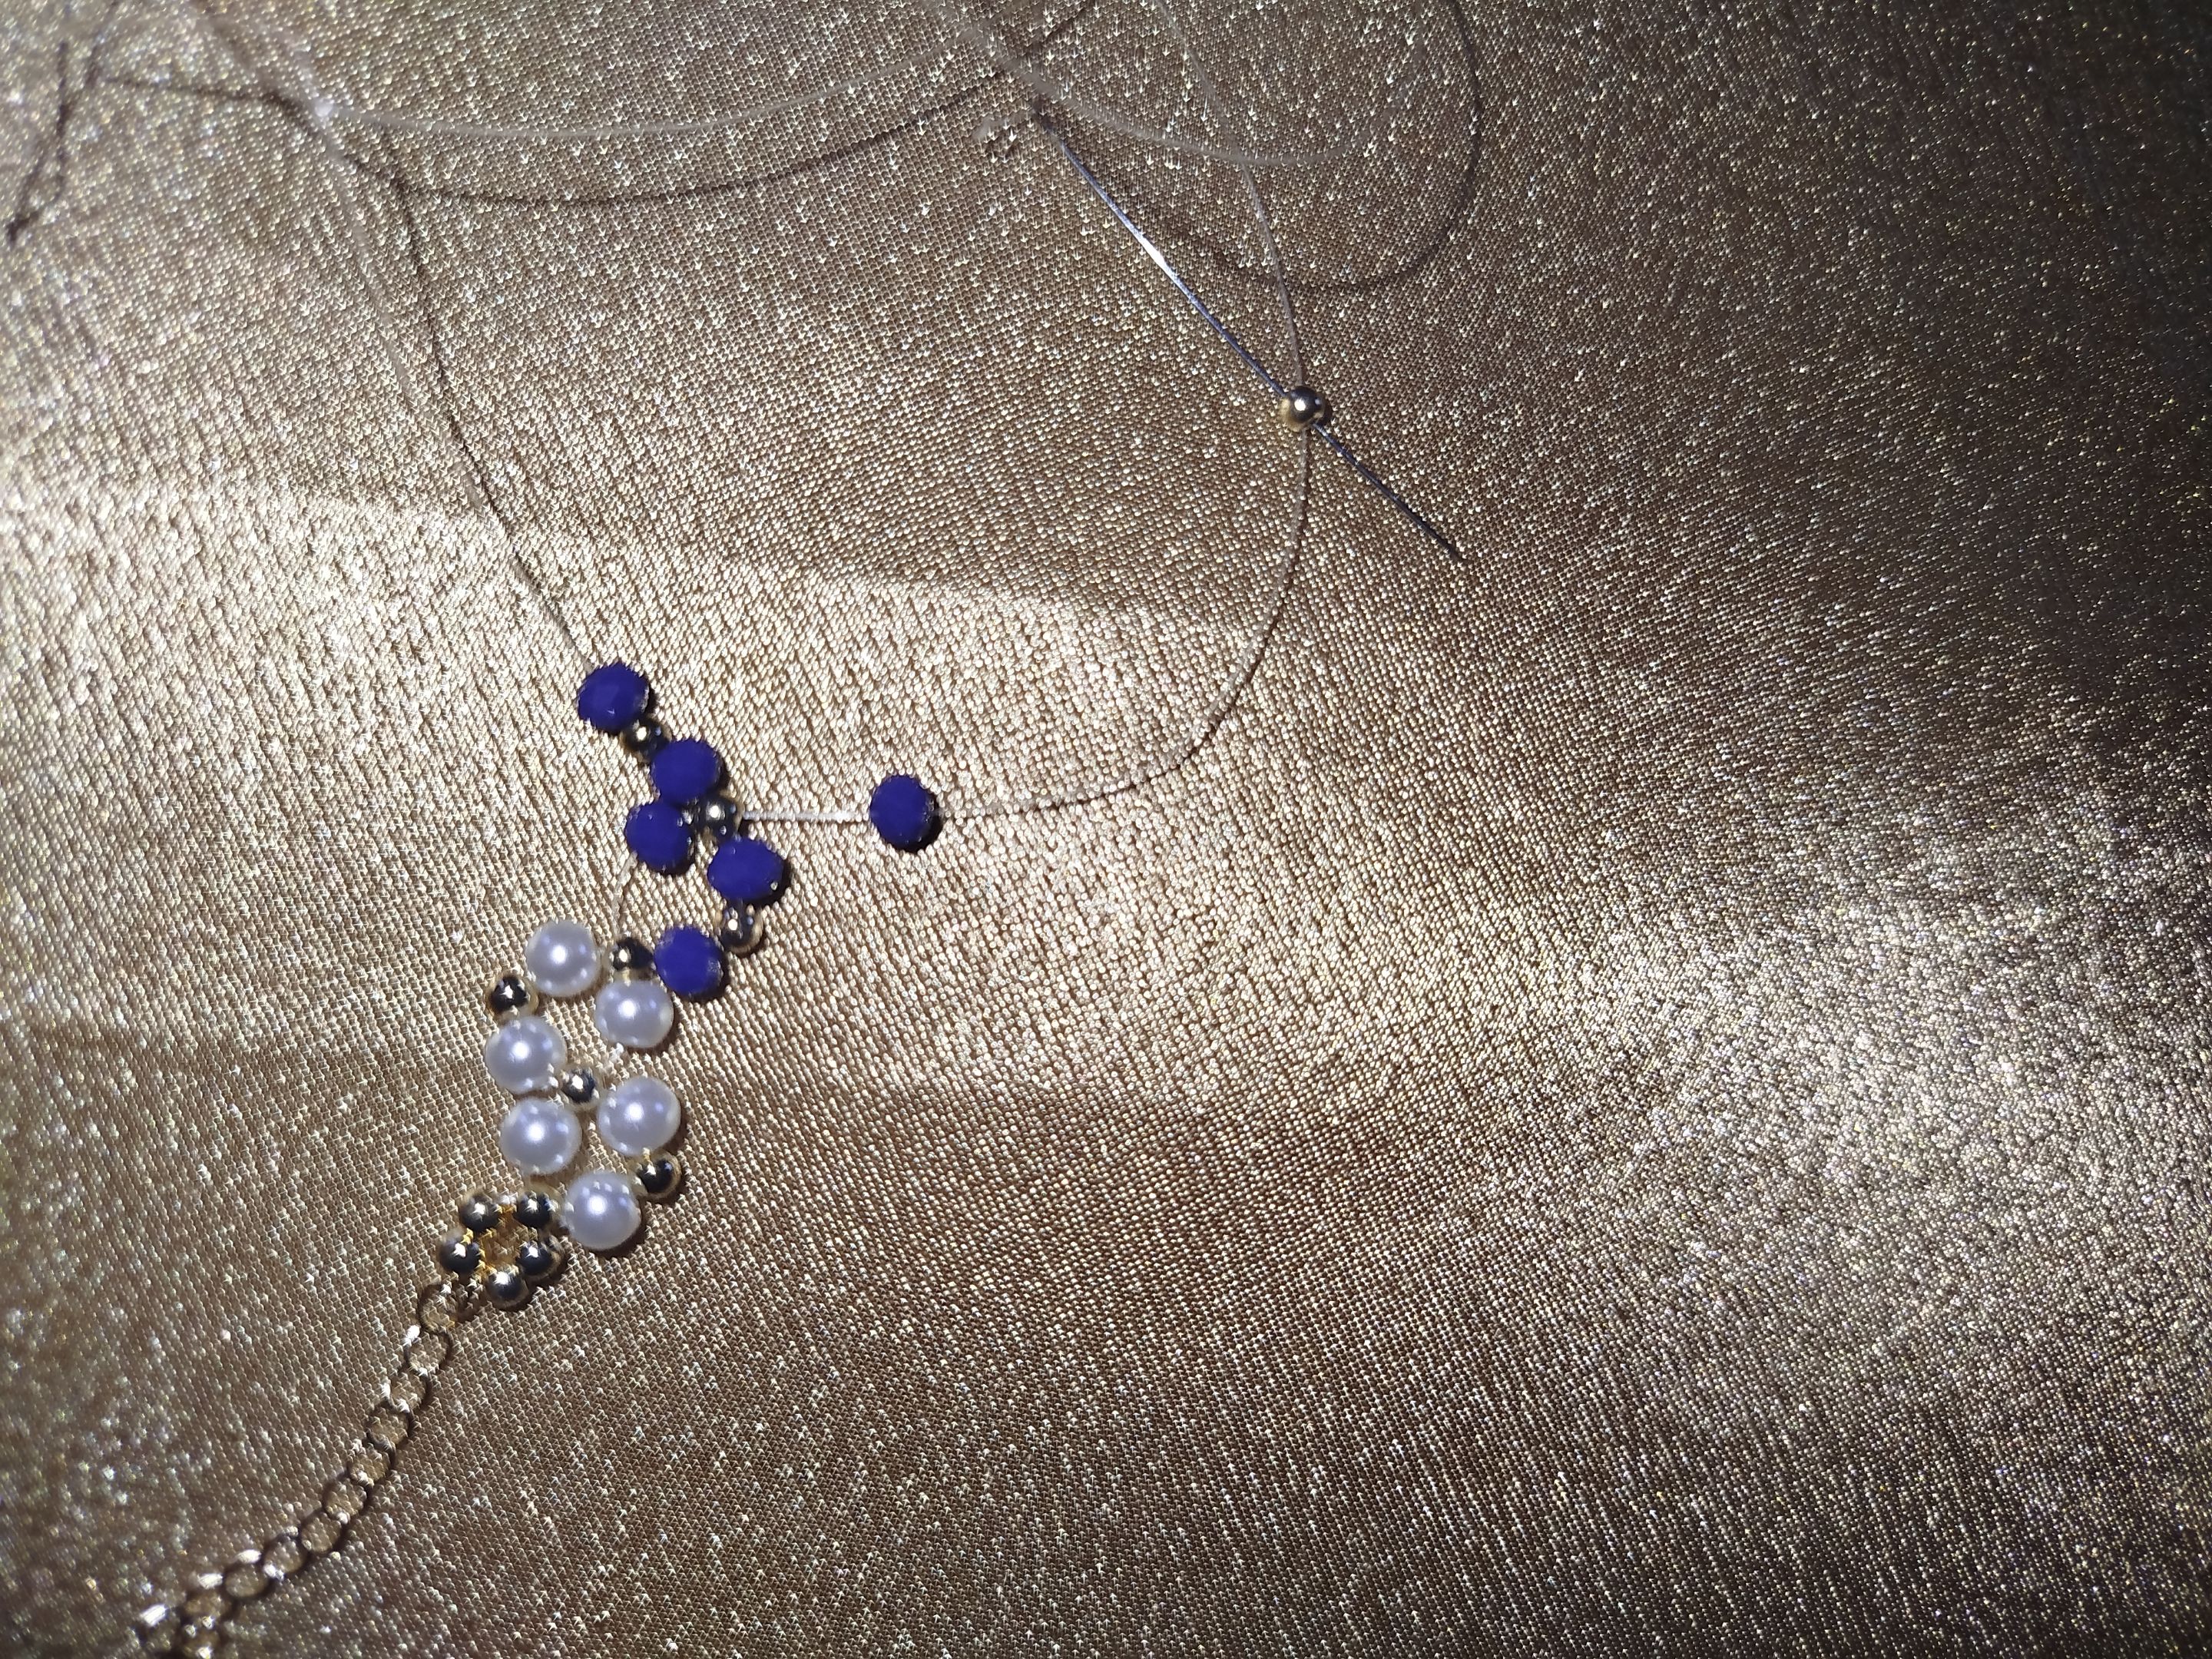
- - - Now, thread the following items onto one of the strands of thread in this order: a bead, a pellet, another bead, and a pellet. Thread only a bead onto the other strand. 
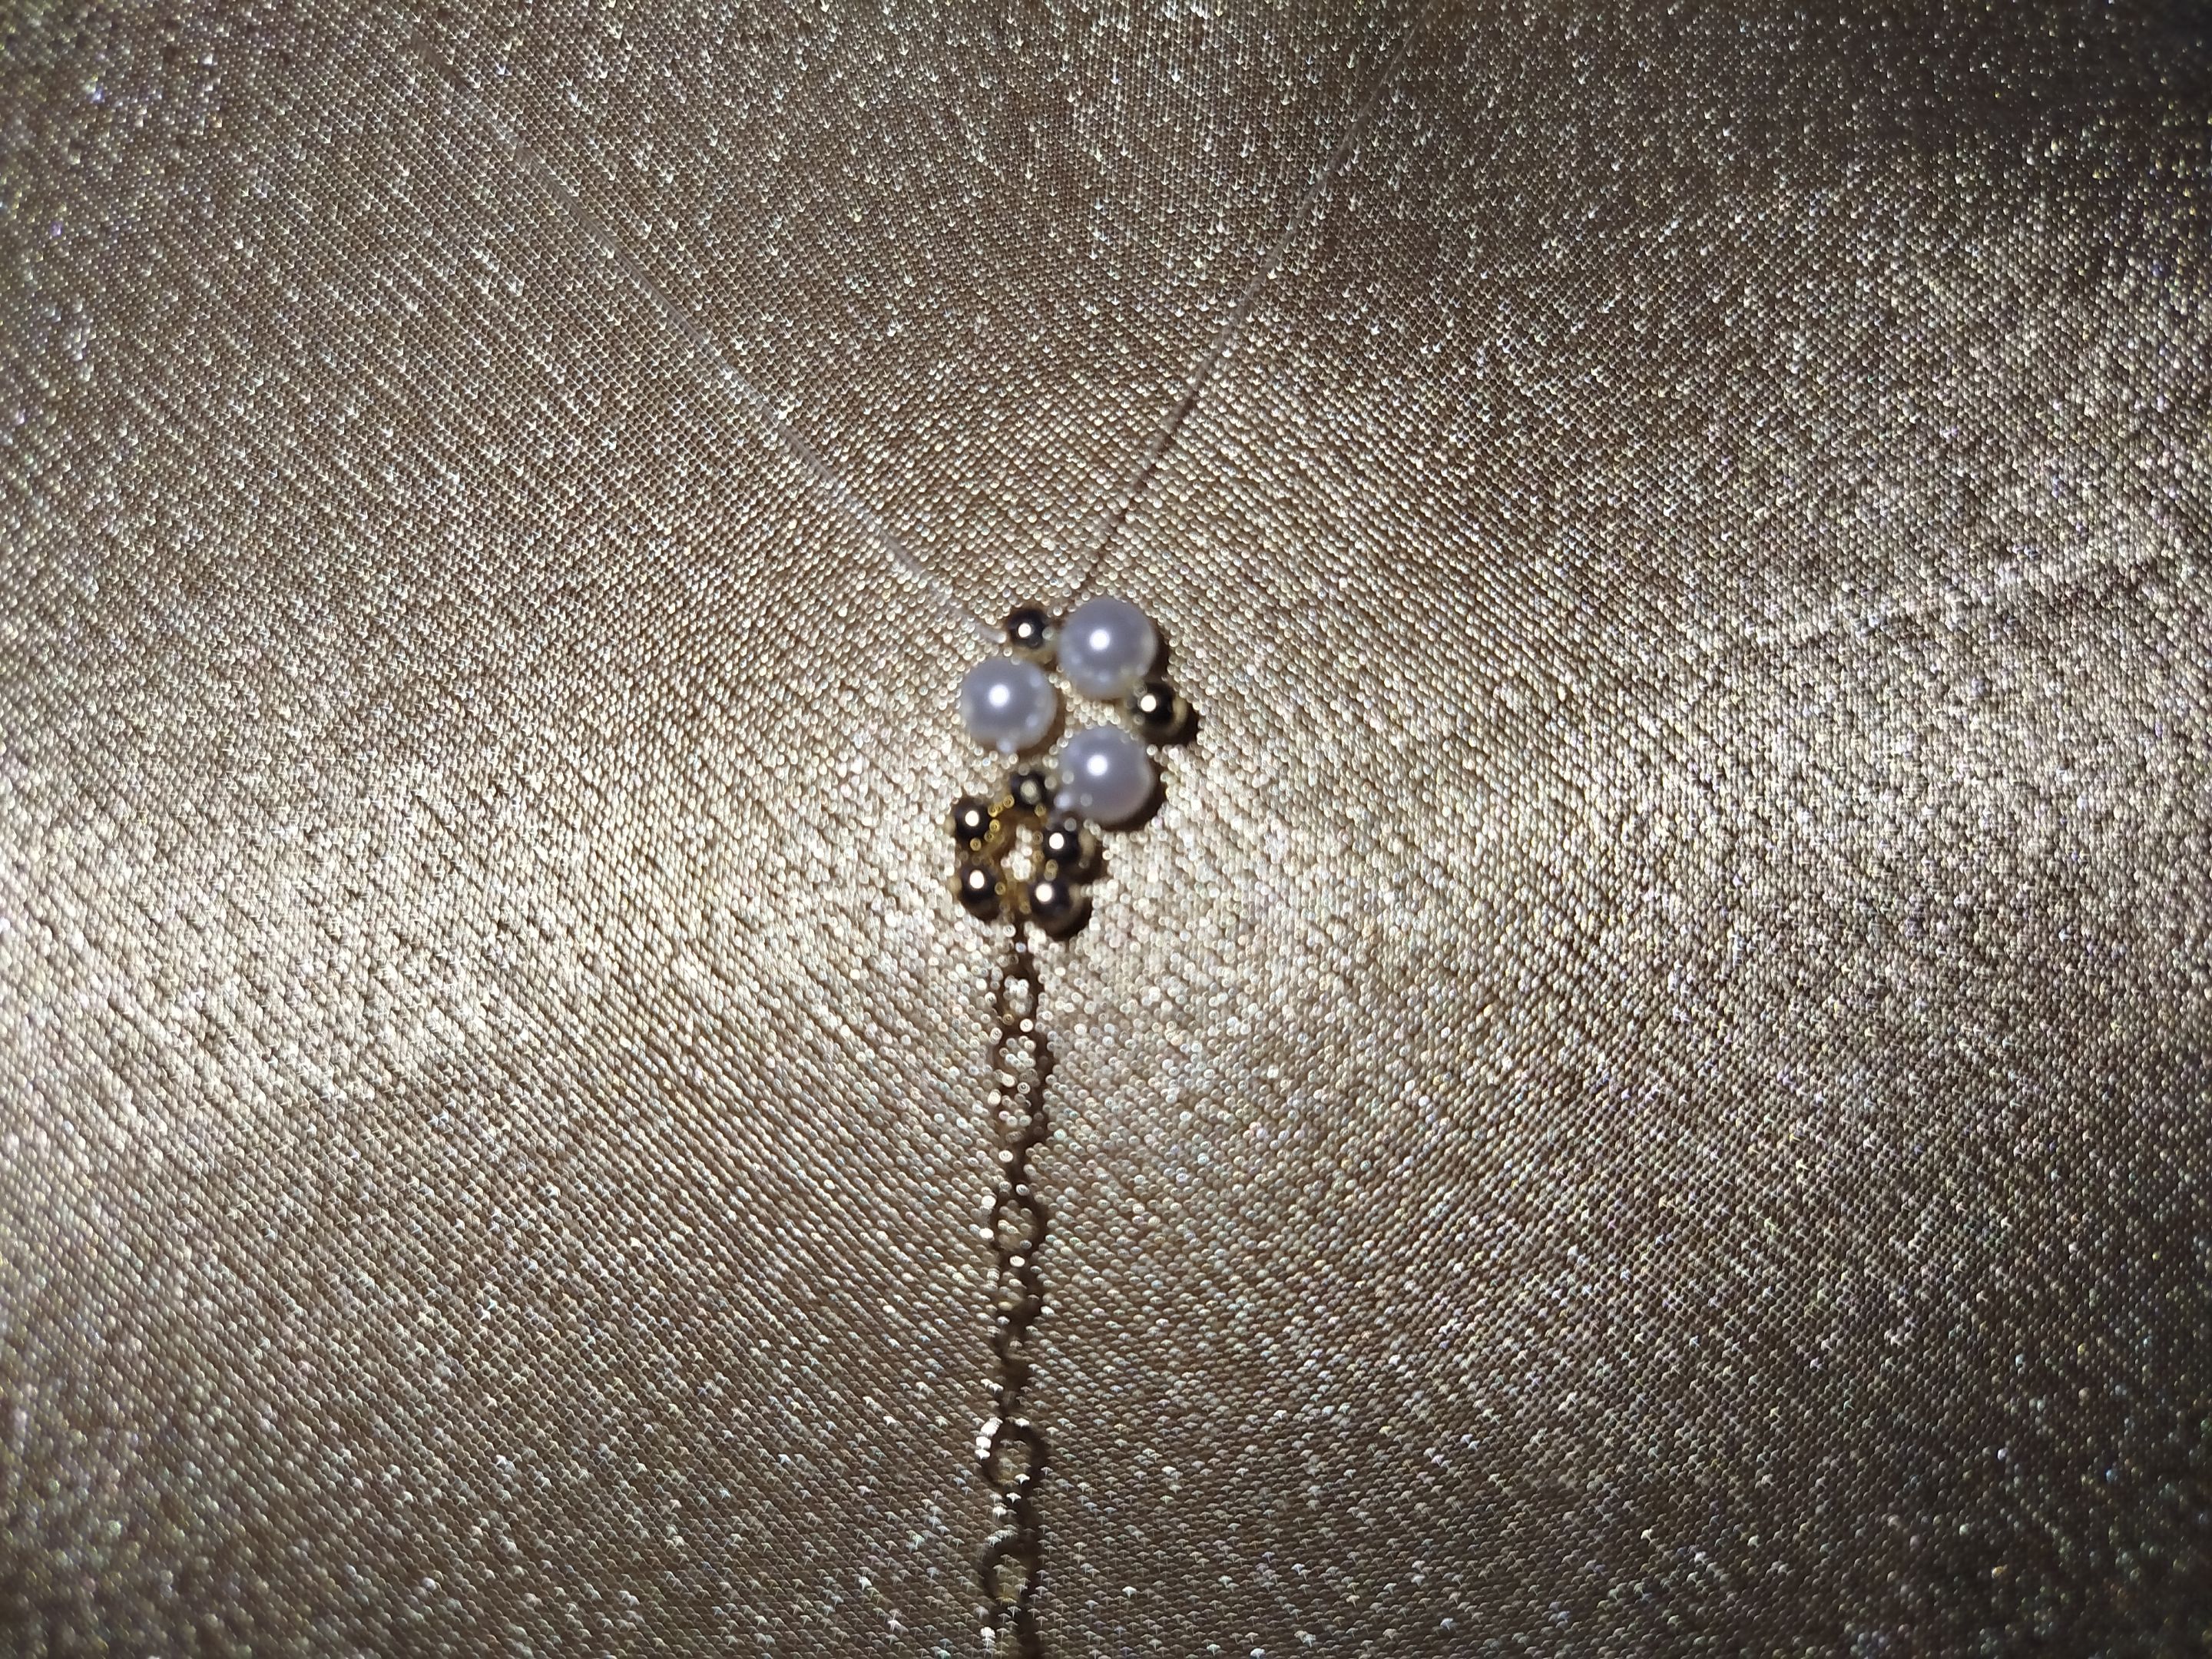
Once you have done this, take the needle from the latter strand and pass it through the pellet at the end of the other thread. When you pull, you will see that a triangular shape is formed with three beads and two pellets. - - -
![IMG_20250921_134417.jpg](https://files.peakd.com/file/peakd-hive/gabimramirez/EoAakpec5qtVBzvon9y4bxxC1KXCZHxB2XC9GWNKfTxB8d4qWcNzZiYYfhZcD3v6umL.jpg)
![IMG_20250921_134510.jpg](https://files.peakd.com/file/peakd-hive/gabimramirez/EoEq76FNoeXCLdMHx6Bex71eWt8FAZfZKWAZEJYtpueaLjWVUpJAP1MbZv3N7HXUyw6.jpg)
--- ![IMG_20250921_134633.jpg](https://files.peakd.com/file/peakd-hive/gabimramirez/Eoc7bYFDesQQJivmfxJhTtQrLpmTdxaNhKFWeZSpSBVMAsDfUKicfrsrKF4pfVPB8kE.jpg) - - - 
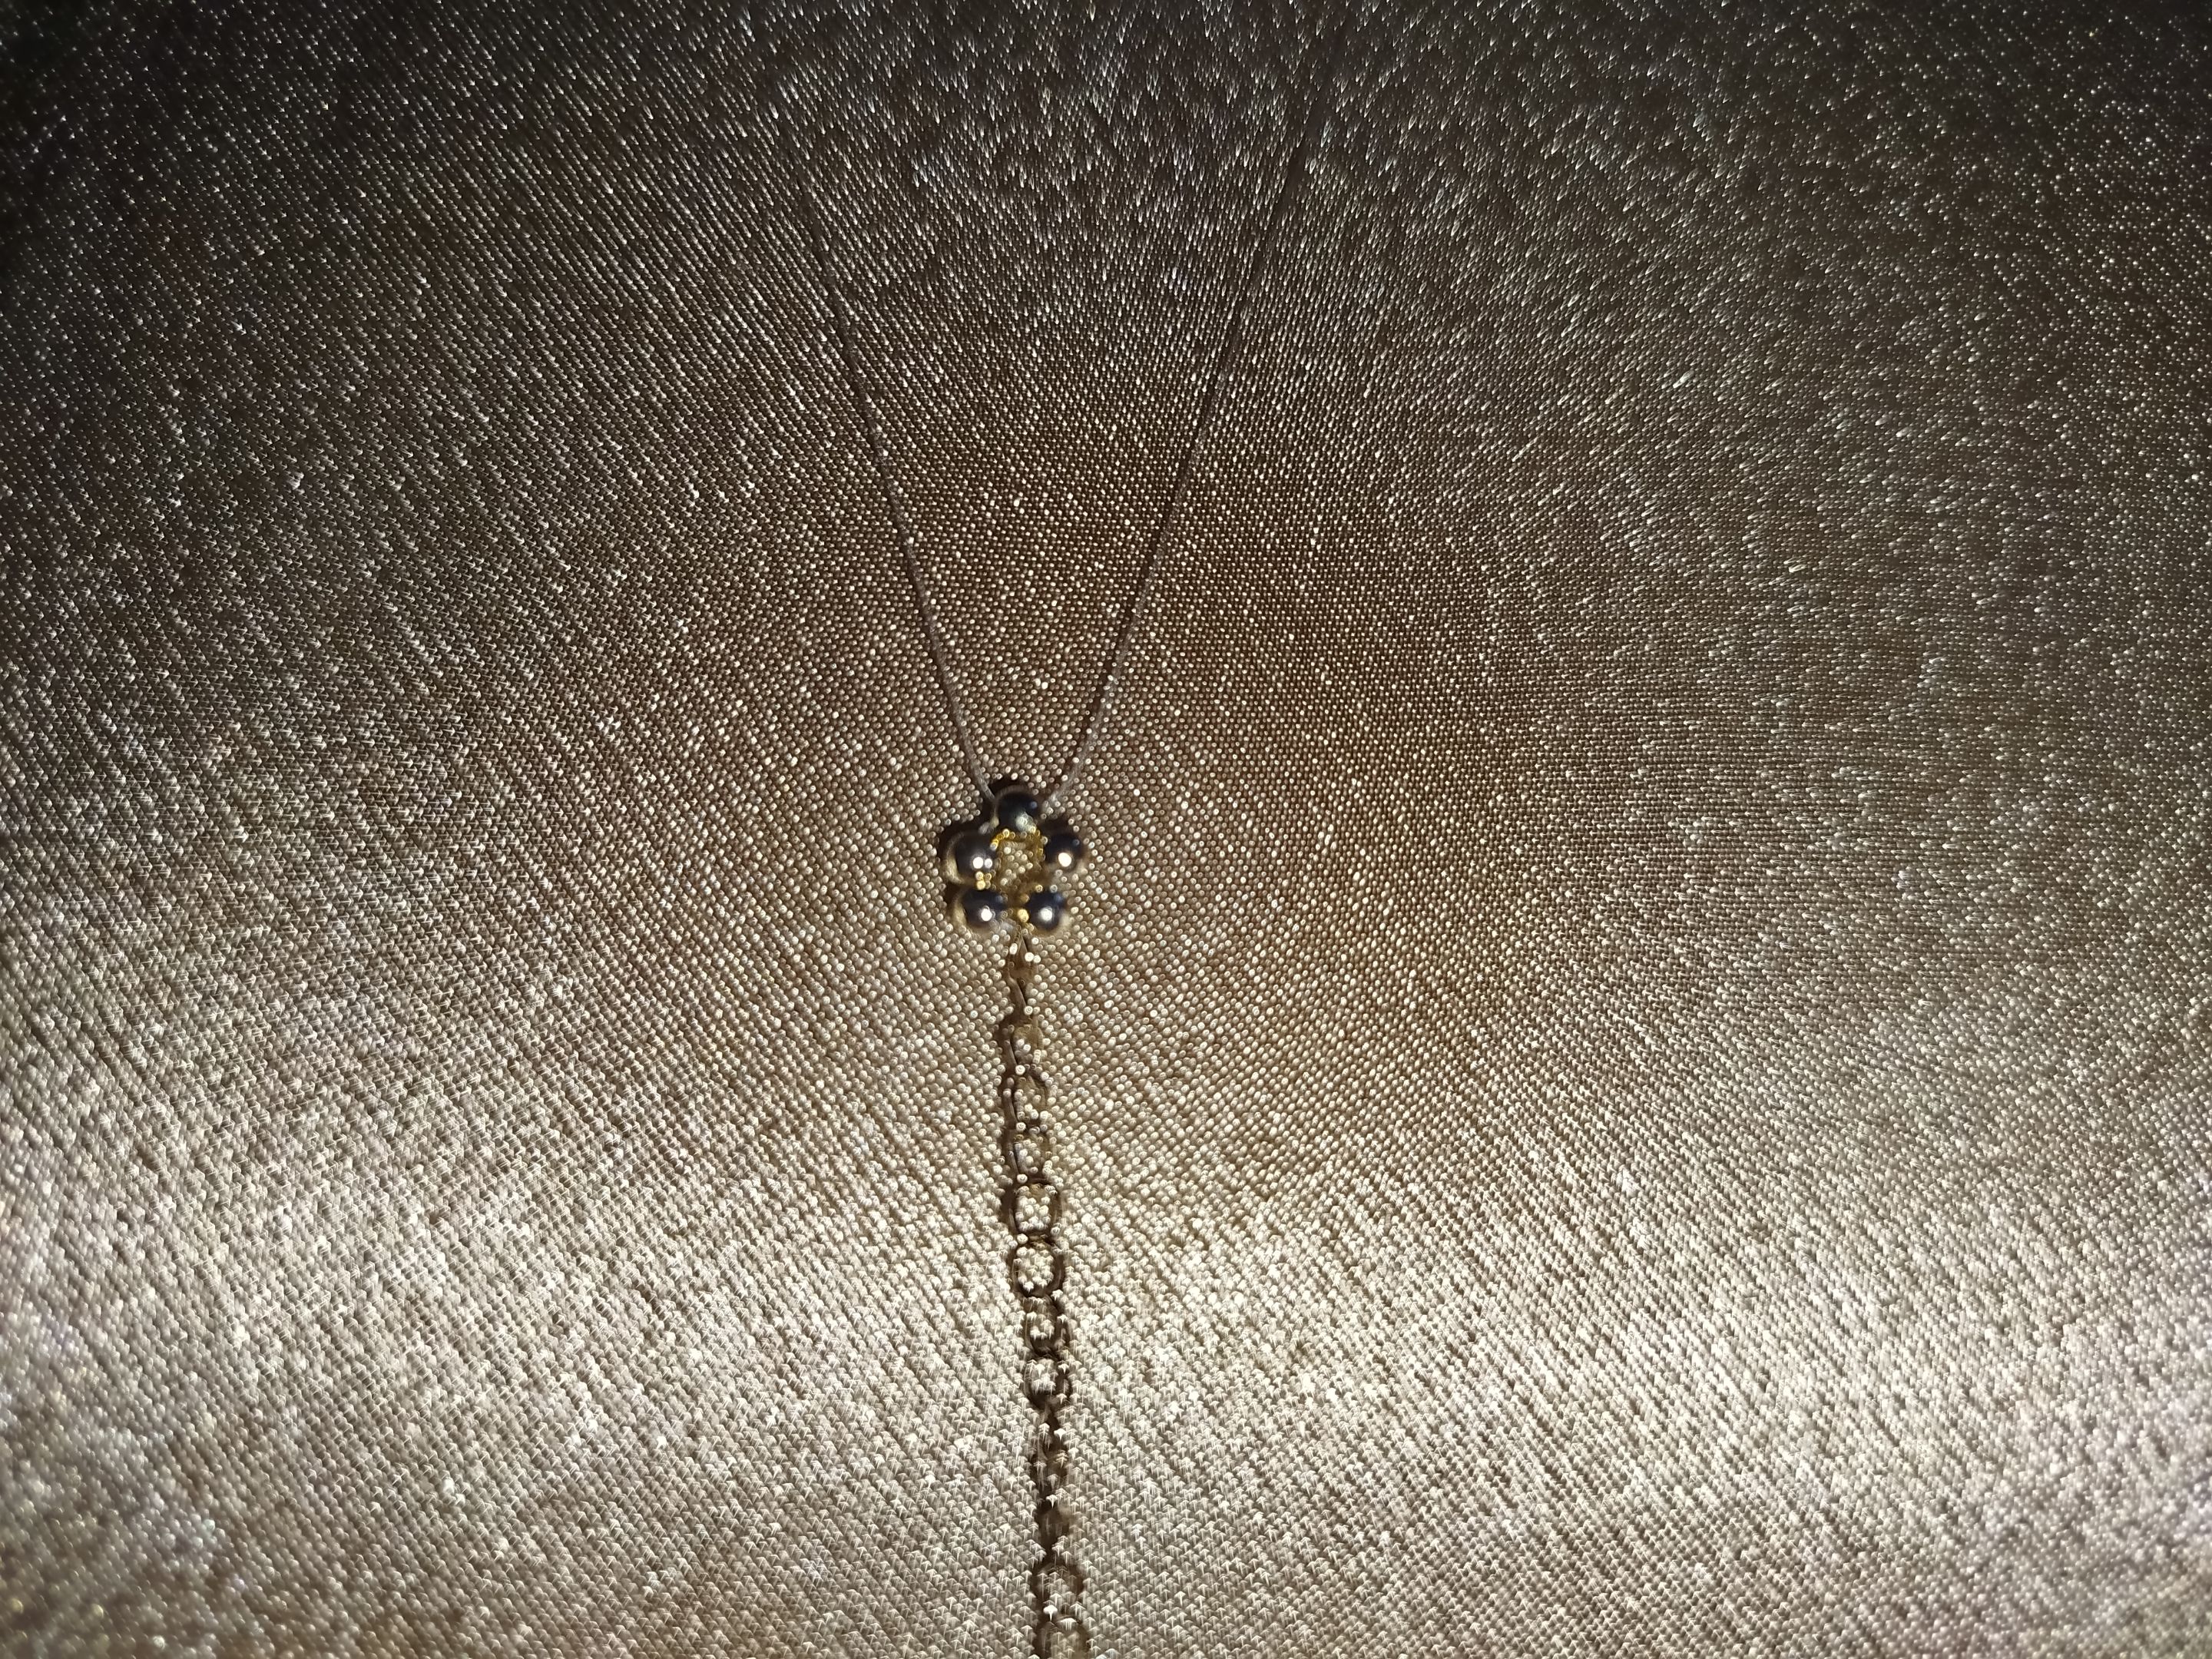
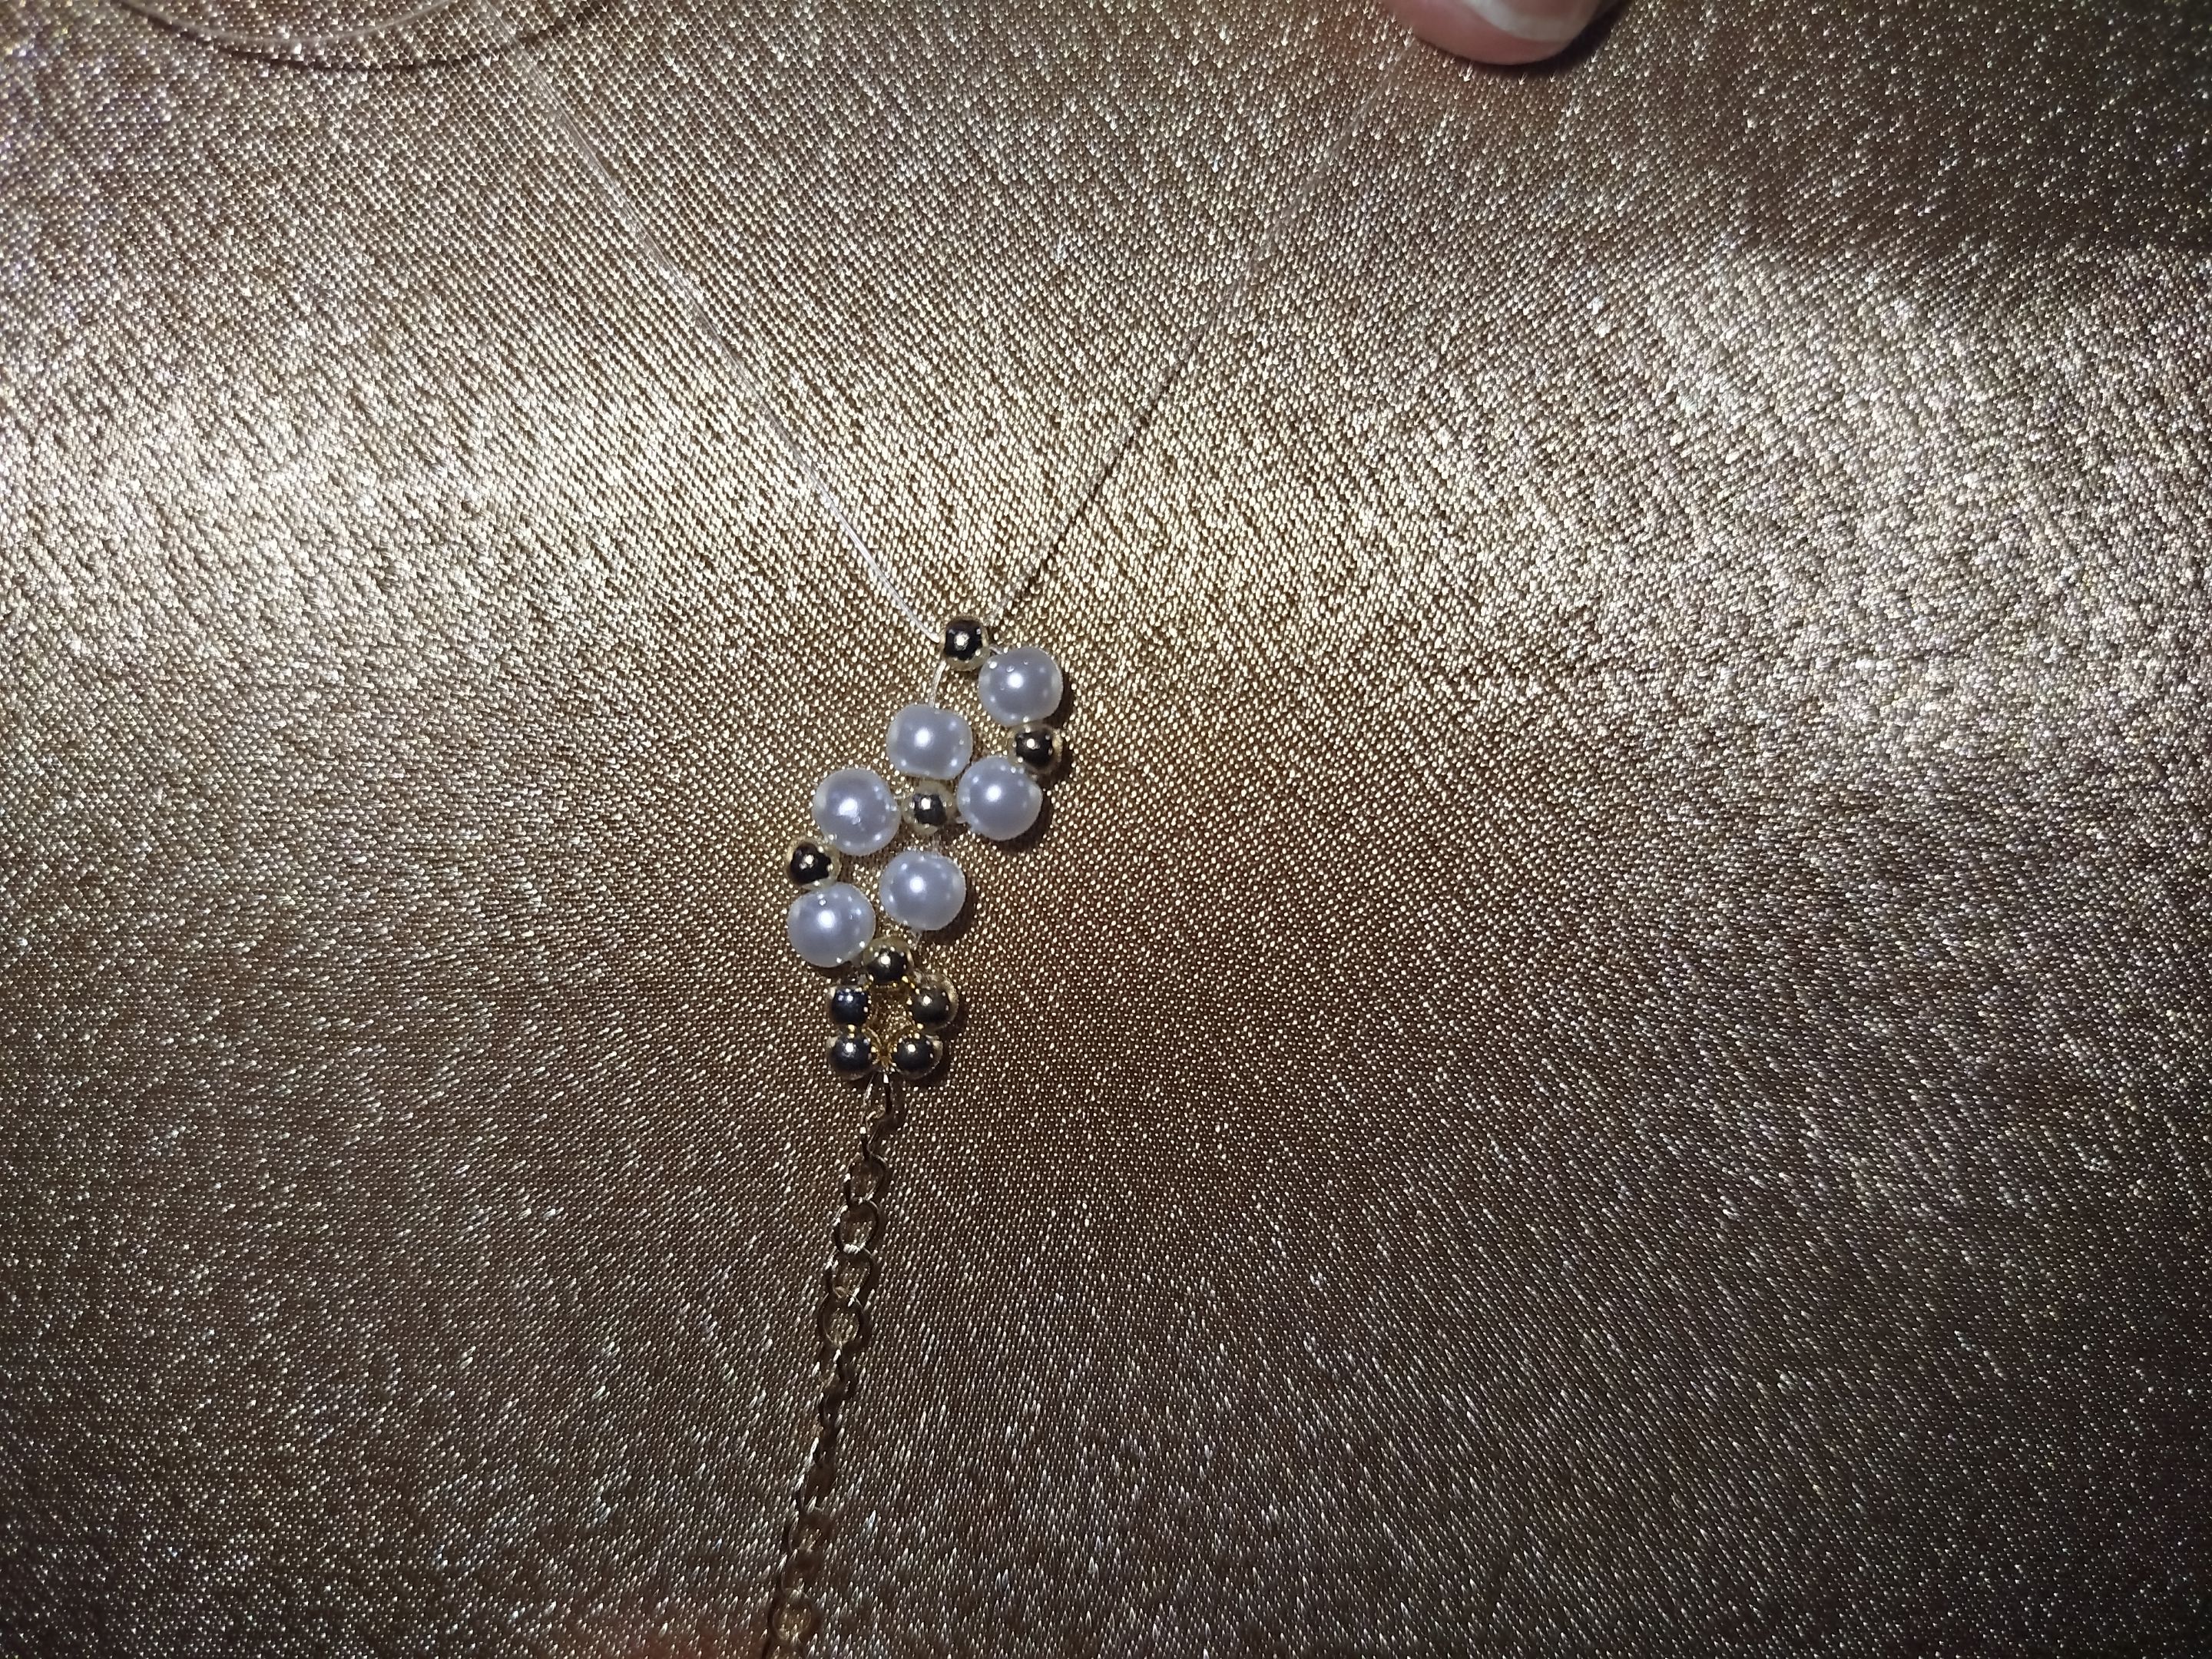
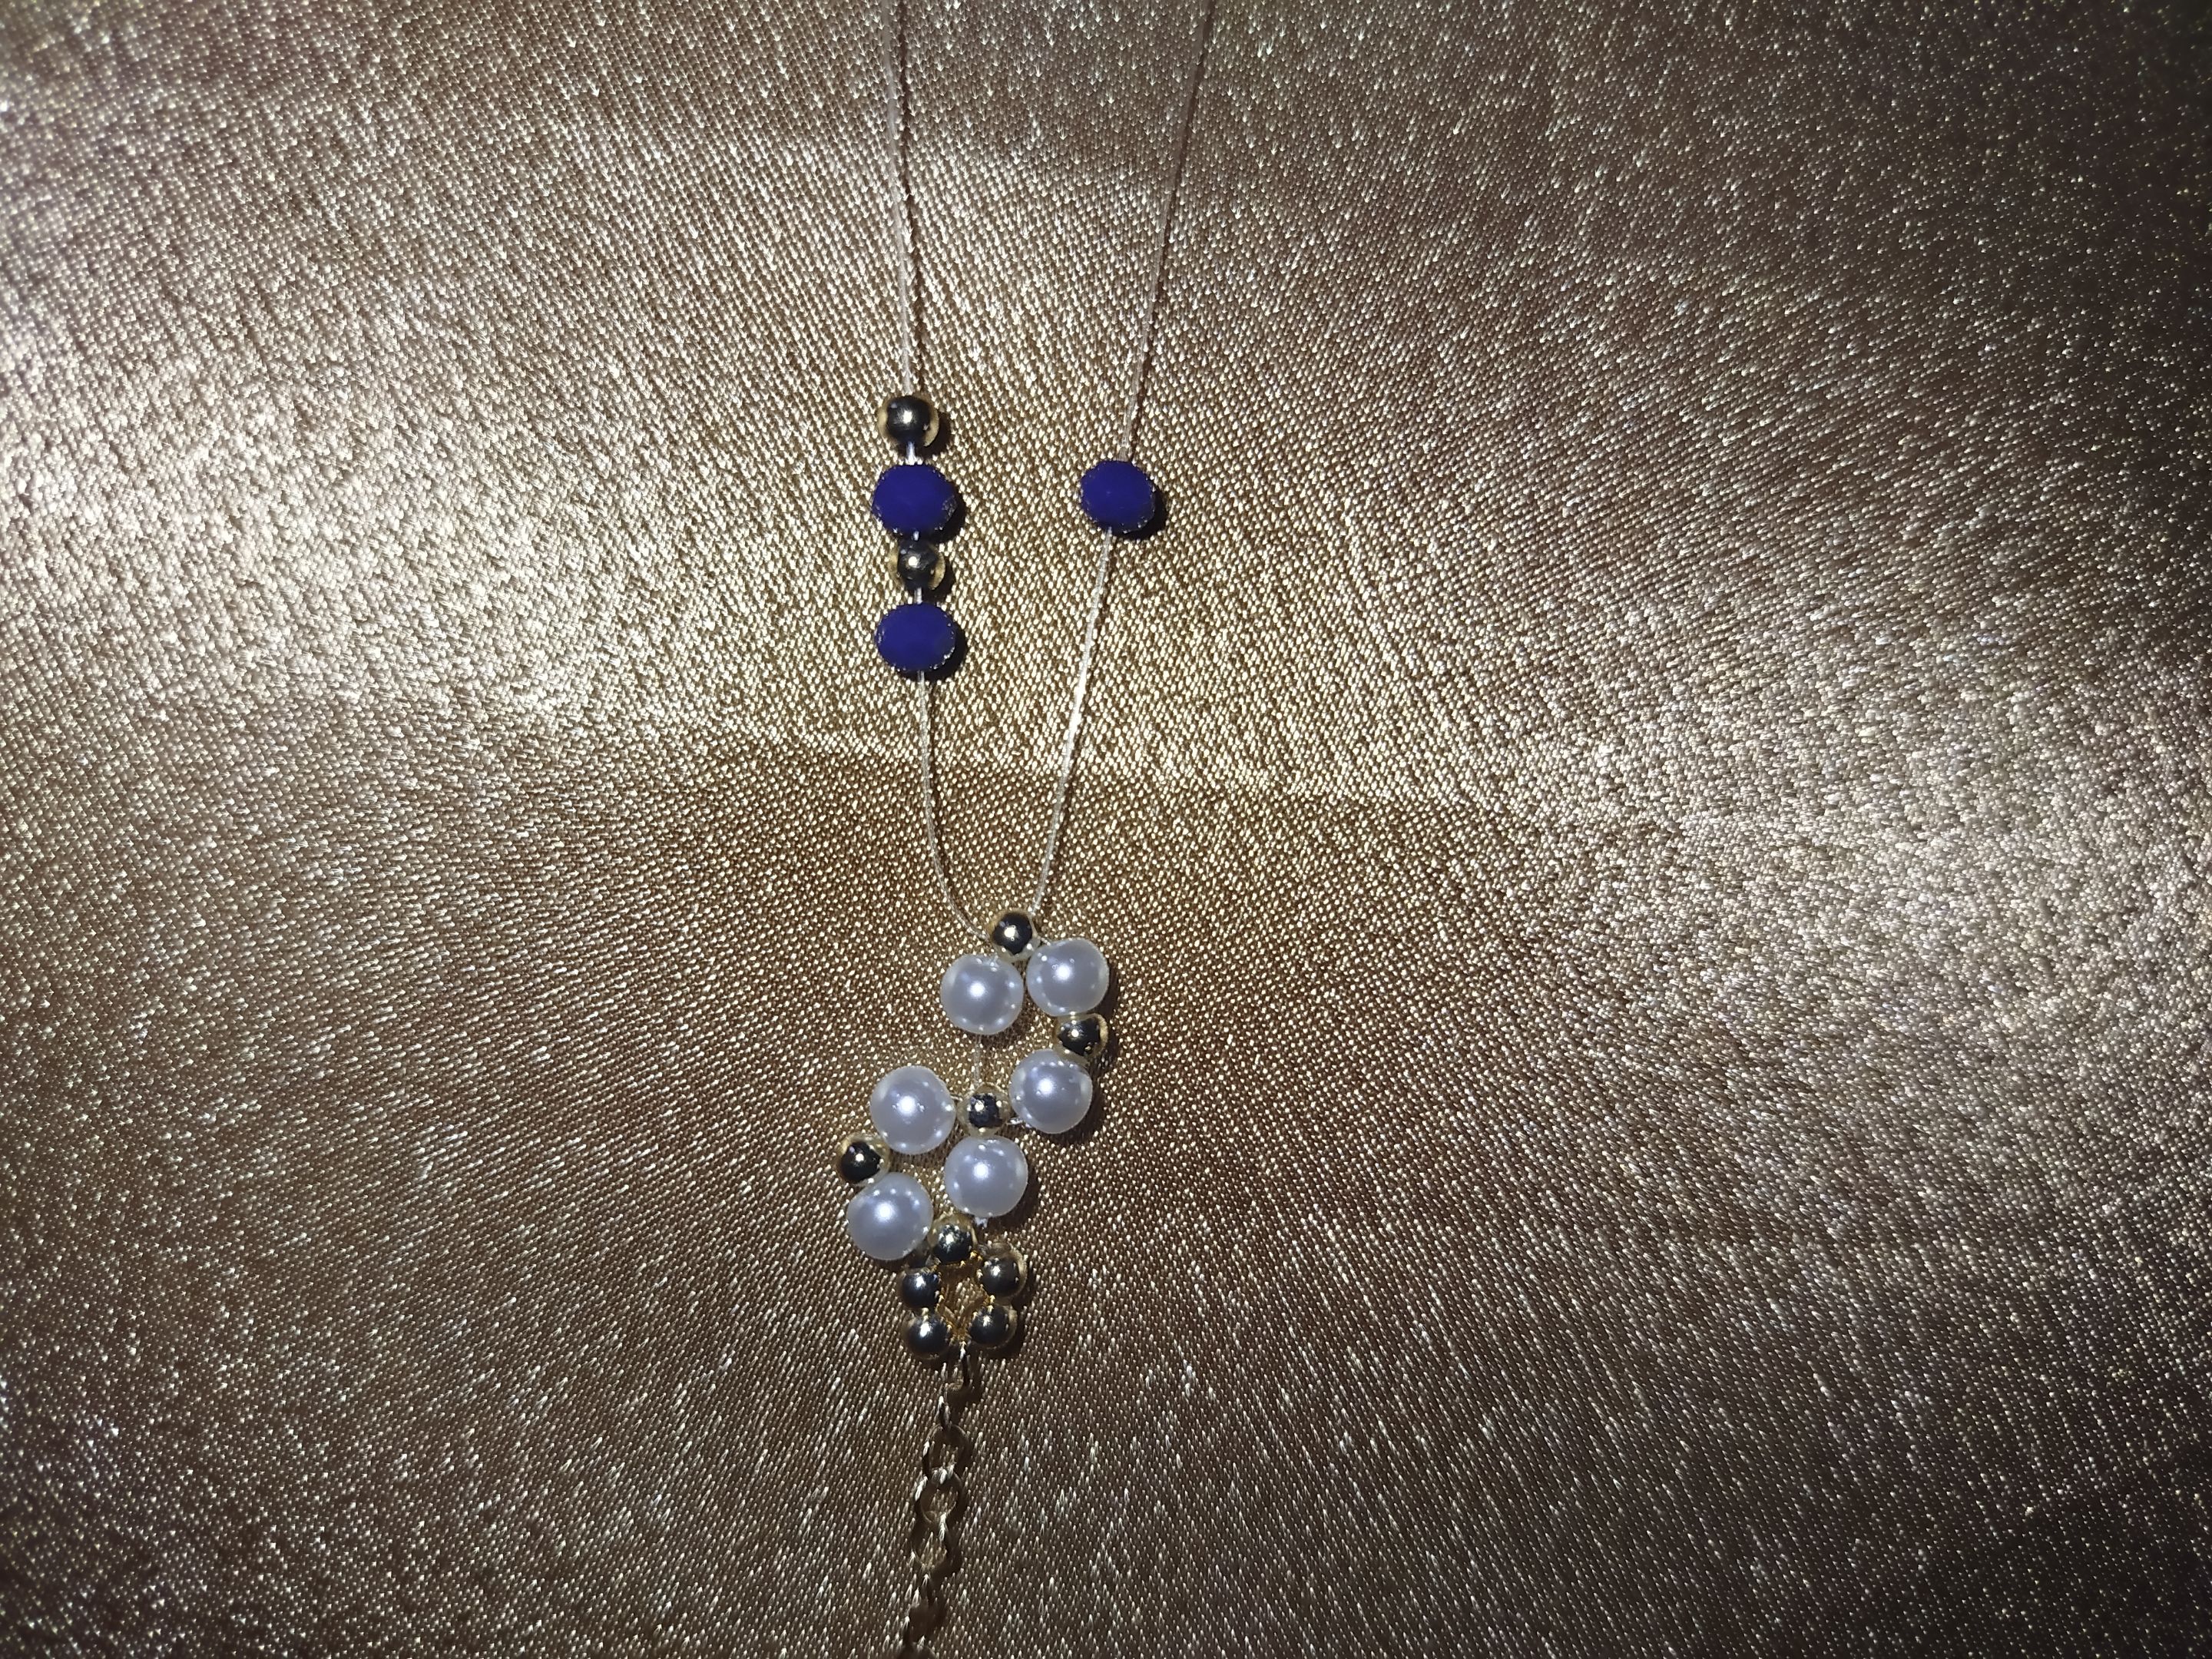
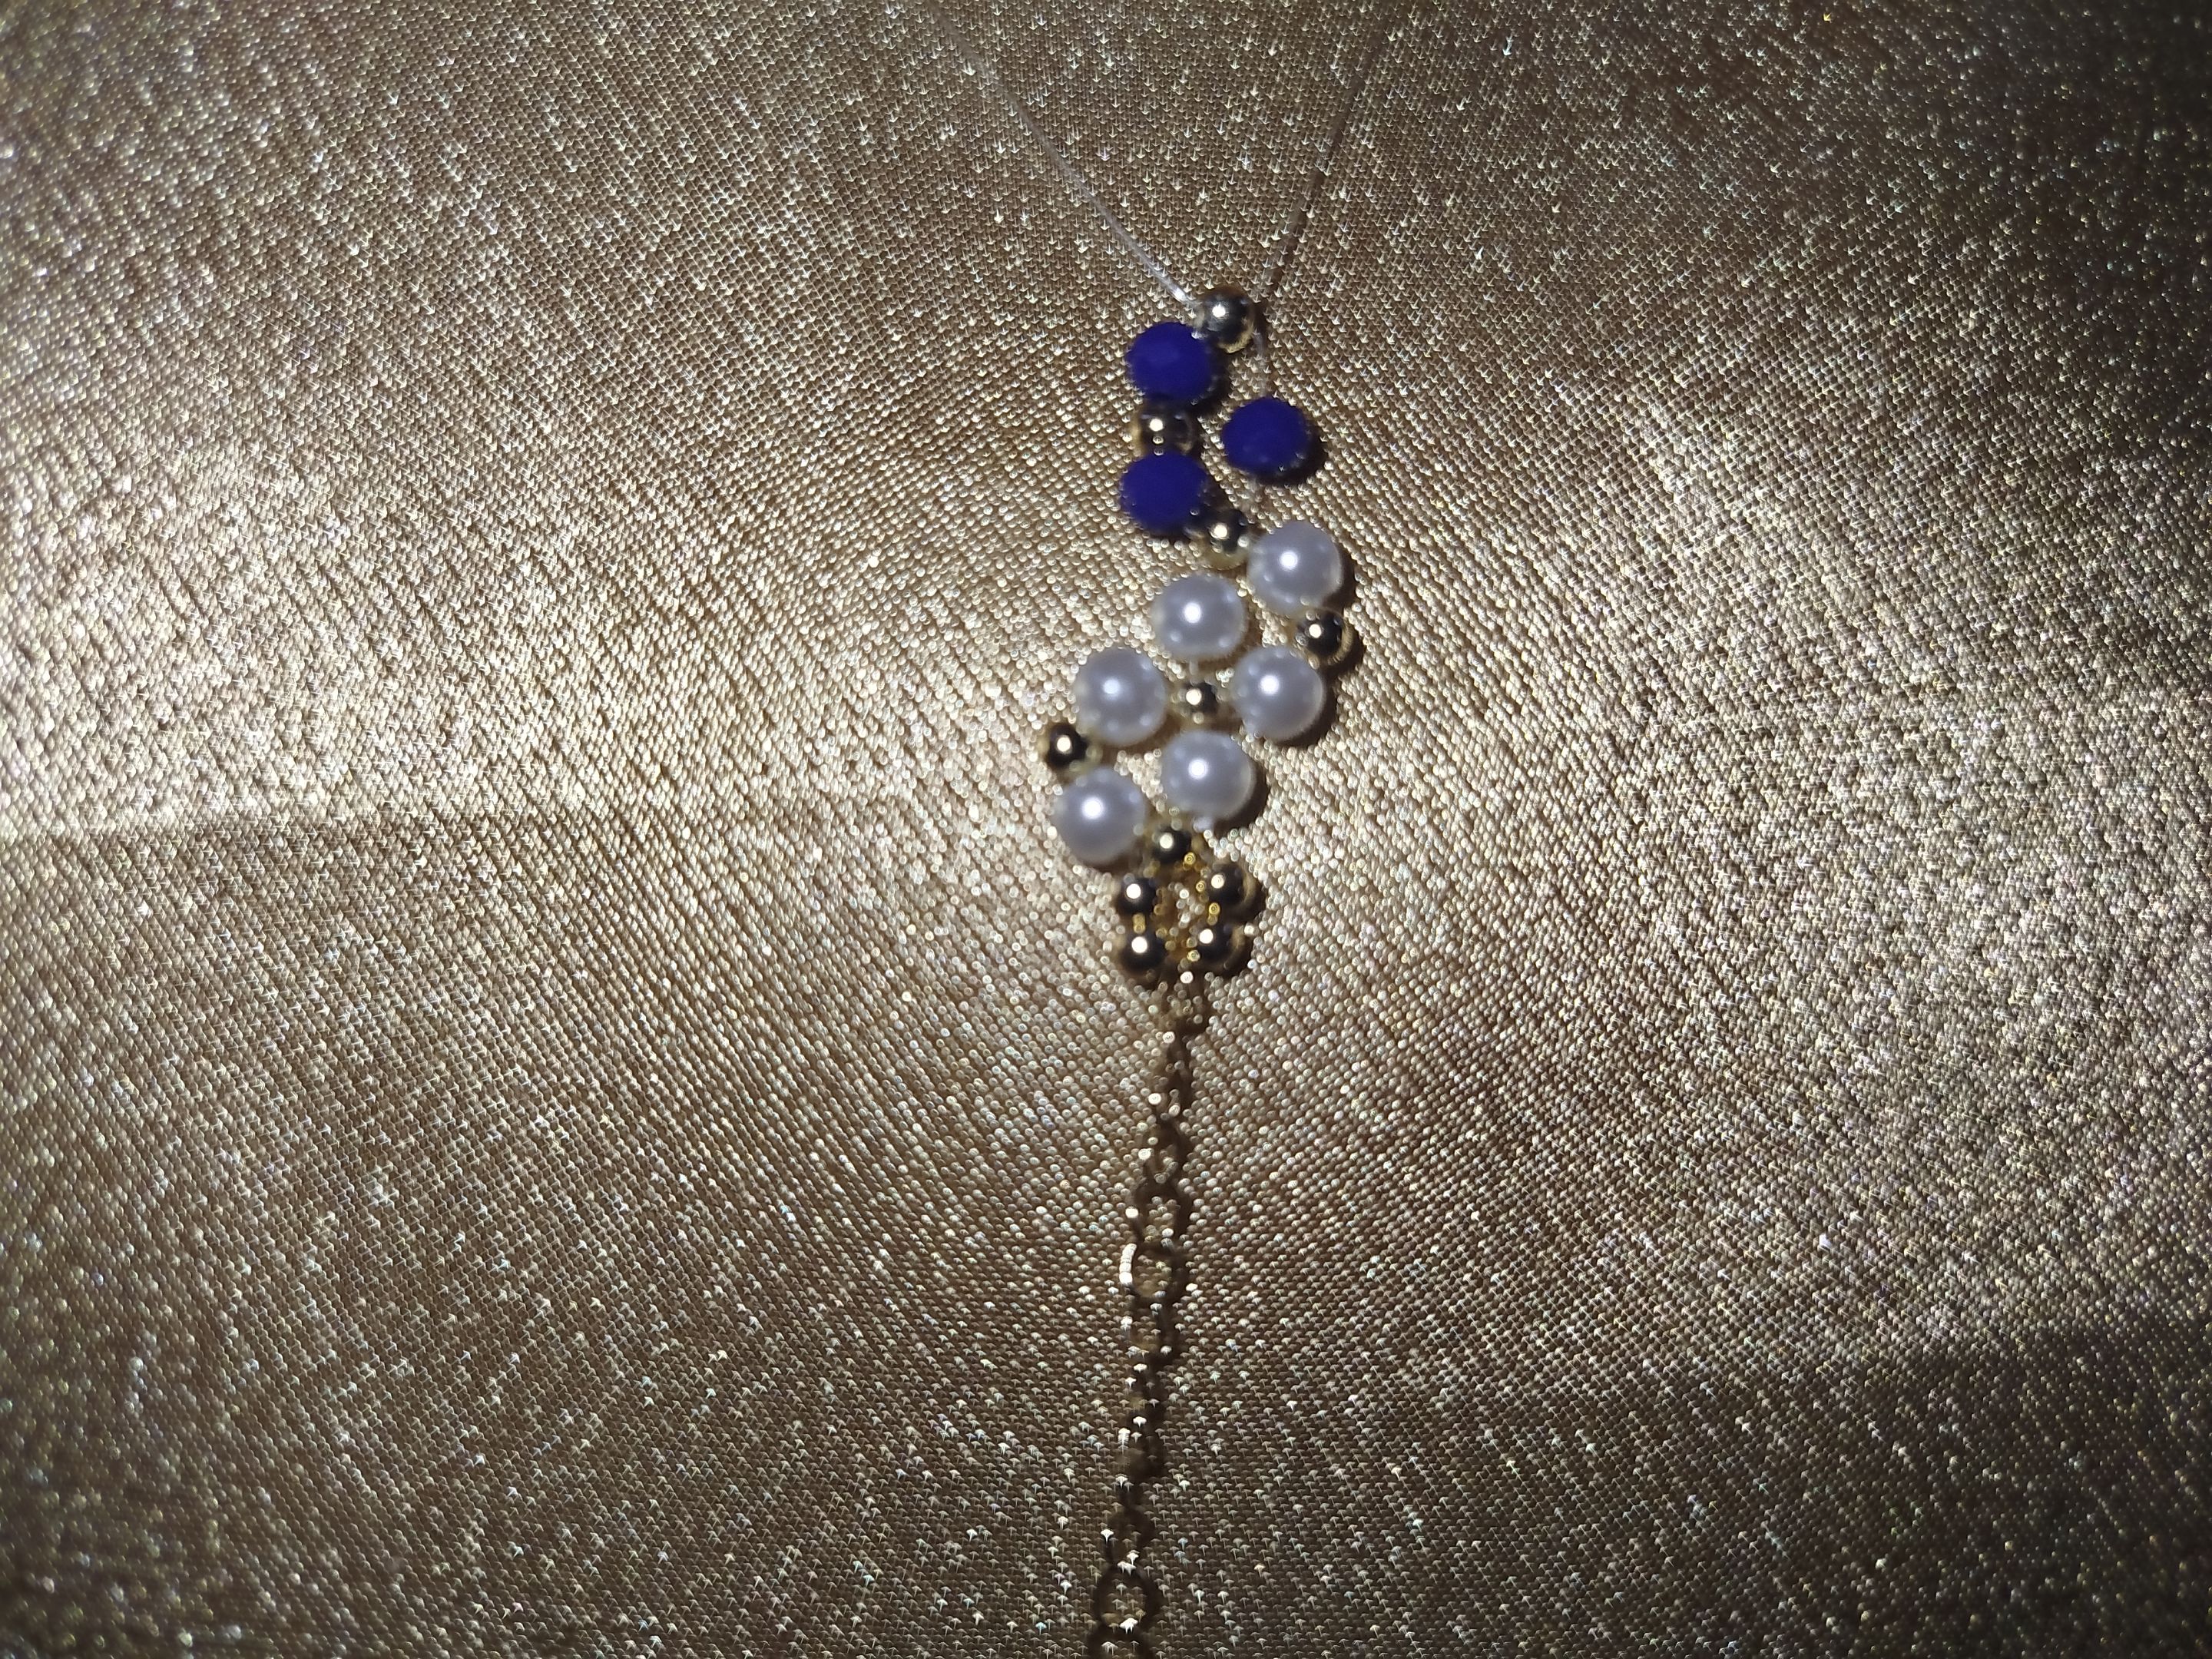
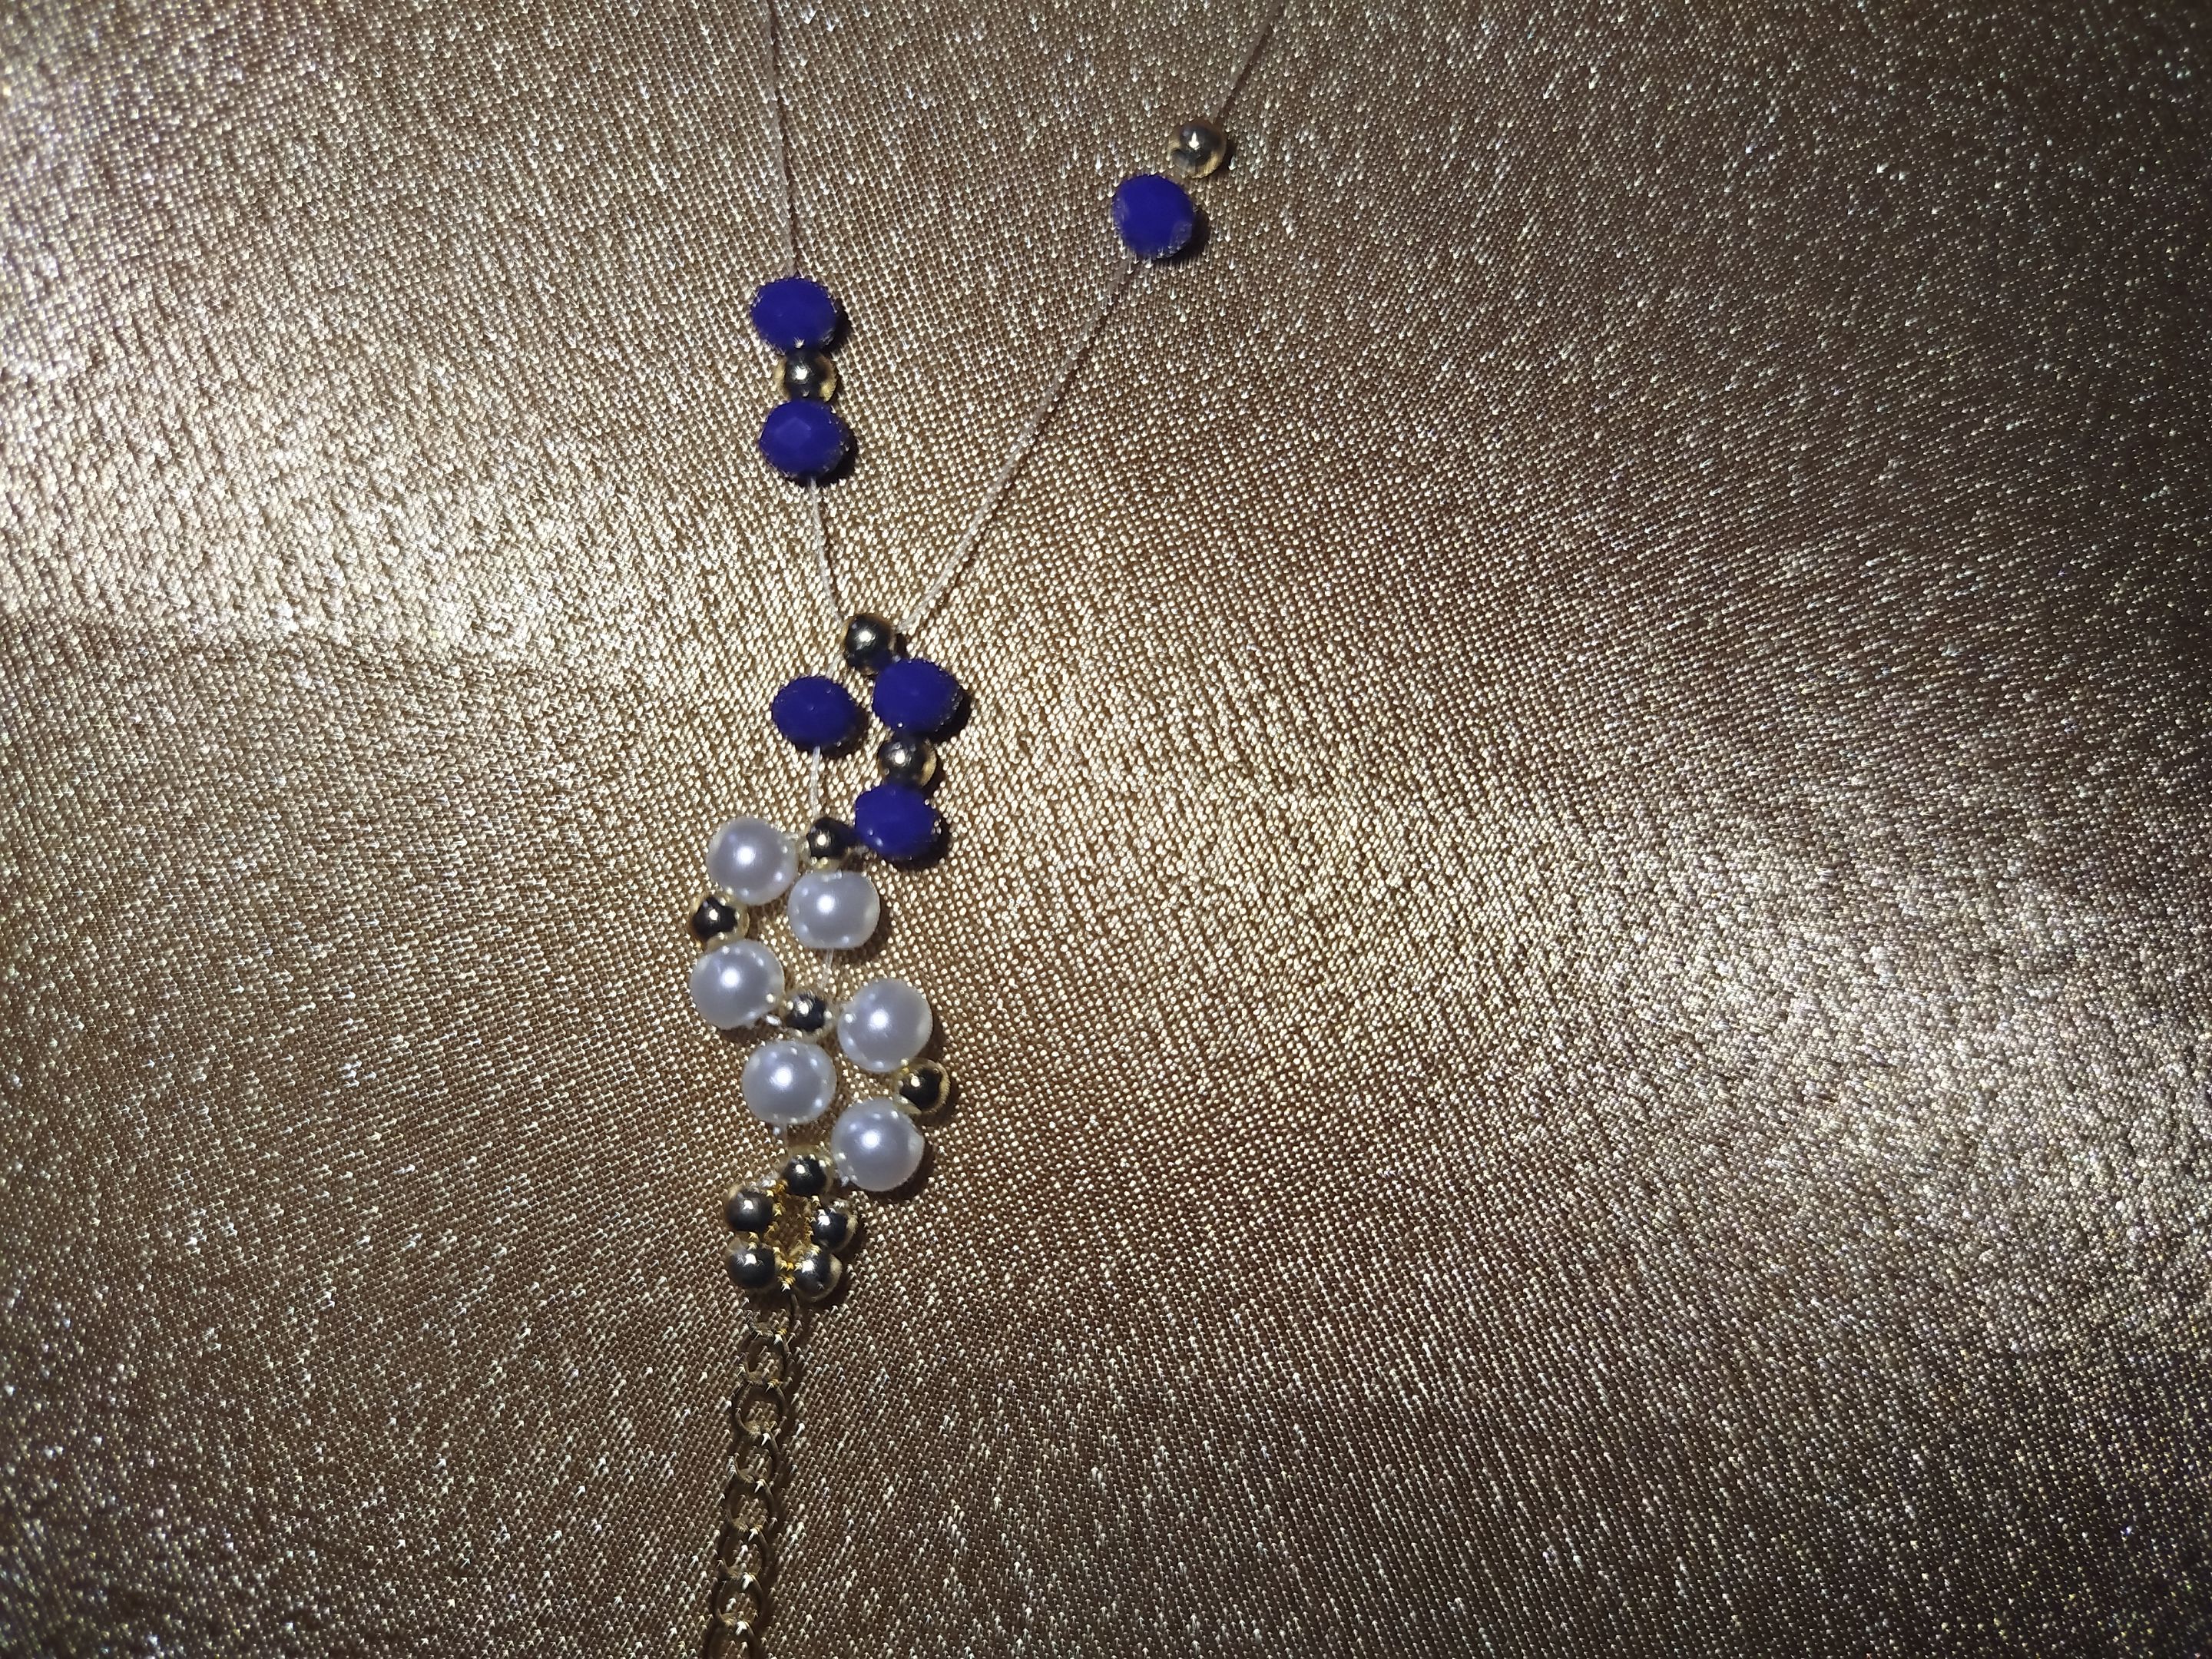
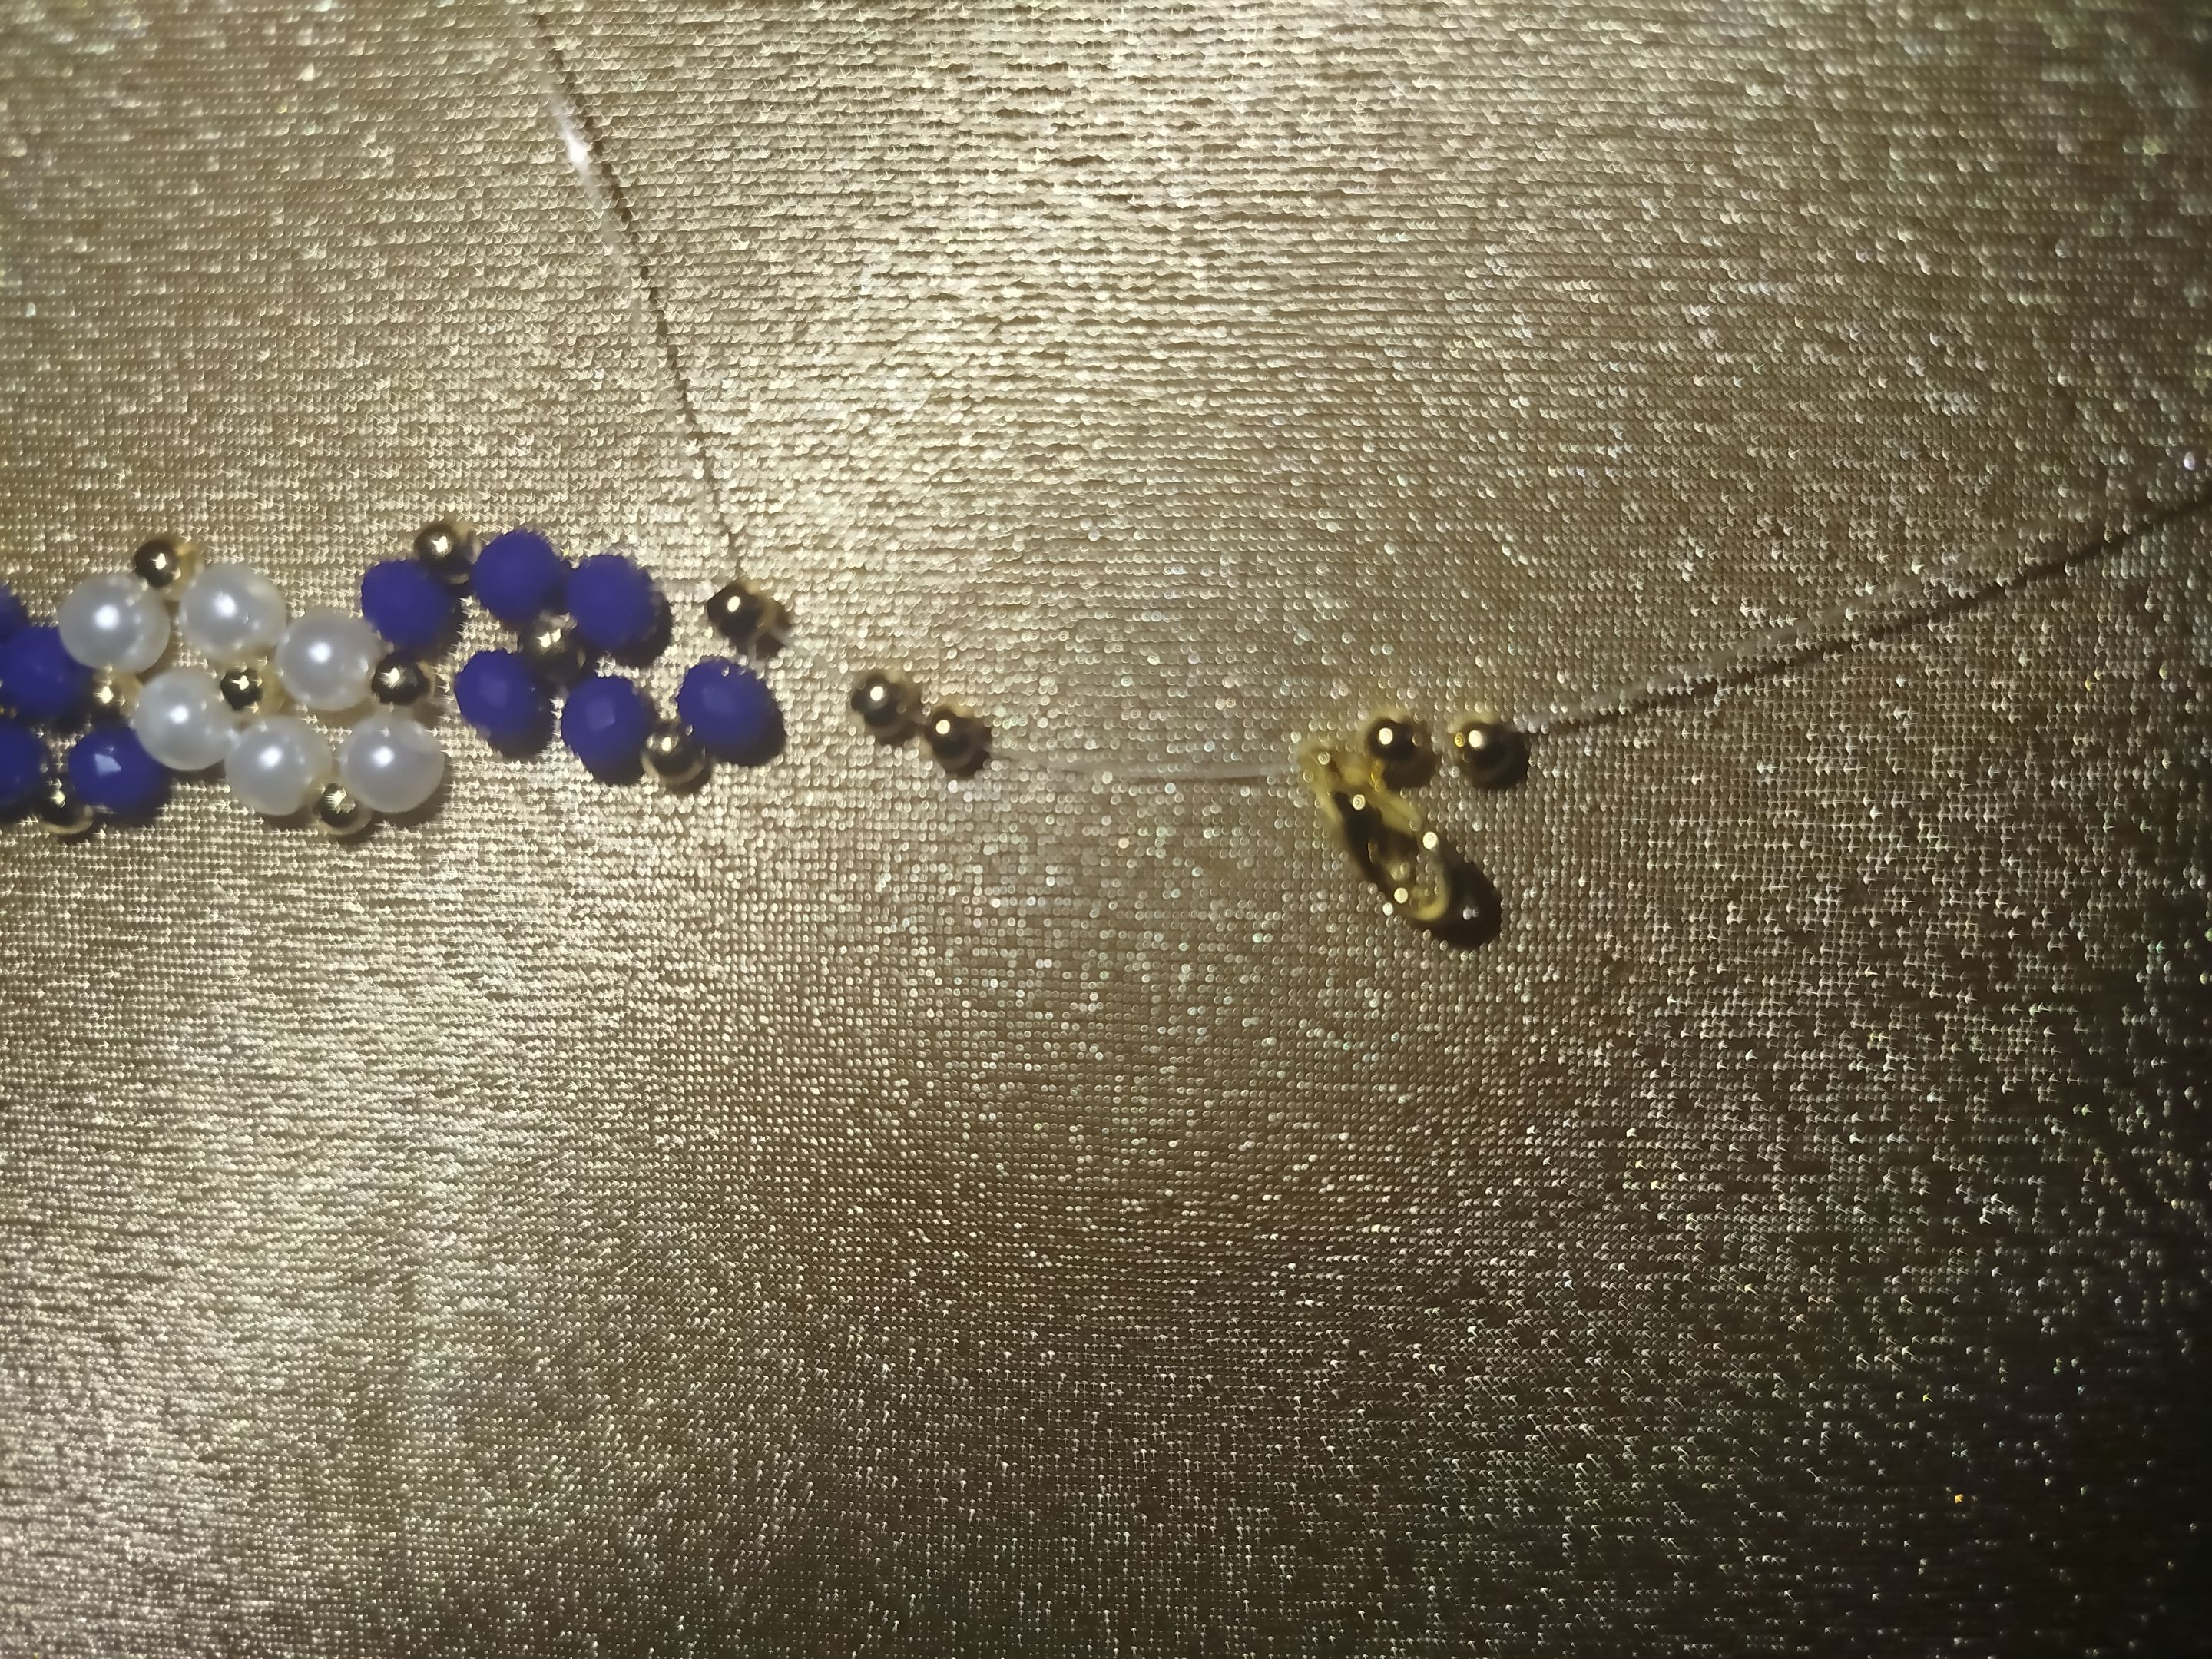
For the next figure, thread a bead and a pellet onto one of the strands. On the other strand, thread only a bead. Pass the needle through the pellet on the other strand and close. This will form a figure with six beads and five pellets. - - -
![IMG_20250921_135002.jpg](https://files.peakd.com/file/peakd-hive/gabimramirez/EoyP6xtxfJgWSEJQeJBdJkNEzCwDNMzXRBWTN3nhFzTfFZWUjUWRcP3BziZurKhNvVb.jpg)
![IMG_20250921_135051.jpg](https://files.peakd.com/file/peakd-hive/gabimramirez/Ep5mHUbEsWa2bVUjnSYXhLBKBWJZ131ayEEe7tvnophD76y9H3h6qTnHinMdJwuUqPr.jpg)
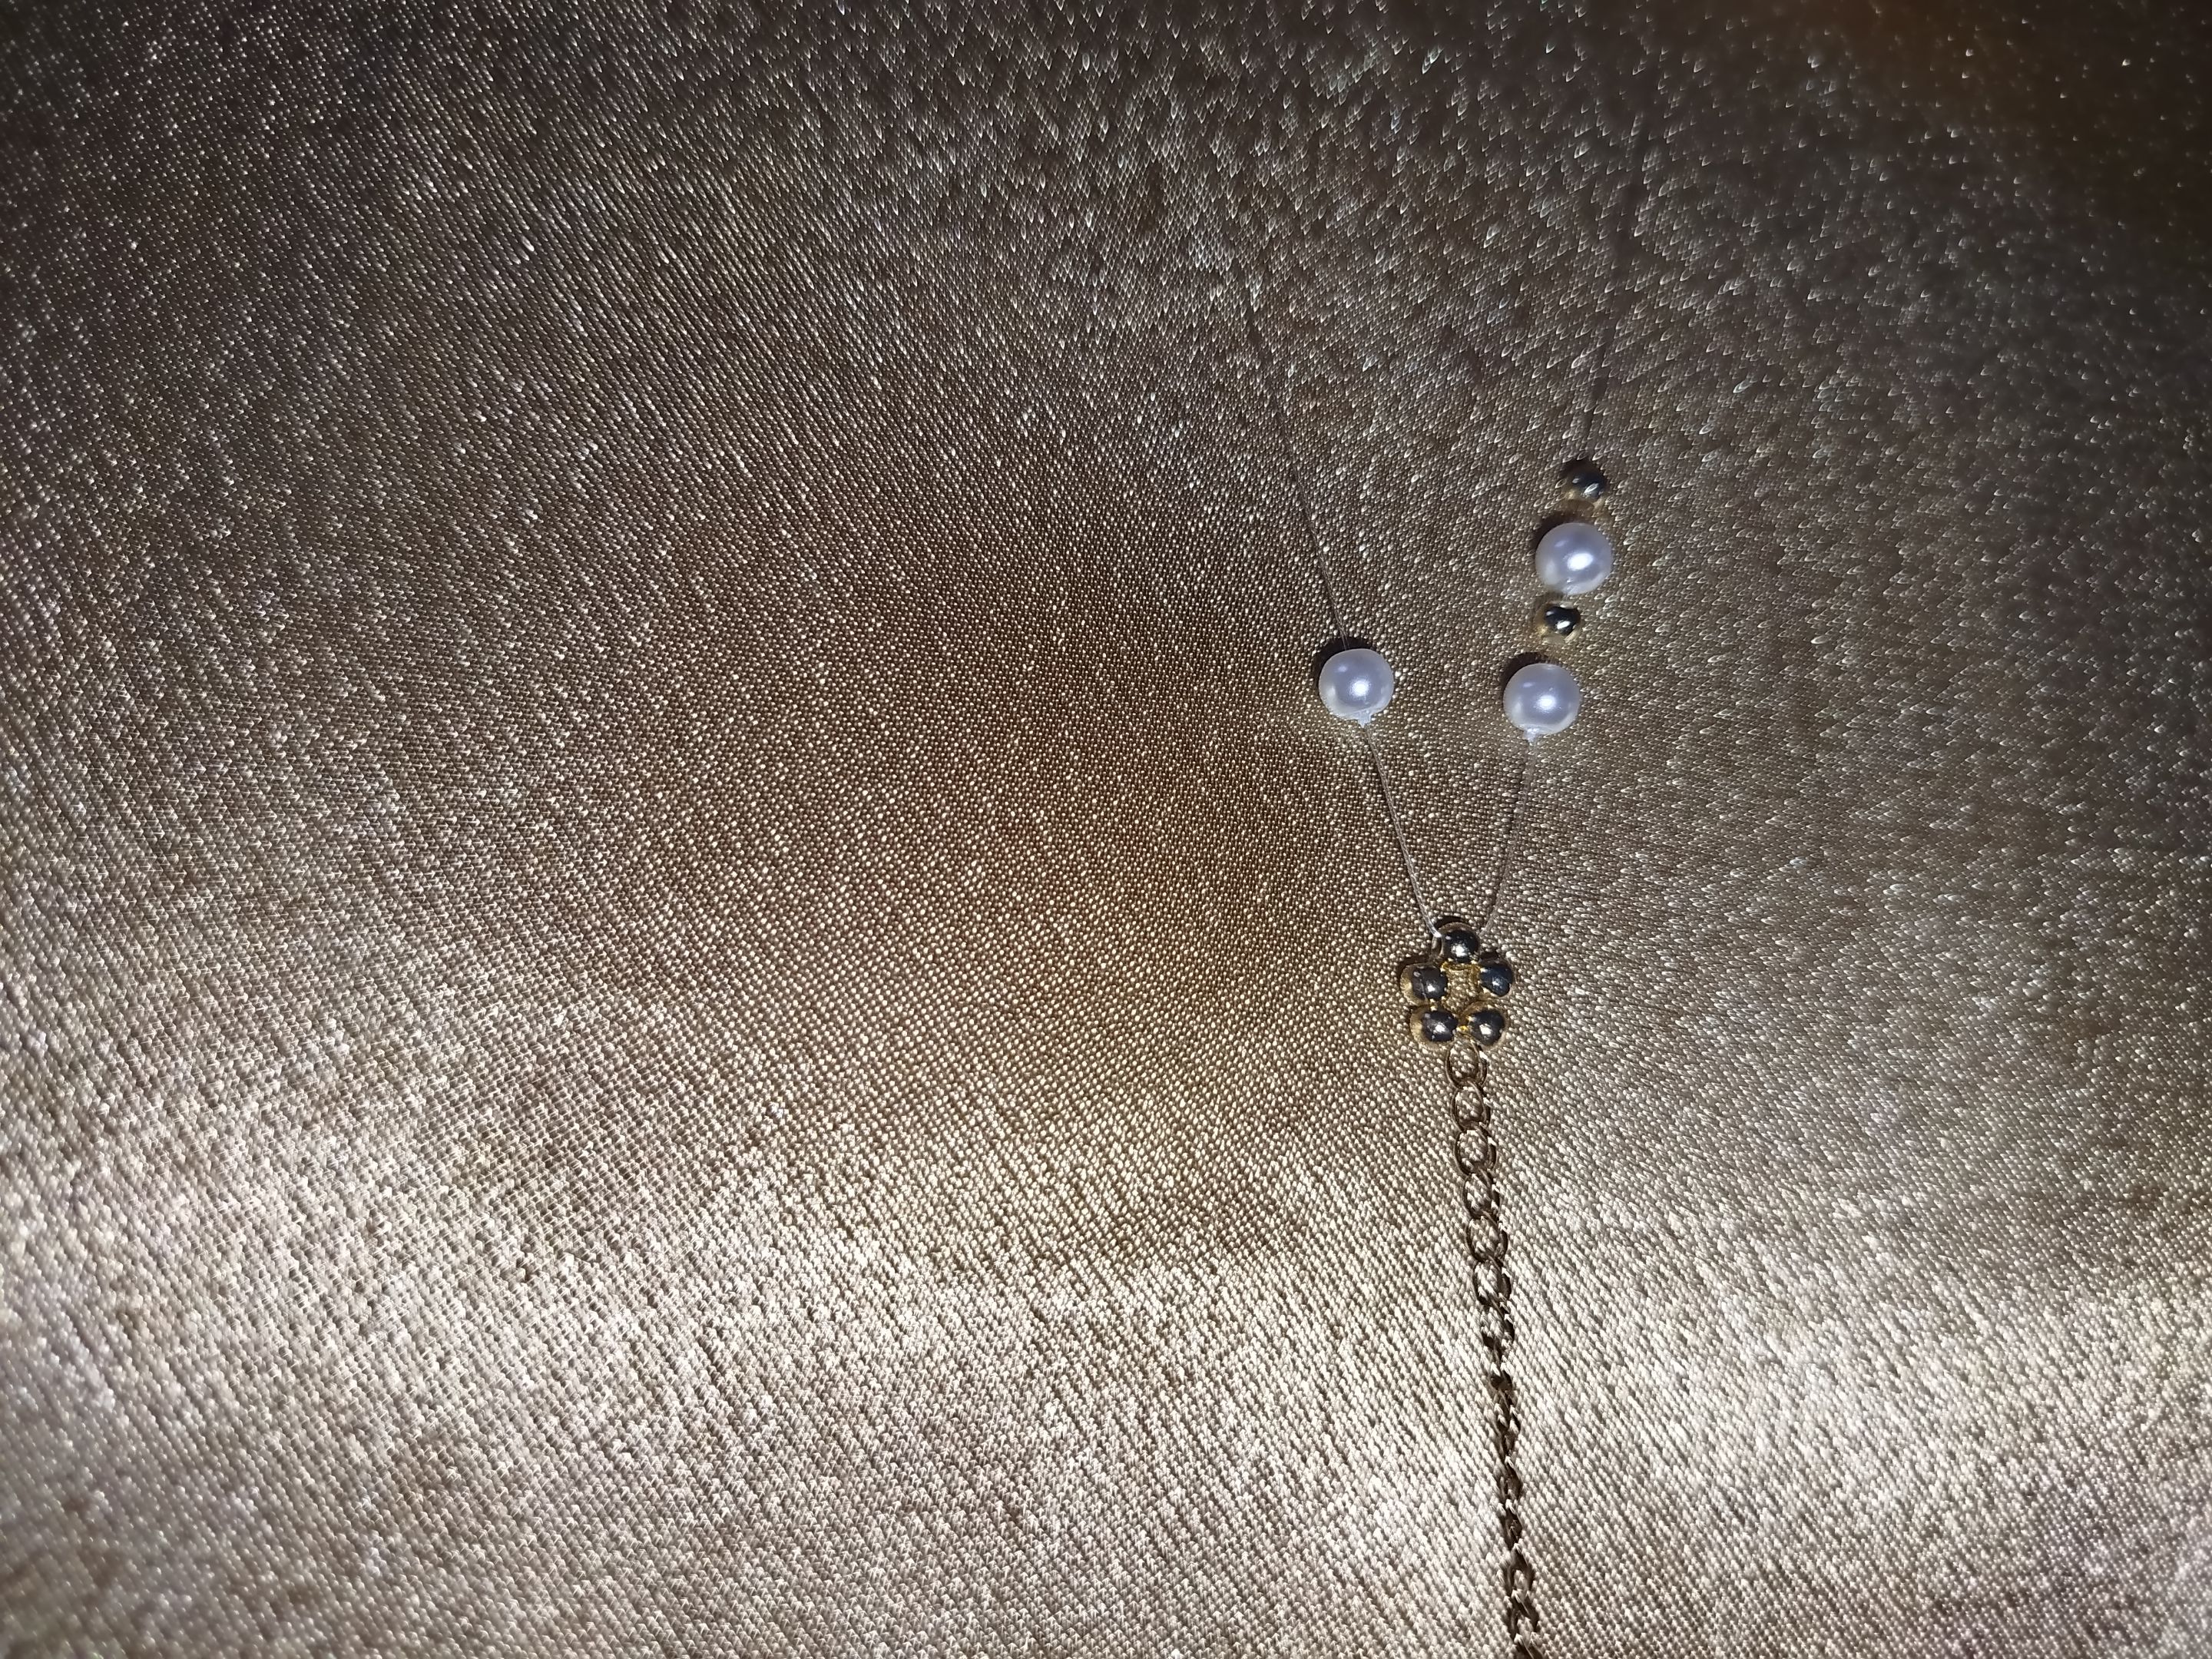
- - - Repeat the same procedure, but this time with the Swarovski crystals or crystal or Murano stones you chose (this depends on the quality you want for your bracelet or bangle, taking costs into account). On one of the strands, thread in the following order: a stone, a bead, a stone, and a bead. On the other strand or nylon thread, thread a stone. Thread the needle through the last bead to close and form the next triangle. - - -
![IMG_20250921_135406.jpg](https://files.peakd.com/file/peakd-hive/gabimramirez/Eokd4MzGDewEZks6XKRFr9RoNavVaqTkoUjH2ykT1fVkrry6J3mm8KbQELRAXpjzw8V.jpg)
![IMG_20250921_135447.jpg](https://files.peakd.com/file/peakd-hive/gabimramirez/EoK6MgmVyZLCKvhagDztUMixFXZUTa2oG7kyemXQhckxyj184s3c2LQtyFyJT3SaGnY.jpg)
- - -
![IMG_20250921_135720.jpg](https://files.peakd.com/file/peakd-hive/gabimramirez/EoptPqkAYxjn5R4fErXhHiJpKgSNnxatnyC4Zm5onxjpRxCoZ4Ty2pKEdv7mnNEBTHr.jpg)
![IMG_20250921_135650.jpg](https://files.peakd.com/file/peakd-hive/gabimramirez/EoeEtcqX871ZJuBCCGxmzsHEeCsp5n6XW8ELtaeUu6Ltztux3jiDP352jq2g47Nr2Tw.jpg)
---
![IMG_20250921_135758.jpg](https://files.peakd.com/file/peakd-hive/gabimramirez/EoiVmpeXQYdEgrGXgLK9gwN2h7qrkVmBKVKRbkwAHn9MBXLkQSgtccPZ8nSHusZgUJy.jpg)
![IMG_20250921_135755.jpg](https://files.peakd.com/file/peakd-hive/gabimramirez/EogNJoUMB1Ak8bmeDCVefaukioMX72xW8PNeeJSj5t5PrsUtU1s6iQrgkNEdTzcsMZ8.jpg)
--- Continue with the same process until the bracelet reaches the desired size for your wrist. To close, follow the same procedure as at the beginning, but instead of the extension chain, use the parrot beak clasp. - - -
![IMG_20250921_165106.jpg](https://files.peakd.com/file/peakd-hive/gabimramirez/EoyPUPqcEeEA1Y5thaT92fiF4zxLRRvM8tjXzKoqpF3jcT2gH7pVxz8VUqo38n3G2pN.jpg)
![IMG_20250921_165237.jpg](https://files.peakd.com/file/peakd-hive/gabimramirez/EoEqXZyiBrdveYEuapj3uHHi14aZU3uZm3bBjnHjYXBb1zvLTNWC47snmw5UFbPN1Fa.jpg)
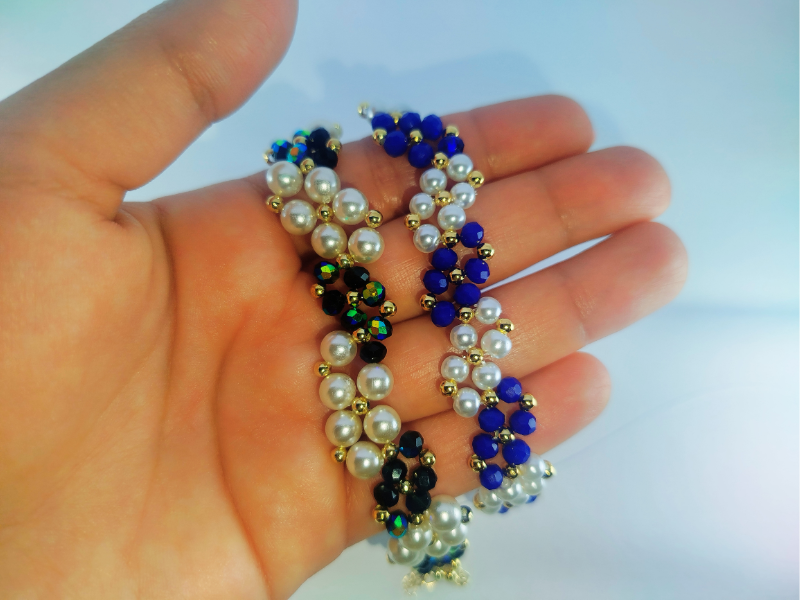
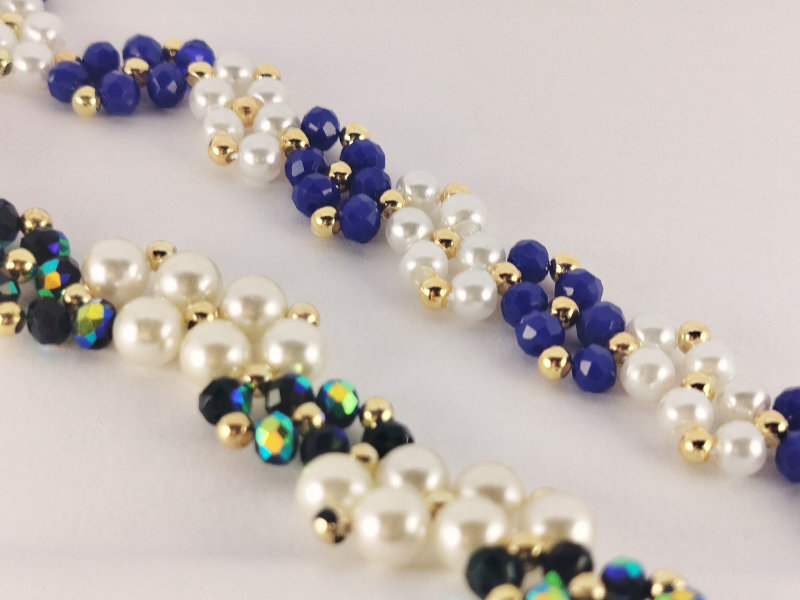
- - - With that, our beautiful bracelet is ready. Here are two models I made this week using the same technique. The result is very elegant, ideal for occasions where the dress code is much more formal. Finally, I would love to hear your opinions in the comments, and I thank you for reading this far. Have a happy day and night. --- ![1.png](https://files.peakd.com/file/peakd-hive/gabimramirez/Ep1ZKsFLs2qtVm6rvq9bP8fdLhDyh6XRhVp1ChxrkZvqwrj2STZof7Sqvohe2e4zFx1.png) --- ![2.png](https://files.peakd.com/file/peakd-hive/gabimramirez/EoH2msrJfRhPZWTSo6eSvghryut2xrWgmQNdn5n7fK5UkxDtA9TtjMZ4neRiBovmUVa.png) ---

1.jpg


¡Hola, queridos amigos de Hive! ¿Te gustaría crear una pieza de bisutería única y elegante? Pues hoy te enseñaré a hacer un hermoso brazalete de perlas y cristales de swarovski o murano, con una técnica de tejido nueva, que es doble pero que no deja de ser sencilla y fascinante. Es un proyecto perfecto para quienes aman los accesorios delicados, elegantes y por supuesto hechos a mano. Sin más que agregarles, les dejo los materiales a utilizar ¡Vamos a comenzar! - - - ![Brazalete con doble línea de perlas (5).jpg](https://files.peakd.com/file/peakd-hive/gabimramirez/23xevCREBhqh78hQE6g6Te89XMstwg8vbMepn43JHikYnGsAkcLV2F9aWaJQvoiMRKtYY.jpg) - - -
- Swarovski o piedras de cristal de murano (del color que prefieras). Perlas. - Balines o cuentas metálicas de 4 mm, preferiblemente en gold-filled para mayor durabilidad. - Agujas para bisutería. - Hilo nylon rígido. - Cierre (pico de loro) y cadena de extensión.
![IMG_20250921_125951.jpg](https://files.peakd.com/file/peakd-hive/gabimramirez/EoGyM6bPXCcHiRfs3ayqarSoD6wxoBJjpejrJdFoLyixQXvSNXcypYvhvWGHv9ynUMQ.jpg)
- - - ![Brazalete con doble línea de perlas (1).jpg](https://files.peakd.com/file/peakd-hive/gabimramirez/EouC8X1R9j66kNGvpKAnK5hHip5rdtGX5AzFBTKT6TdEBui18cTGeJEaZ1eu8xnbR8p.jpg) - - - Para empezar, corta el hilo nylon de un metro de largo. Luego, pasa una aguja por cada extremo y dobla el hilo por la mitad. En el centro exacto (importante detalle), introduce en una de las hebras de hilo la cadena de extensión y tres balines. - - - ![IMG_20250921_131631.jpg](https://files.peakd.com/file/peakd-hive/gabimramirez/EogNHpDi3En2YGKMmv34gPgfqDgHY3NXpGtU7vaEHLBDm9mN5gCArYZ3CBM5EzCKcNc.jpg) - - - Ahora, toma la otra aguja e introdúcela en el último balín, entrelazando las dos hebras de hilo. Ajusta bien para que este balín quede fijo. El objetivo es que la cadena y los balines queden exactamente en la mitad del hilo nylon, con dos hebras o extensiones de hilo de igual tamaño. - - -
![IMG_20250921_131747.jpg](https://files.peakd.com/file/peakd-hive/gabimramirez/EoEq2CvGoZPudMDHBeU4Y7MNqyHL5Q13UrysQJn6zHzzcEJpbtRyTeQKrHuHZLRn14a.jpg)
![IMG_20250921_131900.jpg](https://files.peakd.com/file/peakd-hive/gabimramirez/EoK5pae9E8CNbRQJNenDLj2hqvND5eD4nqJ9oW7pyJof8on4oR88VWdpW4spKwcft2Z.jpg)
- - -
![IMG_20250921_132203.jpg](https://files.peakd.com/file/peakd-hive/gabimramirez/EoK6G16qviH2GhnDnAnaVsKB9UYY1LBZ5WDSw59WoVUyhcHa65vd8frcVnSUy2nA76G.jpg)
![IMG_20250921_134109.jpg](https://files.peakd.com/file/peakd-hive/gabimramirez/EoEqZD7YYfY2dmUyqyVEwBvjPLvKJcWVFkTmmC4ovbFeSmVef5eewxhwEaxA6tXXR8B.jpg)
- - - Ahora, en una de las hebras de hilo, introduce con el siguiente orden: una perla, un balín, otra perla y un balín. En la otra hebra, sólo introduce una perla. Al tener esto listo, toma la aguja de esta última hebra y pásala por el balín que está al final del otro hilo. Al halar, verás que se forma una figura triangular con tres perlas y dos balines. - - -
![IMG_20250921_134417.jpg](https://files.peakd.com/file/peakd-hive/gabimramirez/EoAakpec5qtVBzvon9y4bxxC1KXCZHxB2XC9GWNKfTxB8d4qWcNzZiYYfhZcD3v6umL.jpg)
![IMG_20250921_134510.jpg](https://files.peakd.com/file/peakd-hive/gabimramirez/EoEq76FNoeXCLdMHx6Bex71eWt8FAZfZKWAZEJYtpueaLjWVUpJAP1MbZv3N7HXUyw6.jpg)
--- ![IMG_20250921_134633.jpg](https://files.peakd.com/file/peakd-hive/gabimramirez/Eoc7bYFDesQQJivmfxJhTtQrLpmTdxaNhKFWeZSpSBVMAsDfUKicfrsrKF4pfVPB8kE.jpg) - - - Para la siguiente figura, en una de las hebras, introduce una perla y un balín. En la otra, solo una perla. Pasa la aguja por el balín que está en el otro hilo y cierra. Se formará una figura de seis perlas y cinco balines. - - -
![IMG_20250921_135002.jpg](https://files.peakd.com/file/peakd-hive/gabimramirez/EoyP6xtxfJgWSEJQeJBdJkNEzCwDNMzXRBWTN3nhFzTfFZWUjUWRcP3BziZurKhNvVb.jpg)
![IMG_20250921_135051.jpg](https://files.peakd.com/file/peakd-hive/gabimramirez/Ep5mHUbEsWa2bVUjnSYXhLBKBWJZ131ayEEe7tvnophD76y9H3h6qTnHinMdJwuUqPr.jpg)
- - - Repite el mismo procedimiento, pero esta vez con los cristales Swarovski o las piedras de cristal o Murano que elegiste (esto depende de la calidad que quieras para tu pulsera o brazalete, tomando en cuenta costos). En una de las hebras, introduce con el siguiente orden: una piedra, un balín, una piedra y un balín. En la otra hebra o hilo nylon, una piedra. Entrelaza la aguja a través del último balín para cerrar y formar el siguiente triángulo. - - -
![IMG_20250921_135406.jpg](https://files.peakd.com/file/peakd-hive/gabimramirez/Eokd4MzGDewEZks6XKRFr9RoNavVaqTkoUjH2ykT1fVkrry6J3mm8KbQELRAXpjzw8V.jpg)
![IMG_20250921_135447.jpg](https://files.peakd.com/file/peakd-hive/gabimramirez/EoK6MgmVyZLCKvhagDztUMixFXZUTa2oG7kyemXQhckxyj184s3c2LQtyFyJT3SaGnY.jpg)
- - -
![IMG_20250921_135720.jpg](https://files.peakd.com/file/peakd-hive/gabimramirez/EoptPqkAYxjn5R4fErXhHiJpKgSNnxatnyC4Zm5onxjpRxCoZ4Ty2pKEdv7mnNEBTHr.jpg)
![IMG_20250921_135650.jpg](https://files.peakd.com/file/peakd-hive/gabimramirez/EoeEtcqX871ZJuBCCGxmzsHEeCsp5n6XW8ELtaeUu6Ltztux3jiDP352jq2g47Nr2Tw.jpg)
---
![IMG_20250921_135758.jpg](https://files.peakd.com/file/peakd-hive/gabimramirez/EoiVmpeXQYdEgrGXgLK9gwN2h7qrkVmBKVKRbkwAHn9MBXLkQSgtccPZ8nSHusZgUJy.jpg)
![IMG_20250921_135755.jpg](https://files.peakd.com/file/peakd-hive/gabimramirez/EogNJoUMB1Ak8bmeDCVefaukioMX72xW8PNeeJSj5t5PrsUtU1s6iQrgkNEdTzcsMZ8.jpg)
--- Continúa con el mismo proceso hasta que el brazalete alcance el tamaño deseado para tu muñeca. Para cerrar, haz el mismo procedimiento que al inicio, pero en lugar de la cadena de extensión, usa el cierre de pico de loro. - - -
![IMG_20250921_165106.jpg](https://files.peakd.com/file/peakd-hive/gabimramirez/EoyPUPqcEeEA1Y5thaT92fiF4zxLRRvM8tjXzKoqpF3jcT2gH7pVxz8VUqo38n3G2pN.jpg)
![IMG_20250921_165237.jpg](https://files.peakd.com/file/peakd-hive/gabimramirez/EoEqXZyiBrdveYEuapj3uHHi14aZU3uZm3bBjnHjYXBb1zvLTNWC47snmw5UFbPN1Fa.jpg)
- - - Con esto tendremos listo nuestro bello brazalete. Les enseño dos modelos que hice esta semana con la misma técnica, el resultado es muy elegante, ideal para ocasiones donde la ropa es mucho más formal. Ya para finalizar, me encantaría saber sus opiniones en los comentarios y les agradezco por llegar hasta aquí, que tengan un feliz día y noche. --- ![1.png](https://files.peakd.com/file/peakd-hive/gabimramirez/Ep1ZKsFLs2qtVm6rvq9bP8fdLhDyh6XRhVp1ChxrkZvqwrj2STZof7Sqvohe2e4zFx1.png) --- ![2.png](https://files.peakd.com/file/peakd-hive/gabimramirez/EoH2msrJfRhPZWTSo6eSvghryut2xrWgmQNdn5n7fK5UkxDtA9TtjMZ4neRiBovmUVa.png) ---

Fotos tomadas de mi teléfono Xiaomi Redmi Note 11 Pro y mi teléfono Honor X8a || Photos taken from my Xiaomi Redmi Note 11 Pro phone and from my Honor X8a phone.

Fuente del editor de imágenes || Image editor source

Traductor || Translator

#jewelry #handmade #joyeria #accessories #hechoamano #diy #spanish #neoxian #palnet
Payout: 0.000 HBD
Votes: 746
More interactions (upvote, reblog, reply) coming soon.