This is the story on how I managed to optimize Webpack build process in many ways, resulting in generated bundle size that’s 12 times smaller than what I started with!
The front-end ecosystem is growing continuously, cool new tools and packages are released constantly. While this is great, it also mean it’s harder and harder to be up-to-date with everything.
Recently I spent a few days working on improving performance of an web app. It’s a rather large app built using Django & Django REST Framework to create APIs and a few ⚛️ React apps that make use of these APIs.
While my performance optimizations were done on both back-end and front-end, in this article I’ll recap the steps I took to improve performance of the front-end part built with React and at the end I’ll draw important conclusions from it.
The problem
As I mentioned in the intro above, the main problem our users experienced was the low performance of the system. Unsurprisingly, the most complaints that we got were from users using mobile phones and mobile Internet connection.
They would complain that page load times were often times uncomfortably long and that there was a noticeable delay when navigating between different views.
The investigation
My immediate bet was that our Webpack-built bundles are too heavy and it takes a lot of time for browser to load them from the server.
After these bundles are loaded, only then React is booted and starts rendering the webpage — which also takes time. This means that user has to wait a long time before anything appears on the page.
This would be most noticeable on initial loads (when there are no cached bundles yet) and on slower network connections (on a mobile Internet connection).
Okay, so that’s the suspicion. Now how do I confirm it?
Webpack Bundle Analyzer
Meet the awesome 📊 Webpack Bundle Analyzer. It’s a command-line tool that allows developers to visualize size of Webpack output files with an interactive zoomable treemap.
It’s great for checking what makes up the size of the bundles, especially for such a visual person that I am. This was a natural starting point for me. I quickly added Bundle Analyzer to the dependencies:
$ yarn add -D webpack-bundle-analyzer
Once the analyzer finished installing, I ran profiling command. It generates stats.json file that stores information about the bundles that Webpack builds.
$ npx webpack --profile --json > stats.json
It took a moment and once the file was generated I was ready to dive into the generated statistics:
$ npx webpack-bundle-analyzer stats.json ./dist
First argument is the stats.json file that was just generated, and the second one is a path to the folder where the built files are outputted by Webpack. This is the dist folder by default.
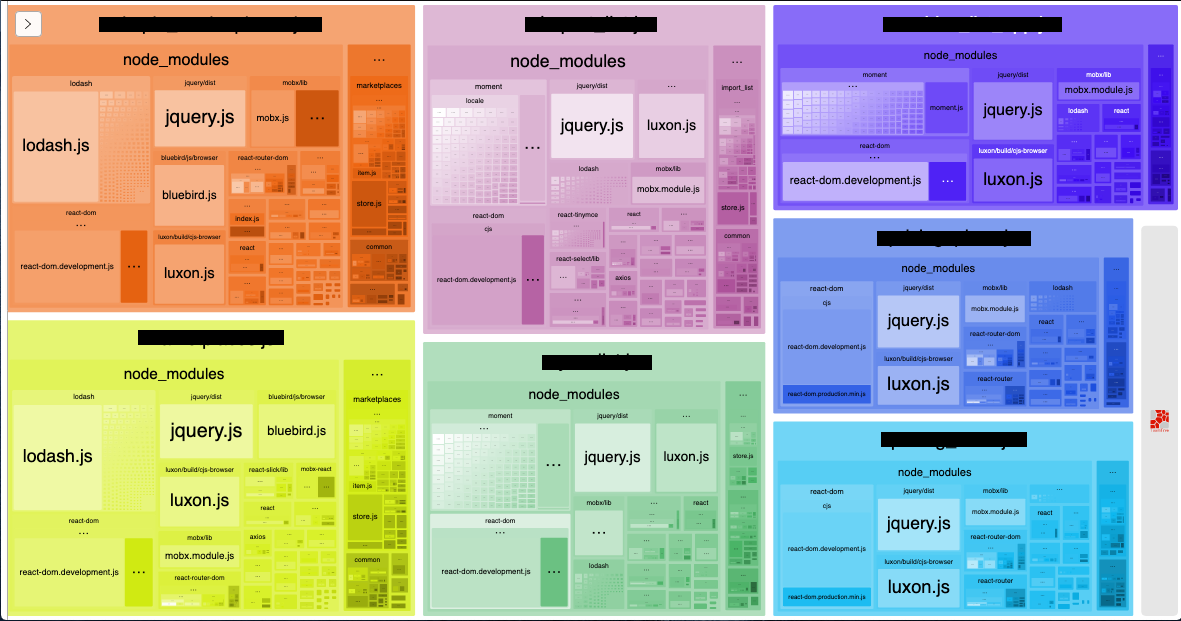
Analyzing the data
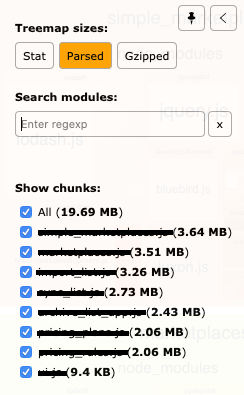
As you can see above, the front-end that needs optimization consists of few separate React apps (chunks). Each of them is mounted at a different URL endpoint.
Before we start digesting the graph, let’s look at the file sizes… All bundles weight almost 20 MB! That’s a lot. And the average 2-3 MB for a single app is also way too much — that’s how much the browser will have to load before it even starts rendering anything. React suggests that chunks do excess 250KB.
But why do these chunks even weight so much? We can find out by investigating composition of these files. These are the problems that arise from this investigation and that I will try to handle in this article:
-
Firstly, the bundled code is not minified for production!
-
Around 80% of each app is
node_modulesdependencies. -
The commons package that I mentioned at the start is not rendered into a separate chunk and so its copy is bundled with each app.
-
Some libraries can be easily replaced with lightweight alternatives, other can be removed altogether.
-
One of the apps is still bundled, even though it’s no longer used.
Of course, it’s possible and even wise to go on and try to find more issues at some point, but let’s not go over the top with too much at once — let’s see how much can be optimized by dealing with just these five problems!
Step 1: Working with Webpack
First step that I took was to update Webpack configuration and ensure that files are properly minimized for production.
While development code shouldn’t be minified to be easier to 🐛 debug, minimizing production code is a standard procedure that allows to lower the size of generated packages by up to few dozen percent.
Unfortunately, the project was still using Webpack 3. Upgrading it to version 4 took a while and I had to replace few Webpack plugins for Webpack 4-compatible versions. But with that out of the way, I was ready.
I wanted to update to Webpack 4, because from this version it’s no longer necessary to set up minification manually if you make use of the mode configuration option.
This was also applicable in my case, so simply adding --mode=production to the already existing build command did the trick! 🎉
A side note: npm audit
If you’re playing with dependencies anyway, remember to use npm audit as well! This command will report you dependencies that have security vulnerabilities in them.
npm audit fix will try to automatically update these packages to newer minor or patch versions that have these vulnerabilities fixed. This command is generally safe to use, because it will not do any major updates, and minor updates shouldn’t include breaking changes anyway — but you can never be sure.
In my case it managed to automatically fix over 150 serious vulnerabilities and did not break anything! 🎉 That was a long time since the last time anyone updated something, I guess… 🤷♂
Step 2: Replacing and removing dependencies
With the first step completed, we can now go into the code itself. Right away it’s easy to spot few dependencies that can be removed or replaced with better alternatives.
Unused app
One of the app bundles was a no longer used , yet it somehow remained in the code base. I started looking through the rest of the apps and quickly discovered, that there were maybe 2 or 3 files that imported something from this unused app— few simple utility functions.
It makes no sense to keep so much legacy code just because of that. Luckily, it was really simple to move these utilities to common module and replace imports so that they point to the new location.
At this point this unnecessary chunk could be safely removed without consequences. 🎉
jQuery
The other thing that draw my attention right away was this huge word repeating… Yes, I’m looking at you, jQuery!
Unfortunately, simply removing jQuery was no option — there was a lot of code that made have use of it and rewriting it would take days if not more. I started thinking about alternative solutions…
I opened the app in the browser and started analyzing the code server by the server… I quickly discovered, that pages that served these React apps already had jQuery included using good old