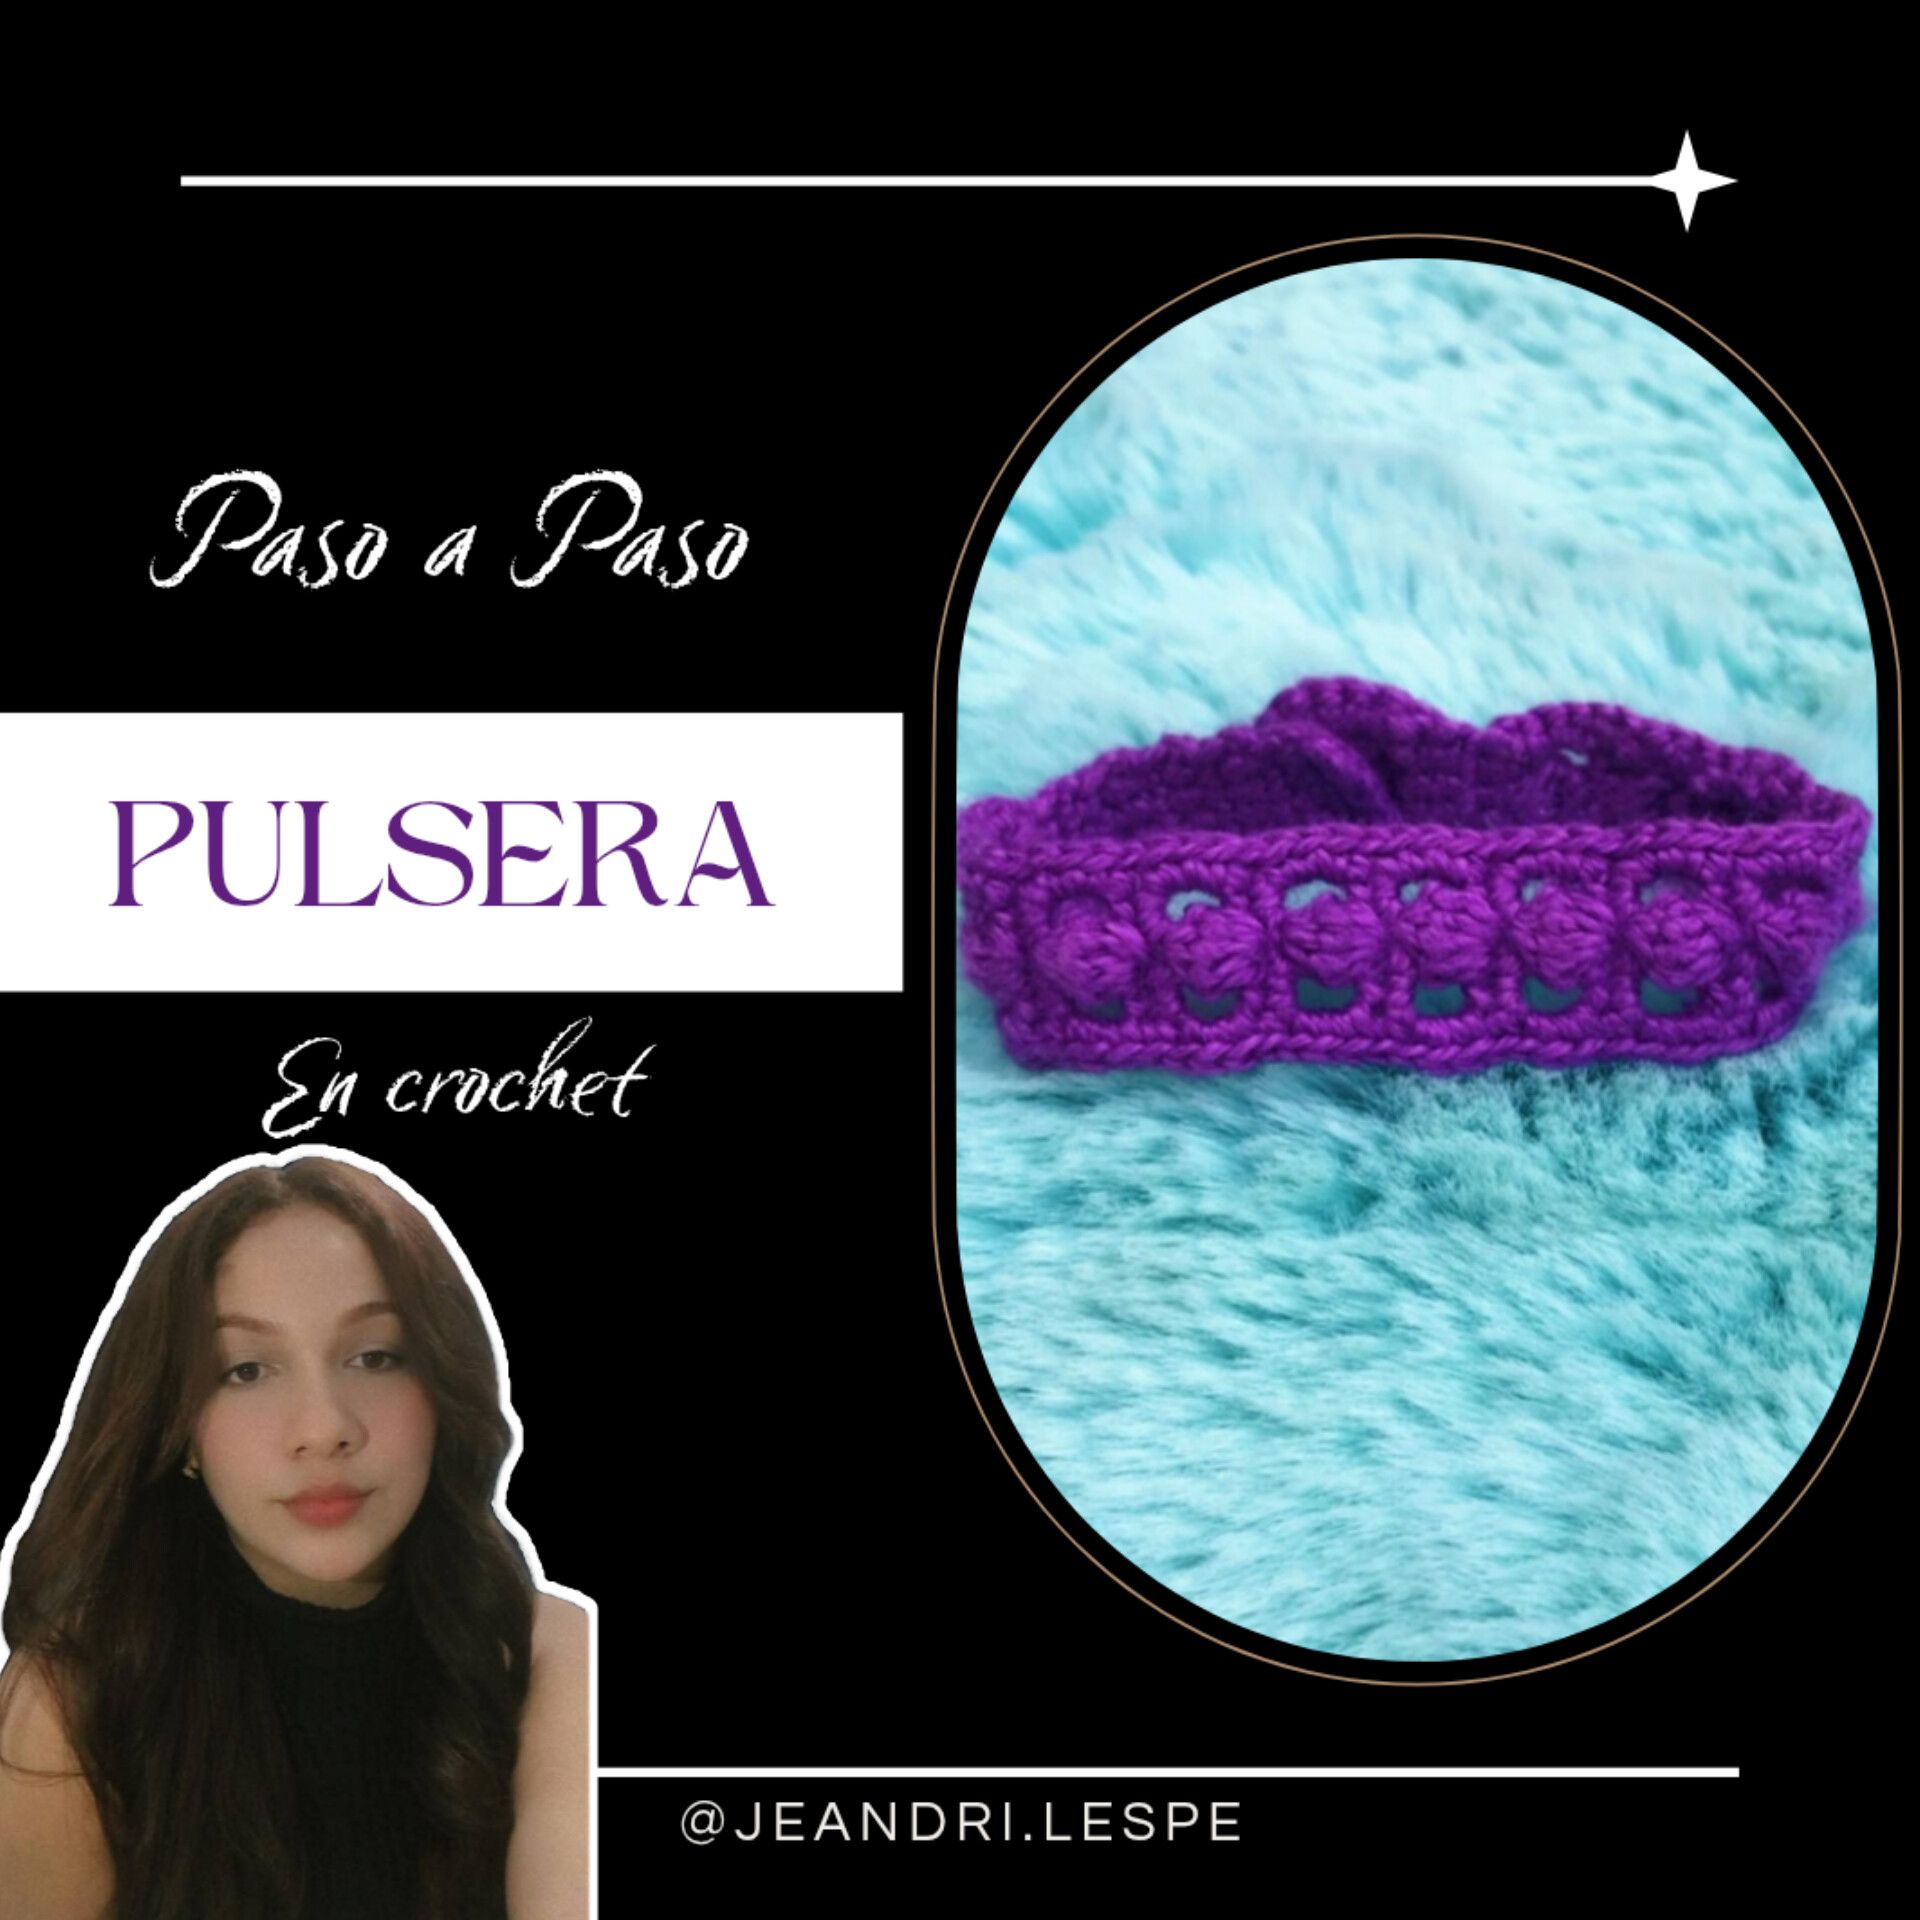
Hola mi gente linda de hive, nuevamente estoy por acá con un nuevo diseño, pero está vez quise traer algo diferente a habitual y es una pulsera en un tono morado que me gustó muchísimo y por supuesto que iba a compartirla con ustedes, espero les guste ❤️ ¡Vamos con los Materiales y el paso a paso! >Hello my lovely hive people, I'm back with a new design, but this time I wanted to bring something different than usual: a bracelet in a purple shade that I really liked, and of course I was going to share it with you. I hope you like it ❤️ Let's get to the materials and the step-by-step instructions! ____ # Materiales / Materials 💜✨ Hilo coral / Coral thread ✨ Aguja (número 3) / Needle (size 3) ✨ ____ Paso 1️⃣ / Step 1️⃣ 💜✨ Lo primero que haremos será un nudo deslizado y seguidamente levantaremos 10 cadenas, las cuales vamos a cerrar en la primera cadena con un punto deslizado, levantamos una cadena y procedemos a hacer 15 puntos bajo los cuales vamos a cerrar con un punto deslizado en el primer punto. 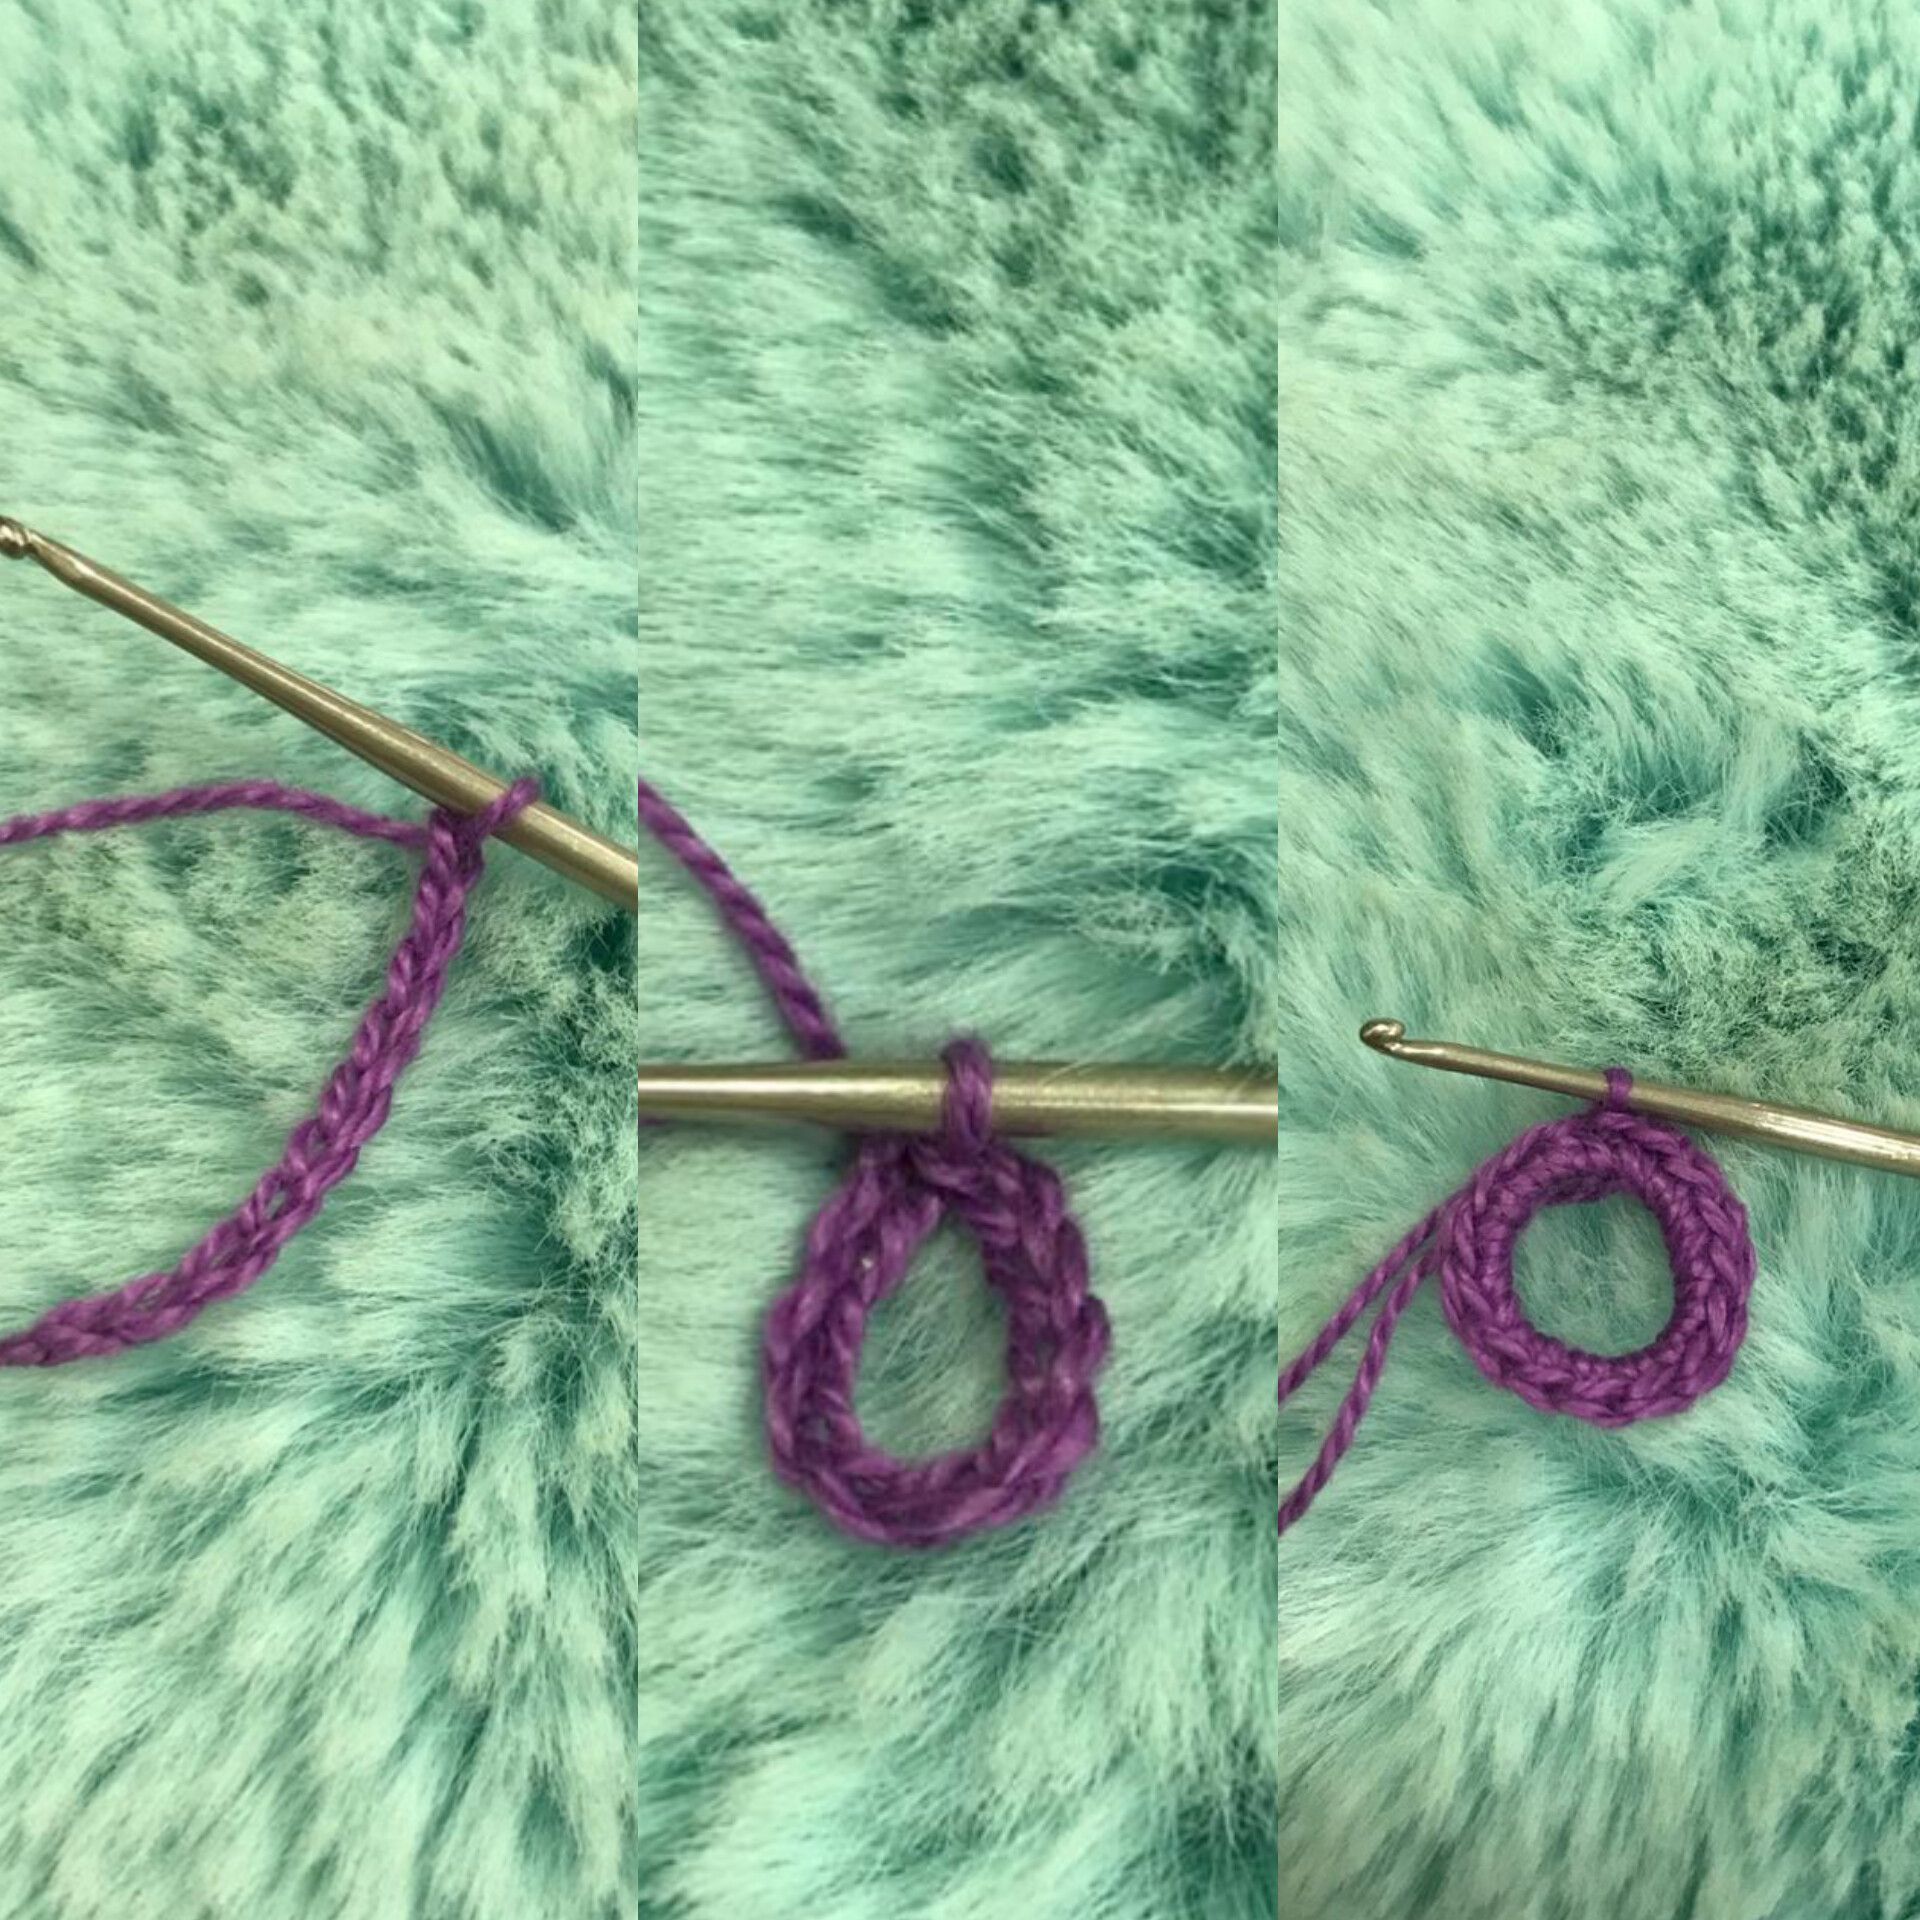 >The first thing we'll do is a slip knot, then we'll pick up 10 chains, which we'll close in the first chain with a slip stitch. We'll pick up a chain and proceed to make 15 stitches under the first chain, which we'll close with a slip stitch in the first stitch. ____ Paso 2️⃣ / Step 2️⃣ 💜✨ Ahora vamos a levantar una cadena y haremos un punto bajo sobre 5 puntos bajos que hicimos en la vuelta anterior, levantamos una cadena, damos vuelta al tejido y volvemos a hacer 1 punto bajo sobre cada uno de los 5 puntos bajos que ya hicimos, repetimos una vez más para un total de 3 hileras de 5 puntos bajos, ahora vamos a levantar 4 cadenas, damos vuelta a nuestro tejido, enlazamos y vamos a ubicar el tercer punto bajo donde haremos 5 puntos puff, tomamos hebra para cerramos el punto y hacemos una cadena para asegurar, ahora enlazamos y haremos un punto alto en el ultimo punto bajo, subimos una cadena y damos vuelta a nuestro tejido, ahora en el primer espacio haremos 2 puntos bajos, pasamos al centro de nuestro punto puff donde hicimos la cadena y haremos nuestro tercer punto bajo, llegamos al otro extremo donde haremos un punto bajo y el ultimo punto bajo lo haremos en la tercera cadena de la vuelta anterior, ahora volvemos a repetir la secuencia del diseño hasta lograr el largo que necesitamos, en mi caso fueron 13 espacios. 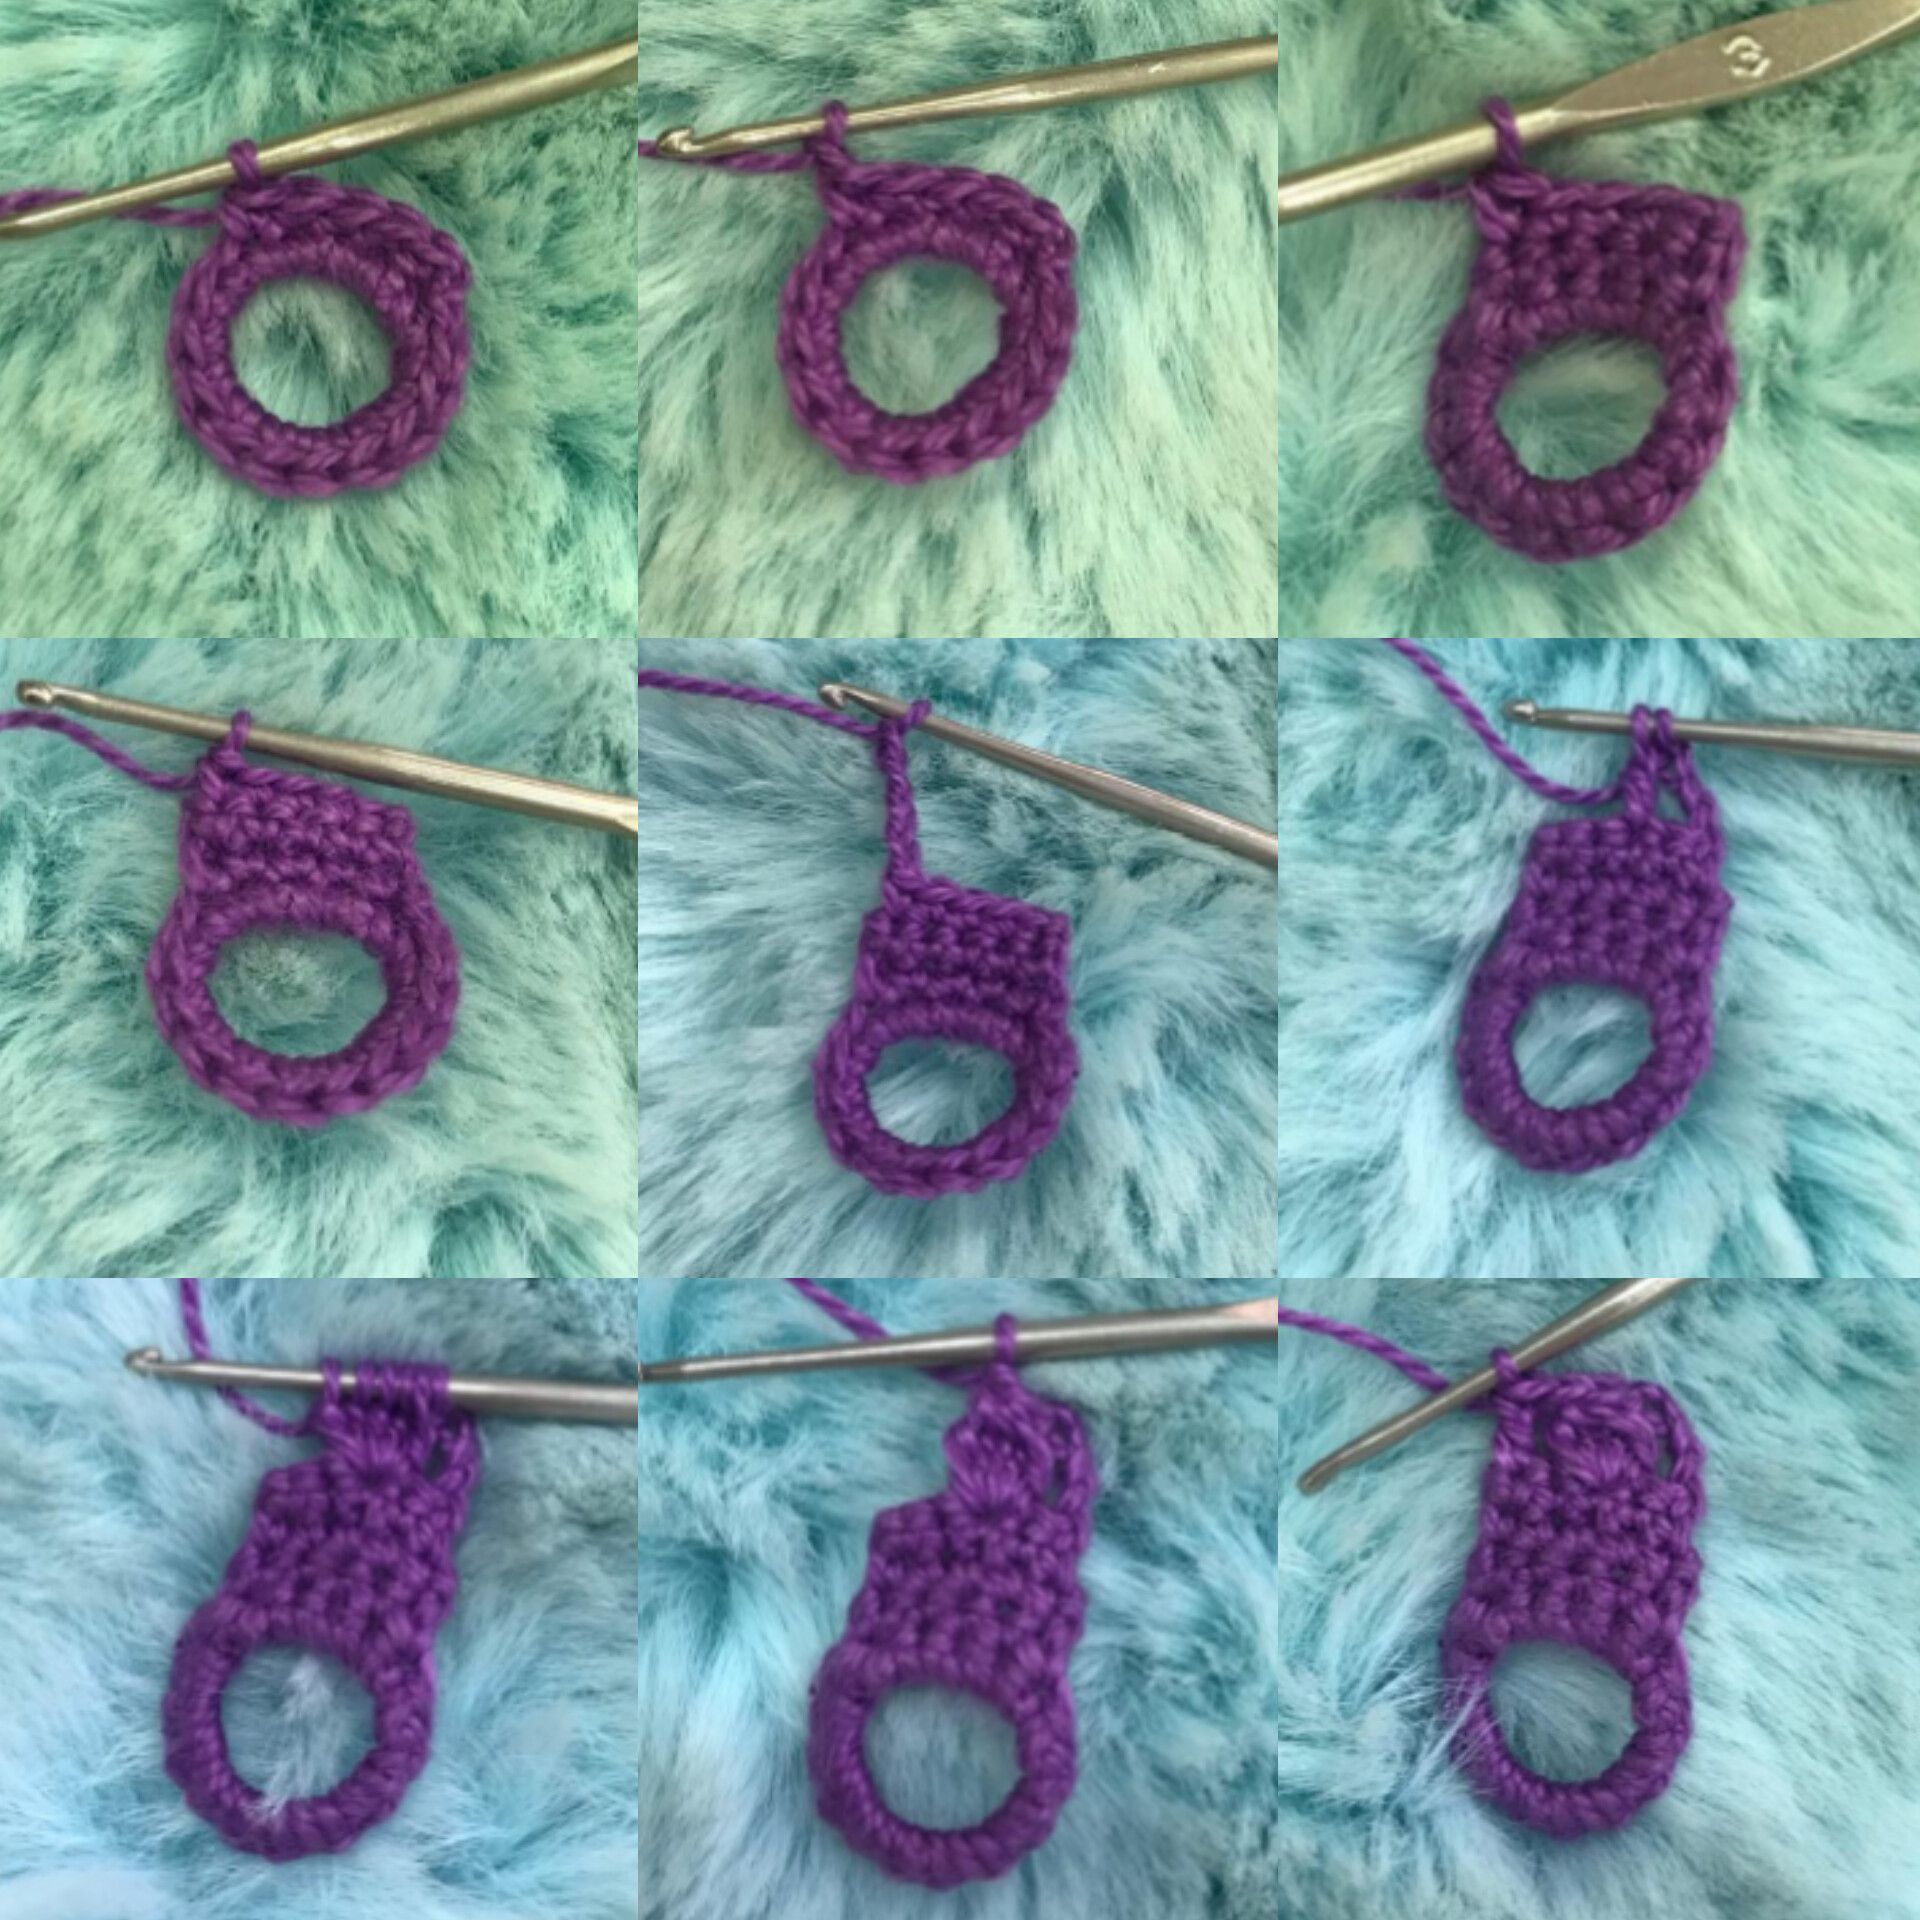  >Now we're going to pick up a chain and make a single crochet over the 5 single crochets we made in the previous row. We'll pick up a chain, turn the fabric, and make 1 single crochet over each of the 5 single crochets we already made. We repeat once more for a total of 3 rows of 5 single crochets. Now we're going to pick up 4 chains, turn our fabric, yarn over, and place the third single crochet where we'll make 5 puff stitches. We yarn over to close the stitch and make a chain to secure. Now we yarn over and make a double crochet in the last single crochet. We pick up a chain and turn our fabric. Now in the first space, we'll make 2 single crochets. We move to the center of our puff stitch where we made the chain and make our third single crochet. We reach the other end where we'll make a single crochet, and we'll make the last single crochet in the third chain of the previous row. Now we repeat the design sequence again until we reach the length we need. In my case, it was 13 spaces. ____ Paso 3️⃣ / Step 3️⃣ 💜✨ Ahora vamos a hacerle el borde a nuestra pulsera, entramos en el primer espacio de cadenas donde haremos 3 puntos bajos, pasamos al punto del medio donde haremos un punto bajo y así sucesivamente hasta llegar al aro que hicimos al comienzo, vamos a ubicar la última hilera de 5 puntos bajos que hicimos al comienzo y nos vamos a desplazar por cada uno de ellos con puntos deslizados hasta llegar al otro extremo y seguir con la secuencia de 3 puntos bajos y un punto bajo en el punto del medio, al llegar a la punta cerraremos con 5 puntos bajos como lo veníamos haciendo en casa diseño, 2 en el primer espacio, 1 en el punto puff y 2 en el siguiente espacio, cerramos con un punto deslizado en el primer punto bajo. 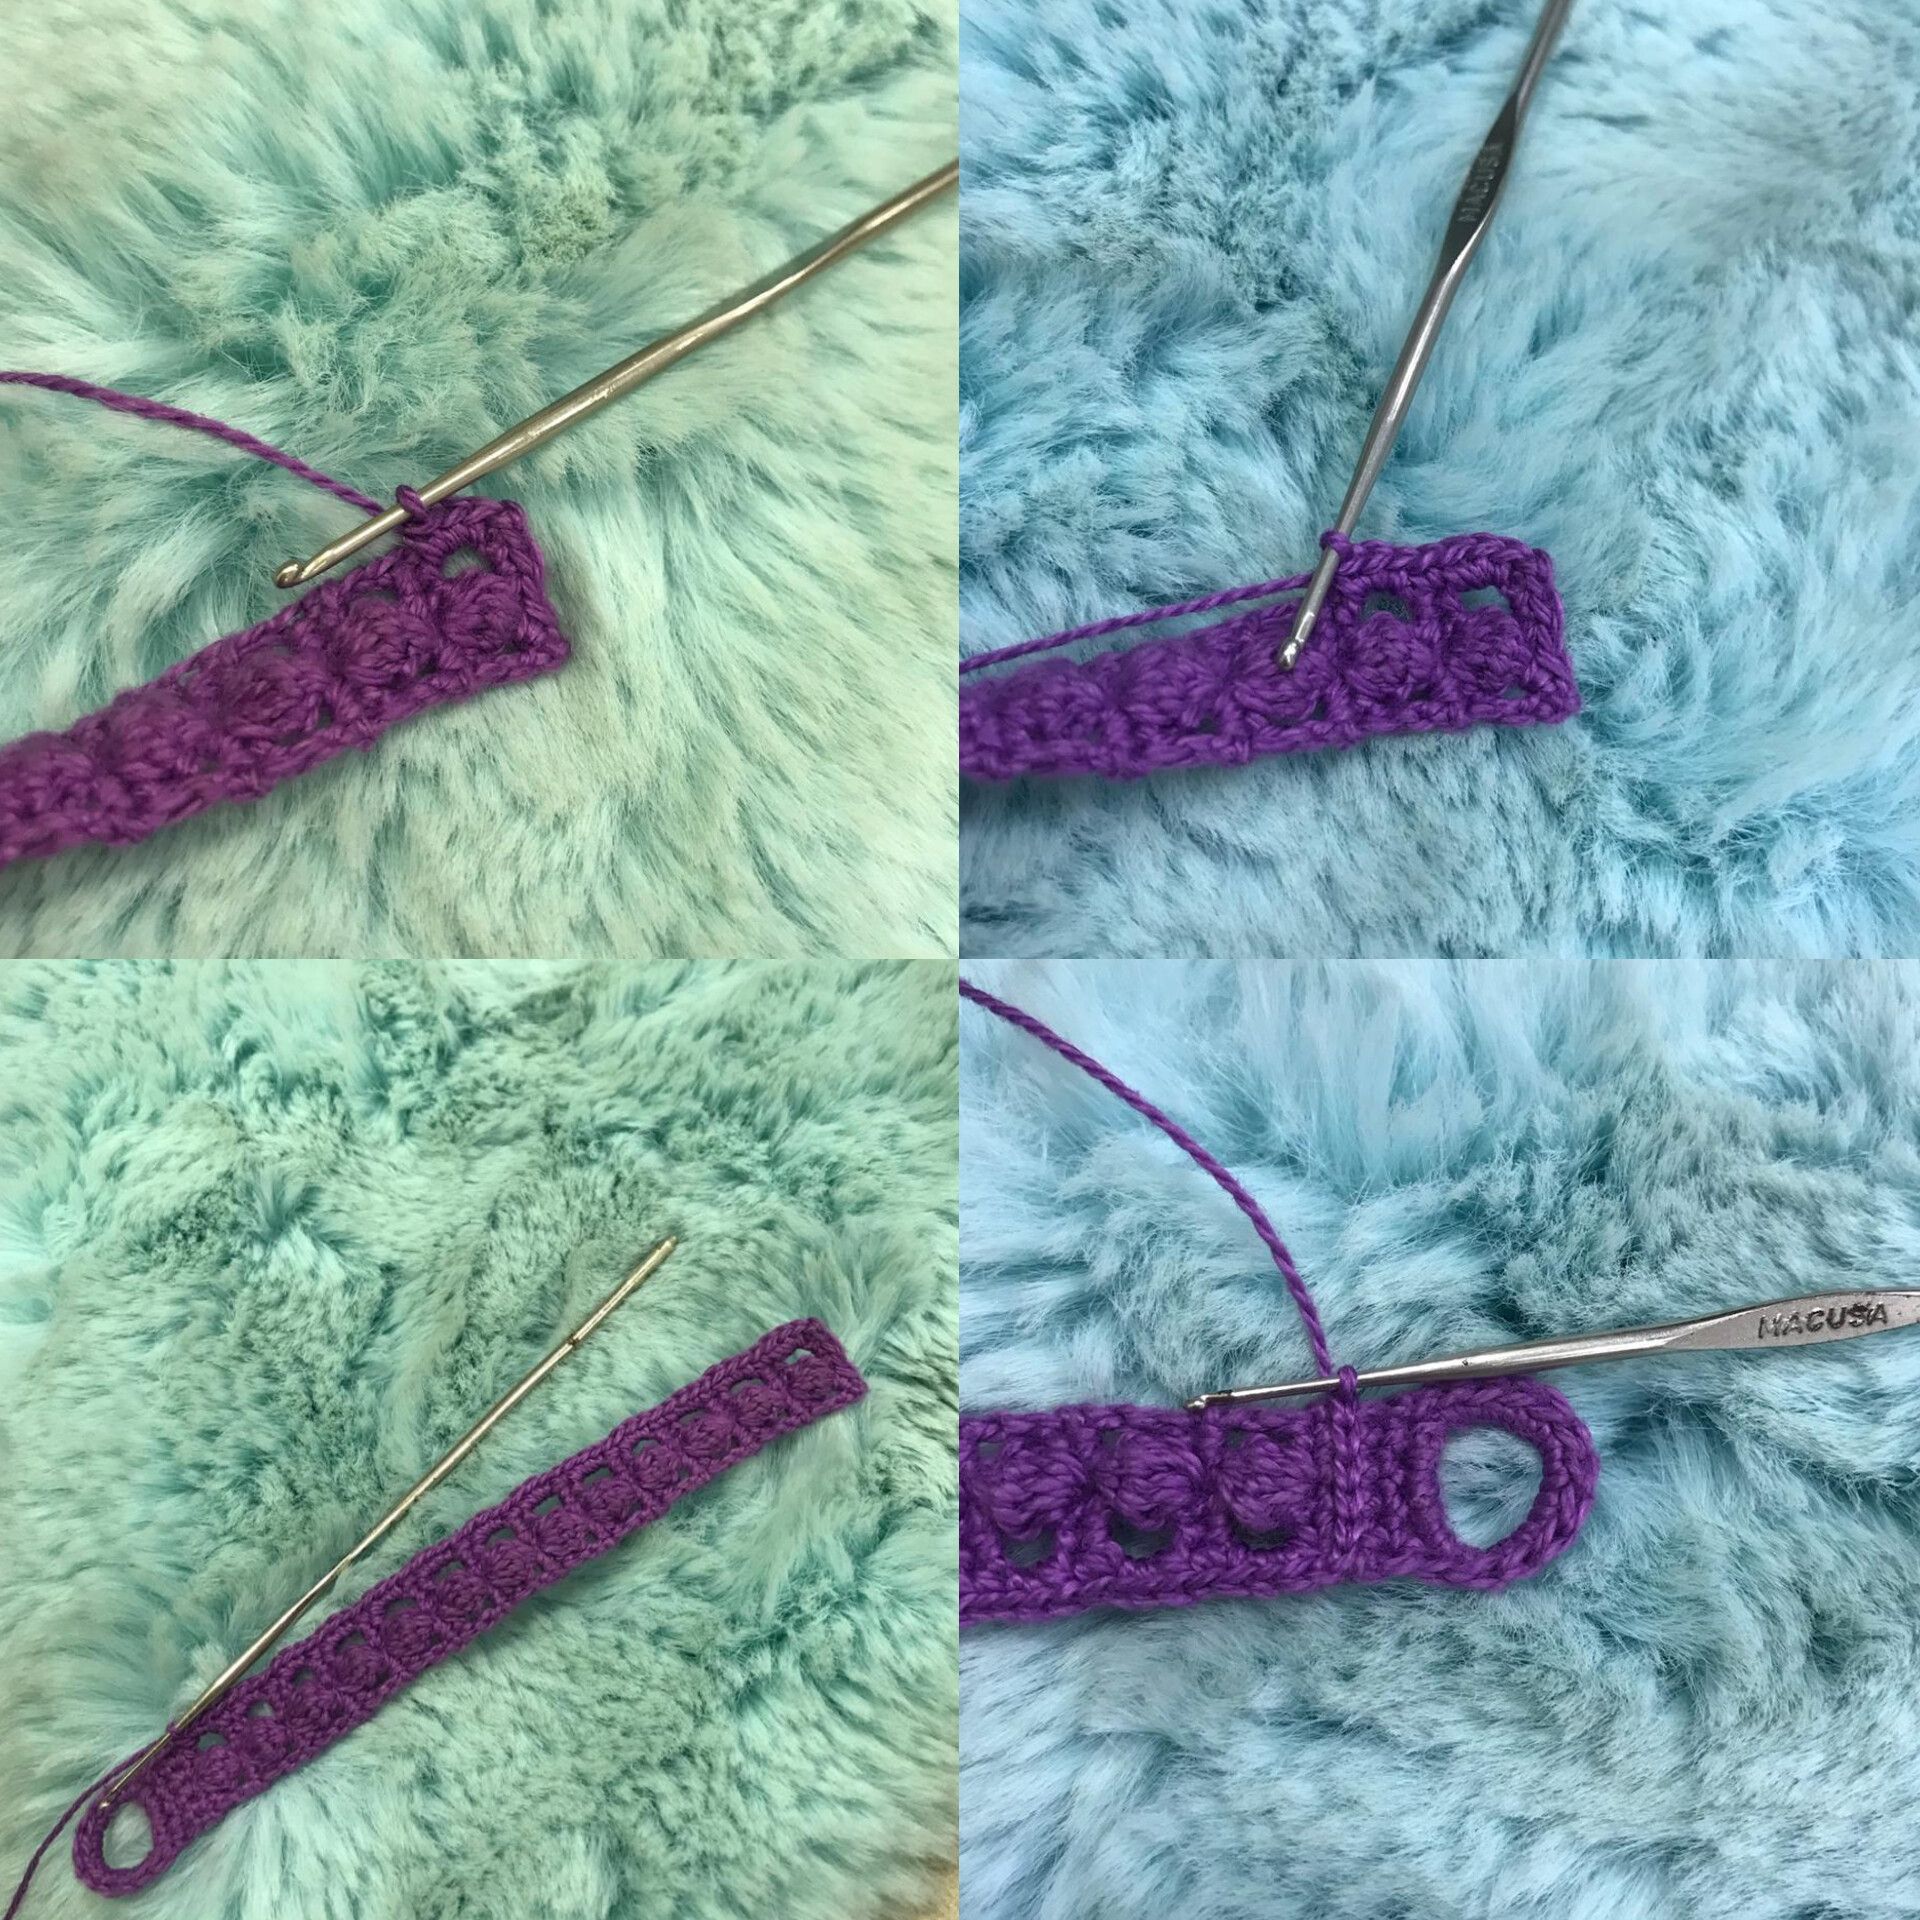  >Now we're going to make the edge of our bracelet. We'll enter the first chain space where we'll make 3 single crochets, move to the middle stitch where we'll make a single crochet, and so on until we reach the ring we made at the beginning. We'll place the last row of 5 single crochets we made at the beginning and move through each of them with slip stitches until we reach the other end and continue with the sequence of 3 single crochets and a single crochet in the middle stitch. When we reach the tip, we'll close with 5 single crochets as we've been doing in each design: 2 in the first space, 1 in the puff stitch, and 2 in the next space. We close with a slip stitch in the first single crochet. ____ Paso 4️⃣ / Step 4️⃣ 💜✨ Ahora vamos a subir una cadena y repetiremos el paso de 5 puntos bajos sobre 5 puntos bajos, hasta completar las hileras necesarias para que llegue de un extremo a otro, en mi caso con 13 fue suficiente, ahora con ayuda de una aguja, saqué suficiente hebra y comencé a hacer un pequeño círculo el cual decidí reforzar pasando un par de veces el hilo por él, ahora sí nuevamente con nuestra aguja de tejer, vamos a levantar 4 cadenas y procedemos a realizar 12 puntos altos pasando por el aro, los cuales vamos a cerrar en el primer punto con un punto deslizado, para que quede una especie de botón con el que vamos a cerrar nuestra pulsera (si tienen el botón y se pueden ahorrar este paso, estupendo también) escondemos el sobrante de hebra y así es como queda lista nuestra pulsera.   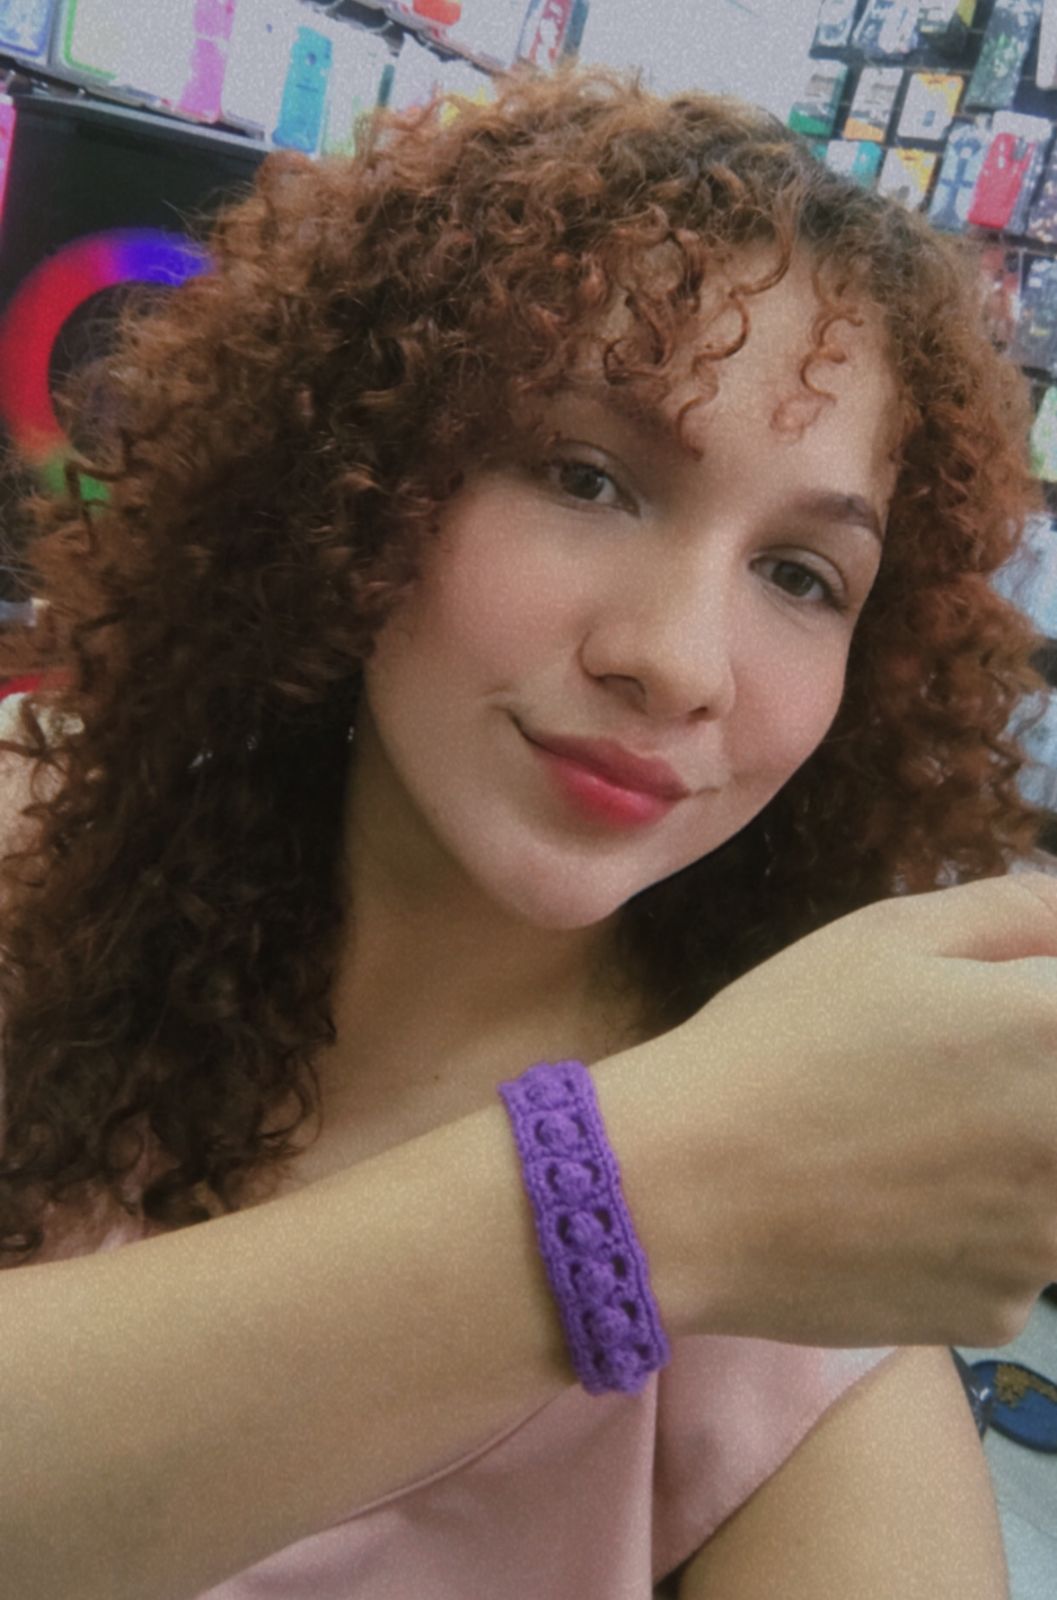    >Now we're going to chain up and repeat the step of 5 single crochets over 5 single crochets, until we've completed the necessary rows to reach from one end to the other. In my case, 13 was enough. Now, with the help of a needle, I pulled out enough yarn and began to make a small circle, which I decided to reinforce by passing the yarn through it a couple of times. Now, again with our knitting needle, we're going to lift 4 chains and proceed to make 12 double crochets, passing through the ring. We're going to close these in the first stitch with a slip stitch, so that we have a kind of button with which we'll close our bracelet (if you have the button and can skip this step, that's great too). We hide the excess yarn, and that's how our bracelet is ready. Espero les haya gustado amigos, muchísimas Gracias por su apoyo siempre, les mando un fuerte abrazo ❤️✨ >I hope you liked it friends, thank you so much for your support always, I send you a big hug ❤️✨