Un saludo para todos, queridos compañeros creativos. ¡Estoy de vuelta más rápido de lo que creí! Resulta que estos últimos días he estado invirtiendo mucho de mi tiempo en buscar, pensar y decidir ideas para crear contenido, y al mismo tiempo cumplir con un par de pequeñas metas para crear cosas que necesito o quiero, para darme un gusto y también a algunas personas a las que quiero muchísimo.
Greetings to all my dear creative companions! I'm back faster than I thought. These past few days, I’ve been investing a lot of my time in searching, thinking, and deciding on ideas to create content, while also working toward a couple of small goals to make things I need or simply want—for myself and for some of the people I love dearly.
Desde que, gracias a la universidad, tuve que adquirir cierto tipo de materiales y herramientas, se me ha estado haciendo mucho más divertido e interesante crear contenido, pues tengo más posibilidades de realizar una mayor variedad de cosas. Entre esas cosas que, en serio, no sabía que necesitaba hasta que las compré, están las pinturas al frío, los pinceles y la paleta para pintar. Esto me ha llenado de motivación e inspiración para crear diferentes cosas; entre ellas está la manualidad de hoy.
Thanks to university, I had to acquire certain materials and tools, and ever since then, creating content has become way more fun and interesting. I now have more possibilities to make a wider variety of things. Among those things—ones I honestly didn’t know I needed until I bought them—are cold paints, brushes, and a painting palette. These have filled me with motivation and inspiration to create all sorts of things, including today’s craft.
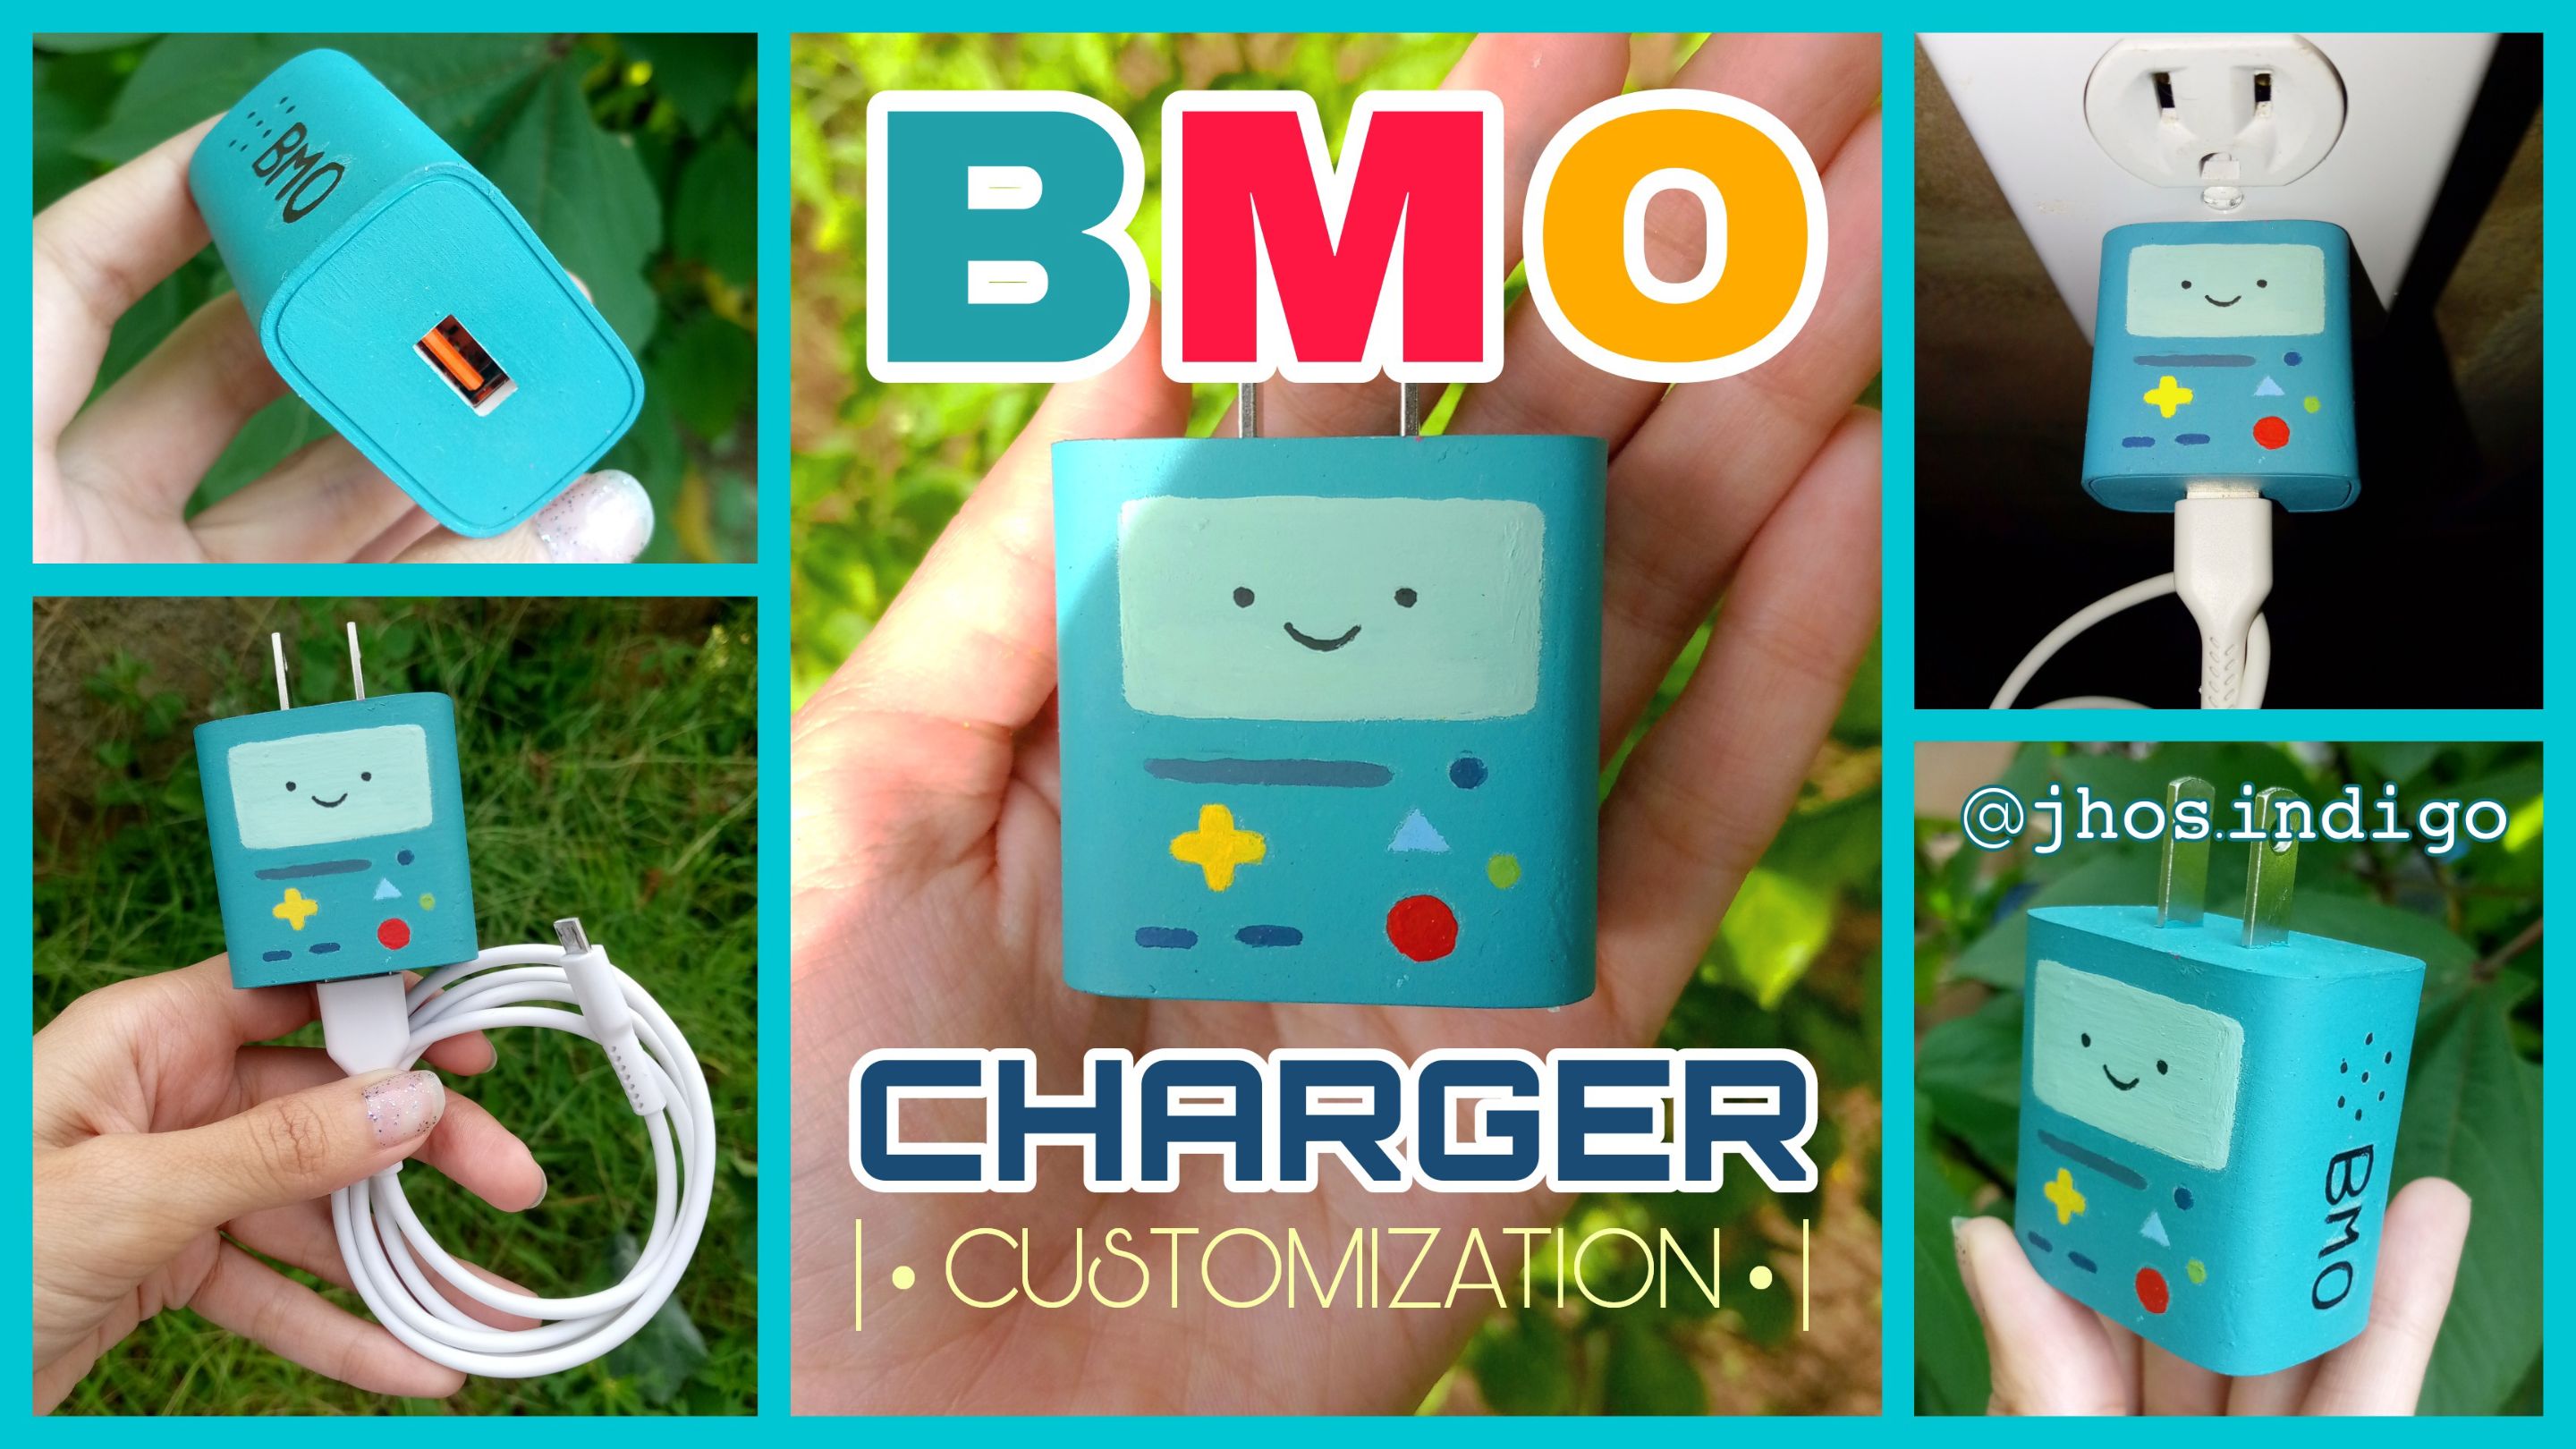
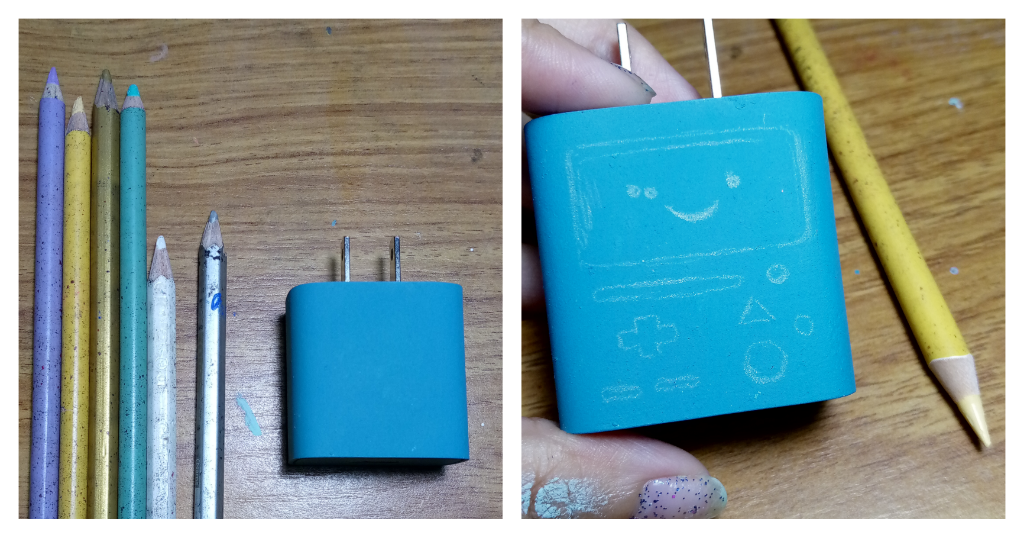
Sin duda alguna, uno de los personajes que amo de Hora de Aventura, por el carisma, la personalidad, la individualidad y la estética que tiene, es BMO, quien es una pequeña consola de juegos perteneciente a Finn y Jake. Es algo antigua y con un diseño y esencia súper amigable y agradable. Tiene el razonamiento, el comportamiento inocente, las reacciones, rarezas y un modo tan puro de interactuar con el mundo que podrían encontrarse en un niño pequeño; eso lo hace sumamente adorable y difícil de no amar, a pesar de lo ocasionalmente cuestionable de sus acciones o palabras.
Without a doubt, one of the characters I absolutely love from Adventure Time—for their charisma, personality, uniqueness, and aesthetic—is BMO, a small gaming console belonging to Finn and Jake. It’s a bit old-school, with a super friendly and pleasant design and vibe. BMO has the reasoning, innocent behavior, reactions, quirks, and pure way of interacting with the world that you’d find in a small child. That makes them incredibly adorable and hard not to love, despite the occasionally questionable things they say or do. Es mi tercer personaje favorito de Hora de Aventura, sin lugar a dudas, pero en estética, para mí, es el que más me atrae. Así que decidí llevar a cabo una idea que había encontrado hace ya un par de años y que me había encantado: personalizar la apariencia de la base de mi cargador según su imagen.
BMO is my third favorite character from Adventure Time, no doubt about it—but aesthetically, they’re the one I find most appealing. So I decided to bring to life an idea I came across a couple of years ago and absolutely loved: customizing the look of my charger base to match BMO’s image.
Sin más preámbulos, les muestro cómo pude hacerlo. (¡Fue un proceso gratificante!)
Without further ado, here’s how I did it. (It was such a rewarding process!)
• 🄼🄰🅃🄴🅁🄸🄰🄻🄴🅂 • 🖌️🕹🎨• 🄼🄰🅃🄴🅁🄸🄰🄻🅂 •
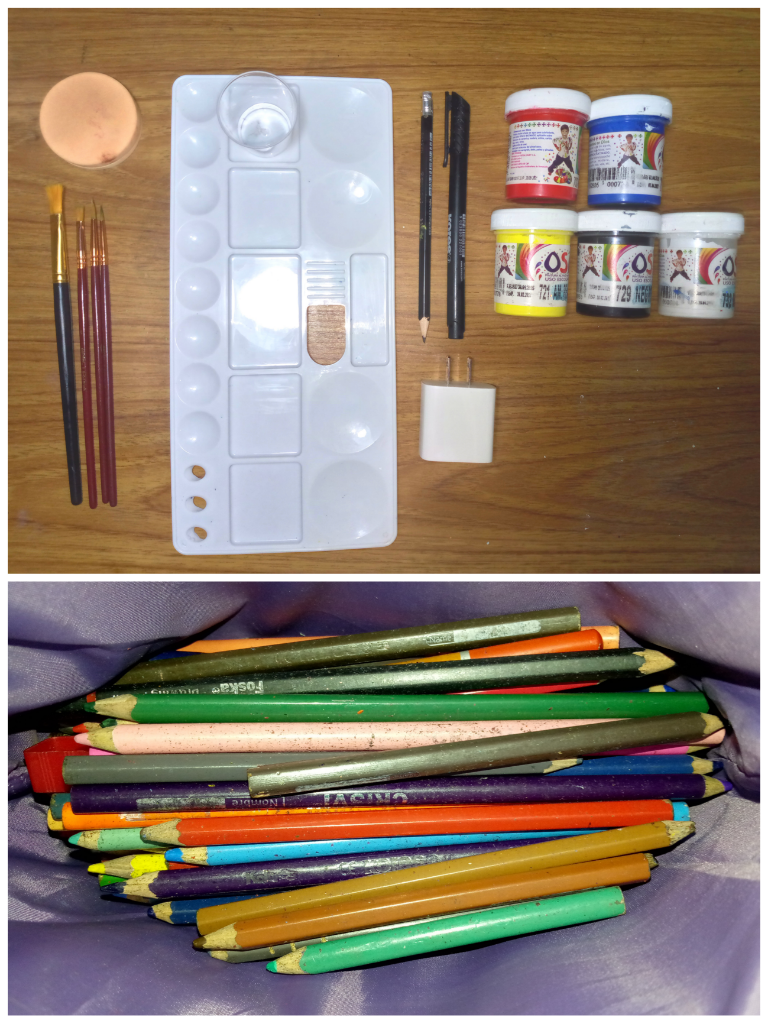
- Lápiz y papel. 📝
- Pinturas al frío: Amarillo, Azúl, Rojo, Blanco y Negro. 🟡🔵🔴⚪⚫
- Pinceles planos de cerda blanda. Grande y pequeño. 🖌️
- Pincel para delinear pequeño. 🖌️
- Esponjita. 🧽
- Paleta, recipiente o soporte (para poder mezclar los colores). 🎨
- Marcador indeleble negro punta fina. 🖊️
- Lápices de colores. 🖍️🌈
- Barniz transparente y pincel blando. ✨🖌️
- Pencil and paper 📝
- Cold paints: Yellow, Blue, Red, White, and Black 🟡🔵🔴⚪⚫
- Flat soft-bristle brushes (large and small) 🖌️
- Small detail brush 🖌️
- Sponge 🧽
- Palette, container, or surface (to mix colors) 🎨
- Fine-tip permanent black marker 🖊️
- Colored pencils 🖍️🌈
- Clear varnish and soft brush ✨🖌️

Imágen de Referencia - Image of Reference
∆ ℙ𝔸𝕊𝕆 𝔸 ℙ𝔸𝕊𝕆 ∆ ✨👾✨ ∆ 𝕊𝕋𝔼ℙ 𝔹𝕐 𝕊𝕋𝔼ℙ ∆
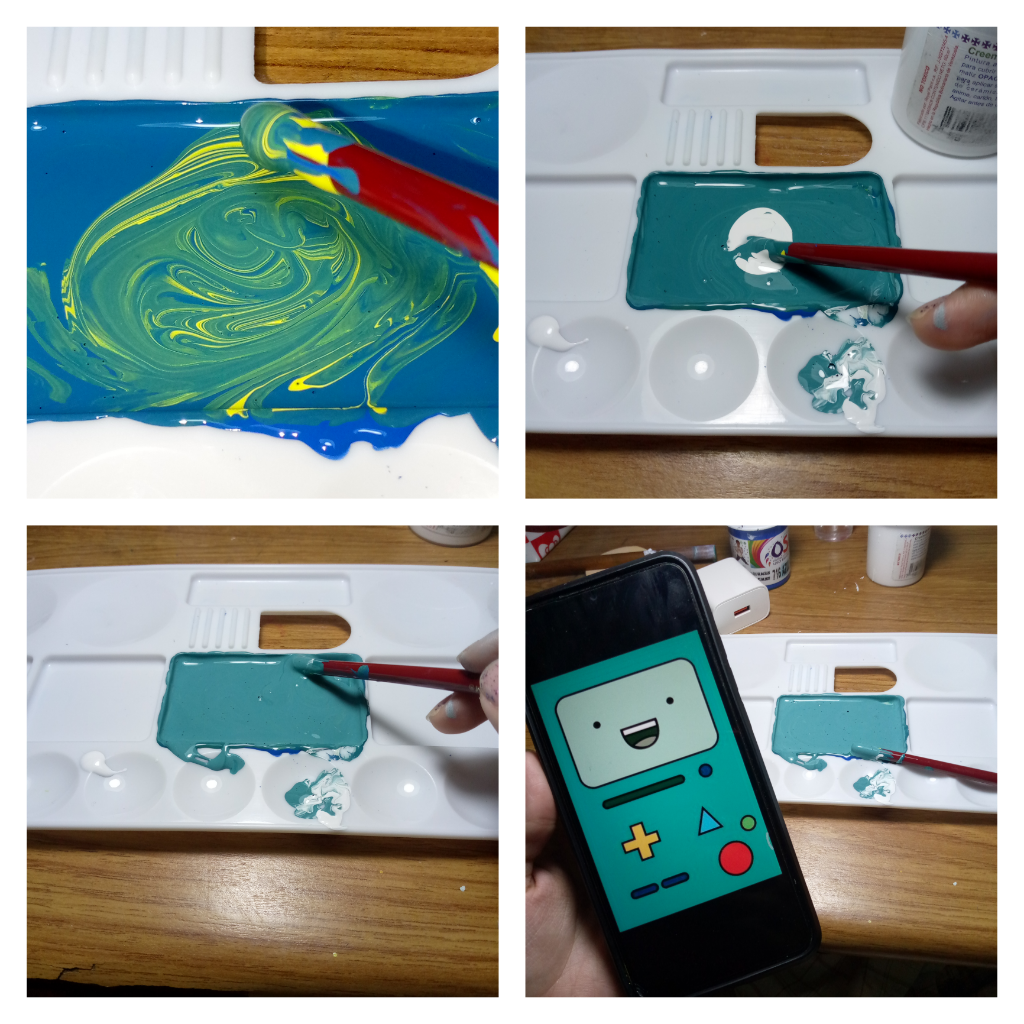
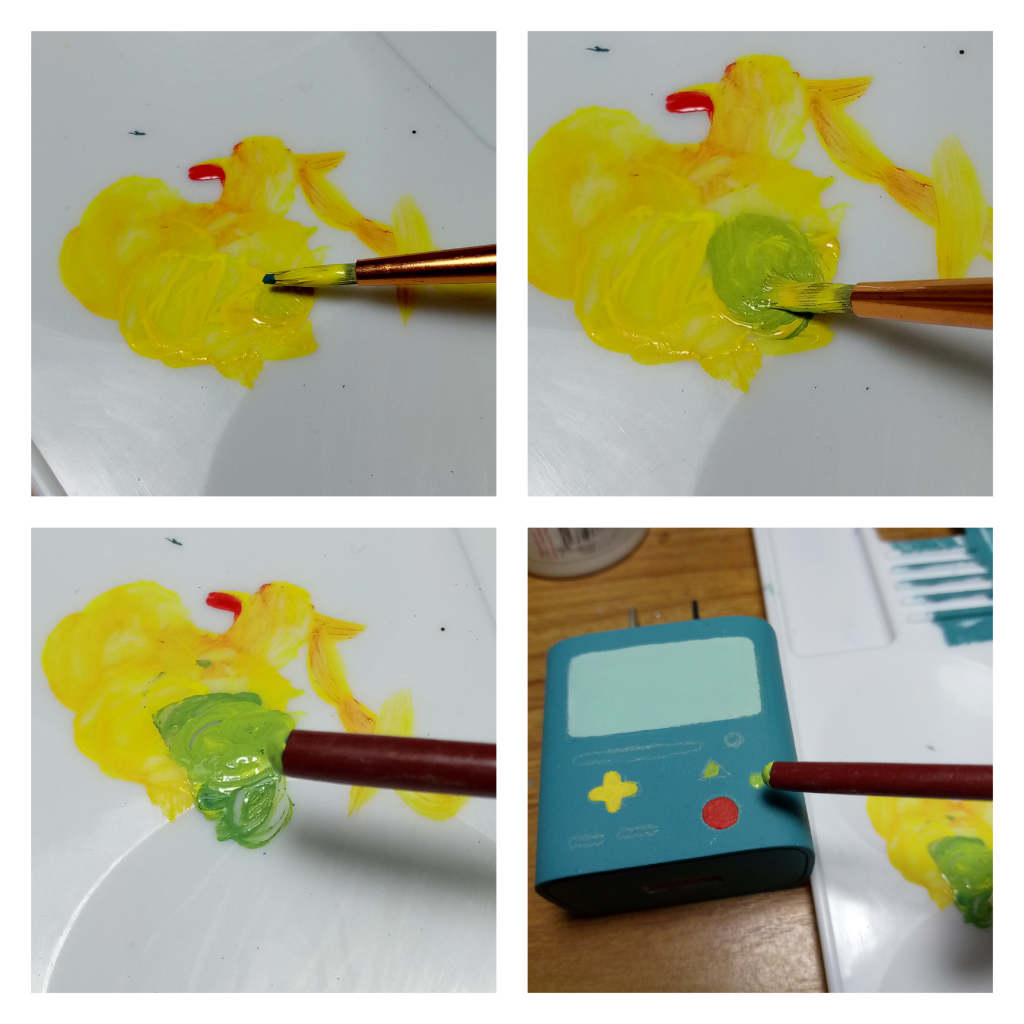
Para hacer el color del cuerpo de BMO usé pinturas azúl, amarillo y blanco. Vertí una parte grande de azúl y una pequeña de amarillo.
To make BMO’s body color, I used blue, yellow, and white paints. I poured a large amount of blue and a small amount of yellow.
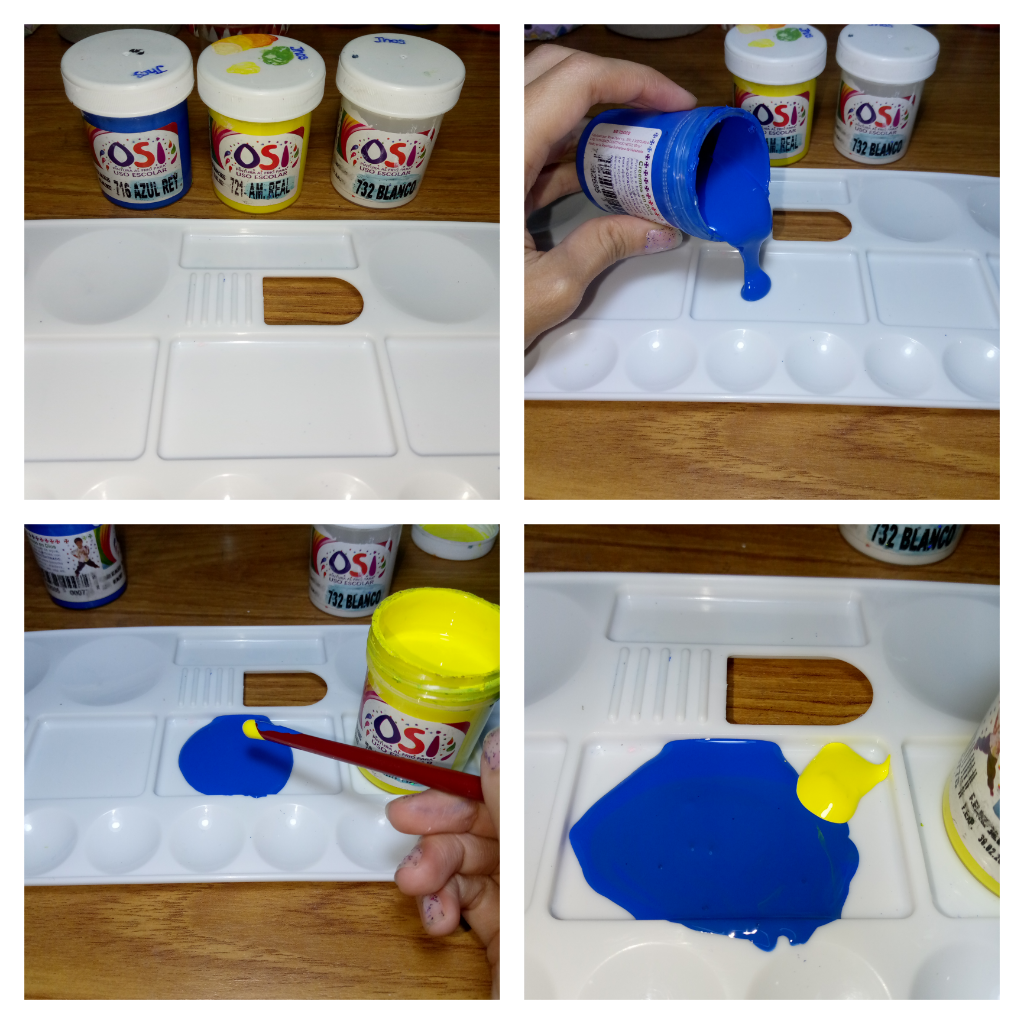
Los mezclé hasta obtener este turquesa y posteriormente le añadí un toque de blanco y los integré. Por supuesto no tengo las medidas exactas pero se trata de ir probando y evaluando cuán parecido es el tono de la imagen de referencia con el color que estamos obteniendo. En mi caso el color que obtuve se me asemejó muchísimo al de BMO en la imagen, por tanto decidí dejarlo así.
I mixed them until I got a turquoise shade, then added a touch of white and blended it in. Of course, I don’t have exact measurements—it’s all about testing and comparing how close the tone is to the reference image. In my case, the color I got looked very similar to BMO’s in the image, so I decided to stick with it.
Con el pincel más grueso de cerda plana empecé a pintar todo alrededor del cargador traté de hacerlo en una sola dirección para evitar o prevenir que el color pudiera verse poco uniforme luego de ir añadiéndole capas, Pero al final no quedó ni rastro de las marcas del pincel así que no tuve ningún problema pero igual recomiendo hacerlo de la manera más prolija posible. Luego de pintar, me ayudé del secador de cabello en frío para secar la pintura en 30 segundos (no se imaginan cuánto me facilitó la vida esto).
Using the thick flat-bristle brush, I started painting all around the charger. I tried to paint in one direction to avoid uneven color when layering. In the end, there were no visible brush marks, so it turned out fine—but I still recommend doing it as neatly as possible. After painting, I used a cold hairdryer to dry the paint in 30 seconds (you wouldn’t believe how much easier that made things).
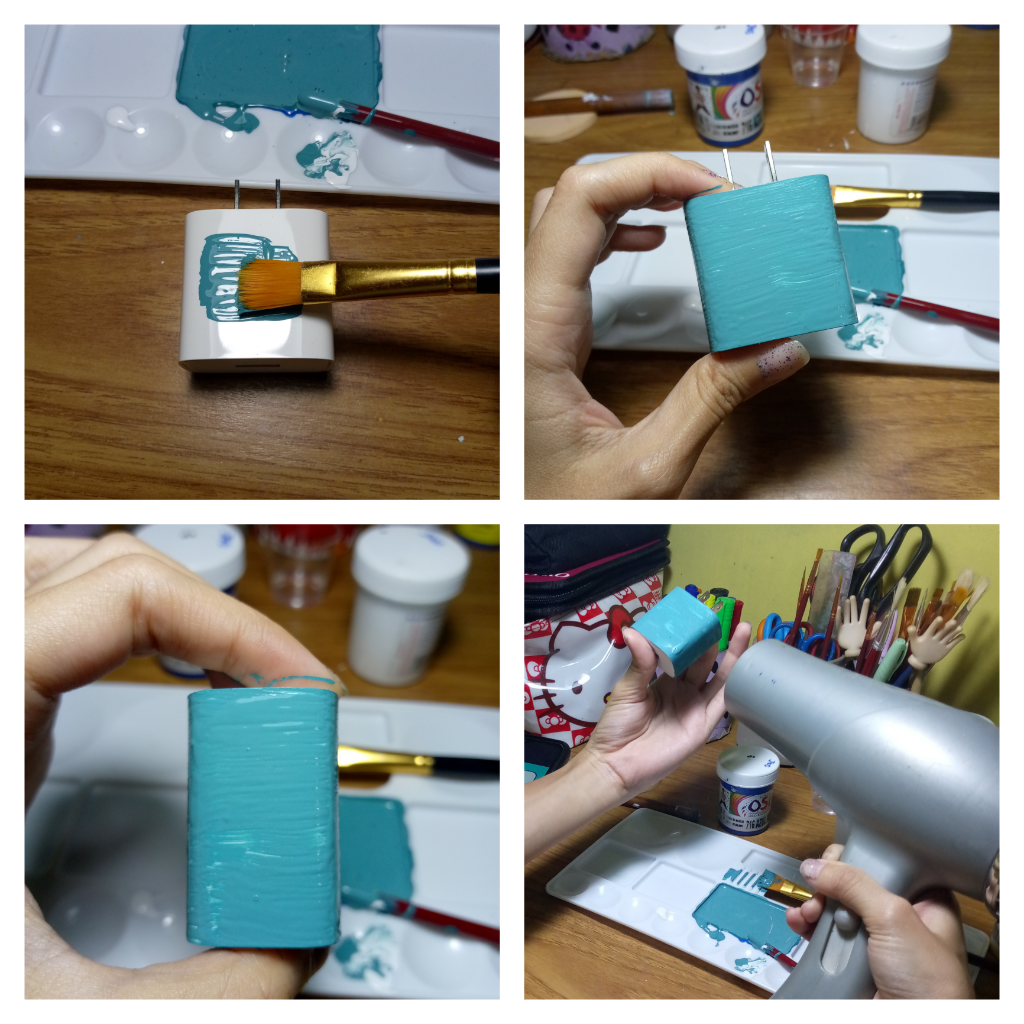
Seguiremos pintando la parte superior e inferior con el pincel y con mucho cuidado de no pintar los elementos importantes que no queremos que se dañen (el puerto y los contactos) y usaremos el secador nuevamente. Procederemos a utilizar la esponja: sumergiremos una pequeña parte de la esponja y daremos toquecitos sobre la superficie del cargador de forma suave y prolija.
Next, we’ll paint the top and bottom parts with the brush, being very careful not to paint over important elements we don’t want to damage (like the port and contacts). We’ll use the hairdryer again. Then we’ll move on to the sponge: dip a small part of the sponge into paint and gently dab it onto the charger’s surface in a soft and tidy manner.
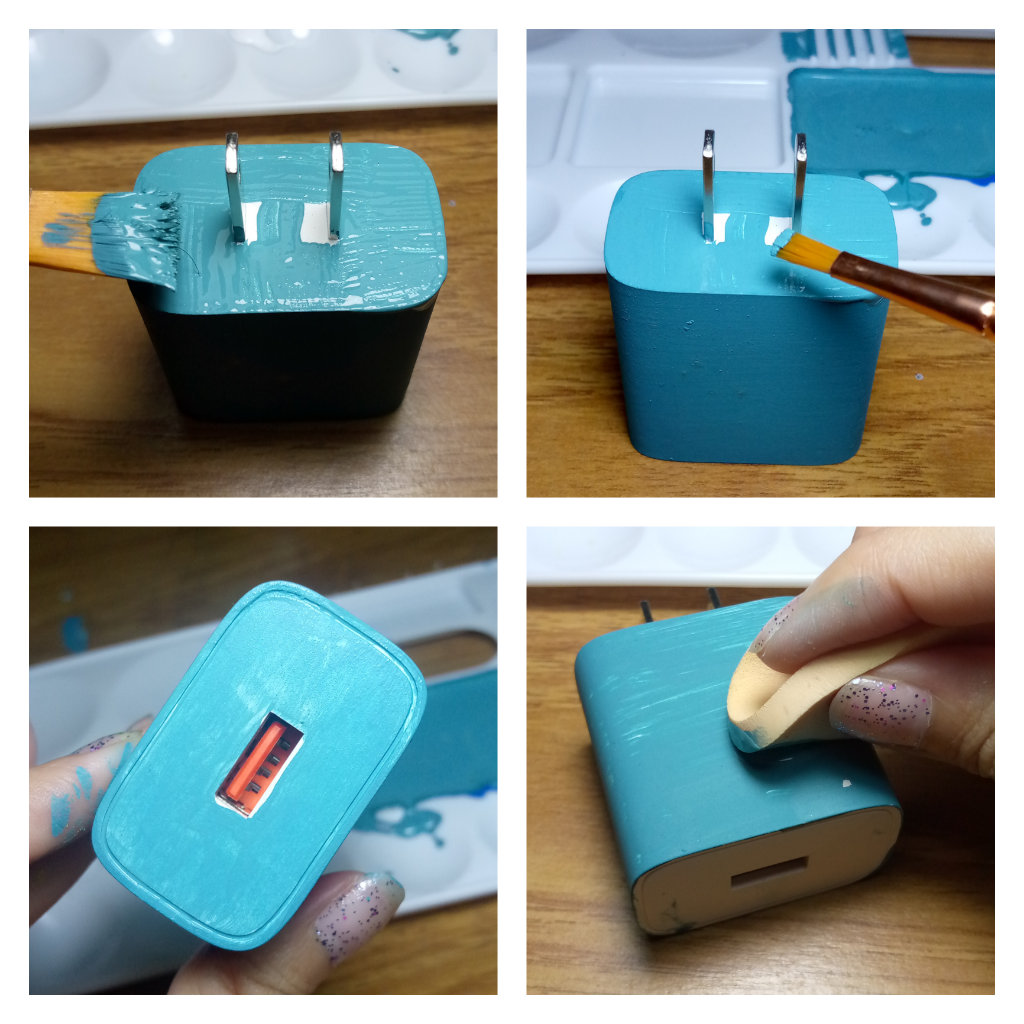
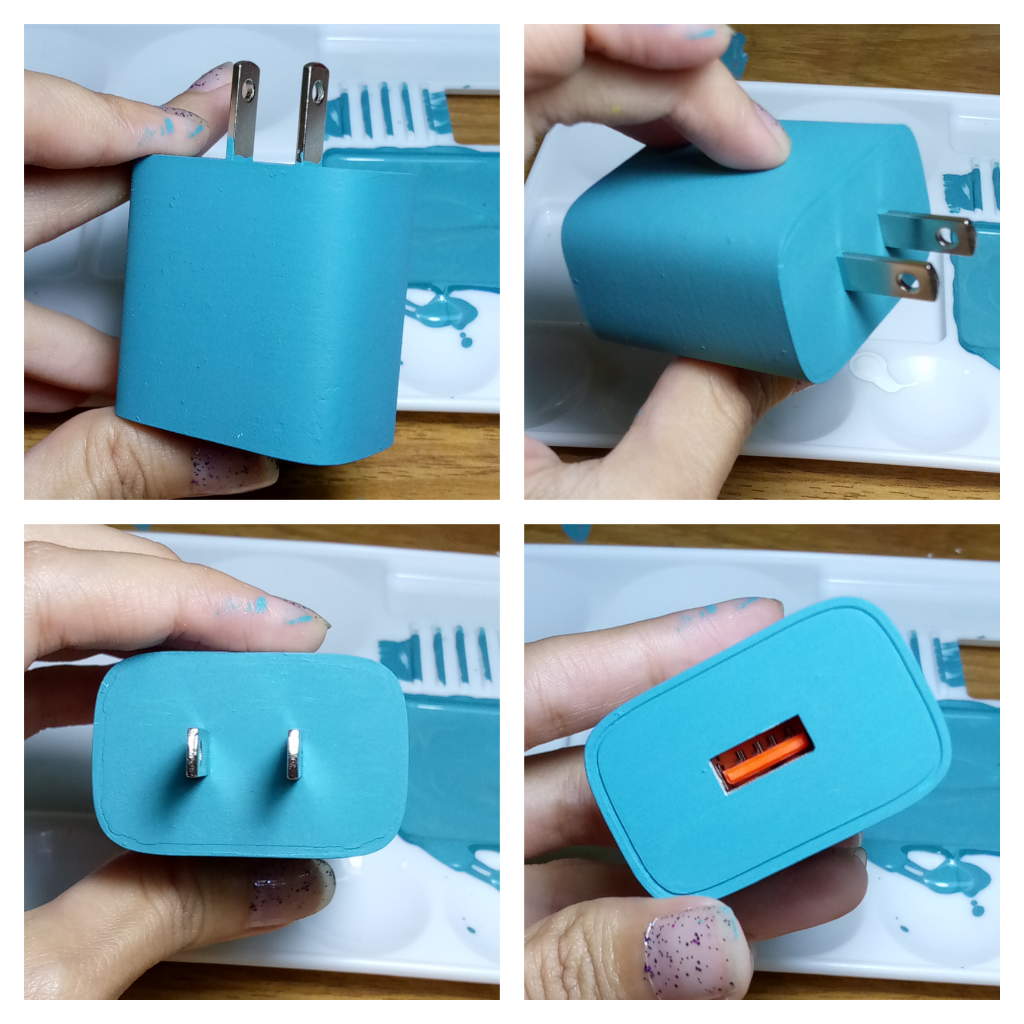
Yo apliqué cuatro capas de pintura hasta que vi que el acabado me convenció. Pero si ustedes ven que les hacen falta más capas de pintura pueden darles uántas necesites, siempre y cuando se cercioren de que estén completamente secas, porque sino, corren el riesgo de que la pintura se les levante cuando intenten aplicar otra capa, o la pintura (a pesar del secado) quede demasiado gruesa húmeda y blanda.
I applied four coats of paint until I was satisfied with the finish. But if you feel that you need more layers, you can apply as many as necessary—just make sure each one is completely dry. Otherwise, you risk the paint lifting when you try to add another coat, or the paint (even if it seems dry) ending up too thick, wet, and soft.
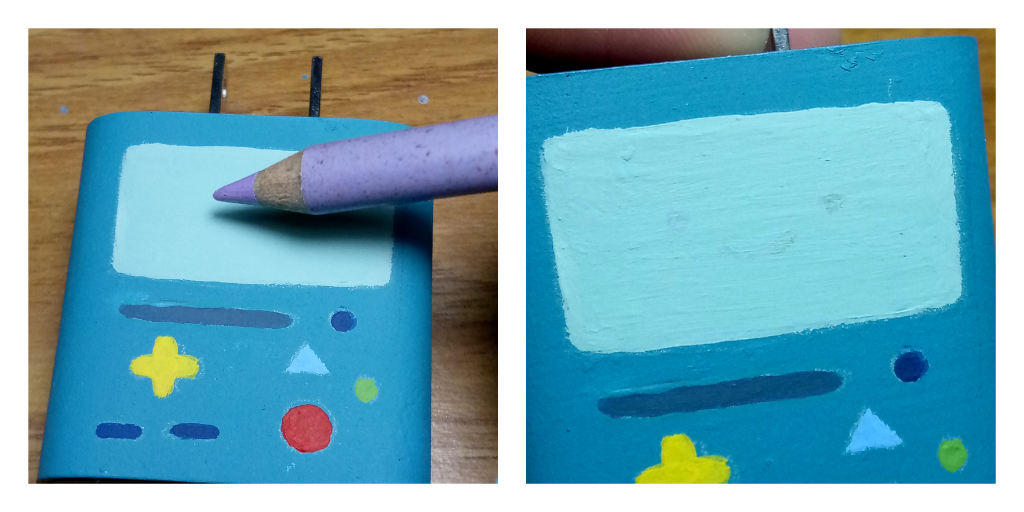
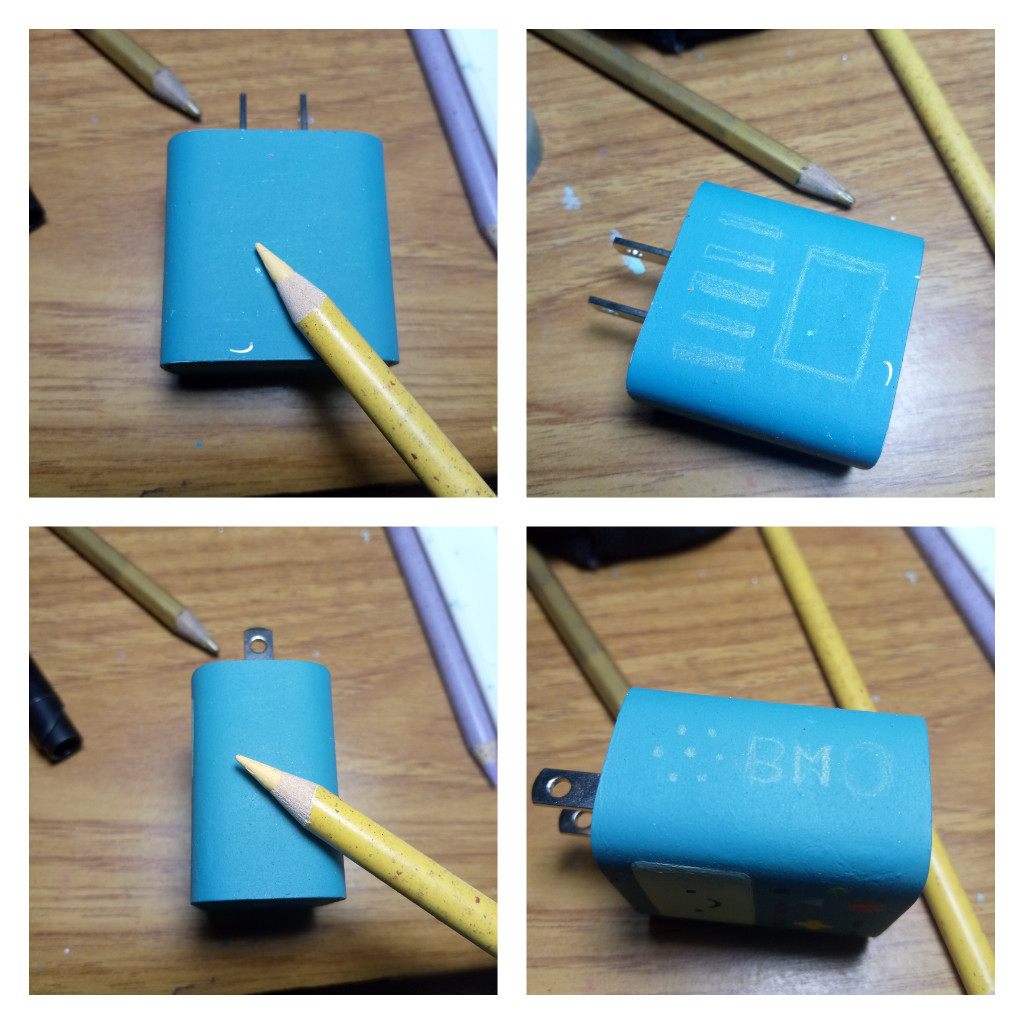
Con ayuda de algún lápiz de color que pueda notarse lo suficiente en la base de pintura, pero que no contraste tanto con la misma: tracé el boceto de los elementos que componen a nuestra adorable consola de juegos. Por los momentos sólo hice lo que más importa iba al frente: La pantalla los botones los puertos y su cara.
With the help of a color pencil that was visible enough on the painted base but didn’t contrast too much with it, I sketched the outline of the elements that make up our adorable little game console. For now, I only drew what mattered most on the front: the screen, the buttons, the ports, and its face.
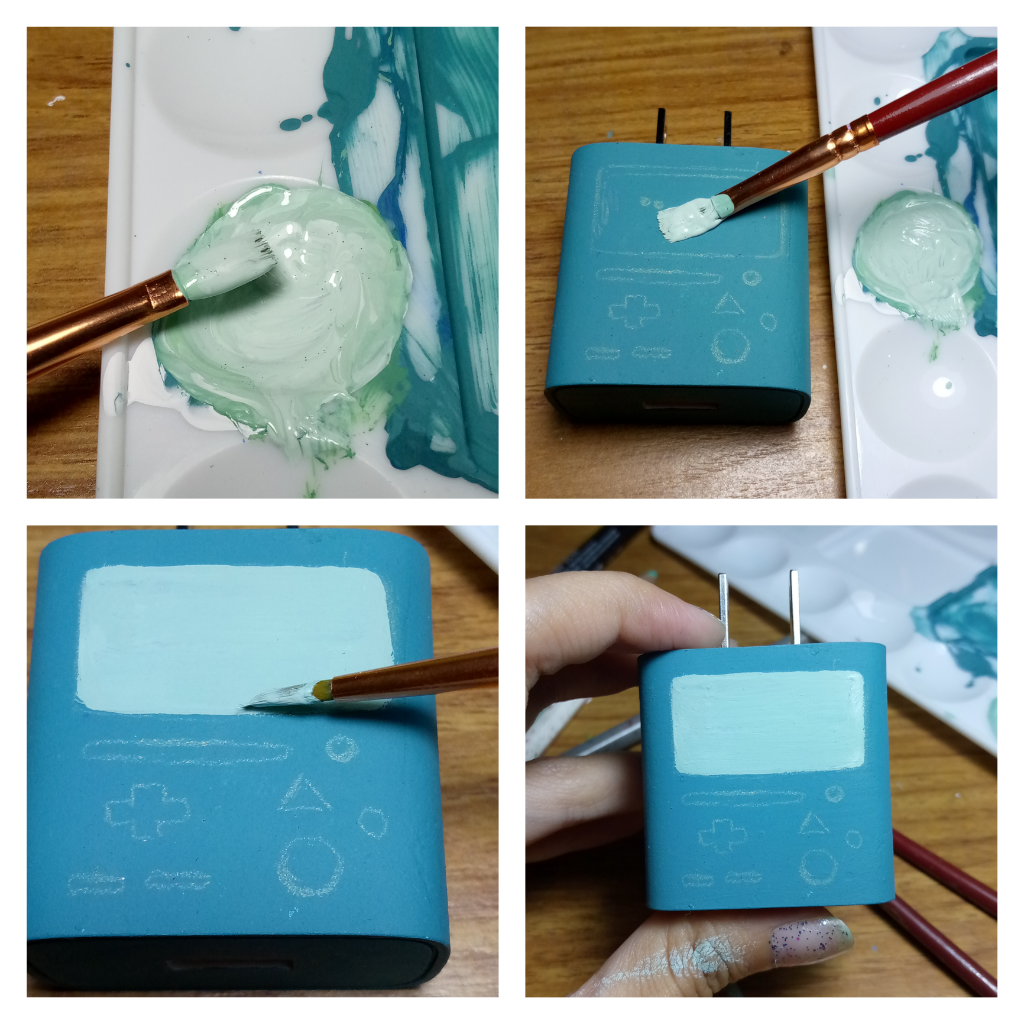
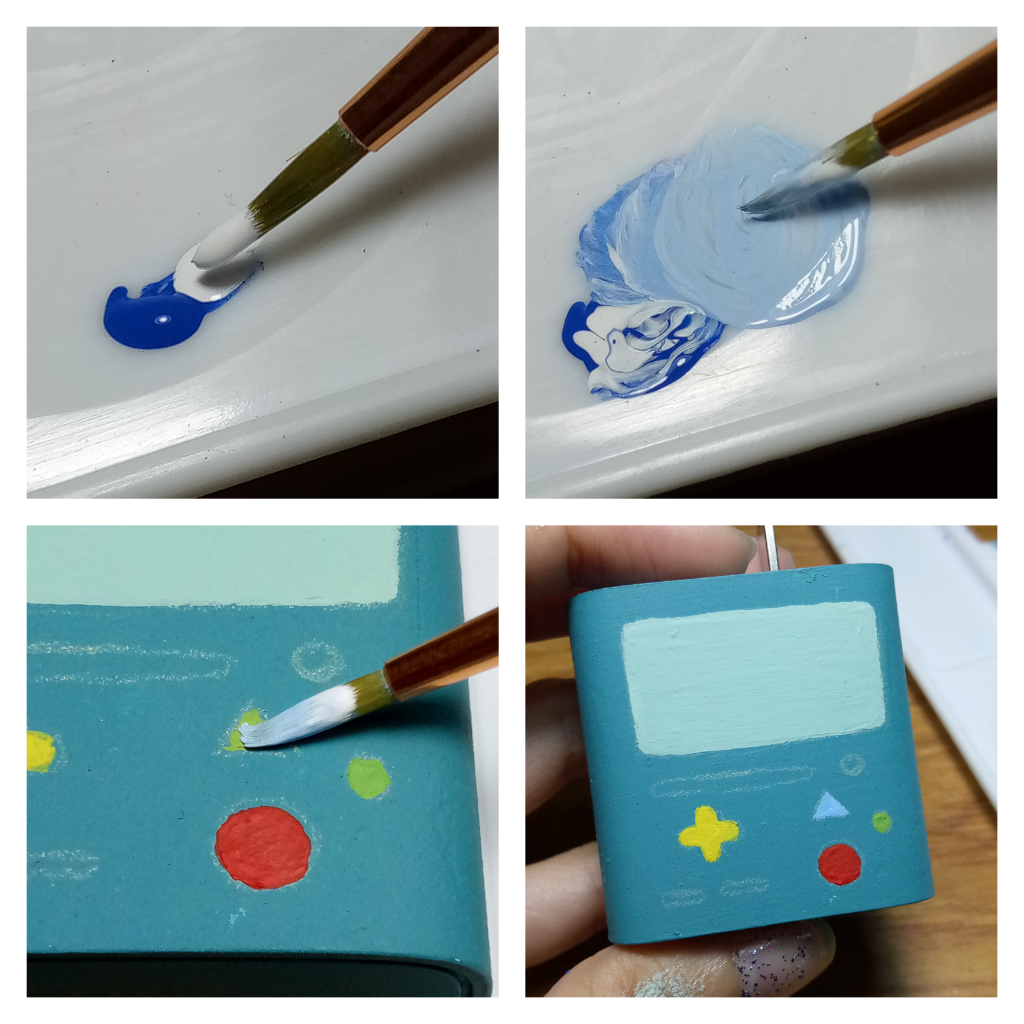
Para la pantalla use una porción media del color base (turquesa), una porción grande de blanco, y una porción mínima de amarillo y los mezclé. Verificamos nuevamente el tono pintando sobre el papel y comparándolo con nuestra imagen de referencia.
For the screen, I used a medium portion of the base color (turquoise), a large portion of white, and a tiny bit of yellow, and mixed them together. We double-checked the tone by painting it on paper and comparing it to our reference image.

Con el pincel plano más pequeño apliqué el color dentro de las limitaciones que había trazado para definir la pantalla. También tuve que utilizar el pincel delineador pequeño para perfeccionar los bordes. A pesar de que no me quedó tan perfectamente recto e inmaculado, quedé conforme con lo que pude lograr.
Using the smallest flat brush, I applied the color within the boundaries I had traced to define the screen. I also had to use a small liner brush to perfect the edges. Even though it didn’t turn out perfectly straight and flawless, I was happy with what I managed to achieve.
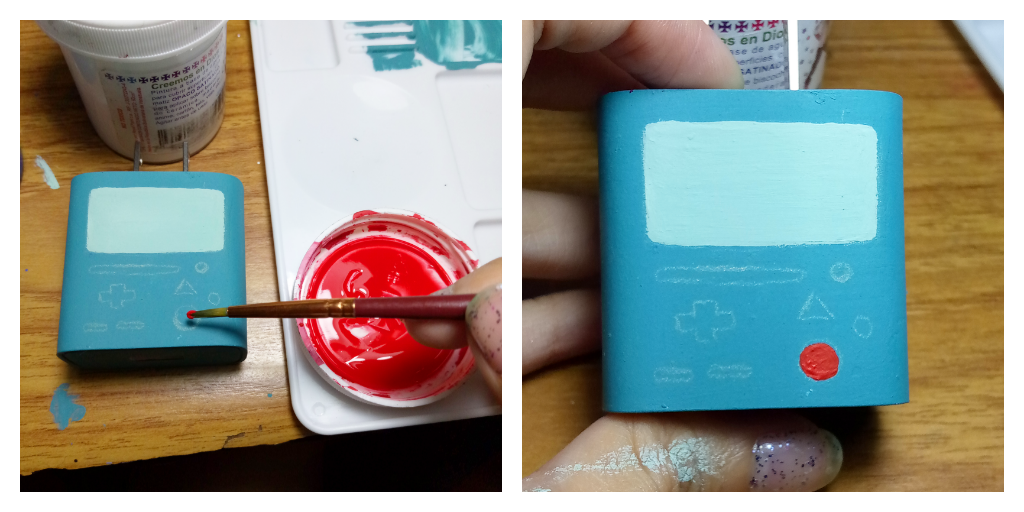
Ahora debemos pintar los botones. Para pintar el rojo únicamente tomé pintura roja y la apliqué con el pincel delineador, con mucho cuidado y paciencia de seguir el boceto.
Now we move on to painting the buttons. For the red one, I simply used red paint and applied it with the liner brush, carefully and patiently following the sketch.
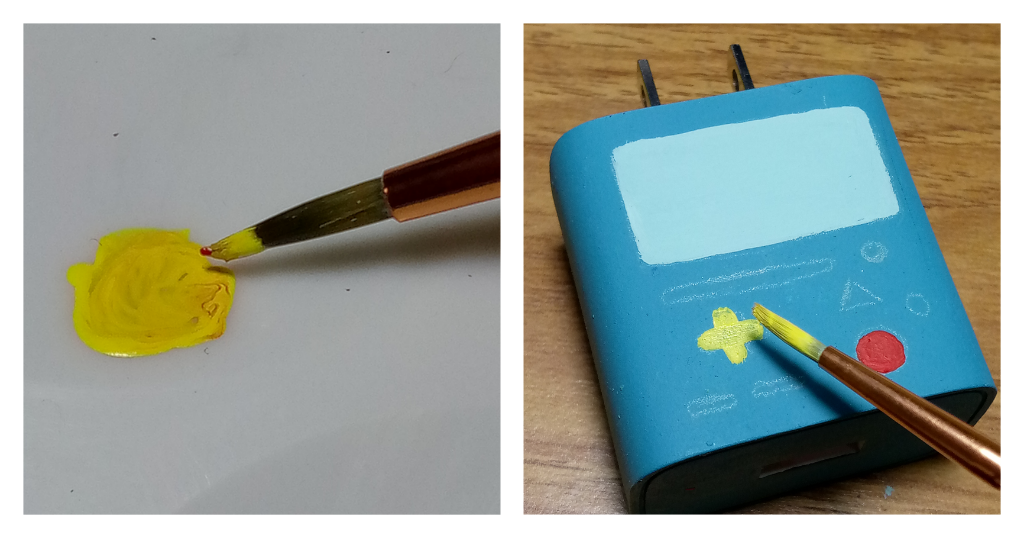
Para el botón direccional junté amarillo con un toque mínimo de rojo para disminuirle el brillo, y pinté el botón usando el delineador.
For the directional button, I mixed yellow with a tiny touch of red to tone down the brightness, and painted it using the liner brush.
Para el redondo pequeño verde: Usando amarillo y azul obtuve un tono de verde manzana y con la parte trasera del mango del pincel tomé pintura y solo lo afinqué sobre la marca del botón.
For the small round green button: I mixed yellow and blue to get an apple green shade, and using the back end of the brush handle, I dipped it in paint and gently pressed it onto the button mark.
Para el triangular: Colocamos un toque de azul con una pizca de blanco lo mezclamos y trazamos con mucho cuidadito.
For the triangular button: we added a touch of blue with a pinch of white, mixed it, and carefully traced the shape.
Los puertos y botón pequeño: azul más una pizca de negro y con delicadeza delimitamos y rellenamos los espacios correspondientes.
The ports and small button: blue with a pinch of black, and we gently outlined and filled in the corresponding areas.

Por último con el turquesa y una pizca de negro haremos la ranura que está bajo su pantalla.
Once again, using a color as a guide, I marked the spot where the face would go.

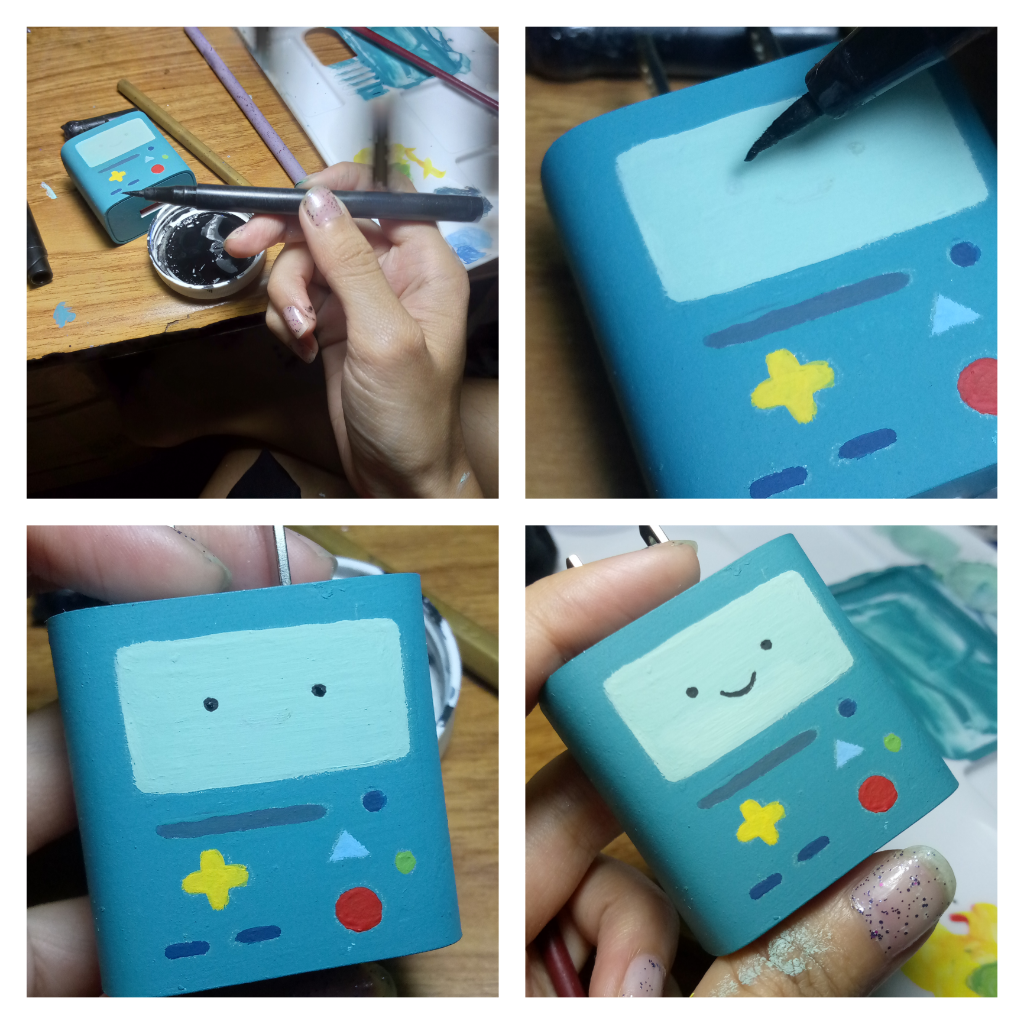
Nuevamente con ayuda de un color, marcamos el lugar en donde estará su cara.
Once again, using a color as a guide, I marked the spot where the face would go.
Para tener más precisión al pintar Opté por usar este aplicador de delineador para ojos que hace mucho tiempo se me acabó. Tomé pintura negra y con sumo cuidado marqué dos puntos para sus ojos y un pequeño arco para su boca.
To be more precise while painting, I chose to use an old eyeliner applicator that had long since run out. I dipped it in black paint and very carefully marked two dots for the eyes and a small arc for the mouth.
Lo que resta en cuanto a diseño es sencillamente trazar los detalles de los laterales y la parte traser que en este caso serían su nombre los puntitos de las bocinas el lugar en donde se colocan sus pilas y los espacios de ventilación.
What remains in terms of design is simply to trace the details on the sides and back, which in this case include its name, the speaker dots, the battery compartment, and the ventilation slots.
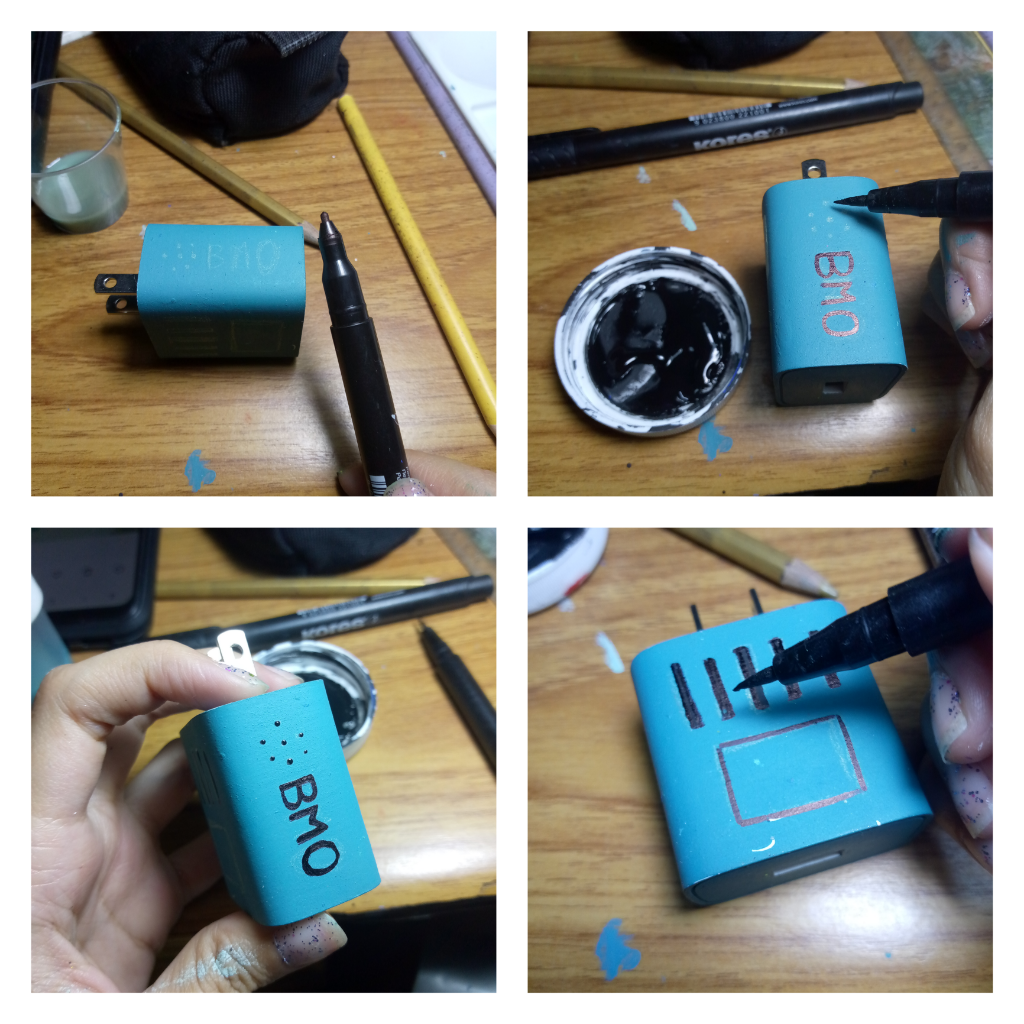
Y a continuación, con ayuda del plumón negro vamos a marcar las letras, compartimento de pilas, y definiremos las rejillas para luego rellenarlas con el delineador y la pintura negra, junto a los puntitos de las bocinas.
Next, with the help of a fine-tip black marker, we’ll outline the letters, the battery compartment, and define the vents, which we’ll then fill in using the liner brush and black paint, along with the speaker dots.
Pero eso no es todo porque antes de terminar o empezar a usarlo debemos recordar algo muy importante y es que es necesario que lo barnicemos para que la pintura no se caiga y así proteger y conservar nuestro trabajo.
But that’s not all—before finishing or starting to use it, we must remember something very important: it’s necessary to apply varnish so the paint doesn’t peel off, helping protect and preserve our work.
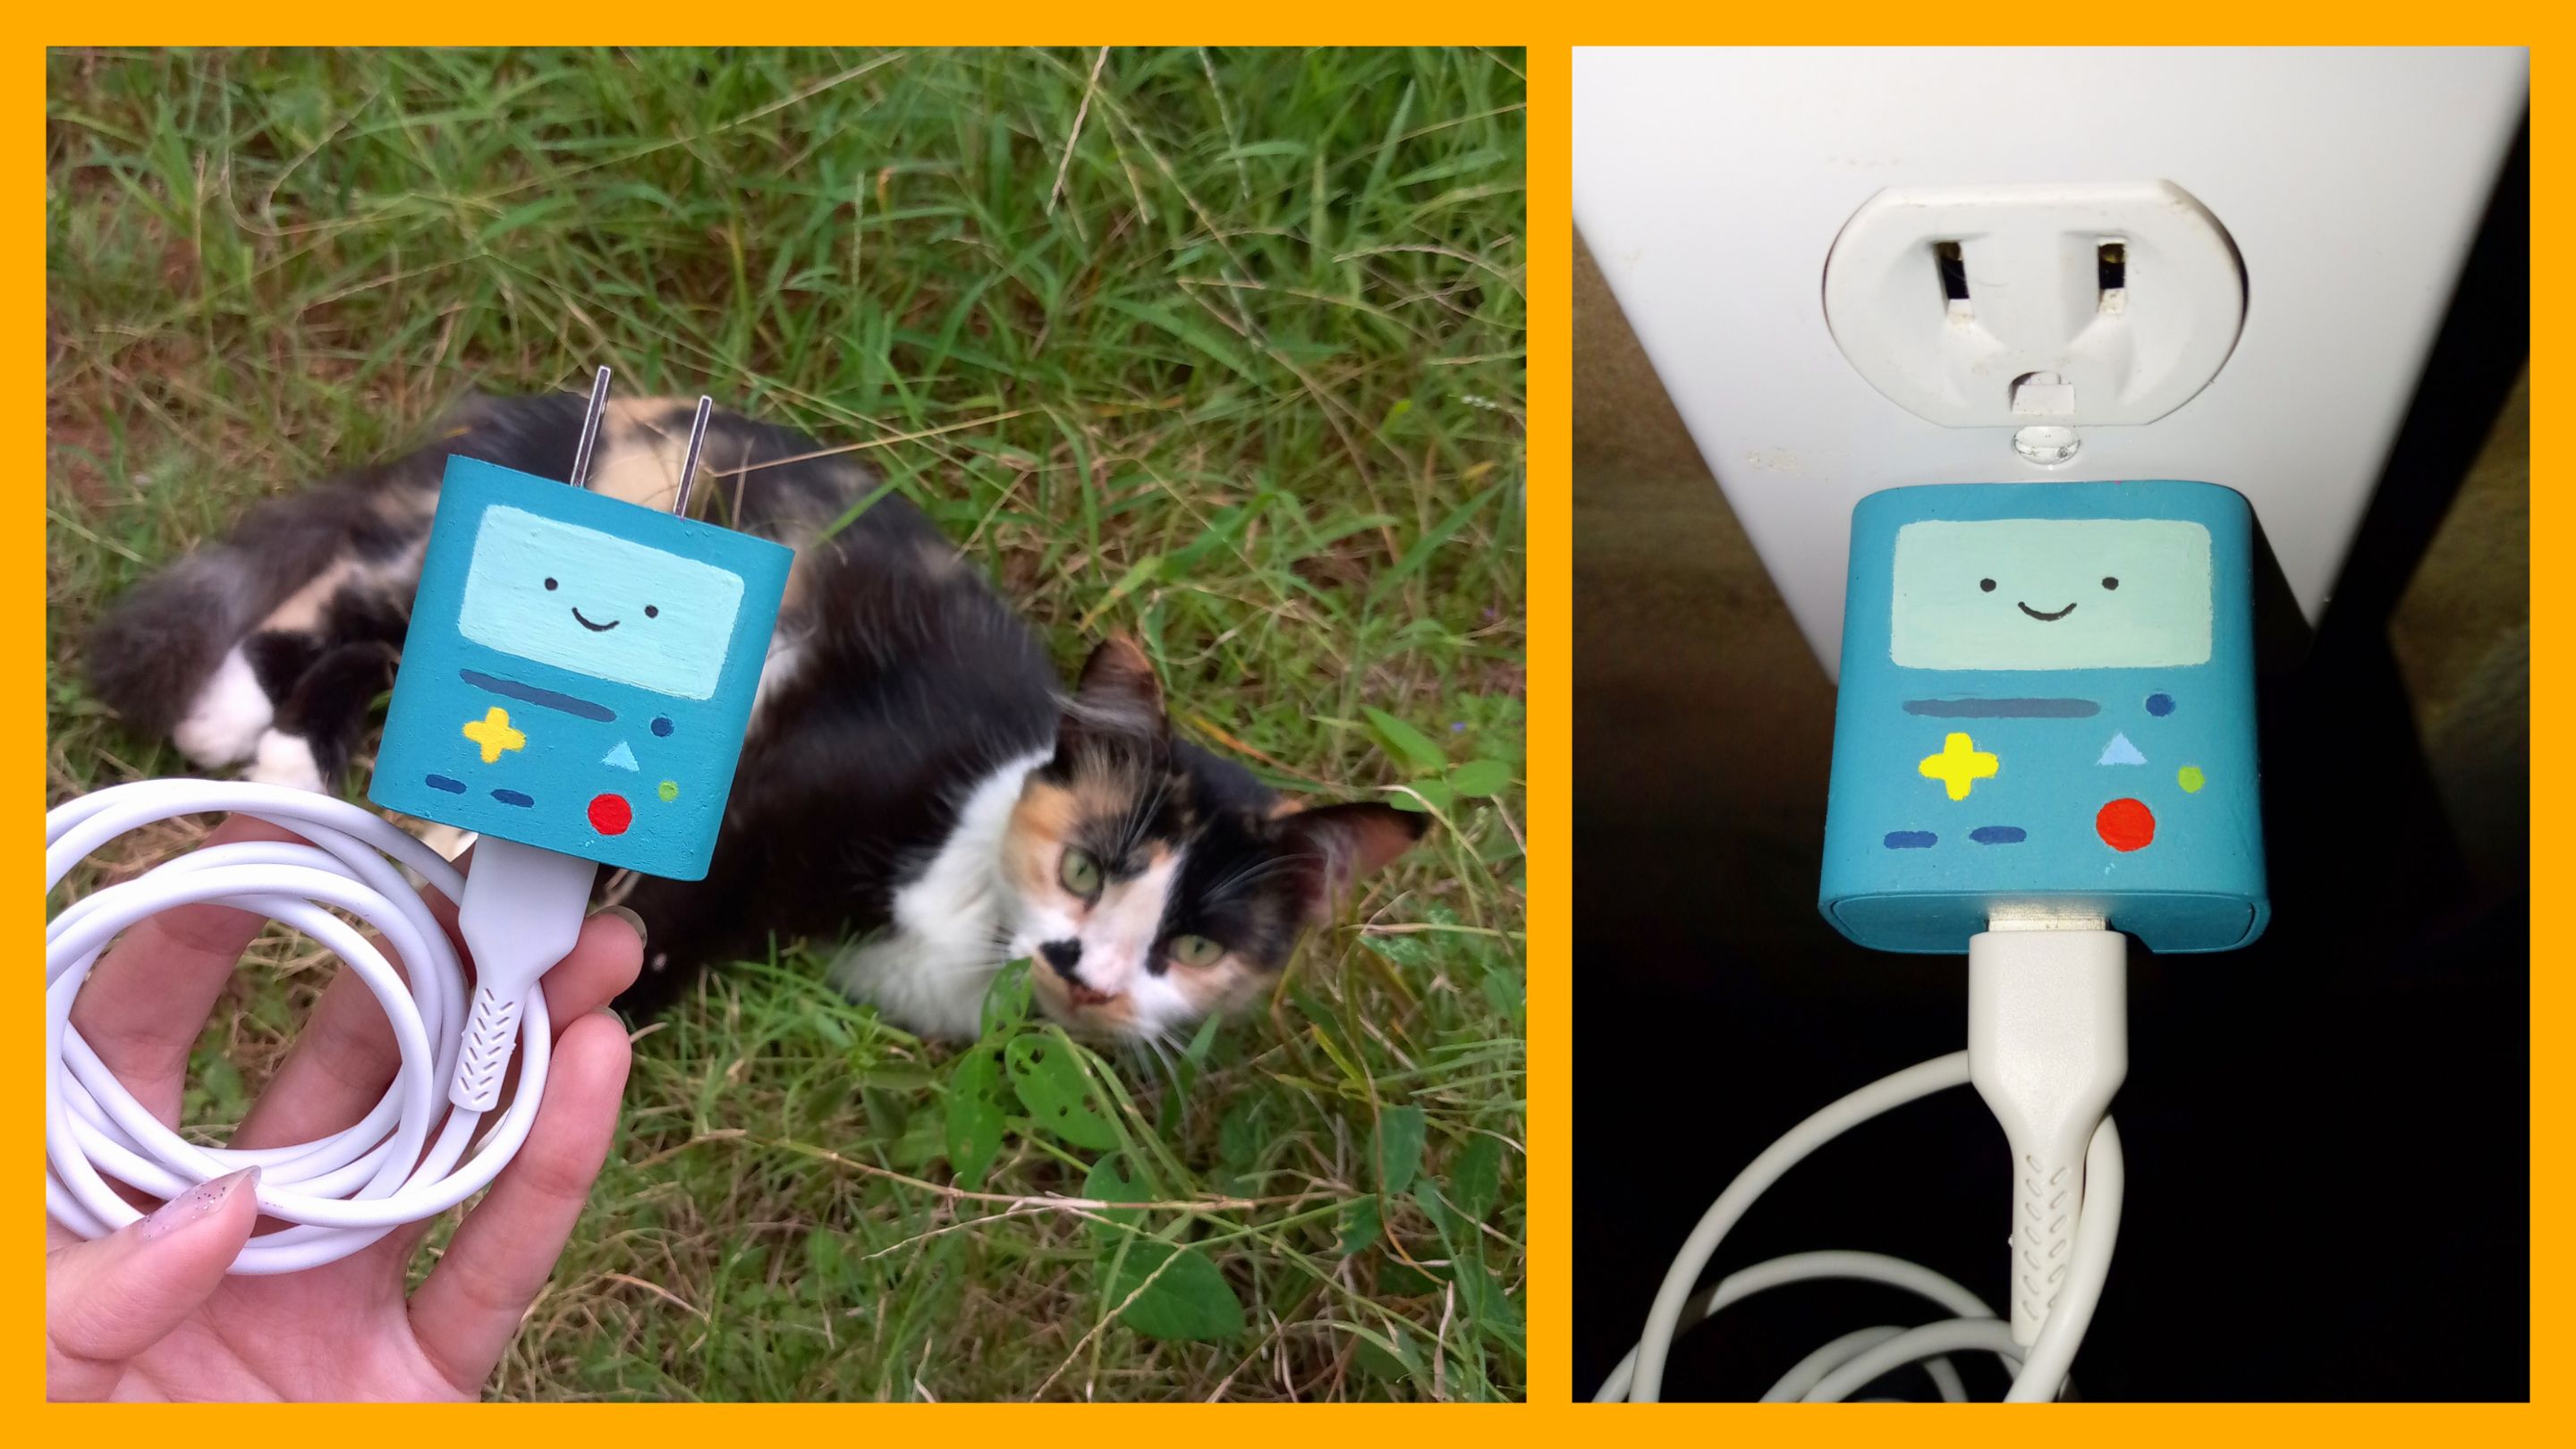
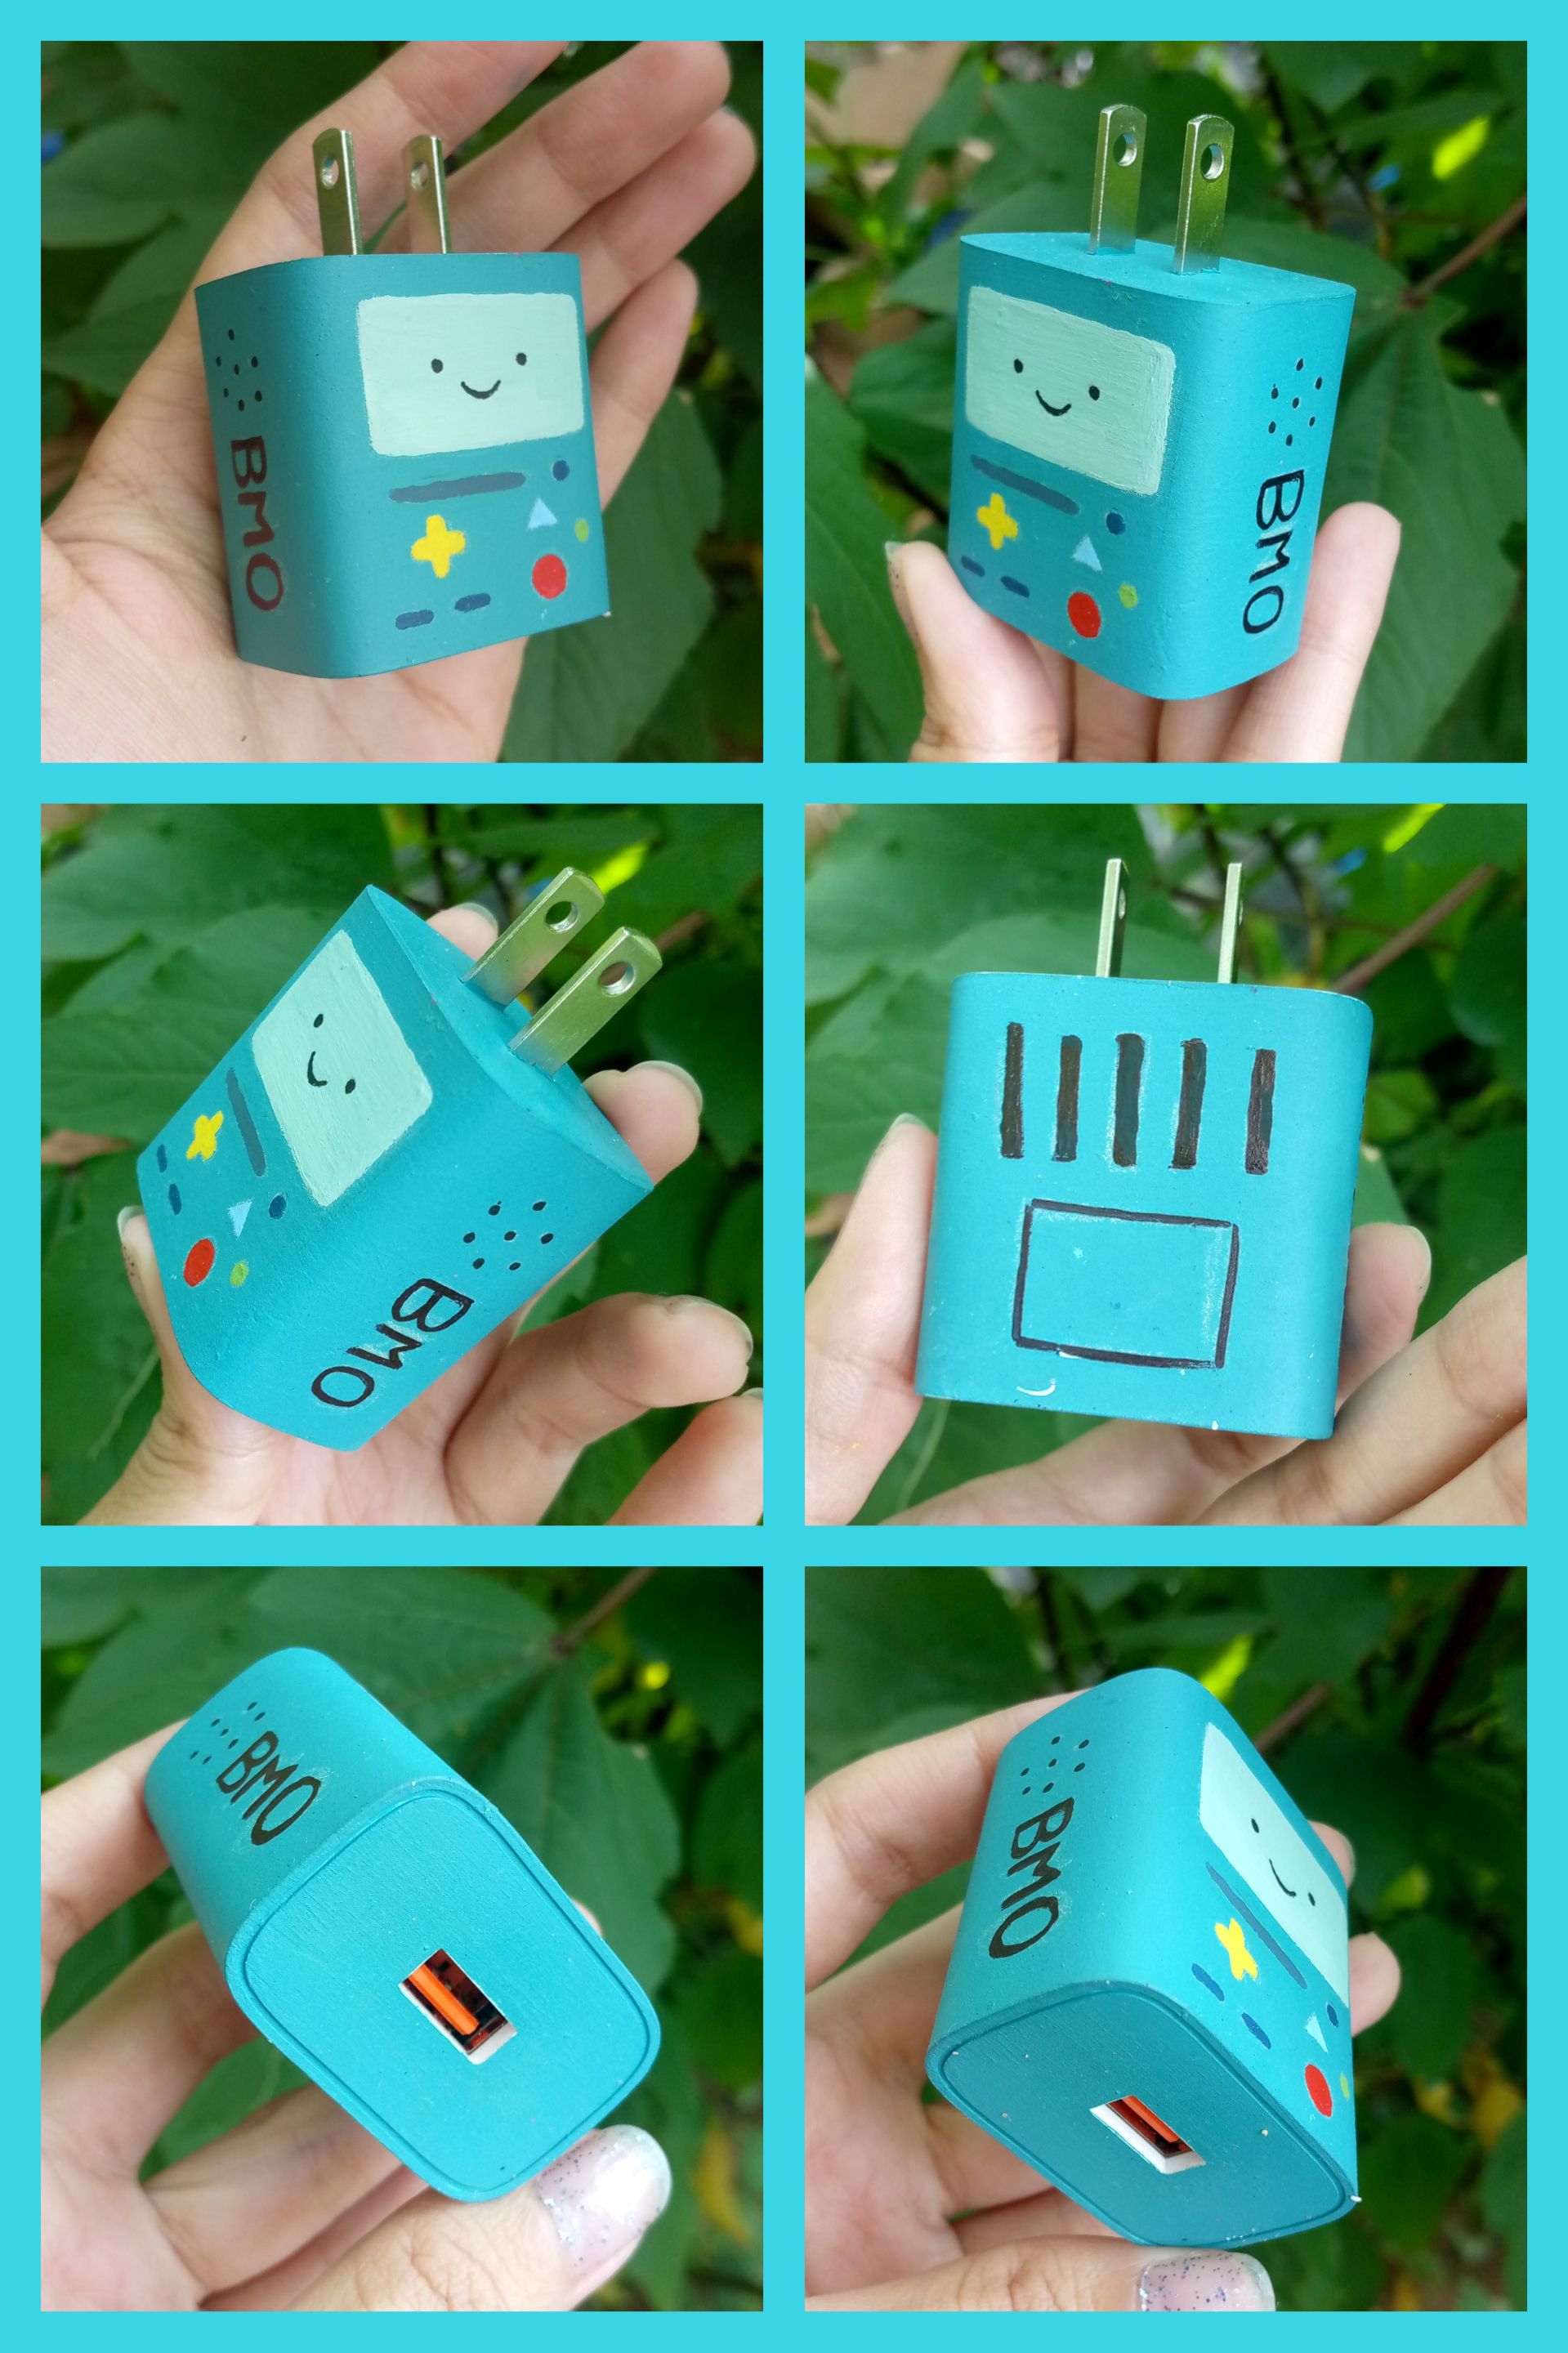
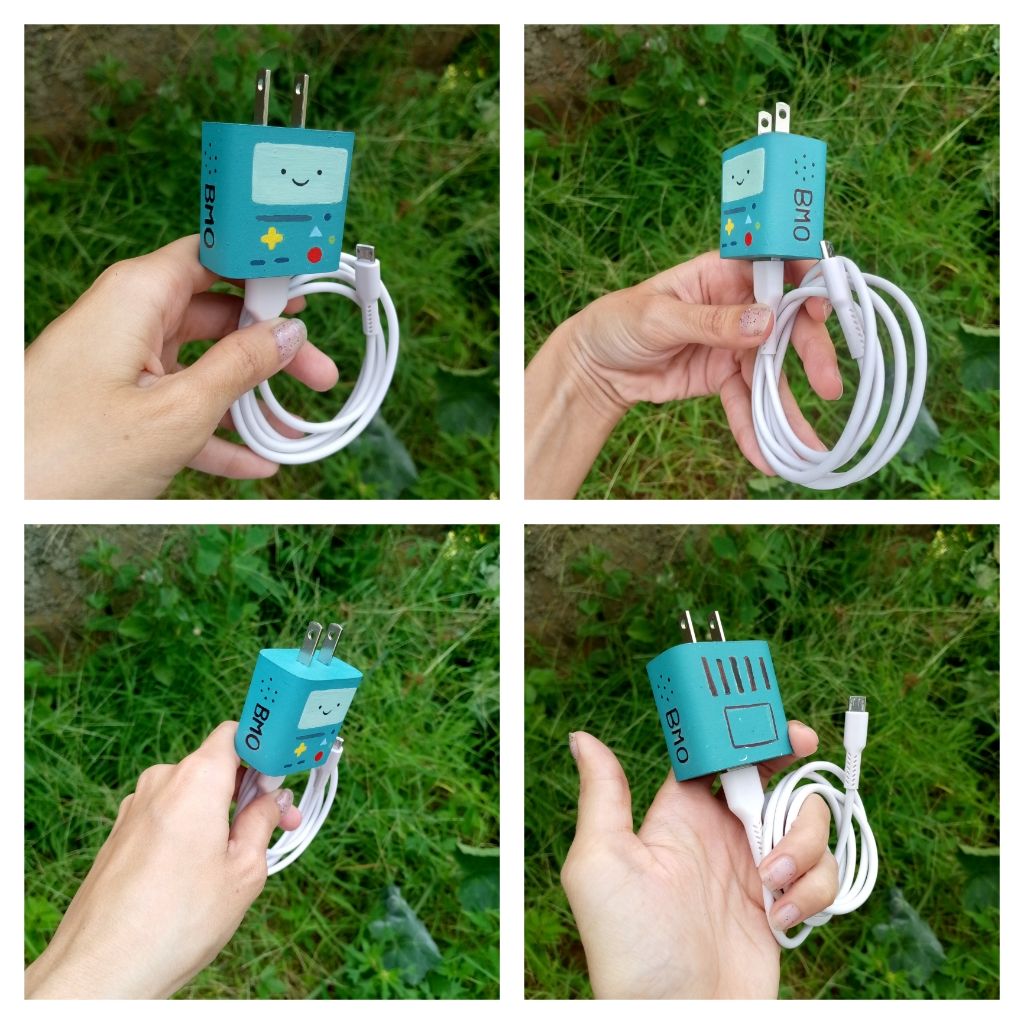
Y ya esto sería todo para personalizar nuestra base de cargador como nuestro lindo personaje. (Debo confesar que realicé la sesión de fotos antes de aplicar el barniz).
And that’s it for customizing our charger base to look like our cute little character.( I must confess I did the photo session before applying the varnish).
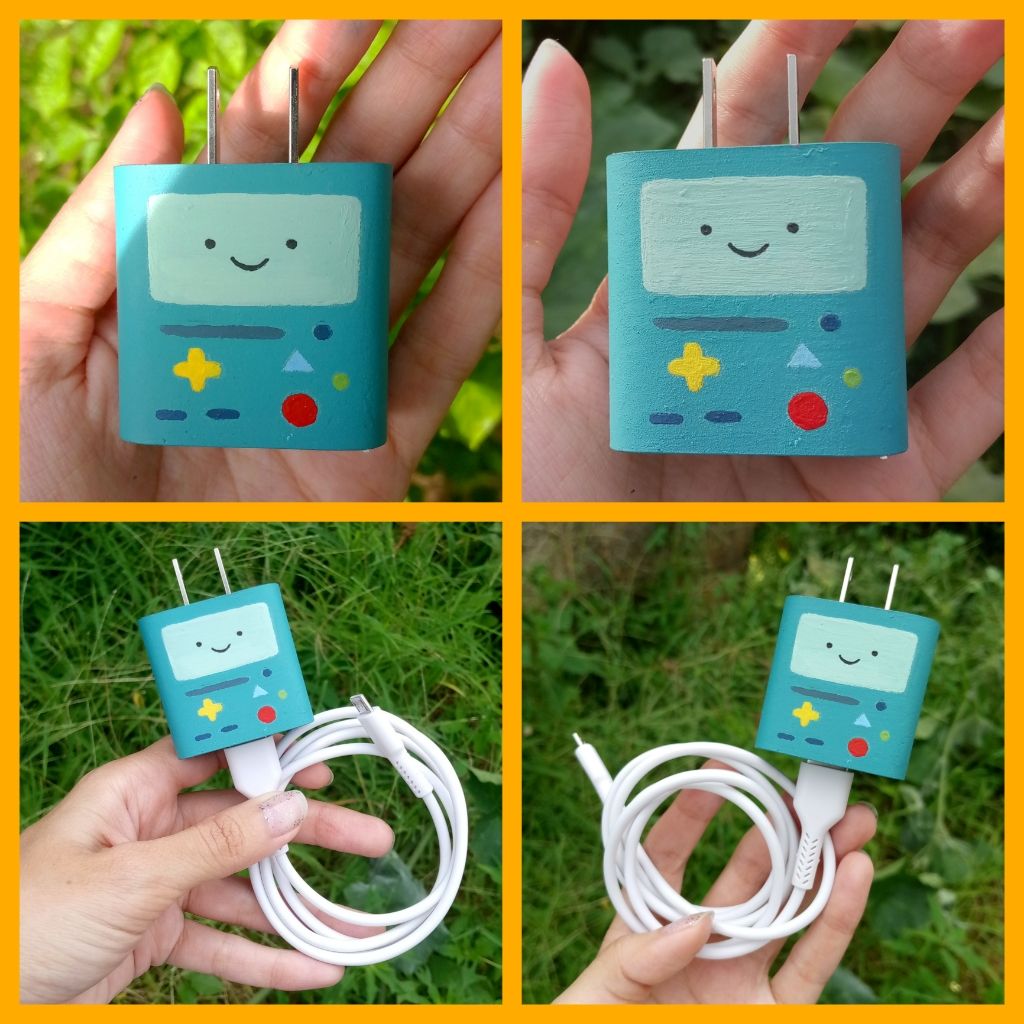
Acá está conectado y con mi gatita que estaba curioseando y la capturé.
Here it is plugged in, with my curious kitty nearby, whom I managed to capture in the shot.