Si hay algo que me encantaba, y que extraño mucho, de cuando era más pequeña, era la cantidad absurda de stickers que solía recolectar de ciertos cuadernos o que me compraban individualmente. Lamentablemente, fui creciendo y la situación económica fue fluctuando bastante, tanto en mi casa como en el país en general. La calidad de los productos también fue disminuyendo, y por mucho tiempo ya no tuve acceso constante a ese tipo de detallitos que tanto me gustaban.
If there’s something I used to love, and really miss, from when I was younger, it’s the absurd amount of stickers I used to collect from certain notebooks or that were bought for me individually. Unfortunately, as I grew older, the economic situation fluctuated quite a bit, both in my household and in the country overall. The quality of products also declined, and for a long time I no longer had regular access to those little details I loved so much.
Actualmente, en las papelerías es más común encontrar cuadernos con stickers o láminas con pegatinas: ya sean esponjosas, con brillantina, con dibujitos particulares o temáticas de alguna serie o videojuego. Sin embargo, aún no tengo el poder adquisitivo para invertir en ese tipo de cosas, que para mí son más bien un capricho. Aun así, me siguen encantando y me niego a no darme el gusto de tener stickers nuevamente, de una forma u otra.
Nowadays, it’s more common to find notebooks with stickers or sticker sheets at stationery stores—whether they’re puffy, glittery, have cute drawings, or are themed around a series or video game. However, I still don’t have the purchasing power to invest in those kinds of things, which for me are more of a treat. Still, I absolutely love them and refuse to deny myself the joy of having stickers again, one way or another.
Por eso pensé en una manera no tan práctica, pero sí muy útil, de hacer stickers caseros. En mi caso, como sé dibujar, quise hacerlos todos a mano. Sé que habrá personas a quienes les resulte más fácil tomar imágenes de internet y, si tienen impresora en casa, simplemente imprimirlas y colorearlas. Pero a mí me gusta más hacerlo de esta forma. Además, pude crear varios diseños propios. También habría podido hacerlos de manera digital, pero aún no he aprendido a dibujar bien en formato digital.
That’s why I came up with a not-so-practical, but very useful way to make homemade stickers. In my case, since I know how to draw, I wanted to make them all by hand. I know some people might find it easier to grab images from the internet and, if they have a printer at home, simply print and color them. But I prefer doing it this way. Plus, I was able to create several original designs. I could’ve made them digitally too, but I haven’t yet learned how to draw well in digital format.
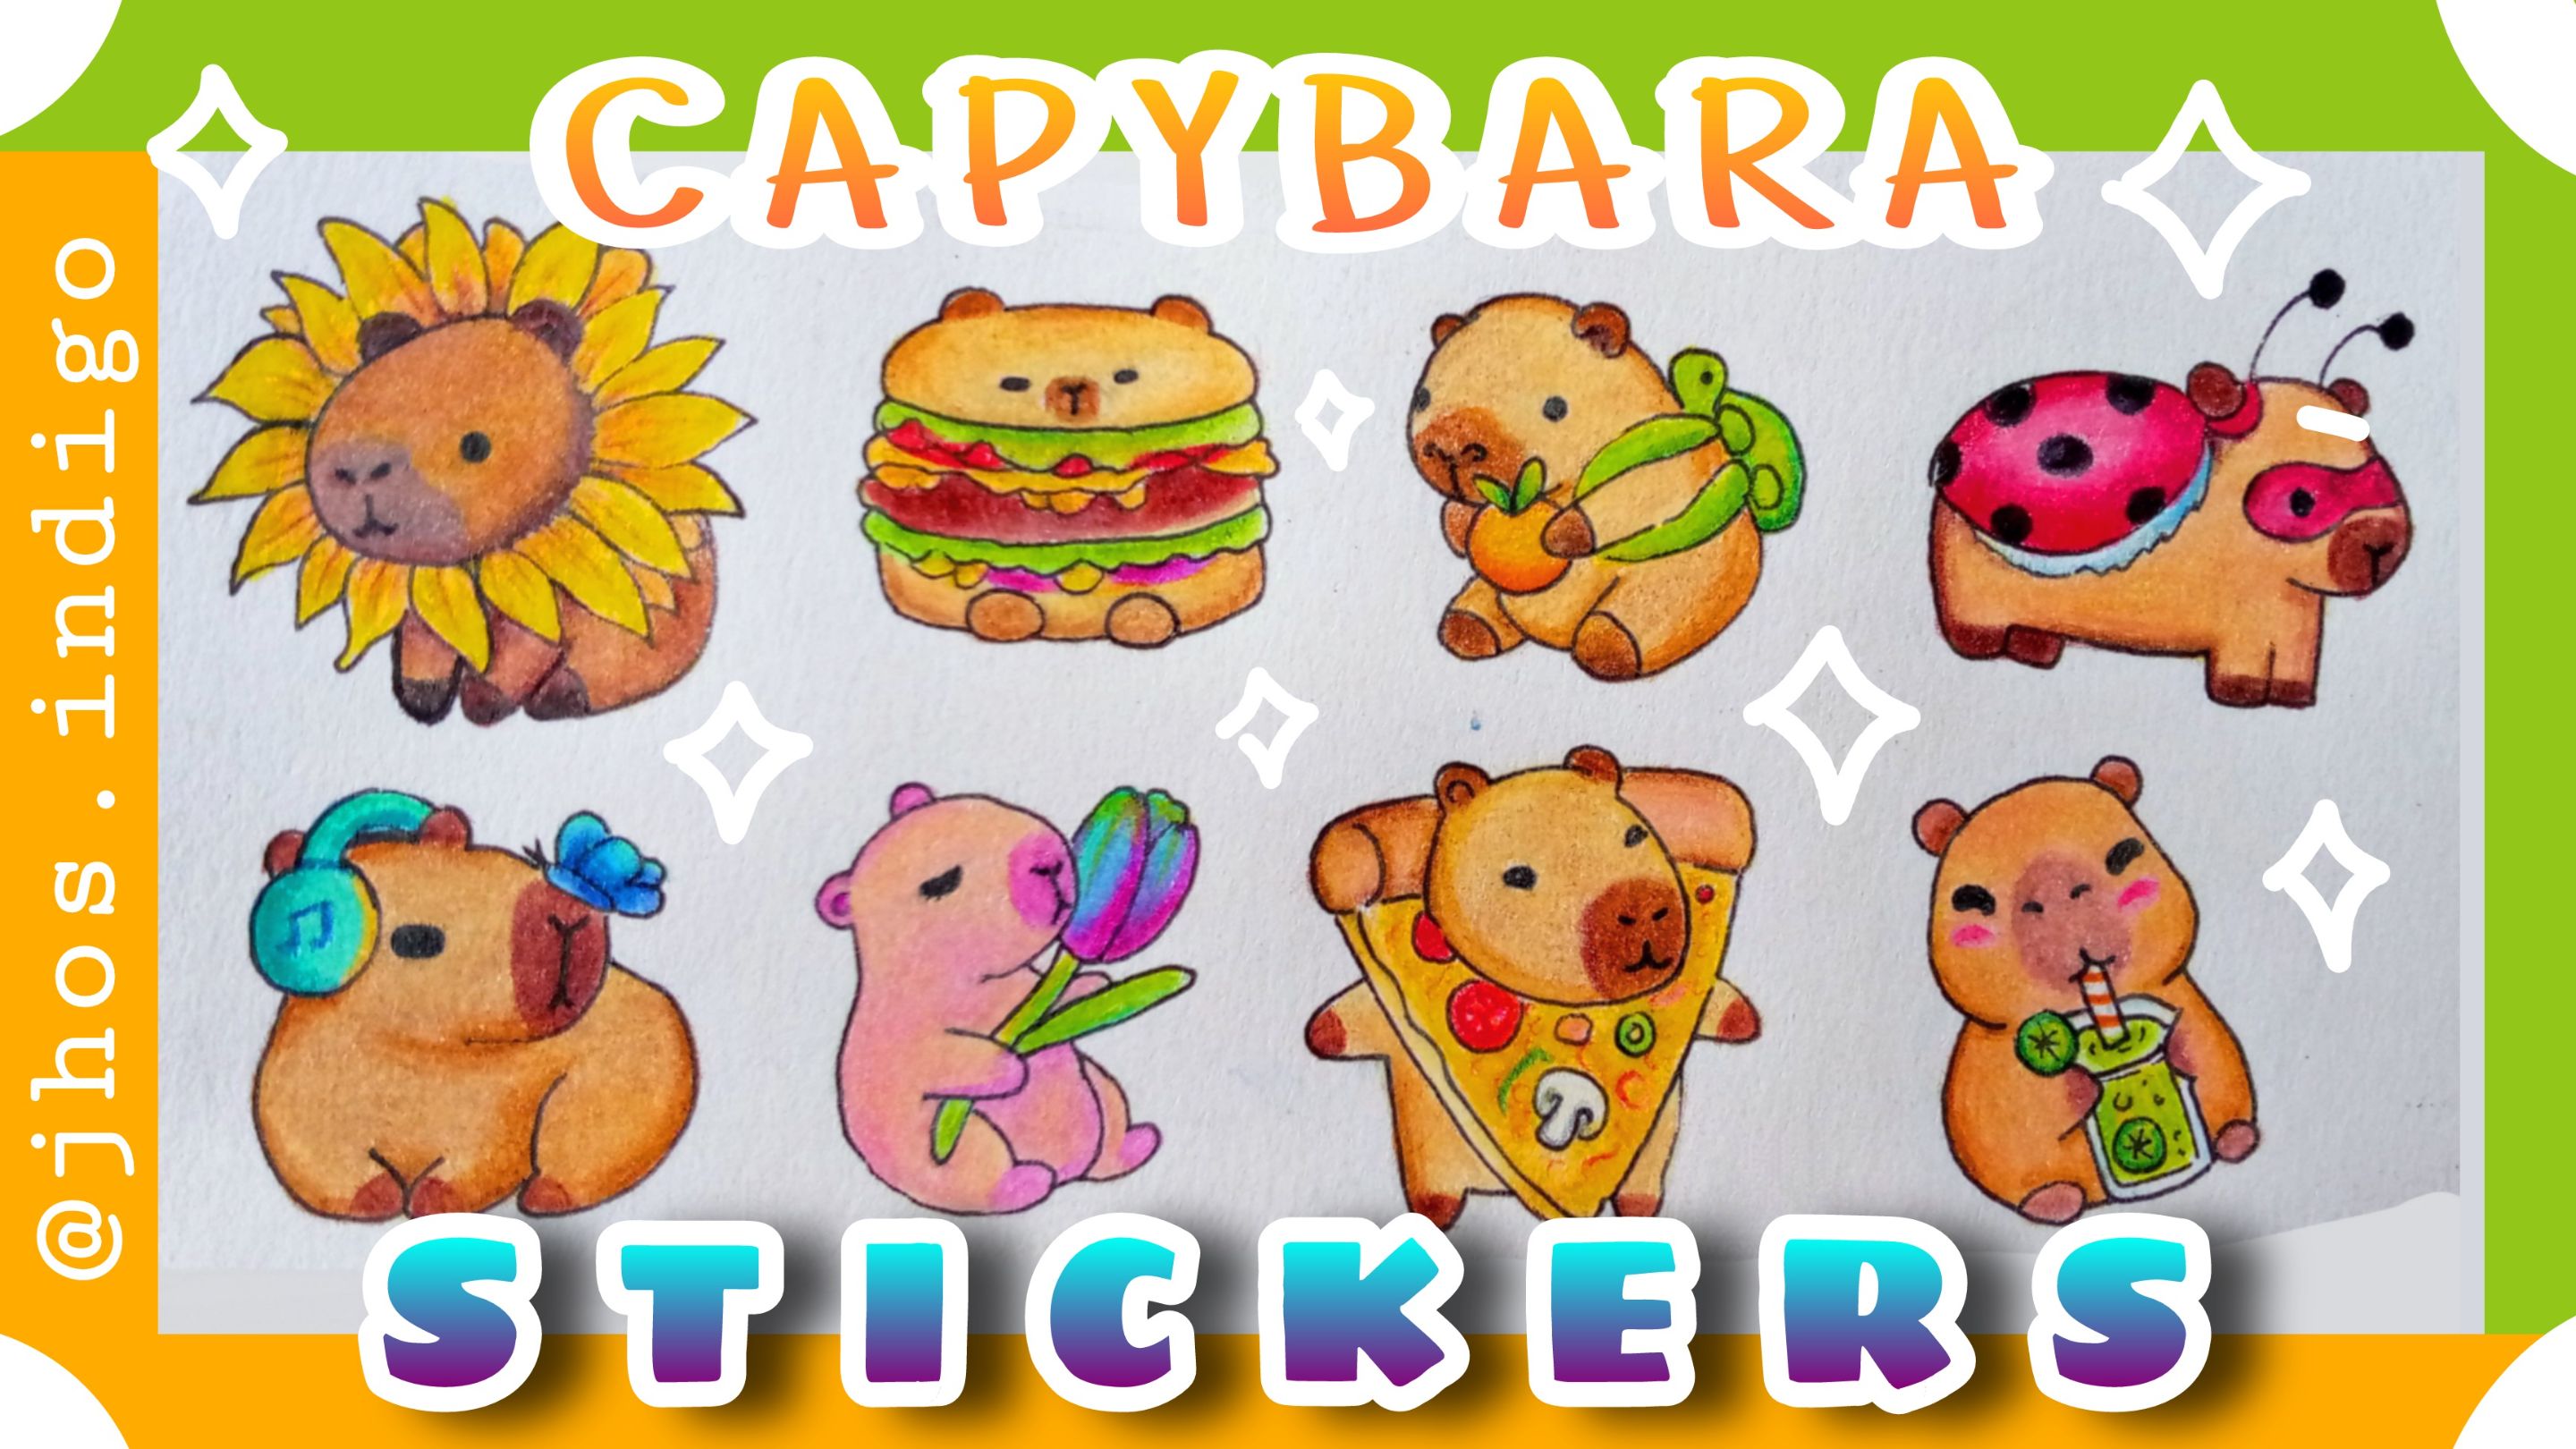
Esta técnica me servirá en el futuro para hacer mis propias creaciones. Sin embargo, en esta oportunidad quise hacer estos stickers para regalárselos a una amiga a la que le encantan los capibaras. Tengo que admitir que para algunos utilicé imágenes de referencia. Por ejemplo, la capibara hamburguesa, la capibara con limonada y la que tiene auriculares las tomé de Pinterest y las modifiqué un poco según los gustos de mi amiga: les añadí auriculares, una bebida distinta o algún ingrediente extra en la hamburguesa.
This technique will be useful in the future for making my own creations. However, this time I wanted to make these stickers as a gift for a friend who loves capybaras. I have to admit that for some of them I used reference images. For example, the hamburger capybara, the one with lemonade, and the one wearing headphones, I found those on Pinterest and modified them a bit based on my friend’s tastes: I added headphones, a different drink, or an extra ingredient in the burger.
A pesar de que lleva algo de tiempo hacer los dibujos, al menos en mi caso, porque me gusta colorearlos con mi propio estilo para que se vean bonitos, la verdad es que dibujarlos y colorearlos de forma tradicional no toma tanto tiempo y se ven bastante bien. Así que, al final, aunque no es el método más rápido, sí es bastante práctico. Por tanto, este tutorial será un poco corto.
Even though drawing them takes some time, at least for me, because I like coloring them in my own style to make them look nice, the truth is that drawing and coloring them traditionally doesn’t take that long and they look pretty good. So, in the end, even though it’s not the fastest method, it’s quite practical. Therefore, this tutorial will be a bit short.
• 𝙼𝙰𝚃𝙴𝚁𝙸𝙰𝙻𝙴𝚂 • 📝🌷 • 𝙼𝙰𝚃𝙴𝚁𝙸𝙰𝙻𝚂 •
- Cartulina Blanca delgada.
- Lápices de colores.
- Lápiz y borrador.
- Bolígrafo roller/en gel/estilógrafo/marcador punta fina o bolígrafo común.
- Tijeras
- Papel contact transparente.
- Thin white cardstock
- Colored pencils
- Pencil and eraser
- Gel roller pen, fineliner, felt-tip pen, or regular ballpoint pen.
- Scissors
- Transparent contact paper

• ℙ𝔸𝕊𝕆 𝔸 ℙ𝔸𝕊𝕆 • 🧸🌻✨ • 𝕊𝕋𝔼ℙ 𝔹𝕐 𝕊𝕋𝔼ℙ •
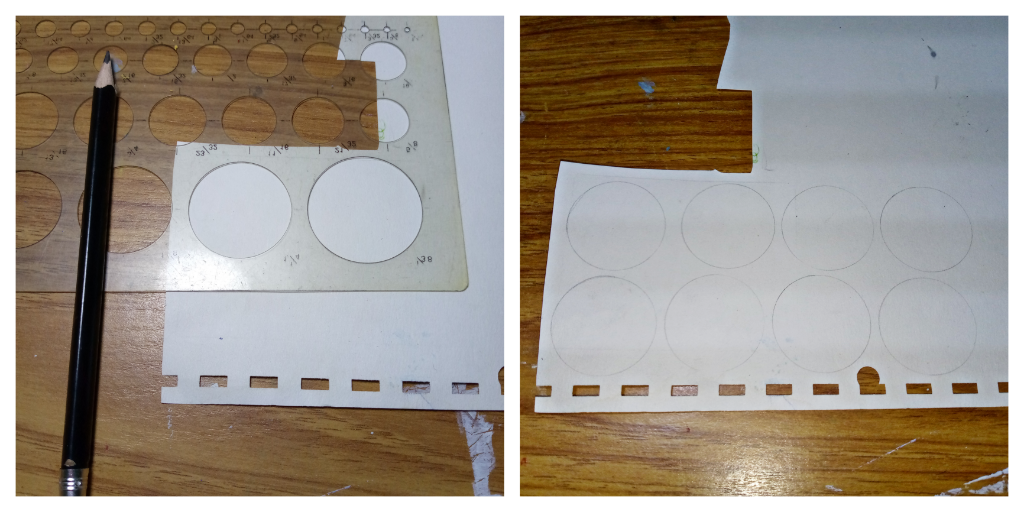
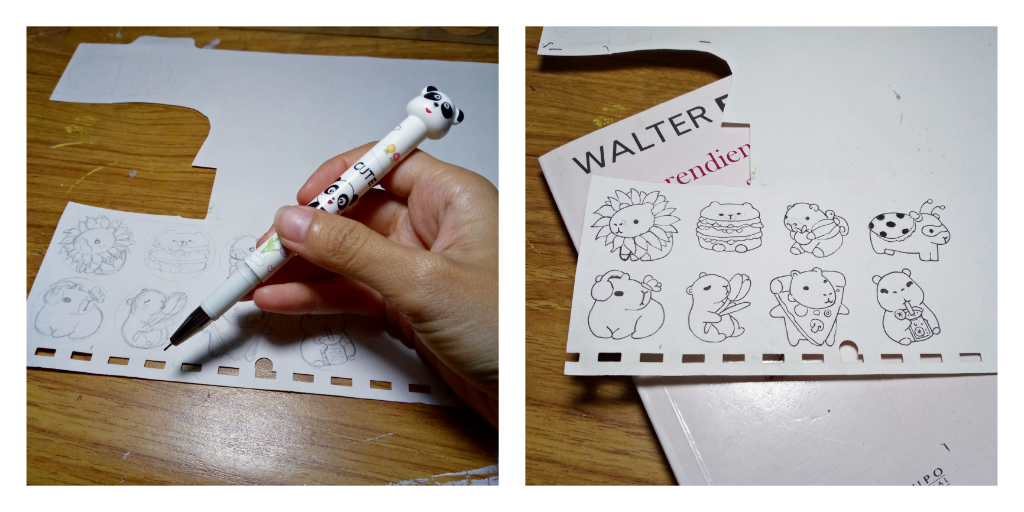
En mi caso, decidí usar una regla de círculos que tenía en casa para darle una medida aproximada y uniforme a cada uno de los dibujitos para los stickers. Coloqué la regla sobre la cartulina y fui trazando círculo por círculo, dejando una distancia adecuada entre cada uno para que pudieran caber correctamente sin que se chocaran entre sí, y dejando suficiente espacio para añadir un borde a cada sticker.
In my case, I decided to use a circle stencil I had at home to give each of the sticker drawings a roughly uniform size. I placed the stencil on the cardstock and traced circle by circle, leaving enough space between each one so they could fit properly without overlapping, and also allowing room to add a border around each sticker.
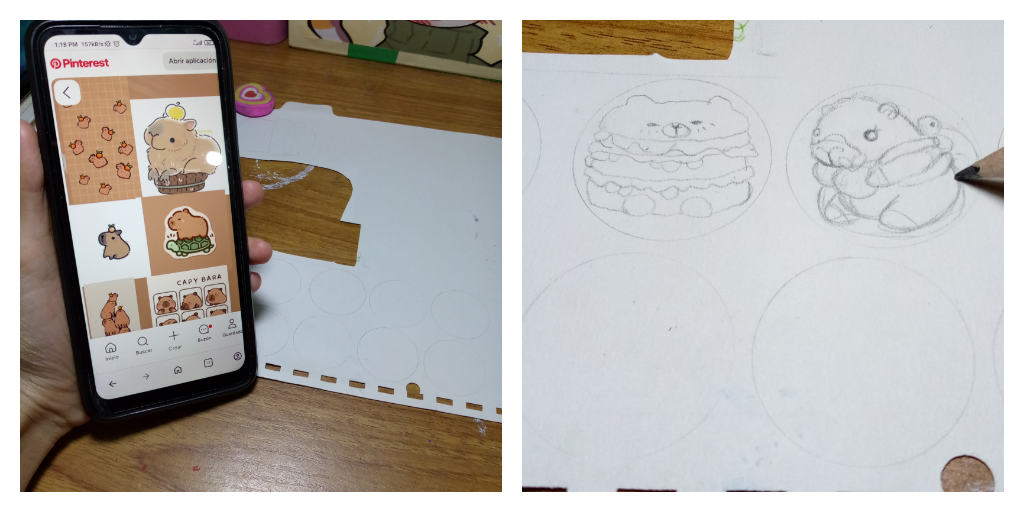
Inmediatamente empecé a dibujar. Algunas ilustraciones las hice con ayuda de imágenes de referencia, y otras salieron directamente de mi imaginación. Por ejemplo, la capibara bebé que sostiene una mandarina en la mano y lleva un bolso en forma de tortuga es una representación de una escultura en plasticina que hice hace algunas semanas.
I immediately started drawing. Some illustrations were inspired by reference images, while others came straight from my imagination. For example, the baby capybara holding a mandarin in its hand and carrying a turtle-shaped bag is based on a clay sculpture I made a few weeks ago.
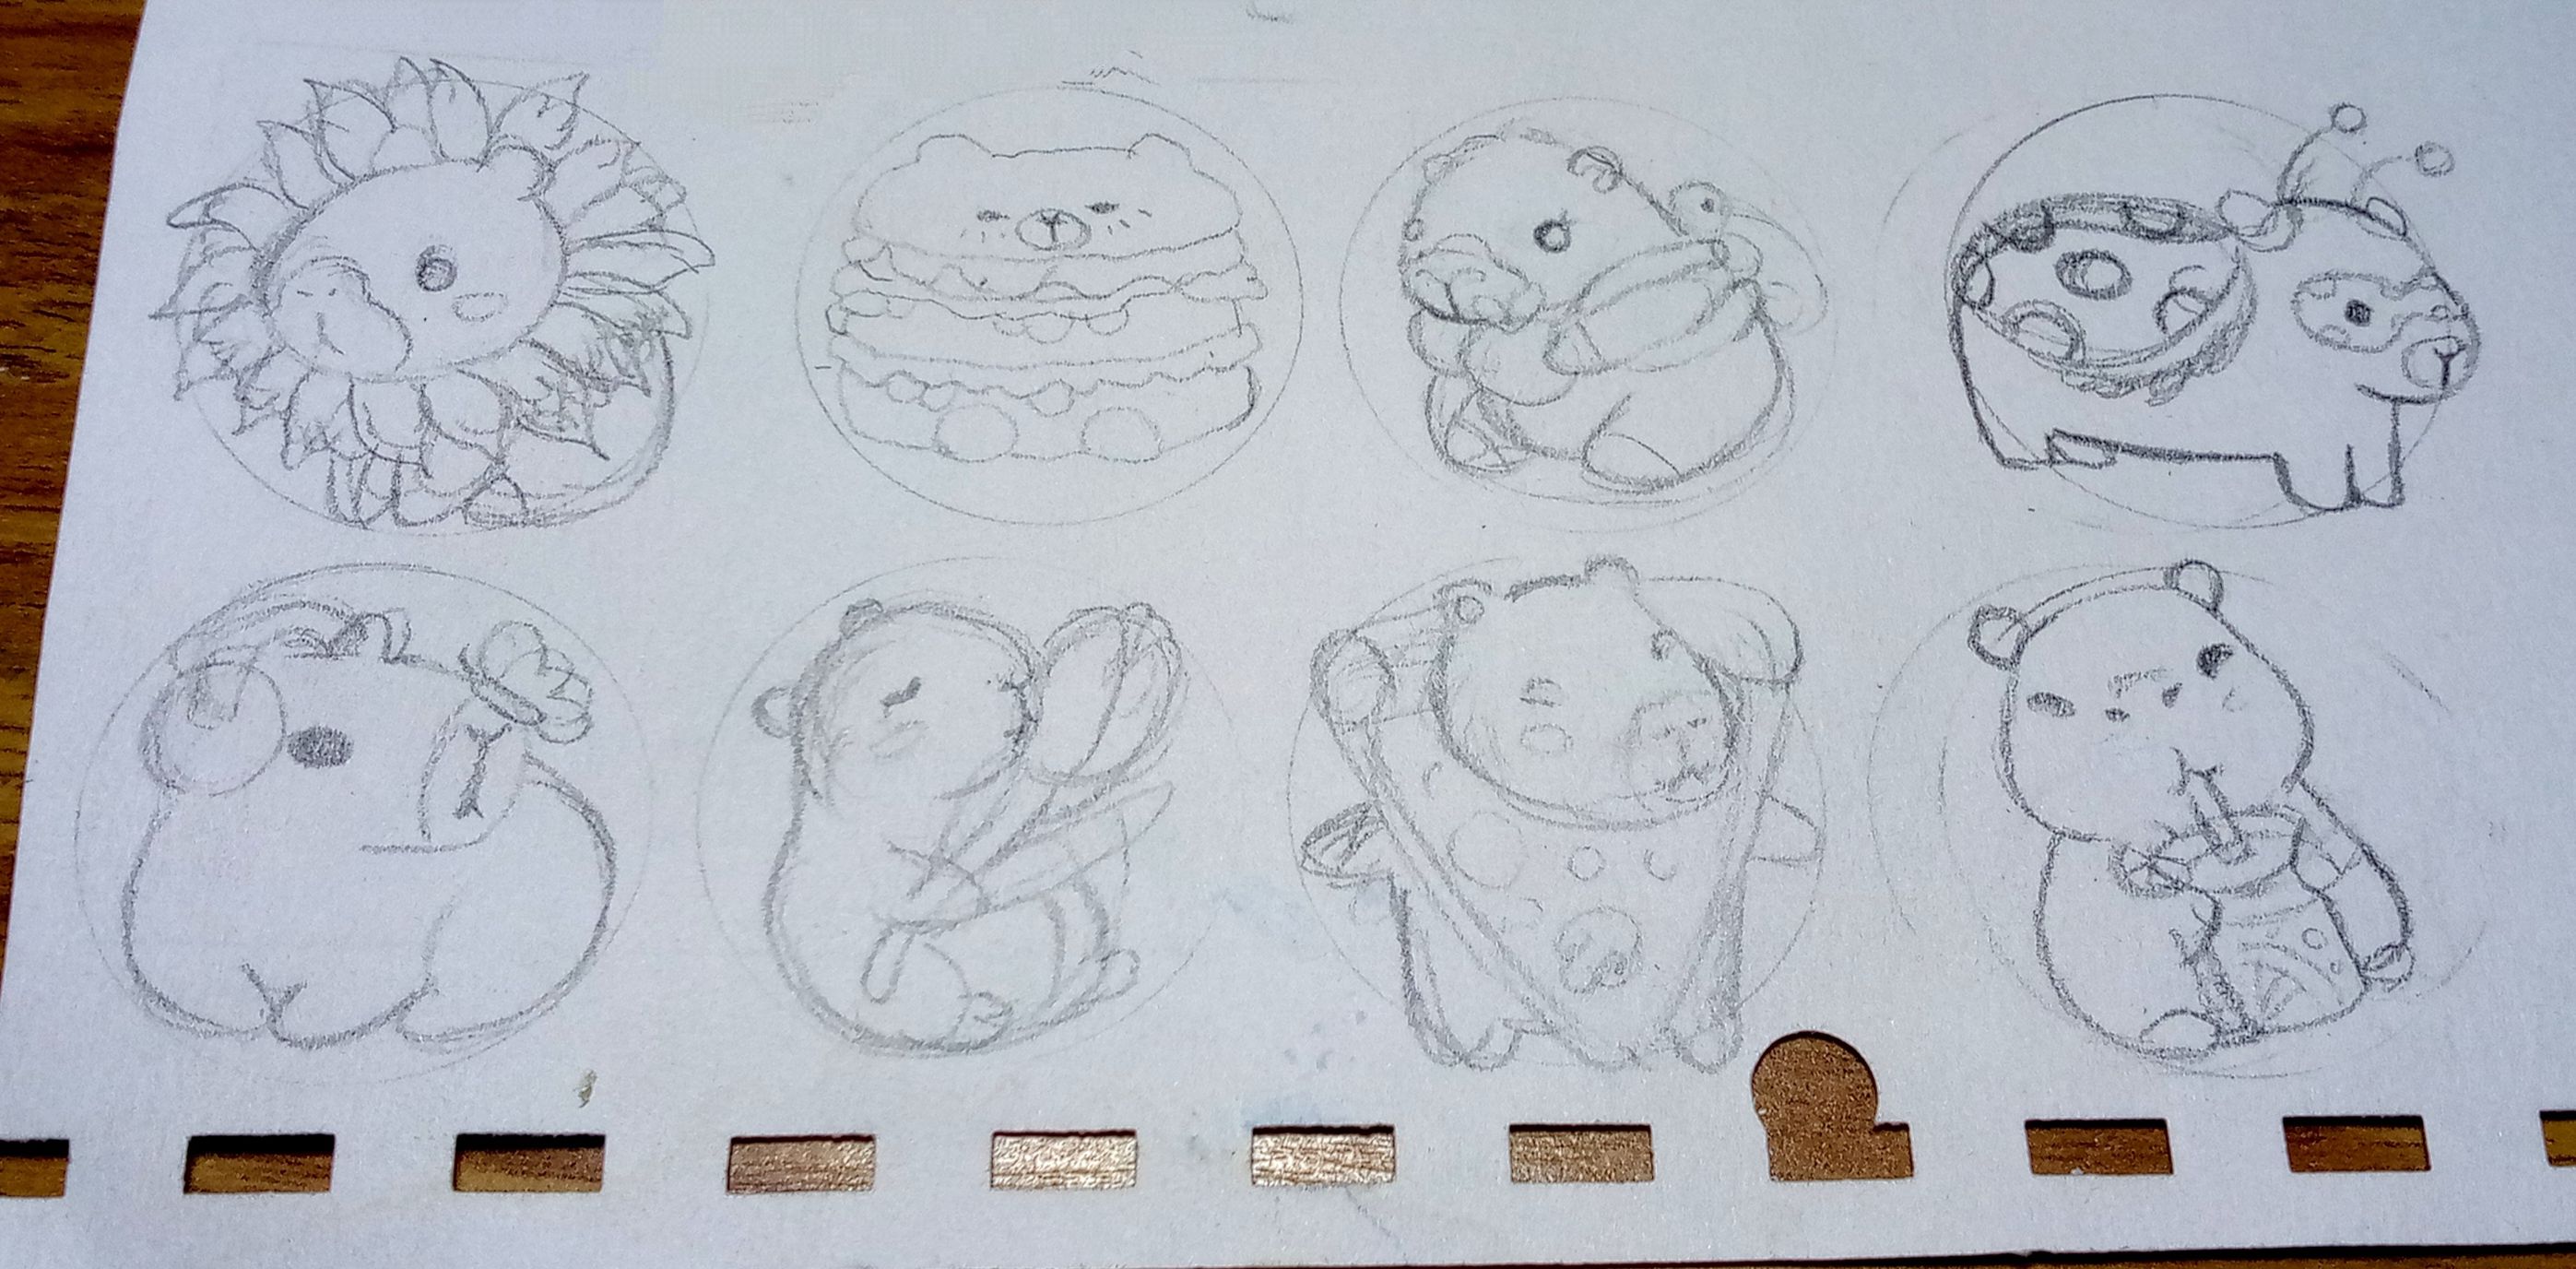
Fui trazando cada capibara con ayuda un Lápiz de grafito. Hice uno con un tulipán, porque es una de las flores favoritas de mi amiga; otro con un collar en forma de pétalos de girasol, que me pareció súper adorable; uno en forma de pizza; otro disfrazado de mariquita, porque ella es muy fan de Miraculous Ladybug; uno escuchando música con sus cascos, ya que le encanta escuchar música; y otro bebiendo limonada, porque esa bebida le fascina.
I sketched each capybara using graphite lines. I made one with a tulip, because it’s one of my friend’s favorite flowers; another with a sunflower petal-shaped necklace, which I thought was super adorable; one shaped like a pizza; another dressed as a ladybug, because she’s a big fan of Miraculous Ladybug; one listening to music with headphones, since she loves music; and another drinking lemonade, because she’s obsessed with that drink.
Llegó el momento de entintarlos. Para hacerlo, usé un bolígrafo que creo que es de gel, aunque no estoy segura. Me lo regaló mi tía en mi cumpleaños: tiene forma de panda, es muy bonito, e incluso tiene un soporte para mantenerse de pie. Es genial, aunque no tiene información sobre el tipo de bolígrafo como tal. De todos modos, ustedes pueden usar el que tengan en casa, siempre y cuando se aseguren de que la tinta se seque bien. Si necesitan esperar unas horas o incluso un día para que se seque completamente y no se corra, háganlo. De lo contrario, al momento de colorear, el resultado puede ser muy inconveniente (yo sufrí las consecuencias porque corrí un poco la tinta al colorear). Después de entintar, con una goma de borrar eliminé suavemente las líneas de grafito.
Then came the inking stage. To do this, I used a pen that I think is gel-based, although I’m not entirely sure. My aunt gave it to me for my birthday—it’s shaped like a panda, really cute, and even has a stand to keep it upright. It’s great, although it doesn’t have any info about the type of pen it is. Anyway, you can use whatever you have at home, as long as you make sure the ink dries properly. If you need to wait a few hours or even a day for it to dry completely and avoid smudging, do it. Otherwise, when it’s time to color, the result can be pretty inconvenient (I learned the hard way because I smudged the ink a bit while coloring). After inking, I gently erased the graphite lines with an eraser.
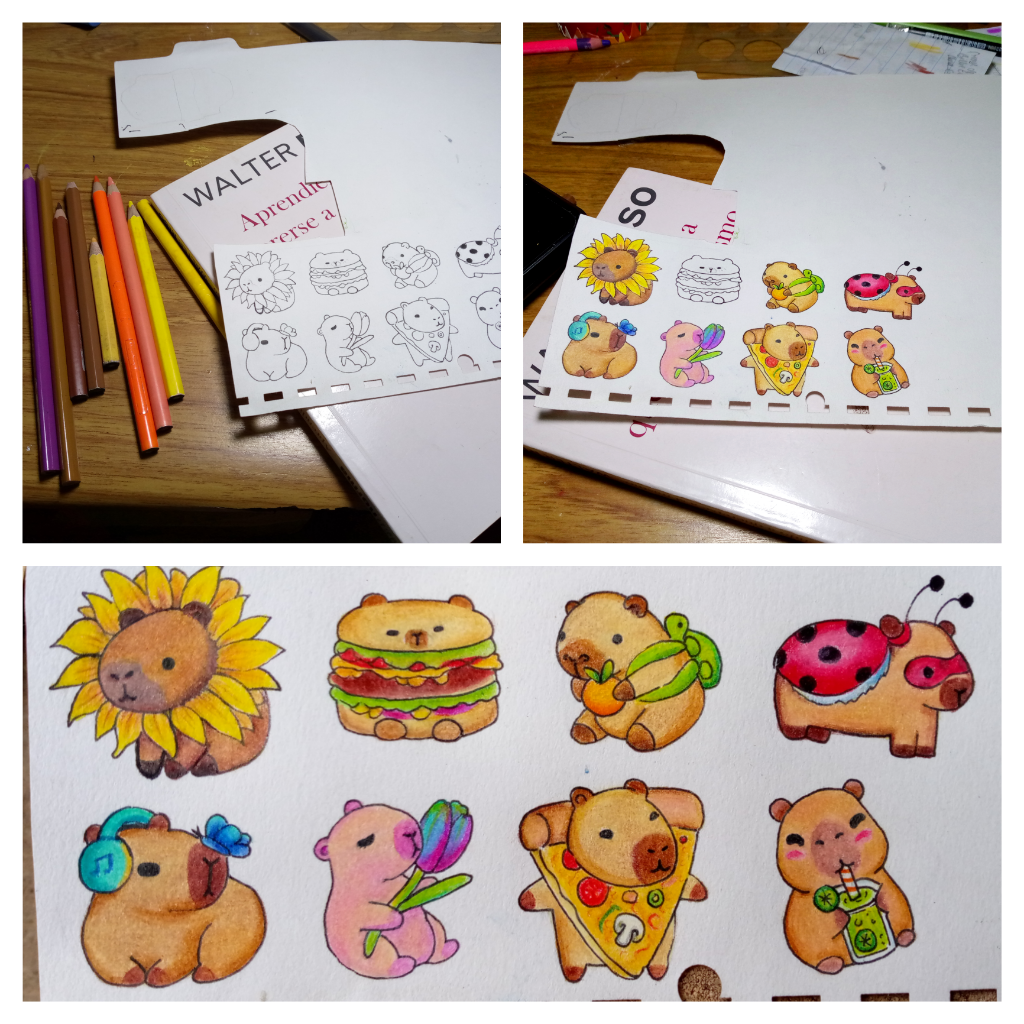
Como mencioné antes, este no es un tutorial sobre coloreado, sino sobre cómo hacer stickers, así que no voy a entrar en muchos detalles sobre el proceso de color. Solo les mostraré los dibujitos una vez terminados. Sin embargo, algo que sí quiero advertirles es que, en mi caso, no quería que todos los capibaras fueran del mismo color, así que tuve que experimentar bastante con distintas tonalidades y mezclas. Utilicé colores como ocre, arena, salmón, melocotón, dorado y castaño.
As I mentioned earlier, this isn’t a coloring tutorial, but rather a guide on how to make stickers, so I won’t go into too much detail about the coloring process. I’ll just show you the drawings once they’re finished. However, one thing I do want to point out is that I didn’t want all the capybaras to be the same color, so I had to experiment quite a bit with different shades and combinations. I used colors like ochre, sand, salmon, peach, gold, and chestnut.
El capibara rosa lo hice así porque hace unos días pasé frente a una tienda y vi un peluche de capibara rosa que me encantó. Me pareció una idea divertida recrearlo en un dibujo. Lo último que coloreé fue la hamburguesa, porque quería dedicarle un poco más de creatividad y no basarme únicamente en los colores de la imagen de referencia. Quería que se viera más llamativa, apetitosa y colorida. Sin lugar a dudas, los que más me gustaron en cuanto al resultado del color fueron la hamburguesa, la pizza y el del tulipán.
The pink capybara was inspired by a plush toy I saw in a store a few days ago—it was pink and absolutely adorable. I thought it would be fun to recreate it as a drawing. The last thing I colored was the hamburger, because I wanted to put a bit more creativity into it and not rely solely on the reference image’s colors. I wanted it to look more eye-catching, appetizing, and colorful. Without a doubt, the ones I liked most in terms of color results were the hamburger, the pizza, and the one with the tulip.
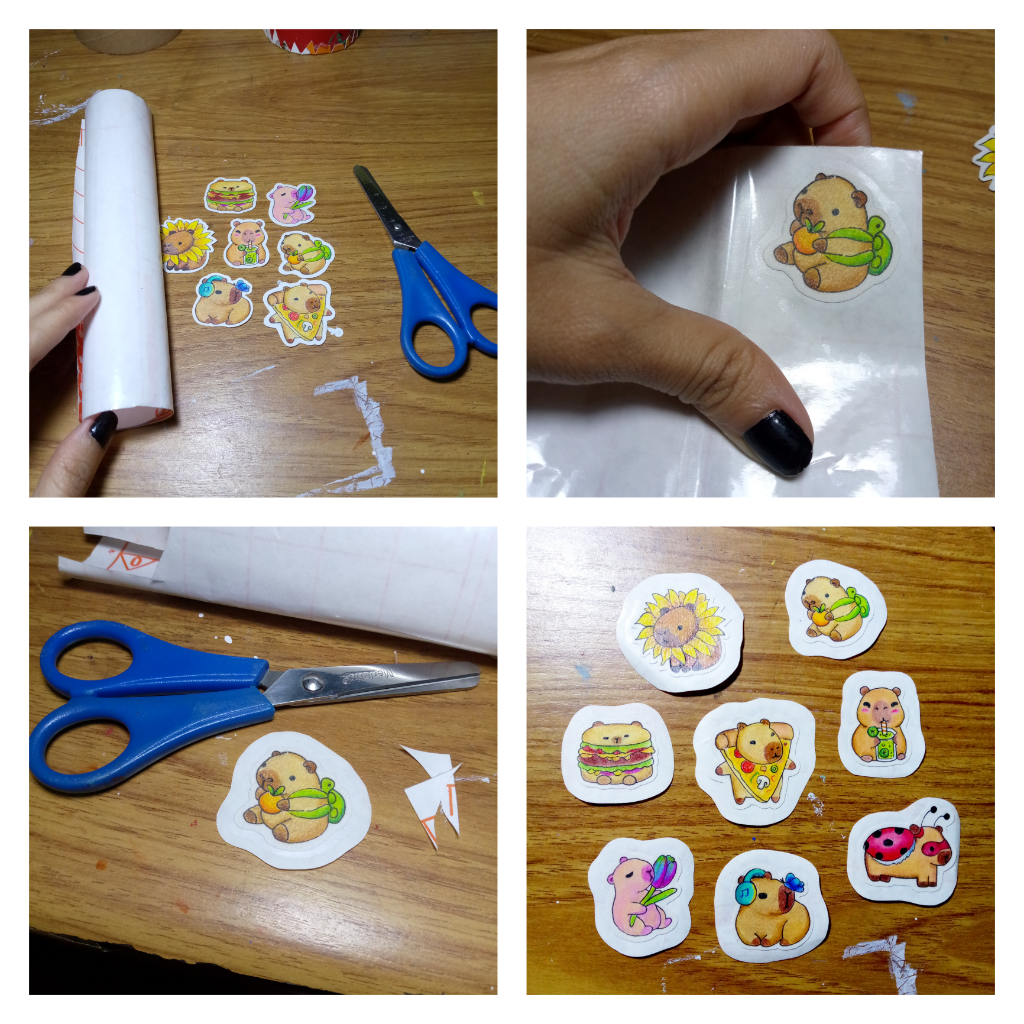
Es momento de recortarlos. Conozco personas que, sin necesidad de líneas guía ni nada por el estilo, cortan este tipo de cosas de forma muy prolija y proporcionada. Sin embargo, yo sí necesito hacer líneas guía, porque suelo desviarme, cortar de más o de menos. Aún estoy aprendiendo a detectar los pesos visuales al momento de recortar para lograr un buen balance.
Now it’s time to cut them out. I know people who can cut these kinds of things very neatly and proportionally without needing guide lines or anything like that. However, I do need guide lines, because I tend to veer off, cut too much or too little. I’m still learning how to detect visual weight when cutting to achieve a good balance.
Primero, con ayuda de un color clarito, en este caso elegí azul pastel, tracé las líneas guía. Luego recorté cada sticker en cuadritos para separarlos entre sí, y después los fui recortando de forma más detallada.
First, using a light-colored pencil—pastel blue, in this case—I drew the guide lines. Then I cut each sticker into small squares to separate them, and afterward I trimmed them more precisely.
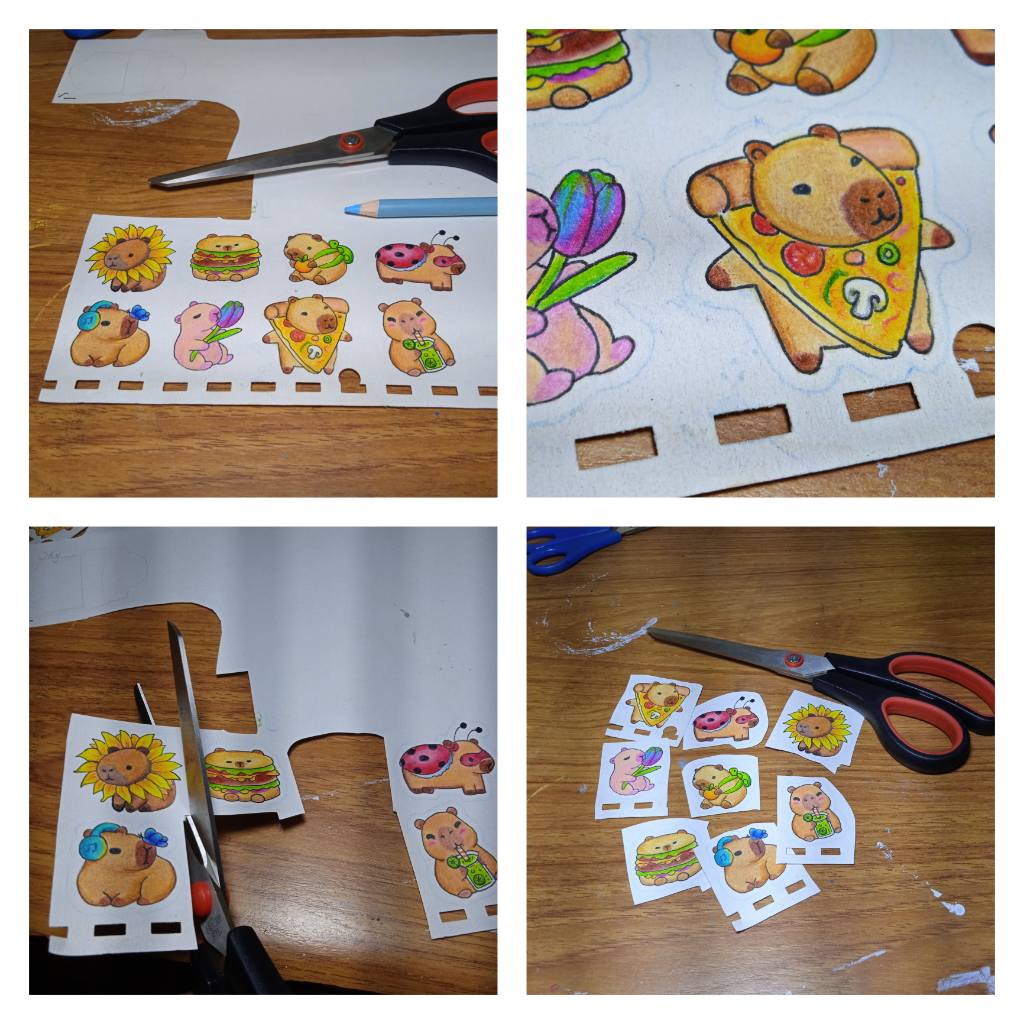
Con ayuda de una tijera más pequeña, los corté siguiendo la silueta de cada uno para que tuvieran una estética más cuidada.
Using a smaller pair of scissors, I cut along the silhouette of each one to give them a more polished look.
Ahora viene una parte muy importante: hacer que estos amiguitos sean adhesivos y se puedan aplicar donde uno quiera. Lo que hice fue lo siguiente: despegué parcialmente el adhesivo del papel encerado, introduje el dibujito entre ambos, y lo pegué directamente sobre el adhesivo. Luego lo dejé caer nuevamente sobre el papel encerado. Les recomiendo hacerlo a una buena distancia de los bordes para poder recortar con más libertad.
Now comes a very important part: making these little friends adhesive so they can be applied wherever you want. Here’s what I did: I partially peeled the adhesive from the wax paper, placed the drawing between the two layers, and stuck it directly onto the adhesive. Then I laid it back down onto the wax paper. I recommend doing this at a good distance from the edges so you have more freedom when cutting.
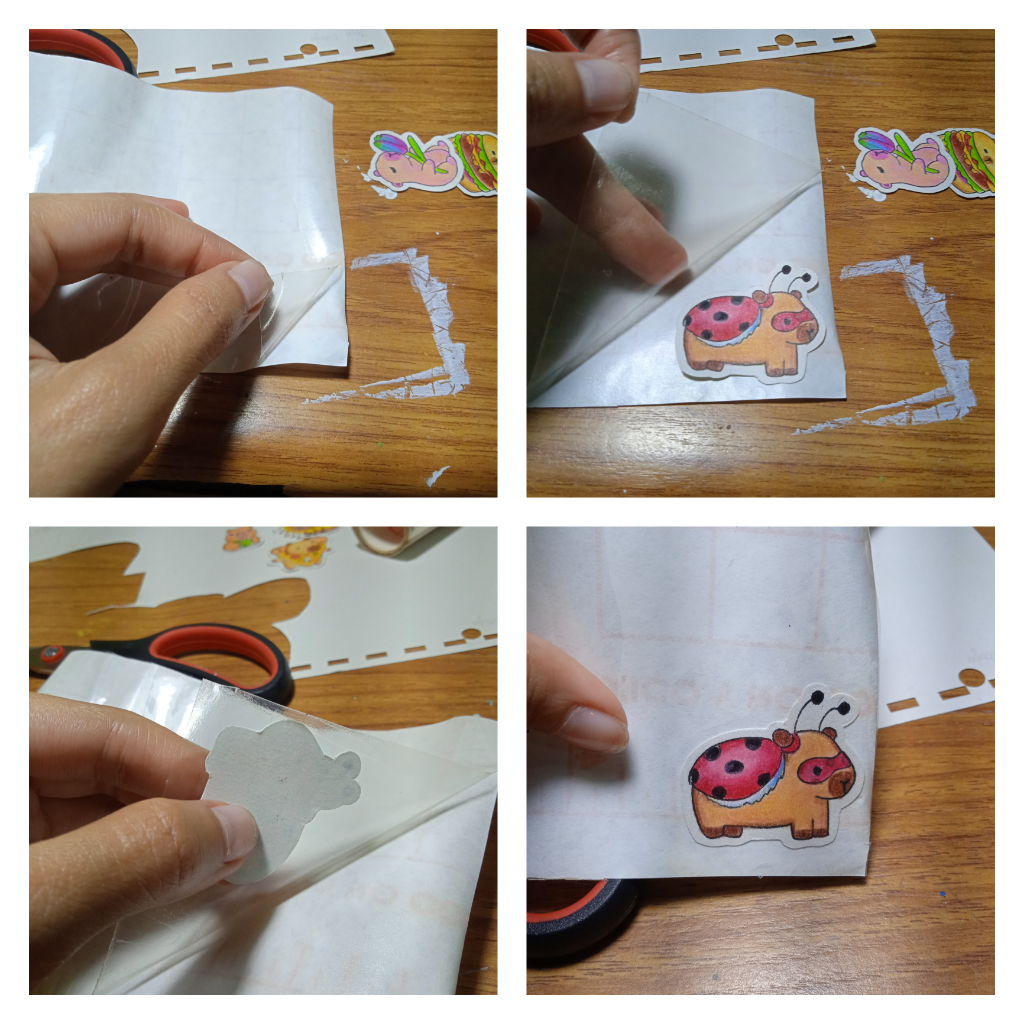
Les menciono que al trabajar con esta cartulina delgada (que es como una hoja de papel más gruesa), el papel contact no se adhiere con precisión a los bordes del dibujo. Siempre queda un pequeño espacio. Por eso, deben asegurarse de recortar lejos de ese borde para que el adhesivo siga unido al papel de protección que está debajo. Aquí les muestro mejor, porque con rojo el espacio que quiero que noten que se forma entre el dibujo y el adhesivo. Y con azul marqué el espacio que dejé alrededor que sí se adhiere, para que se pegue correctamente al papel manteca.
One thing to note when working with this thin cardstock (which is like a thicker sheet of paper) is that contact paper doesn’t adhere precisely to the edges of the drawing. There’s always a small gap. So, make sure to cut far enough from that edge so the adhesive remains attached to the protective backing underneath. I’ll show you more clearly: in red, I marked the space that forms between the drawing and the adhesive, and in blue, the area I left around it that does adhere properly, so it sticks well to the wax paper.
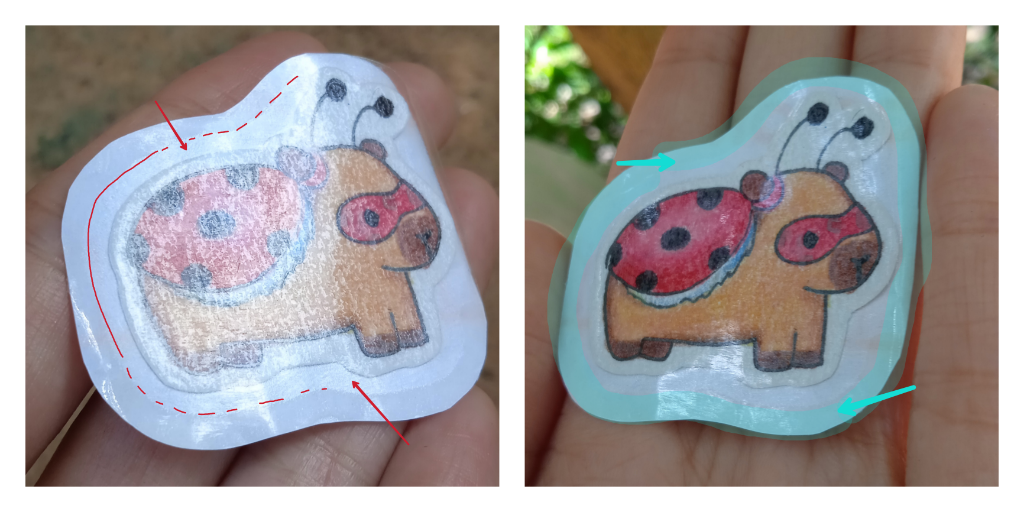
Sé que parece un detalle menor, pero en realidad es fundamental. De lo contrario, el papel de protección se despegará, y este es vital para preservar el sticker, guardarlo, transportarlo y poder usarlo después, cuando uno quiera.
I know it might seem like a minor detail, but it’s actually essential. Otherwise, the protective backing will come off—and that part is crucial for preserving the sticker, storing it, transporting it, and being able to use it later, whenever you want.
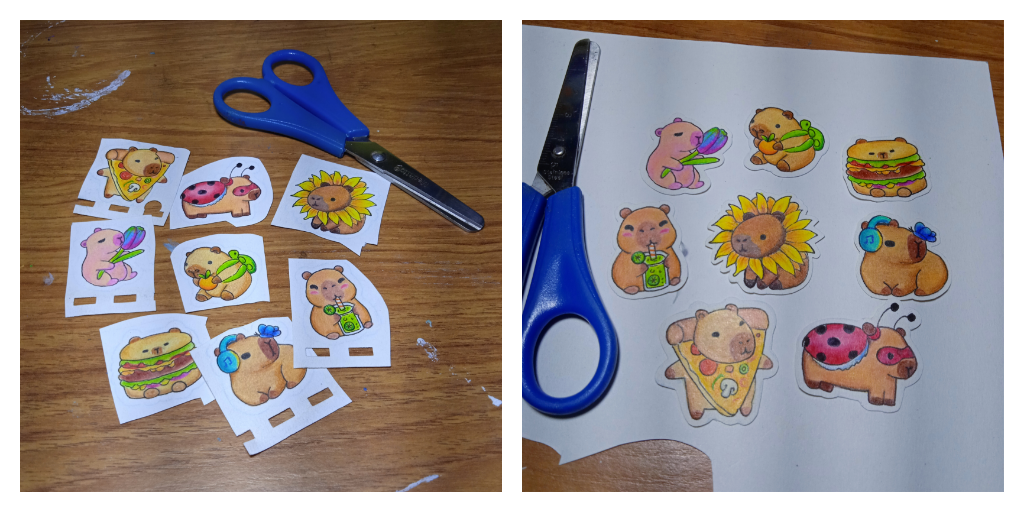
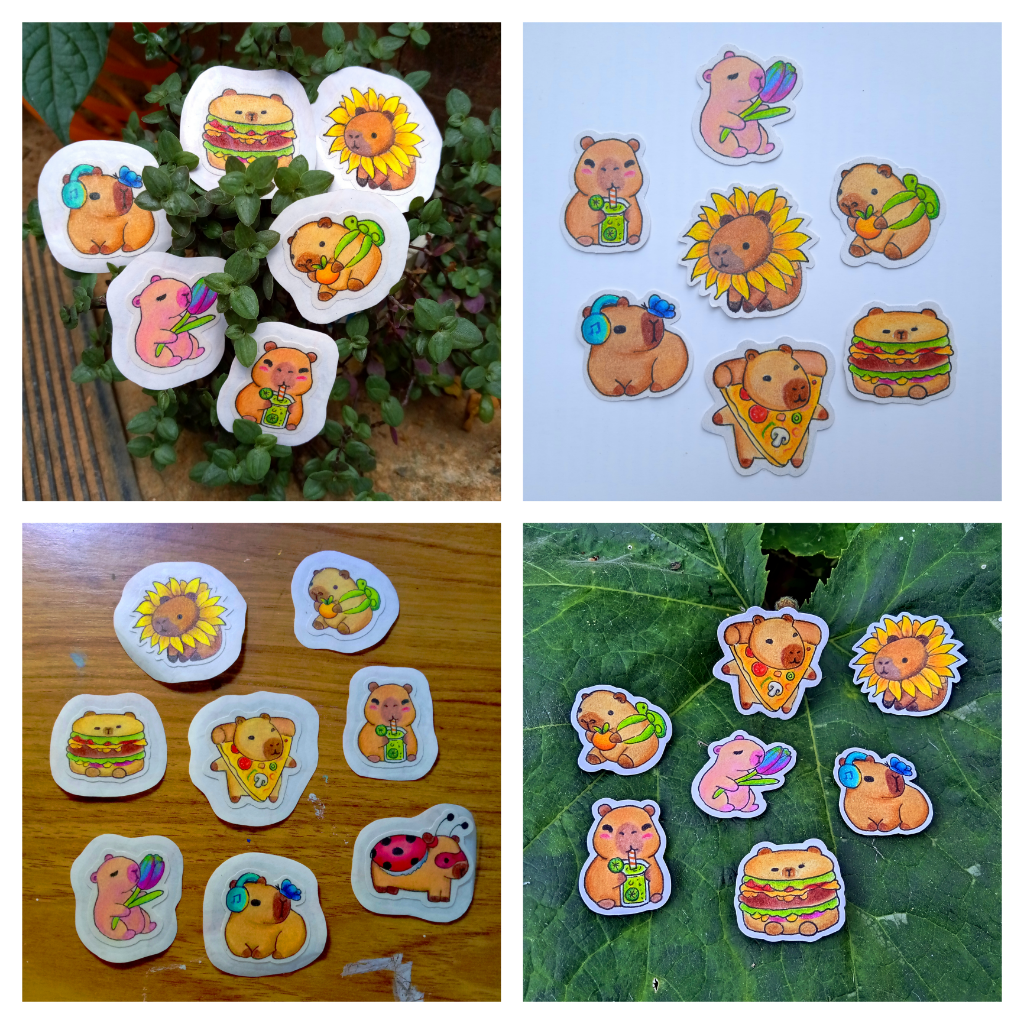
Teniendo esto en cuenta, ya podemos recortar el sticker de la forma que queramos: puede ser en círculo, rectángulo, cuadrado, con bordes suavizados, o siguiendo lo más posible la silueta del dibujo. El formato depende de lo que les resulte más práctico y estético.
With that in mind, we can now cut the sticker into whatever shape we like: it can be a circle, rectangle, square, with softened edges, or following the silhouette of the drawing as closely as possible. The format depends on what feels most practical and visually appealing to you.
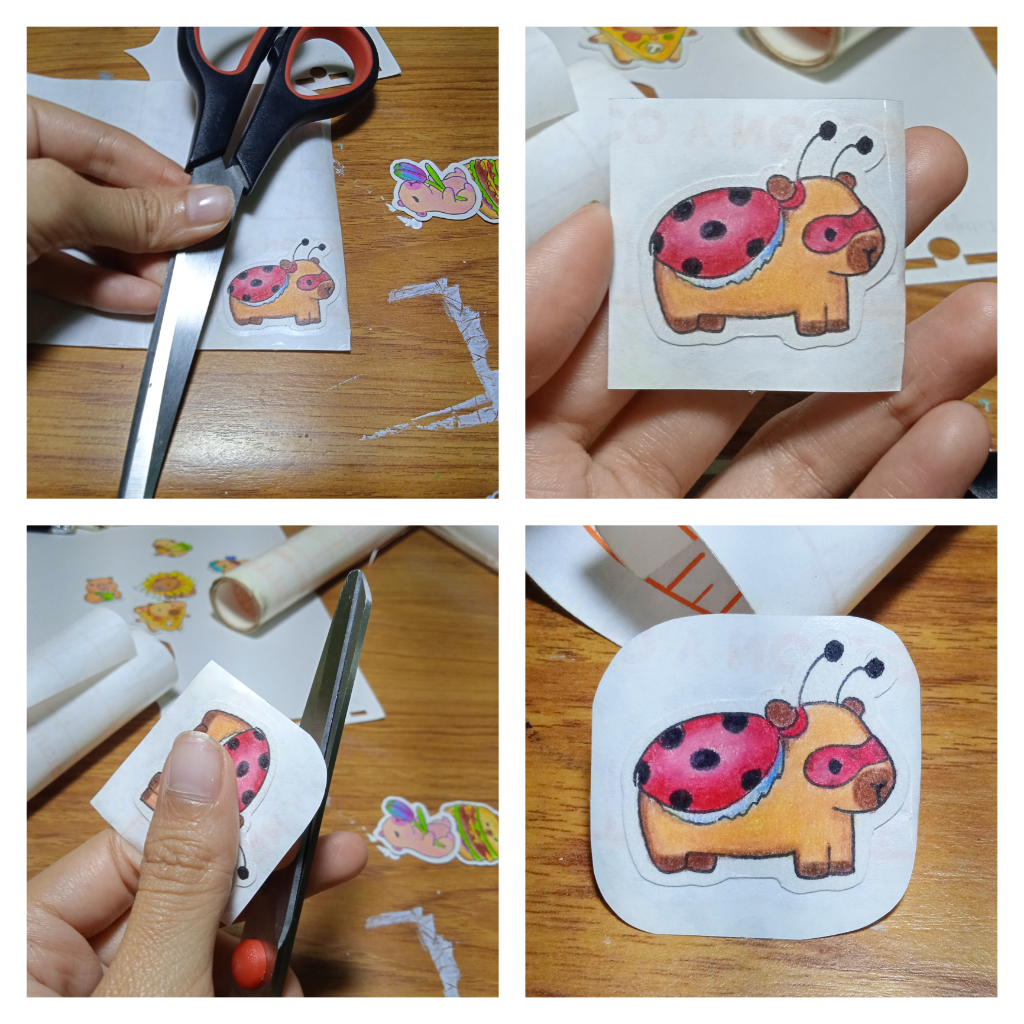
Personalmente, me gusta recortarlos siguiendo la silueta del sticker, porque siento que armoniza visualmente y se ve mucho más natural, organizado y bonito al momento de pegarlo sobre cualquier superficie.
Personally, I like cutting them along the silhouette of the sticker because I feel it creates visual harmony and looks much more natural, neat, and pretty when applied to any surface.
Hacemos lo mismo con los demás... ¡y listo el pollo! ✨🍊🌷
We do the same with the rest... and voilà, it’s done! ✨🍊🌷
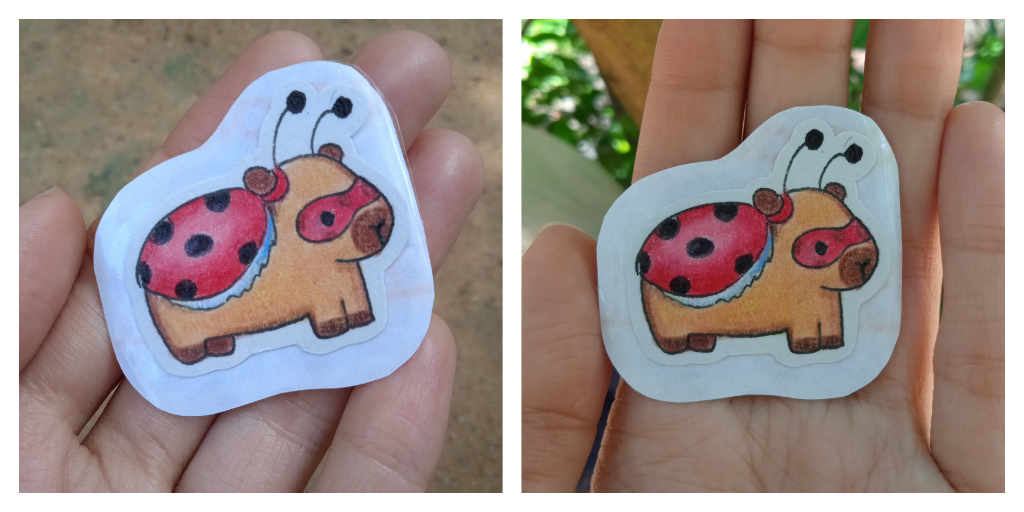
Este es el resultado final. Y como son un regalo, la verdad es que no quise pegarlos todavía en ninguna superficie 🤣. Pero no hay motivo para dudar de este método: es pura lógica simple. Así que... les debo esa última muestra 😬 ¡No me funen, por favor! 😅
Here’s the final result. And since they’re a gift, I honestly didn’t want to stick them onto anything just yet 🤣. But there’s no reason to doubt this method—it’s just simple logic. So... I owe you that final demo 😬 Please don’t cancel me! 😅
Gracias por tomarse el tiempo de leer mi contenido, espero que este tutorial les haya servido y nos vemos en un próximo post. 💙🍁
Thanks for taking the time to read my content. I hope this tutorial was helpful, and I’ll see you in the next post. 💙🍁