Holiss, espero que se encuentren bien.
Hiii, I hope you're all doing well.
Creo que nunca había publicado en esta comunidad, pero últimamente me he estado animando a hacer más cosas, lo cual me tiene muy contenta. Entre ellas está el deseo de expandir mis horizontes y participar en más espacios como este. Me da algo de miedo equivocarme, pero creo que me da más miedo perder oportunidades por no atreverme y dejar de aprender.
I think I had never posted in this community before, but lately I've been feeling more encouraged to try new things, which makes me really happy. One of those things is the desire to broaden my horizons and take part in more spaces like this one. I'm a bit afraid of making mistakes, but I think I'm even more afraid of missing out on opportunities by not daring to try and not learning.
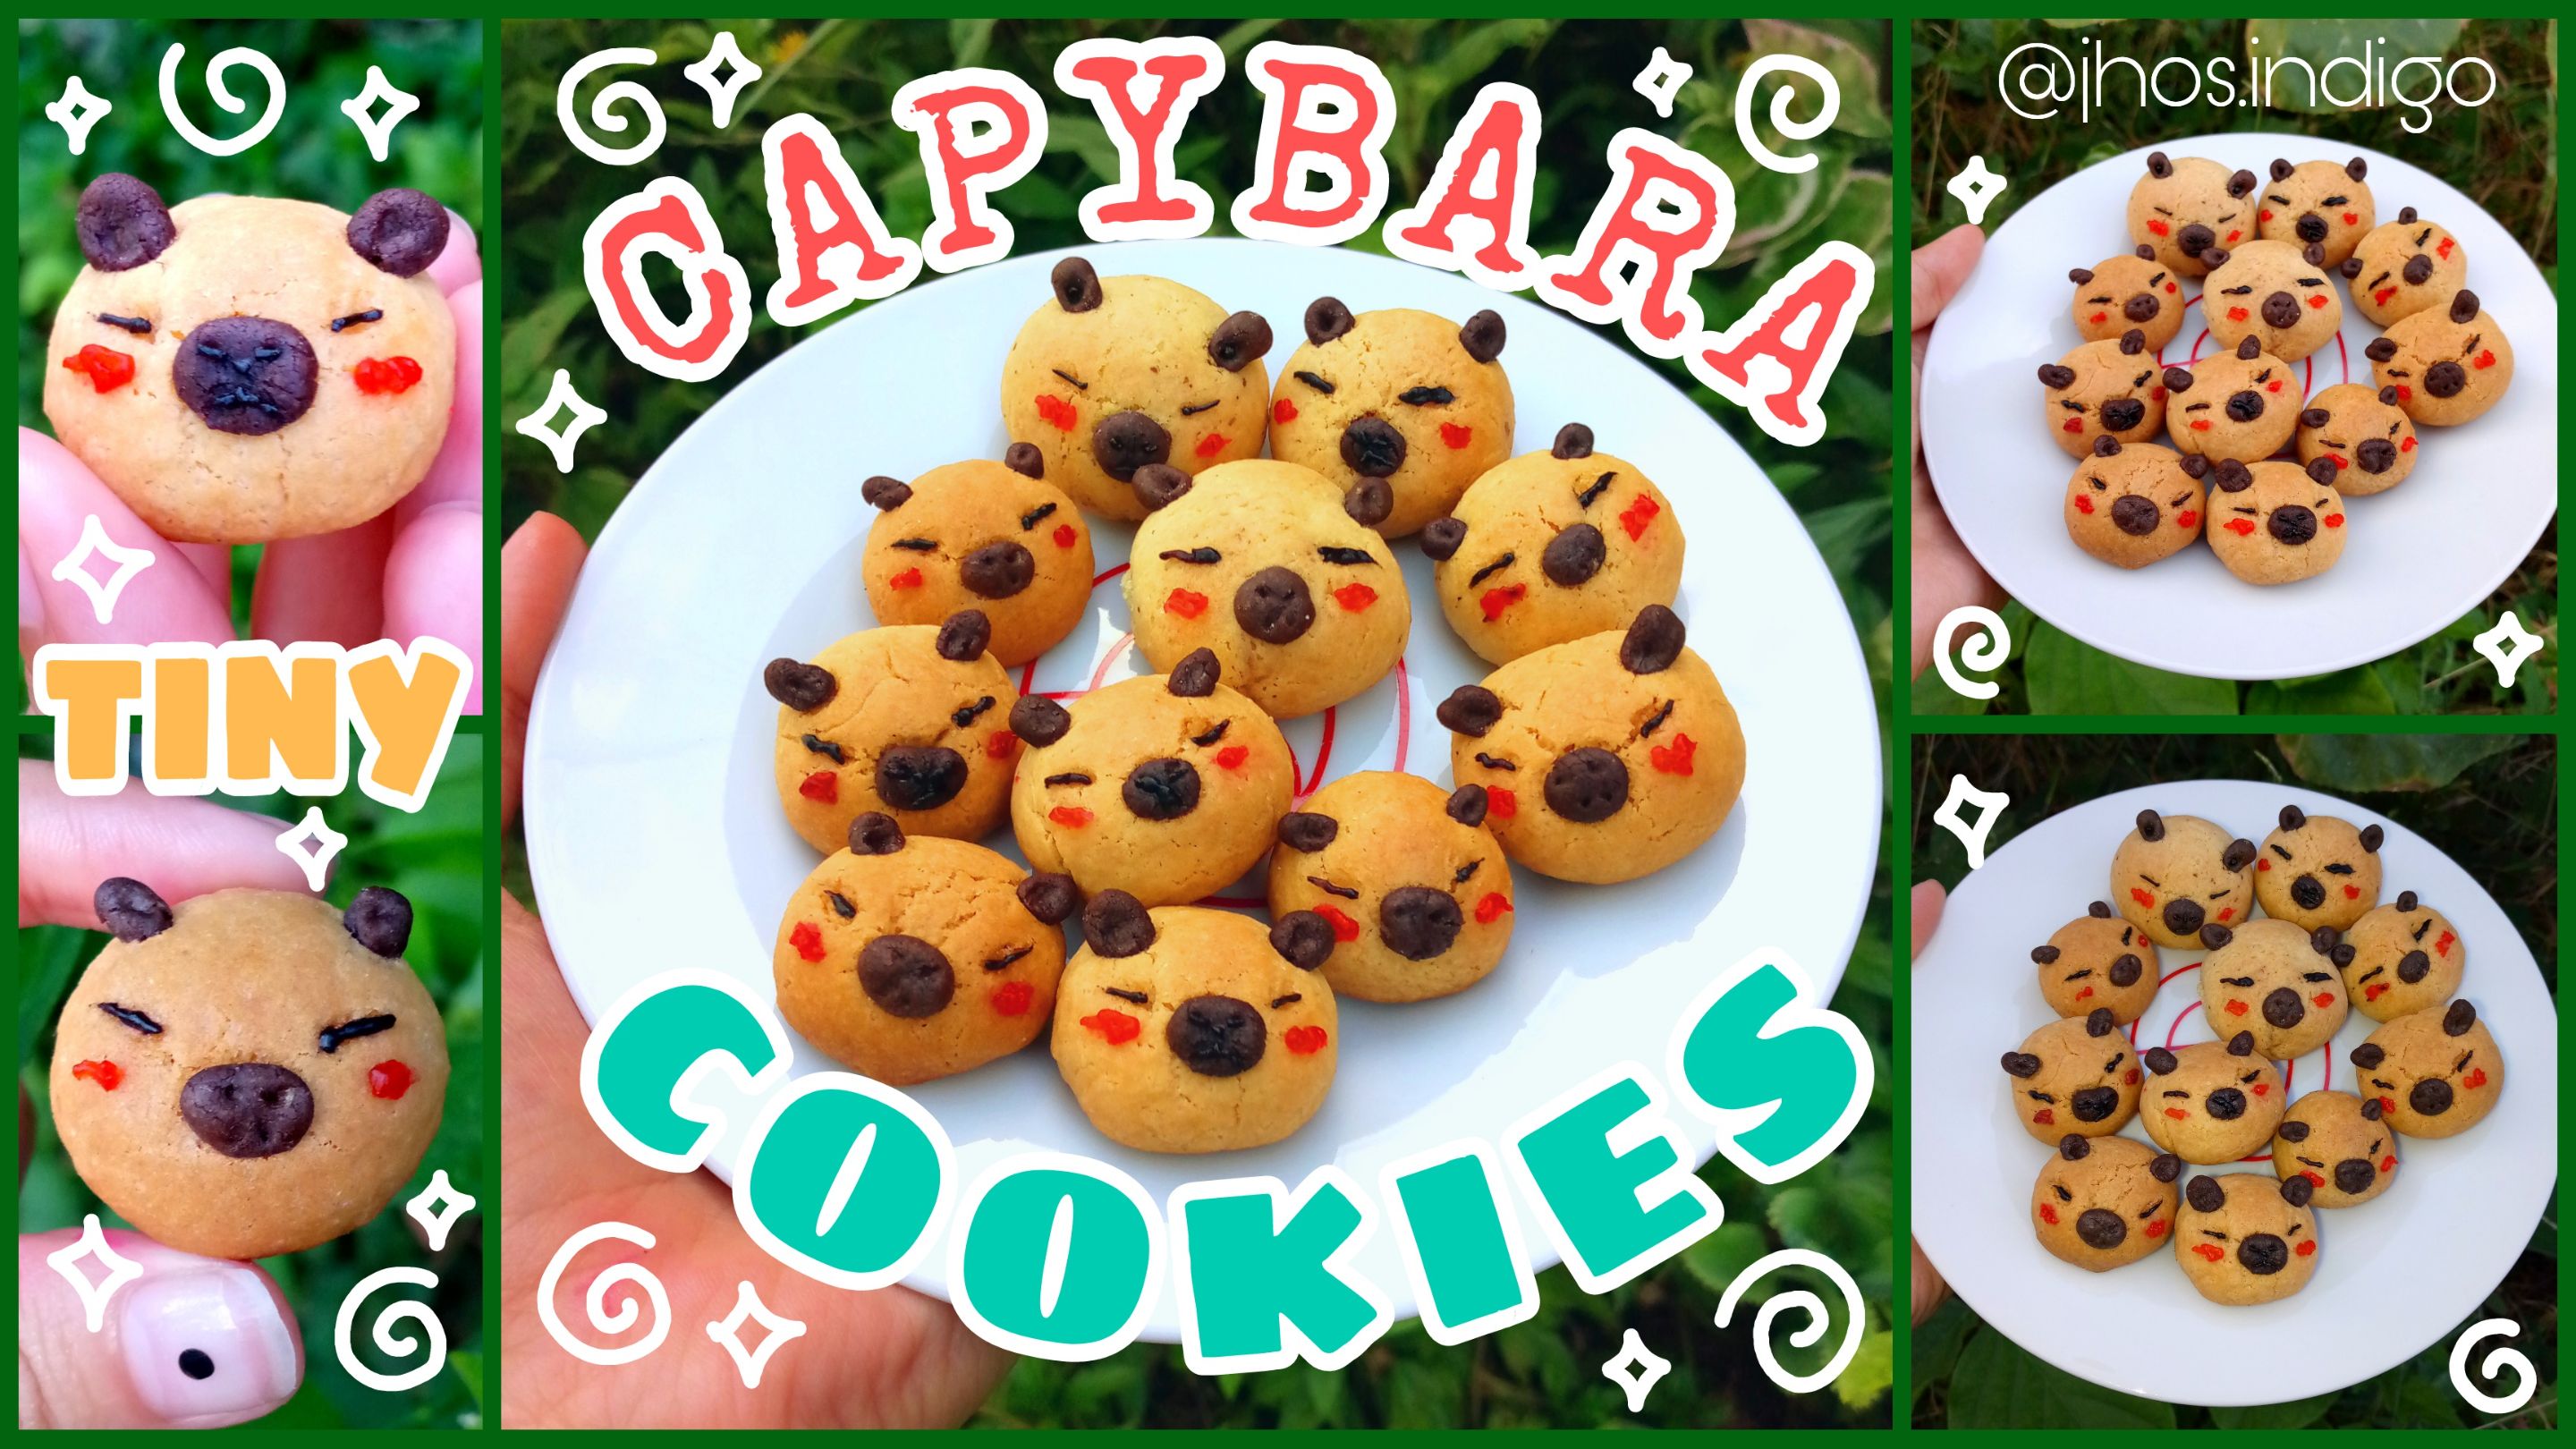
Mi post anterior también fue sobre galletas de capibara, aunque en ese caso tenían un estilo más tradicional: la clásica forma circular, más práctica por decirlo así. Las de hoy, en cambio, tienen un diseño distinto. De hecho, las hice con la masa que me sobró de las anteriores, así que esta vez me saltaré el paso de elaboración de la masa. Solo colocaré los ingredientes y daré una breve explicación del proceso, sin incluir fotos de esa parte. Lo que realmente quería era compartir con ustedes mi proceso de personalización, para que puedan recrearlo en casa si les gusta.
My previous post was also about capybara cookies, although those had a more traditional style—the classic round shape, more practical, you could say. Today’s cookies, however, have a different design. In fact, I made them using the leftover dough from the previous batch, so this time I’ll skip the dough-making step. I’ll just list the ingredients and give a brief explanation of the process, without including photos of that part. What I really wanted was to share my customization process with you, so you can recreate it at home if you’d like.
Por cierto, aunque la idea surgió de mí, como suele pasar con casi todo lo que hago, normalmente dibujo lo que imagino y experimento con la masa hasta que algo toma forma. Aun así, hay momentos en los que me siento más segura buscando referencias y dejándome guiar por ellas. En este caso, la apariencia que más me gustó y que se ajustó a la imagen mental que tenía fue la de una creadora de contenido en Instagram: @i._.cha. Al revisar su perfil por unos minutos, me di cuenta de que hace cosas súper hermosas. Creo que se convertirá en uno de mis referentes, no porque quiera copiar sus creaciones, sino porque me inspira ver a personas haciendo cosas tan bonitas y creativas en el mundo de la repostería. Eso es lo que yo quiero: desarrollar mi creatividad, seguir experimentando y pensar en nuevas formas de crear algo único.
By the way, although the idea came from me—as is usually the case with most things I make—I normally sketch out what I imagine and experiment with the dough until something takes shape. Still, there are moments when I feel more confident looking for references and letting them guide me. In this case, the look that I liked the most and matched the mental image I had was from a content creator on Instagram: @i._.cha. After browsing her profile for a few minutes, I realized she makes incredibly beautiful things. I think she’ll become one of my inspirations—not because I want to copy her creations, but because it fills me with joy to see people making such lovely and creative things in the world of baking. That’s what I want to do: develop my creativity, keep experimenting, and come up with my own unique creations.
Me veo reflejada en personas como ella, porque me emociona la idea de algún día poder llegar a ese nivel. Espero que puedan echarle un ojo a su perfil, apoyarla y disfrutar de las cositas hermosas que hace.
I see myself reflected in people like her, because the idea of someday reaching that level excites me. I hope you can check out her profile, support her, and enjoy the beautiful little things she makes.
• 𝙸𝙽𝙶𝚁𝙴𝙳𝙸𝙴𝙽𝚃𝙴𝚂 • 🤎🍪✨ • 𝙸𝙽𝙶𝚁𝙴𝙳𝙸𝙴𝙽𝚃𝚂 •
• 𝙼𝙰𝚂𝙰• • 𝙳𝙾𝚄𝙶𝙷•
- Harina 🌾 (330gr)
- Azúcar 🍯 (230gr)
- Leche. ¼ Taza. 🥛🐮 (60ml)
- Aceite. ¼ Taza. 🌻(60ml)
- 1 Huevo. 🥚
- Vainilla. 1cda. 🌼 (15ml)
- Flour 🌾 (330gr)
- Sugar 🍯 (230gr)
- Milk. ¼ Cup. 🥛🐮 (60ml)
- Oil. ¼ Cup. 🌻 (60ml)
- 1 Egg. 🥚
- Vanilla. 1 tbsp. 🌼 (15ml)
• MASA DE CHOCOLATE • 🤎🍫 • CHOCOLATE DOUGH •
- Harina. ½ Taza 🌾 (60gr)
- Cacao. ⅔ Taza 🍫 (50gr)
- Flour. ½ Cup 🌾 (60gr)
- Cocoa. ⅔ Cup 🍫 (50gr)
• 𝙶𝙻𝙰𝚂𝙴𝙰𝙳𝙾 •
- Agua. 💧
- Maicena. 🌽
- Azúcar. 🍯
- Colorantes negro, rosa, rojo o naranja. 🖤💗❤️🧡
- Water 💧
- Cornstarch 🌽
- Sugar 🍯
- Black, pink, red, or orange food coloring. 🖤💗❤️🧡
• MATERIALES • ✨ • MATERIALS •
- Batidor eléctrico. 🌀
- Manga para decorar o jeringa. 💉
- Electric hand mixer. 🌀
- Decorating bag or syringe. 💉
• ℙℝ𝕆ℂ𝔼𝔻𝕀𝕄𝕀𝔼ℕ𝕋𝕆 • 🍪🤎 • ℙℝ𝕆ℂ𝔼𝔻𝕌ℝ𝔼 •
En un recipiente vamos a añadir huevos, azúcar, vainilla y aceite. Batimos bien con ayuda de una batidora de mano hasta que la mezcla se torne blanquecina y espumosa. Luego añadimos la leche y seguimos mezclando. Apartamos un cuarto de esta mezcla en otro recipiente y lo reservamos.
In a bowl, we’re going to add eggs, sugar, vanilla, and oil. Mix well using a hand mixer until the mixture becomes pale and frothy. Then add the milk and continue mixing. Set aside one-quarter of this mixture in a separate bowl and reserve it.
A continuación, iremos integrando poco a poco la harina en la mezcla principal. Cuando se vuelva muy densa, será momento de empezar a amasar con las manos.
Next, gradually incorporate the flour into the main mixture. Once it becomes very dense, it’s time to start kneading with your hands.
A la mezcla que reservamos anteriormente le añadimos harina y cacao, mezclamos bien y luego amasamos.
To the reserved mixture, add flour and cocoa powder, mix well, and then knead.
Tomamos una porción de la masa de vainilla y la estiramos con las manos hasta formar un tubo. Después, la dividimos en partes iguales con ayuda de un cuchillo, cortando por el centro para asegurarnos de que cada porción tenga la misma cantidad.
Take a portion of the vanilla dough and stretch it with your hands to form a tube. Then divide it into equal parts using a knife, cutting through the center to ensure each portion has the same amount.
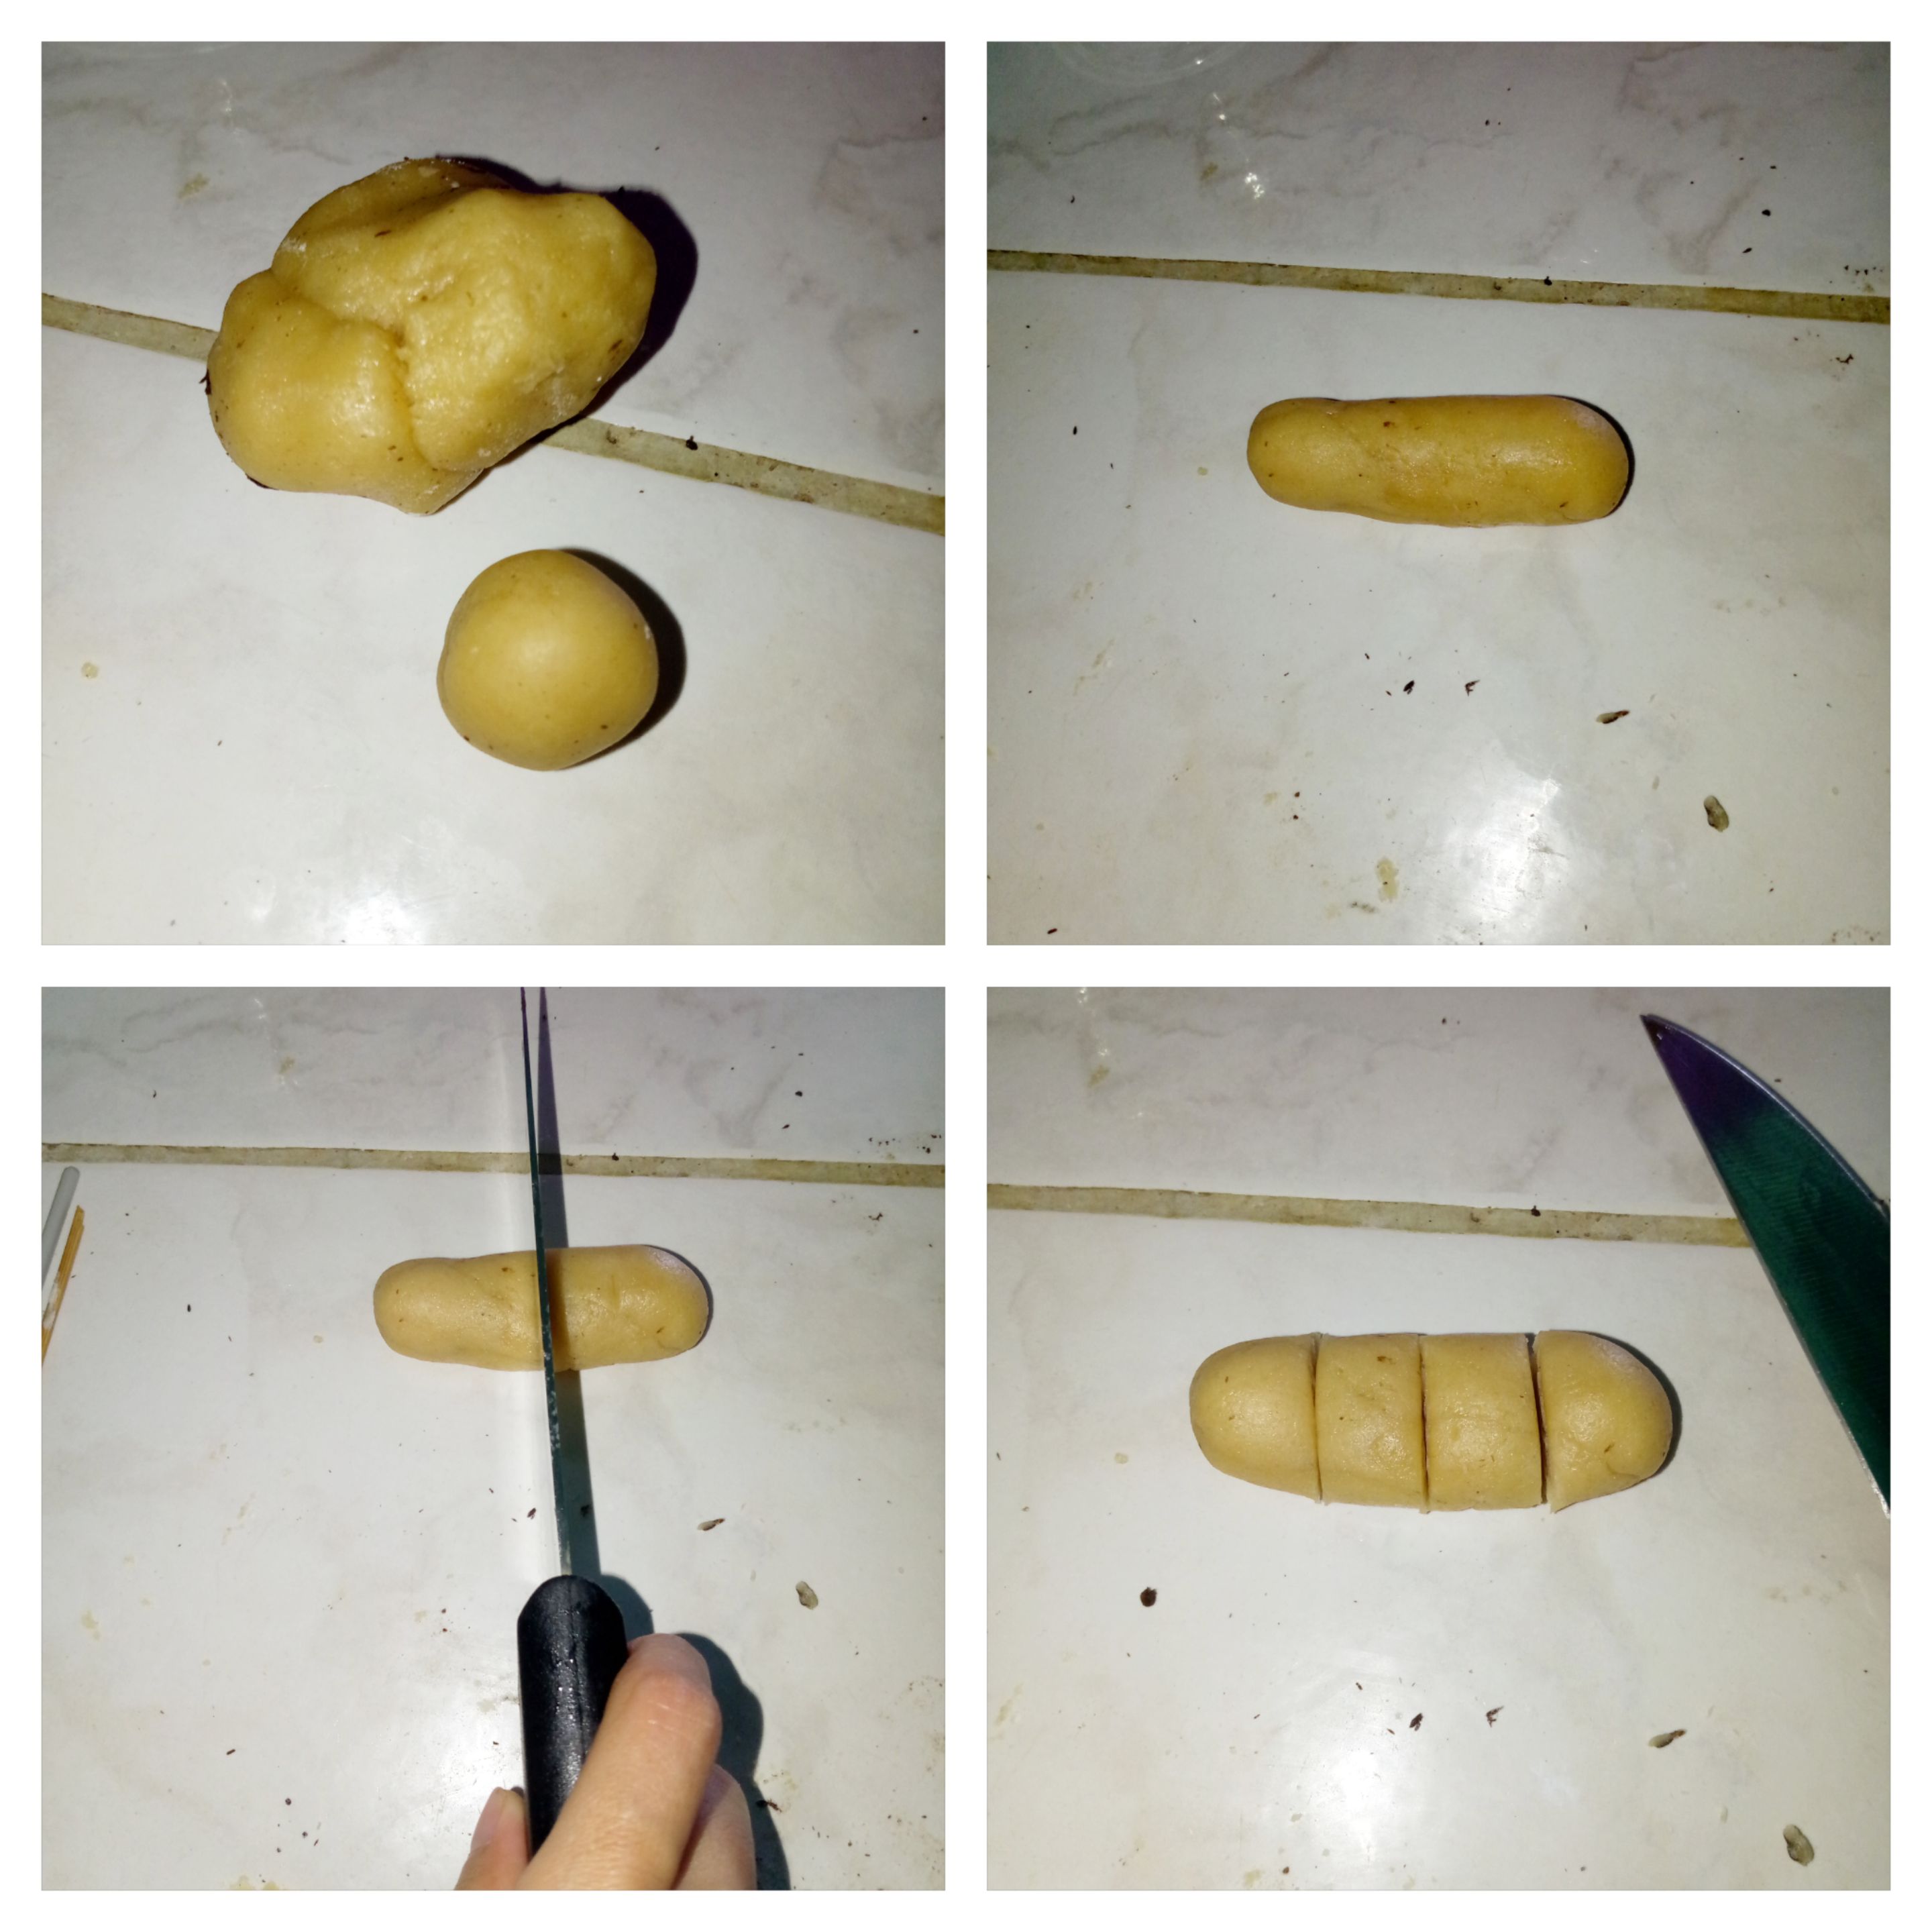
Con las manos formamos pequeñas bolitas y las colocamos sobre una bandeja previamente engrasada.
With your hands, shape small balls and place them on a previously greased baking tray.
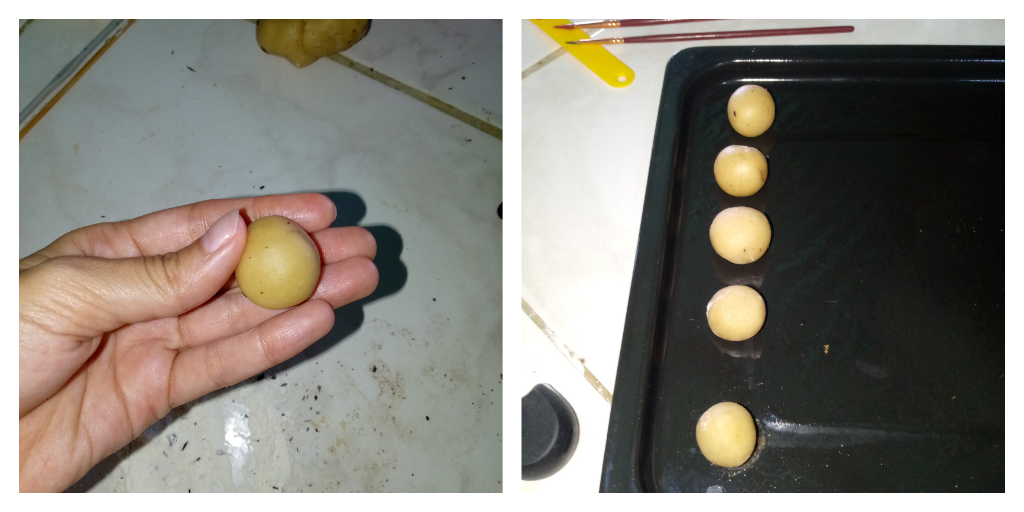
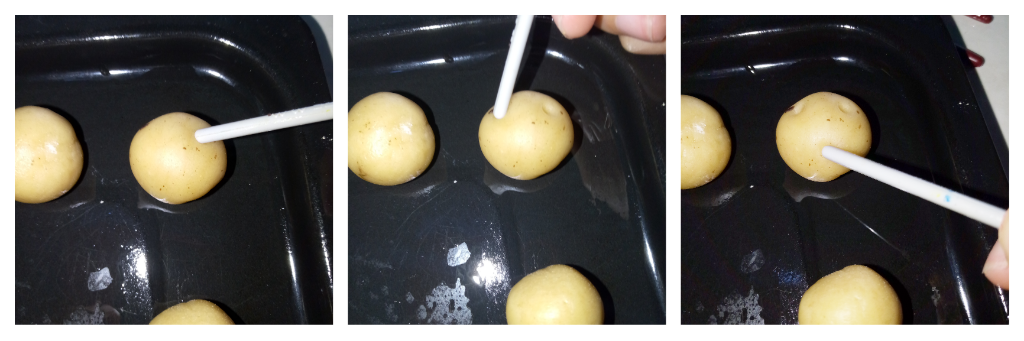
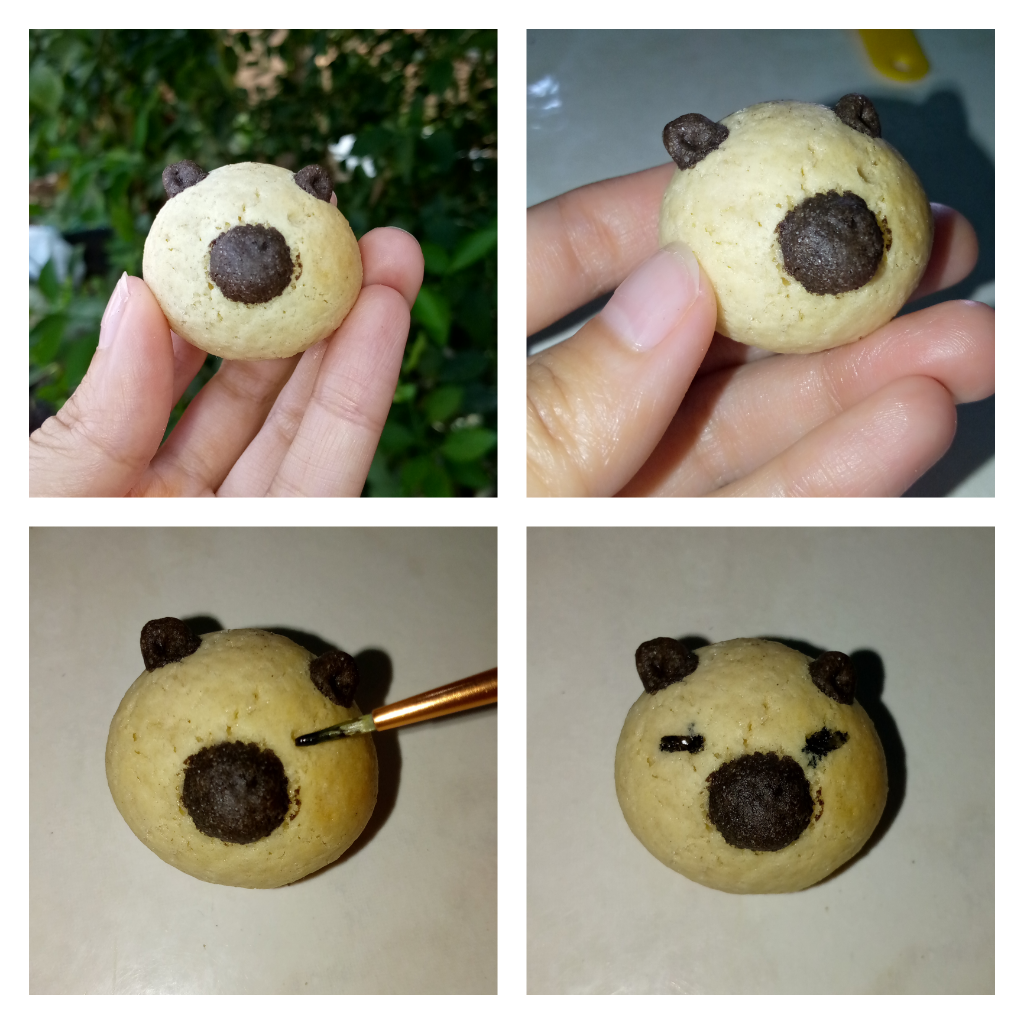
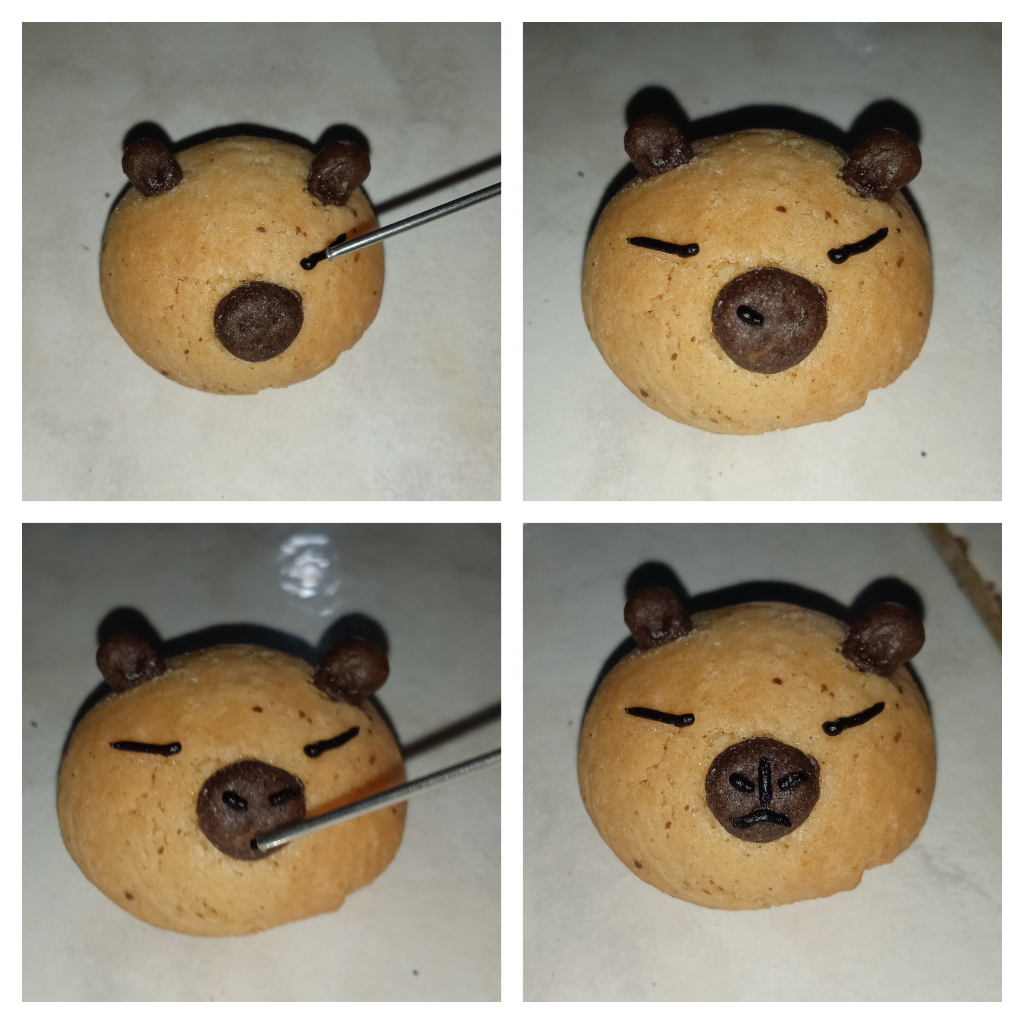
Ahora, con el mango de un pincel o alguna otra herramienta, marcamos dos puntos en la parte superior de cada bolita (donde irán las orejitas) y uno en el centro de la cara (donde irá el hocico).
Now, using the handle of a brush or another tool, mark two points on the top of each ball (where the ears will go) and one in the center of the face (where the snout will be).
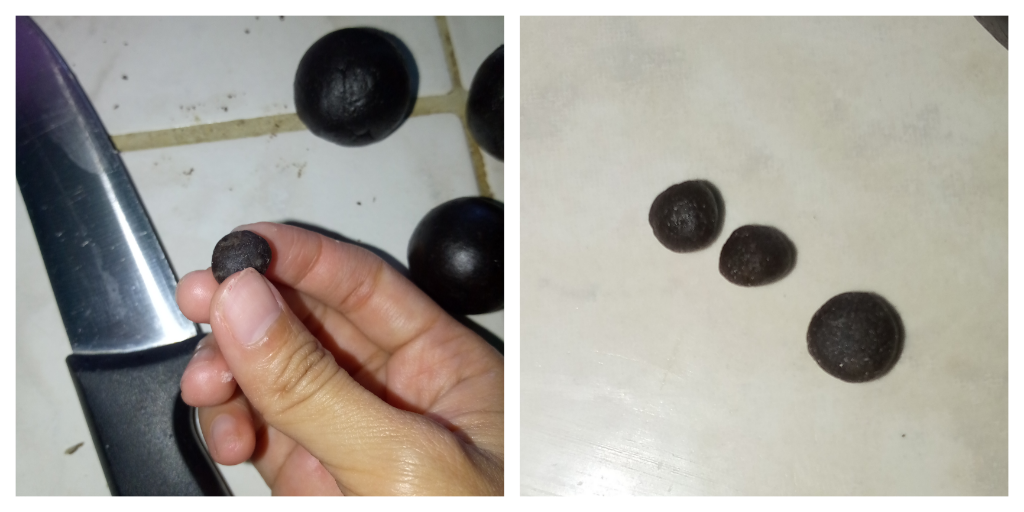
Tomamos una pequeña porción de la masa de chocolate y sacamos tres partes: una mediana y dos más pequeñas.
Take a small portion of the chocolate dough and divide it into three parts: one medium-sized and two smaller ones.
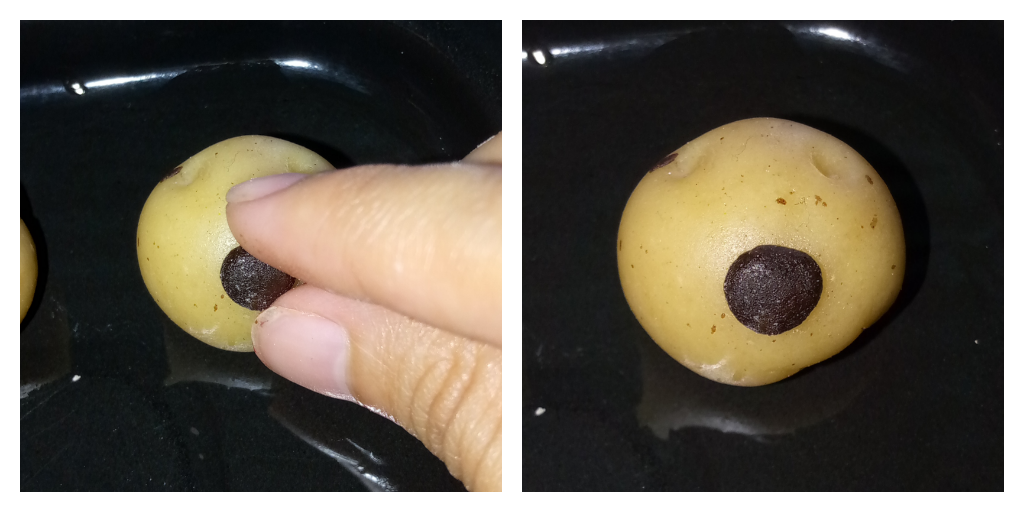
La primera la convertimos en una bolita, la alargamos ligeramente con los dedos para formar un óvalo, la aplastamos suavemente y la colocamos en el hocico, presionando un poco para que se adhiera bien.
The first piece is shaped into a small ball, then gently stretched with your fingers to form an oval. Lightly flatten it and place it on the snout, pressing slightly to make sure it sticks well.
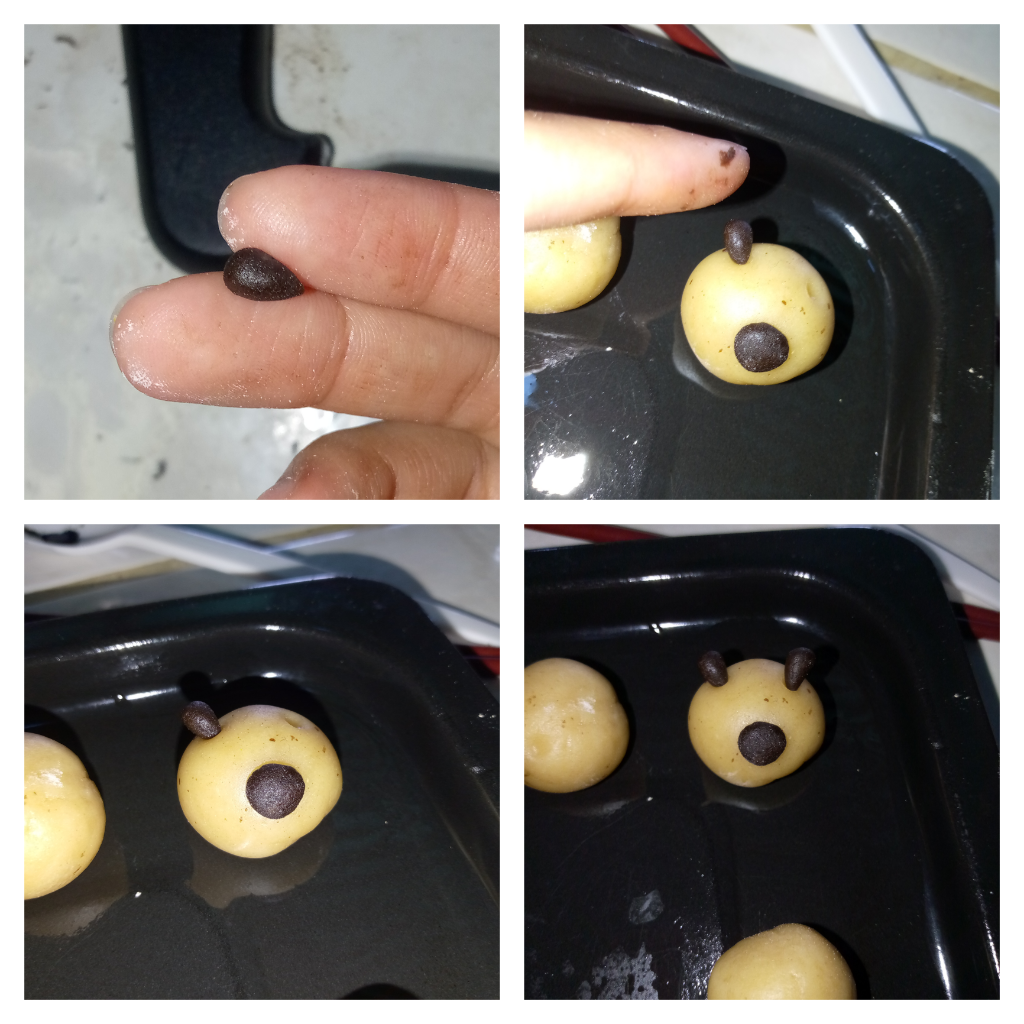
Las otras dos las hacemos bolitas también, y luego pellizcamos uno de sus extremos para darles forma de gota. Las colocamos en los puntos marcados para las orejitas y, con un objeto de punta, presionamos en el centro de cada una para crear una hendidura y asegurar que queden bien adheridas a la cabeza.
The other two are also shaped into small balls, and then one end is pinched to create a teardrop shape. Place them on the marked spots for the ears, and using a pointed tool, press into the center of each one to create a small indentation and help them adhere securely to the head.
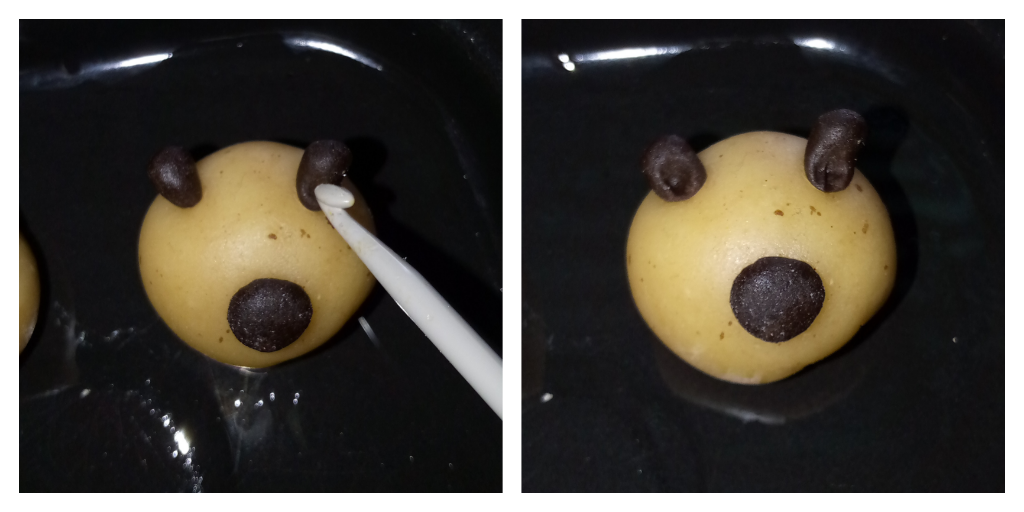
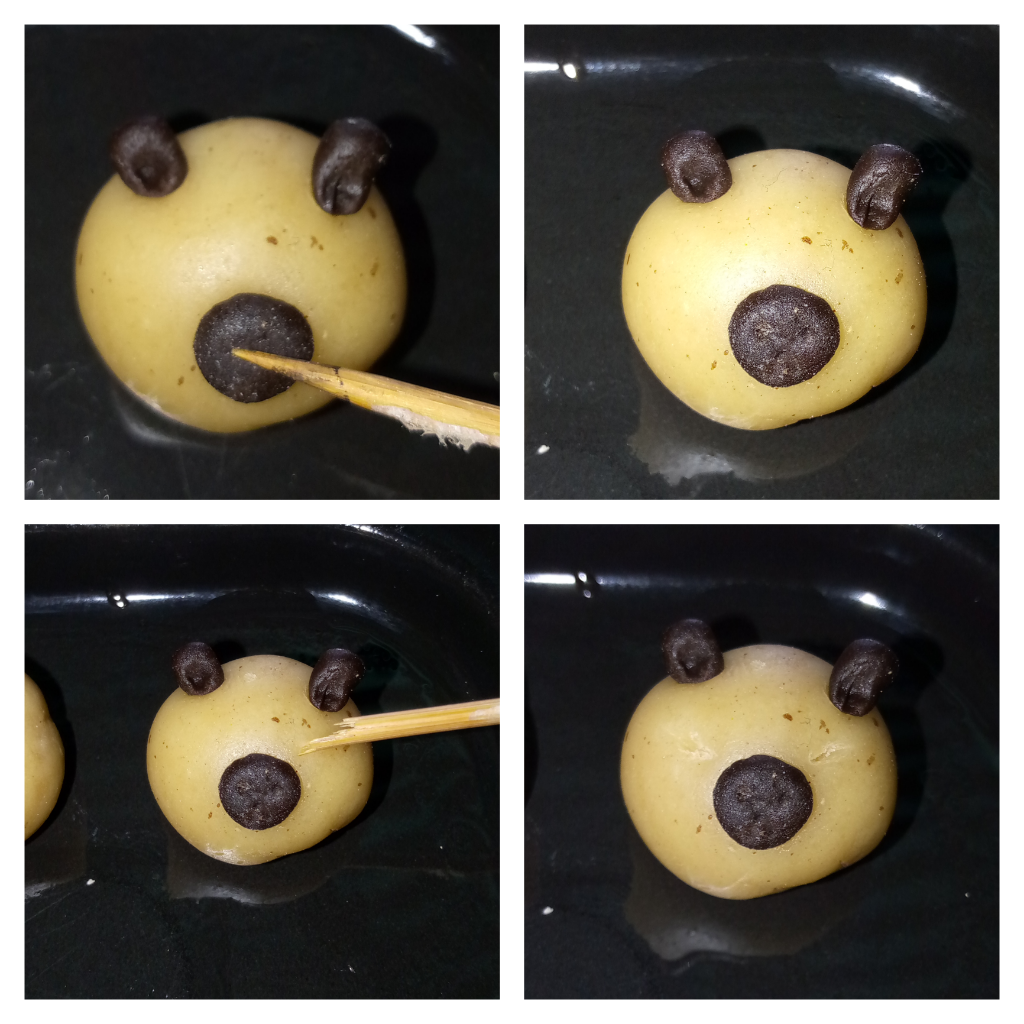
Con un mondadientes o alguna herramienta de punta delgada, marcamos los orificios de la nariz en el hocico y dibujamos la forma de la boca. También trazamos las líneas que indicarán dónde estarán sus ojitos cerrados.
Using a toothpick or any fine-tipped tool, mark the nostrils on the snout and draw the shape of the mouth. Then, trace the lines where the closed eyes will go.
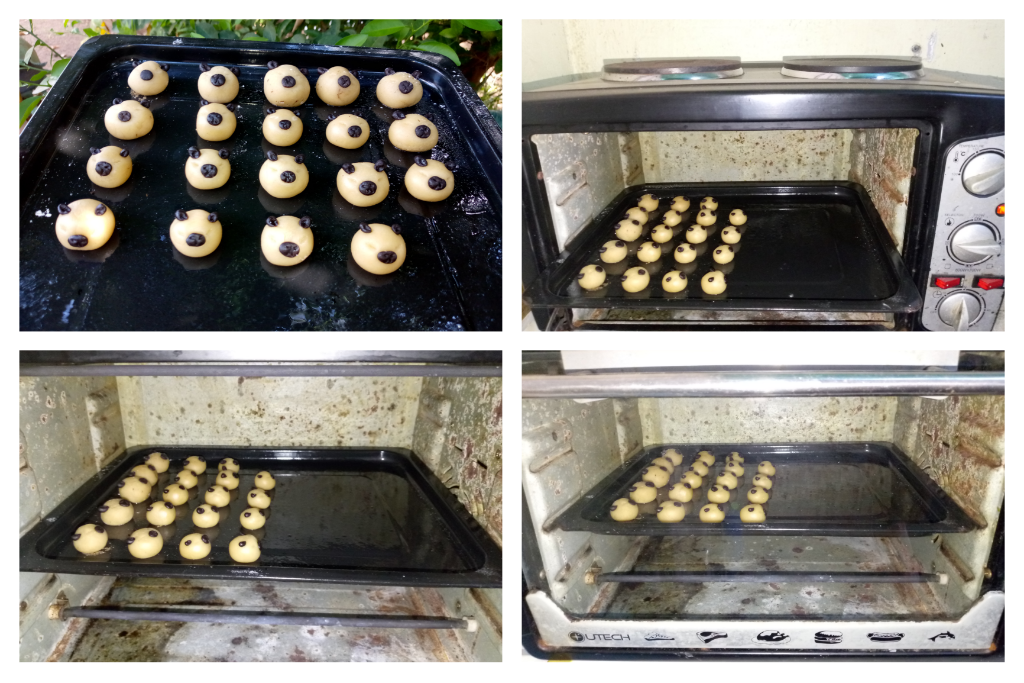
Precalentamos el horno durante 5 minutos a 180 °C y luego horneamos las galletas por 10 minutos. En mi caso, quise que quedaran bien doradas y crujientes, por eso las dejé ese tiempo. Pero si prefieren que queden más claras, pueden hornearlas solo por 7 minutos.
Preheat the oven for 5 minutes at 180°C (356°F), and then bake the cookies for 10 minutes. In my case, I wanted them to be nicely golden and crispy, so I left them in for the full time. But if you prefer them lighter, you can bake them for just 7 minutes.

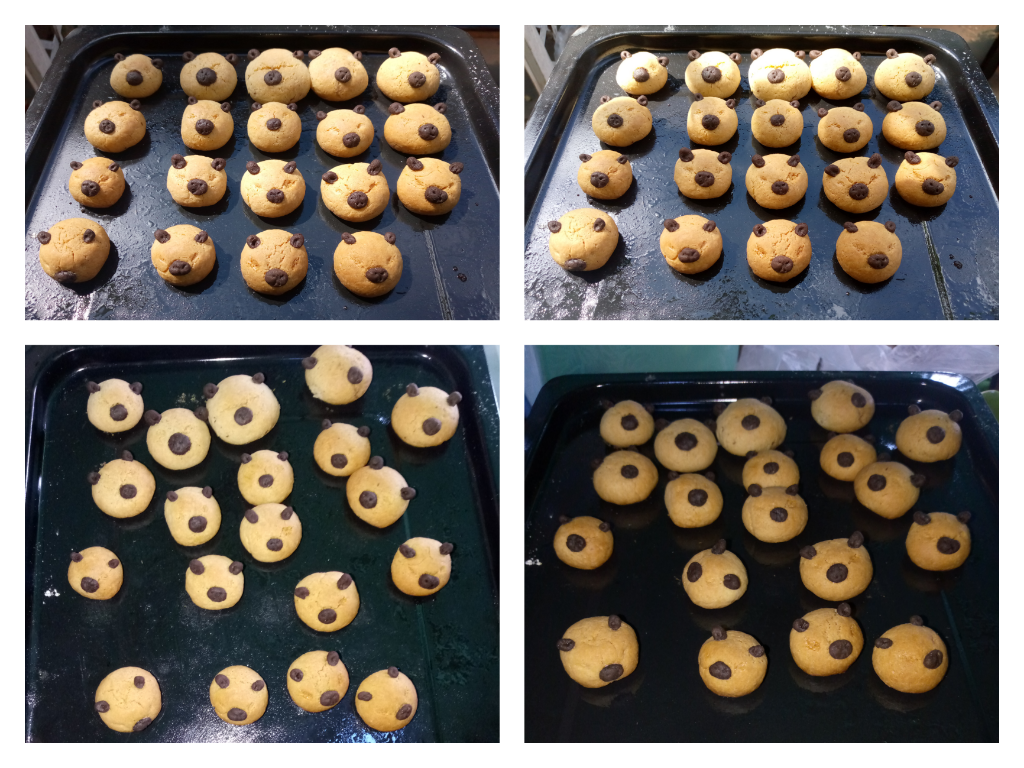
Las sacamos del horno, esperamos que se enfríen un poco y las despegamos fácilmente de la bandeja con las manos.
Take them out of the oven, let them cool slightly, and gently remove them from the tray with your hands.
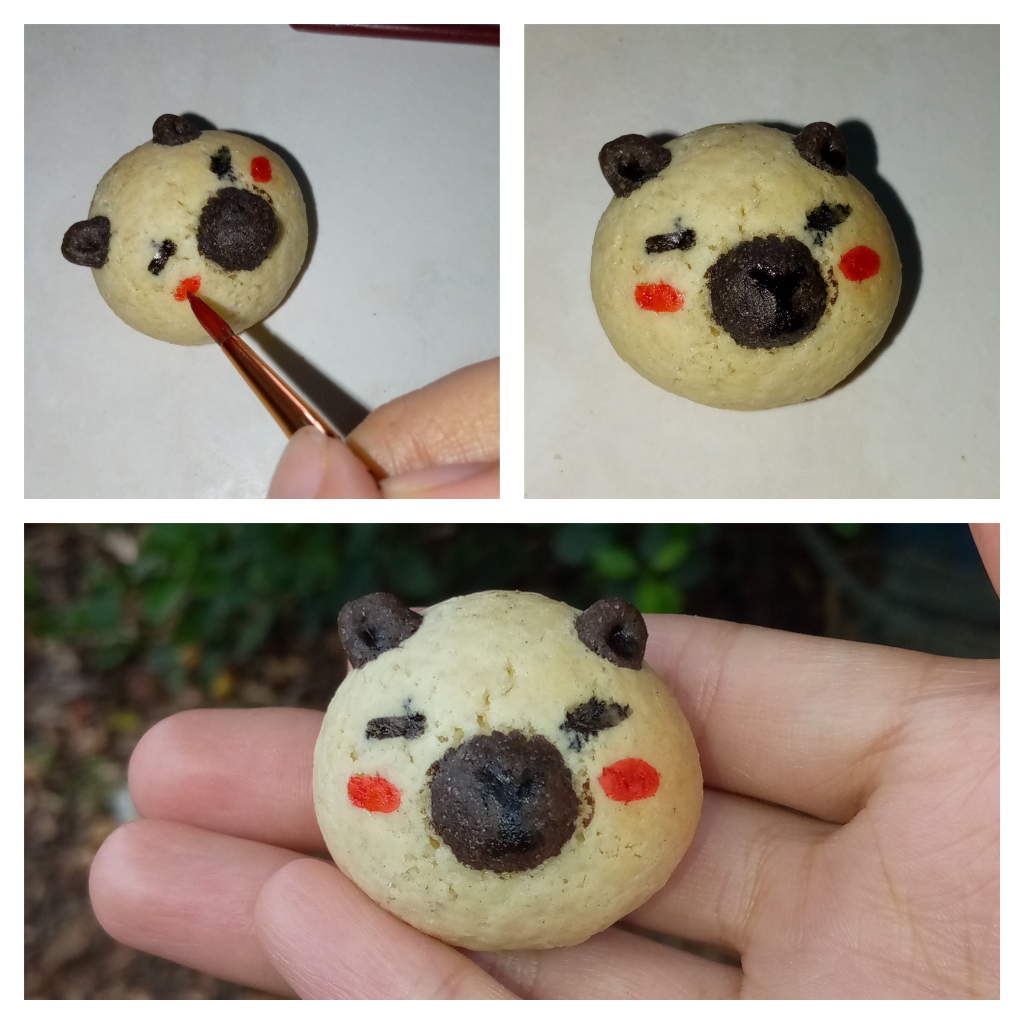
La verdad es que, cuando intenté hacer esta personalización por primera vez, quise pintarlas solo con agua, colorante comestible y pinceles delgados. Pero como la masa se agrieta un poco al hornearse, el pigmento se filtraba por esas grietas y el resultado era un efecto chorreado poco estético que no me gustó para nada.
Aun así, sigue siendo una opción válida para decorarlas de forma más rápida y práctica.
To be honest, when I tried this customization for the first time, I wanted to paint them using only water, edible coloring, and fine brushes. But since the dough tends to crack a bit during baking, the pigment seeped into those cracks, creating a streaky effect that didn’t look very nice to me.
Still, it remains a valid option for decorating them in a quicker and more practical way.
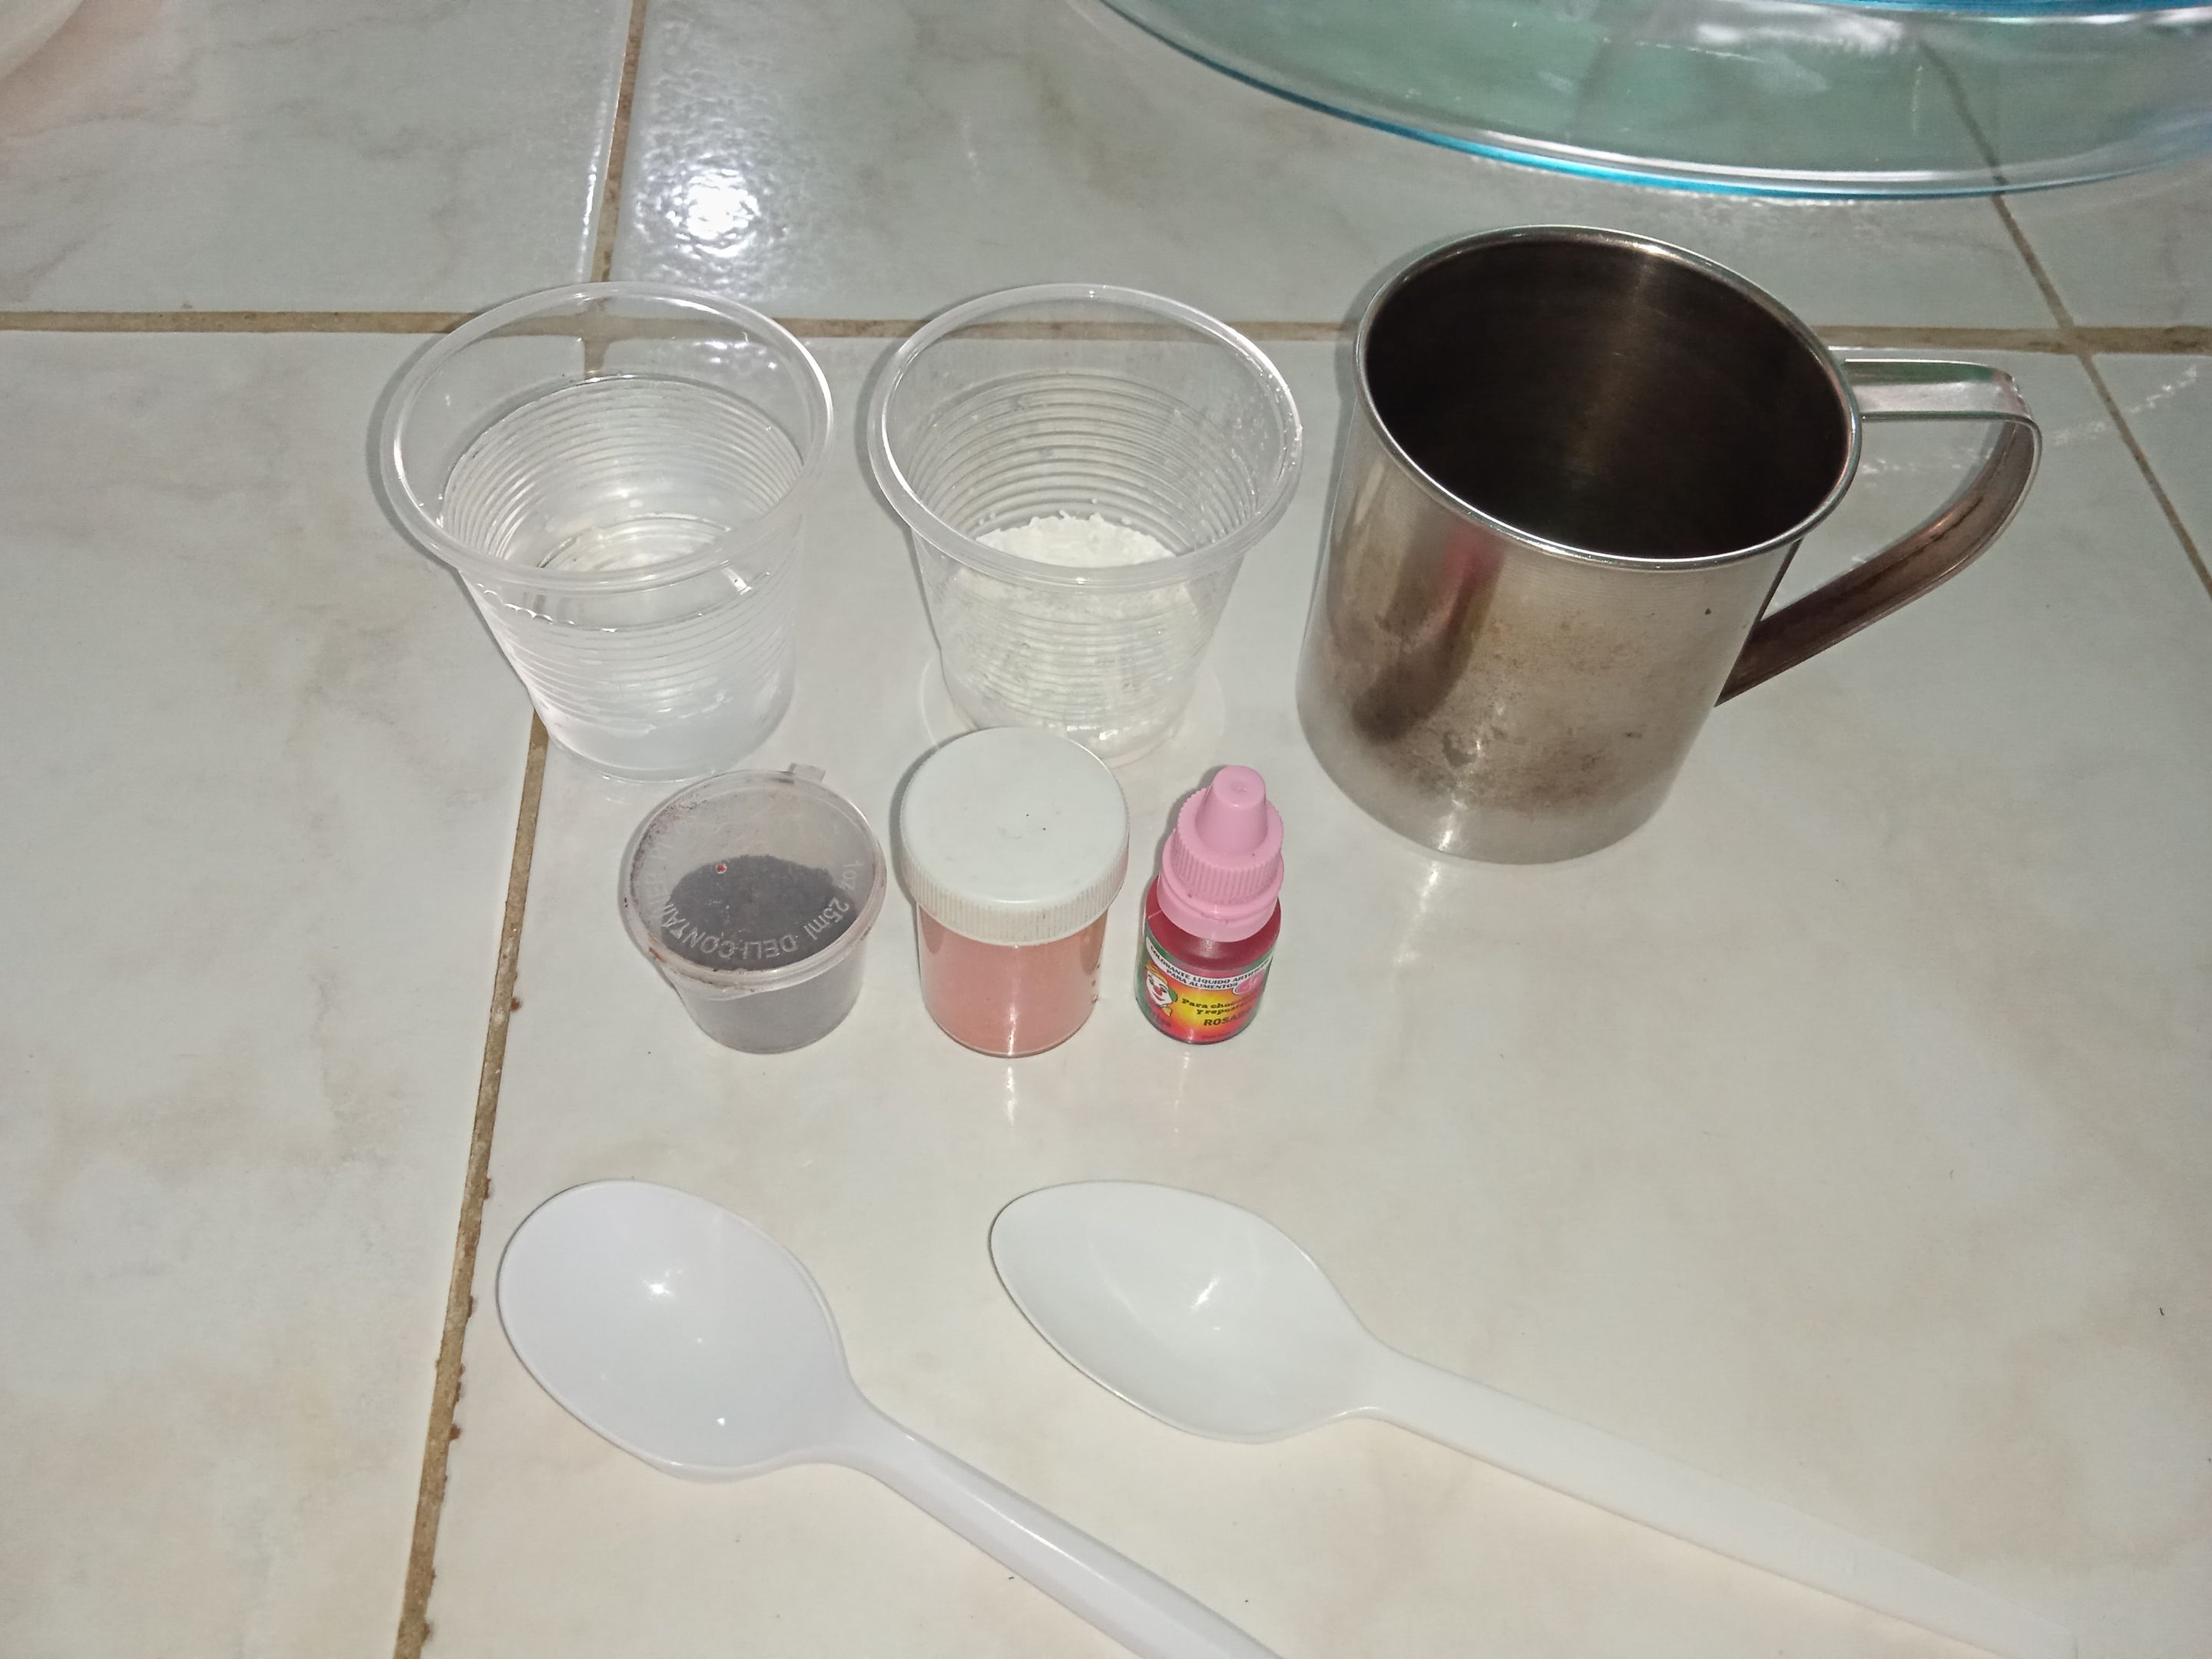
• GLASEADO • ✨❤️ • GLAZE •
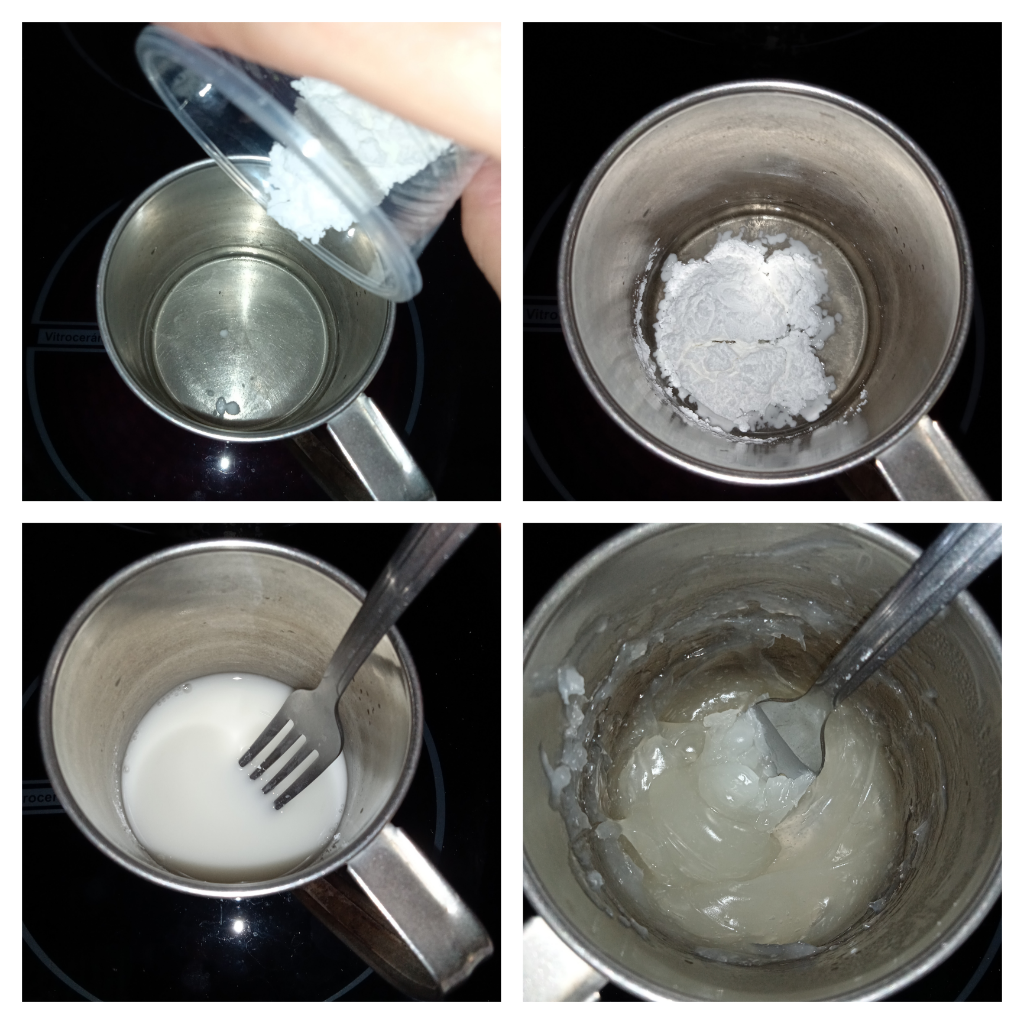
Tomamos el recipiente pequeño y le agregamos una pequeña porción de agua. Luego encendemos la estufa a llama baja, añadimos la cucharada de azúcar y la disolvemos mientras mezclamos lentamente. Incorporamos la maicena y esperamos a que comience a espesar; debemos dejar que se vuelva traslúcida y densa, lo cual nos indicará que ya está lista.
Take the small container and add a small amount of water. Then turn on the stove to low heat, add the tablespoon of sugar, and dissolve it while stirring slowly. Add the cornstarch and wait for it to start thickening; it should become translucent and dense, which will indicate that it’s ready.
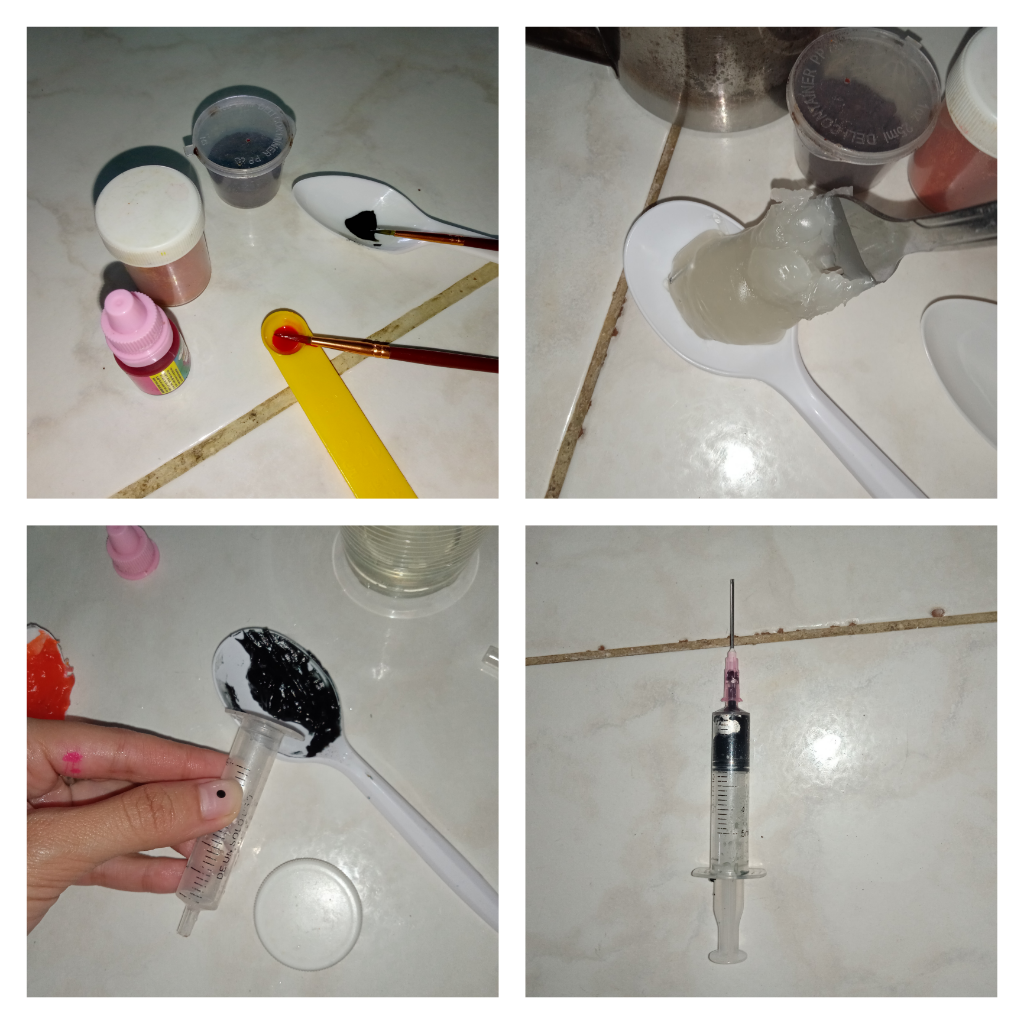
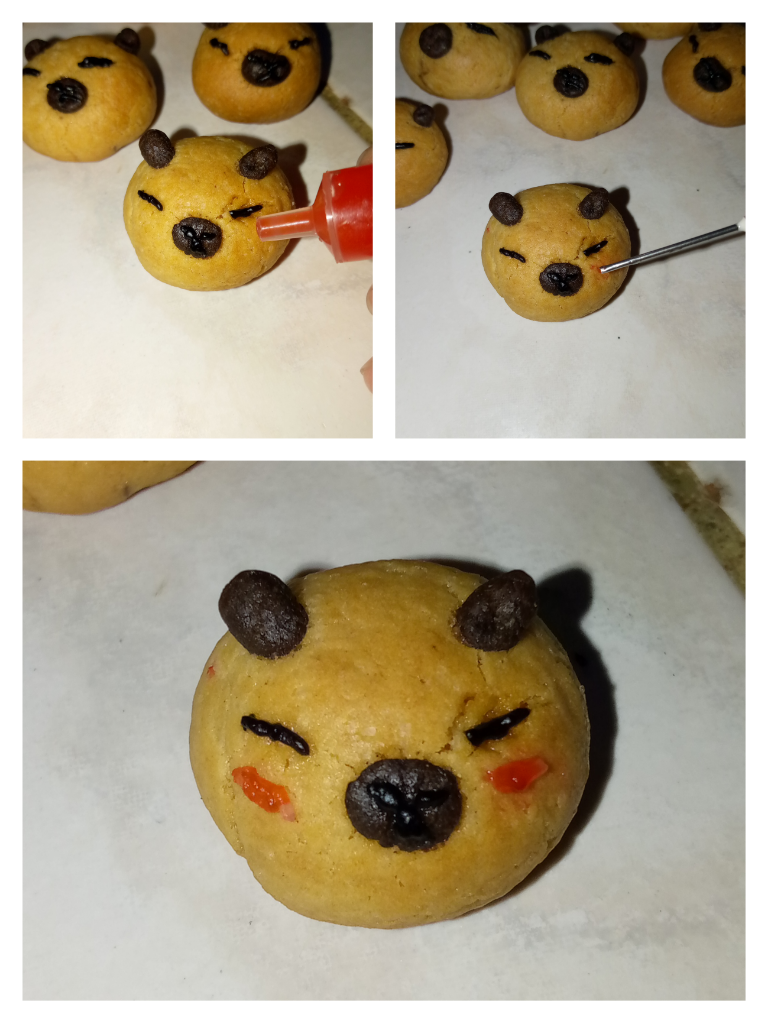
Separamos dos pequeñas porciones en cucharas individuales: a una le añadimos colorante negro, y a la otra, colorante rojo, naranja o rosa, según el efecto que queramos lograr.
Separate two small portions into individual spoons: add black food coloring to one, and red, orange, or pink to the other, depending on the effect you want to achieve.
En mi caso, no pude conseguir una boquilla ni una manga pastelera lo suficientemente pequeña para hacer este tipo de detalles, así que opté por usar una jeringa que tengo exclusivamente para decoraciones de repostería. Incluso tiene una aguja adaptada para que no sea punzante ni peligrosa. Colocamos el glaseado dentro de la jeringa.
In my case, I couldn’t find a piping tip or decorating bag small enough for this kind of detail, so I used a syringe that I keep exclusively for pastry decorations. It even has a modified needle that isn’t sharp or dangerous. Place the glaze inside the syringe.
Con mucha paciencia y amor, presionamos suavemente para dibujar las dos líneas de los ojos. Luego rellenamos las marcas de la nariz y la boca.
With lots of patience and love, gently press to draw the two lines for the eyes. Then fill in the marks for the nose and mouth.
Lavamos la jeringa y repetimos el proceso para aplicar el color en las mejillas rosadas.
Wash the syringe and repeat the process to apply the pink color to the cheeks.
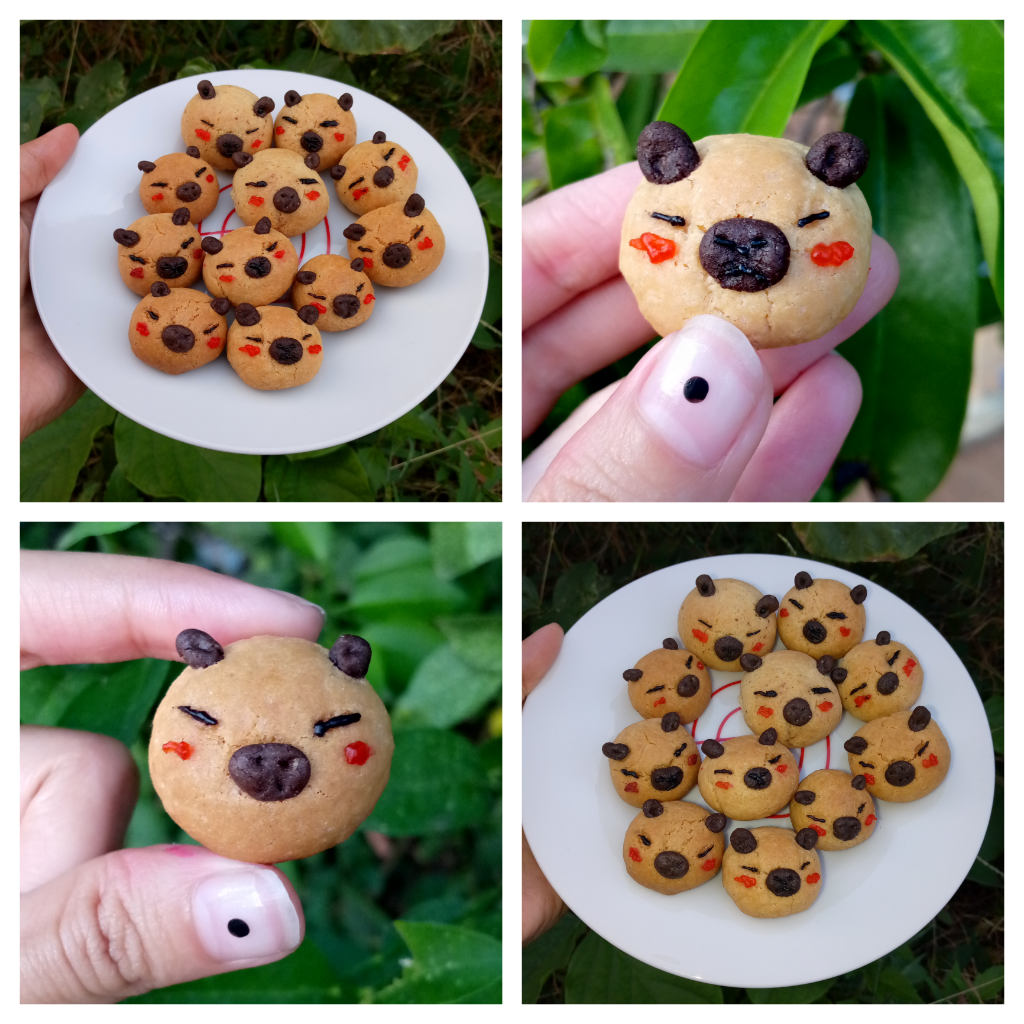
Y este es el hermoso resultado final:
And here is the beautiful final result:
Mil gracias por tomarse el tiempo de leer mi post y nos vemos en una próxima ocasión. 💙🍁
Thank you so much for taking the time to read my post—see you next time! 💙🍁