(ENG)
Hello everyone, I hope you are well, together with your loved ones, enjoying good health and with great enthusiasm, to create your new ideas. Today I am very pleased to share, with all of you, a very nice project, where I put into practice the crochet and recycling technique, to make a beautiful jewelry box, ideal to give, a gift on Halloween night, inspired by the symbolic, possessed pumpkin. I invite you to follow me step by step, and motivating you to make yours. I hope you like it and enjoy making it.

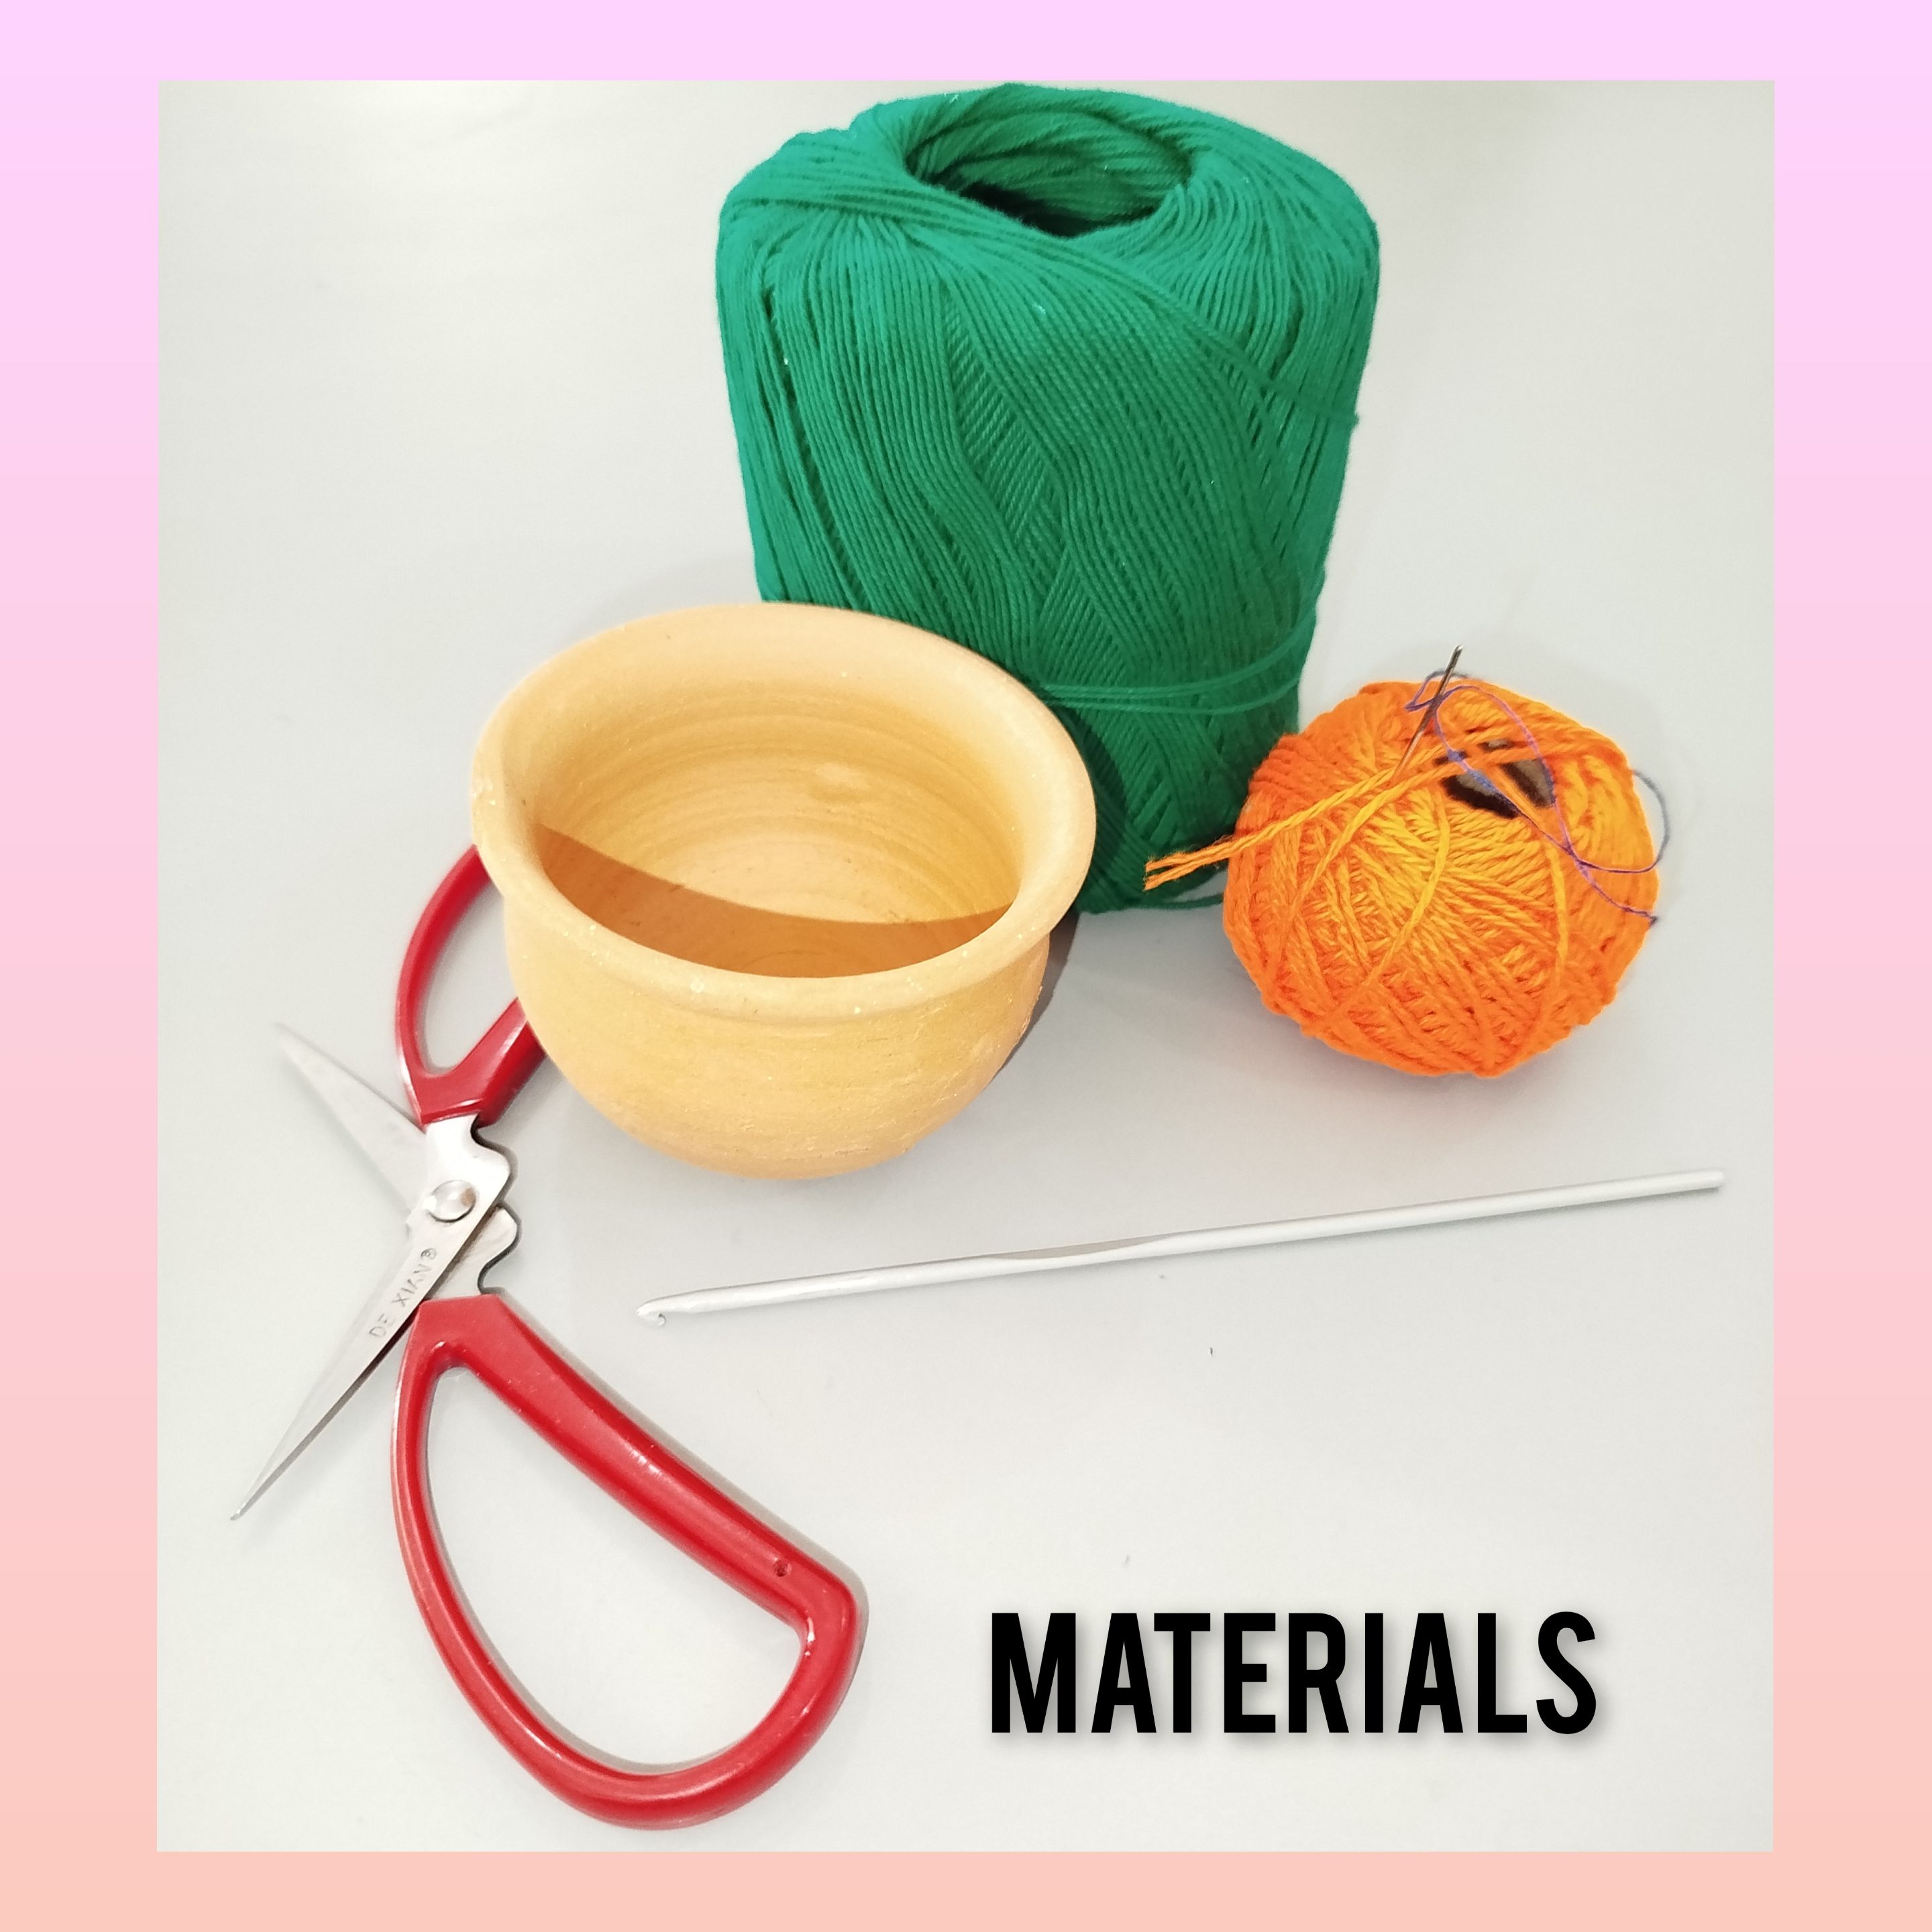
Materials:
. Threads for knitting, colors (green, orange) . Black sewing thread. . Knitting needle. . Embroidery needle. . Small clay pot. .scissors.
steps to follow:
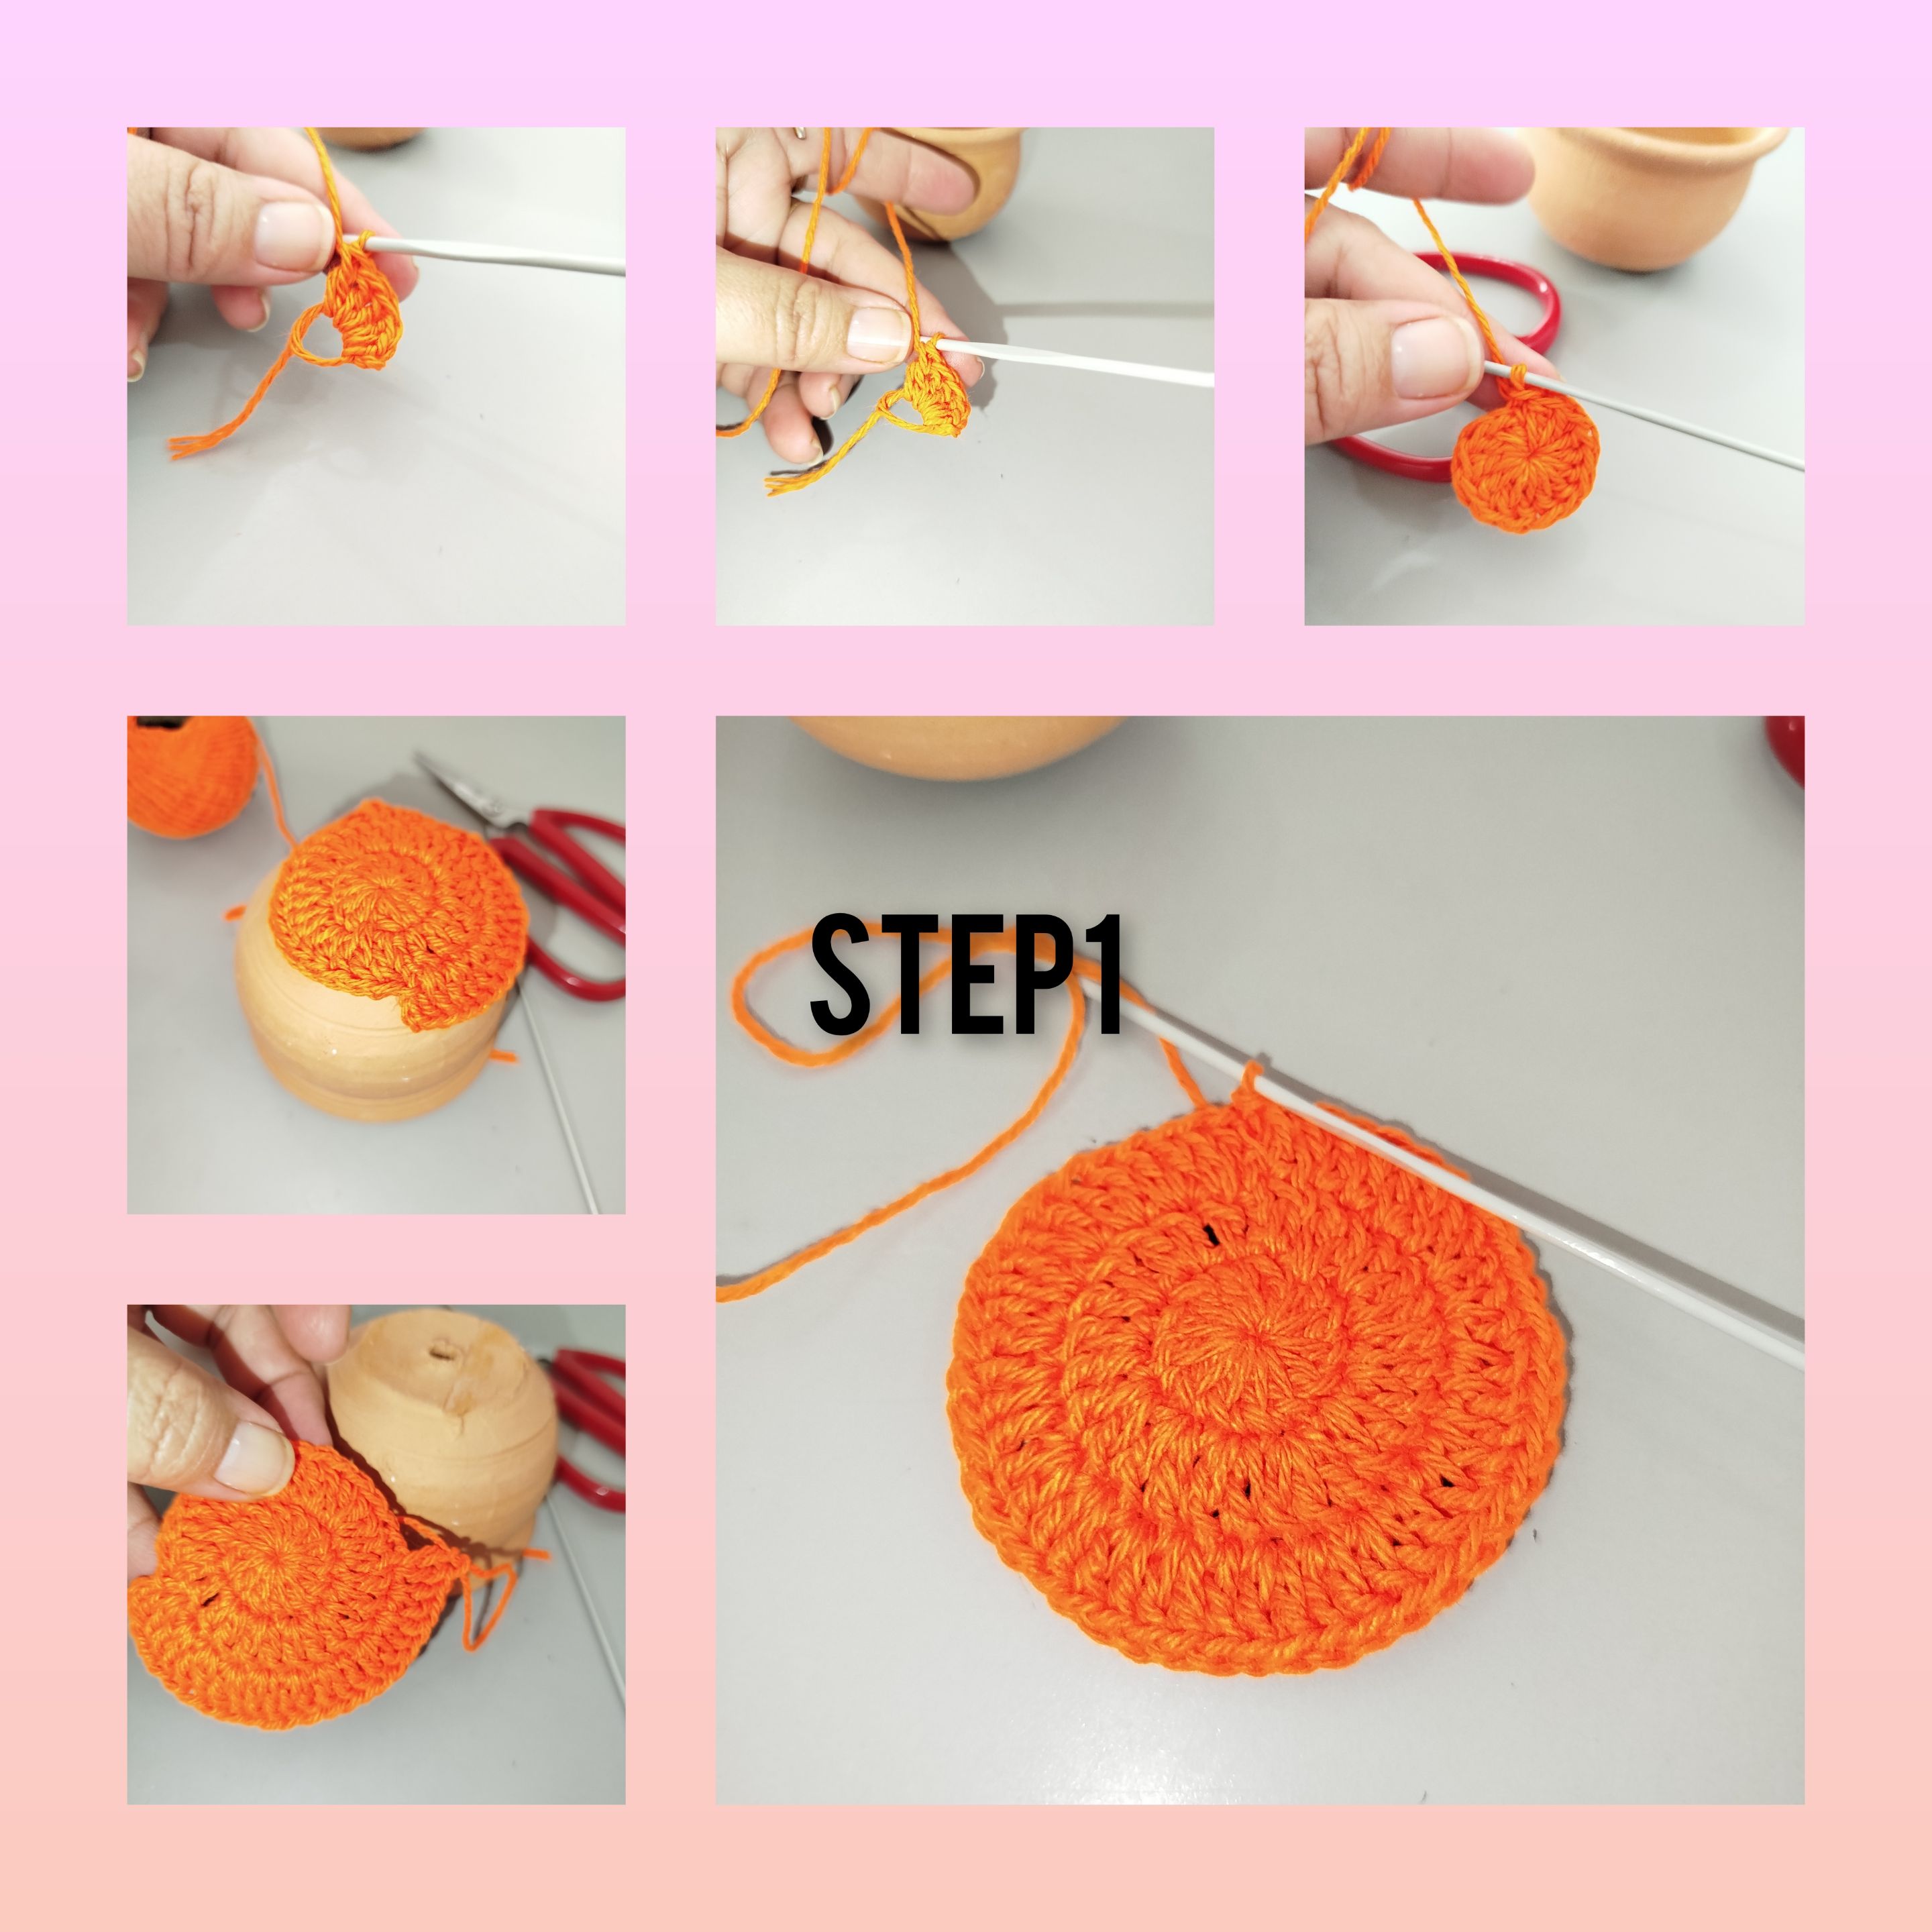
1.) Start, making a magic ring, and fill with twelve double crochets, I close the ring and join the first and last double crochet, with a slip stitch, I knit Two more rounds, making an increase in double crochets, after two stitches, from the last round. In this way, cover the bottom of the pot with clay.
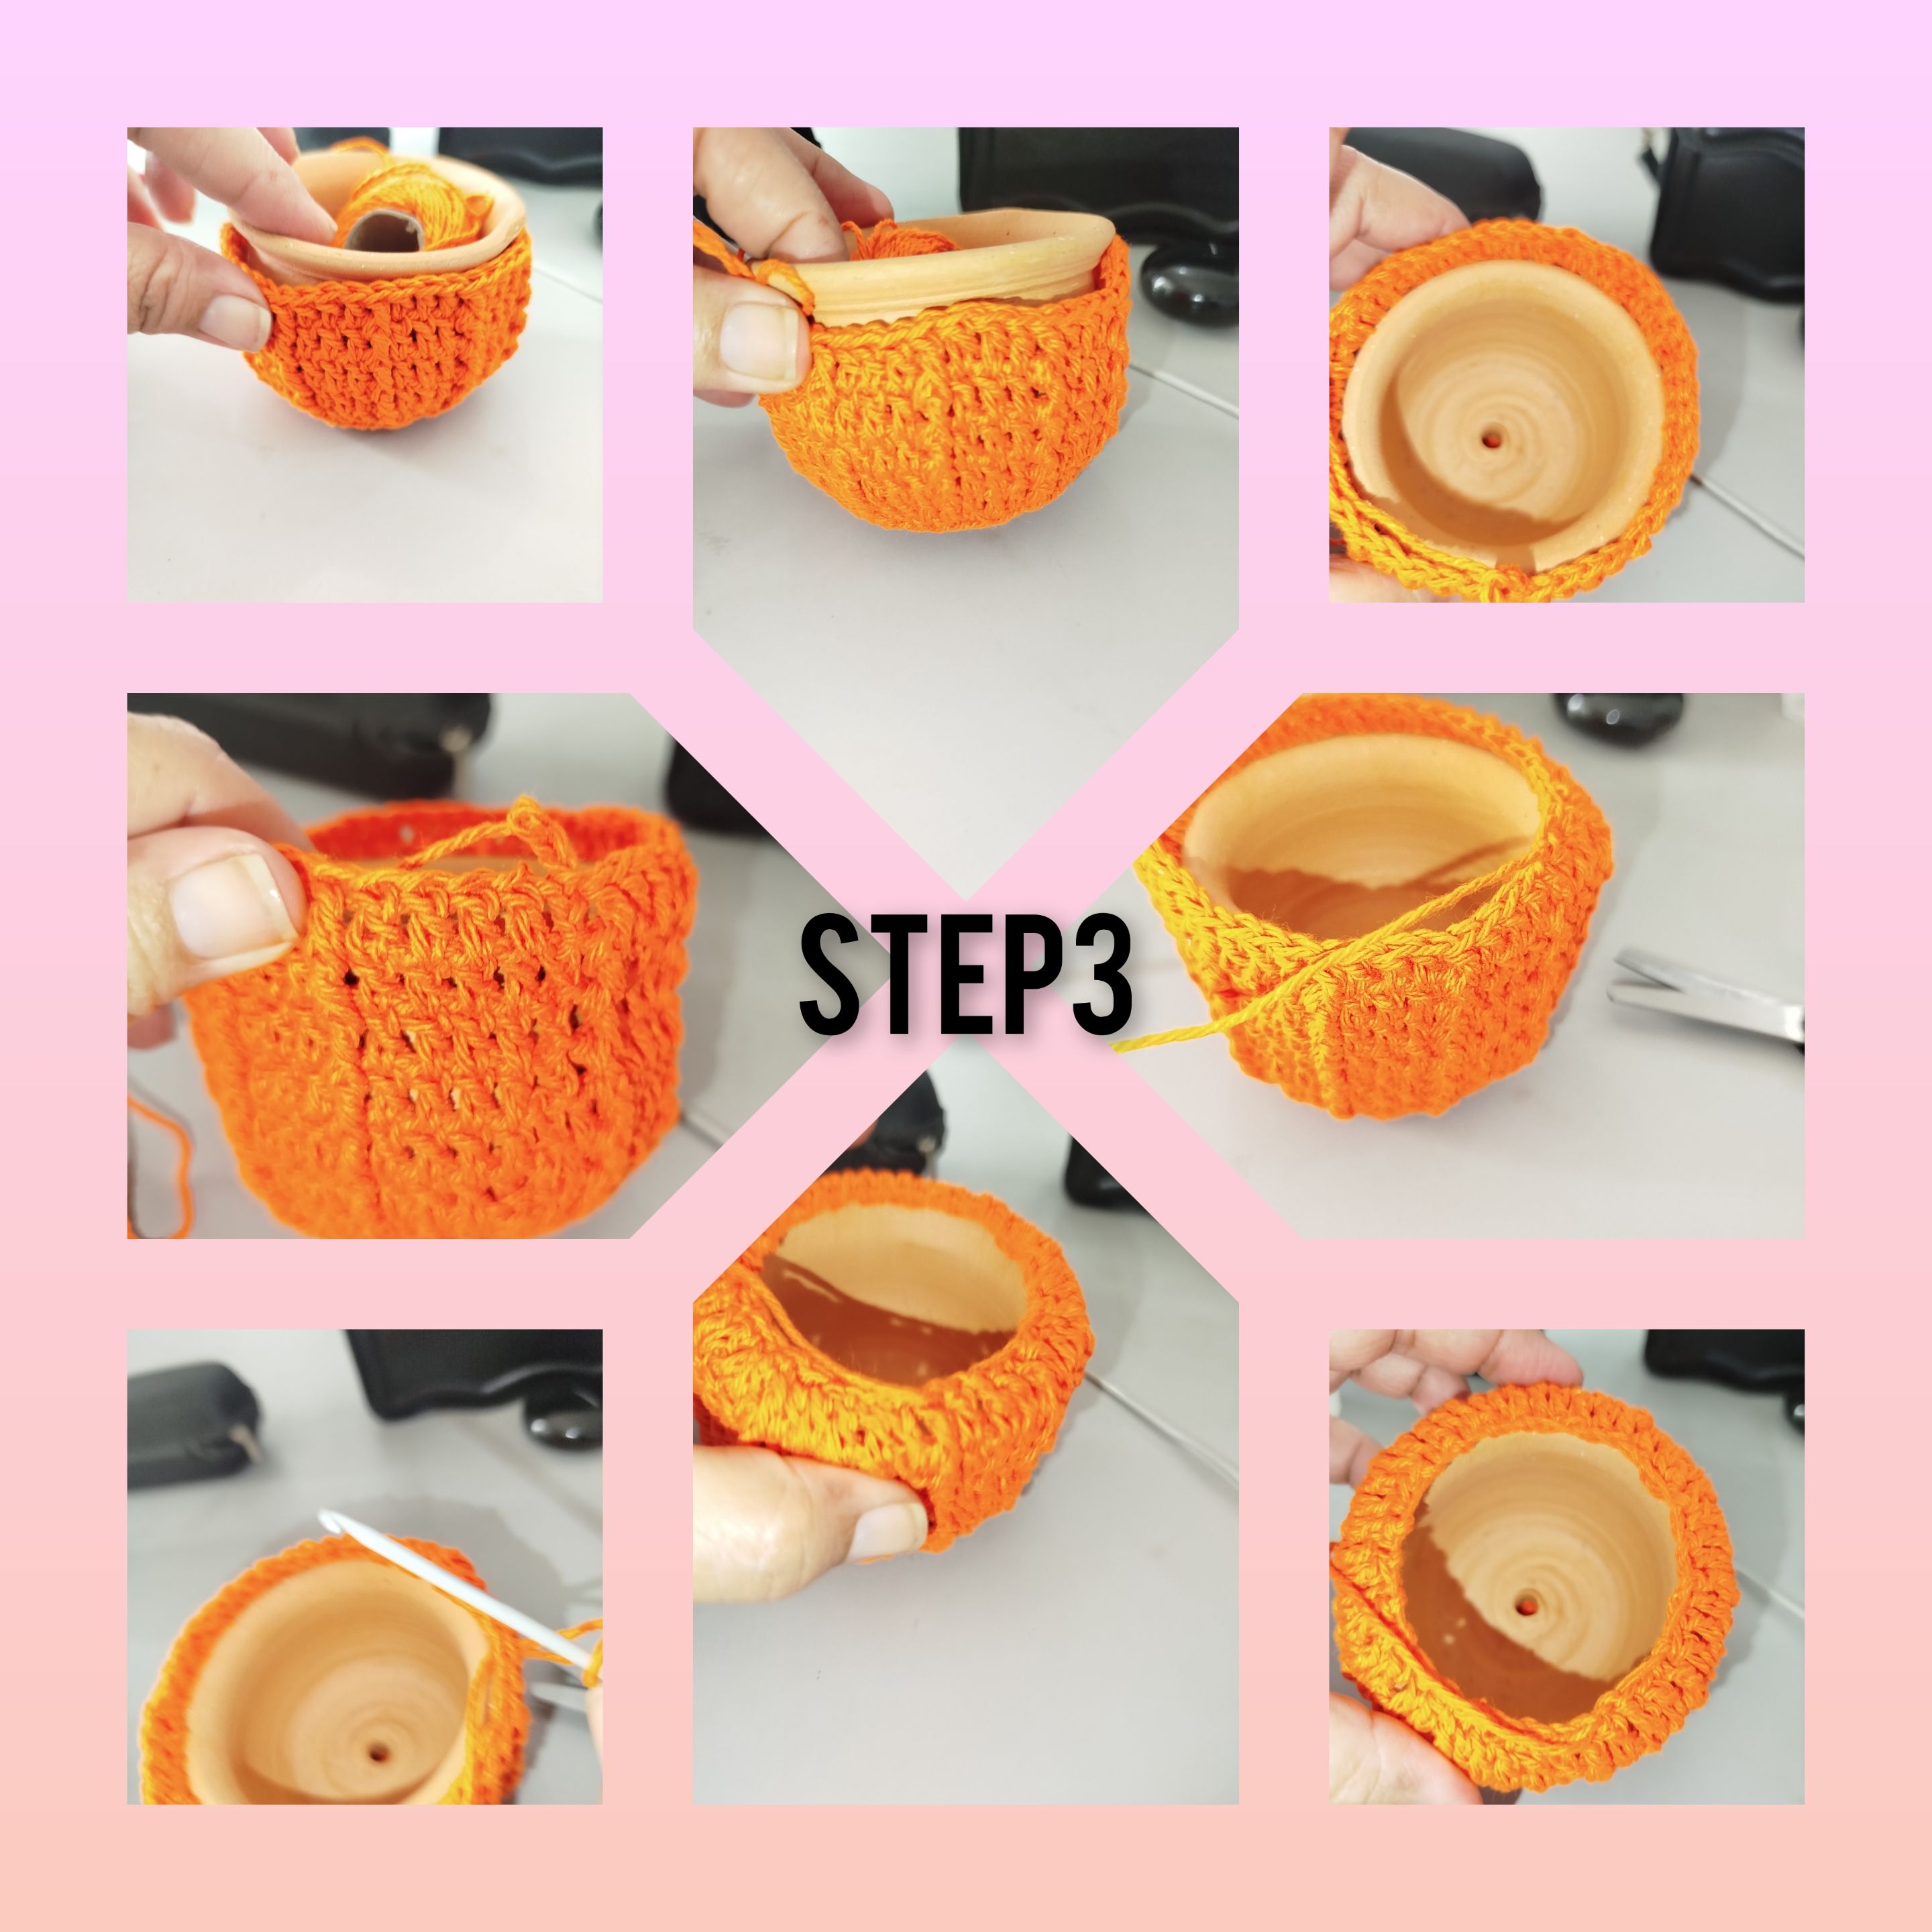
2.) For the next step, I knit a first round, making a cut, taking the yarn from the high point, from the back. And so I continue knitting, but now, on this round, I will make a raised stitch on the outside, and I repeat in the following rounds, until I reach the size or height of a pot. Knitting a total of seven rounds, consecutive with double crochets.

3.) I continue and on this occasion, I cut the thread, leaving a long strand and I pass it, inside the high points, and picked up a little, in this way, the lining of the pot is fixed. I hide the residual thread.
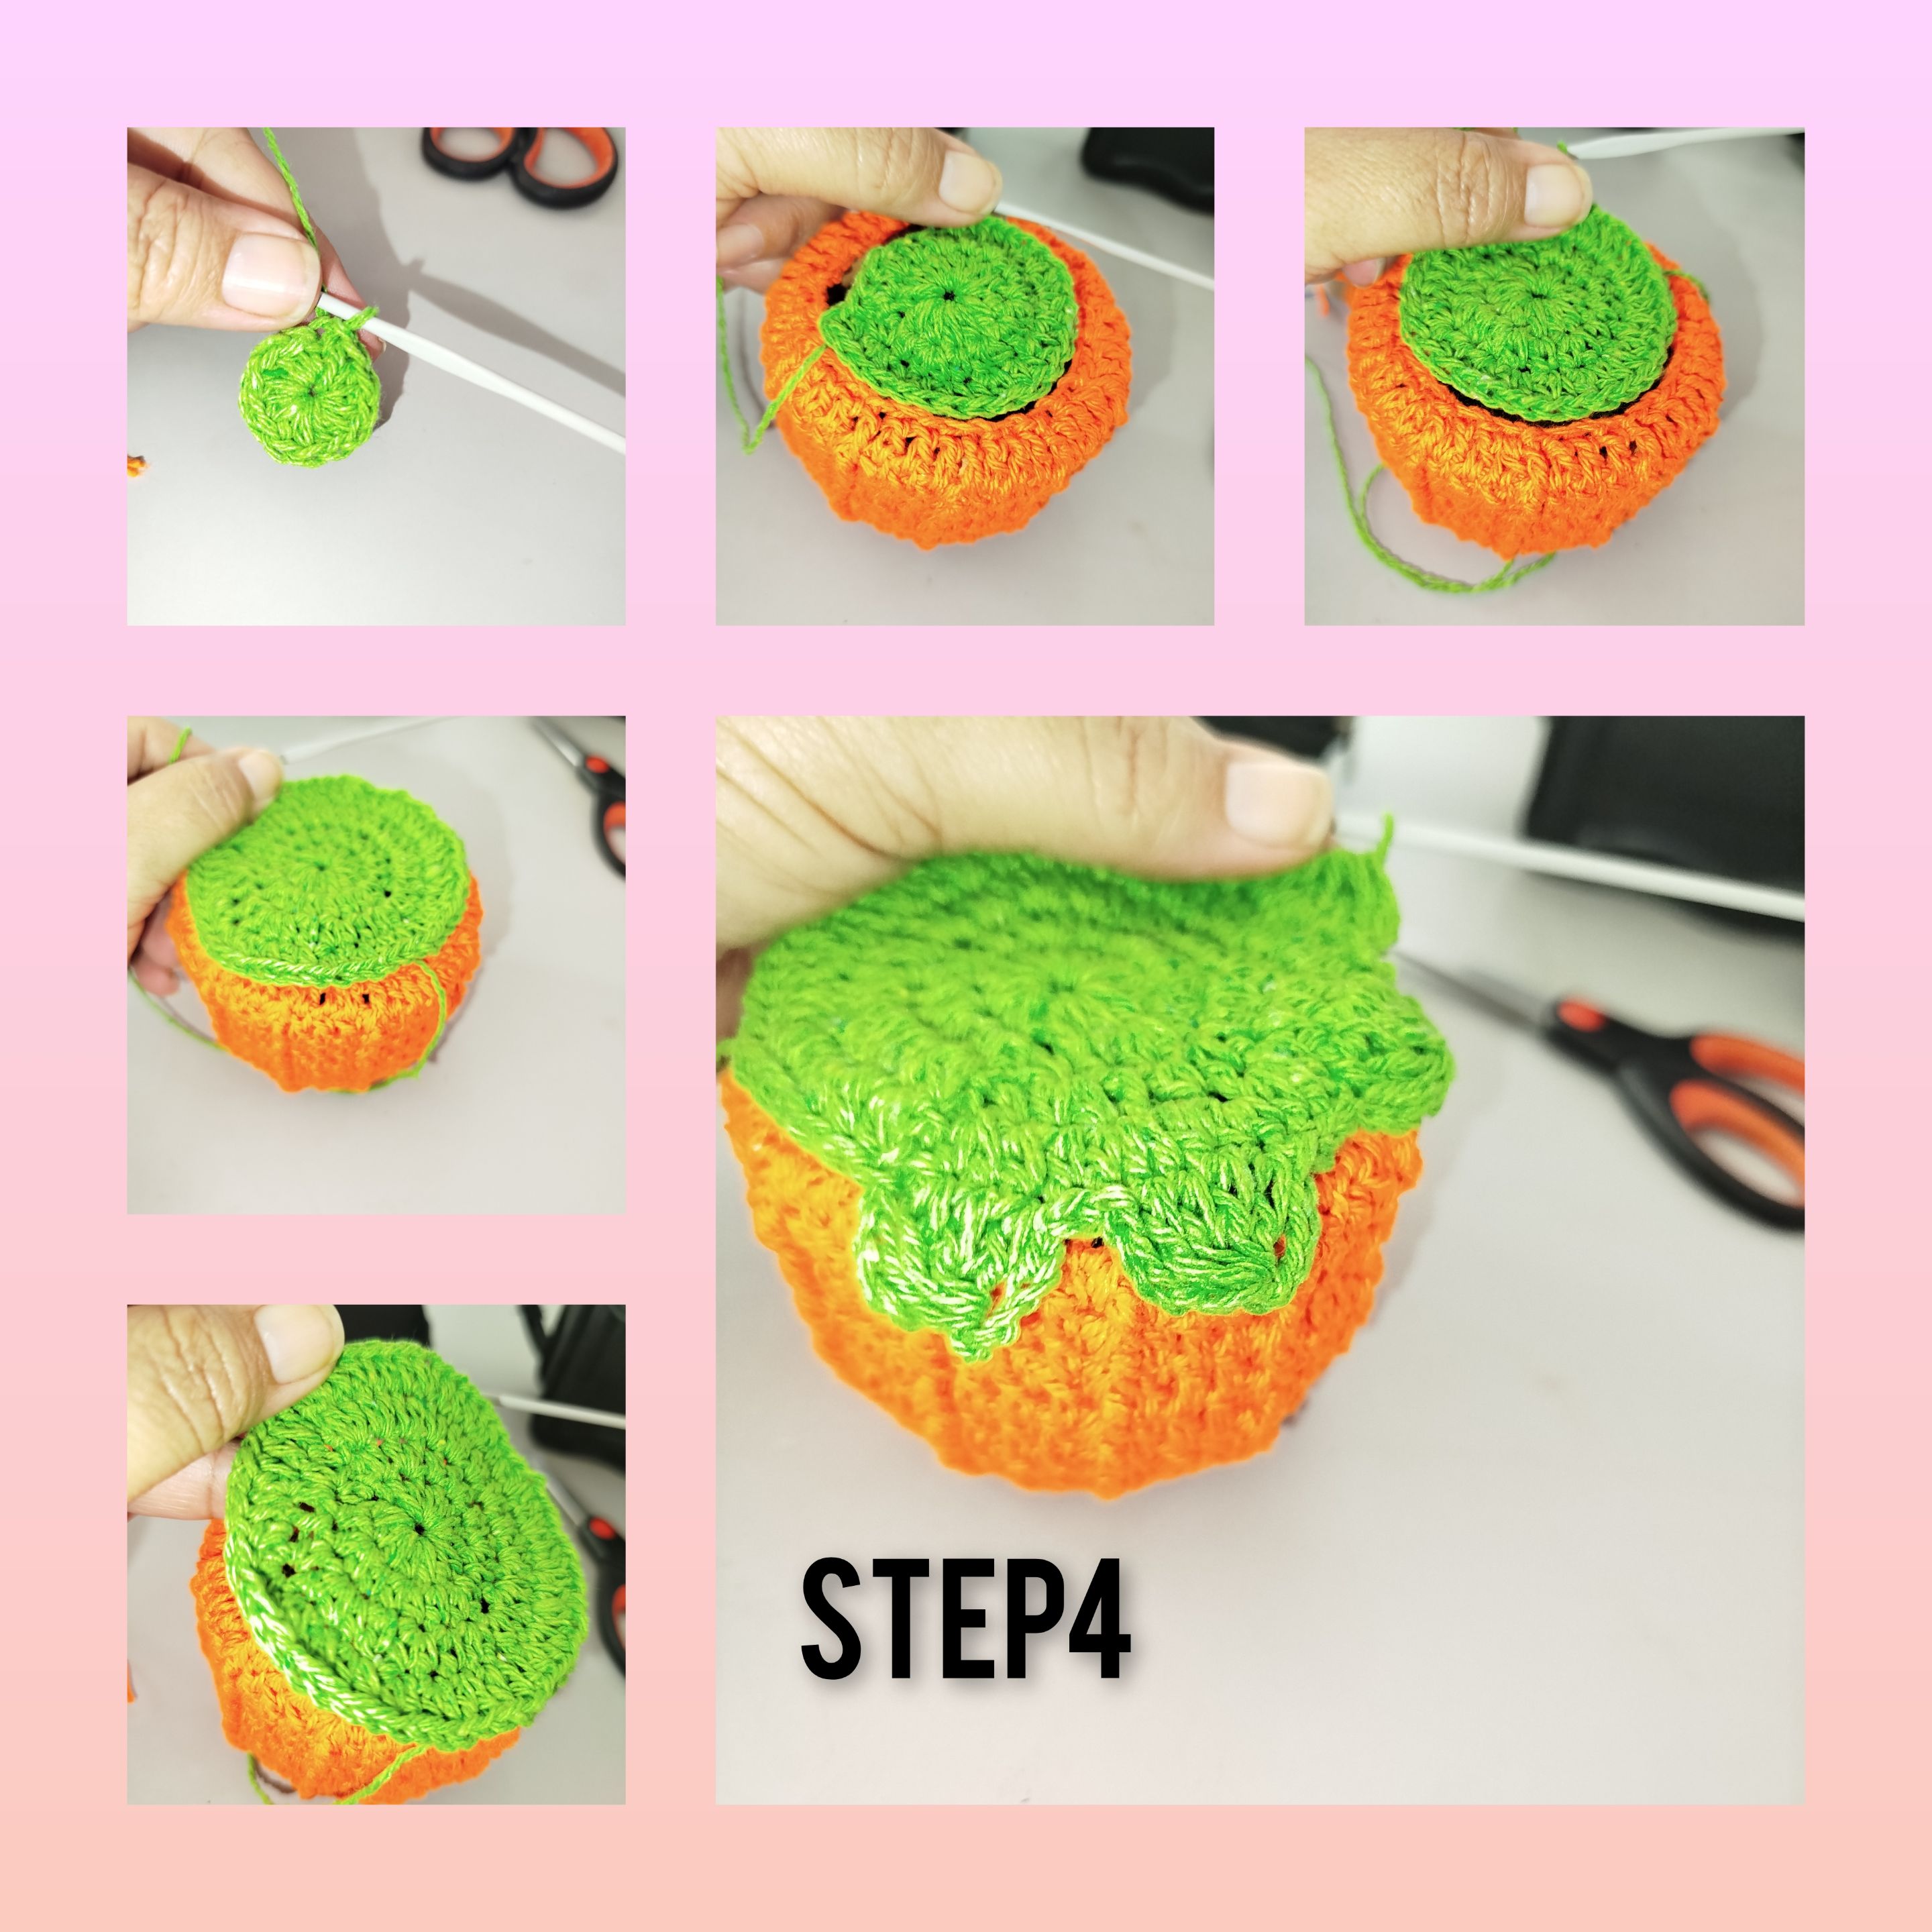
4.) Continue and the next thing will be, repeat the process of the first step, this time to create the lid of the small chest, and continue using the green thread and knit groups of five double crochets, closed together, and which in turn, simulate
5.) I continue and this time, I knit the final part of the stem, I knit seven chain stitches, then I knit three rounds of half stitches, one in each chain stitch. I glue the ends of the chains and the last row of half stitches and formed a small tube, which I insert into the center of the circle knitted in the previous step.
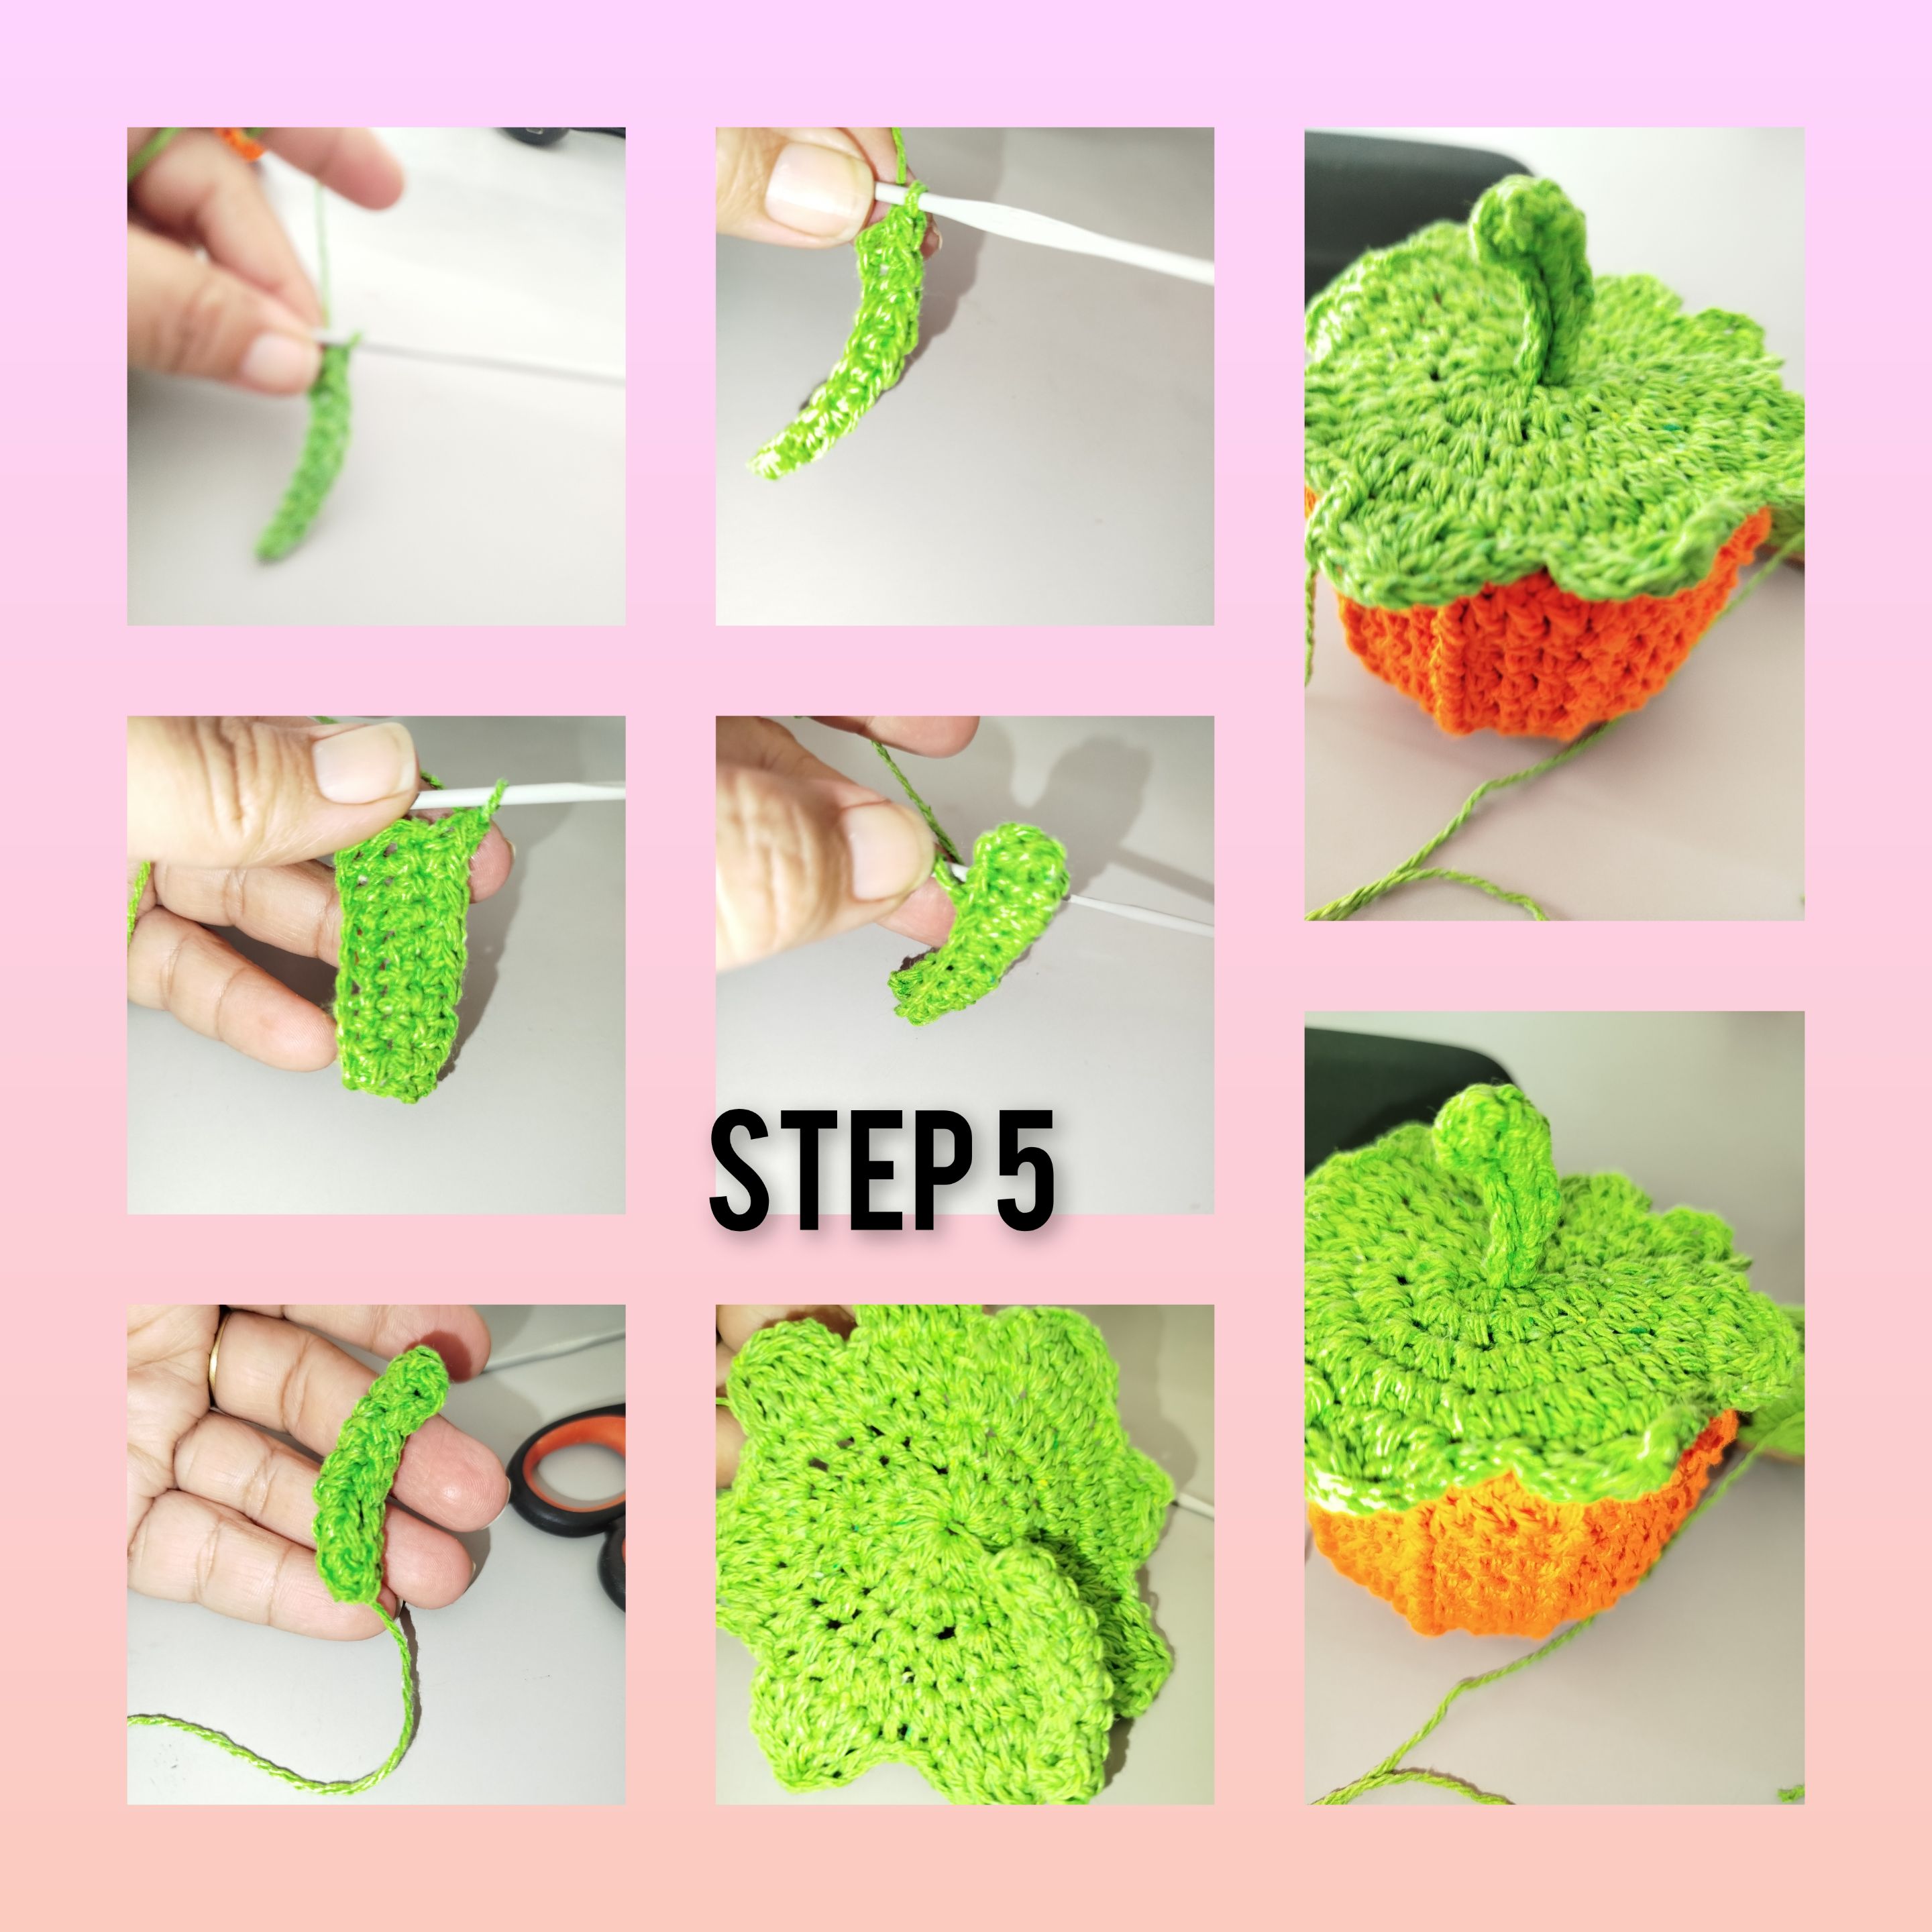
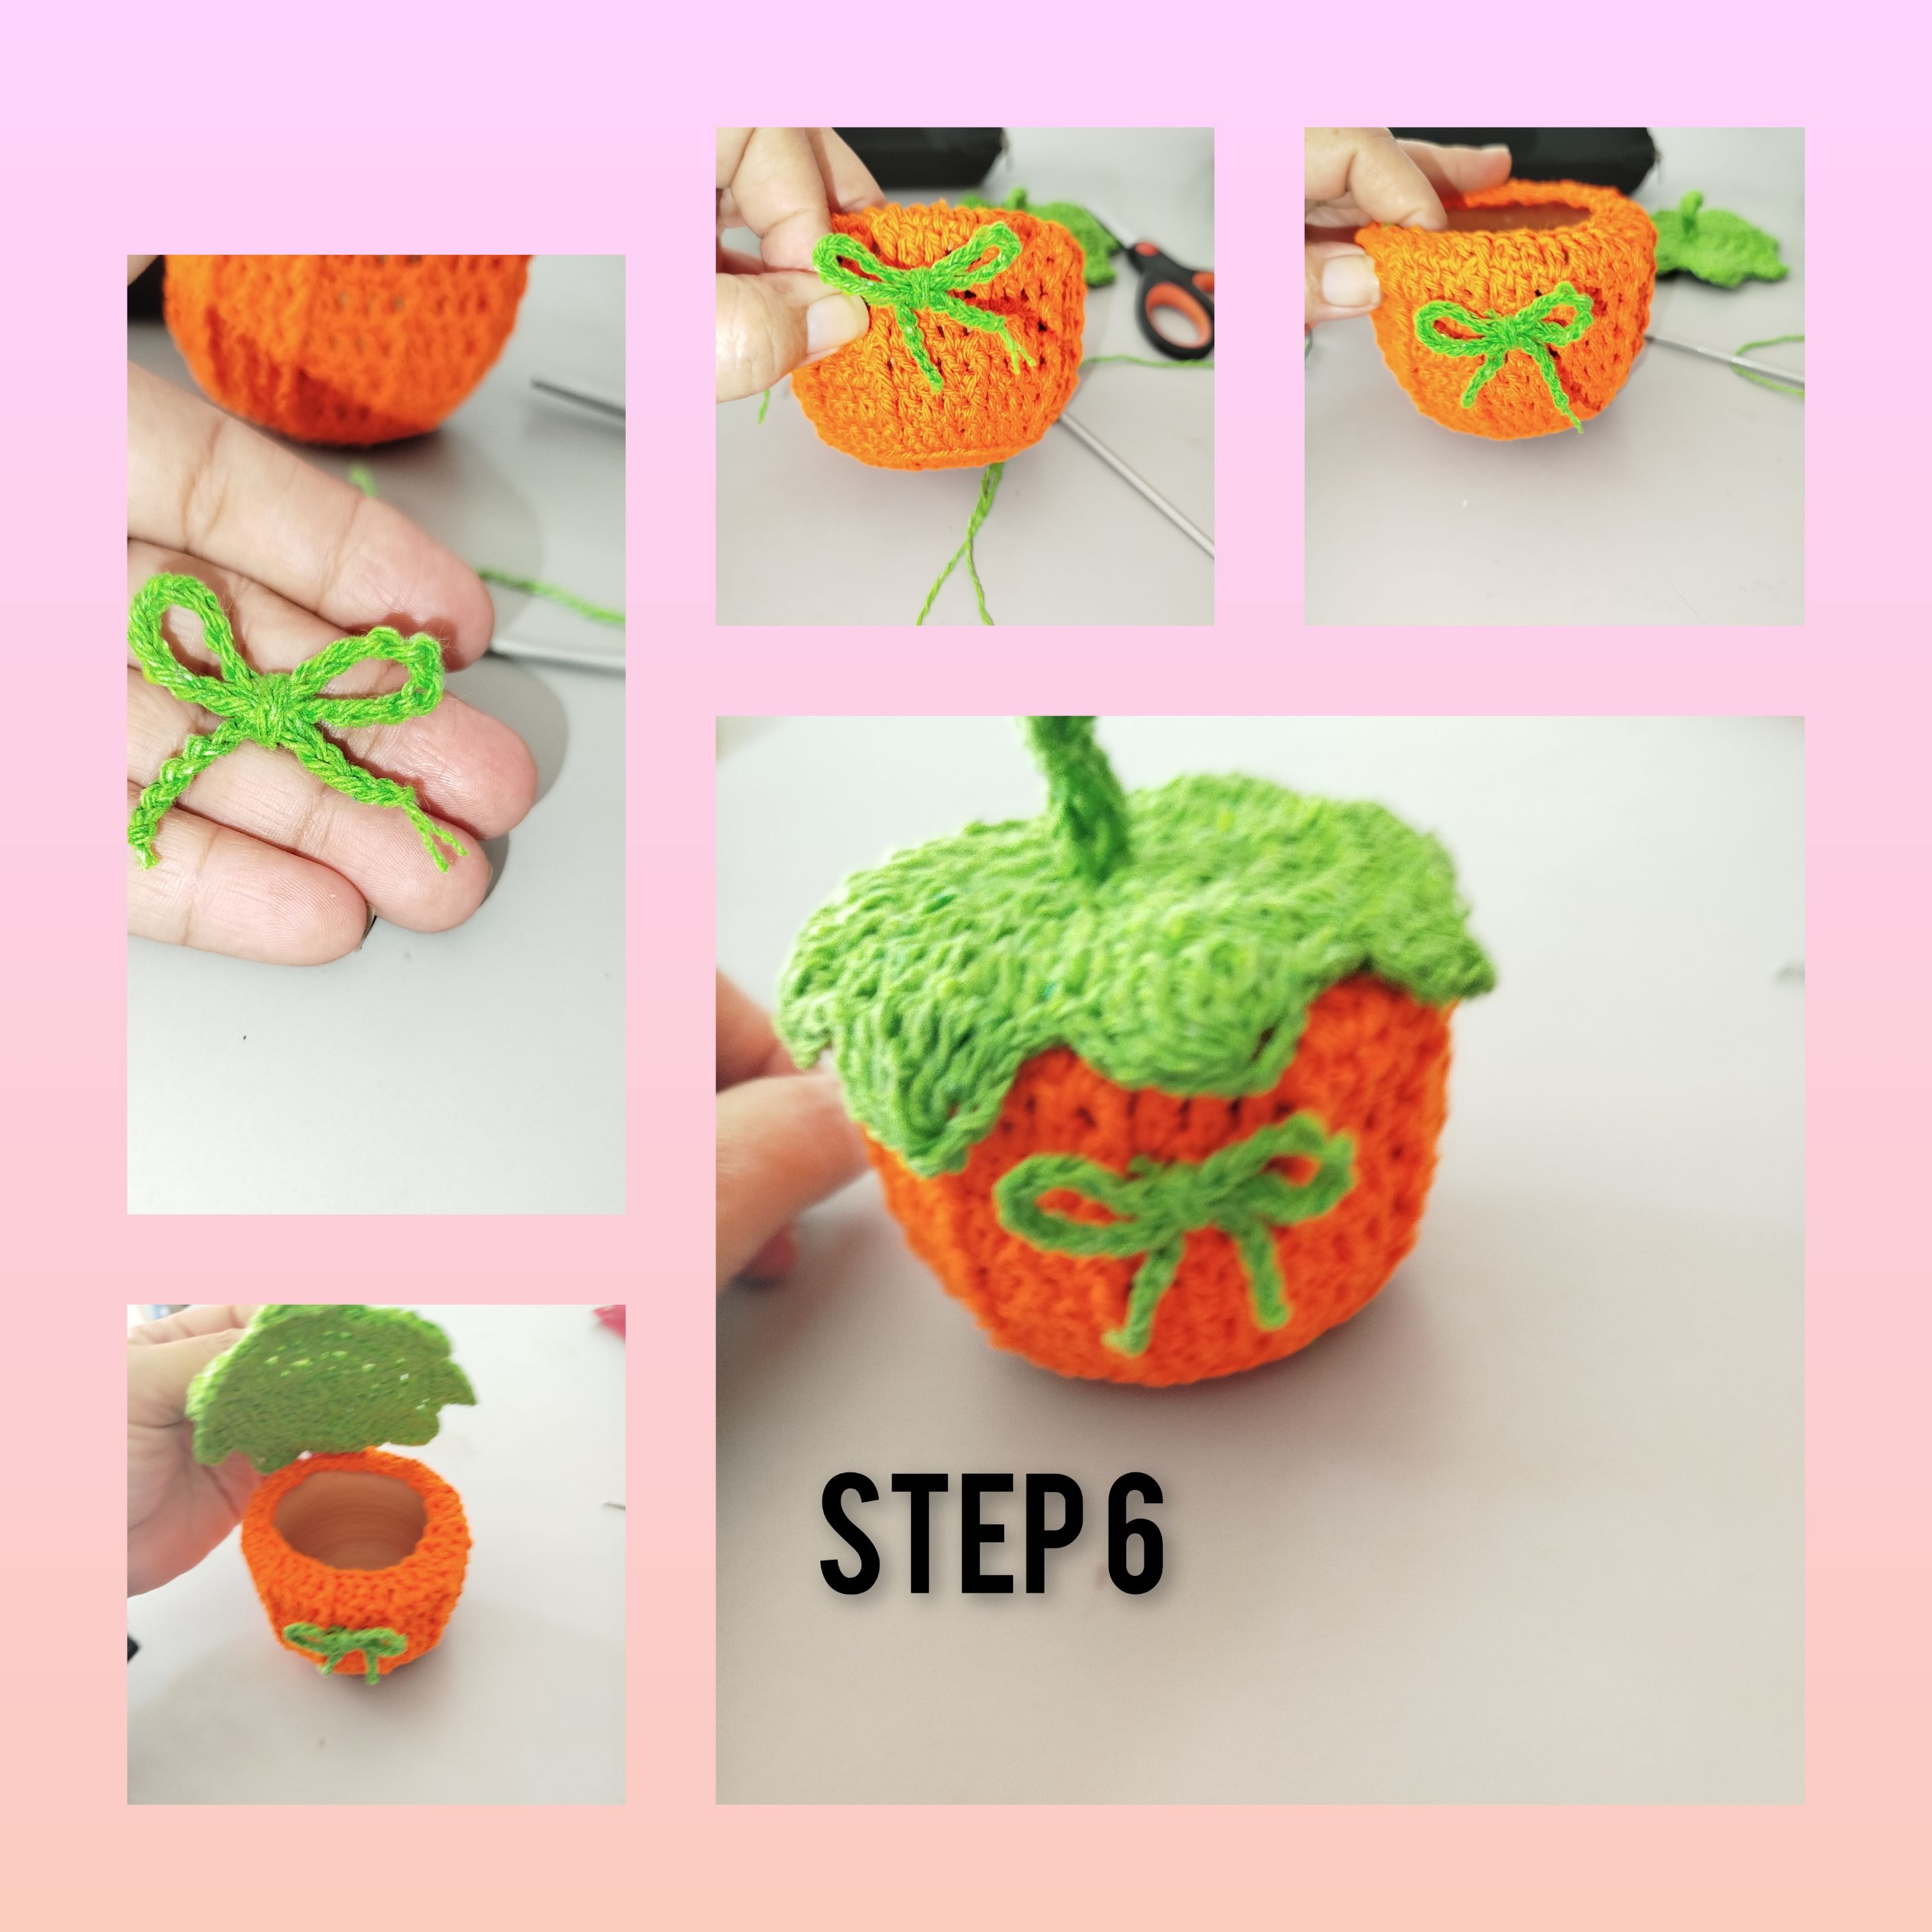
6.) I knit twenty more ch stitches and made a bow, which I glued with several knots to the front of the haunted pumpkin. I also glued some stitches to fix the lid, and avoid losing it when uncovering the chest.
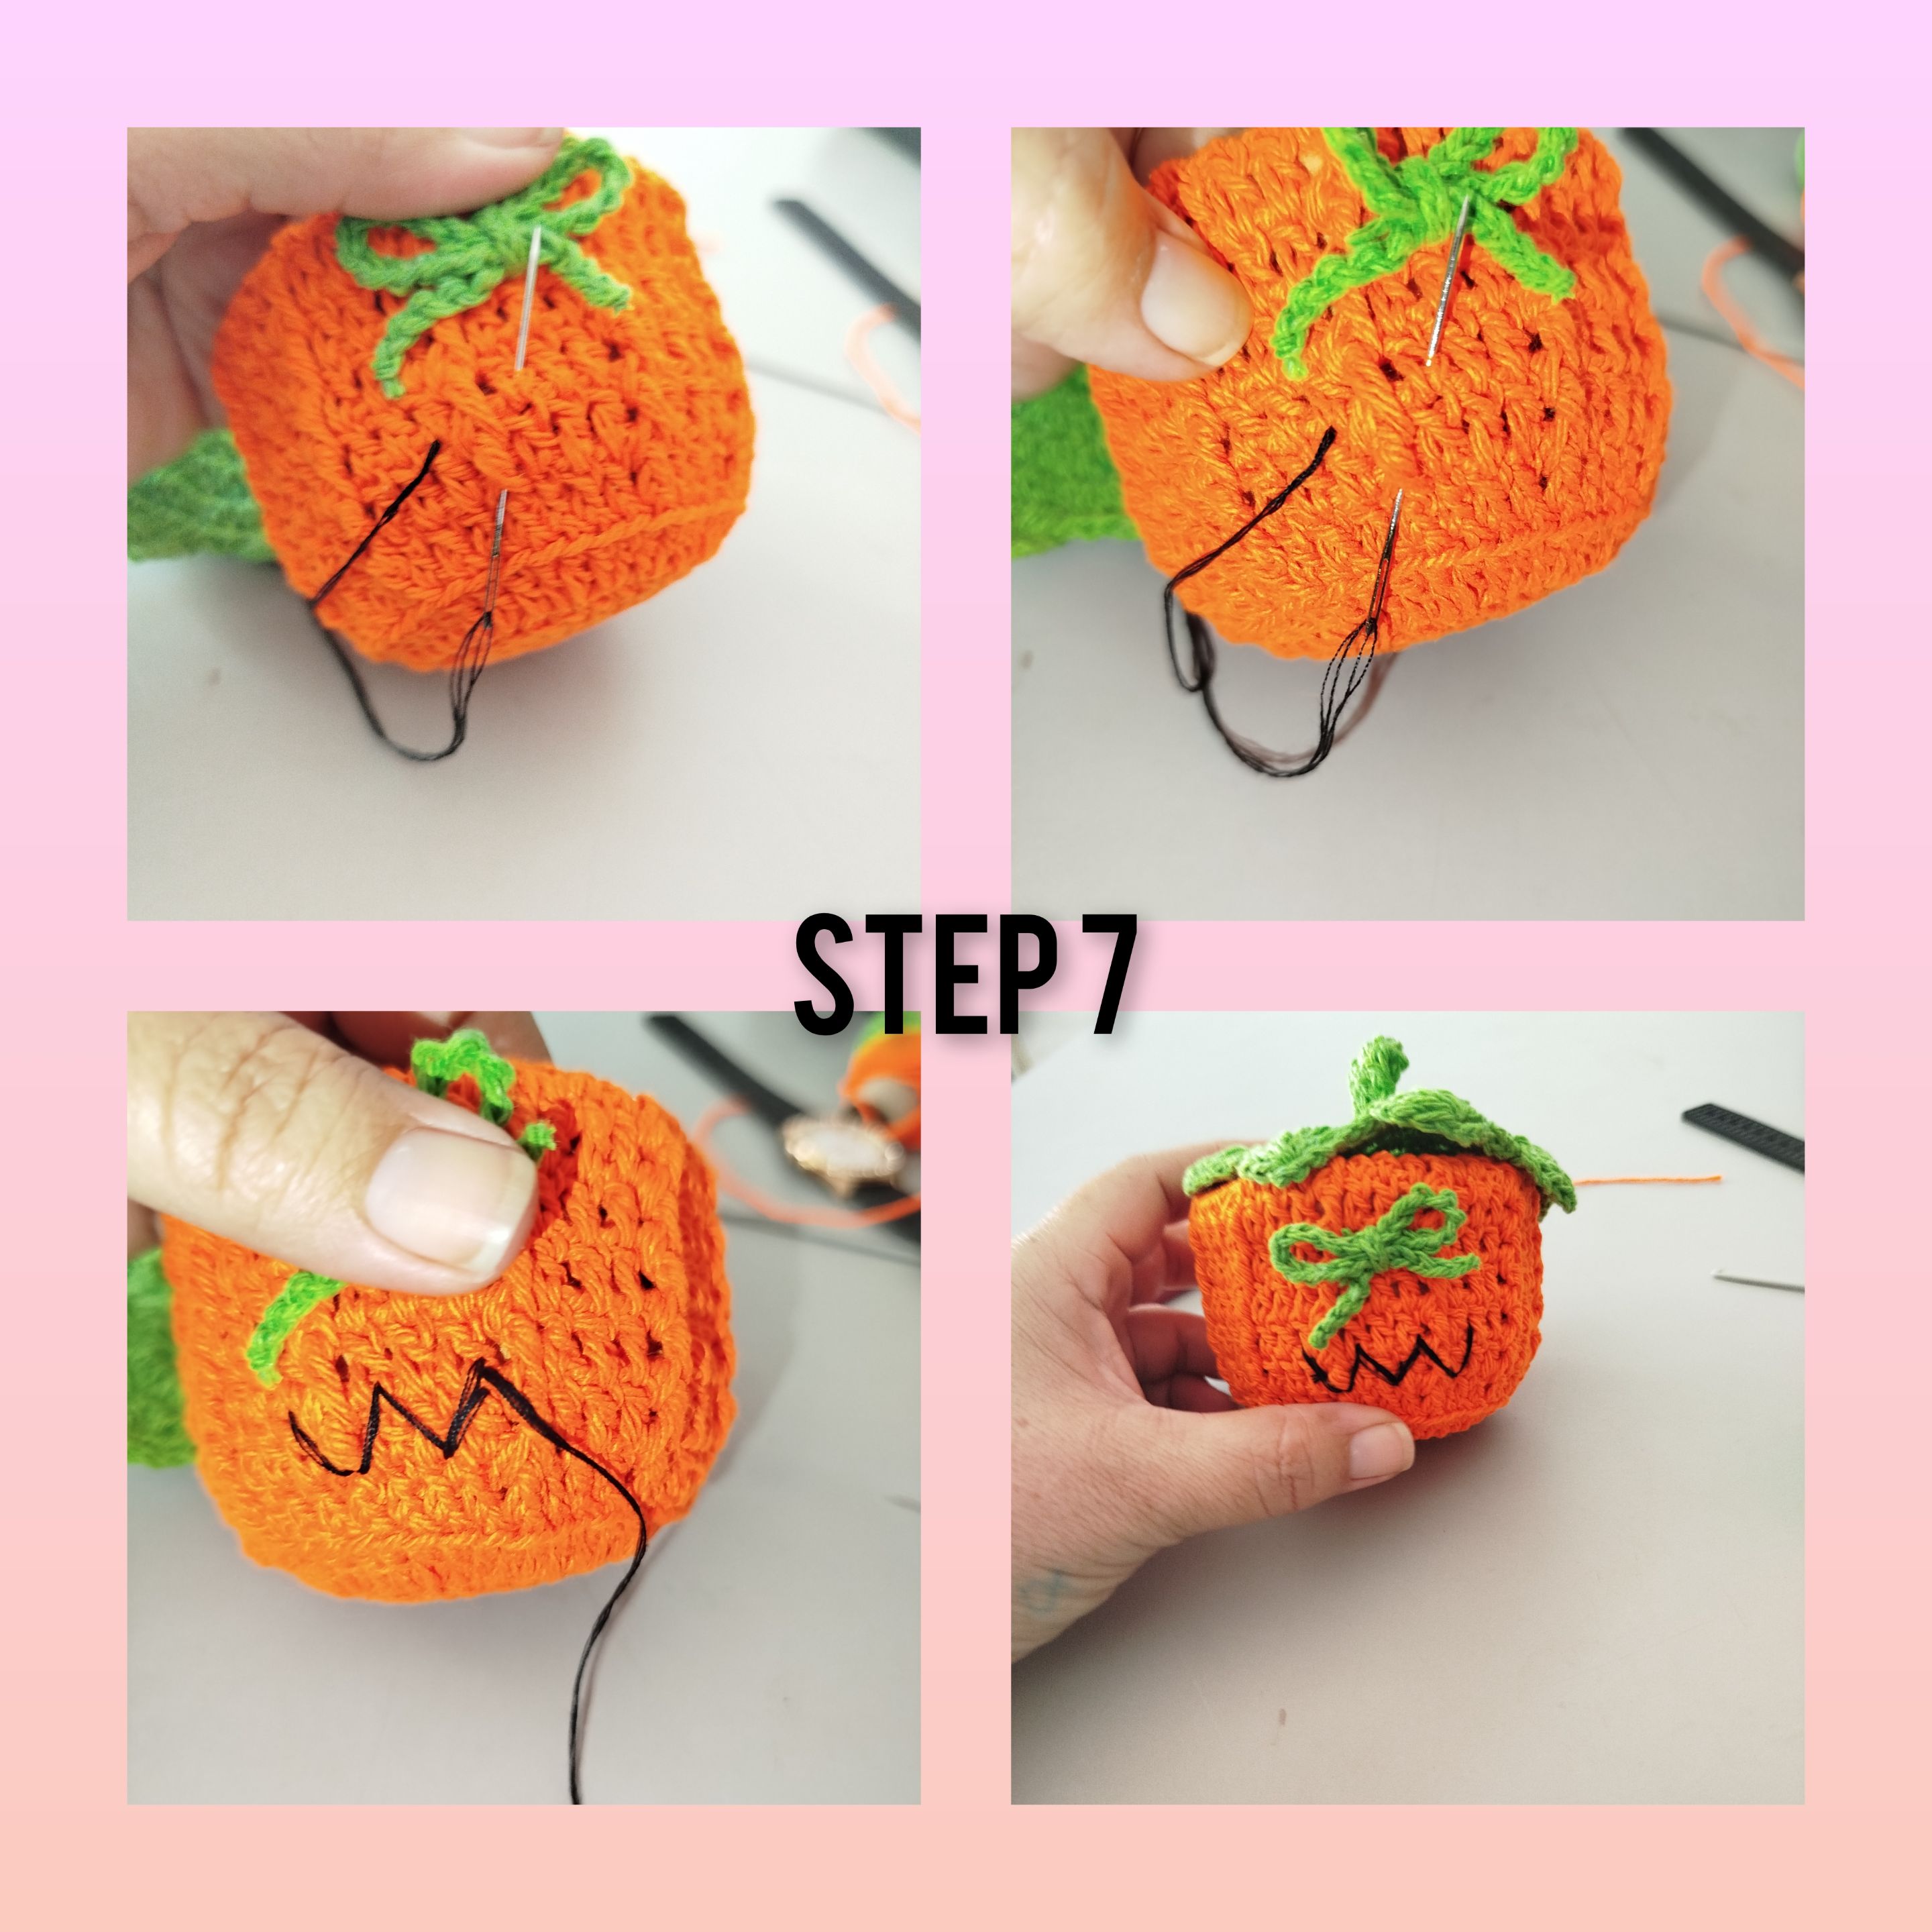
7.) Continuous, and with the thread and needle, thick, under the loop the mouth of the possessed calaba.
All photos are my property, taken with my phone. . Use incollage to show the sequence of each step. . Use language translator.
Grateful for having followed me until the end, it is always a pleasure, to see that you have visited me on my blog, always welcome, until next time
(ESP)
Hola a todos, deseo se encuentran bien, en unión de sus seres queridos, gozando de buena salud y con gran entusiasmo, para crear sus nuevas ideas. Hoy me da mucho gusto, compartir, con todos ustedes, muy bonito proyecto, dónde puse en práctica la técnica de crochet y reciclaje, para elaborar un hermoso joyero, ideal para dar, un regalo en noche de halloween, inspirado en la simbólica, calabaza, poseída, Les invito a seguirme el paso a paso, y motivando a que realicen la suya. Deseo les guste y disfruten de su elaboración.
Materiales:
. Hilos ara tejer, colores ( verde, anaranjado) . Hilo de coser de color negro. . Aguja para tejer. . Aguja para bordar. . Maceta pequeña de arcilla. .tijeras.
pasos a seguir:
1.) Inicio, haciendo un anillo mágico, y relleno con doce puntos altos, cierro el anillo y uno el primero y último punto alto, con un punto deslizado, tejo Dos vu latas más, haciendo un aumento de puntos altos, luego de dos puntos, de la vuelta pasada. De esta manera, loco cubrir el fondo de la maceta de arcilla.
2.) Para el siguiente paso, tejo una primera vuelta, haciendo, un corte, tomando la hebra de el punto alto, de atrás. Y así sigo tejiendo, pero ahora, en esta vuelta, haré un punto en relieve por fuera,y repito en las siguientes vueltas,hasta alcanzar el tamaño o altura la de maceta. Tejiendo un total de siete vueltas, consecutivas de puntos altos.
3.) Continuo y en esta oportunidad, corto el hilo dejando una hebra, larga y voy pasándola, por dentro de los puntos altos, y recogí un poco, de esta forma, queda fijado el forro de la maceta. Oculto el hilo residual.
4.) Continuo y lo siguiente será, repetir el proceso de el primer paso, está vez para crear la tapa de el pequeño cofre, y continuo usando el hilo de color verde y tejo grupos de cinco puntos altos, cerrados juntos, y que a su vez, simulan
5.) Continuo y está vez, tejo la parte final de el pedúnculo, tejo siete puntos cadenas, luego tejo, tres vueltas de medios puntos, uno en cada puntos cadenas. Pego los extremos de las cadenas y la última vuelta de medios puntos y formó un pequeño tubo, el cual, introduzco en el centro de el círculo tejido en paso anterior.
6.) Tejo veinte puntos cad más y armó un lazo, que pego con varios nudos en pla parte frontal de la calabaza embrujada. Así mismo pego algunas puntadas,para fijar la tapa, y evitar perder al destapar el cofre.
7.) Continuo, y con el hilo y aguja, gordo, debajo de el lazo la boca de la calaba poseída.
Todas las fotos son de mí propiedad, tomadas con mí teléfono. . Use incollage, para mostrar la secuencia de cada paso. . Use traductor lenguaje.
Agradecida me hayas seguido hasta el final siempre es un gusto, ver me hayas visitado en mi blog, bienvenidos siempre, será hasta una próxima