
Hola amigos 👋 espero estén muy bien. Por este lado seguimos haciendo lindos adornitos, ya al arbol no le cabe un adorno más.
Hello friends 👋 I hope you are very well. On this side we are still making beautiful ornaments, the tree can't fit any more decorations.
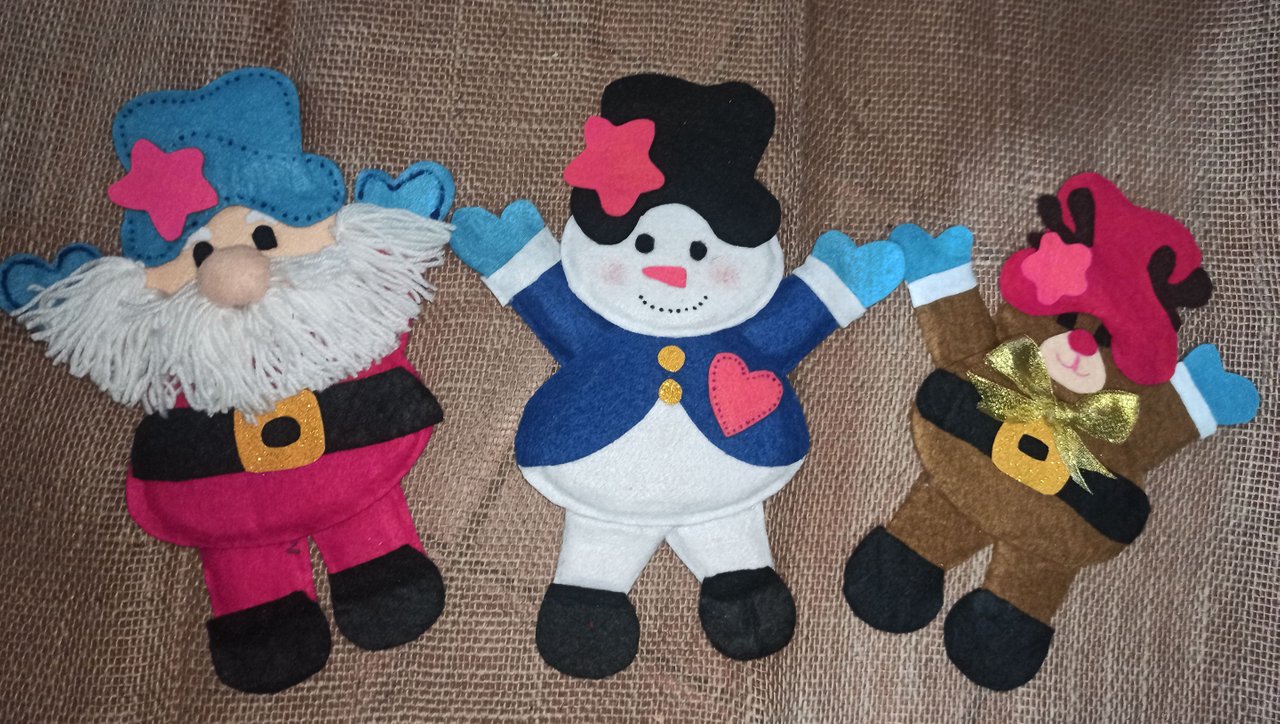
En este nuevo tutorial les enseño 3 adornos que he realizado con fieltro.
Un muñeco de nieves, Santa Claus y Rodolfo el reno están ahora adornando el árbol de navidad. Como ya lo mencione están hechos con fieltro y para darle firmeza he usado cartón, el resto de materiales se especifican a continuación.


In this new tutorial, I show you 3 ornaments I made with felt.

 A snowman, Santa Claus, and Rudolph the reindeer are now decorating the Christmas tree. As I already mentioned they are made with felt and to give them firmness I have used cardboard, the rest of the materials are specified below.
🎅 Fieltro rojo
🎅 Fieltro blanco
🎅 Fieltro color piel
🎅 Fieltro azul claro y oscuro
🎅 Fieltro negro
🎅 Fieltro naranja
🎅 Fieltro marrón claro y oscuro
🎅 Foamy amarillo escarchado
🎅 Estambre blanco
🎅 Silicón
🎅 Cartón
🎅 Red felt
🎅 White felt
🎅 Skin-colored felt
🎅 Light and dark blue felt
🎅 Black felt
🎅 Orange felt
🎅 Light and dark brown felt
🎅 Frosted yellow foamy felt
🎅 White stamen
🎅 Silicone
🎅 Cardboard
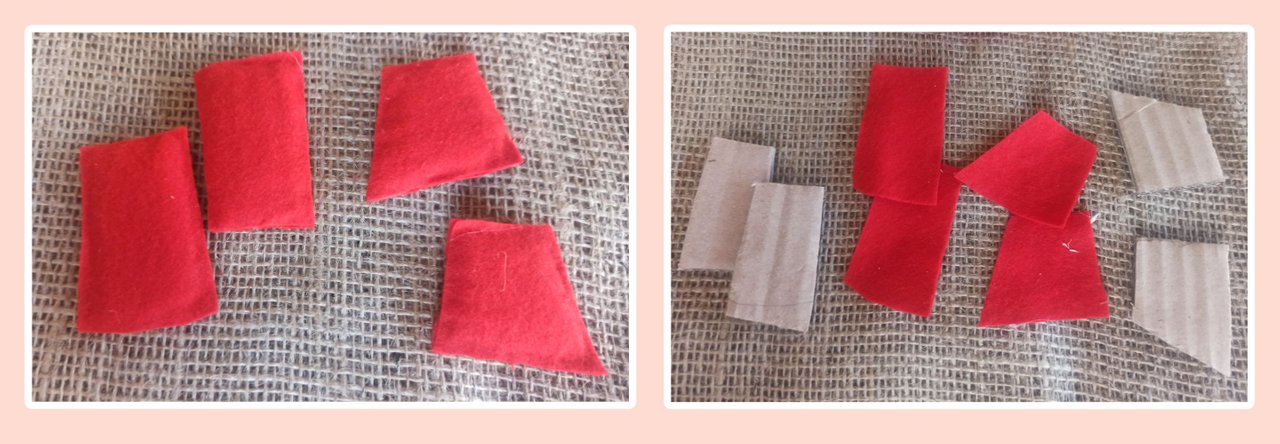
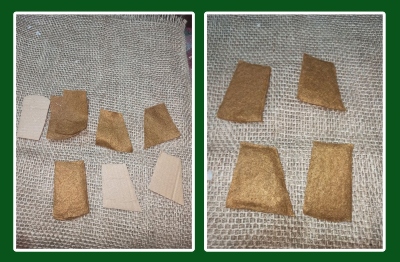
⛄️ Aquí los moldes. Pinchando en cada imagen pueden detallarlos mejor. Se usa casi los mismos patrones para los tres muñecos, y unos que otros detalles específicos para cada muñeco.
⛄️ Here are the molds. Clicking on each image you can detail them better. Almost the same patterns are used for the three dolls and some other specific details for each doll.
| https://images.hive.blog/0x0/https://files.peakd.com/file/peakd-hive/kellyrsa/23tmRz98fs8cPUy1vahSTFSMgpoNgR4DAf5R9mR6Vw5WJ6XyhrcuMa6SnFfsUg9FLPp8b.jpg |
https://images.hive.blog/0x0/https://files.peakd.com/file/peakd-hive/kellyrsa/23wqu2qko269gufrRE4qXbFa84ezWPRT5GQSQHqS3AaY7o3xrgstseBubrFMjtCDnAZtt.jpg |
https://images.hive.blog/0x0/https://files.peakd.com/file/peakd-hive/kellyrsa/23wgW5cKy4DcMEDjxpq6DRHY46McBLMNVqLoPzwctVSeecUvNF8fmJmaap982jF4YbJPt.jpg |
https://images.hive.blog/0x0/https://files.peakd.com/file/peakd-hive/kellyrsa/23tc5j3Vg5NzJxrW5rMTt2jYuSianTwQfNzntES1HfdrrEQPi4owhoL9GxfK7nWm41EE2.jpg |
https://images.hive.blog/0x0/https://files.peakd.com/file/peakd-hive/kellyrsa/23wX5QxNX4pWPrMiT9Qy6QTFswjvRj5Chvx6V4ChN1Y1vKWP8Sh36EU8YrwfZXJfQxXc6.jpg |
|
|
|
|
|
⛄️ ⛄️ ⛄️ ⛄️ ⛄️ ⛄️ ⛄️ ⛄️ ⛄️ ⛄️ ⛄️ ⛄️ ⛄️ ⛄️ ⛄️ ⛄️ ⛄️ ⛄️
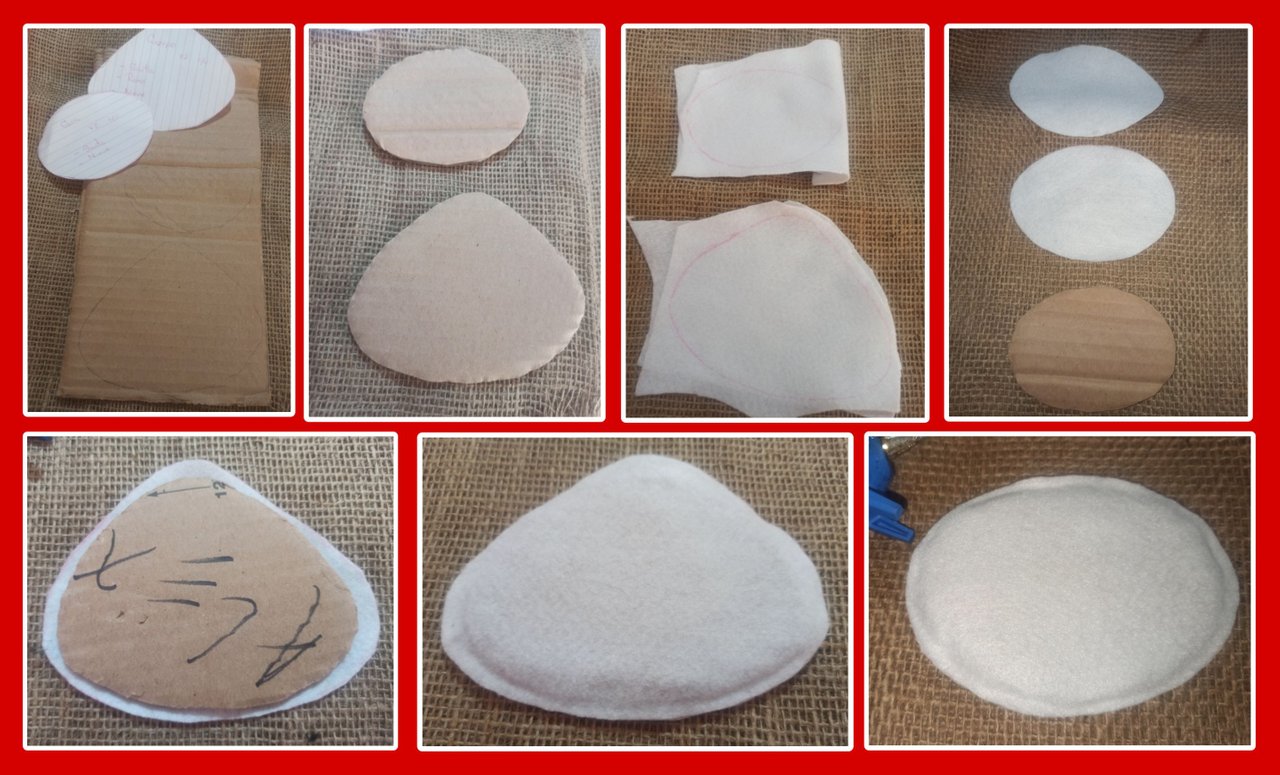
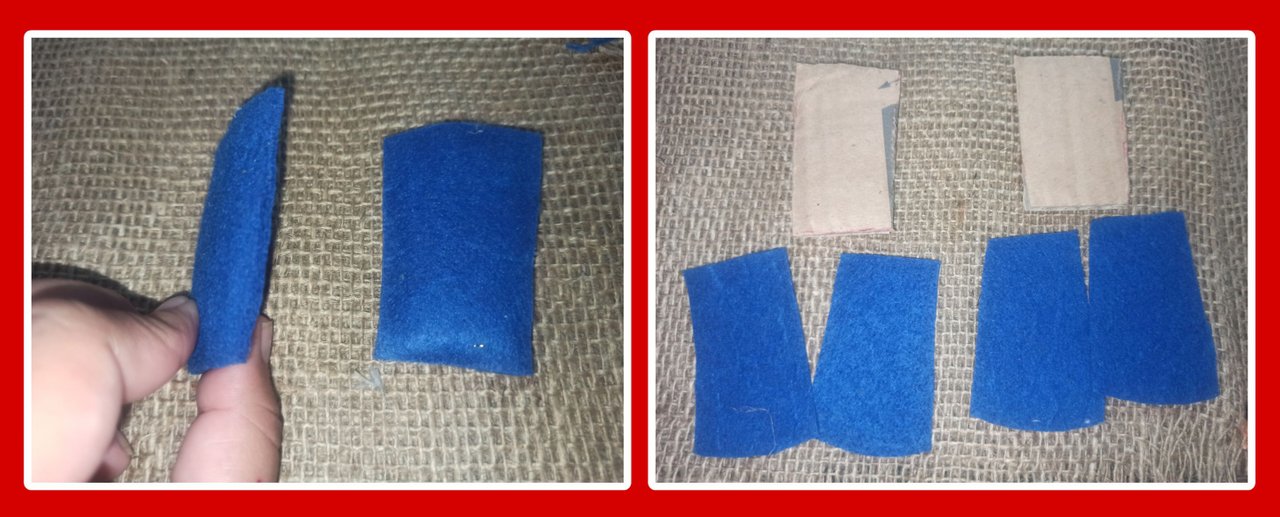
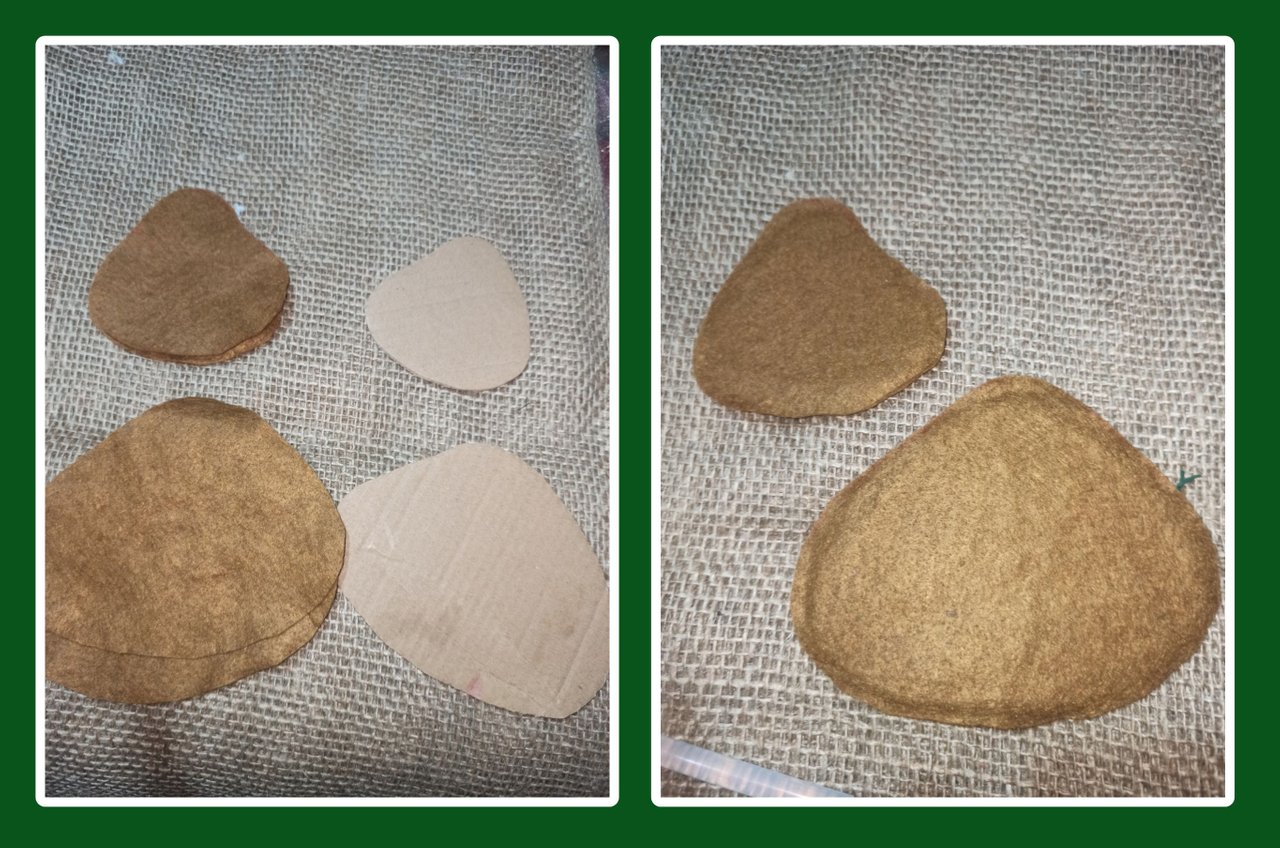
⛄️ Saco las piezas de la cabeza y el cuerpo, en fieltro blanco y en cartón. Las piezas del cartón tienen que ser más pequeñas que las del fieltro. Con la tijera le quito 1 cm y así vamos a hacer con todas las piezas que se va a utilizar de cartón.
Pegamos con silicón el fieltro al cartón por las dos caras.
⛄️ I draw the head and body pieces, in white felt and cardboard. The cardboard pieces have to be smaller than the felt ones. With the scissors, we remove 1 cm and so we are going to do with all the cardboard pieces that we are going to use.

Glue the felt to the cardboard with silicone on both sides.
⛄️ ⛄️ ⛄️ ⛄️ ⛄️ ⛄️ ⛄️ ⛄️ ⛄️ ⛄️ ⛄️ ⛄️ ⛄️ ⛄️ ⛄️ ⛄️ ⛄️ ⛄️
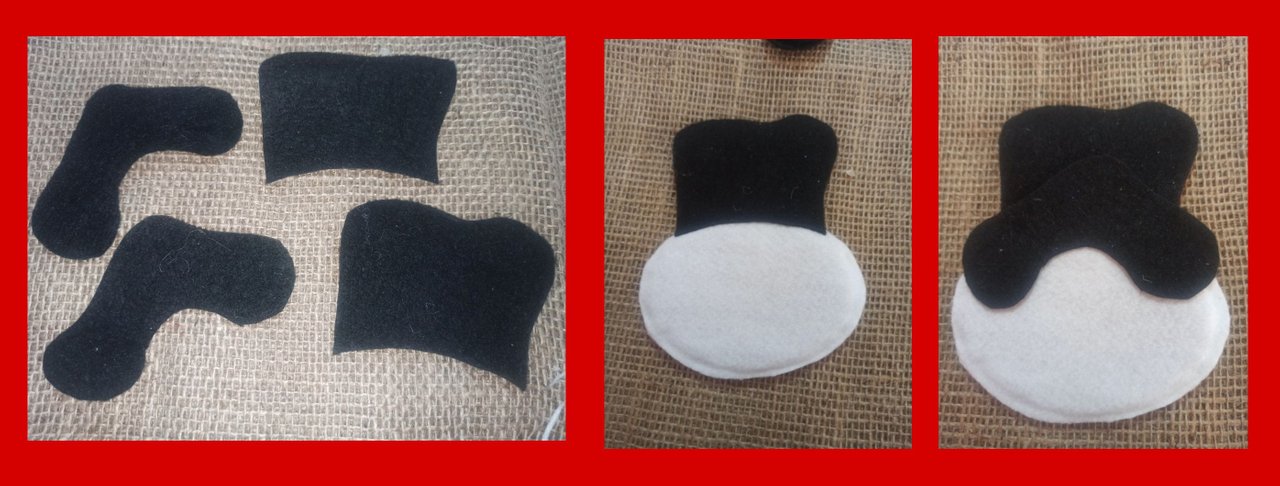
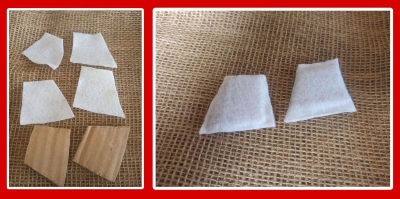
⛄️ El sombrero. Saco las piezas en cartón y en fieltro negro. Lo pego a la cabeza.
⛄️ The hat. I take out the pieces in cardboard and black felt. I glue it to the head.
⛄️ ⛄️ ⛄️ ⛄️ ⛄️ ⛄️ ⛄️ ⛄️ ⛄️ ⛄️ ⛄️ ⛄️ ⛄️ ⛄️ ⛄️ ⛄️ ⛄️ ⛄️
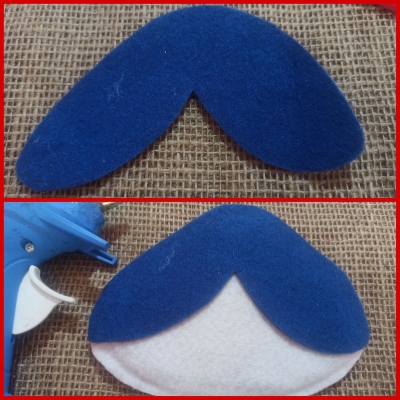
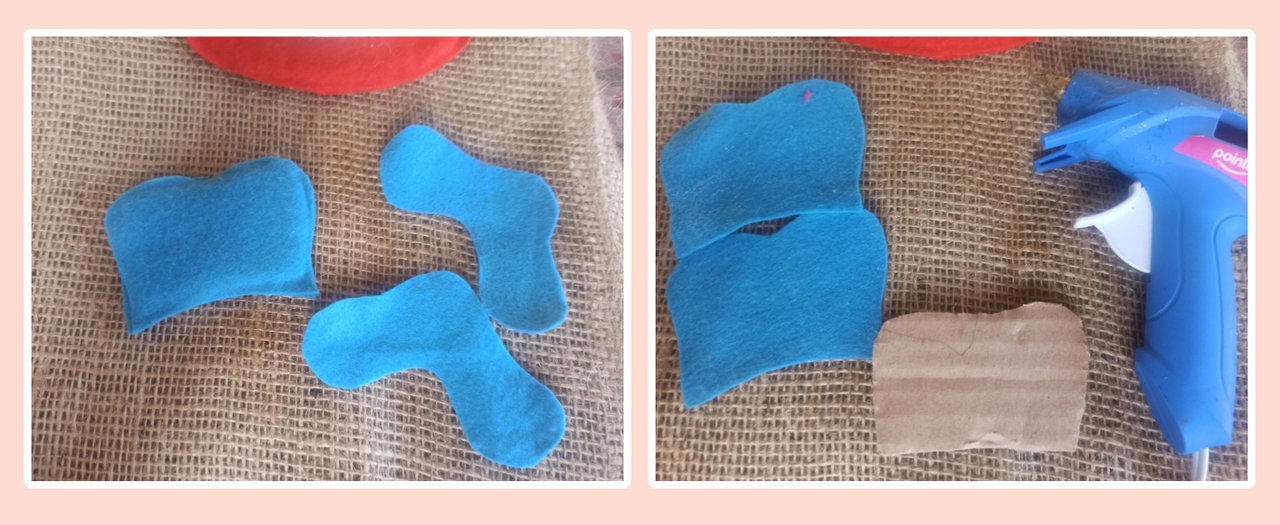
⛄️ El chaleco en color azul, lo pegamos al cuerpo del muñeco.
⛄️ The vest is blue, we glue it to the body of the doll.
⛄️ ⛄️ ⛄️ ⛄️ ⛄️ ⛄️ ⛄️ ⛄️ ⛄️ ⛄️ ⛄️ ⛄️ ⛄️ ⛄️ ⛄️ ⛄️ ⛄️ ⛄️
⛄️ Las piernas y brazos también van encartonados. Los brazos en color azul y piernas en blanco.
⛄️ The legs and arms are also cautioned. The arms are blue and the legs white.
⛄️ ⛄️ ⛄️ ⛄️ ⛄️ ⛄️ ⛄️ ⛄️ ⛄️ ⛄️ ⛄️ ⛄️ ⛄️ ⛄️ ⛄️ ⛄️ ⛄️ ⛄️
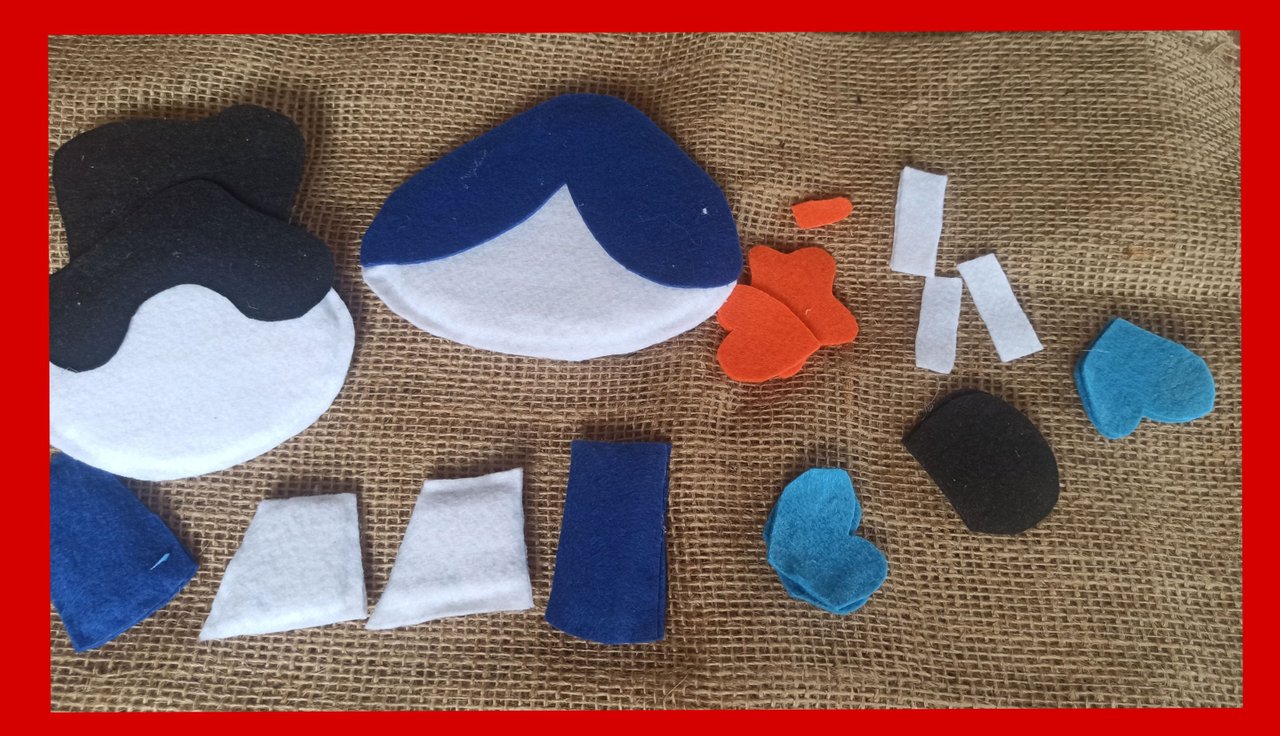
⛄️ Con las piezas listas que llevan cartón. Sacamos todas las demás piezas. Los colores del chaleco, guantes, gorro pueden escoger el color de su preferencia.
⛄️ With the ready pieces that carry cardboard. We take out all the other pieces. The colors of the vest, gloves, and hat can choose the color of your preference.
⛄️ ⛄️ ⛄️ ⛄️ ⛄️ ⛄️ ⛄️ ⛄️ ⛄️ ⛄️ ⛄️ ⛄️ ⛄️ ⛄️ ⛄️ ⛄️ ⛄️ ⛄️
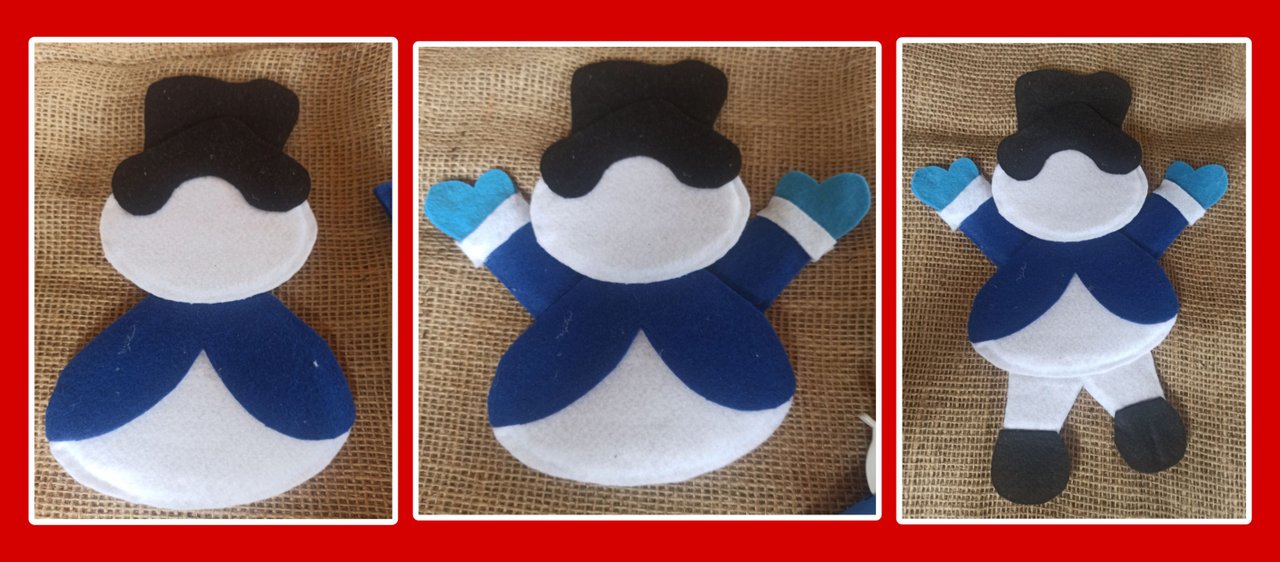
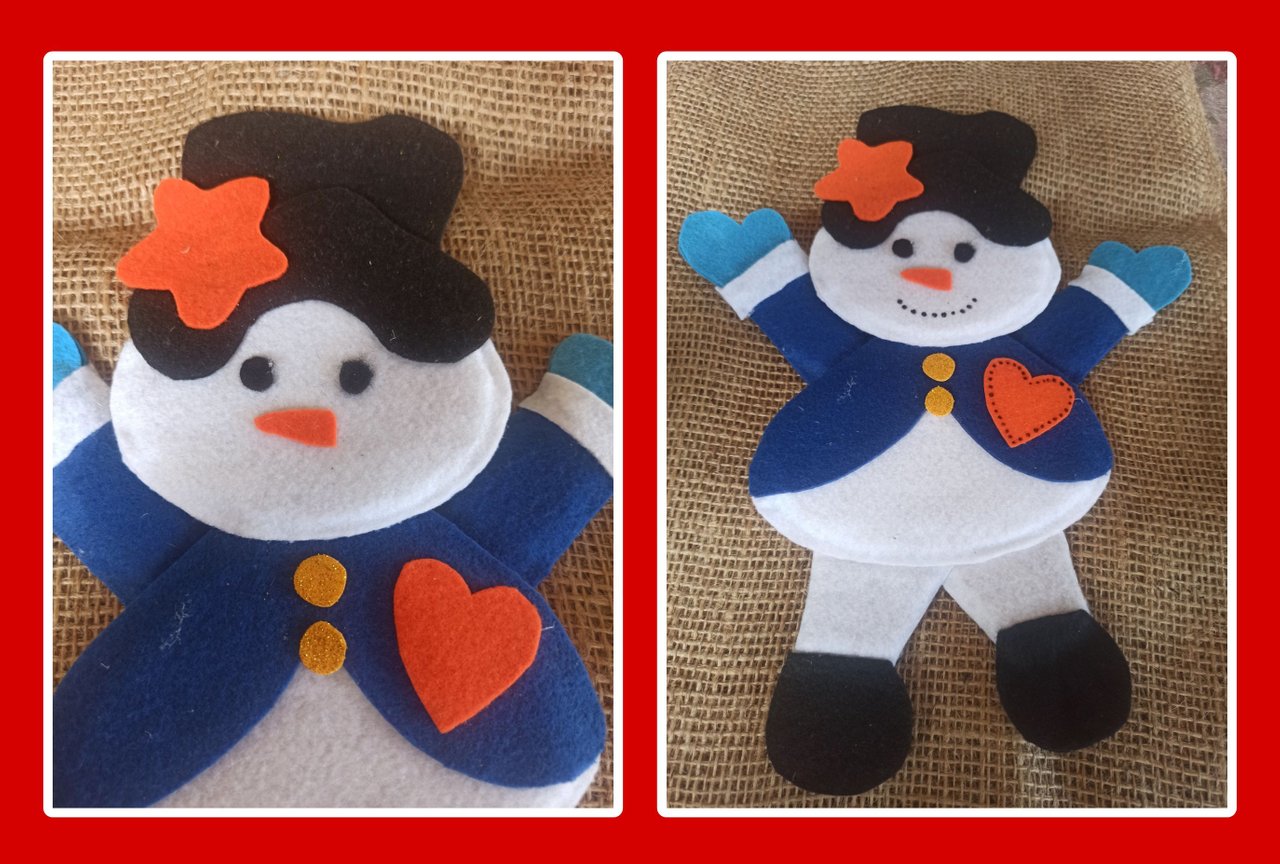
⛄️ Comienzo con el montaje del muñeco de nieve. Pego la cabeza al cuerpo. Los brazos, a los brazos pego los guantes. Las piernas y los zapatos.
⛄️ I start with the assembly of the snowman. I glue the head to the body. The arms, to the arms I glue the gloves. The legs and shoes.
⛄️ ⛄️ ⛄️ ⛄️ ⛄️ ⛄️ ⛄️ ⛄️ ⛄️ ⛄️ ⛄️ ⛄️ ⛄️ ⛄️ ⛄️ ⛄️ ⛄️ ⛄️
⛄️ Pego los detalles de la estrella, el corazón y los botones del chaleco. Por último, hago la cara, los ojos y su particular nariz y con pintura acrílica negra hago unos puntos para formar la boca.
I glue the details of the star, heart, and buttons of the vest. Finally, I make the face, the eyes, and his particular nose and with black acrylic paint, I make some dots to form the mouth.
⛄️ ⛄️ ⛄️ ⛄️ ⛄️ ⛄️ ⛄️ ⛄️ ⛄️ ⛄️ ⛄️ ⛄️ ⛄️ ⛄️ ⛄️ ⛄️ ⛄️ ⛄️
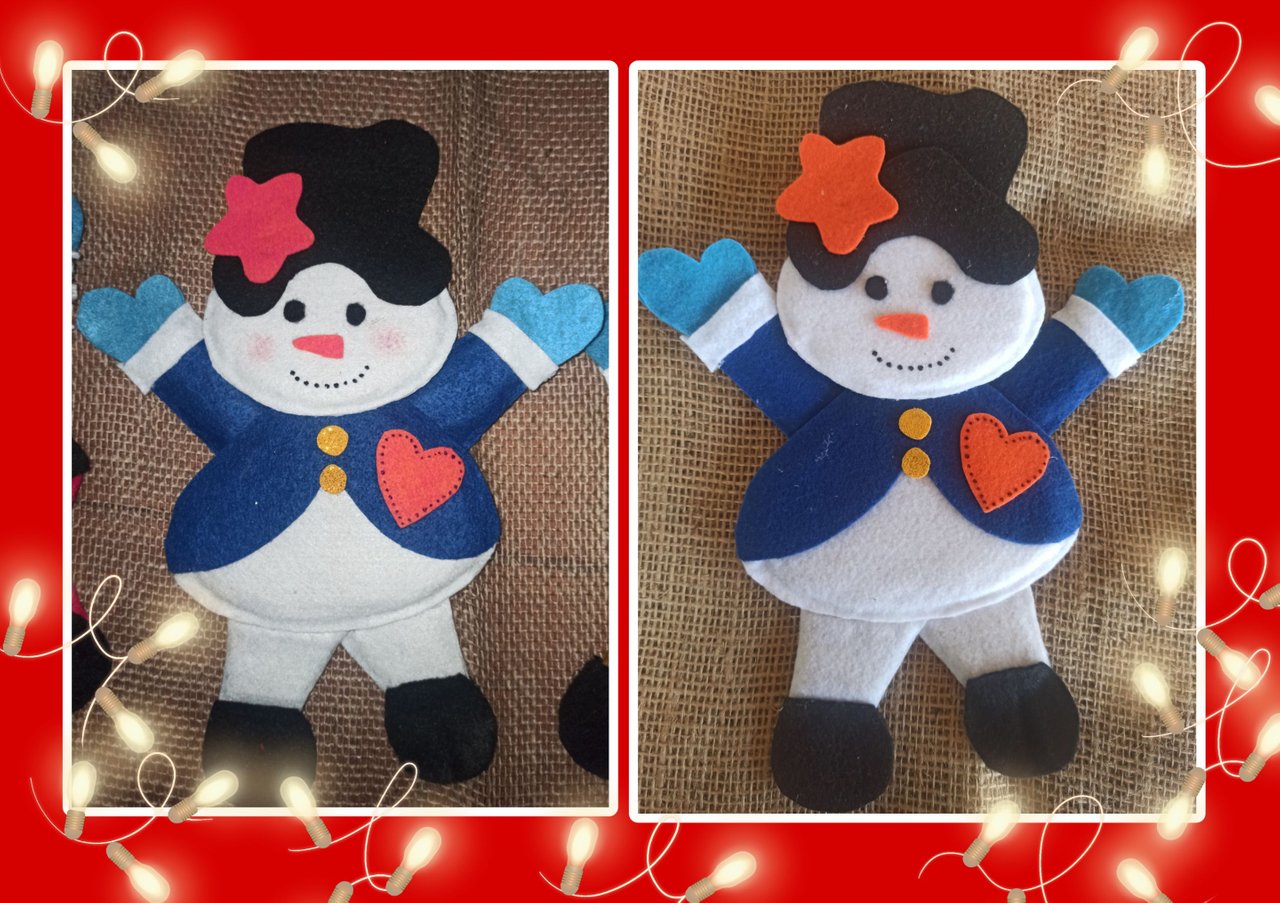
⛄️ Y así de bonito ha quedado el muñeco de nieve.
⛄️ And that's how beautiful the snowman turned out.

🎅 Tras descansar y salir en busca de más silicona que se me había acabado, empiezo con el segundo adorno.
🎅 After resting and going out in search of more silicone that I had run out of, I start with the second ornament.
 ```
🎅 🎅 🎅 🎅 🎅 🎅 🎅 🎅 🎅 🎅 🎅 🎅 🎅 🎅 🎅 🎅
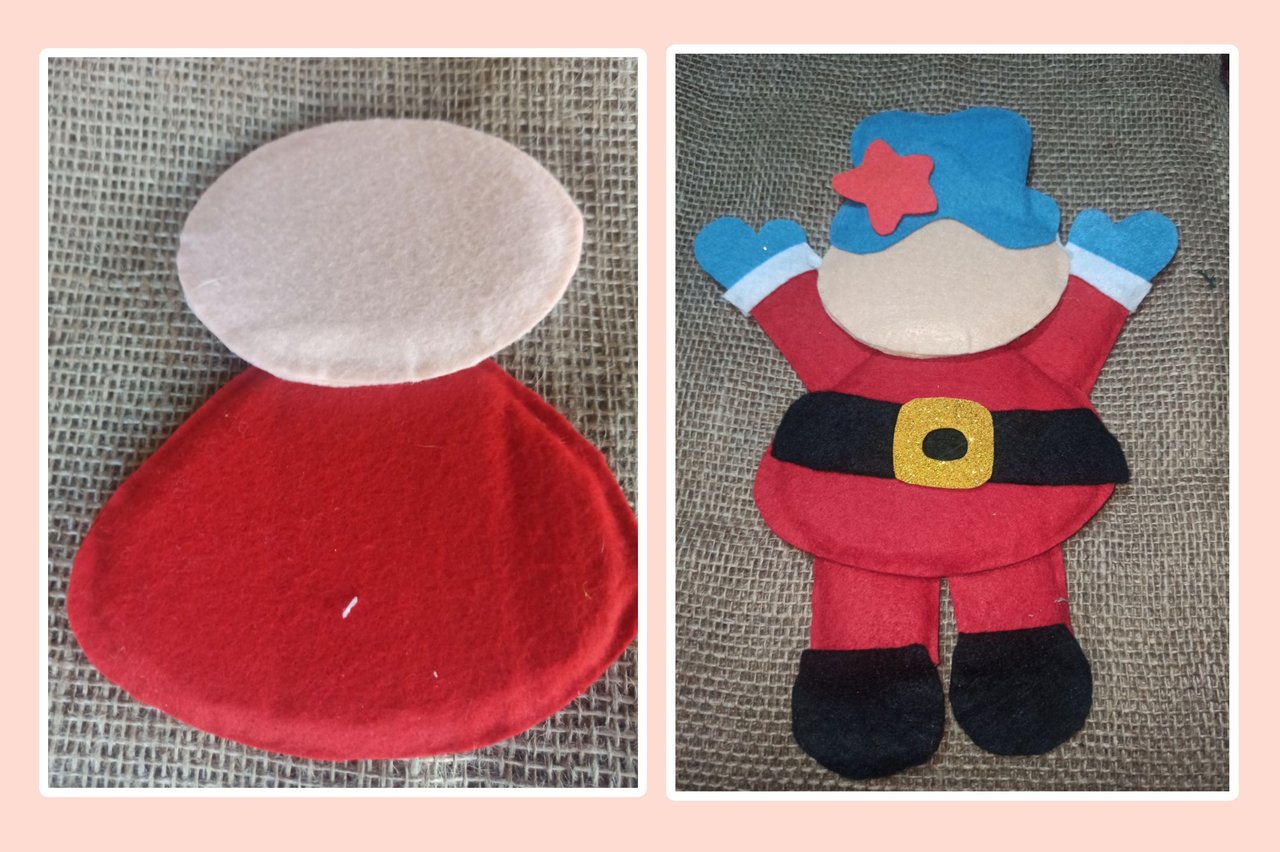
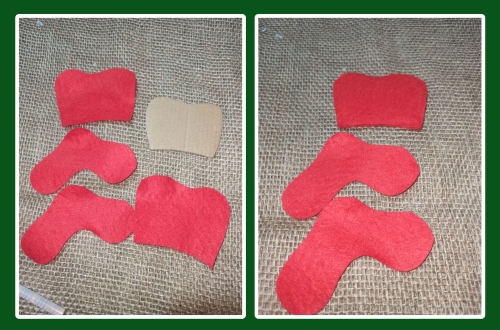
🎅 Al igual que el muñeco de nieve, empiezo por la cabeza y el cuerpo. La cabeza de color carne y el cuerpo rojo.
🎅 Just like the snowman, I start with the head and the body. The flesh-colored head and the red body.
---
|https://files.peakd.com/file/peakd-hive/kellyrsa/23uFifhzqYe6bw9JbFiMeHAbr2FdVS5QBZBv893XUifjpcuXjqzRghYCpeRiWqEmiiGiT.jpg|https://files.peakd.com/file/peakd-hive/kellyrsa/24248jmuGsHV4aiRX4Dim7SnpagGG4Su7yHTcFTBVL8iLiHuMoUS2DCCE9Nh5ZBfiiKBu.jpg
|---|---|
🎅 🎅 🎅 🎅 🎅 🎅 🎅 🎅 🎅 🎅 🎅 🎅 🎅 🎅 🎅 🎅
🎅 El gorro de Santa lo hice en azul, pero en realidad después de terminarlo no me gustó el color que elegí, quedaría mejor en rojo. Para los brazos y las piernas, fieltro rojo. Aquí sacamos las piezas tanto en fieltro como en cartón.
🎅 Santa's hat I made it in blue, but actually after finishing it I didn't like the color I chose, it would look better in red. For the arms and legs, red felt. Here we took out the pieces in both felt and cardboard.
🎅 🎅 🎅 🎅 🎅 🎅 🎅 🎅 🎅 🎅 🎅 🎅 🎅 🎅 🎅 🎅
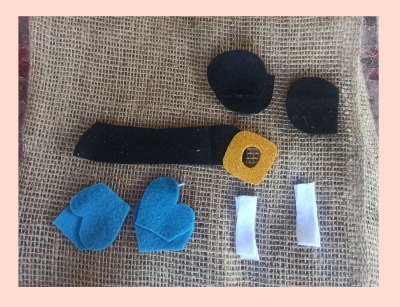
🎅 Saco las otras piezas. Cinturón y zapatos negros. Hebilla con foamy escarchado. Guantes azules.
🎅 I take out the other pieces. Black belt and shoes. Buckle with frosted foamy. Blue gloves.
---
🎅 🎅 🎅 🎅 🎅 🎅 🎅 🎅 🎅 🎅 🎅 🎅 🎅 🎅 🎅 🎅
🎅 Empiezo a armar el Santa.
🎅 I start to put together the Santa.
🎅 🎅 🎅 🎅 🎅 🎅 🎅 🎅 🎅 🎅 🎅 🎅 🎅 🎅 🎅 🎅
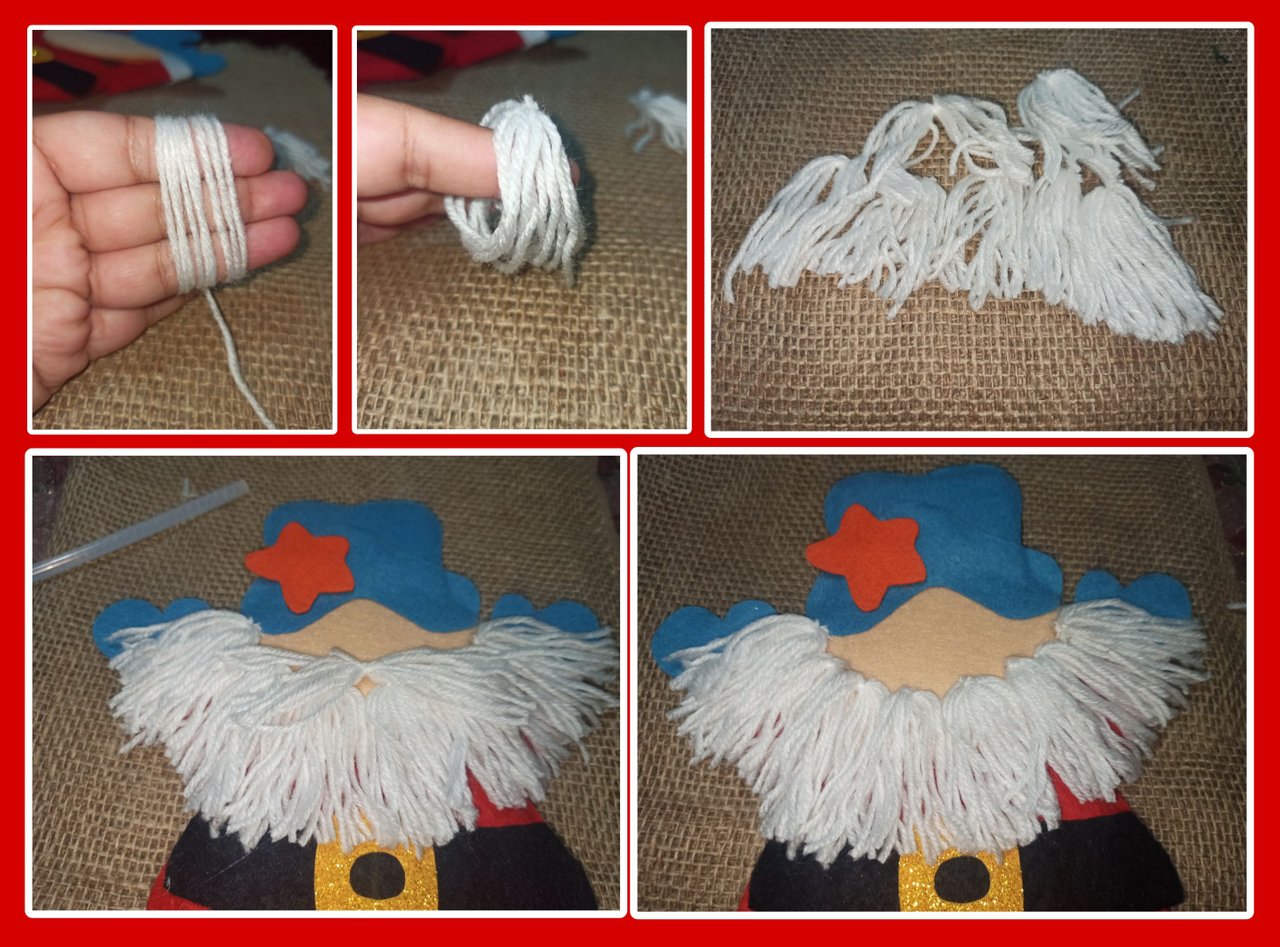
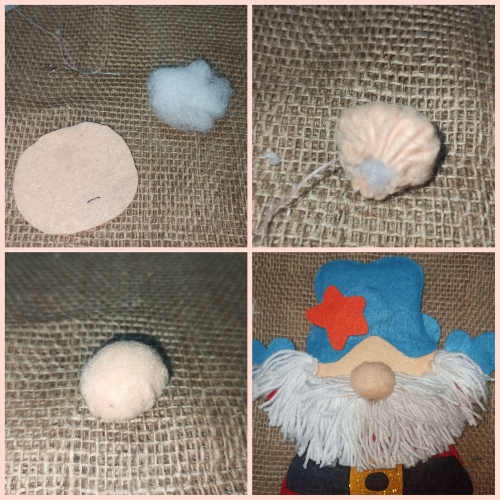
🎅 Para la barba del Santa Claus utilice estambre. Enrolle en mis dedos el estambre, dando unas 8 vueltas. Con una tira del mismo hilo, hice el nudo con fuerza. Corta las uniones para dejar tiras. Repetí el mismo procedimiento 9 veces. Las pegué al muñeco y conseguí una exuberante barba.
🎅 For the beard of Santa Claus use yarn. I rolled the yarn in my fingers, giving about 8 turns. With a strip of the same yarn, I tied the knot tightly. Cut down the joints to leave strips. I repeated the same procedure 9 times. I glued them on the doll and I got a lush beard.
---
🎅 🎅 🎅 🎅 🎅 🎅 🎅 🎅 🎅 🎅 🎅 🎅 🎅 🎅 🎅 🎅
🎅 Para la nariz, fieltro, carne y algodón. Hice un círculo con el fieltro, con hilo y ayuda de la aguja frunzo con el algodón adentro. Pego la nariz.
🎅 For the nose, feet, flesh, and cotton. I made a circle with the felt, with thread, and with the help of the needle I pucker with the cotton inside. I glue the nose with glue.
🎅 🎅 🎅 🎅 🎅 🎅 🎅 🎅 🎅 🎅 🎅 🎅 🎅 🎅 🎅 🎅
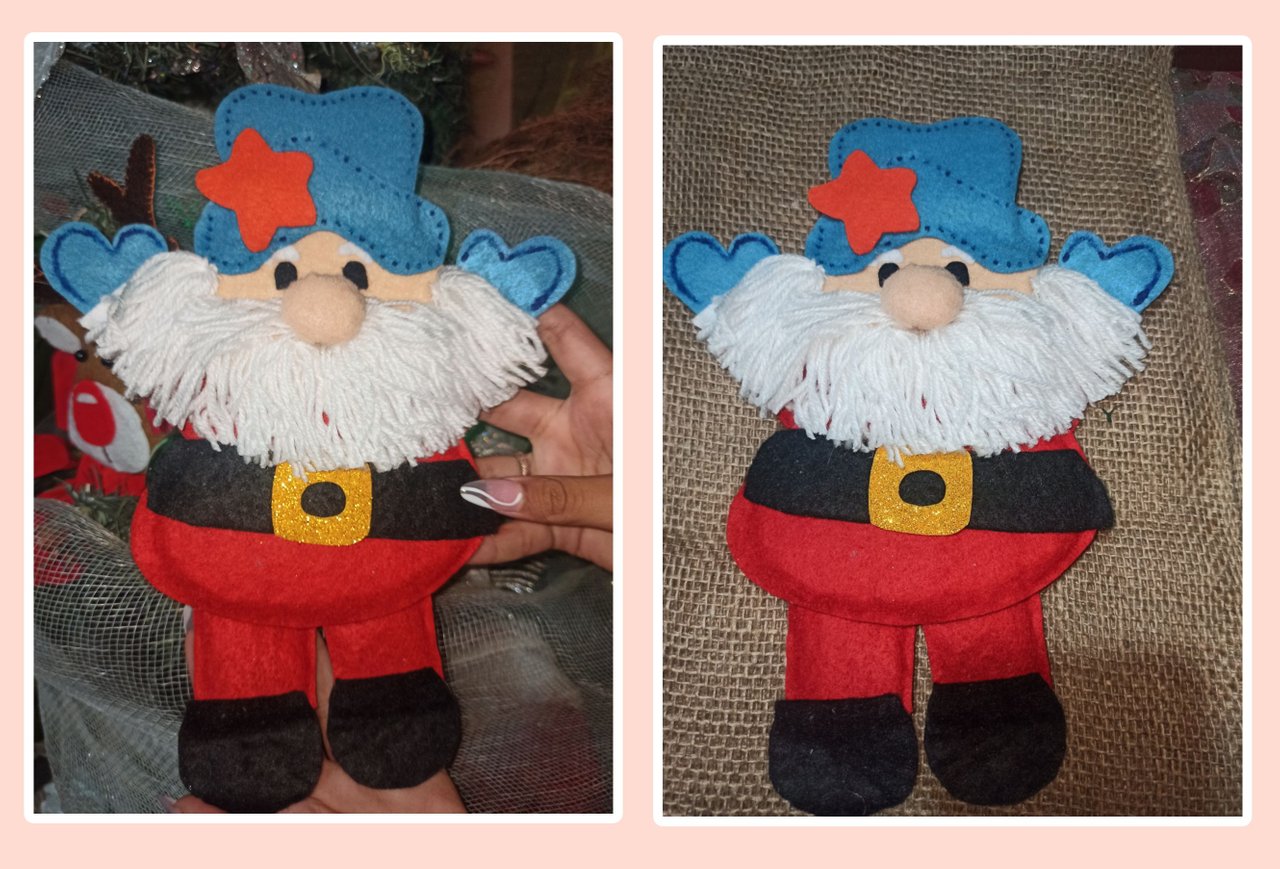
🎅 Con pintura acrílica azul hice una decoración en todo el borde del gorro y los guantes.
Teniendo como resultado este hermoso Santa Claus.
🎅 With blue acrylic paint I made a decoration all around the edge of the hat and gloves.
As a result this beautiful Santa Claus.
---

🎄 Vaya por café y galletas que nos falta el reno. Este proceso se los daré resumido, ya que no es más que seguir los pasos anteriores.
🎄 Go for coffee and cookies we are missing the reindeer. This process I will give you summarized, as it is nothing more than following the steps above.
🎄 🎄 🎄 🎄 🎄 🎄 🎄 🎄 🎄 🎄 🎄 🎄 🎄 🎄 🎄 🎄 🎄 🎄
🎄 El reno es con fieltro marrón y uso el mismo procedimiento que los anteriores adornos.
🎄 The reindeer is with brown felt and I use the same procedure as the previous ornaments.
🎄 🎄 🎄 🎄 🎄 🎄 🎄 🎄 🎄 🎄 🎄 🎄 🎄 🎄 🎄 🎄 🎄 🎄
🎄 Las piernas y brazos, en fieltro y cartón.
🎄 Legs and arms, in felt and cardboard.
🎄 🎄 🎄 🎄 🎄 🎄 🎄 🎄 🎄 🎄 🎄 🎄 🎄 🎄 🎄 🎄 🎄 🎄
🎄 El gorro lo hice en rojo.
🎄 🎄 🎄 🎄 🎄 🎄 🎄 🎄 🎄 🎄 🎄 🎄 🎄 🎄 🎄 🎄 🎄 🎄
🎄 Here are all the parts.
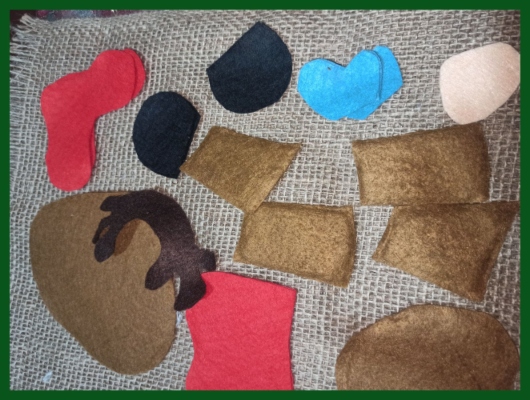
🎄 🎄 🎄 🎄 🎄 🎄 🎄 🎄 🎄 🎄 🎄 🎄 🎄 🎄 🎄 🎄 🎄 🎄
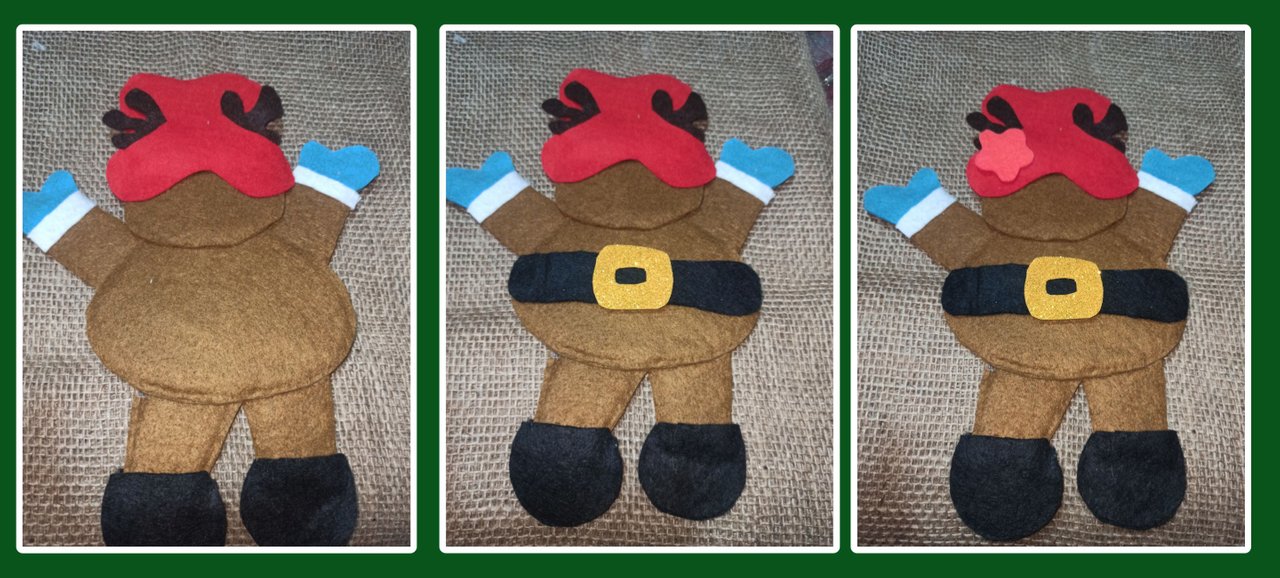
🎄 Empiezo a armar el reno.
🎄 I start to put the reindeer together.
🎄 🎄 🎄 🎄 🎄 🎄 🎄 🎄 🎄 🎄 🎄 🎄 🎄 🎄 🎄 🎄 🎄 🎄
🎄 Termino con los destalles para tener listo un bello adorno
🎄 I finish with the details to have a beautiful ornament ready.


🎄 🎄 🎄 🎄 🎄 🎄 🎄 🎄 🎄 🎄 🎄 🎄 🎄 🎄 🎄 🎄 🎄 🎄
Estos adornos se pueden utilizar para decorar cualquier lugar. Pegados en la puerta principal de la casa quedarían preciosos, añadir unas tiras para colgar y colocarlos en el árbol o en guirnaldas.
No he mencionado que los adornos tienen un tamaño de aproximadamente 30 cm. Yo pegué unos palos de madera o palillos de altura en la parte trasera y los coloqué sobresaliendo del árbol.
These ornaments can be used to decorate any place. Glued on the front door of the house they would look beautiful, ad