Buenas Cervantes y comunidades Hive espero estén excelentes, en el blog del día de hoy te enseñare como puedes cambiar tus Divisas de cualquier procesador de pago existente hacia tu Moneda Nacional usando AirTM, es la mejor manera, más confiable, rápida, efectiva y eficaz método que he utilizado para cambiar Divisas a la moneda de mi país y tenerlos en mi cuenta bancaria. Hoy podrás aprender fácilmente. - ¿Qué es AirTM?. - Como registrarte en AirTM. - Como Verificar tu cuenta de AirTM. - Como funciona AirTM. - Como agregar fondos a tu cuenta de AirTM. - Como comprar criptomonedas en AirTM. - Como retirar fondos desde AirTM hacia Binance o cualquier otro Criptomonedero. - Como retirar dinero desde AirTM hacia tu cuenta Bancaria en Moneda Nacional. >Good Cervantes and Hive communities I hope they are excellent, In today's blog I will show you how you can change your currencies from any existing payment processor to your National Currency using AirTM, It is the best, most reliable, fast, effective and efficient method that I have used to change Currencies to the currency of my country. and have them in my bank account. Today you can learn easily. >- What is AirTM?. >- How to register in AirTM. >- How to verify your AirTM account. >- How AirTM works. >- How to add funds to your AirTM account. >- How to buy cryptocurrencies in AirTM. >- How to withdraw funds from AirTM to Binance or any other Crypto wallet. >- How to withdraw money from AirTM to your Bank account in National Currency.
Airtm es una cuenta denominada en dólares conectada a procesadores de pagos electrónicos y bancos en la mayor parte del mundo a través de una red peer-to-peer. Los usuarios mantienen su saldo en dólares y pueden depositar fondos o retirar dinero desde y hacia su cuenta, así como enviar, solicitar dinero a nivel nacional e internacional. >Airtm is a dollar-denominated account connected to electronic payment processors and banks throughout most of the world through a peer-to-peer network. Users maintain their balance in dollars and can fund or withdraw from and to their account as well as send, request money nationally and internationally.
Lo primero vamos a aprender es a crear una cuenta en la plataforma, para ellos puedes ingresar desde el siguiente link: [AirTM](https://app.airtm.com) este no es un link de referidos. >The first thing we are going to learn is to create an account on the platform, for them you can enter from the following link: [AirTM](https://app.airtm.com) This not is referral link.
**Nota:** Si eres de Venezuela debes usar una VPN para ingresar a la plataforma ya que esta se encuentra bloqueada por los proveedores de internet Nacional, pero esto no es problema, te recomiendo usar ZenMate VPN con el navegador Chrome o Windscribe VPN ambos los he utilizado y funcionan perfectamente para regístrate y realizar tus transacciones. >**Note:** If you are from Venezuela you must use a VPN to enter in the platform since it is blocked by the National internet providers, but this is not a problem, I recommend use ZenMate VPN with the Chrome browser or Windscribe VPN, I have used both them and they work perfectly to register and carry out your transactions.
A continuación, vas a seleccionar “individual” si tu cuenta es para uso personal y harás el proceso de verificación KYC con CI o DNI personal, si haces clic en “Business” deberás verificar tu cuenta con los documentos de tu empresa. >Next, you will select "individual" if your account is for personal use and you will do the KYC verification process with CI or personal DNI, if you click on "Business" you must verify your account with your company documents. 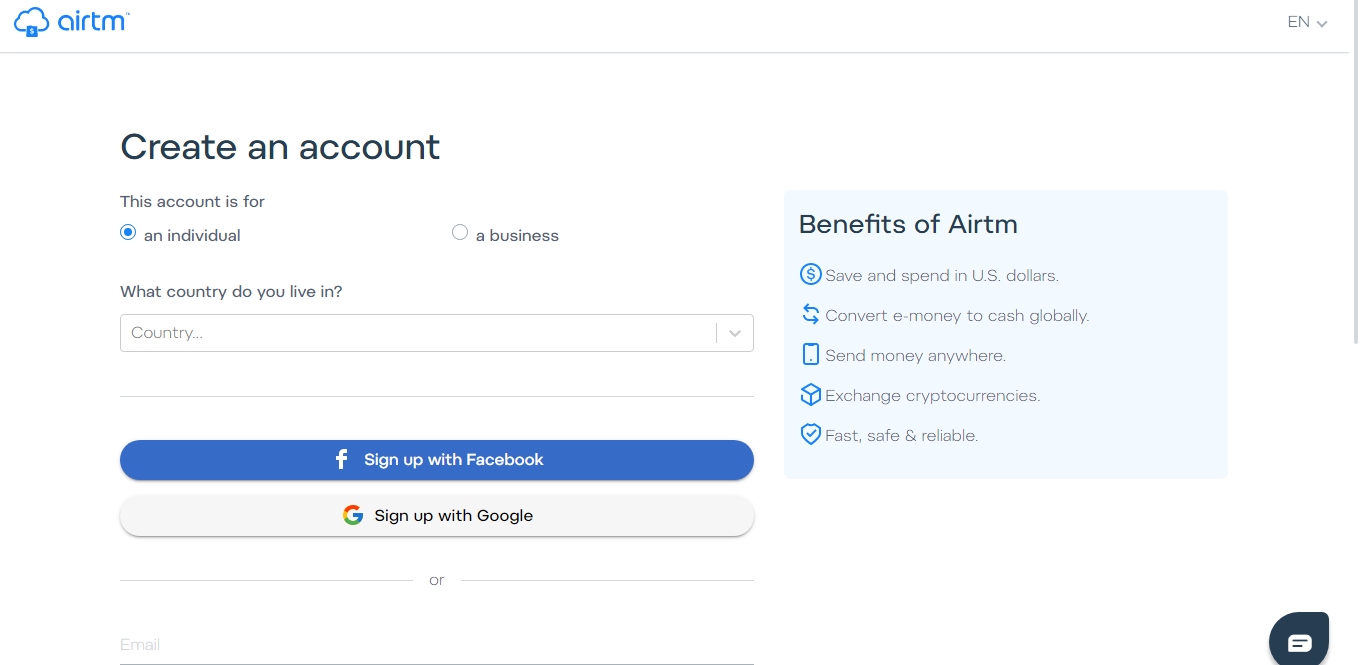
Tendrás la posibilidad de crear tu cuenta con tu Facebook, Cuenta de Gmail, y si haces scroll podrás ver que puedes registrarte introduciendo tu correo y tus datos de manera manual. >You will have the possibility to create your account with your Facebook, Gmail account, and if you scroll you will see that you can register by entering your email and your data manually. 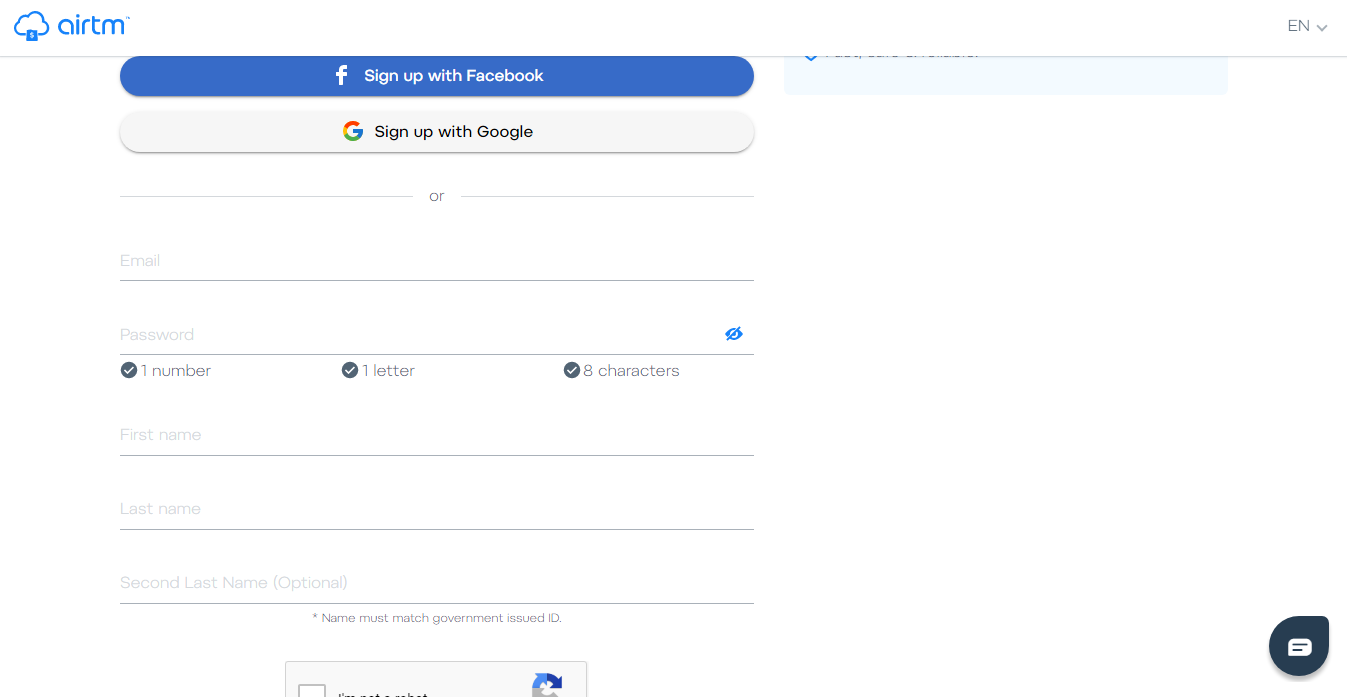
Una vez registrado, confirmas tu dirección email e iras al área de “Ajuste” en esta área estarán todos los datos personales de tu cuenta, (por seguridad los he ocultado) y luego vas a hacer clic en “Verificación” >Once registered, you confirm your email address and you will go to the "Adjust" area. In this area there will be all the personal data of your account, (for security reasons I have hidden them) and then you will click on "Verification" 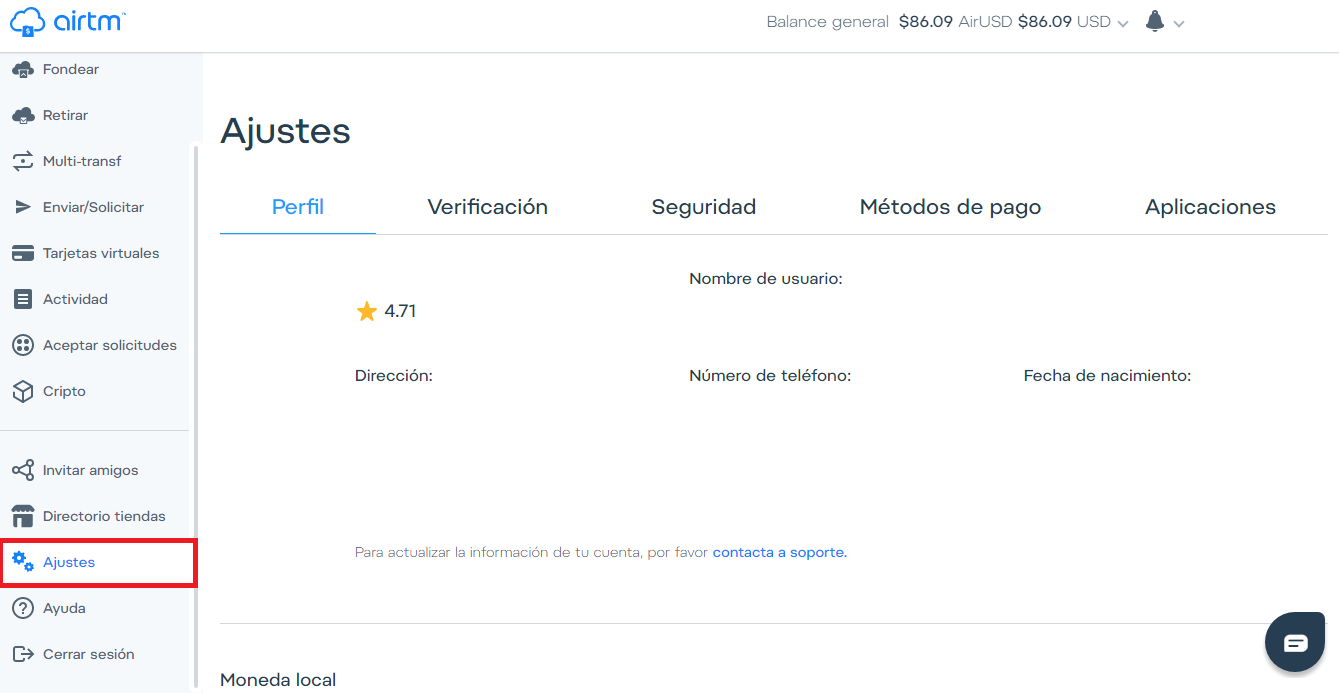
Una vez en verificación, aparecerá un formulario de carga en el cual deberemos cargar nuestra identificación personal y luego una foto selfi con tu identificación en la mano. A mí me aparece “Tu cuenta esta verificada” pero a ti, cuando crees tu cuenta te aparecerán las instrucciones para verificar tu cuenta. >Once in verification, a loading form will appear in which we will have to upload our personal identification and then a selfie photo with your identification in hand. to me appears "Your account is verified", but when you create your account, will appear the instructions to verify your account. 
Una vez nuestra cuenta este verificada podremos usar la plataforma AirTM totalmente. Así que te mostrare para que funciona cada ventana y como puedes usar la plataforma para intercambiar tus Divisas a tu Moneda Nacional o Cualquier otra moneda. >Once our account is verified we can use the AirTM platform fully. So I will show you for what each window works and how you can use the platform to exchange your Currencies to your National Currency or any other currency.
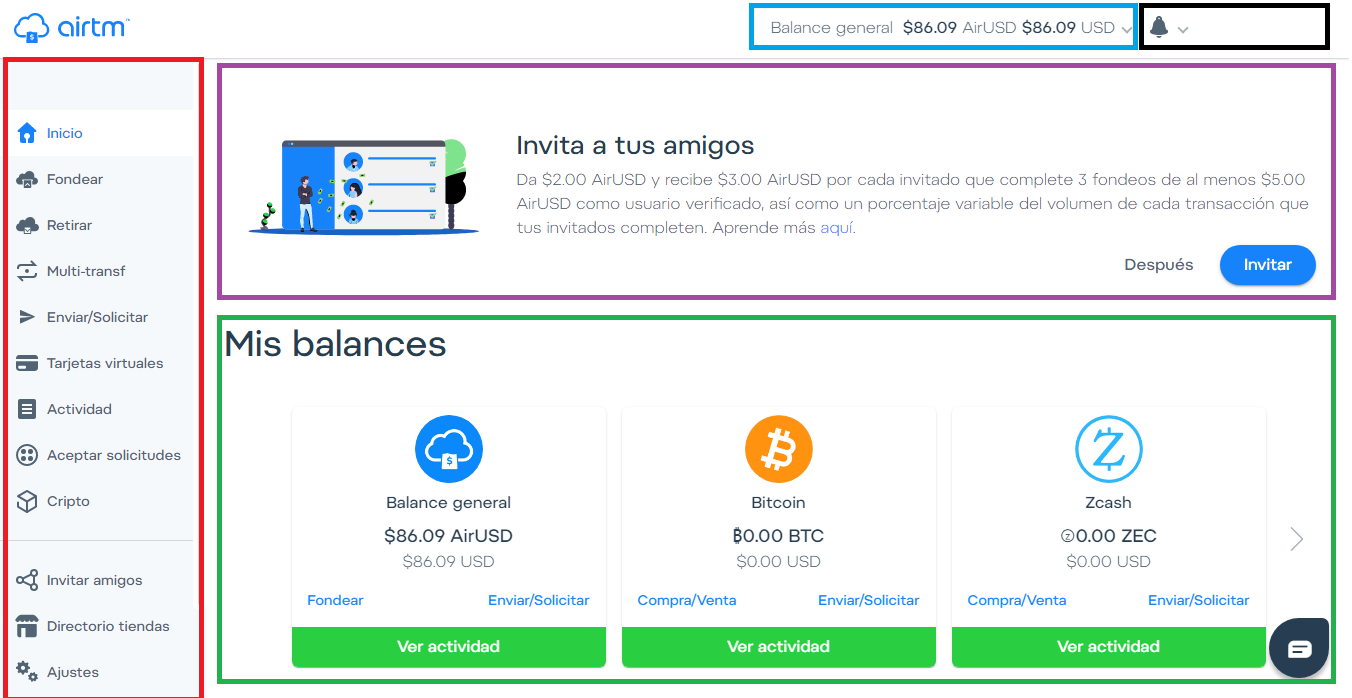 Vamos a dividir la página de inicio en 5 secciones, en el área de color rojo se encuentran el menú principal de AirTM desde el cual al hacer clic en los botones disponibles, iremos a cada sección correspondiente, en el área de color morado se encuentra la información del plan de referidos de AirTM con el cual podremos ganar ingresos extras, en el área de color verde estarán las principales monedas que usamos y sus respectivos balances, si vemos arriba en el área azul estará nuestro balance total y en el área de color negro estará la campana de notificaciones, nuestro nombre y foto de perfil. >We are go to divide the home page in 5 sections, in the red area you will find the AirTM main menu from which when you click on the available buttons, we will go to each corresponding section, in the purple area you will find the Information on the AirTM referral plan with which you can earn extra income, in the green area will be the main currencies we use and their respective balances, if we see above in the blue area it will be our total balance and in the black area there will be the notification bell, our name and profile picture. 
Si hacemos scroll down en la página de inicio, podremos ver el historial de operaciones que hemos realizado con nuestra cuenta (Por seguridad he ocultado los datos importantes). >If we scroll down on the home page, we can see the history of operations that we have made with our account (For security I have hidden important data). 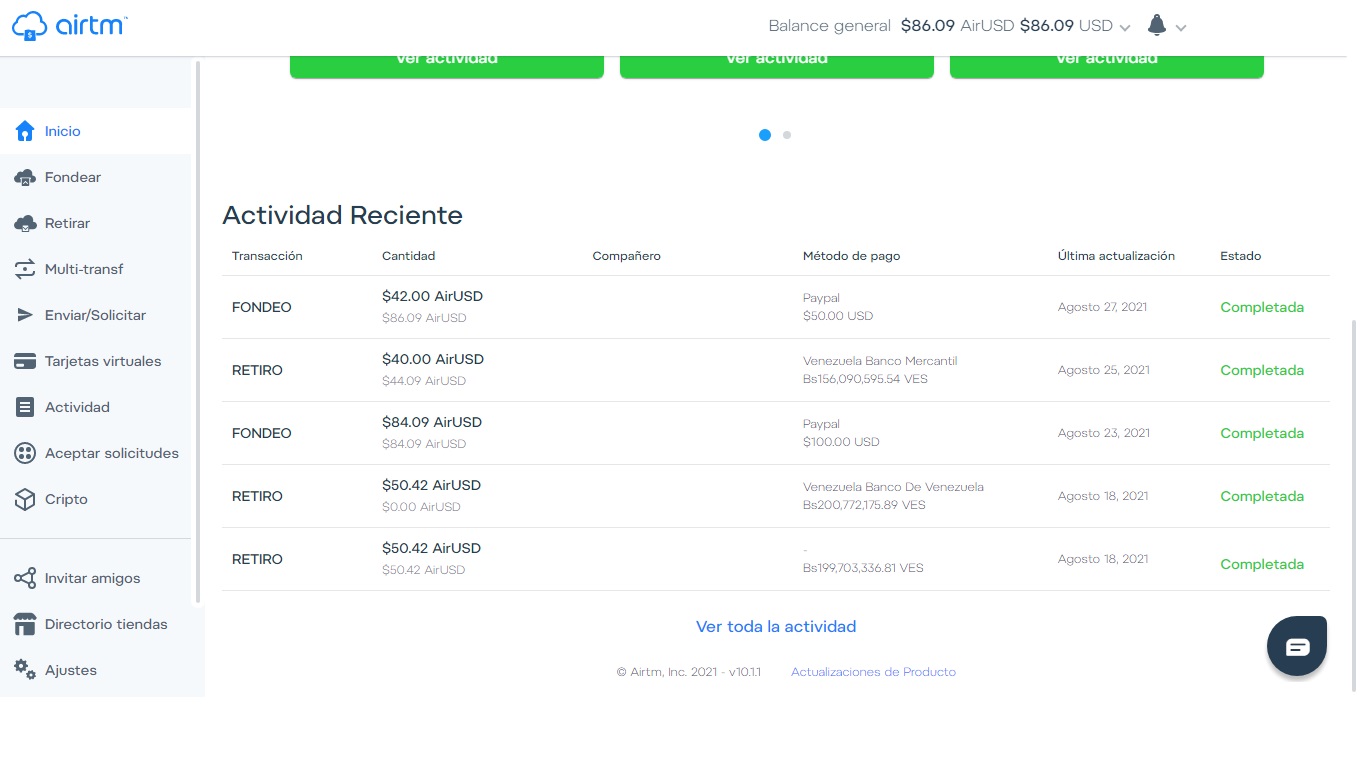
En la ventana “Fondear” es el área desde donde podremos agregar fondos a nuestra cuenta de AirTM y estarán los métodos de pagos que hemos utilizados para realizar transacciones. Ya te mostrare como puedes agregar fondos a tu AirTM. >In the “Fund” window is the area from where we can add funds to our AirTM account and the payment methods that we have used to carry out transactions will be displayed. I'll show you how you can add funds to your AirTM. 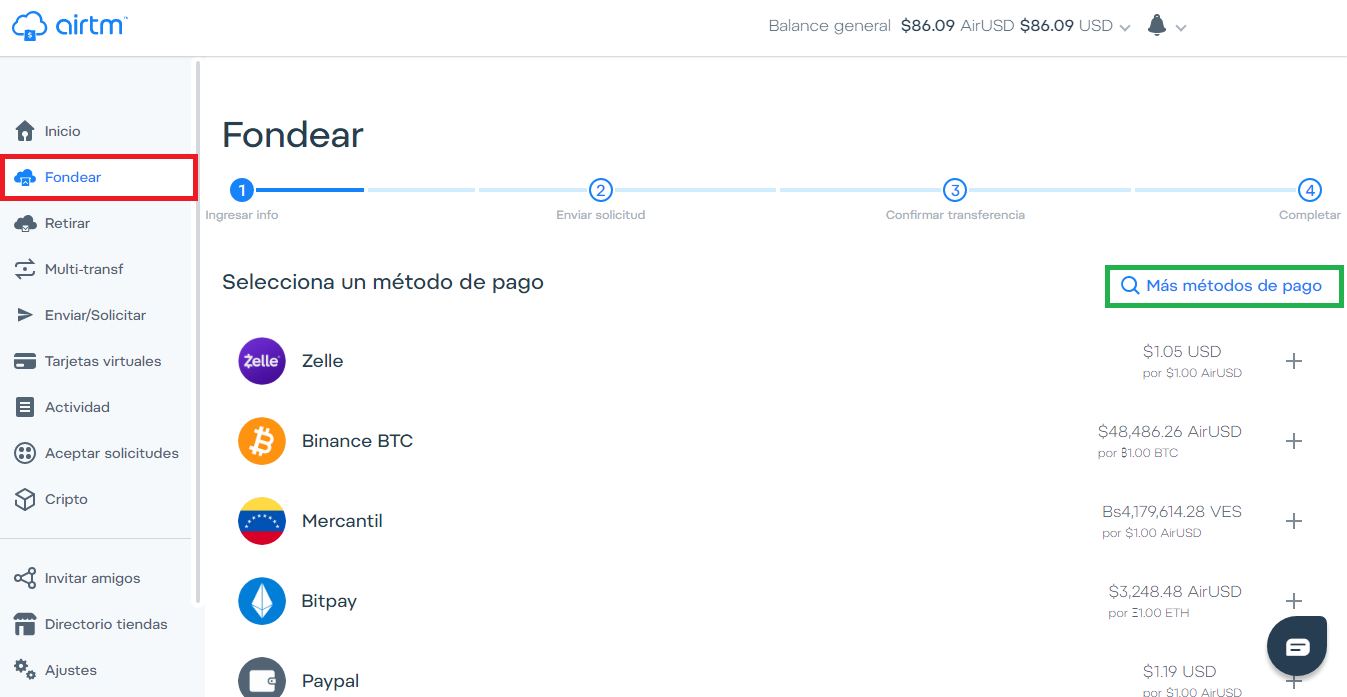
Si hacemos clic en el área demarcada con verde “Mas métodos de pago” podremos asociar a nuestra cuenta otros métodos de pagos de los cientos disponibles para Fondear o Retirar dinero de nuestra cuenta AirTM. >If we click on the area marked with green "More payment methods" we will be able to associate to our account other payment methods of the hundreds available to Fund or Withdraw money from our AirTM account. 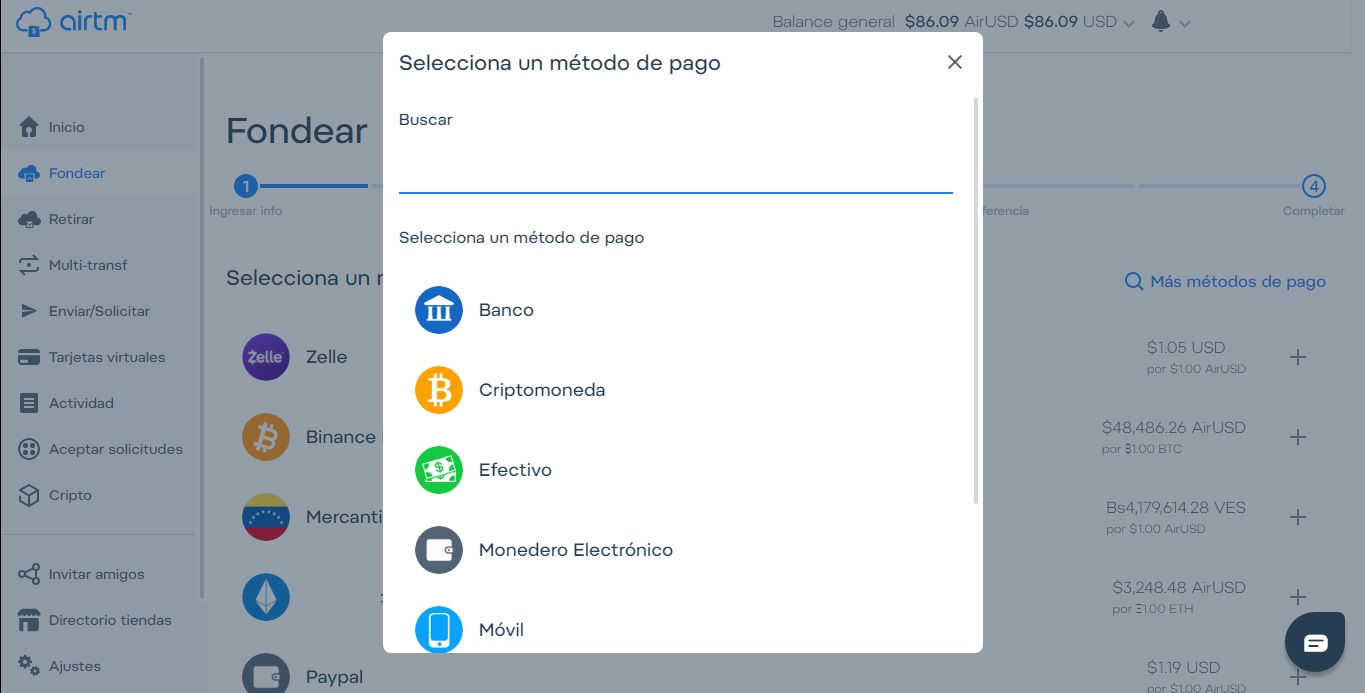
En la ventana “Retirar” es desde donde podremos retirar nuestro dinero hacia nuestras cuentas bancarias o cualquier otro método de pago en el cual deseemos agregar fondos, esta ventana funciona de la misma manera que la ventana de Fondear. >In the window "Withdraw" is where we can withdraw our money to our bank accounts or any other payment method in which we want to add funds. This window works in the same way as the Funding window. 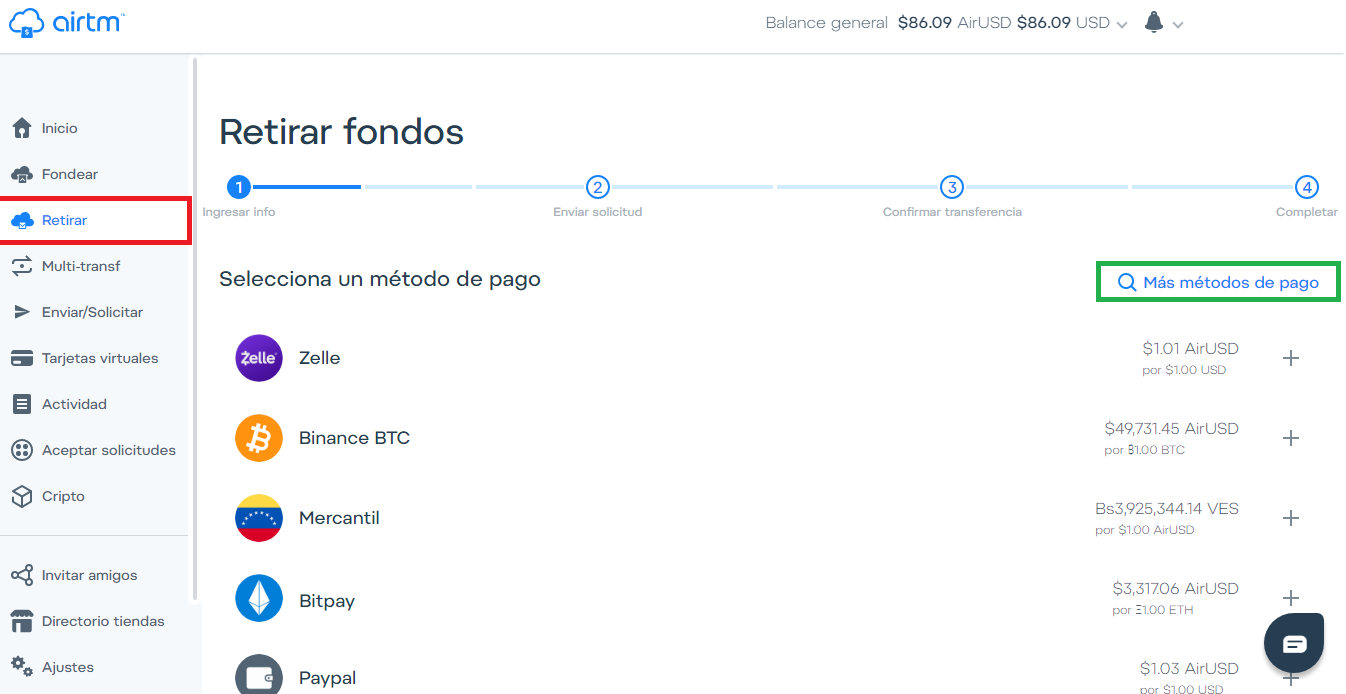
En la ventana “Multi-Transfer” podremos solicitar dos transferencias, una de fondeo y una de retiro para simplificar el proceso de transferir de un procesador de pago hacia otro. >In the “Multi-Transfer” window we can request two transfers, one funding and one withdrawal to simplify the process of transferring from one payment processor to another. 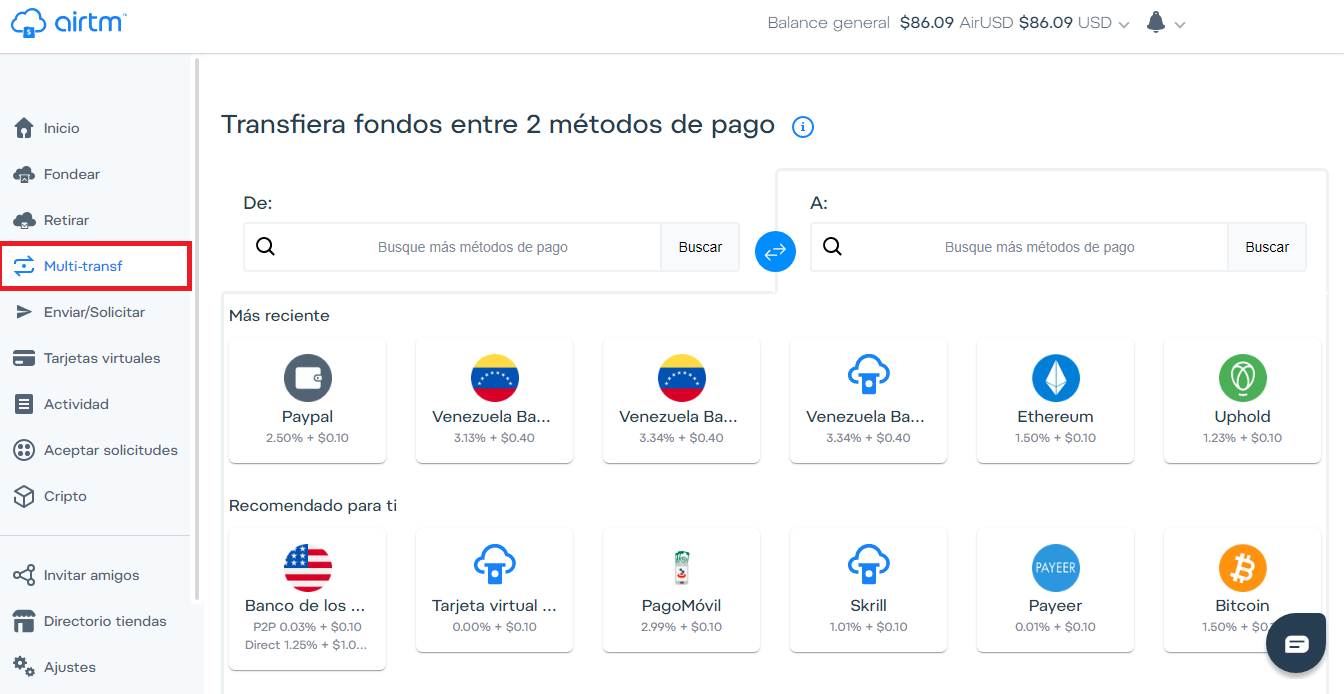
En la ventana “Enviar/Solicitar” podremos enviar AirUSD a cualquier persona que queramos y el dinero le llegara completo ya que las transferencias entre cuentas AirTM no poseen comisión y también podremos solicitar pagos a usuarios. >In the "Send / Request" window we can send AirUSD to anyone we want and the money will reach them in full since transfers between AirTM accounts do not have a commission and also we can request payments to users. 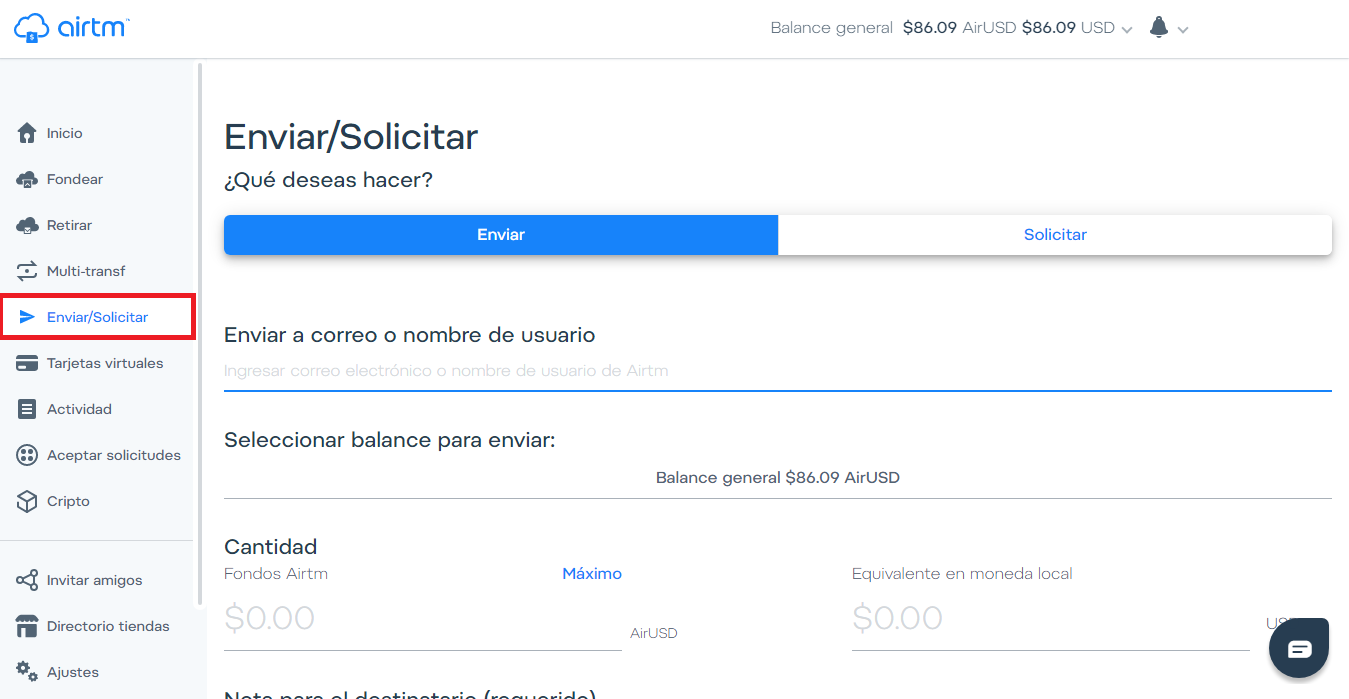
"Tarjeta Virtuales", estas son tarjeta que proporciona AirTM las cuales puedes utilizar para adquirir cualquier servicio o realizar compras a través de internet como en (Amazon, Ebay, Netflix, Disney Plus, Amazon Prime, Spotify, Steam y mas) esta prohibido usarlas en sitios de apuestas y contenido de adultos. >"Virtual Cards", these are cards provided by AirTM which you can use to acquire any service or make purchases through the internet as in (Amazon, Ebay, Netflix, Disney Plus, Amazon Prime, Spotify, Steam and more) it is forbidden to use them on sites betting and adult content.
Es una excelente solución para adquirir servicios de internet y funcionan excelente. >Is an excellent solution to acquire internet services and they work excellent 
En la ventana “Actividad” estarán todas las transacciones que hemos realizado en AirTM desde que creamos nuestra cuenta. >In the "Activity" window will be all the transactions that we have made in AirTM since we created our account. 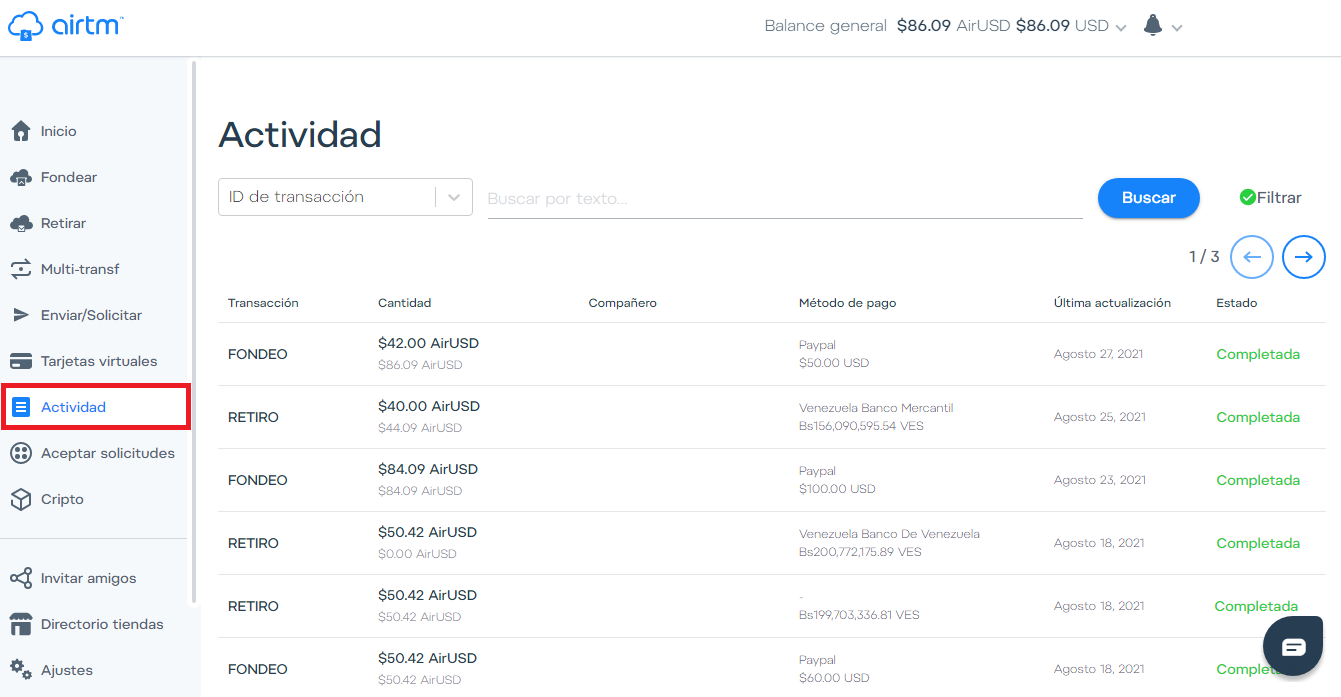
En “aceptar solicitudes” podremos ayudar a Fondear o Retirar dinero a personas que hayan puesto una solicitud y con ello ganar dinero. >In " accept requests" we can help to add Funds or Withdraw money to people who have placed an requests and whit this earn money. 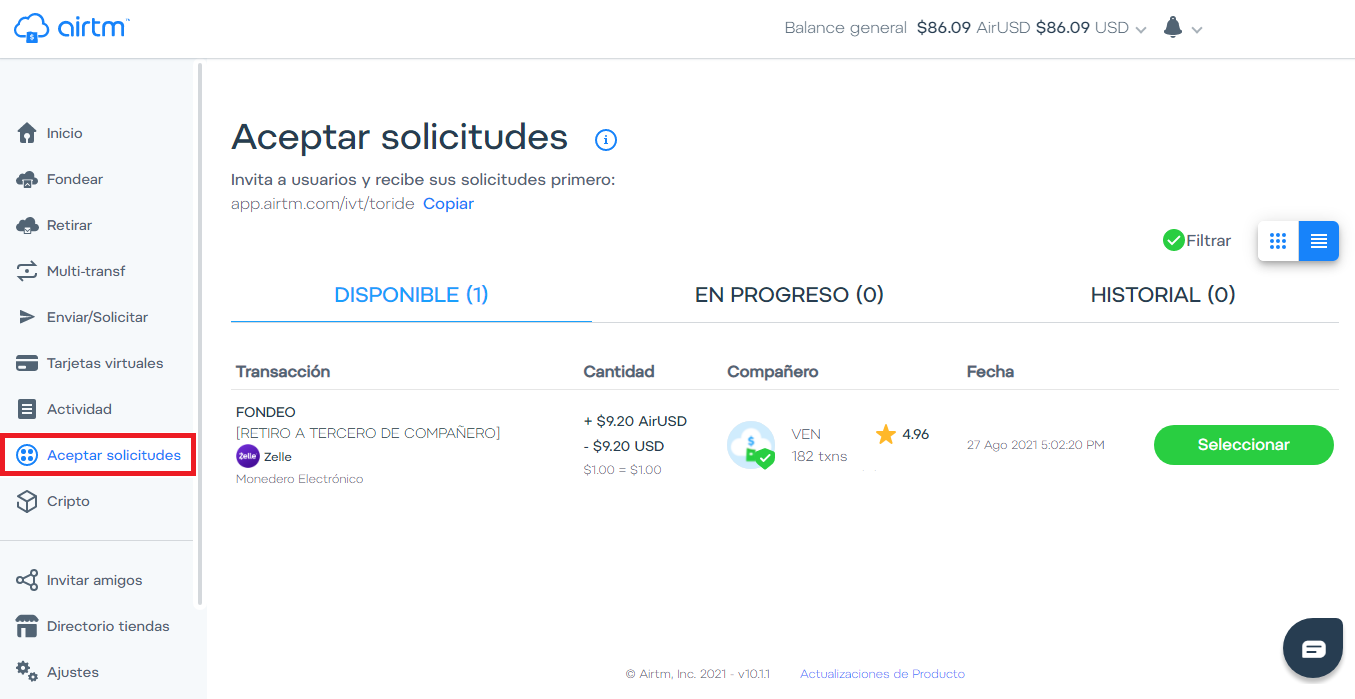
En la ventana “Cripto” podremos comprar, Vender y Ahorrar Criptomonedas dentro de AirTM. >In the "Crypto" window we can buy, Sell and Save Cryptocurrencies within AirTM. 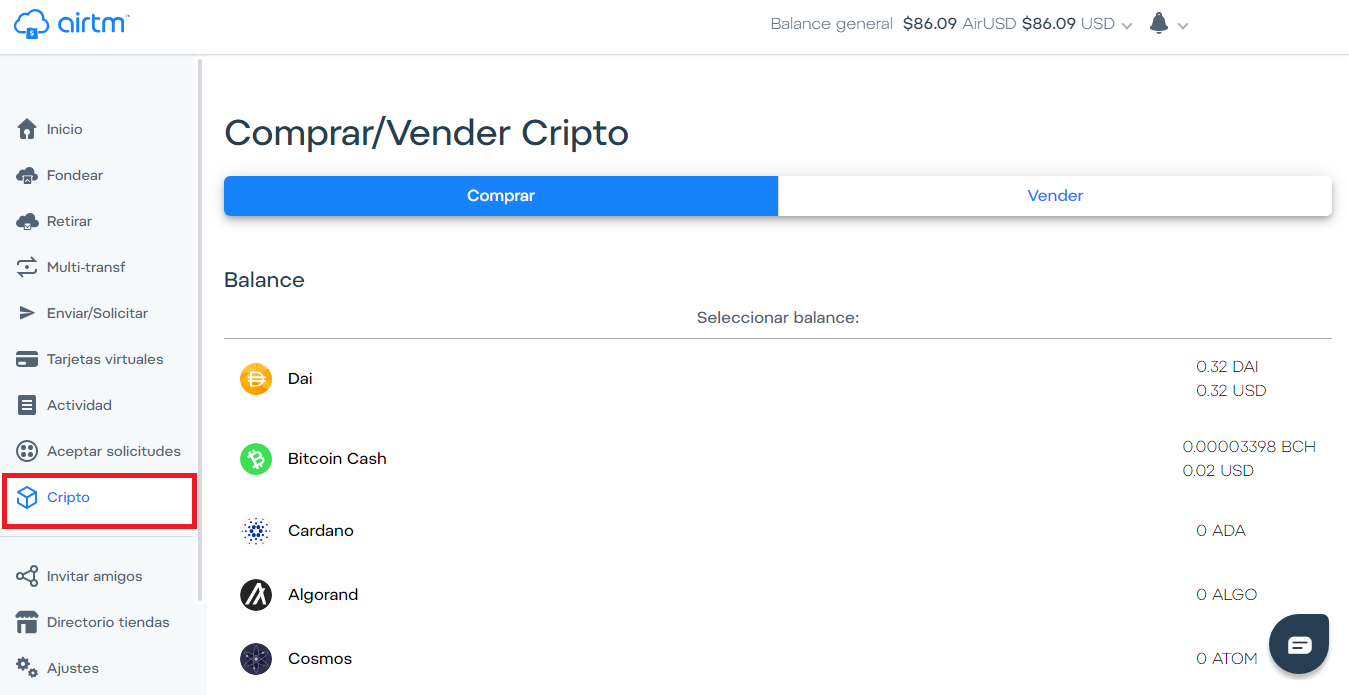
En “Invitar Amigos” encontraras el Plan de afiliados y las herramientas de referidos de AirTM >In "Invite Friends" you will find the Affiliate Plan and the AirTM referral tools 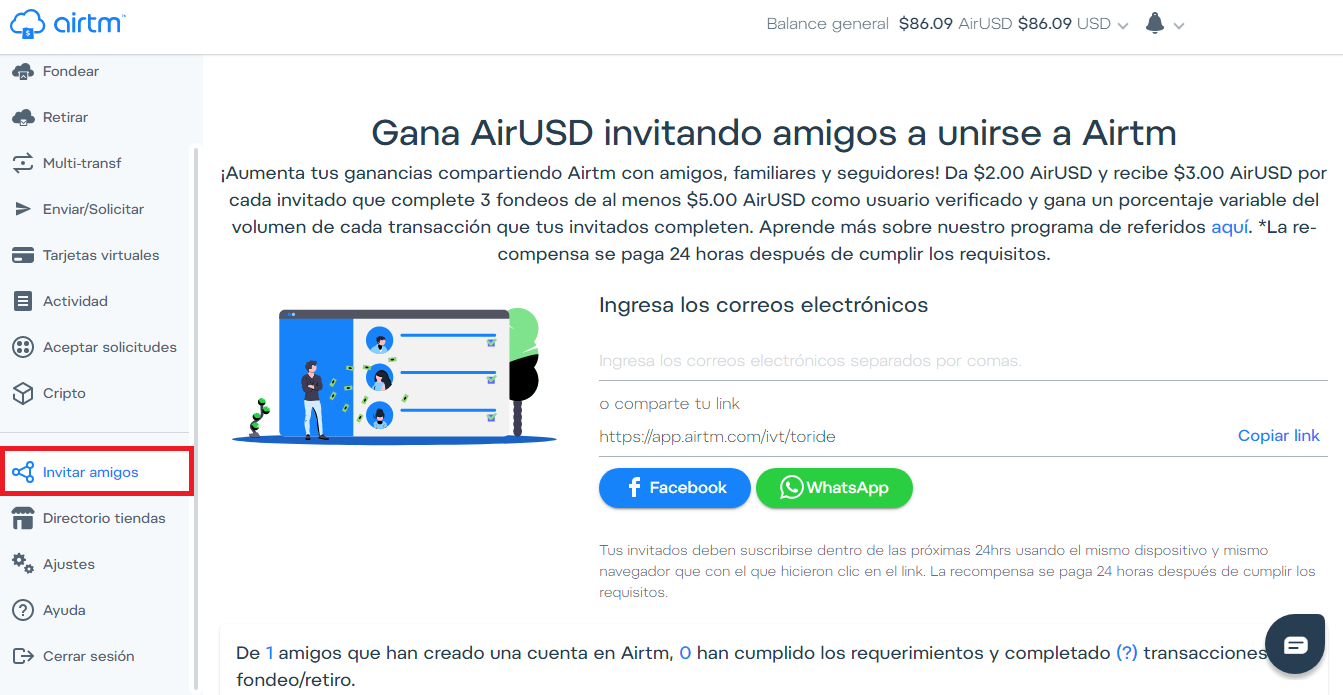
Como vimos previamente, en ajustes se encuentra toda la información de nuestra cuenta y donde podremos realizar las configuraciones de nuestro Perfil. (por seguridad he ocultado la informacion) >As we saw previously, in settings you will find all the information of our account and where we can make the settings of our Profile. (for security I have hidden the information) 
También tenemos las ventanas de “Directorio tiendas” en donde se encuentra una variedad de tiendas en las que podremos compra o adquirir servicios pagando con AirUSD desde la plataforma AirTM. Mas abajo está el botón “Ayuda” donde podremos solventar cualquier duda o contactar al soporte en AirTM y por último el botón “Cerrar sesión”. >We also have the "Store Directory" windows where you will find a variety of stores where we can buy or acquire services by paying with AirUSD from the AirTM platform. Below is the "Help" button where we can answer any questions or contact AirTM support and finally the " logout" button.
A continuación, veras en el siguiente ejemplo como agregar fondo en AirTM. Cuando una persona desea agregar fondos en AirTM, va a la opción "Fondear", luego selecciona el procesador de pago, en esta oportunidad seleccionare PayPal. >Next, you will see in the following example how to add funds in AirTM. When a person wants to "Add Funds" in AirTM, they go to the “Fund” option, then select the payment processor, this time I will select PayPal. 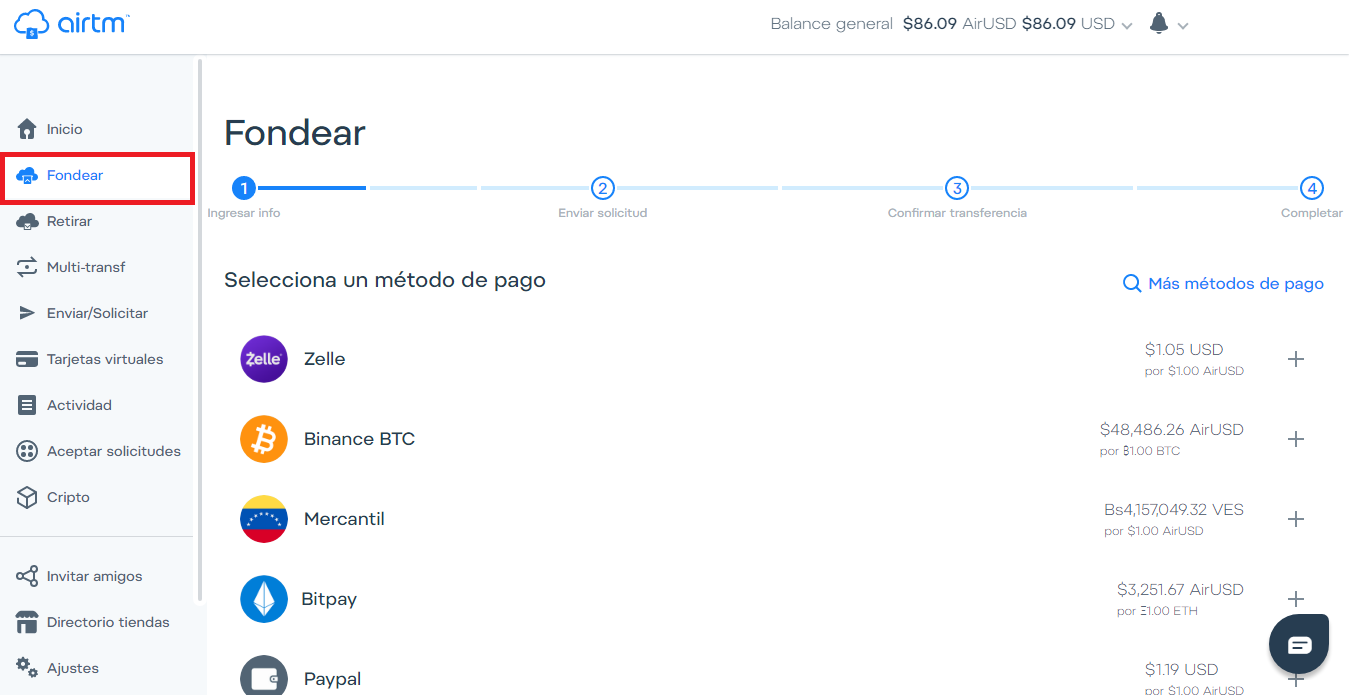 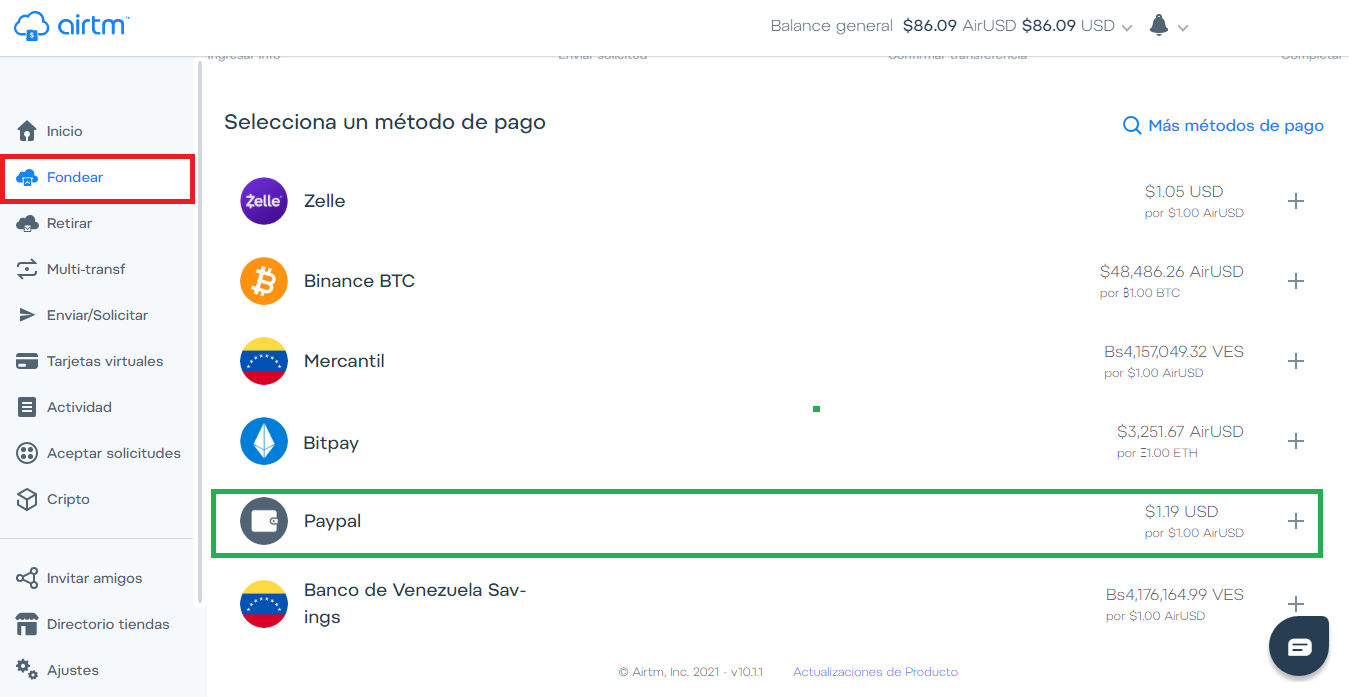
Luego de hacer clic se abrirá la página en donde podrás introducir el monto con el cual deseas fondear tu cuenta. En el área de “Fondear” podrás notar que tienes dos áreas para introducir los montos y puedes hacerlo desde donde tu desees, si colocas el monto en “Fondos a enviar” será la cantidad que tu deveras enviar a la persona que acepto tu solitud de fondeo, y a tu cuenta se te fondeará exactamente el monto que aparece en “Fondos por recibir”. >After clicking, the page will open where you can enter the amount with which you want to add fund in your account. In the "Fund" area you will be able two areas to enter the amounts and you can do it from wherever you want, if you put the amount in "Funds to send" it will be the amount that you must send to the person who accepted your request for add fund, and your account will be funded exactly the amount that appears in "Funds to receive". 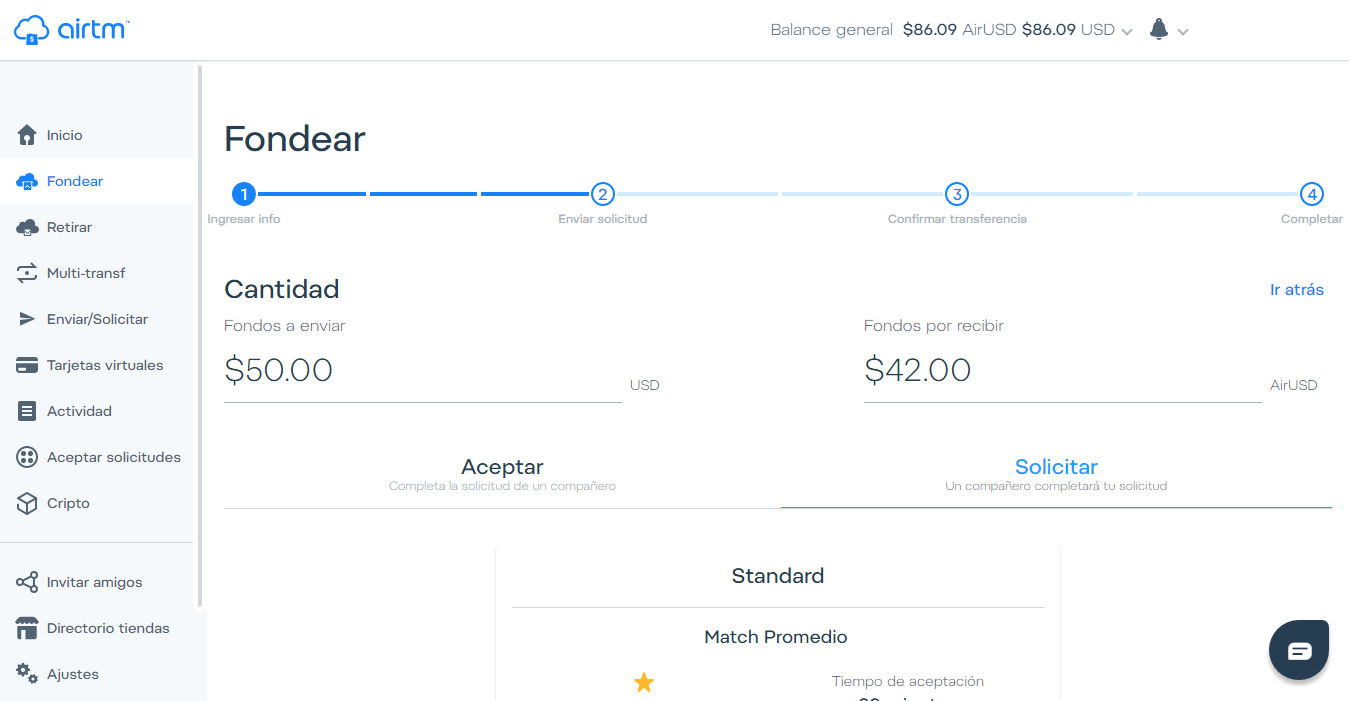
En esta ocasión yo fondeare 50$ USD. Vemos que este en azul el área “Solicitar” y damos clic en “Seleccionar”. >This time I will add $ 50 USD. We see that the “Request” area is in blue and we click on “Select”. 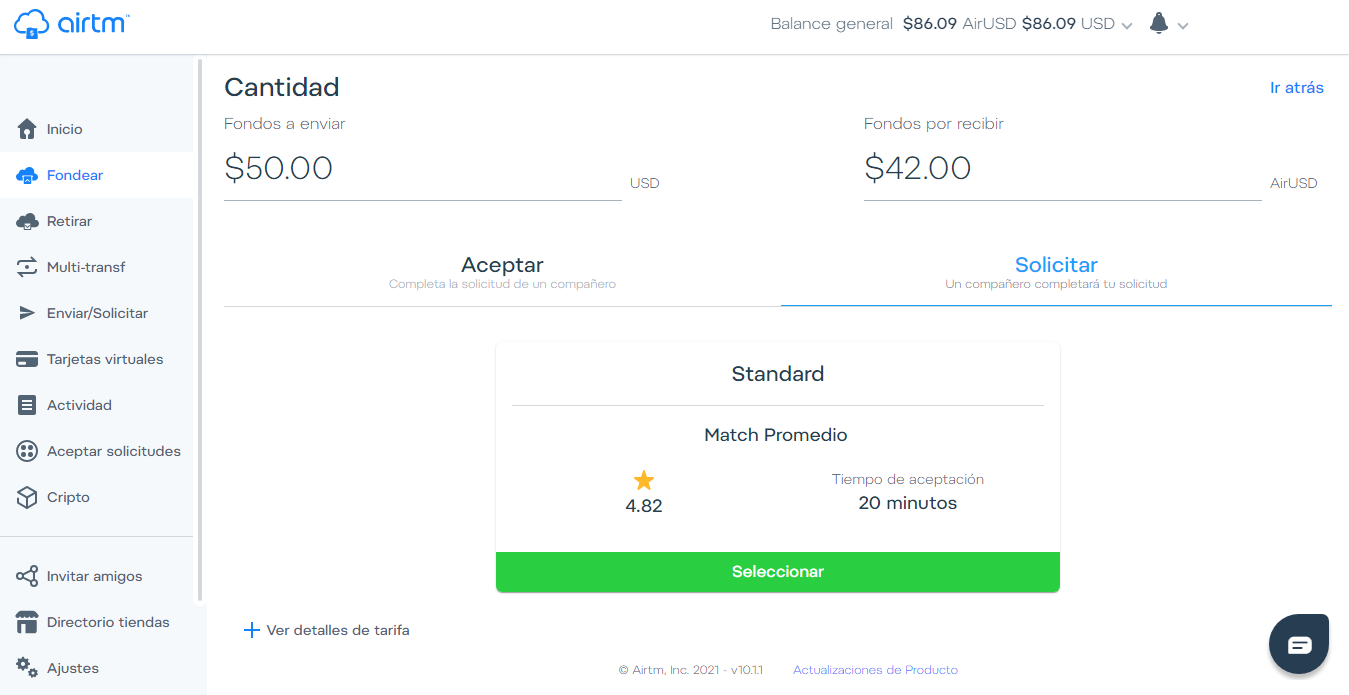
En la siguiente página, deberemos asegurarnos que nuestros datos estén correctamente colocados y daremos clic en “Enviar Solicitud” >On the next page, we must make sure that our data is correctly placed and click on "Send Request" 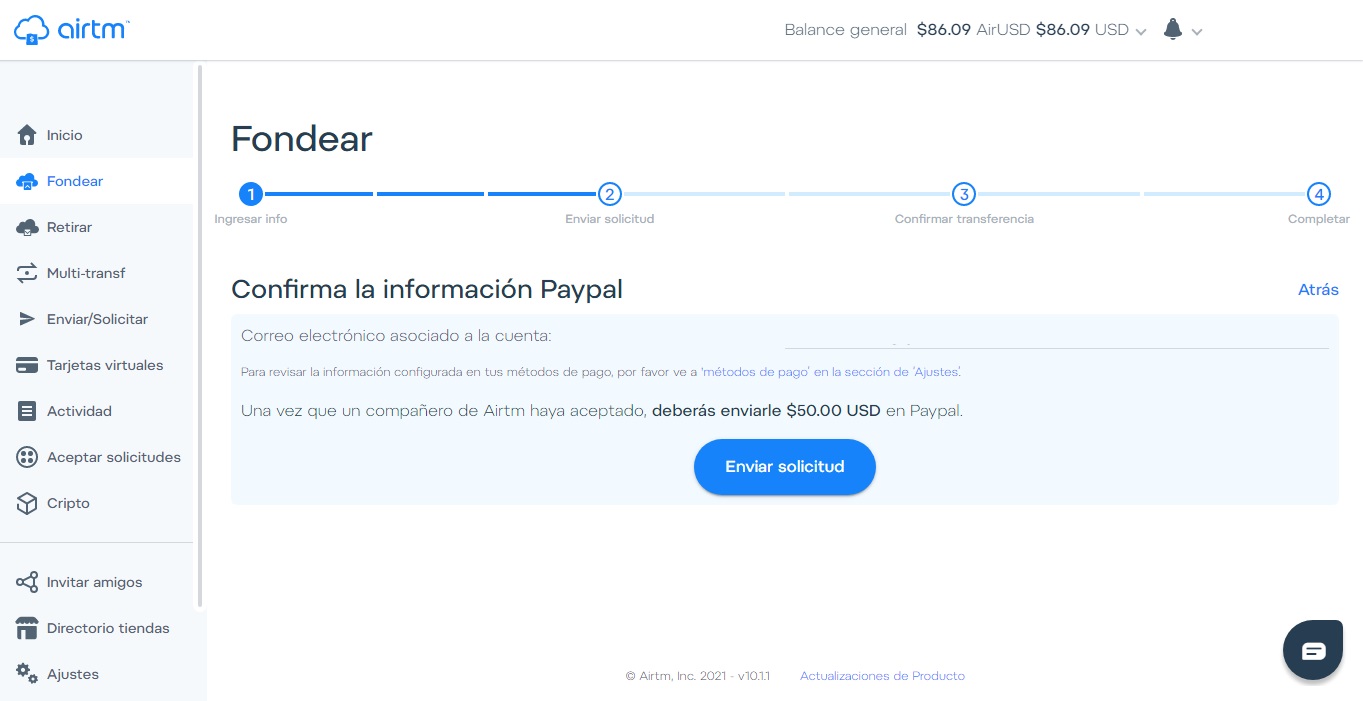
Y nuestra solicitud de Fondeo será puesta en el área de “Aceptar solicitudes” y algún compañero en AirTM aceptara nuestra solicitud, lo cual es bastante rápido, todas mis transacciones las he completado en menos de 12 minutos desde el momento en el coloco la solicitud. >And our Funding request will be placed in the "Accept requests" area and a colleague in AirTM will accept our request, which is quite fast, all my transactions have been completed in less than 12 minutes from the moment I placed the request. 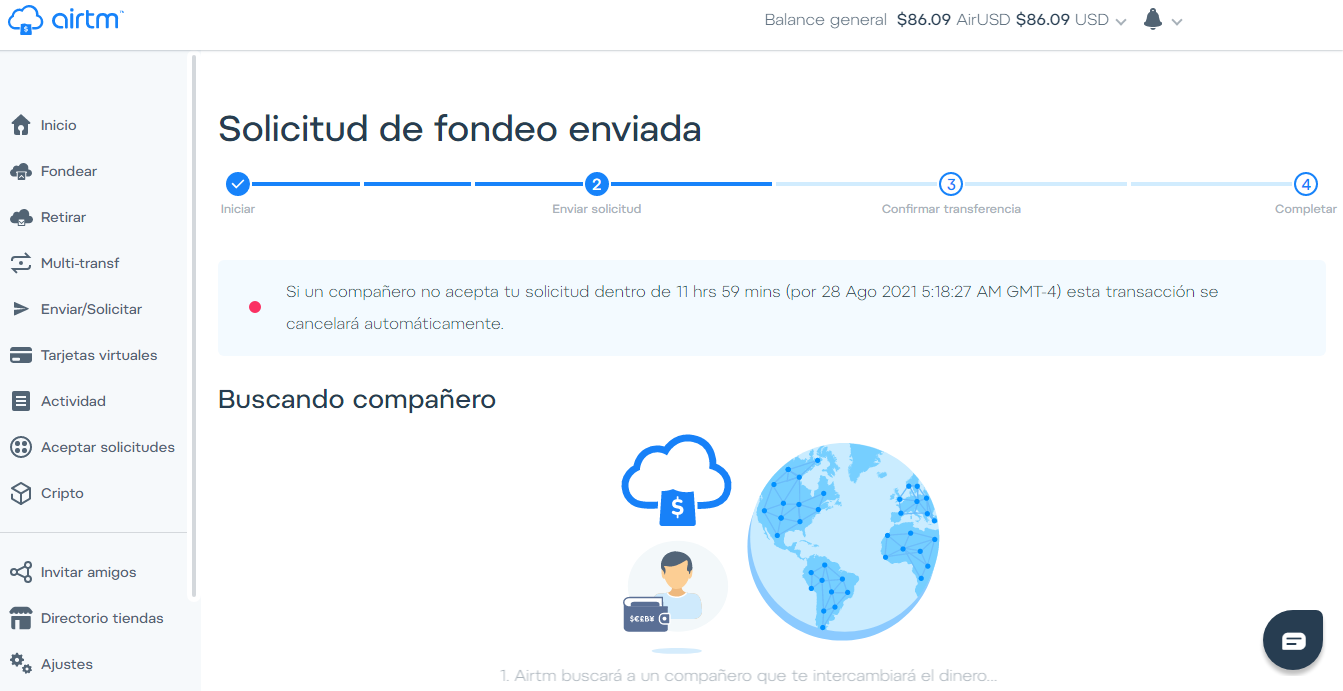
Una vez un compañero acepte nuestra solicitud, el deberá poseer en su saldo AirUSD la cantidad que yo estoy solicitando y a el o ella le bloquearan ese saldo a mi favor, hasta que yo complete la transacción enviándole a la cuenta de PayPal que me indican la cantidad que coloque en “Fondos a Enviar”. >Once a colleague accepts our request, he must have in his AirUSD balance the amount that I am requesting and he or she will block that balance in my favor, until I complete the transaction by sending the amount him that you place in "Funds to Send" to the PayPal account indicates. 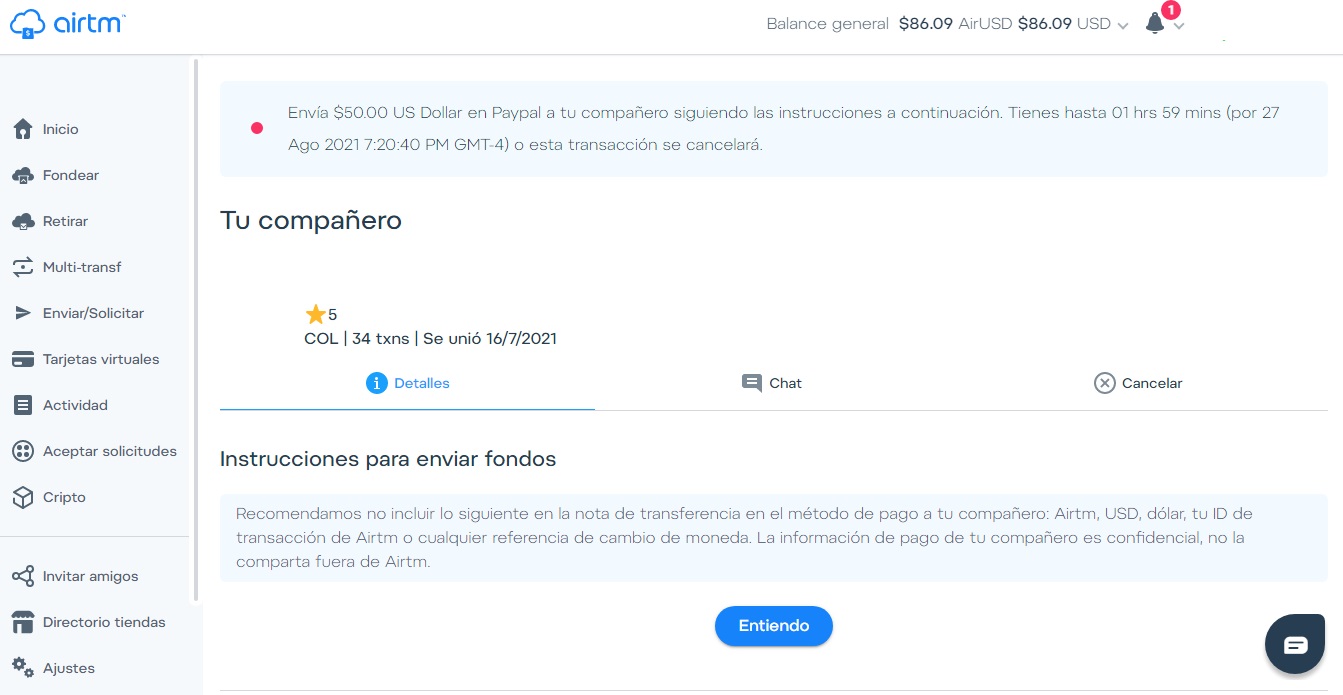
Con
Buenas Cervantes y comunidades Hive espero estén excelentes, en el blog del día de hoy te enseñare como puedes cambiar tus Divisas de cualquier procesador de pago existente hacia tu Moneda Nacional usando AirTM, es la mejor manera, más confiable, rápida, efectiva y eficaz método que he utilizado para cambiar Divisas a la moneda de mi país y tenerlos en mi cuenta bancaria. Hoy podrás aprender fácilmente. - ¿Qué es AirTM?. - Como registrarte en AirTM. - Como Verificar tu cuenta de AirTM. - Como funciona AirTM. - Como agregar fondos a tu cuenta de AirTM. - Como comprar criptomonedas en AirTM. - Como retirar fondos desde AirTM hacia Binance o cualquier otro Criptomonedero. - Como retirar dinero desde AirTM hacia tu cuenta Bancaria en Moneda Nacional. >Good Cervantes and Hive communities I hope they are excellent, In today's blog I will show you how you can change your currencies from any existing payment processor to your National Currency using AirTM, It is the best, most reliable, fast, effective and efficient method that I have used to change Currencies to the currency of my country. and have them in my bank account. Today you can learn easily. >- What is AirTM?. >- How to register in AirTM. >- How to verify your AirTM account. >- How AirTM works. >- How to add funds to your AirTM account. >- How to buy cryptocurrencies in AirTM. >- How to withdraw funds from AirTM to Binance or any other Crypto wallet. >- How to withdraw money from AirTM to your Bank account in National Currency.
**¿Qué es AirTM?**
>**What is AirTM?**
Antes que todo debemos saber, ¿qué es AirTM? >First of all we must know, what is AirTM?
Airtm es una plataforma utilizada por cientos de miles de personas para ahorrar en dólares, enviar remesas, realizar pagos locales y convertir dinero de los procesadores de pagos electrónicos en dinero a su cuenta bancaria local, todo en tiempos rápidos y con muy pocas comisiones.
>Airtm is used by hundreds of thousands of people to save in dollars, send remittances, make local payments, and convert money from electronic payment processors to money in their local bank account, all in fast times and very few commissions.
Antes que todo debemos saber, ¿qué es AirTM? >First of all we must know, what is AirTM?
Airtm es una cuenta denominada en dólares conectada a procesadores de pagos electrónicos y bancos en la mayor parte del mundo a través de una red peer-to-peer. Los usuarios mantienen su saldo en dólares y pueden depositar fondos o retirar dinero desde y hacia su cuenta, así como enviar, solicitar dinero a nivel nacional e internacional. >Airtm is a dollar-denominated account connected to electronic payment processors and banks throughout most of the world through a peer-to-peer network. Users maintain their balance in dollars and can fund or withdraw from and to their account as well as send, request money nationally and internationally.
Lo primero vamos a aprender es a crear una cuenta en la plataforma, para ellos puedes ingresar desde el siguiente link: [AirTM](https://app.airtm.com) este no es un link de referidos. >The first thing we are going to learn is to create an account on the platform, for them you can enter from the following link: [AirTM](https://app.airtm.com) This not is referral link.
**Nota:** Si eres de Venezuela debes usar una VPN para ingresar a la plataforma ya que esta se encuentra bloqueada por los proveedores de internet Nacional, pero esto no es problema, te recomiendo usar ZenMate VPN con el navegador Chrome o Windscribe VPN ambos los he utilizado y funcionan perfectamente para regístrate y realizar tus transacciones. >**Note:** If you are from Venezuela you must use a VPN to enter in the platform since it is blocked by the National internet providers, but this is not a problem, I recommend use ZenMate VPN with the Chrome browser or Windscribe VPN, I have used both them and they work perfectly to register and carry out your transactions.
Para regístrate haz clic en “Join”
>To register click on "Join"
A continuación, vas a seleccionar “individual” si tu cuenta es para uso personal y harás el proceso de verificación KYC con CI o DNI personal, si haces clic en “Business” deberás verificar tu cuenta con los documentos de tu empresa. >Next, you will select "individual" if your account is for personal use and you will do the KYC verification process with CI or personal DNI, if you click on "Business" you must verify your account with your company documents. 
Tendrás la posibilidad de crear tu cuenta con tu Facebook, Cuenta de Gmail, y si haces scroll podrás ver que puedes registrarte introduciendo tu correo y tus datos de manera manual. >You will have the possibility to create your account with your Facebook, Gmail account, and if you scroll you will see that you can register by entering your email and your data manually. 
Una vez registrado, confirmas tu dirección email e iras al área de “Ajuste” en esta área estarán todos los datos personales de tu cuenta, (por seguridad los he ocultado) y luego vas a hacer clic en “Verificación” >Once registered, you confirm your email address and you will go to the "Adjust" area. In this area there will be all the personal data of your account, (for security reasons I have hidden them) and then you will click on "Verification" 
Una vez en verificación, aparecerá un formulario de carga en el cual deberemos cargar nuestra identificación personal y luego una foto selfi con tu identificación en la mano. A mí me aparece “Tu cuenta esta verificada” pero a ti, cuando crees tu cuenta te aparecerán las instrucciones para verificar tu cuenta. >Once in verification, a loading form will appear in which we will have to upload our personal identification and then a selfie photo with your identification in hand. to me appears "Your account is verified", but when you create your account, will appear the instructions to verify your account. 
Una vez nuestra cuenta este verificada podremos usar la plataforma AirTM totalmente. Así que te mostrare para que funciona cada ventana y como puedes usar la plataforma para intercambiar tus Divisas a tu Moneda Nacional o Cualquier otra moneda. >Once our account is verified we can use the AirTM platform fully. So I will show you for what each window works and how you can use the platform to exchange your Currencies to your National Currency or any other currency.
**Como funciona AirTM**
**How AirTM works**
 Vamos a dividir la página de inicio en 5 secciones, en el área de color rojo se encuentran el menú principal de AirTM desde el cual al hacer clic en los botones disponibles, iremos a cada sección correspondiente, en el área de color morado se encuentra la información del plan de referidos de AirTM con el cual podremos ganar ingresos extras, en el área de color verde estarán las principales monedas que usamos y sus respectivos balances, si vemos arriba en el área azul estará nuestro balance total y en el área de color negro estará la campana de notificaciones, nuestro nombre y foto de perfil. >We are go to divide the home page in 5 sections, in the red area you will find the AirTM main menu from which when you click on the available buttons, we will go to each corresponding section, in the purple area you will find the Information on the AirTM referral plan with which you can earn extra income, in the green area will be the main currencies we use and their respective balances, if we see above in the blue area it will be our total balance and in the black area there will be the notification bell, our name and profile picture. 
Si hacemos scroll down en la página de inicio, podremos ver el historial de operaciones que hemos realizado con nuestra cuenta (Por seguridad he ocultado los datos importantes). >If we scroll down on the home page, we can see the history of operations that we have made with our account (For security I have hidden important data). 
En la ventana “Fondear” es el área desde donde podremos agregar fondos a nuestra cuenta de AirTM y estarán los métodos de pagos que hemos utilizados para realizar transacciones. Ya te mostrare como puedes agregar fondos a tu AirTM. >In the “Fund” window is the area from where we can add funds to our AirTM account and the payment methods that we have used to carry out transactions will be displayed. I'll show you how you can add funds to your AirTM. 
Si hacemos clic en el área demarcada con verde “Mas métodos de pago” podremos asociar a nuestra cuenta otros métodos de pagos de los cientos disponibles para Fondear o Retirar dinero de nuestra cuenta AirTM. >If we click on the area marked with green "More payment methods" we will be able to associate to our account other payment methods of the hundreds available to Fund or Withdraw money from our AirTM account. 
En la ventana “Retirar” es desde donde podremos retirar nuestro dinero hacia nuestras cuentas bancarias o cualquier otro método de pago en el cual deseemos agregar fondos, esta ventana funciona de la misma manera que la ventana de Fondear. >In the window "Withdraw" is where we can withdraw our money to our bank accounts or any other payment method in which we want to add funds. This window works in the same way as the Funding window. 
En la ventana “Multi-Transfer” podremos solicitar dos transferencias, una de fondeo y una de retiro para simplificar el proceso de transferir de un procesador de pago hacia otro. >In the “Multi-Transfer” window we can request two transfers, one funding and one withdrawal to simplify the process of transferring from one payment processor to another. 
En la ventana “Enviar/Solicitar” podremos enviar AirUSD a cualquier persona que queramos y el dinero le llegara completo ya que las transferencias entre cuentas AirTM no poseen comisión y también podremos solicitar pagos a usuarios. >In the "Send / Request" window we can send AirUSD to anyone we want and the money will reach them in full since transfers between AirTM accounts do not have a commission and also we can request payments to users. 
"Tarjeta Virtuales", estas son tarjeta que proporciona AirTM las cuales puedes utilizar para adquirir cualquier servicio o realizar compras a través de internet como en (Amazon, Ebay, Netflix, Disney Plus, Amazon Prime, Spotify, Steam y mas) esta prohibido usarlas en sitios de apuestas y contenido de adultos. >"Virtual Cards", these are cards provided by AirTM which you can use to acquire any service or make purchases through the internet as in (Amazon, Ebay, Netflix, Disney Plus, Amazon Prime, Spotify, Steam and more) it is forbidden to use them on sites betting and adult content.
Es una excelente solución para adquirir servicios de internet y funcionan excelente. >Is an excellent solution to acquire internet services and they work excellent 
En la ventana “Actividad” estarán todas las transacciones que hemos realizado en AirTM desde que creamos nuestra cuenta. >In the "Activity" window will be all the transactions that we have made in AirTM since we created our account. 
En “aceptar solicitudes” podremos ayudar a Fondear o Retirar dinero a personas que hayan puesto una solicitud y con ello ganar dinero. >In " accept requests" we can help to add Funds or Withdraw money to people who have placed an requests and whit this earn money. 
En la ventana “Cripto” podremos comprar, Vender y Ahorrar Criptomonedas dentro de AirTM. >In the "Crypto" window we can buy, Sell and Save Cryptocurrencies within AirTM. 
En “Invitar Amigos” encontraras el Plan de afiliados y las herramientas de referidos de AirTM >In "Invite Friends" you will find the Affiliate Plan and the AirTM referral tools 
Como vimos previamente, en ajustes se encuentra toda la información de nuestra cuenta y donde podremos realizar las configuraciones de nuestro Perfil. (por seguridad he ocultado la informacion) >As we saw previously, in settings you will find all the information of our account and where we can make the settings of our Profile. (for security I have hidden the information) 
También tenemos las ventanas de “Directorio tiendas” en donde se encuentra una variedad de tiendas en las que podremos compra o adquirir servicios pagando con AirUSD desde la plataforma AirTM. Mas abajo está el botón “Ayuda” donde podremos solventar cualquier duda o contactar al soporte en AirTM y por último el botón “Cerrar sesión”. >We also have the "Store Directory" windows where you will find a variety of stores where we can buy or acquire services by paying with AirUSD from the AirTM platform. Below is the "Help" button where we can answer any questions or contact AirTM support and finally the " logout" button.
**Como agregar fondos a tu cuenta de AirTM**
>**How add funds to your AirTM account**
A continuación, veras en el siguiente ejemplo como agregar fondo en AirTM. Cuando una persona desea agregar fondos en AirTM, va a la opción "Fondear", luego selecciona el procesador de pago, en esta oportunidad seleccionare PayPal. >Next, you will see in the following example how to add funds in AirTM. When a person wants to "Add Funds" in AirTM, they go to the “Fund” option, then select the payment processor, this time I will select PayPal.  
Luego de hacer clic se abrirá la página en donde podrás introducir el monto con el cual deseas fondear tu cuenta. En el área de “Fondear” podrás notar que tienes dos áreas para introducir los montos y puedes hacerlo desde donde tu desees, si colocas el monto en “Fondos a enviar” será la cantidad que tu deveras enviar a la persona que acepto tu solitud de fondeo, y a tu cuenta se te fondeará exactamente el monto que aparece en “Fondos por recibir”. >After clicking, the page will open where you can enter the amount with which you want to add fund in your account. In the "Fund" area you will be able two areas to enter the amounts and you can do it from wherever you want, if you put the amount in "Funds to send" it will be the amount that you must send to the person who accepted your request for add fund, and your account will be funded exactly the amount that appears in "Funds to receive". 
En esta ocasión yo fondeare 50$ USD. Vemos que este en azul el área “Solicitar” y damos clic en “Seleccionar”. >This time I will add $ 50 USD. We see that the “Request” area is in blue and we click on “Select”. 
En la siguiente página, deberemos asegurarnos que nuestros datos estén correctamente colocados y daremos clic en “Enviar Solicitud” >On the next page, we must make sure that our data is correctly placed and click on "Send Request" 
Y nuestra solicitud de Fondeo será puesta en el área de “Aceptar solicitudes” y algún compañero en AirTM aceptara nuestra solicitud, lo cual es bastante rápido, todas mis transacciones las he completado en menos de 12 minutos desde el momento en el coloco la solicitud. >And our Funding request will be placed in the "Accept requests" area and a colleague in AirTM will accept our request, which is quite fast, all my transactions have been completed in less than 12 minutes from the moment I placed the request. 
Una vez un compañero acepte nuestra solicitud, el deberá poseer en su saldo AirUSD la cantidad que yo estoy solicitando y a el o ella le bloquearan ese saldo a mi favor, hasta que yo complete la transacción enviándole a la cuenta de PayPal que me indican la cantidad que coloque en “Fondos a Enviar”. >Once a colleague accepts our request, he must have in his AirUSD balance the amount that I am requesting and he or she will block that balance in my favor, until I complete the transaction by sending the amount him that you place in "Funds to Send" to the PayPal account indicates. 
Con