
**Nota:** Este blog esta creado con el fin de orientar y educar en el manejo de la plataforma, tanto a los nuevos usuarios como también a los interesados en ser parte de Hive.io.
> **Note:** This blog have been created with the goal of educate and guide in the management of the platform, both at the new user, at the registered, and to the interested in being part of Hive.io.
**Conociendo a fondo PeakD**
>**Getting know in depth to PeakD**
En nuestro anterior post conocimos un poco de que se trata PeakD y nos registramos en esta plataforma. Así que hoy aprenderemos acerca de la funcionalidad de la plataforma. > In our previous post we learned a little about what is PeakD and we registered on this platform. So today we will learn about the functionality of the platform.
Nos dirigimos a la dirección web https://peakd.com/ y se abrirá la pagina de PeakD. > We go to the web address https://peakd.com/ and wil be open the PeakD page.

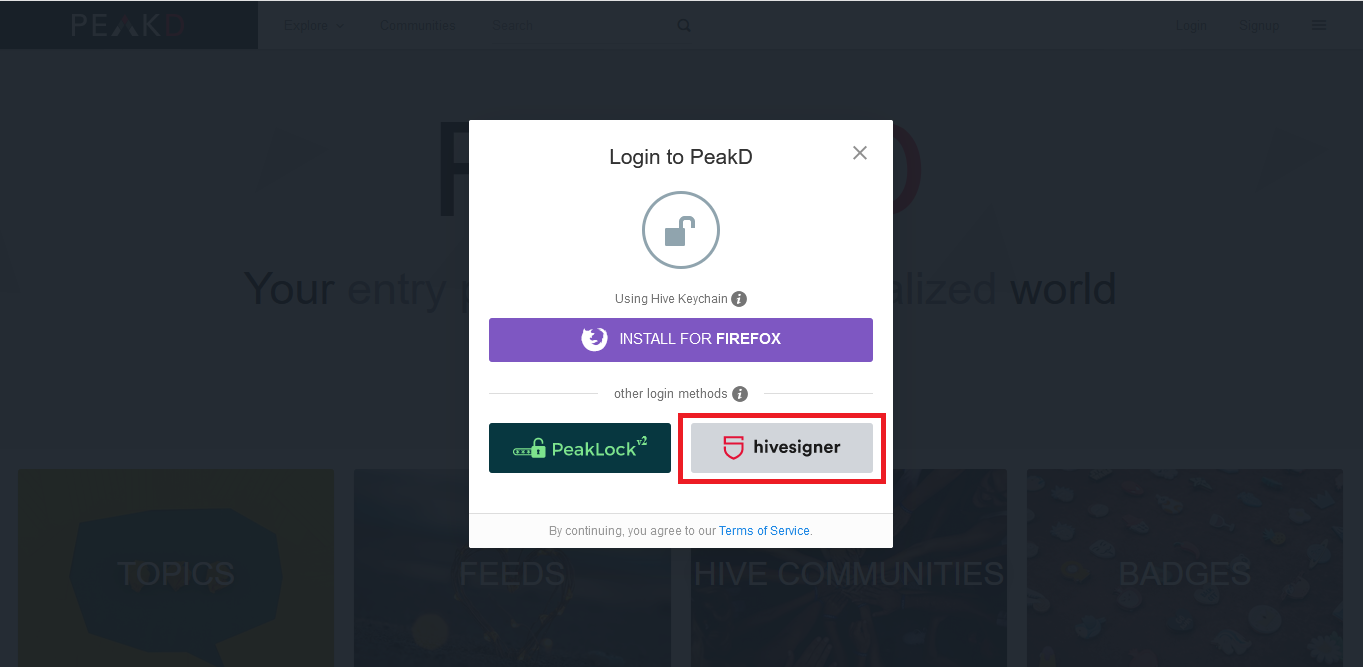
Hacemos clic en login y luego en Hivesigner
>We click on login and then on Hivesigner
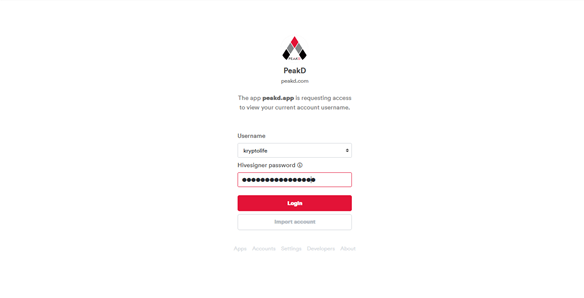
Iniciamos sesión con nuestro usuario y Hivesigner password, contraseña que creamos en el blog anterior y damos clic en login. > And we login with our user and Hivesigner password, password that we created in the previous blog and we click on login.
Y se abrirá la plataforma.
>And the platform will open.
Coloque con un recuadro las áreas que veras a continuación para que puedas conocer un poco más la plataforma. > I placed a box in the areas that you will see below, so that you can know a little more about the platform.
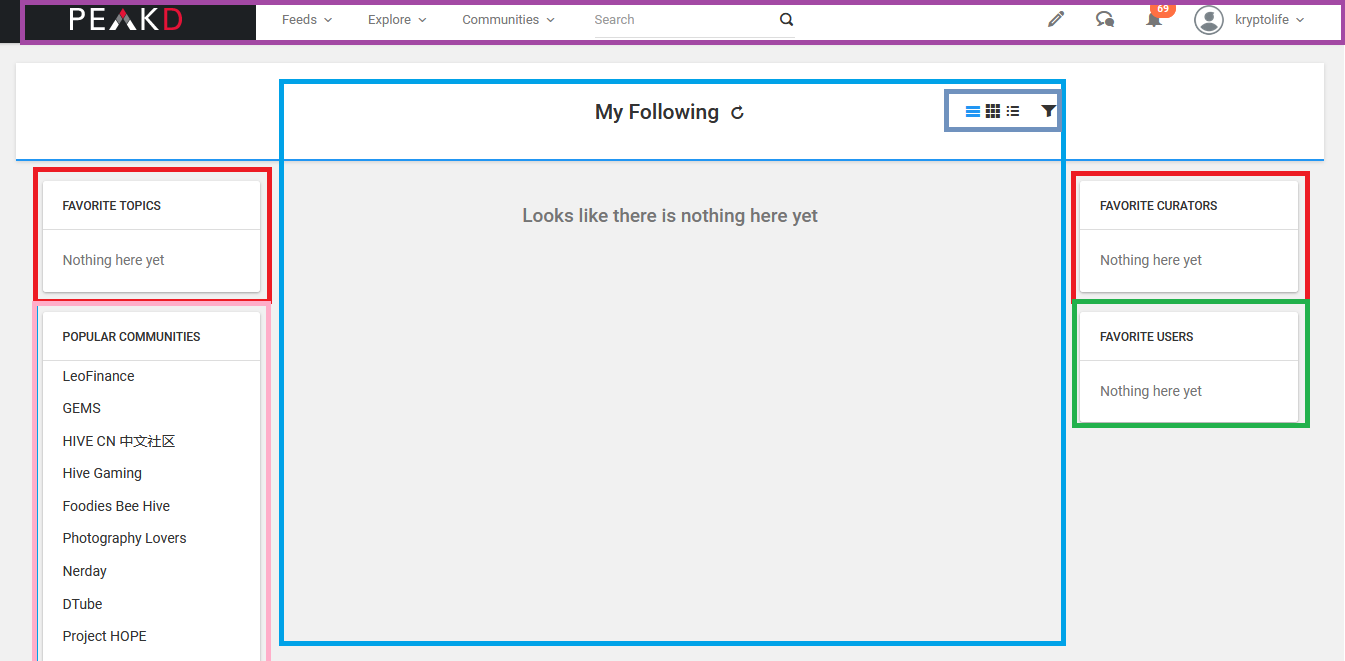
La barra que puedes ver demarcada con color morado es la barra principal de la plataforma, al navegar por PeakD, siempre estará presente. > The bar that you can see demarcated with purple is the principal bar of the platform, when you browsing for PeakD, it will always be present.
En el recuadro de color rojo a la izquierda, estarán tus temas favoritos, en el recuadro rojo de la derecha estarán tus curadores favoritos y en el recuadro de abajo, el de color verde están tus usuarios favoritos, más adelante aprenderás como hacer que aparezcan tus temas, curadores y usuarios favoritos aquí. > In the red box on the left, there will be saw your favorite topics, in the red box on the right will be saw your favorite curators and in the box below the green are your favorite users, more later you can learn how make that your favorite topics, curators and users appear here.
La zona que dice “Popular Communities” demarcada de color rosado es la zona en donde se encuentran las comunidades Tendencia de la blockchain. > The area that says “Popular Communities” outlined in pink is the area where are located the trend communities of the blockchain.
En la zona de color azul, cuando le das Follow a un usuario te apareceran sus posts aqui, algo bastante útil, si te gusta leer los posts que publica este usuario. > In the blue area, when you follow a user, their posts will appear here, something quite useful, if you like to read the posts that this user publish.
En los iconos con el recuadro pequeño de color gris azulado, puedes cambiar la vista con la que deseas ver los posts en esta sección, pueden ser en forma de: Panel, Grilla o Lista. > In the icons with the little blue-gray box, you can change the view with which you want to see the posts in this section, they can be in the form of: Panel, Grid or List.

Bien, vamos a conocer lo que hay en la barra principal. >Well, let's get to know what's on the principal bar.

Al hacer clic sobre los botones de la barra principal se nos abre el menú desplegable con el contenido que posee este botón. Así que, al hacer clic sobre el primer botón ¨Feed¨ se nos abrirá un menu desplegable y este poseerá el siguiente contenido. > Clicking on the buttons on the main bar opens the drop-down menu with the content that this button has. So, when you click on the first button ¨Feed¨ a dropdown menu will open and it will have the following content.
1 - ¨Following Feed¨ al hacer clic en este botón se abrirá la página que previamente hemos descrito, que es en donde se nos muestras los posts que publican los usuarios a los que le damos Follow. > 1 - ¨Following Feed¨ clicking on this button will open the page that we have previously described, which is where we are shown the posts published by the users that we follow.

2 - ¨Communities Feed¨ En esta área podremos ver todos los posts que publican los usuarios en las comunidades que estamos suscritos. > 2 - ¨Communities Feed¨ In this area we can see all the posts published by users in the communities that we are subscribed to.
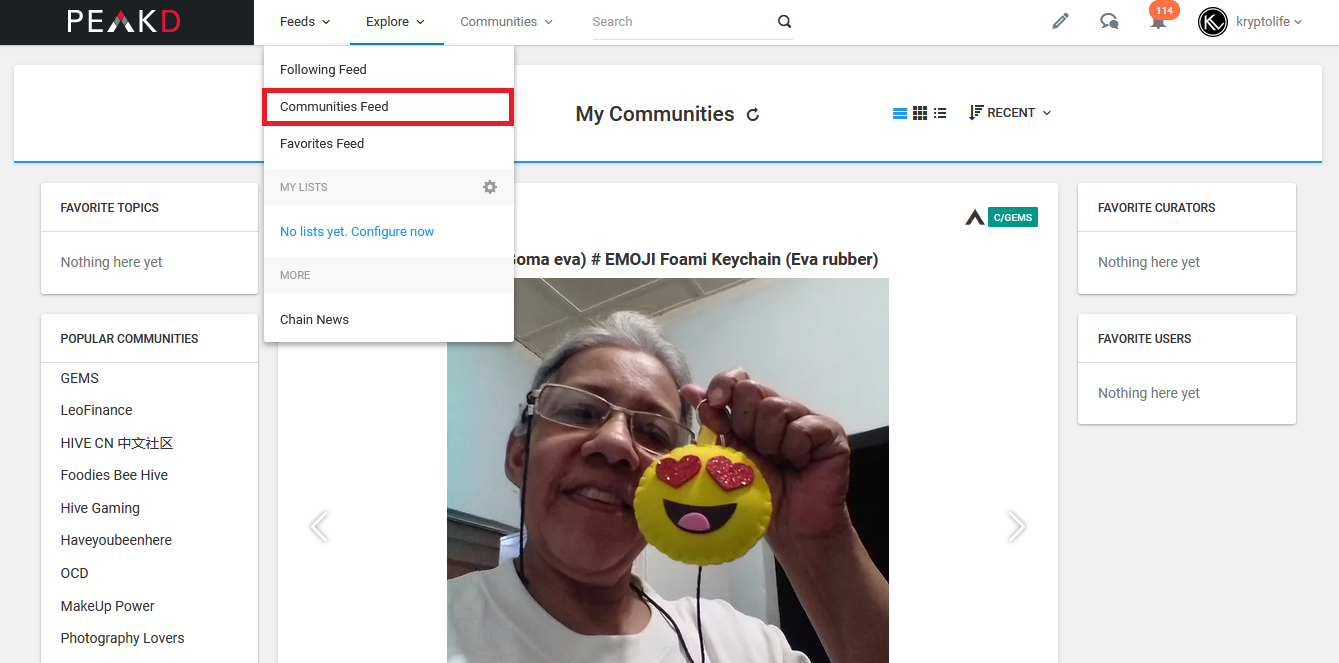
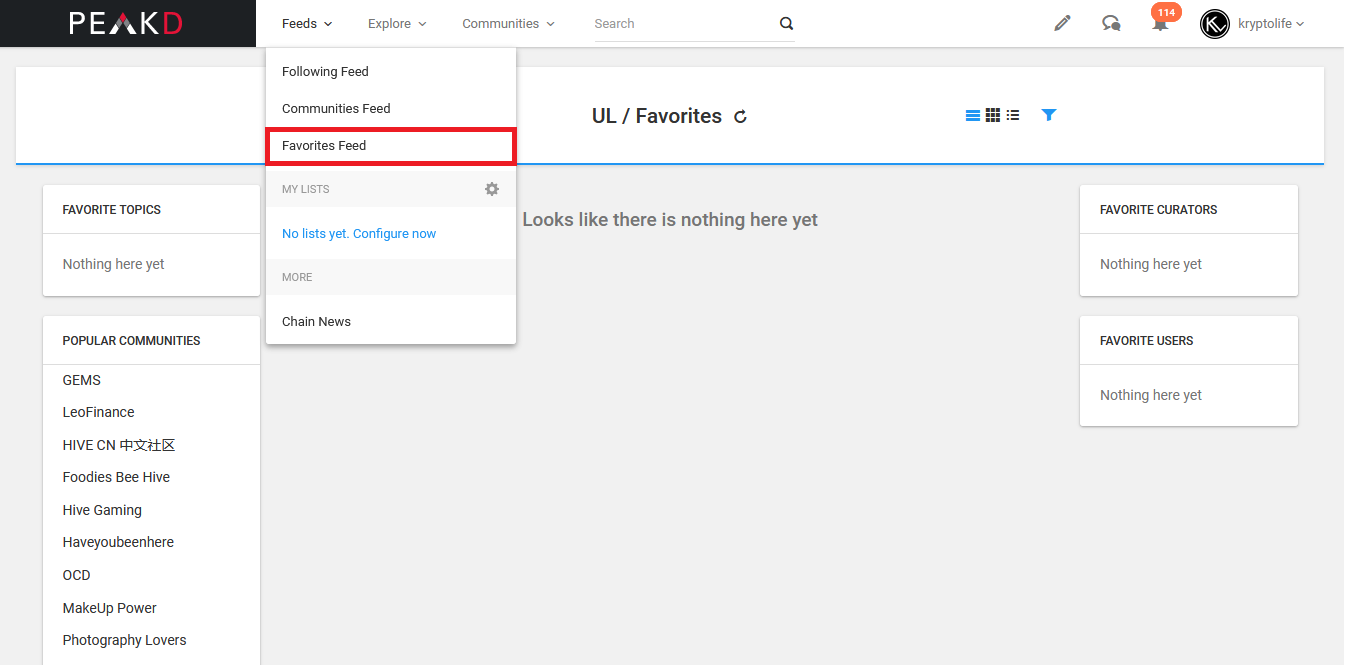
3 - ¨Favorites Feed¨ Cuando le damos a la estrellita en el perfil de un usuario, nos aparecera en esta zona sus post. > 3 - ¨Favorites Feed¨ When we give to the star on the user's profile, their posts will appear in this area.
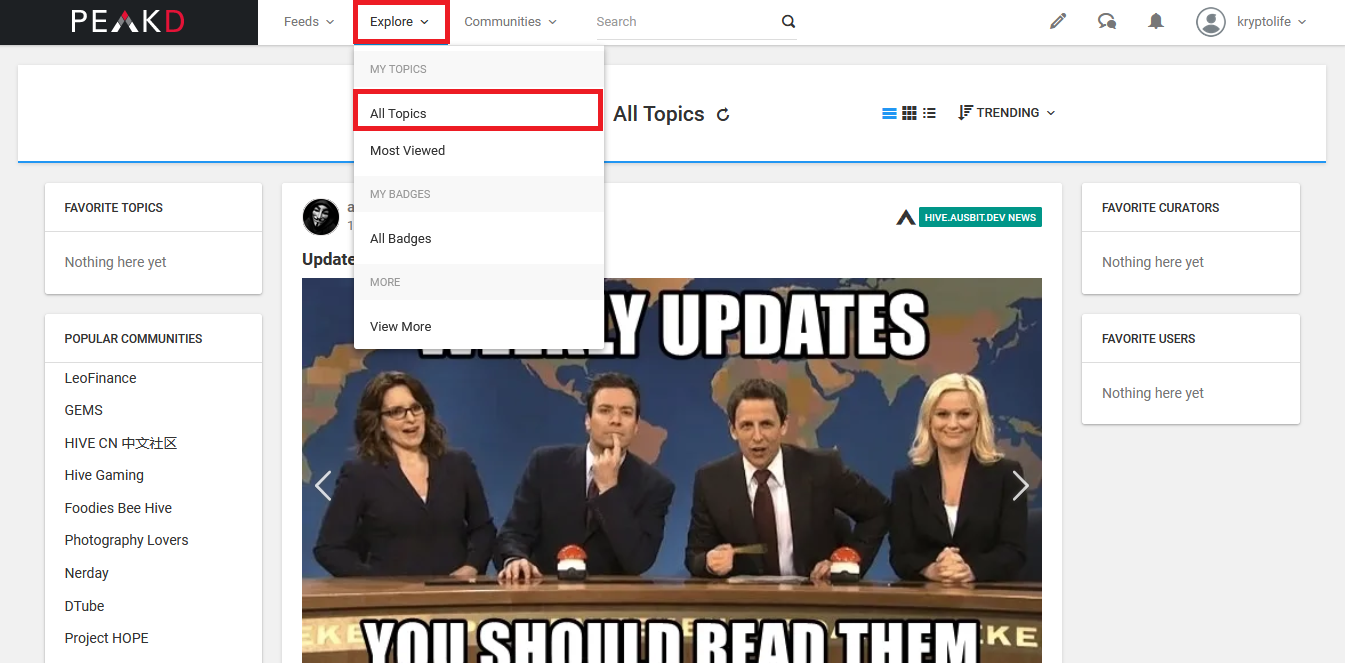
Vamos por el siguiente botón ¨Explore¨ damos clic en ¨all Topics¨
>We go to the following button ¨Explore¨ we click on ¨all Topics¨
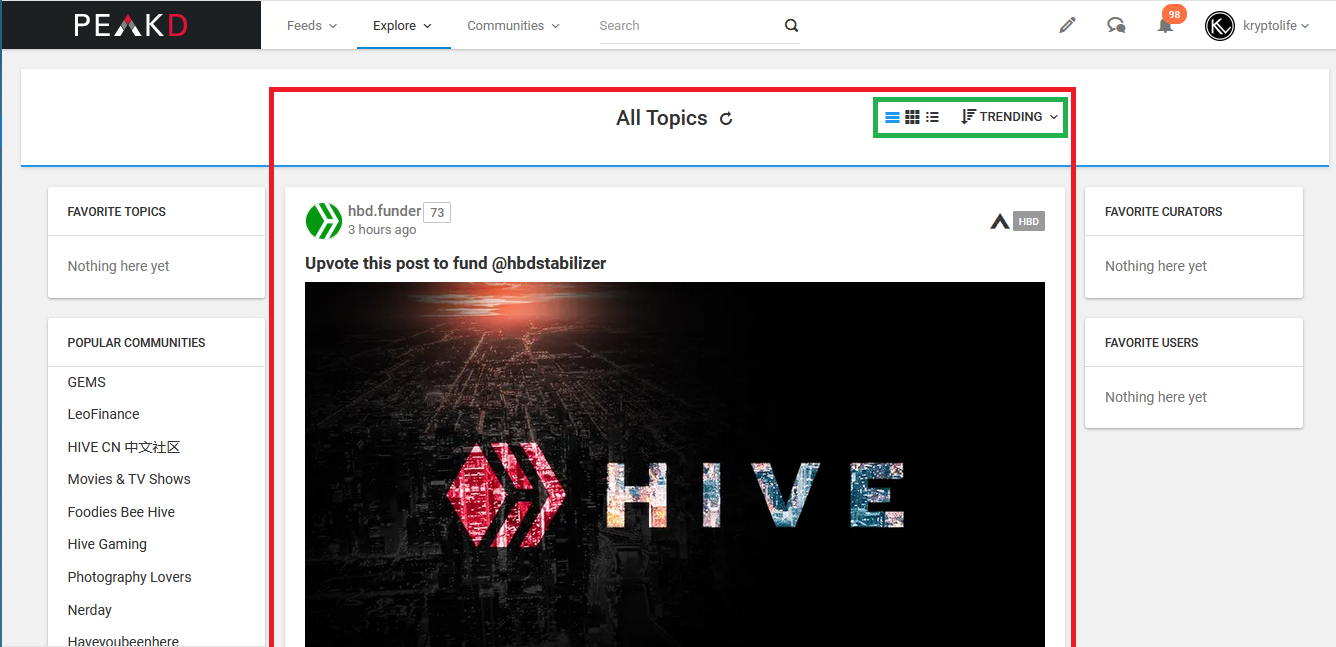
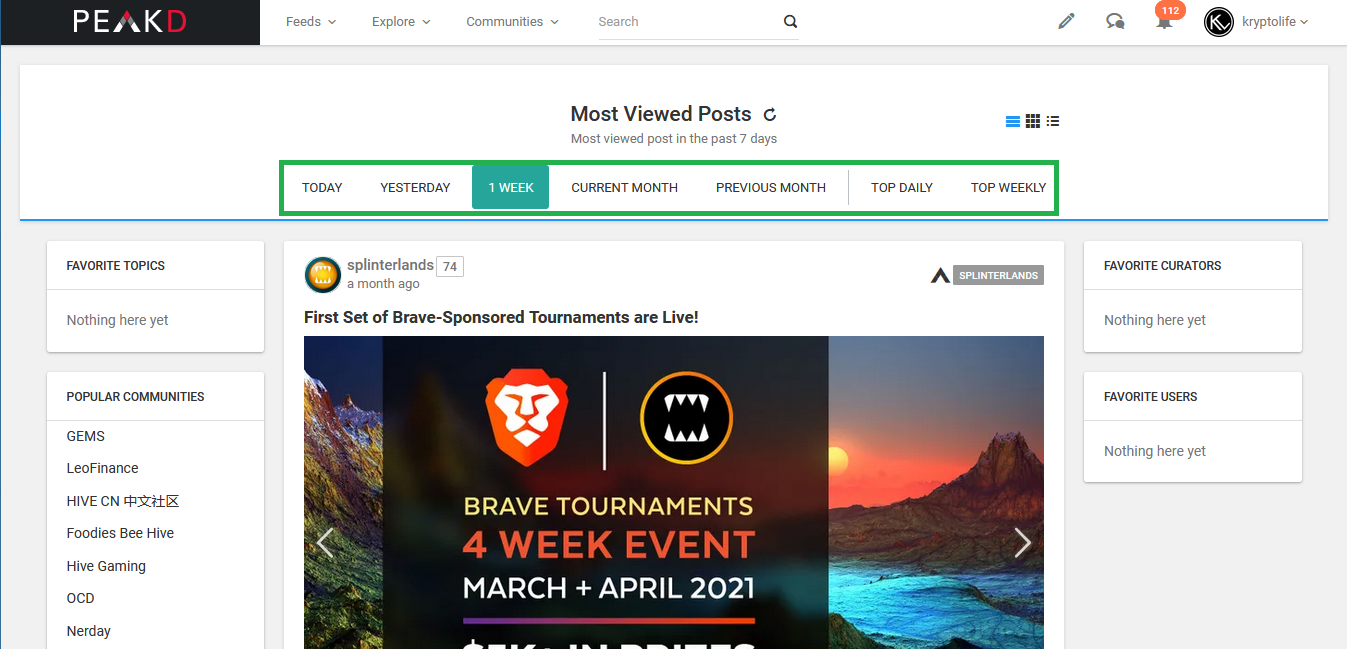
Veremos en la zona con el recuadro rojo de la siguiente imagen, todos los posts publicados por todos los usuarios en todas las comunidades, según la clasificación en la que estén, que en este caso es, por los más Trending, Si hacemos clic en el área que posee el recuadro verde, podremos ajustar que se nos muestren los más: Recientes = Recent, más vistos = Hot y los post tendencia = Trending. Y también podemos ajustar la vista para que los posts se nos muestren en forma de Panel, Grilla o Lista. > We will see inside the area with the red box of the following image the posts published by all users in all communities, according to the classification in which they are, which in this case is, by the most Trending, If we click on the area that has the green box, we can adjust the view for are shown the most: Recent = Recent post, Hot = Most Viewed and Trending = The trending post. And we can also adjust the view so that the posts are shown to us in the form of a Panel, Grid or List.
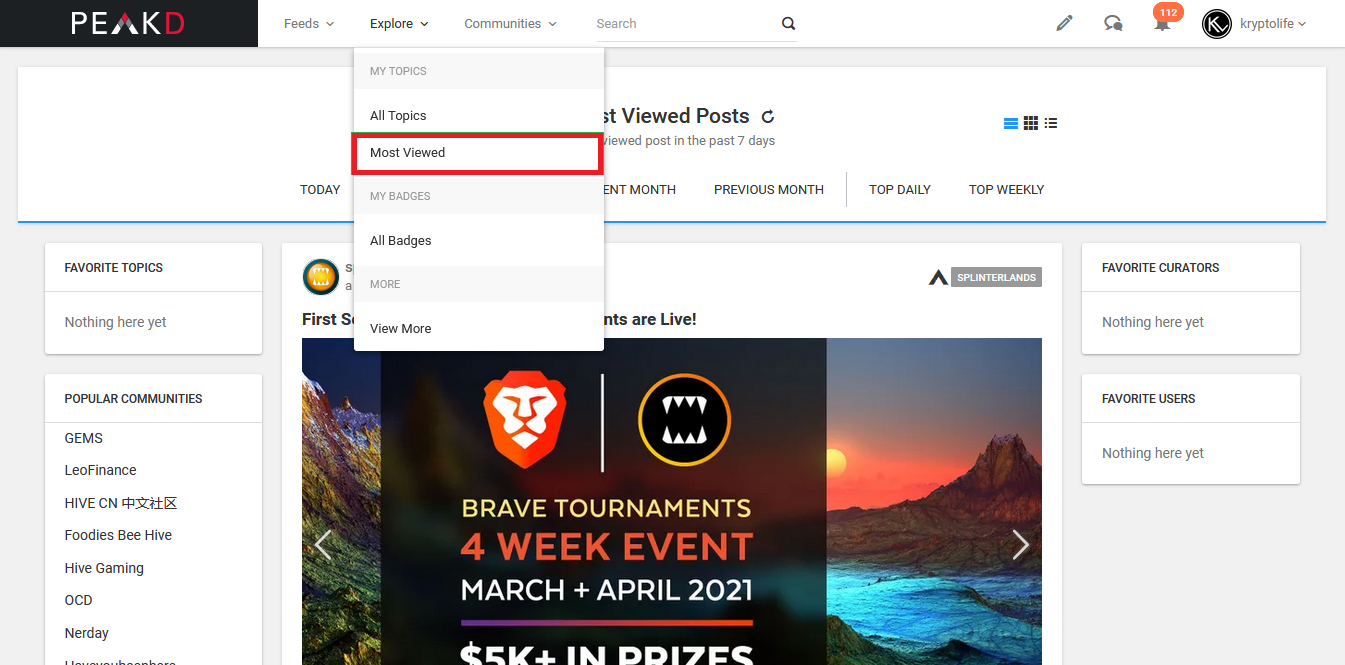
Hacemos clic en ¨Most Viewed¨. Aquí podremos ver los posts más vistos por todos los usuarios, y podemos clasificarlos por fecha, (Hoy, Ayer, hace 1 semana, en el mes en curso, el mes pasado) en el área con el recuadro de color verde. > We click on ¨Most Viewed¨. Here we can see the posts most viewed by all users, and we can classify them by date, (Today, Yesterday, 1 week ago, in the current month, last month), in the area with the green color.
¨All Badges¨, al hacer clic aquí se te mostraran diferentes recuadros con el nombre y la descripción de los diferentes badges, los badges son insignias que ayudan a los usuarios a encontrar e identificar creadores de contenido que comparten intereses comunes, algo similar a las comunidades, te suscribes en estas, pero en estas no se pueden publicar post. > “All Badges”, by clicking here you will be shown different boxes with the name and description of the different badges, badges that help users find and identify content creators who share common interests, something similar to communities , you subscribe to these, but in these you not can published post.

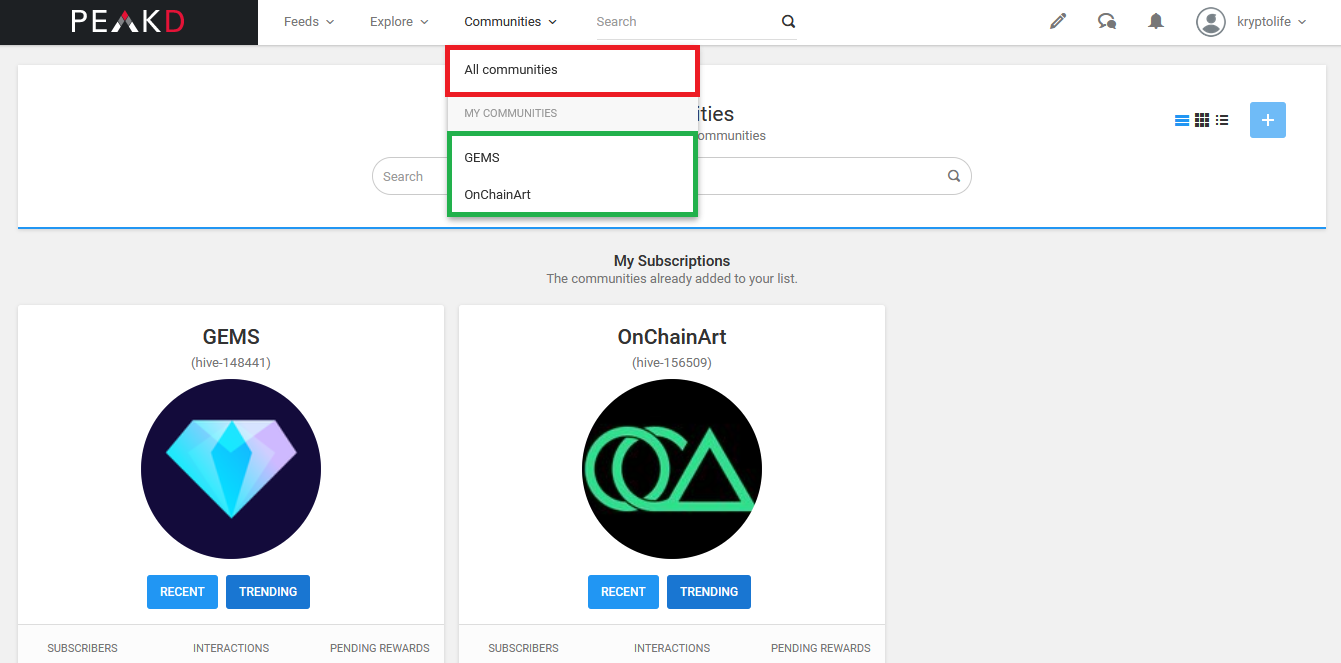
En el siguiente botón del menú principal ¨Communities¨ se encuentran las comunidades en las que podremos postear nuestro contenido. Para que este sea visualizado por más usuario y tengas la posibilidad de tener votos mejor valorados. En este menú desplegable se verán los botones. > In the next button of the main menu ¨Communities¨ are the communities in which we can post our content. So that this can be viewed by more users and you have the possibility of have higher rated votes. In this drop-down menu you will see the buttons.
1 -¨All Communities¨, el que esta en el recuadro “Rojo” en esta área podremos ver las comunidades a las que estamos suscritos y todas las comunidades que existen en la plataforma. > 1 - ¨All communities¨ in the red box site where we can see the communities to which we are subscribed and all the communities that exist on the platform.
2 - Debajo, en ¨My Communities¨ en el recuadro verde, en el menú desplegable estarán todas las comunidades a las que estamos suscritos. Pronto veremos cómo suscribirnos a estas comunidades. > 2 - Under, in ¨My Communities¨ in the green box in the drop-down menu will be all the communities to which we are subscribed. coming soon see how to subscribe to these communities.
En la barra de busqueda que dice ¨Search¨ podras realizar busquedas dentro de la plataforma para en encontrar (Usuarios, Comunidades, Contenido y demas). > In the search bar that says ¨Search¨ you can perform searches inside the platform for find (Users, Communities, Content and others).

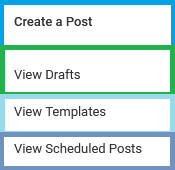
Al hacer clic en el icono del lápiz, se abrirá el menú desplegable, en donde podremos (Crear un Post = Create a post, Ver los post guardados = View Drafts, Ver o crear un Template (¨formato prediseñado para realizar nuestros post¨) y ver los post programados para ser publicados de manera automatica. > By clicking on the pencil icon, will open the drop-down menu , where we can (Create a Post, See save the posts, View or create a Template (¨predesigned format to make our posts¨) and see the posts scheduled to be published automatically.

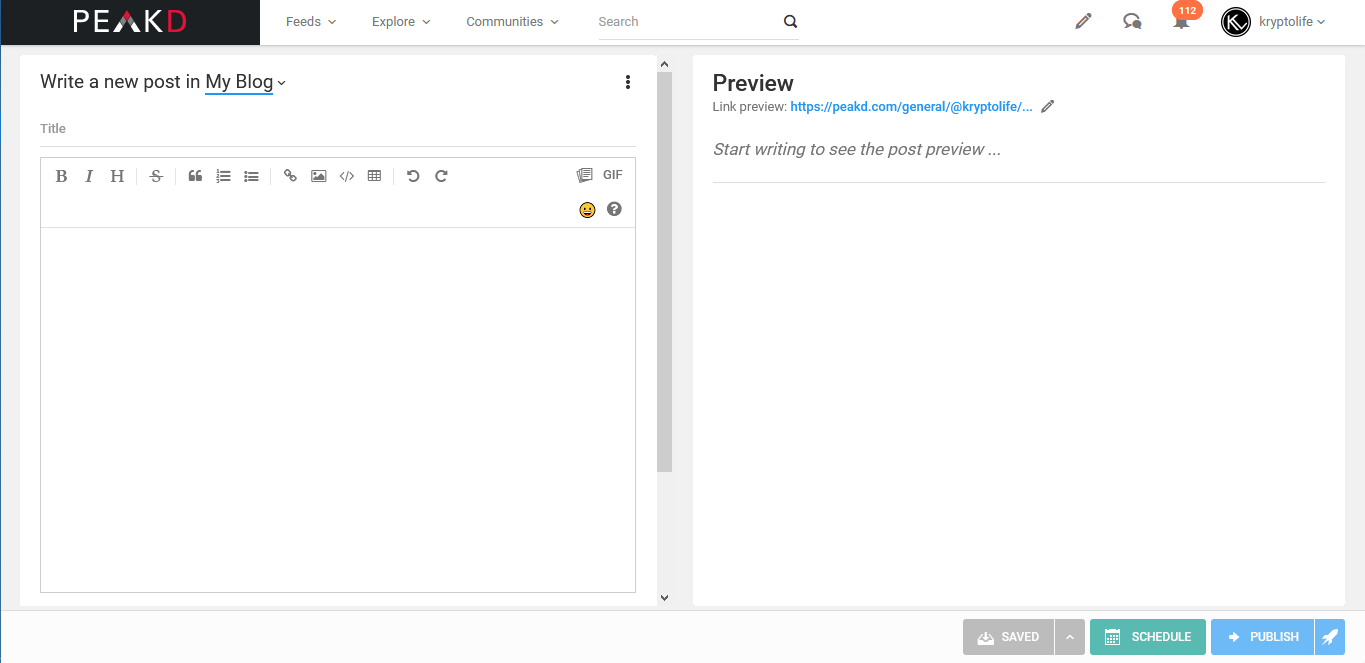
Al darle clic en ¨Create a post¨ se nos abrirá la siguiente página en donde podremos plasmar nuestro contenido y ver como se publicará, pero en nuestro siguiente Blog veremos cómo crear un post en PeakD. > By clicking on ¨Create a post¨ the following page will open where we can write our content and see how it will be published, but in our next Blog we will see how to create a post in PeakD.
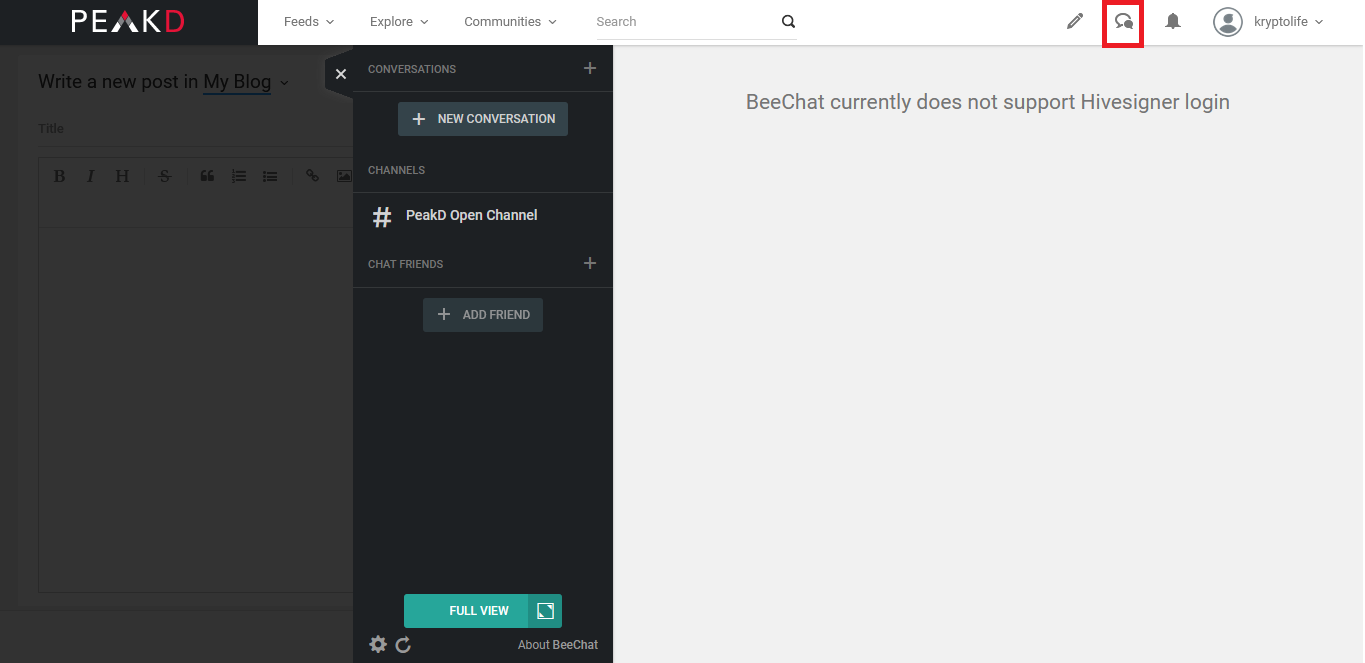
Vamos con el siguiente botón de nuestra barra de menú, este es “Beechat”, una app implementada en la plataforma PeakD, que podremos usar para chatear con otros usuarios, recomiendo hacer clic en ¨About BeeChat¨ para saber más acerca de esto y no enviar contraseñas, ni información privada atraves de este medio. Recomiendo usar este chat únicamente para hablar con otros usuarios. > We go with the next button on our menu bar, this is "Beechat", an app implemented on PeakD platform, which we can use to chat with other users, I recommend click on ¨About BeeChat¨ for know about this, and not send passwords or private information through this medium. I recommend using this chat only to talk with other users.
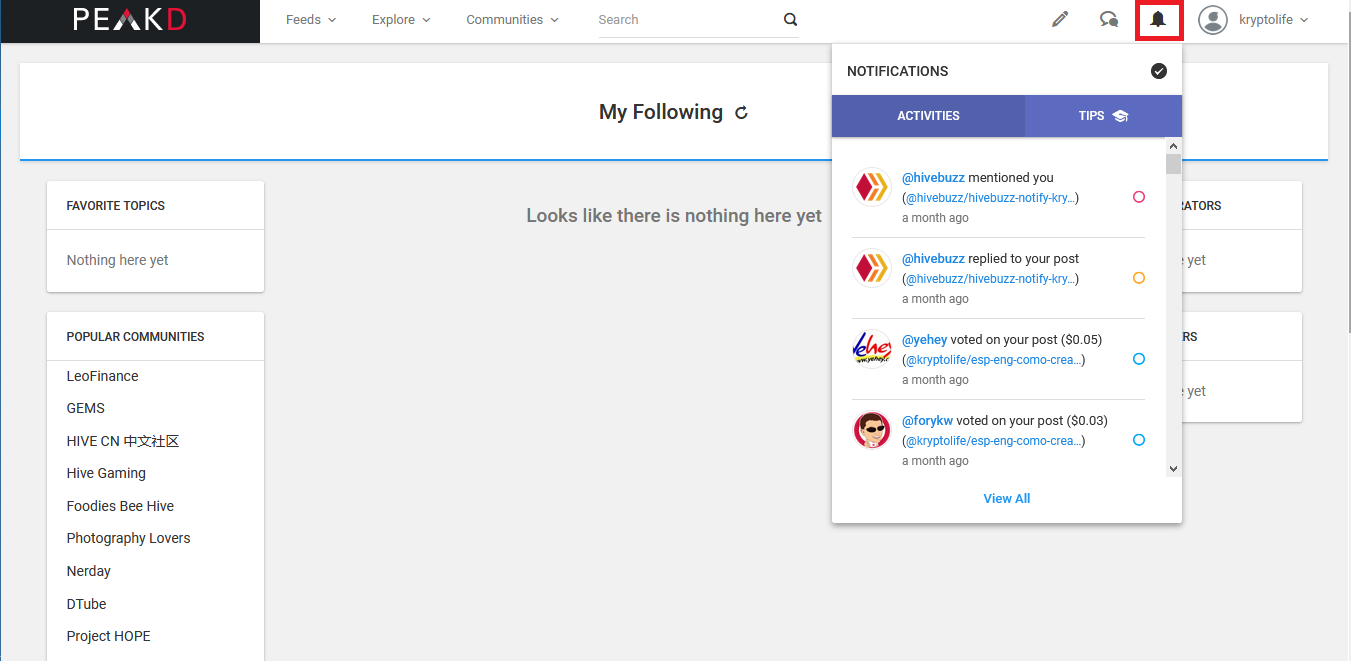
En el botón de la campanita en la barra de menú, veremos las notificaciones de nuestra cuenta, cuando un usuario nos da (votos positivos, realiza comentarios en nuestros posts, comparte nuestras publicaciones o nos menciona en algún post). > In the bell button in the menu bar, we will see the notifications of our account, when a user gives us (positive votes, makes comments on our posts, shares our publications or mentions us in a post).
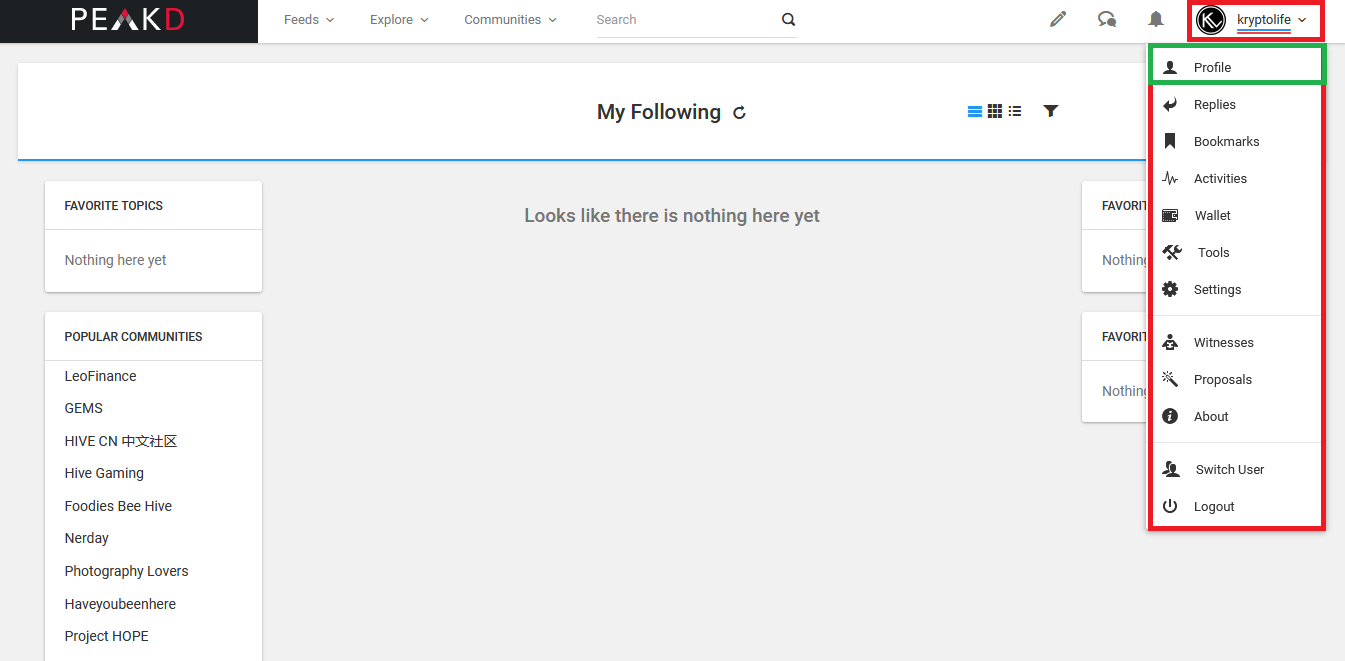
Por último, hacemos clic en nuestro nombre de usuario o en nuestra foto, y al abrirse el menú desplegable, podremos acceder a nuestro Perfil, Replies = Respuestas, Bookmarks = Marcadores, Activities = Actividad, Walle = Monedero, Tools = Herramientas, Settigns = Configuraciones, Witnesses = Testigos, Proposal = Propuestas, About = Acerca de, Switch User = Cambiar de usuario y Logout = Cerrar sesion. Primero, vamos a ver nuestro perfil, así que para ello vamos a hacer clic en Profile. > Finally, we click on our username or on our photo, and when the drop-down menu opens, we can access to our Profile, Replies, Bookmarks, Activities, Wallet, Tools, Settigns, Witnesses, Proposal, About, Switch User and Logout. First, we are going to see our profile, so for this we are going to click on Profile.
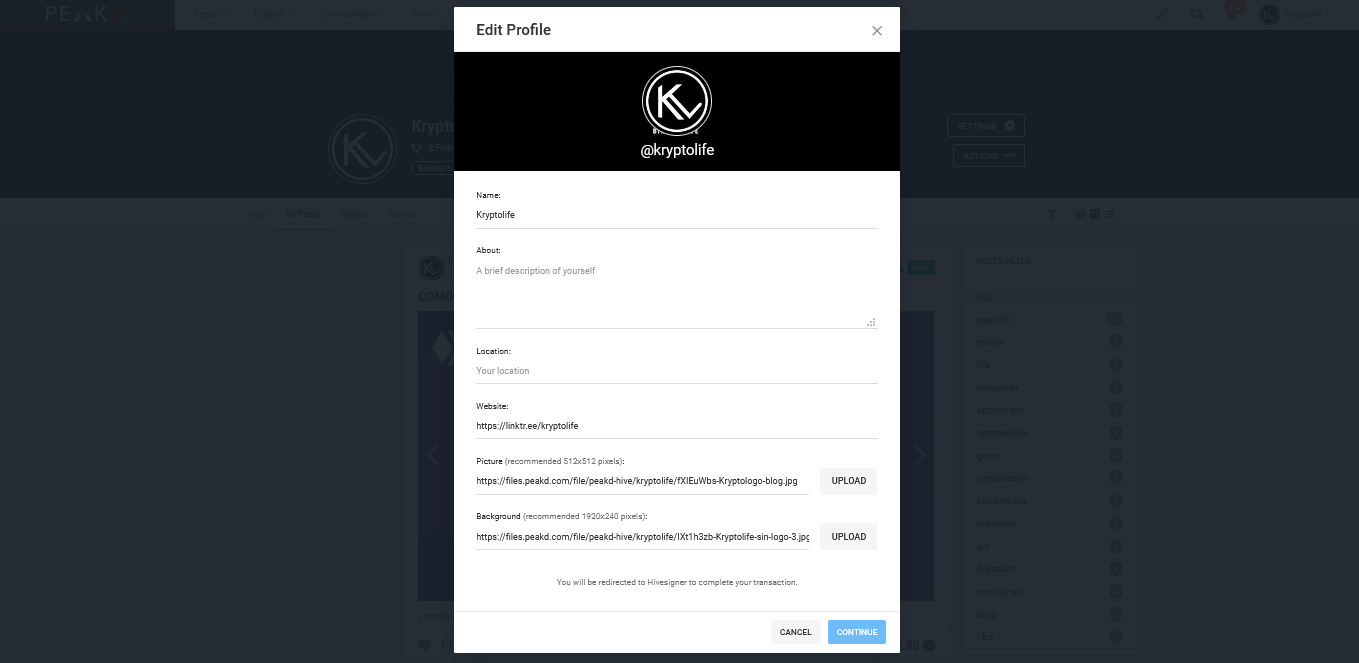
En nuesto perfil, encontraremos de izquierda a derecha, nuestra foto de perfil, que, al darle clic, se abrirá una ventana en donde podremos personalizar nuestra imagen, fondo, descripción, nombre de la cuenta y agregar una dirección de sitio web. > In our profile, we will find from left to right, our profile photo, which, when we click, will open a window where we can customize our image, background, description, account name and add a website address.
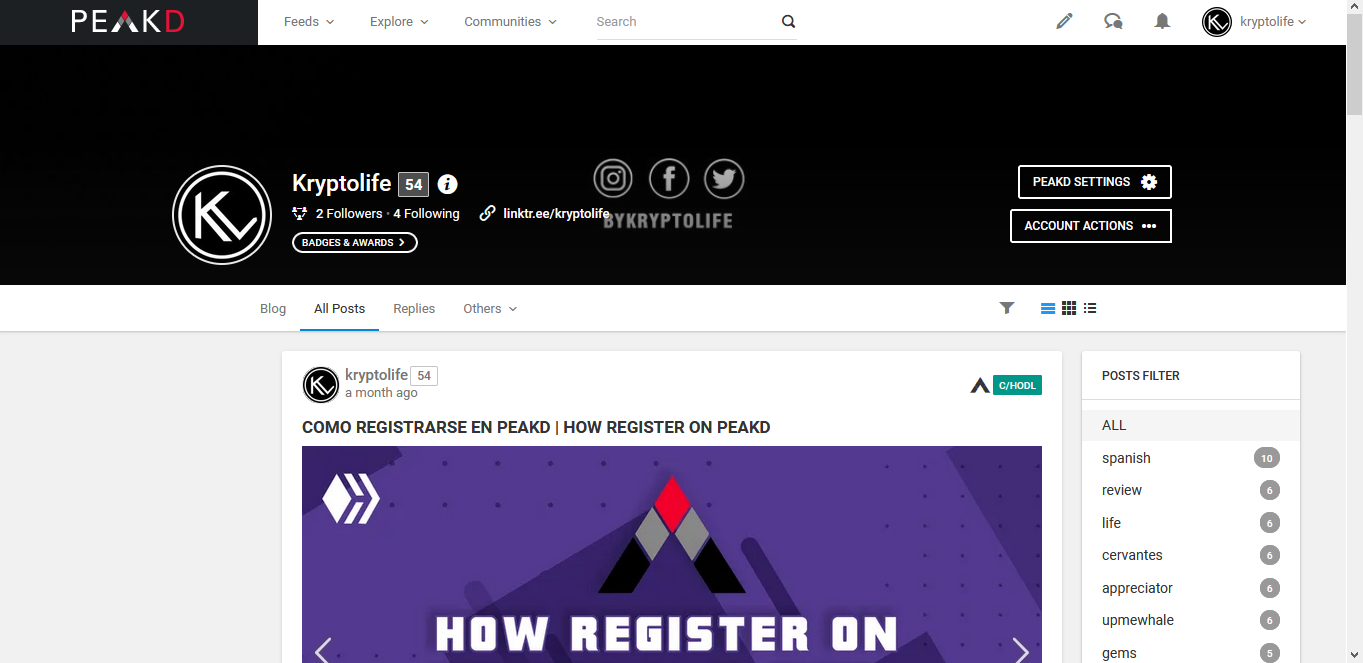
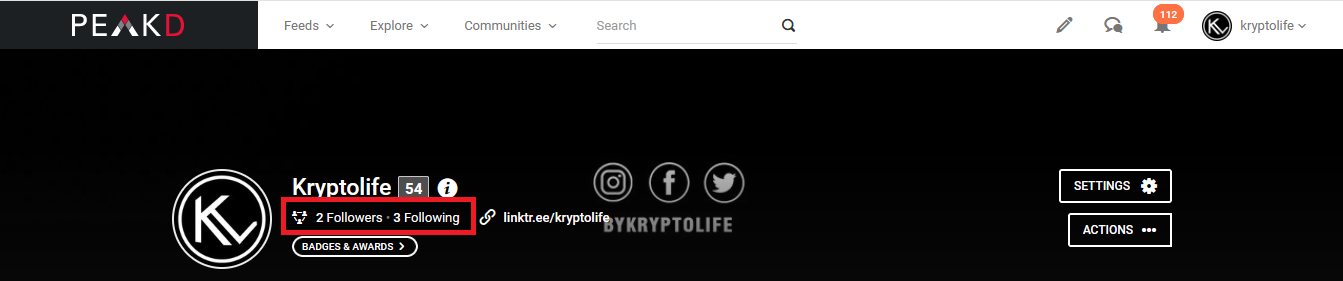
Siguiendo tenemos dos botones tipo enlace, en donde podemos ver nuestros followers y a quien le damos follow. > Following we have two link-type buttons, where we can see our followers and who we follow.
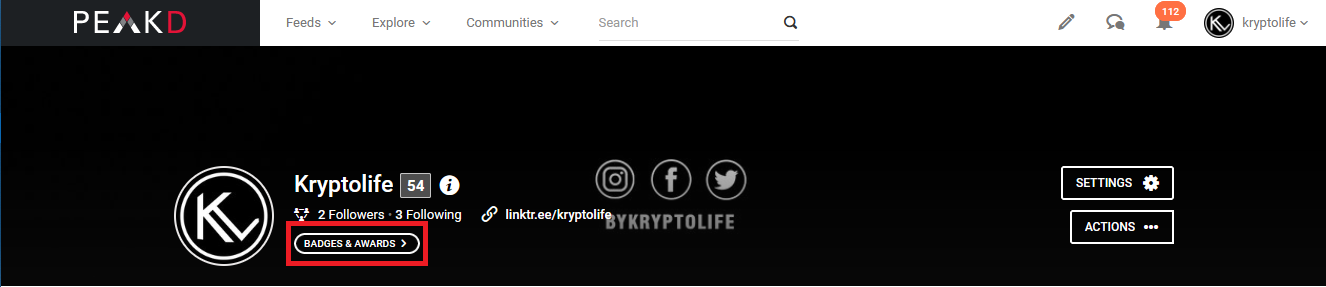
Debajo de estos botones, tenemos un botón para acceder a nuestro badges, son medallas de logros e hitos alcanzados en nuestro blog. > Below these buttons, we have a button to access our badges, they are medals of achievements and milestones reached by our blog.
A la de derecha de nuestro nombre, esta el nivel o reputación de nuestra cuenta, si posicionamos el clic sobre este número nos dará la cifra exacta. > To the right of our name, is the level or reputation of our account, if we position the click on this number it will give us the exact level.
#gems
#spanish
#creativecoin
#review
#life
#blocktrades
#cervantes
Payout: 0.000 HBD
Votes: 164
More interactions (upvote, reblog, reply) coming soon.