Cover created in Canva

Hace aproximadamente 14 días, casi 15, inicie una serie de publicaciones con la intención de explicar en detalle algunas estrategias adaptativas para jugar en el nuevo “Formato Frontier”, en este post, que si no lo han leído pueden hacer clic [AQUÍ]( https://peakd.com/hive-13323/@lenonmc21/estrategias-adaptativas-pata-jugar-en-el-nuevo-formato-frontier-parte-1-terica-esen-azg) para leerlo, explicaba los aspectos fundamentales y más básicos para comenzar tu carrera como mago de batalla, aprender la anatomía de las cartas, sus estadísticas, habilidades, estrategias de posicionamiento, y este tipo de detalles muy importantes para tener éxito en el juego.
Pero, ahora quiero hacer algo diferente y mostrarles ejemplos concretos de como jugar y como no hacerlo para aumentar las probabilidades de ganar en el campo de batalla, recordando que, este modo de juego es 100% gratuito, nuestra progresión depende de que tanto juguemos y completemos el “Modo Campaña” y avancemos en el “Formato Frontier”, en este post, explicare con ejemplos de batallas reales, cuales son las estrategias mas eficaces, desde mi experiencia por su puesto, y lo que debes evitar hacer para tratar de no perder.
**Como siempre digo, este se trata de probabilidades, no quiere decir que con las recomendaciones que les daré, tendrán el éxito asegurado, este modo de juego a pesar de ser sencillo, por ser gratuito, la realidad es que la jugabilidad esta muy buena, es compleja y depende de que tan estratega puedas ser, así que, si quieres saberlo, lee este post hasta el final y déjame en los comentarios cual es tu experiencia con el nuevo modo “Frontier”.**

# Ejemplos de batallas (Cosas que deberías hacer para tener éxito)

Para comenzar, mostrare las batallas en donde obtuve victorias y explicare el combo usado, esto con la finalidad de mostrar detalles y aspectos que te pueden hacer ganar si sabes leer e interpretar bien las reglas de batalla, sin embargo, puede que, a ti, no te funcione como a mí, ya que las condiciones para todos pueden ser muy distintas, es por eso que, antes de comenzar con la explicación señalare 3 aspectos claves para tener en cuenta:
>* **Lee muy bien las reglas:** De esto depende tu elección de cartas, si las lees correctamente y las entiendes, tus probabilidades de ganar aumentaran.
>
>* **Aprende de tu adversario:** Si una batalla no te salió bien y creías que saldría perfecta, observa el combo que uso tu oponente, esto te puede enseñar varias cosas positivas para ganar tu próxima batalla.
>
>* **Repite lo anterior todo el tiempo.**

### Combos Positivos
**Batalla 1**

[Enlace a la batalla](https://splinterlands.com/battle/sl_9991217820eb580b8077ec1fe0f38354?ref=lenonmc21)
>* **Las reglas:** Como pueden ver, una de las reglas de la batalla es “Maneuvers”, la cual le da a todos las unidades del campo la habilidad de “Reach”, beneficiando a los monstruos del tipo de ataque cuerpo a cuerpo para atacar desde la 2da posición. La segunda regla es “Lost Legendaries”, su palabra lo dice, no se pueden usar cartas legendarias, por lo que, solo quedan para elegir el resto de las rarezas.
>
>* **Costo de mana:** El costo de mana para invocar a nuestras unidades es de 37 puntos, una cantidad suficiente y no tan complicada para aplicar una combinación.
>
>* **Analizando la batalla:** La regla determinante en esta batalla es “Maneuvers”, y sabiendo su efecto, es natural pensar que el oponente podría tener inclinaciones para “Defenderse”, con escudo, por ejemplo, de los ataques físicos, mientras se arma así mismo con puras unidades cuerpo a cuerpo para llevar la “Ofensiva”.
>
> En este caso y cuando vi la regla, mi inclinación fue por usar un ataque mágico, reforzando el poder de este tipo de unidades y yendo directamente por los puntos de vida de las cartas, de esta manera tomo a mi rival por sorpresa, ademas de que coloque un monstruo con la habilidad de “Taunt” para atraer todos los ataques hacia ella, dando mas holgura para mi ataque.
---
**Batalla 2**
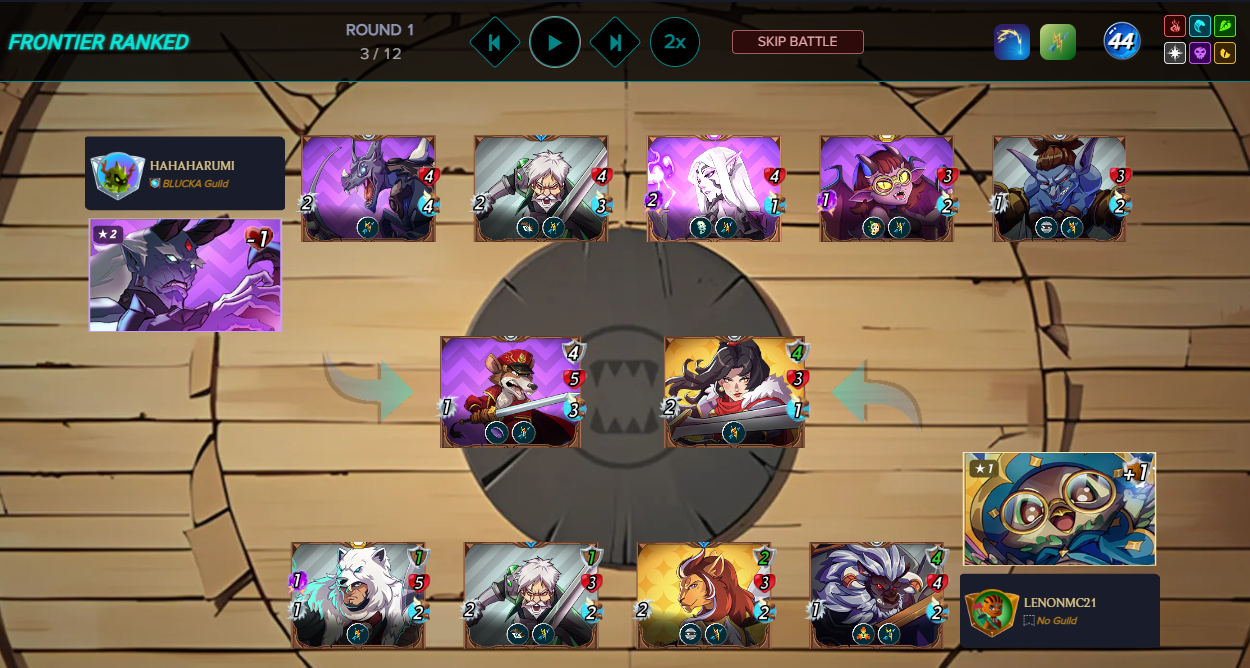
[Enlace a la batalla](https://splinterlands.com/battle/sl_fcb34b226bd15b21a8ae096fc399cf1b?ref=lenonmc21)
>* **Las Reglas:** Las reglas de esta batalla son (Tis But Scratches y Ferocity), la primer de ellas otorga a todas las unidades la habilidad llamada “Cripple”, la cual con cada ataque exitoso que propinen las unidades, las cartas del rival pierden -1 punto de su salud máxima, eso quiere decir que, una unidad con “Heal” de 4 de vida, cuando pierde puntos en la siguiente ronda solo se recuperara a 3 puntos. Con la según regla, todos los monstruos ganan la habilidad de “Fury”, la cual funciona única y exclusivamente si el oponente tiene una unidad con “Taunt”, si esto es así, la carta con “Fury” causa el doble del daño, en pocas palabras, si tiene 3 puntos, causara 6 en total.
>
>* **Costo de mana:** Esta batalla tiene un costo de mana un poco mas ajustado, de 34 puntos, aun sigue siendo buena, por lo que, sabiendo posicionar nuestras cartas podemos ejecutar una combinación.
>
>* **Análisis de la batalla:** En esta batalla tenemos que concentrarnos es en aplicar una buena alienación y no tanto en las reglas, ya que, ambas condiciones no cambian de forma brusca el campo de batalla, por lo que, en este caso, decidí jugar con tierra, ya que es la única que posee una carta con la habilidad de “Heal” y un arconte que da +1 de vida, por otro lado, la diferencia es que coloque una unidad con “Thorns” de primera posición para dañar un ataque físico, para posteriormente la carta con “Heal” tome la 1ra posición.
>
> Mis últimas cartas son netamente ofensivas, con ataque de rango, pero con suficientes puntos de vida, siendo esta la clave para ganar, ya que las unidades de mi oponente eran más débiles en términos de puntos de vida y también en ataque, el solo gano velocidad por su “Arconte” y yo +1 punto de salud por el mío, ya que como pierden un punto de salud máximo, esto le daría más puntos de vida de los que tienen originalmente.
En sección quiero poner un ejemplo de una batalla que perdí, esto con la finalidad de que observen como jugo mi oponente y el porque es tan importante tener creatividad al momento de jugar, ya que, a pesar de tener monstruos más débiles que yo, pudo ganar, además, aquí es donde entra uno de los aspectos claves que mencioné al inicio (Aprender de tu oponente), pero, vamos a la batalla para detallar lo sucedido:
---
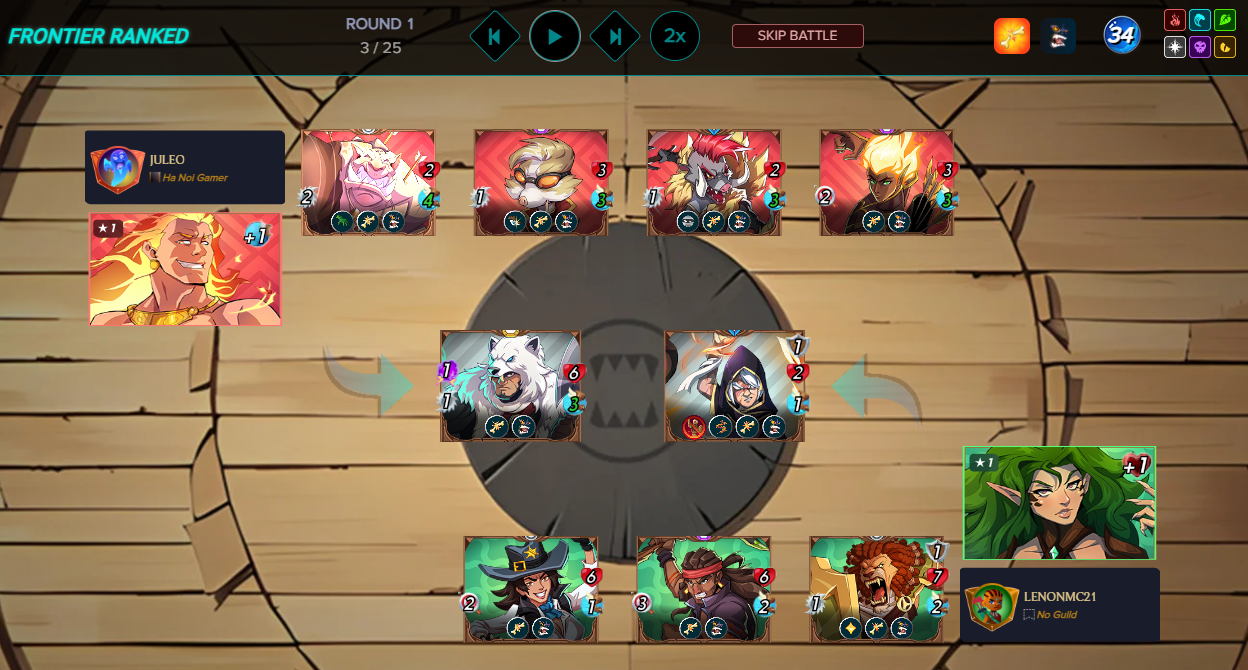
[Enlace a la batalla](https://splinterlands.com/battle/sl_dc1c96f4b8c9b6e2beac7746d8b664b3?ref=lenonmc21)
* **Las Reglas:** En esta batalla tenemos 2 reglas, la primera de ellas es “Weak Magic” y la segunda “Return Fire”, ambas muy fácil de interpretar y discernir, ya que la primera de ellas, cuando atacas con magia, se va directamente al escudo de las unidades si es que la tienen y la segunda, devuelve los ataques de “Rango o Hacha”.
* **Costo de mana:** 44 puntos de mana son mas que suficientes para armar un combo muy sólido.
* **Análisis de batalla:** Primero, lo que hay que evitar es usar ataques de “Rango o Hacha”, así que me enfoque en puro ataque “Cuerpo a Cuerpo” mientras usaba mi “Arconte” para que me brindara “Armadura”, de hecho, antes de que comenzara la batalla si ven la imagen, tengo ventaja, pero, algo que cambio las cosas fue la habilidad del “Arconte” enemigo, ya que le resta a todas mis unidades -1 punto de vida, adicional a eso, mi rival tenia una carta con la habilidad de “Weaken”, disminuyendo en 1 punto mas la vida de todas mis cartas, dejándome vulnerable y en desventaja contra su combinación.
---
***Nota: Con esto claro ¿Se entendió que fue lo que cambio la batalla de repente? Déjenme en los comentarios, que mas vieron y porque perdí.***

# Consideraciones finales

Así culmina la 2da parte de esta serie de publicaciones en las que explico algunas estrategias adaptativas para jugar en el nuevo “Formato Frontier”, esta vez fue mas practica que la anterior, aunque incluí algunos aspectos teóricos, tienen suficiente material para estudiar en esta publicación, especialmente los más nuevos.
Si tienen mas dudas, por favor comenten y con gusto estaré respondiendo.
### Nos vemos en el "Campo de Batalla"

About 14 days ago, almost 15, I started a series of posts with the intention of explaining in detail some adaptive strategies for playing in the new "Frontier Format." If you haven't read it yet, you can click [HERE](https://peakd.com/hive-13323/@lenonmc21/adaptive-strategies-for-playing-in-the-new-frontier-format-part-1-theory-and-basics) to read it. I explained the fundamental and most basic aspects for starting your career as a battle mage, learning the anatomy of the cards, their stats, abilities, positioning strategies, and other very important details for succeeding in the game.
But now I want to do something different and show you specific examples of how to play and how not to play in order to increase your chances of winning on the battlefield, remembering that this game mode is 100% free, our progression depends on how much we play and complete the "Campaign Mode" and advance in the "Frontier Format." In this post, I will explain with examples from real battles which strategies are most effective, based on my experience of course, and what you should avoid doing to try not to lose.
**As I always say, this is about probabilities. It doesn't mean that with the recommendations I'm going to give you, you'll be guaranteed success. This game mode, despite being simple and free, is actually very good in terms of gameplay. It's complex and depends on how strategic you can be, So, if you want to know more, read this post to the end and let me know in the comments what your experience with the new "Frontier" mode has been like.**

# Examples of battles (Things you should do to be successful)

To begin with, I will show you the battles in which I was victorious and explain the combo I used, with the aim of highlighting details and aspects that can help you win if you know how to read and interpret the battle rules correctly. However, it may not work for you in the same way it did for me, as conditions can vary greatly from person to person. That is why, before I begin with the explanation, I will point out three key aspects to bear in mind:
>* **Read the rules carefully.:** Your choice of cards depends on this. If you read them correctly and understand them, your chances of winning will increase.
>
>* **Learn from your opponent:** If a battle didn't go well for you and you thought it would be perfect, look at the combo your opponent used. This can teach you several positive things to help you win your next battle.
>
>* **Repeat the above all the time.**

### Positive Combos
**Battle 1**

[Link to the battle](https://splinterlands.com/battle/sl_9991217820eb580b8077ec1fe0f38354?ref=lenonmc21)
>* **The rules:** As you can see, one of the rules of battle is "Maneuvers," which gives all units on the field the "Reach" ability, benefiting melee attack monsters by allowing them to attack from the 2nd position. The second rule is "Lost Legendaries," which means that legendary cards cannot be used, so only the rest of the rarities remain to choose from.
>
>* **Mana cost:** The mana cost to summon our units is 37 points, which is sufficient and not too complicated to apply a combination.
>
>* **Analyzing the battle:** The decisive rule in this battle is "Maneuvers," and knowing its effect, it is natural to think that the opponent might be inclined to "Defend" themselves, with a shield, for example, from physical attacks, while arming themselves with pure melee units to carry out the "Offensive."
>
> In this case, when I saw the rule, I was inclined to use a magic attack, reinforcing the power of this type of unit and going directly for the life points of the cards. This way, I took my opponent by surprise, and I also placed a monster with the "Taunt" ability to attract all attacks towards it, giving me more leeway for my attack.
---
**Battle 2**

[Link to the battle](https://splinterlands.com/battle/sl_fcb34b226bd15b21a8ae096fc399cf1b?ref=lenonmc21)
>* **The Rules:** The rules of this battle are (Tis But Scratches and Ferocity). The first rule grants all units the ability called "Cripple," which means that with each successful attack by the units, the opponent's cards lose 1 point of their maximum health. This means that a unit with a "Heal" of 4 health, when it loses points in the next round, will only recover to 3 points. With the second rule, all monsters gain the "Fury" ability, which only works if the opponent has a unit with "Taunt." If this is the case, the card with "Fury" causes double the damage. In short, if it has 3 points, it will cause 6 in total.
>
>* **Mana cost:** This battle has a slightly higher mana cost of 34 points, but it is still good, so if we know how to position our cards, we can execute a combination.
>
>* **Analysis of the battle:** In this battle, we have to focus on applying good alignment rather than rules, since neither condition drastically changes the battlefield. In this case, I decided to play with Earth, since it is the only one that has a card with the "Heal" ability and an archon that gives +1 life. On the other hand, the difference is that I placed a unit with "Thorns" in the first position to damage a physical attack, so that the card with "Heal" could then take the first position.
>
> My last cards are clearly offensive, with range attack, but with enough health points, which is the key to winning, since my opponent's units were weaker in terms of health points and also in attack. He only gains speed because of his "Archon" and I gain +1 health point because of mine, since they lose one maximum health point, this would give him more health points than he originally had.
In this section, I want to give an example of a battle I lost, so you can see how my opponent played and why it is so important to be creative when playing. Despite having weaker monsters than me, he was able to win. This is where one of the key aspects I mentioned at the beginning comes in (learn from your opponent), but let's go to the battle to see what happened in detail:
---

[Link to the battle](https://splinterlands.com/battle/sl_dc1c96f4b8c9b6e2beac7746d8b664b3?ref=lenonmc21)
* **The Rules:** In this battle, we have two rules: the first is "Weak Magic" and the second is "Return Fire." Both are very easy to interpret and discern, since the first one, when you attack with magic, goes directly to the units' shields if they have them, and the second one returns "Range or Axe" attacks.
* **Mana cost:** 44 mana points are more than enough to put together a very solid combo.
* **Battle analysis:** First, what you have to avoid is using "Range or Axe" attacks, so I focused on pure "Melee" attacks while using my "Archon" to give me "Armor." In fact, before the battle began, if you look at the image, I had the advantage, but something that changed things was the enemy Archon's ability, which reduced all my units' health by 1 point. In addition to that, my opponent had a card with the "Weaken" ability, reducing the health of all my cards by 1 more point, leaving me vulnerable and at a disadvantage against his combination.
---
***Note: With that clarified, do you understand what suddenly changed the battle? Please leave a comment with what else you observed and why I lost.***

# Final thoughts

This concludes the second part of this series of posts in which I explain some adaptive strategies for playing in the new "Frontier Format." This time it was more practical than the previous one, although I included some theoretical aspects. There is enough material to study in this post, especially for newcomers.
If you have any further questions, please comment and I will be happy to answer them.
### See you at the "Battlefield".
 coming soon.