Hello friends! I know I haven’t been posting lately, but I want you to know that NO! I won’t leave you because everything I do for you, my dear readers, I do it with love and despite the limitations imposed on me by the electrical conditions of my city, I am back with RECHARGED content made with great enthusiasm for you. Although, well, this card is not EXACTLY AND PRECISELY made for you, you know what I mean, I think. lol.
What it is actually made for you is this post in which I will explain step by step how to do this FABULOUS slider card so you can replicate it and give it to your loved ones.
I made this card a couple weeks ago in an EPIC moment of my life: "MY BEST FRIEND CAME BACK TO VENEZUELA AFTER 6 MONTHS ABROAD"
#
I was so excited and happy to see my bestie because she has been like a sister for me for more than 12 years, so I gave her a ton of hugs, Venezuelan chocolates and this card in which basically I wanted to express a feeling: "My heart was broken because you were not with me, but now is fixed because you came back".
#
I’m too sweet, right? I know, I know... I deviated from the main topic again, it is normal in me, but without further ado, I will explain the step by step of this card.
 ##
##
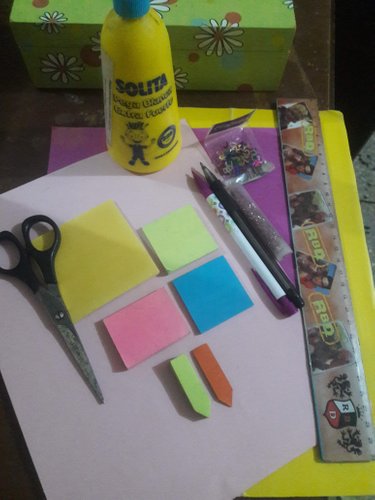 The main materials that you need to elaborate this card are:
- Cardboards.
- Black marker.
- Scissors.
- Ruler.
- Glue.
- Ribbon (10 cm)
##
The main materials that you need to elaborate this card are:
- Cardboards.
- Black marker.
- Scissors.
- Ruler.
- Glue.
- Ribbon (10 cm)
##
 ---
---
**Step 2.** Cut out the rectangle we previously marked on the top and the corners of the tabs at the bottom to fold them inwards as shown in the following image. ---
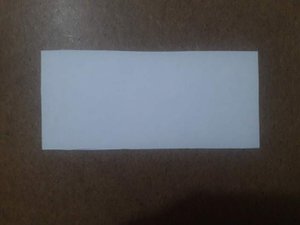
**Step 3.** Cut out a rectangle of cardboard of 13cm x 7cm. It must be a little larger than the opening we did on the previous step since this will have the internal message of the card written and we do not want the edges to look messy. --- **Step 4.** Decorate the internal message according to the celebration. In this case I cut small sheets separators to create a garland of pennants and I wrote the word ***”BIENVENIDA"*** (that's spanish for Welcome) and I added the words ***”Geme"*** (my bestie's nickname), ***”I love U”*** and ***”XOXO”*** using metallic decorative letters. Then glue this decorated cardboard on the bottom of the base card. 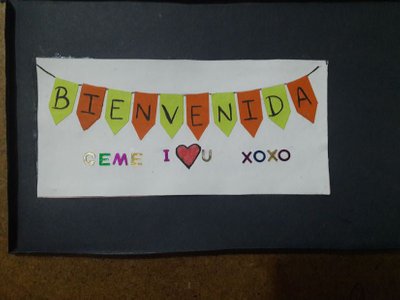 --- **Step 5.** Fold the base card in half again and stick the tabs to the top to form the envelope. It is important to note that in this step you will have a small surplus (0,5cm) of cardboard in the lower and left part of the envelope that you simply have to cut out when the tabs dry. 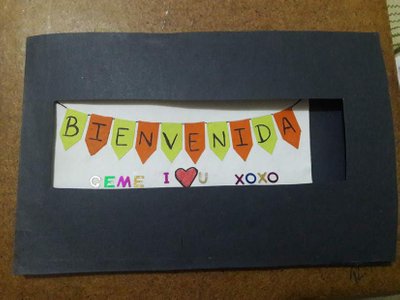 --- **Step 6.** In this step we must create the sliding part of the card, for it, select a card of contrasting color and cut it with the measures indicated in the following image: 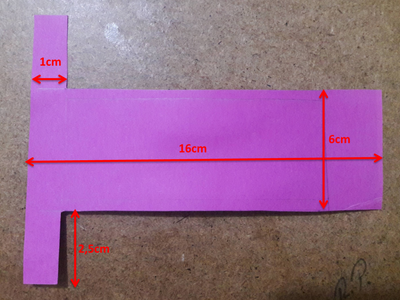 --- **Step 7.** Decorate this last piece with the materials that you have at home and make sure it fits perfectly inside the envelope that we created previously. In this case, I simply use a piece of white paper and a black marker to create a kind of band with the phrase "Te extrañé mucho" that is translated to "I missed you so much" 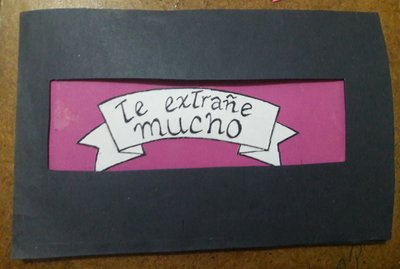 ---
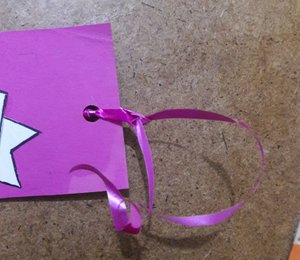
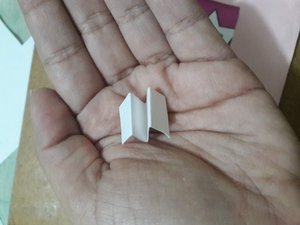
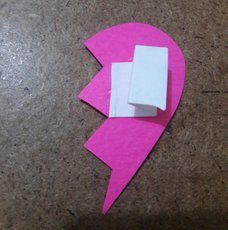
**Step 8.** Make a small hole in the end of the sliding cardboard using a paper hole punch and tie a piece of ribbon approximately 10 cm long so you can pull it out. --- **Step 9.** Draw a heart or any other figure you want and cut it in half. Then, take a small piece of cardboard folded in the shape of an accordion and stick it on the back of the heart.
---
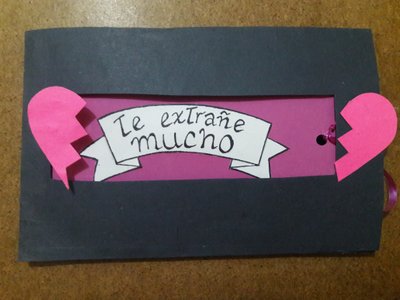
**Step 10**. Glue one of the sides of the heart to the right frame of the envelope and the other side to the left end of the sliding piece as shown in the following image:
---
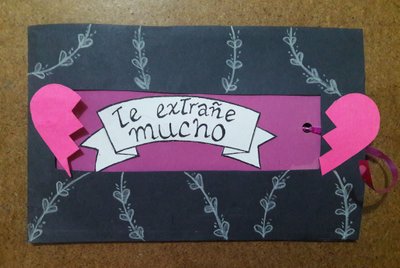
**Paso 11.** Finally, decorate and add the final touches to your card. In this case, I used a white pencil to draw a cute pattern that makes everything look very cohesive.
##
My bestie loved this card and I hope you like it too. Thanks for reading and a virtual hug in the distance for you all!

##
MATERIALS
#
Additionally, I will mention some of the materials I used to make the decorations on the card, but you can omit them and work with the materials you have at home. I invite you to play with your imagination and give a creative use to those elements that you have grabbing dust on the desk.
- Colored post-it notes.
- White pencil.
- Metallic decorative letters.
##
PROCESS
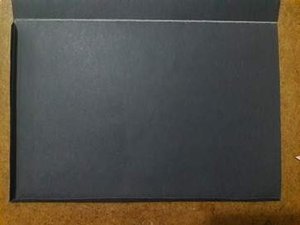
Once you have devised the design, you select the colors you want to work with. In this case, I decided to use black cardboard as a base, and fuchsia and white for decorations.
**Step 1.** Fold the base card (A4 size) in half, make a mark in the middle and extend it again. On one side we draw a rectangle using the measurements shown below and on the other side we draw the lines that will serve as a guide to fold the tabs of the envelope.
---
**Step 2.** Cut out the rectangle we previously marked on the top and the corners of the tabs at the bottom to fold them inwards as shown in the following image. ---
**Step 3.** Cut out a rectangle of cardboard of 13cm x 7cm. It must be a little larger than the opening we did on the previous step since this will have the internal message of the card written and we do not want the edges to look messy. --- **Step 4.** Decorate the internal message according to the celebration. In this case I cut small sheets separators to create a garland of pennants and I wrote the word ***”BIENVENIDA"*** (that's spanish for Welcome) and I added the words ***”Geme"*** (my bestie's nickname), ***”I love U”*** and ***”XOXO”*** using metallic decorative letters. Then glue this decorated cardboard on the bottom of the base card.  --- **Step 5.** Fold the base card in half again and stick the tabs to the top to form the envelope. It is important to note that in this step you will have a small surplus (0,5cm) of cardboard in the lower and left part of the envelope that you simply have to cut out when the tabs dry.  --- **Step 6.** In this step we must create the sliding part of the card, for it, select a card of contrasting color and cut it with the measures indicated in the following image:  --- **Step 7.** Decorate this last piece with the materials that you have at home and make sure it fits perfectly inside the envelope that we created previously. In this case, I simply use a piece of white paper and a black marker to create a kind of band with the phrase "Te extrañé mucho" that is translated to "I missed you so much"  ---
**Step 8.** Make a small hole in the end of the sliding cardboard using a paper hole punch and tie a piece of ribbon approximately 10 cm long so you can pull it out. --- **Step 9.** Draw a heart or any other figure you want and cut it in half. Then, take a small piece of cardboard folded in the shape of an accordion and stick it on the back of the heart.
 |
 |
 |
##
RESULTADO FINAL
Copyright @leribyleri - All Rights Reserved
My bestie loved this card and I hope you like it too. Thanks for reading and a virtual hug in the distance for you all!

#art
#adsactly
#artzone
#ocd-resteem
#elegance
Payout: 0.000 HBD
Votes: 63
More interactions (upvote, reblog, reply) coming soon.