Creating Python virtual environments, installing packages, resolving dependencies, and ensuring everything runs smoothly is no fun, it can take a lot of time and effort.
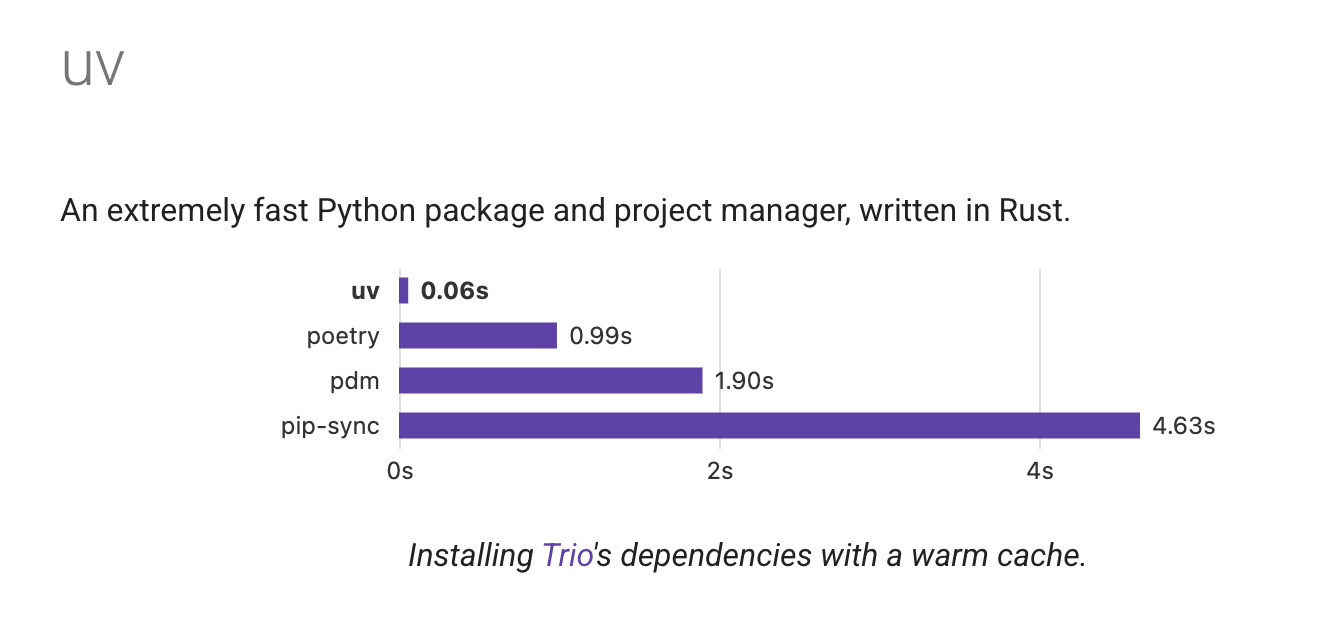
A new tool named UV offers a powerful, streamlined way to handle all these tasks, making your workflow faster and simpler.
Managing Python Projects the Old Way
Before looking into UV, why bother changing your workflow? - Multiple tools and commands: Typically, managing a project involves creating a virtual environment (like with venv), installing packages (with pip), and handling dependency conflicts. - Manual setup: Creating and activating virtual environments is often manual, which can lead to errors or inconsistencies. - Dependency management issues: Without proper locking, package updates can break your code. - Repeated processes: When sharing projects, team members must replicate environment setup, which can be time-consuming.
These issues can slow down development and make collaborations tricky. This is where UV offers a new approach.
What Is UV?
UV is an all-in-one tool designed to handle the essential parts of Python project management seamlessly. It combines multiple features: - Automatic management of virtual environments - Simplified package management - Dependency resolution with lock files - Easy execution of Python tools without installing them globally
Installing UV
Depending on your operating system, installation is straightforward:
For Mac users
brew install uv
For Windows Users
winget install UV
Linux
curl -LsSf https://astral.sh/uv/install.sh | sh
Verify installation
After installation, confirm UV is installed:
uv --version
If the version number appears, you’re ready to proceed.
Creating and Managing Projects with UV
1. Initialize a New Project
Use the uv init command. It creates a new directory with essential files:
uv init my_api_project
(Alternatively, run uv init inside an existing directory.)
This creates:
- A pyproject.toml file (project metadata and dependencies)
- A README.md
- A main.py (entry point for your code)
2. Understanding pyproject.toml
This file replaces older formats like requirements.txt. It contains: - Project info - Dependencies - Metadata
3. Adding Dependencies
Instead of manually installing packages with pip and updating a requirement file, just run:
uv add fastapi
This does two things:
- Adds fastapi to your pyproject.toml
- Installs it into the virtual environment
You don’t need to explicitly create or activate virtual environments, the process is handled behind the scenes.
4. Running Your Code
To run your main script:
uv run main
UV will automatically activate the right environment and execute your code.
Package Management with UV
Lock Files for Reliable Environments
When you add dependencies:
uv add redis sqlalchemy
UV updates pyproject.toml and creates (or updates) uv.lock with every package's exact version, ensuring consistent setups across machines.
Viewing Dependency Trees
To see all dependencies:
uv tree
Handling Development Dependencies
You can add tools like testing frameworks only for development:
uv add pytest --dev
These are stored separately, helping keep production environments clean.
Synchronizing Environments
To set up your environment on a new machine or after changes:
uv sync
This reads the lock file and rebuilds the environment exactly as specified.
Removing Packages
To remove a package:
uv remove sqlalchemy
It updates your environment and configuration automatically.
Running Python Tools Without Installing Globally
Sometimes, you want to format code with tools like Black or check code with Flake8, without installing them globally. UV simplifies this:
uvx black main.py
This command: - Creates a temporary environment - Installs Black there - Runs it on your file - Cleans up afterward
It’s fast, clean, and avoids cluttering your system.
You can also specify specific versions:
uvx black==22.3.0 main.py
And if you need a tool frequently, you can install it globally (but still isolated):
uvx install black
TL;DR
Check out UV if you're looking for a better way to manage your Python projects.