HOLAAA!! Amigos de HIVE espero hayan disfrutado de su fin de semana.
HELLO!! HIVE friends, I hope you enjoyed your weekend.
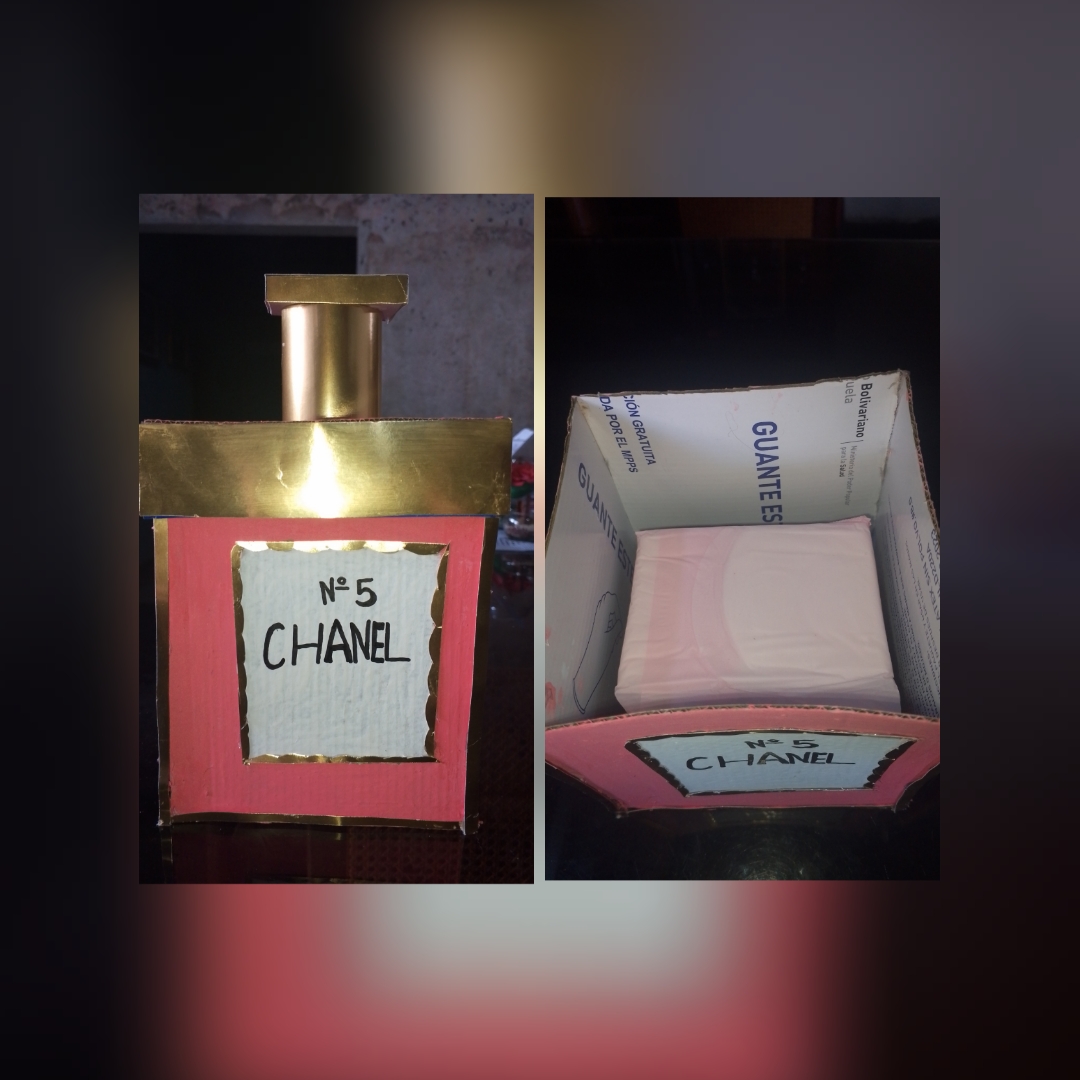
Hoy les quiero compartir mis mas reciente tarea creativa una hermosa caja para tus toallas sanitarias con forma de perfume de Chanel la cual se me ocurrió elaborar. Cuando estaba limpiando mi habitación y note que mis toallas estaban tiradas por la mesa de noche o gavetas y no solo le pareció algo Antihigiénico sino también porque es mi poco práctico debido a que muchas veces cuando buscaba las toallas no aparecían así que decidí hacer un contenedor donde guardarlas por lo decidí crear esta bella y sencilla cajita .
Today I want to share with you my most recent creative task, a beautiful box for your sanitary pads in the shape of a Chanel perfume, which I decided to make. When I was cleaning my room and noticed that my pads were lying around on the nightstand or in drawers, not only did it seem unhygienic, but it was also impractical because many times when I looked for the pads they didn't appear, so I decided to make a container to store them, so I decided to create this beautiful and simple little box.
Basándome en uno de mis productos favoritos y más usados por la marca Chanel que es el CHANEL N 5 conocido por su suave fragancia y su hermosa presentación me pareció ideal que fuera el diseño principal de mi caja debido a que había pensado en un principio en hacer algo sencillo Pero luegó se me ocurrió esta idea y pensé en llevarlo a cabo.
Based on one of my favorite and most used products from the Chanel brand, which is CHANEL N 5, known for its soft fragrance and beautiful presentation, it seemed ideal to me that it should be the main design of my box because I had initially thought of doing something simple. But then this idea came to me and I thought of carrying it out.
A continuación les mostraré los pasos a seguir y los materiales empleados para su elaboración .
Below I will show you the steps to follow and the materials used for its preparation.
🖌️Materiales ✂️
- Una caja de cartón .
- Tijeras.
- Pinturas al frío.
- Pincel de punta fina.
- Un lápiz.
- Un marcador punta fina.
- Cartulina metalizada.
- Silicona.
- Un encendedor.
- Una regla.
- Un tubo de papel higiénico.
- Cinta adhesiva.
🖌️Materials ✂️
- A cardboard box.
- Scissors.
- Freeze-dried paints.
- A fine-point paintbrush.
- A pencil.
- A fine-point marker.
- Metallic cardstock.
- Silicone.
- A lighter.
- A ruler.
- A toilet paper tube.
- Adhesive tape.

♻️Elaboración♻️
♻️Elaboration♻️
- Paso 1
Tome la caja y la corte por el medio para luego medir con la regla y cortar un cuadrado de 14 x 16 cm
Take the box and cut it in half, then measure with the ruler and cut a 14 x 16 cm square.

Repetí el procedimiento y obtuve 5 cuadrados iguales que serían mi caja me dispuse a pegarlos de la siguiente manera.
I repeated the procedure and obtained 5 equal squares that would be my box. I set about gluing them in the following way.
- Paso 2
Ya armada la caja procedo a colocar pequeños trozos de cinta adhesivo en el medio donde iria la etiqueta y de esa forma evitaría que la pintura se pasará a ese sitio .
Once the box is assembled, I proceed to place small pieces of adhesive tape in the middle where the label would go and in this way I would prevent the paint from passing to that place.

Después pinto la caja de color rosa aplicando la primera capa y luego una segunda lo deje secar. Para luego hacer la tapa con la misma medida de los lados de mi caja 14 x 16 cm con 4 cm de diferencia la corte y luego pegue sus extremo de la siguiente manera .
Next, I painted the box pink, applying the first coat and then letting it dry with a second. To make the lid, I used the same measurements as the sides of my box: 14 x 16 cm, with a 4 cm difference. I cut it and then glued the ends together as follows
- Paso 3
Ya teniendo la tapa lista la pinte del mismo color de la caja , procedi a hacer el adorno que iría arriba cortando rectangulos de 5 x 6 cm que luego pegue entre si . Después tome el rollo de papel higiénico lo corte por la mitad y procedo a forrar todo con la cartulina metalizada de la siguiente manera.
With the lid ready, I painted it the same color as the box. I proceeded to make the decoration that would go on top by cutting 5 x 6 cm rectangles that I then glued together. Then I took the toilet paper roll, cut it in half, and proceeded to cover everything with the metallic cardboard as follows.


Una vez hecho esto pegue el adorno a mi tapa y corte algunos pedazos de cartulina 4 x 16 cm para adornar los bordes de la tapa .
Once this was done I glued the ornament to my lid and cut some 4 x 16 cm pieces of cardstock to decorate the edges of the lid.
- Paso 4
Corte algunos trozos de cartulina más finos pero de igual largo para decorar igualmente los bordes de la caja y de la etiqueta retirando primero la cinta adhesiva con cuidado para después aplicar una capa de pintura blanca.
Cut some thinner but equally long pieces of cardstock to decorate the edges of the box and the label, first carefully removing the tape and then applying a coat of white paint.

Ya hecho esto finalmente coloque los bordes de la etiqueta con los trozos de cartulina dorada y luego con el marcador escribí la palabra Chanel .
Once this was done, I finally placed the edges of the label with the pieces of gold cardboard and then with the marker I wrote the word Chanel
Y LISTOO!! tenemos una hermosa caja con forma de perfume Chanel para guardar nuestras toallas sanitarias que no solo es muy bonita si no también práctica y multifuncional no es nada difícil de hacer y no se requiere de demasiados materiales sin más me despido .
AND READY!! We have a beautiful box shaped like a Chanel perfume to store our sanitary napkins that is not only very pretty but also practical and multifunctional, it is not difficult at all to make and does not require too many materials. Without further ado, I say goodbye.
MUCHAS GRACIAS!! por visitar mi blog hasta la próxima publicación .
THANK YOU VERY MUCH!! for visiting my blog until the next post.