Hello, NeedleWorkMonday digital cologne.
Receive a big hug.
I hope you are well from the other side of the screen.
Hola, colonia digital de NeedleWorkMonday.
Reciban un fuerte abrazo.
Espero que estén bien desde el otro lado de la pantalla.
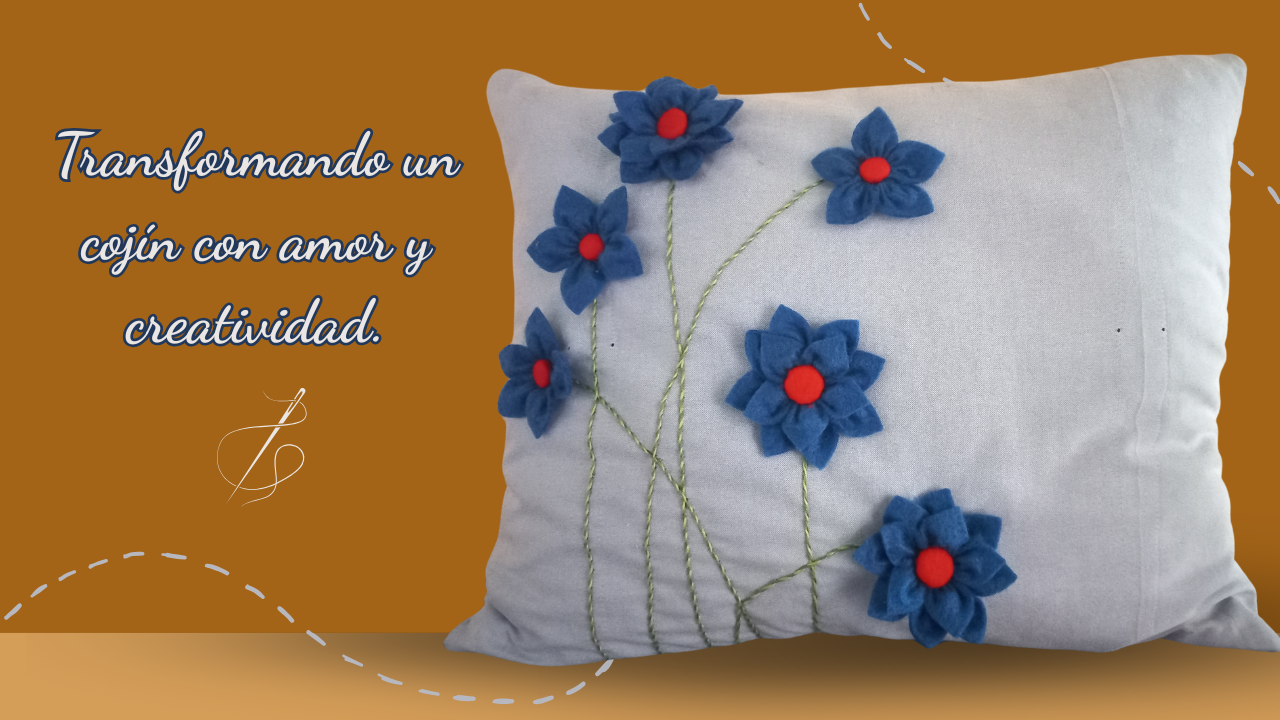
Image edited in Canva / Imagen editada en Canva
Hello my NeedleWorkMonday friends. Today I want to share with you a very special project: a cover for a cushion that has a huge sentimental value for me. It is not just any cushion, it came to me in a casual way, but over time it became a symbol of a memory that I treasure.
It was a gift from friends to my eldest son, when he was about to leave the country for Argentina. At the airport, he was notified that he had excess baggage, and in his haste, he decided to leave me the cushion. Since then, 8 years have passed, and although it has accumulated a lot of use, I have never thought of getting rid of it. For me, it is still the last thing my son gave me before he left, and I want it to continue to accompany me, but this time with a renewed touch.
So I decided to make her a simple, but no less beautiful cover. Something that would give it new life without erasing its essence, so I opted to reuse a shirt that I no longer wear. It seemed like a practical idea, and it allows me to keep with me something that means so much.
To decorate the cover, I chose flowers: simple, but lovely, because I want the design to have a delicate and warm air.
Hola mis amigos de NeedleWorkMonday. Hoy quiero compartir con ustedes un proyecto muy especial: una funda para un cojín que tiene un enorme valor sentimental para mí. No es cualquier cojín, llegó a mí de una manera casual, pero con el tiempo se convirtió en un símbolo de un recuerdo que atesoro.
Fue un regalo que le hicieron los amigos a mi hijo mayor, cuando estaba por irse del país, rumbo a Argentina. En el aeropuerto, le notificaron que tenía exceso de equipaje, y en medio de las prisas, decidió dejarme el cojín. Desde ese momento, ya han pasado 8 años, y aunque ha acumulado mucho uso, jamás he pensado en deshacerme de él. Para mí, sigue siendo lo último que mi hijo me regaló antes de partir, y quiero que siga acompañándome, pero esta vez con un toque renovado.
Así que decidí hacerle una funda sencilla, pero no menos hermosa. Algo que le diera nueva vida sin borrar su esencia, así que opte por reutilizar una camisa que ya no uso. Me pareció una idea práctica, y me permite mantener conmigo algo que significa tanto.
Para decorar la funda, elegí flores: simples, pero encantadoras, porque quiero que el diseño tenga un aire delicado y calido.
Here's how I did it.
Materials:
1. Tape measure.
2. Color thread according to the fabric.
3. Scissors.
4. Felt (blue and red).
5. Buttons (medium and small).
6. Embroidery thread (dark and light green).
7. Shirt for recycling.
8. Pencil.
Aquí les cuento cómo lo hice.
Materiales:
1. Cinta métrica.
2. Hilo del color según la tela.
3. Tijeras.
4. Fieltro (azul y rojo).
5. Botones (Medianos y pequeños).
6. Hilo de bordar (Verde oscuro y claro).
7. Camisa para reciclar.
8. Lápiz.

| https://files.peakd.com/file/peakd-hive/mily0202/23xKxdpkZta7hLUZMw1BT5r9DYJiwhDtqALn9pdUjDe7pTNtTFHGmZGy1j4oobphUoxzU.jpg | https://files.peakd.com/file/peakd-hive/mily0202/Eo4Az2p2YFU5ZhY47vdCn62vdy6t6t7JCtb3U99CdaJRftBmxyxxf4QhXho5ALpE44s.jpg |
|---|---|
To start, I cut two pieces of the shirt 40 cm high by 46 cm wide, adjusting these measurements to the size of the cushion. These will be the base of the cover. For the back, I decided to take advantage of the area where the buttons of the shirt are located. This makes it easier to open and close it, allowing you to get the cushion in and out comfortably, without the need to add zippers or additional snaps. I sewed them together, as you can see it's super simple.
Para empezar, corté dos piezas de la camisa de 40 cm de alto por 46 cm de ancho, ajustando estas medidas al tamaño del cojín. Estas serán la base de la funda. Para la parte de atrás, decidí aprovechar el área donde están ubicados los botones de la camisa. Esto facilita la apertura y el cierre de la misma, permitiendo meter y sacar el cojín con comodidad, sin necesidad de añadir cremalleras o broches adicionales. Las uní con costura, como verán es super sencillo.
| https://files.peakd.com/file/peakd-hive/mily0202/23tmPwzWzJFQjkrCUAVZBMjssmARCyoQ1xtAdLKXGoRw7aX1yQ6Yvxmv8yFg9GhhbvdG7.jpg | https://files.peakd.com/file/peakd-hive/mily0202/23xpAuS48Hg1bAMfxED4nNamMbeo3jbbyZRvBP5AHivRwZFG1pS6B9x4FxoWFkgA1EifX.jpg | https://files.peakd.com/file/peakd-hive/mily0202/23uQxeTFw2LPwoAFSo3AfeJEkZCh5zRMfmwG2dktnnR568sZMXkW8jxDNDZHekJVRAmuQ.jpg |
|---|---|---|
Now comes the decorating part, although it requires a little more patience, I assure you that it is a simple process. First, I cut circles in blue felt with a diameter of 6 centimeters. Then, I divided each circle in half and, in turn, each half I cut again, obtaining four pieces in total. These small pieces will be the petals of our flowers.
Viene la parte del decorado, aunque requiere un poquito más de paciencia, les aseguro que es un proceso sencillo. Primeramente, corte círculos en fieltro azul de 6 centímetro de diámetro. Luego, cada círculo lo dividí a la mitad y, a su vez, cada mitad la volví a cortar, obteniendo cuatro piezas en total. Estas pequeñas piezas serán los pétalos de nuestras flores.
| https://files.peakd.com/file/peakd-hive/mily0202/23xAgHJFbPxUBojprBxoEt6oRKjFdnvrHU2XMY95jtXnNx1tRhoqjwo5d9PrpEMRmiUN1.jpg | https://files.peakd.com/file/peakd-hive/mily0202/23xAe7z6GM5TGMm2rzWiv74FmCrMXLzigVsq8ShCPp2DrbqohwxHk94U9yUWHhJRXJ5kU.jpg |
|---|---|
| https://files.peakd.com/file/peakd-hive/mily0202/23wqpa2AYN81CTUhbsiCeXcVjXvpSnnRiKPfo3iAD1Ntn2PQwvit8aEZfPLRhrhWU75xZ.jpg | https://files.peakd.com/file/peakd-hive/mily0202/23xVM1h4xpBkM7CTZaipM85uFrzbsvcm88SMFBhnjnGqVAmXpBprd1nA66jDG3zkuvXLB.jpg |
|---|---|
Once all the pieces have been cut, I will assemble two types of flowers, one small and the other a little larger.
For the small flower, I need 5 pieces. I take the first one and sew a seam through the base, then I incorporate the others one by one. When I have them all, I pull the thread to gather them and fix them well with stitching. And that's it, our first flower is finished.
For the larger flower, I need 13 pieces, divided as follows: 5 pieces to form another small flower and 8 pieces to give it more size and volume. I will do the same technique as the ruffling. Once both are ready, I superimpose the small flower over the larger one, achieving a layered effect. And so I have the two types of flowers for decoration. Simple, but charming.
Ya cortadas todas las piezas, armare dos tipos de flores, una pequeña y otra un poco más grande.
Para la flor pequeña, necesito 5 piezas. Tomo la primera y paso una costura por la base, luego voy incorporando las demás una por una. Cuando las tenga todas, jalo el hilo para fruncirlas y fijo bien con costura. Y listo, nuestra primera flor está terminada.
Para la flor más grande, necesito 13 piezas, divididas de la siguiente manera: 5 piezas para formar otra flor pequeña y 8 piezas para darle más tamaño y volumen. Le hare la misma técnica del fruncido. Una vez que ambas estén listas, sobrepongo la flor pequeña sobre la más grande, logrando un efecto de capas. Y así ya tengo los dos tipos de flores para la decoración. Sencillas, pero con encanto.
| https://files.peakd.com/file/peakd-hive/mily0202/23xVPmDb2cdJhbZ1JNULnLQY1xJj7kQQWKysEhGjnkcVGiPrb9C1mc2TLXzG6hSZRw9zh.jpg | https://files.peakd.com/file/peakd-hive/mily0202/23wXJGkxHMue5reVQQQ9d84pnUtuPPXTWkqmdvi57ERQUz2uKd3zTiUJ1A9ofAfonTxHy.jpg |
|---|---|
| https://files.peakd.com/file/peakd-hive/mily0202/23yJLU2YPLuTSJhv6yDFiMZamK8BtLJ2SgGkxd818CtWcZyy5yLCxPsd7Bx46Qnb9mdyP.jpg | https://files.peakd.com/file/peakd-hive/mily0202/23x1BKPomcfDtuQjU9UvDXDR1MpCDnoQW4Agz661XceF1dxEn9qvT8Z3X3grTMqLMYq7b.jpg |
|---|---|
For the last detail of the flower and to make it completely ready, I will make a small circle in red felt to cover a button. Once the button is lined, I simply place it in the center of the flower and fix it well with stitching. Giving it the perfect finish.
Para el último detalle de la flor y dejarla completamente lista, hare un pequeño circulo en fieltro rojo para forrar un botón. Una vez forrado el botón, simplemente lo coloco en el centro de la flor y lo fijamos bien con costura. Dándole el acabado perfecto.
| https://files.peakd.com/file/peakd-hive/mily0202/23vsQY6SYY7Wgd3QzCweMx7iguWppyCnLkiGpvCvtcfbBLC4nTYTS2seGJhbQUANUmkDp.jpg | https://files.peakd.com/file/peakd-hive/mily0202/23xyWxTKNmWLau7qJ7oVy42RPMbUsEjBx24Wizb5jzCR8j7x9jpke3isymp4NvWDrhQtC.jpg |
|---|---|
In the next step design some stems to accompany our flowers. With the help of a soft pencil I draw lines in different directions on the fabric, at this point it is up to you. I use two embroidery threads in different shades of green for contrast. The embroidery I use is the cord stitch. And now all that's left to do is to glue the flowers.
En el siguiente paso diseñe unos tallos para que acompañen a nuestras flores. Con la ayuda de un lápiz de tono suave trazo líneas en diferentes direcciones sobre la tela, en este punto ya queda a criterio de ustedes. Uso dos hilos de bordar en diferentes tonos de verde para dar contraste. El bordado que utilizo es el punto cordoncillo. Y finalizado solo queda pegar las flores.
| https://files.peakd.com/file/peakd-hive/mily0202/23xVH5n6EpgPdWoMLAkKtHetc2jYDqLECPDrK9aLch8GTg7JfavRBqKxLbw8dFyCyEup7.jpg | https://files.peakd.com/file/peakd-hive/mily0202/23yJJKaPWj5pqy54tm2e9wm3bZgKxRT2EGLrc1cuHh9xxRSCYfQoEJ7tPZhNS6JVEs8ee.jpg |
|---|---|
| https://files.peakd.com/file/peakd-hive/mily0202/EoAaJiRxSEPVmkF4xvwM8B8AUsgtHW4W5YYKx5AbxACJCf2uWPRkkvdVZgoPCaoiwun.jpg | https://files.peakd.com/file/peakd-hive/mily0202/23xyVMNQk5kXYZ5fb9rPvbn9WFxuwsMXoZ2NgQuCKELLQTeFwkMwsouZa8f26NG7aFt9e.jpg |
|---|---|
This is how the cover looks on the cushion. I felt that, with this project, I am not only renewing my cushion, but also the love that surrounds it. I hope you enjoy it as much as I do.
Thank you for making it this far.
Thank you for making it this far.
Así queda la funda en el cojín. Sentí que, con este proyecto, no solo renuevo mi cojín, sino también el cariño que lo envuelve. Espero que lo disfruten tanto como yo.
Gracias por llegar hasta aquí.
| https://files.peakd.com/file/peakd-hive/mily0202/EpXLRLJSfB6DSsL5oVNGew9oLTMS8HSd83jRrirHmAChdzj7uEEtQby62BGgxV1hpCW.jpg | https://files.peakd.com/file/peakd-hive/mily0202/23zkpVVhRHeQkhk13UsYcyDU27JLjkJPt5VZtPk7s9F2rQcACAh9f8txzEmgQHXt1mez6.jpg |
|---|---|
Fotos de mi autoría / Photos by me
Traducción: DeepL Translate versión gratuita. / Translation: DeepL Translate Free version.
Traducción: DeepL Translate versión gratuita. / Translation: DeepL Translate Free version.