Hola, colonias digitales que conforman el universo de Hive. Reciban un fuerte abrazo.
Espero que estén bien desde el otro lado de la pantalla.
Hello, digital colonies that make up the Hive universe. Receive a big hug.
I hope you're doing well from the other side of the screen.
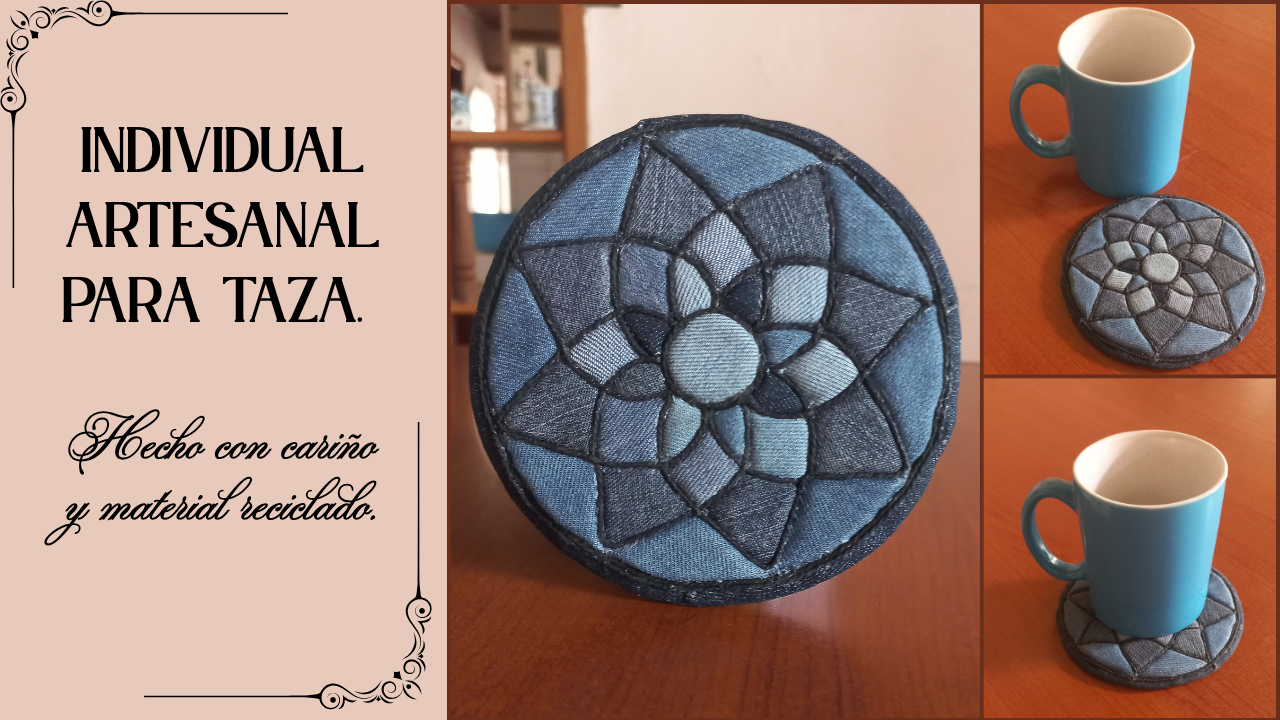
Imagen editada en Canva / Image edited in Canva
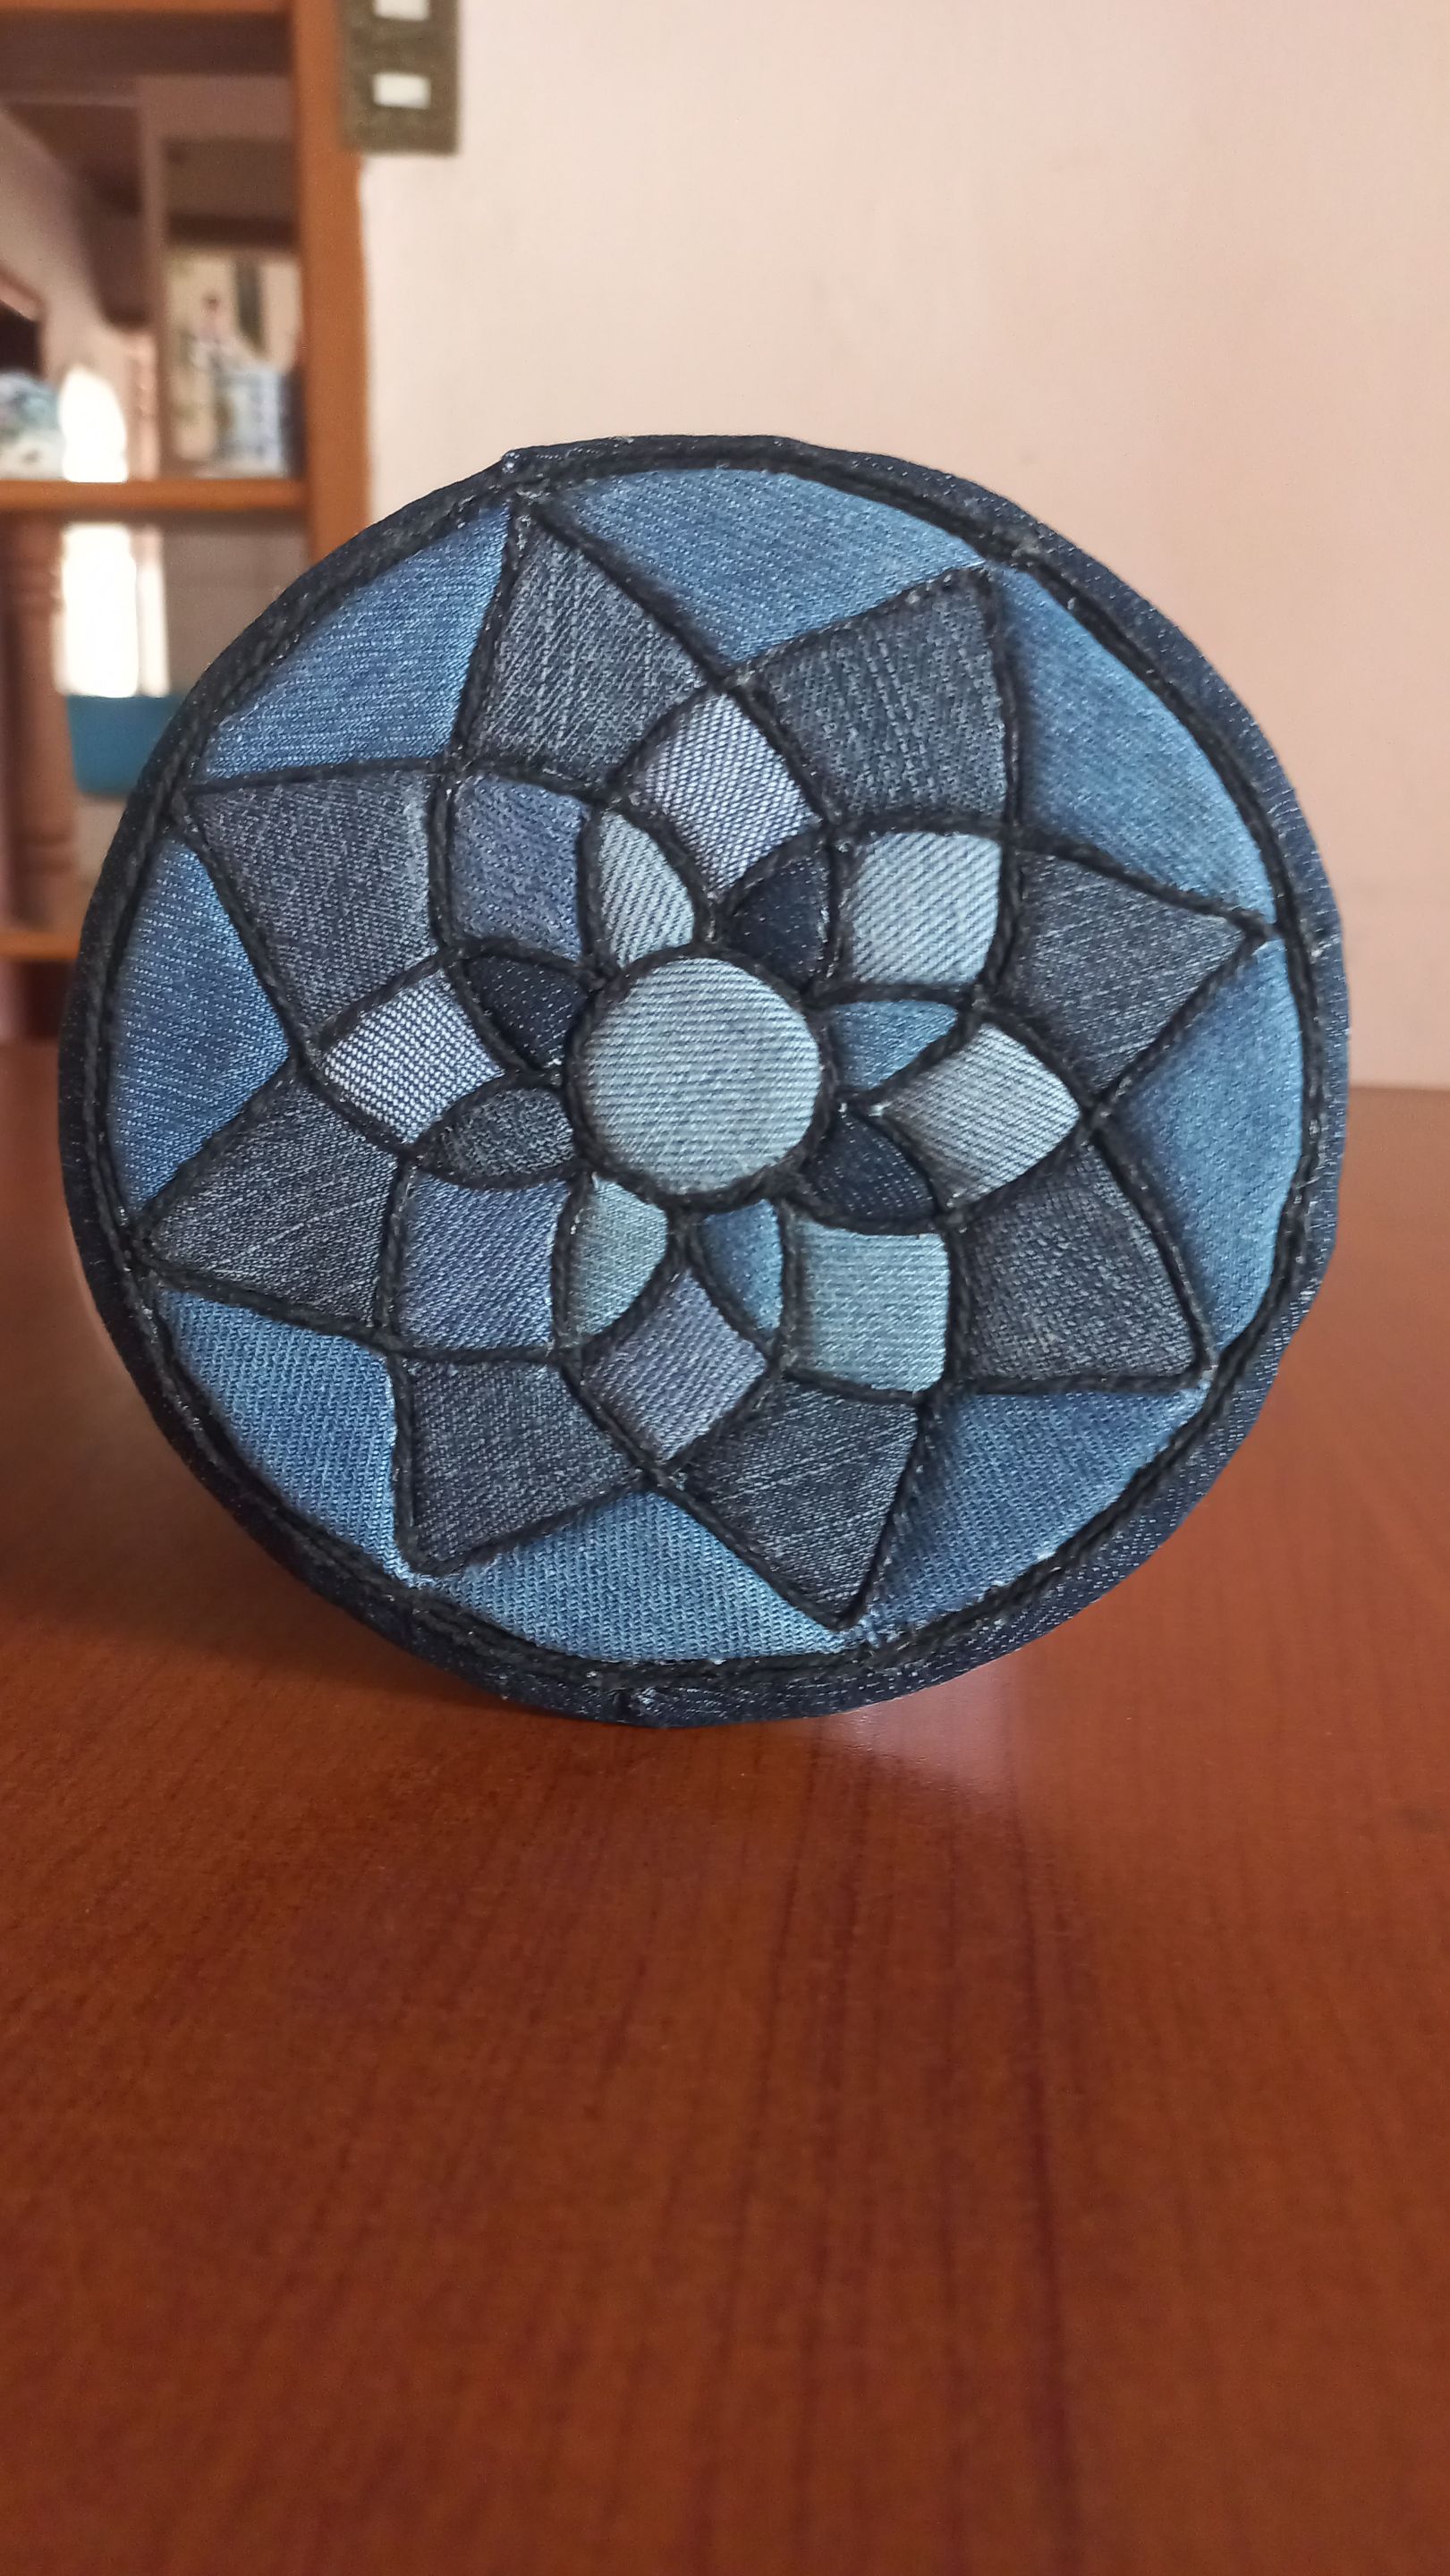
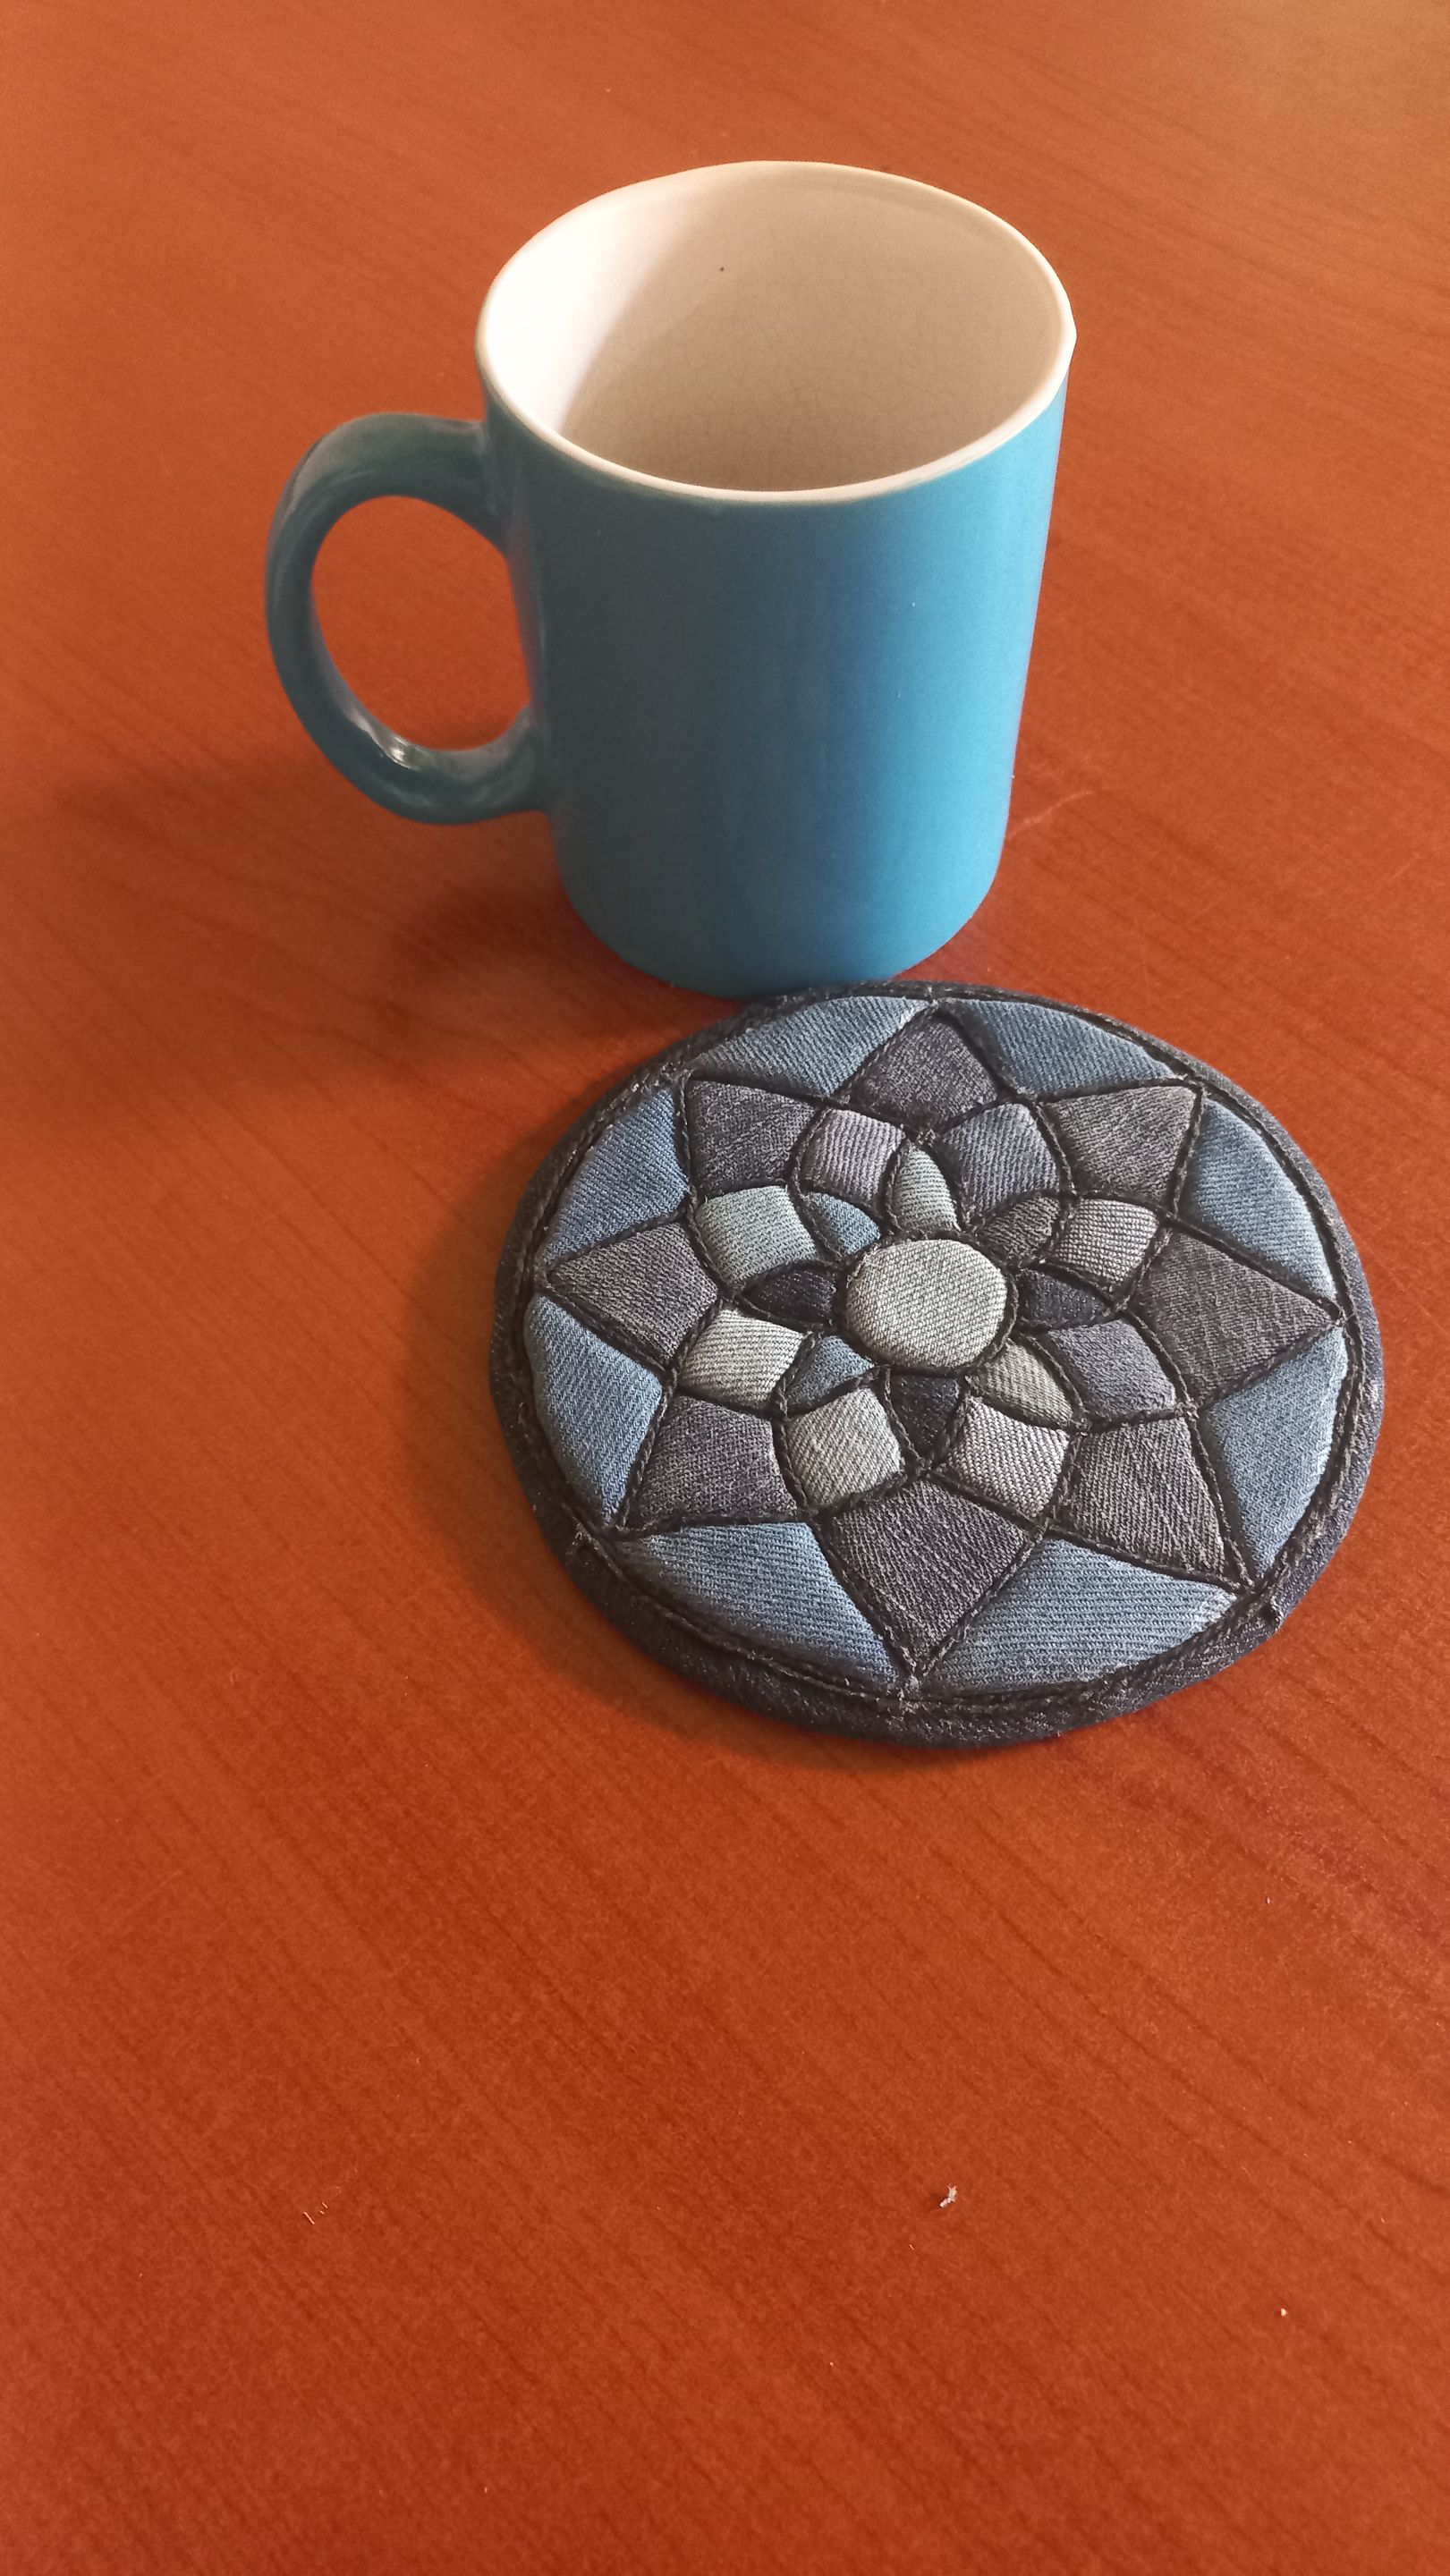
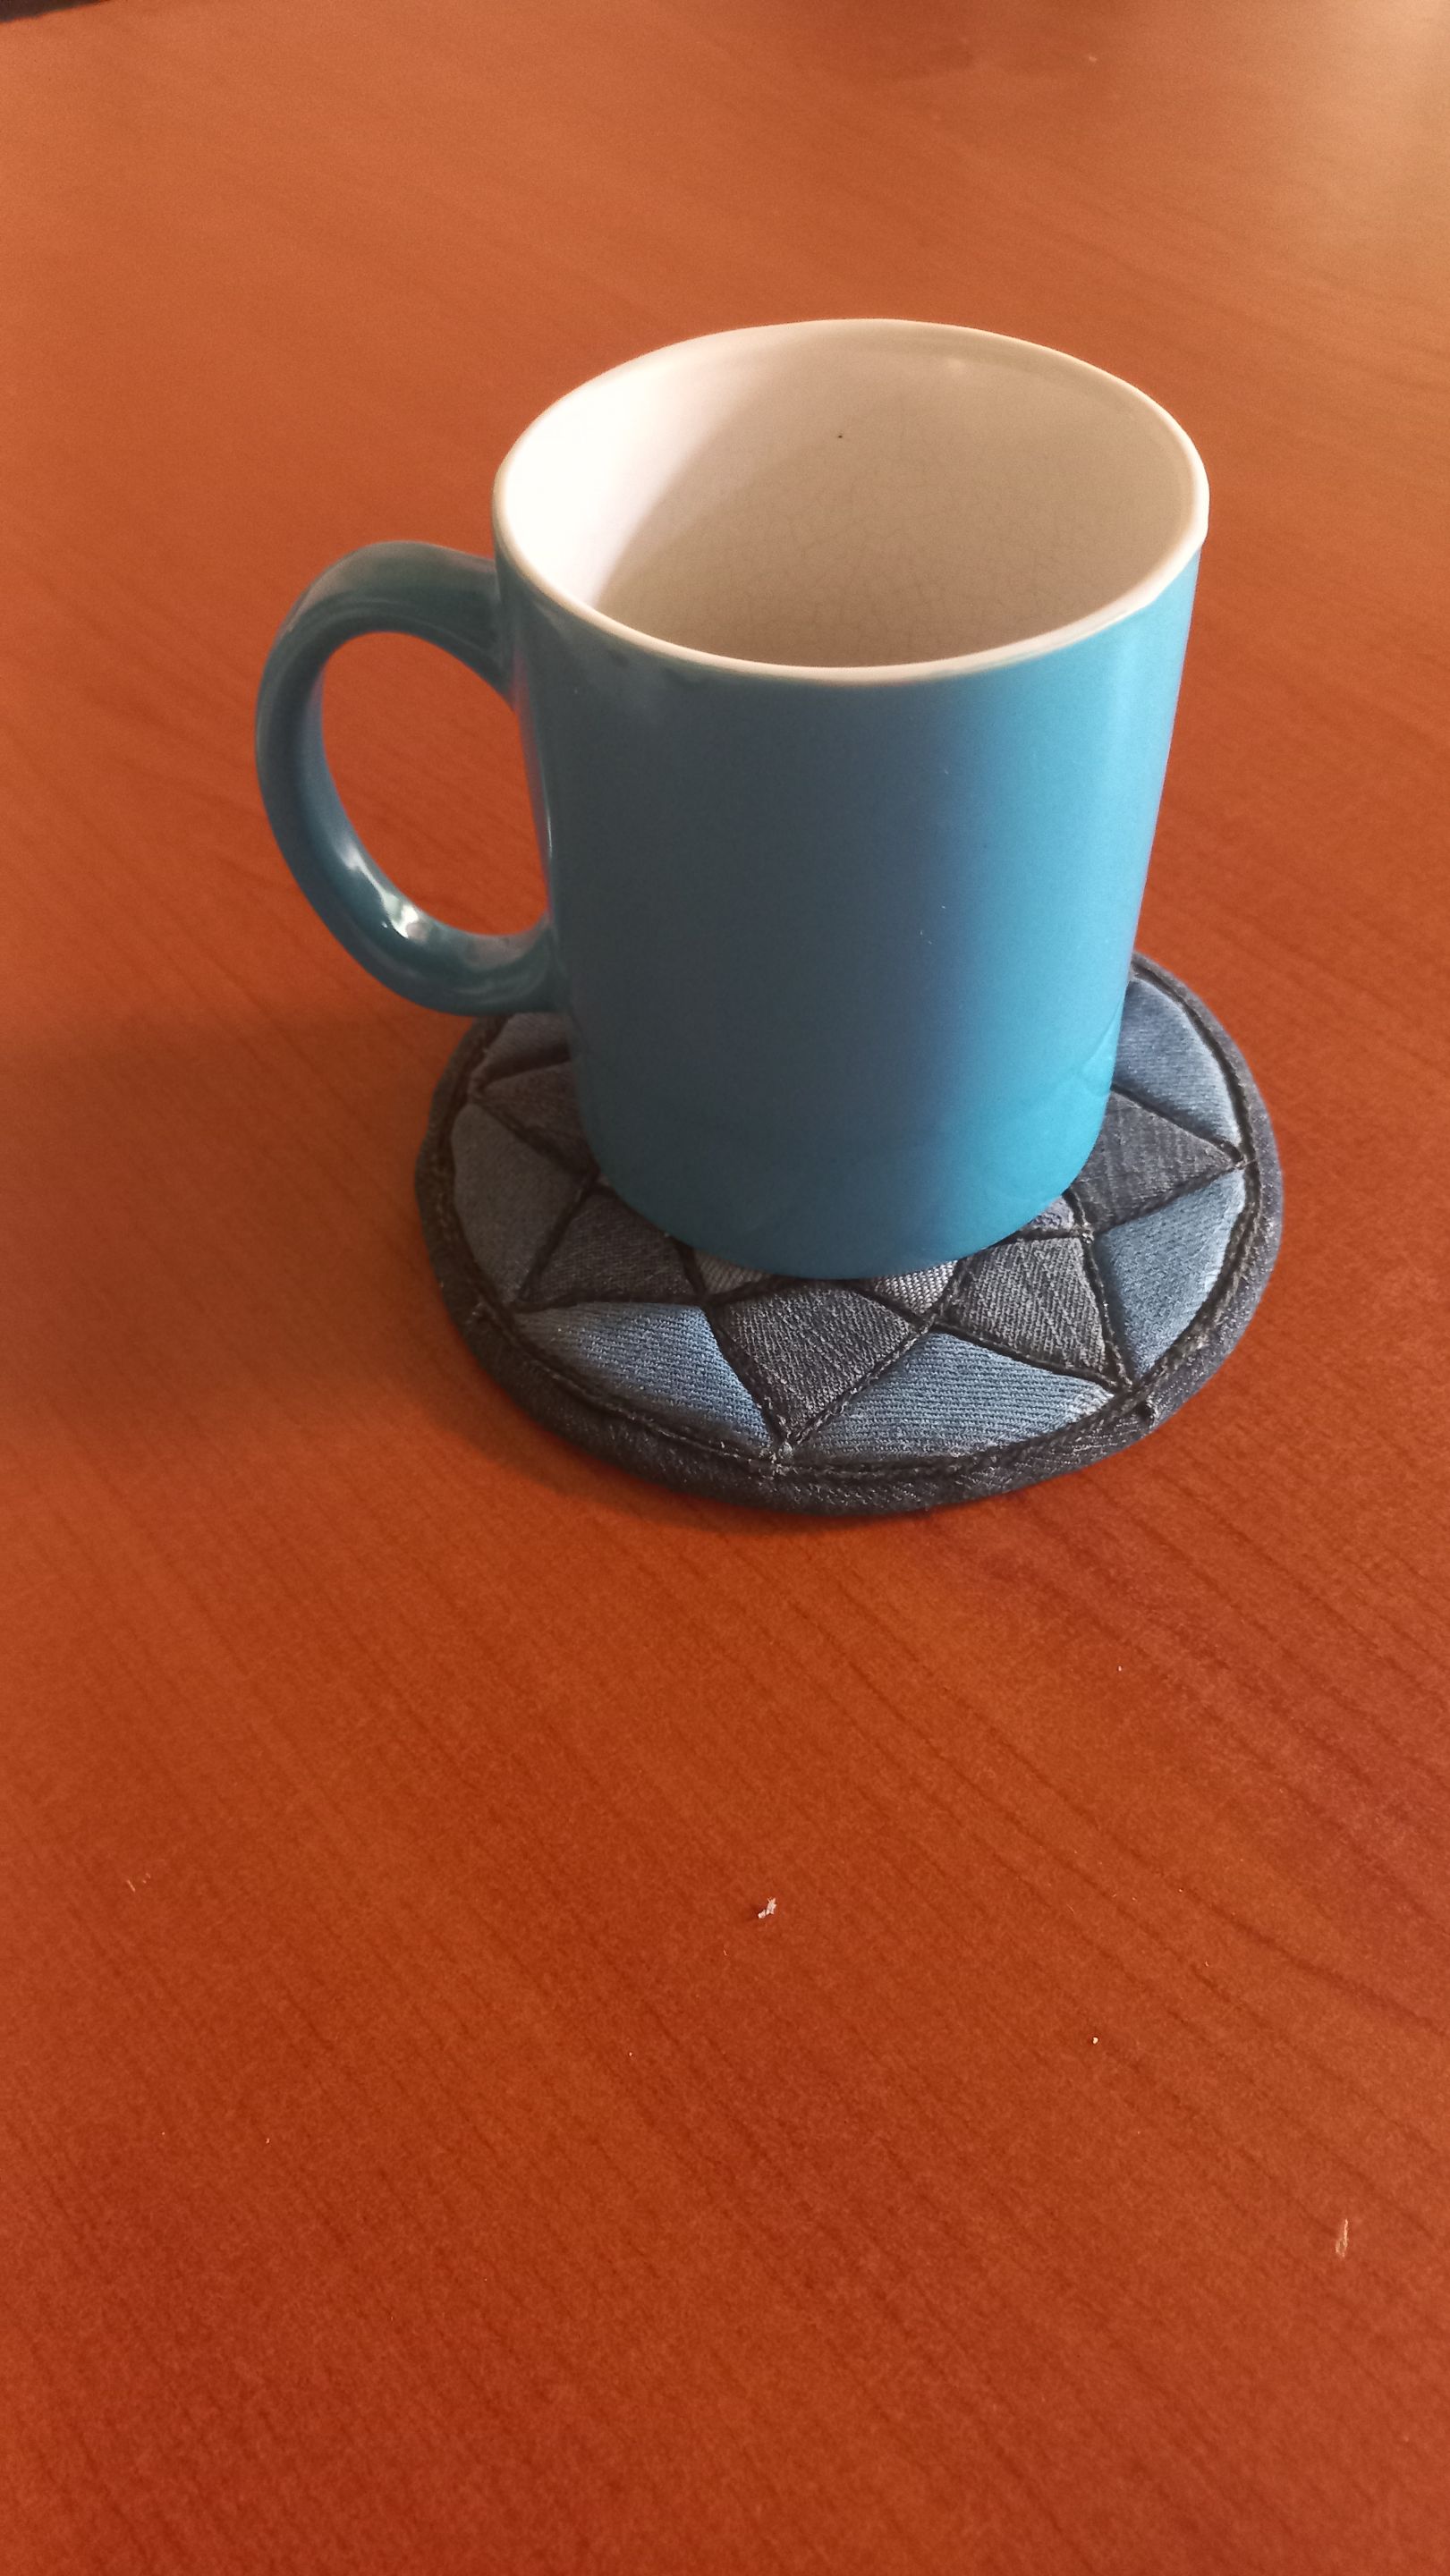
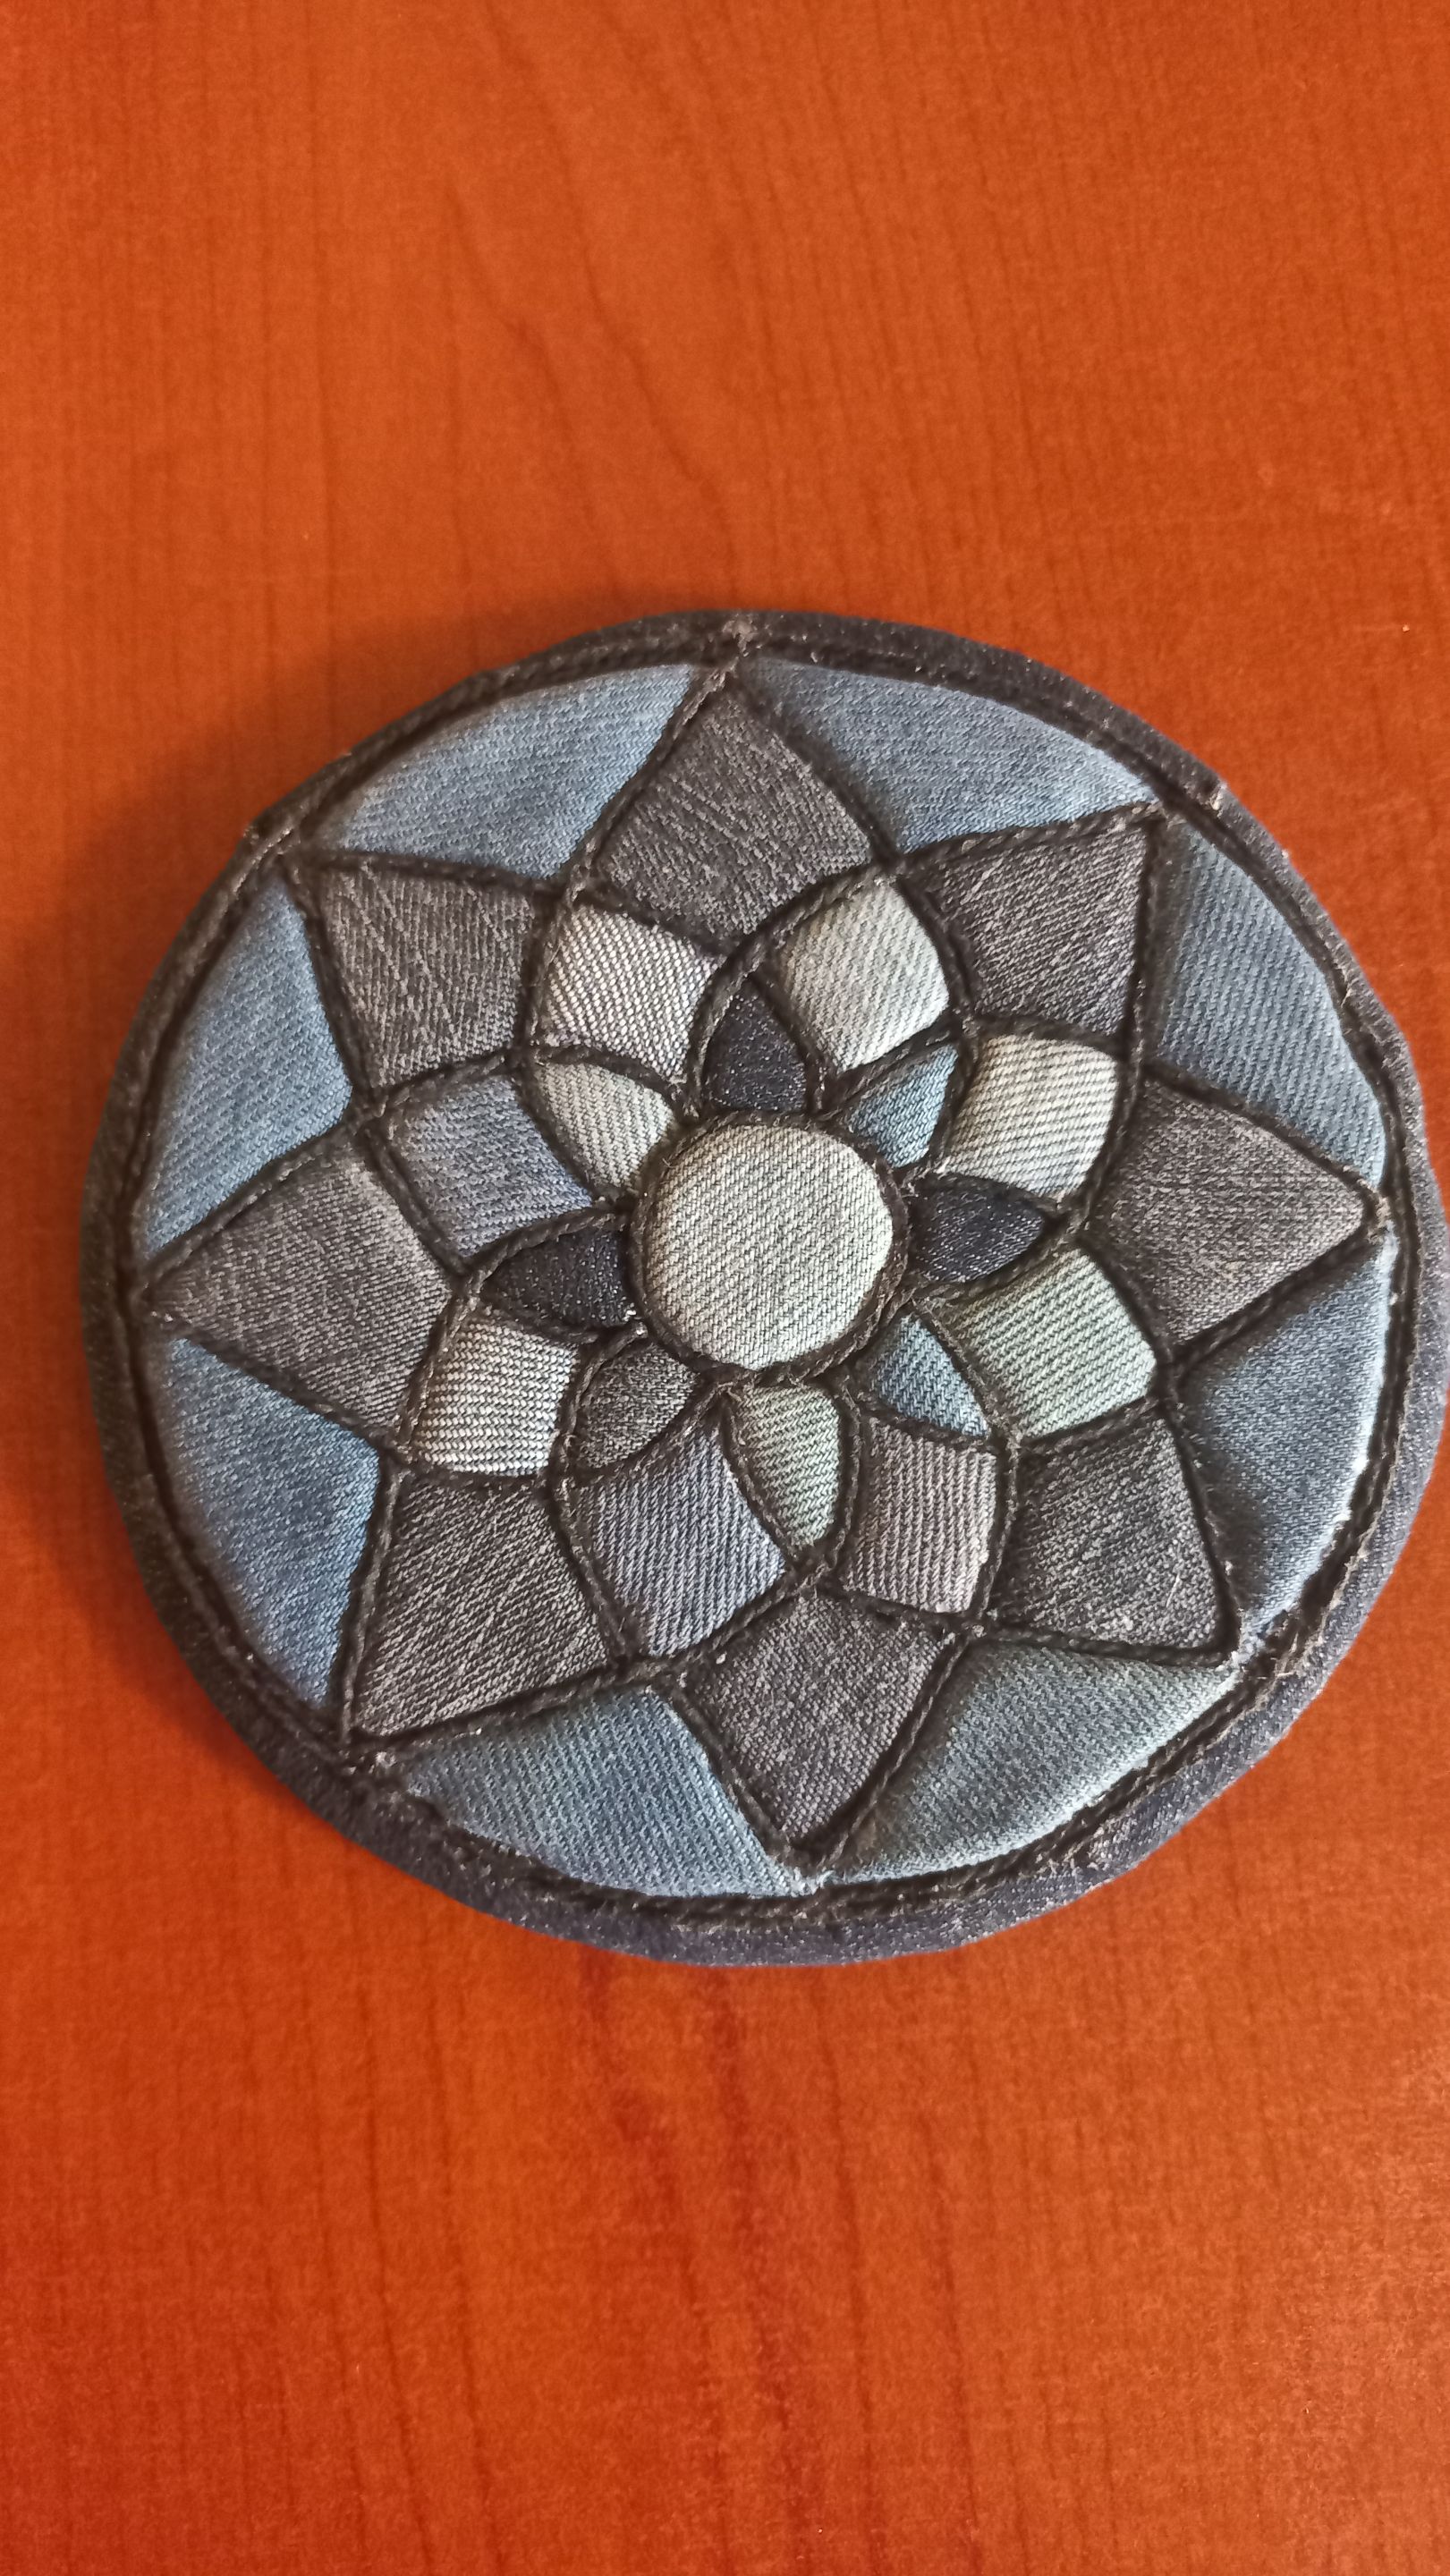
Hola, mis amigos creativos de HIVE DIY. Hoy les traigo un proyecto que me llena de alegría por partida doble: por lo que representa y a quién va dirigido. Se trata de un individual para taza, con temática floral en forma de mosaico, elaborado con materiales reciclados aproximadamente en un 80%.
La idea nació como un regalo especial para una amiga muy querida que acaba de ser ascendida en su trabajo y estará estrenando nueva oficina, así que pensé en hacerle una pieza única y hecha a mano, que no solo fuera útil y decorativa, sino que también llevará un mensaje de cariño, admiración y mis buenos deseos en esta nueva etapa.
Es un proyecto muy sencillo pero lleno de la mejor intención, que nos recuerda que los logros se celebran con constancia y dedicación. Así que los invitos a que me acompañen en el paso a paso.
Hello, my creative friends at HIVE DIY. Today I bring you a project that fills me with joy for two reasons: what it represents and who it is intended for. It is a coaster for a cup, with a floral mosaic theme, made from approximately 80% recycled materials.
The idea came about as a special gift for a dear friend who had just been promoted at work and was moving into a new office. I wanted to make her something unique and handmade that would not only be useful and decorative, but would also convey my affection, admiration, and best wishes for this new stage in her life.
It is a very simple project, but one filled with the best of intentions, reminding us that achievements are celebrated with perseverance and dedication. So, I invite you to join me in this step-by-step process.
Materiales:
1. Bandeja de anime (poliestireno expandido).
2. Retazos de tela (jeans de diferentes tonos).
3. Cordón fino de algodón.
4. Papel para calcar.
5. Cúter.
6. Tijera.
7. Regla.
8. Lápiz.
9. Silicon líquido.
10. Pega escolar.
11. Pincel.
12. CD (en desuso).
13. Diseño.
14. Pinza o cualquier objeto con punta semi redondeada.
15.Pegamento de contacto o cualquier pegamento fuerte.
Materials: |https://files.peakd.com/file/peakd-hive/mily0202/23xARawT3KUux8ubkM5x2ZGcK4Z9oQrCQrMYiZfza2MJKqFZnKXbUMm2aF2YS9bAvG9GN.jpg|https://files.peakd.com/file/peakd-hive/mily0202/23xVPJDHb6qUtVsnVyyBs6xqoNoFd57FdnDZskcZFvVjtrm6qGjJNjYU6udfaaWg1Y9QR.jpg| |-|-| ---
1. Anime tray (expanded polystyrene).
2. Fabric scraps (jeans in different shades).
3. Thin cotton cord.
4. Tracing paper.
5. Cutter.
6. Scissors.
7. Rule.
8. Pencil.
9. Liquid silicon.
10. School glue.
11. Paintbrush.
12. CD (obsolete).
13. Design.
14. Tweezers or any object with a semi-rounded tip.
15. Contact adhesive or any strong adhesive.
Paso 1: Lo primero que hago es tomar la bandeja de anime (poliestireno expandido) y corto un círculo del mismo tamaño que el diseño. En mi caso, mide 12,5 cm de diámetro, pero ustedes pueden adaptarlo según el estilo que quieran darle al individual.
Luego, con ayuda de papel para calcar (ese aliado que nunca falla), transfiero el diseño al círculo con mucho cuidado. Y es aquí donde viene la parte delicada: con el cúter, hago cortes muy suaves siguiendo todas las líneas del diseño. El truco está en no pasarse de profundidad, es decir solo marcar, sin atravesar la pieza.

|https://files.peakd.com/file/peakd-hive/mily0202/23w2oGnRbrd6RWaQbPbr5rLrNvkeMeoq9Y4AuwkVWBviFpRgo6HqAEWub2gpTm7ZX5HqP.jpg|https://files.peakd.com/file/peakd-hive/mily0202/23wqiCo4SAZM42YuGaJfDmR7ZLQEoZ9fEk5dzScfatsmevwrx8cc6MRJmt7F8WZJwmzkN.jpg|
|-|-|
---
Luego, con ayuda de papel para calcar (ese aliado que nunca falla), transfiero el diseño al círculo con mucho cuidado. Y es aquí donde viene la parte delicada: con el cúter, hago cortes muy suaves siguiendo todas las líneas del diseño. El truco está en no pasarse de profundidad, es decir solo marcar, sin atravesar la pieza.
Step 1: The first thing I do is take the Styrofoam tray and cut out a circle the same size as the design. In my case, it measures 12.5 cm in diameter, but you can adapt it according to the style you want to give the placemat.
Then, with the help of tracing paper (that trusty ally), I carefully transfer the design onto the circle. And this is where the tricky part comes in: using the craft knife, I make very gentle cuts along all the lines of the design. The trick is not to cut too deeply, i.e., just mark the surface without cutting through the piece.
Paso 2: Tomo uno de los retazos de tela que tenga más o menos el mismo tamaño que la sección del diseño donde lo voy a colocar. En este caso, comienzo por el centro de la flor.
Con ayuda de la pinza o cualquier objeto con la punta semi redondeada, empiezo a introducir los bordes del retazo por los cortes que hice previamente con el cúter. La idea es ir metiendo la tela con suavidad. Sin presionar mucho, solo lo justo para que se vea firme, pero sin romper el anime.

|https://files.peakd.com/file/peakd-hive/mily0202/23xVFDLTvxRMC6sjLV2XL9mVVRyWDLfdKh4LkqSkw8Ct6Deon6iWaqJKuee2XeQWs3afe.jpg|https://files.peakd.com/file/peakd-hive/mily0202/23uFU9epZKmx2fPLcMMtXqSTAo9EKDHhGVpjCg3Cy4k72RGzxfE8yCfE4YmtxAvGB4UKX.jpg|https://files.peakd.com/file/peakd-hive/mily0202/23tmKifknEpkNikLDTATwVhVjb7rvCP1ULFMBjYa5BsmQXeaoEZDnn2zXHhDa654KCMhV.jpg|
|-|-|-|
---
Con ayuda de la pinza o cualquier objeto con la punta semi redondeada, empiezo a introducir los bordes del retazo por los cortes que hice previamente con el cúter. La idea es ir metiendo la tela con suavidad. Sin presionar mucho, solo lo justo para que se vea firme, pero sin romper el anime.
Step 2: I take one of the fabric scraps that is roughly the same size as the section of the design where I am going to place it. In this case, I start at the center of the flower.
Using the tweezers or any object with a semi-rounded tip, I begin to insert the edges of the scrap fabric into the cuts I made previously with the utility knife. The idea is to gently insert the fabric. Without pressing too hard, just enough to make it look firm, but without breaking the anime.
Paso 3: En este punto escojo trocitos de tela en distintos tonos. Los voy colocando uno a uno en las secciones del diseño, siguiendo la forma y cuidando que los colores se complementen o se destaquen entre sí. Hasta cubrir todo el diseño.

|https://files.peakd.com/file/peakd-hive/mily0202/23tvijDxu7UJvZ7vUiANtfiig4u4kMf2yt49vTYHbePKR4aoE3DETDamXRUy7dfhn4ZhC.jpg|https://files.peakd.com/file/peakd-hive/mily0202/23tmJA5ekR1GgfmUcxeL2Mkejz7xLt7wTWKtfKowpoPDMETAJnkxHxrHEjavyzjKoCCu6.jpg|
|-|-|
---
Step 3: At this point, I choose pieces of fabric in different shades. I place them one by one in the sections of the design, following the shape and making sure that the colors complement or stand out from each other. I continue until the entire design is covered.
Paso 4: Es el turno de la base y para ello corto un círculo de tela de unos 14 cm de diámetro, un poquito más grande que el diseño, para que tenga margen. Ubico el centro y pego con pega de contacto el CD reciclado, esto le dará firmeza. Luego, tomo la parte del diseño que ya decoré con tela y la pego encima del CD, de modo que este quedé en el centro de las dos capas.
Con el borde sobrante de la tela base, termino de cubrir todo el contorno, ajustando bien.

|https://files.peakd.com/file/peakd-hive/mily0202/23vhuZsgBPvikzRUmpvVB5BXLXYqDerJcc6QA1BTUiKcX4w3Z41zM1zW8MDmwQrvY3LME.jpg|https://files.peakd.com/file/peakd-hive/mily0202/23tvgMr6ydnxWJNXDqgMaGgNBuuYnjRjtKFudAnn2FFy2JbdzEgjaNkSeaBxekd9PPJay.jpg|
|-|-|

|https://files.peakd.com/file/peakd-hive/mily0202/23uFRMgg4hv7gWjmAuZ2zDUdgt1jrqVfAcARUEFnKACDfT8EMER4275hnP7bv5N7EJmeh.jpg|https://files.peakd.com/file/peakd-hive/mily0202/23w2uUJNuhBx6fwMSBHQ8CNywhXUUTMiBtnMELfp6utoBAHusWHQrwUmjGuRwpwS2jPJp.jpg|
|-|-|
---
Con el borde sobrante de la tela base, termino de cubrir todo el contorno, ajustando bien.
Step 4: Now it's time for the base. I cut a circle of fabric about 14 cm in diameter, a little larger than the design, to allow for some margin. I locate the center and glue the recycled CD with contact adhesive to give it stability. Then, I take the part of the design that I already decorated with fabric and glue it on top of the CD, so that it is in the center of the two layers.
With the excess edge of the base fabric, I finish covering the entire outline, adjusting it well.
Paso 5: Ya casi en la recta final solo me queda hacer esos pequeños detalles que hacen la gran diferencia. Para cubrir las uniones y darle un acabado más delicado, uso el cordón fino que pego siguiendo cada línea del diseño.
Después, preparo una mezcla, 70% de pegamento escolar y 30% de agua. Con un pincel suave, aplico esta mezcla por toda la superficie del individual. Este paso no solo fija la tela, sino que le da esa consistencia firme.

|https://files.peakd.com/file/peakd-hive/mily0202/23yTmQQpEnyAs4QHfzYYevjJQDZymUoSNzaAM9wMNmu9JKWW1RsqNKV9ji1xp196aNWSq.jpg|https://files.peakd.com/file/peakd-hive/mily0202/23wqeQtXxyZE6Wh9pKWSCRVjVEdyxRkCaZftw7EmNNJXrMi3Vs3uuDvNtwYa9cPzLFaMy.jpg|
|-|-|
---
Después, preparo una mezcla, 70% de pegamento escolar y 30% de agua. Con un pincel suave, aplico esta mezcla por toda la superficie del individual. Este paso no solo fija la tela, sino que le da esa consistencia firme.
Step 5: Now that I'm almost at the finish line, all that's left to do is those little details that make a big difference. To cover the seams and give it a more delicate finish, I use thin cord that I glue along each line of the design.
Next, I prepare a mixture of 70% school glue and 30% water. Using a soft brush, I apply this mixture to the entire surface of the placemat. This step not only secures the fabric, but also gives it a firm consistency.
Espero que seque muy bien y nuestro individual especial para taza ya está listo. Deseo que este proyecto los inspire a crear, y a regalar detalles que hablen por sí solos.
Gracias por acompañarme en este proceso.
---
Gracias por acompañarme en este proceso.
I hope it dries well, and our special personalized mug is ready. I hope this project inspires you to create and give gifts that speak for themselves.
Thank you for accompanying me in this process.
Foto de mi autoría / Photo by me
Traducción: DeepL Translate versión gratuita. / Translation: DeepL Translate Free version.
---

Traducción: DeepL Translate versión gratuita. / Translation: DeepL Translate Free version.