Hola, colonias digitales que conforman el universo de Hive. Reciban un fuerte abrazo.
Espero que estén bien desde el otro lado de la pantalla.
Hello, digital colonies that make up the Hive universe. Receive a big hug.
I hope you're doing well from the other side of the screen.

Imagen editada en Canva / Image edited in Canva
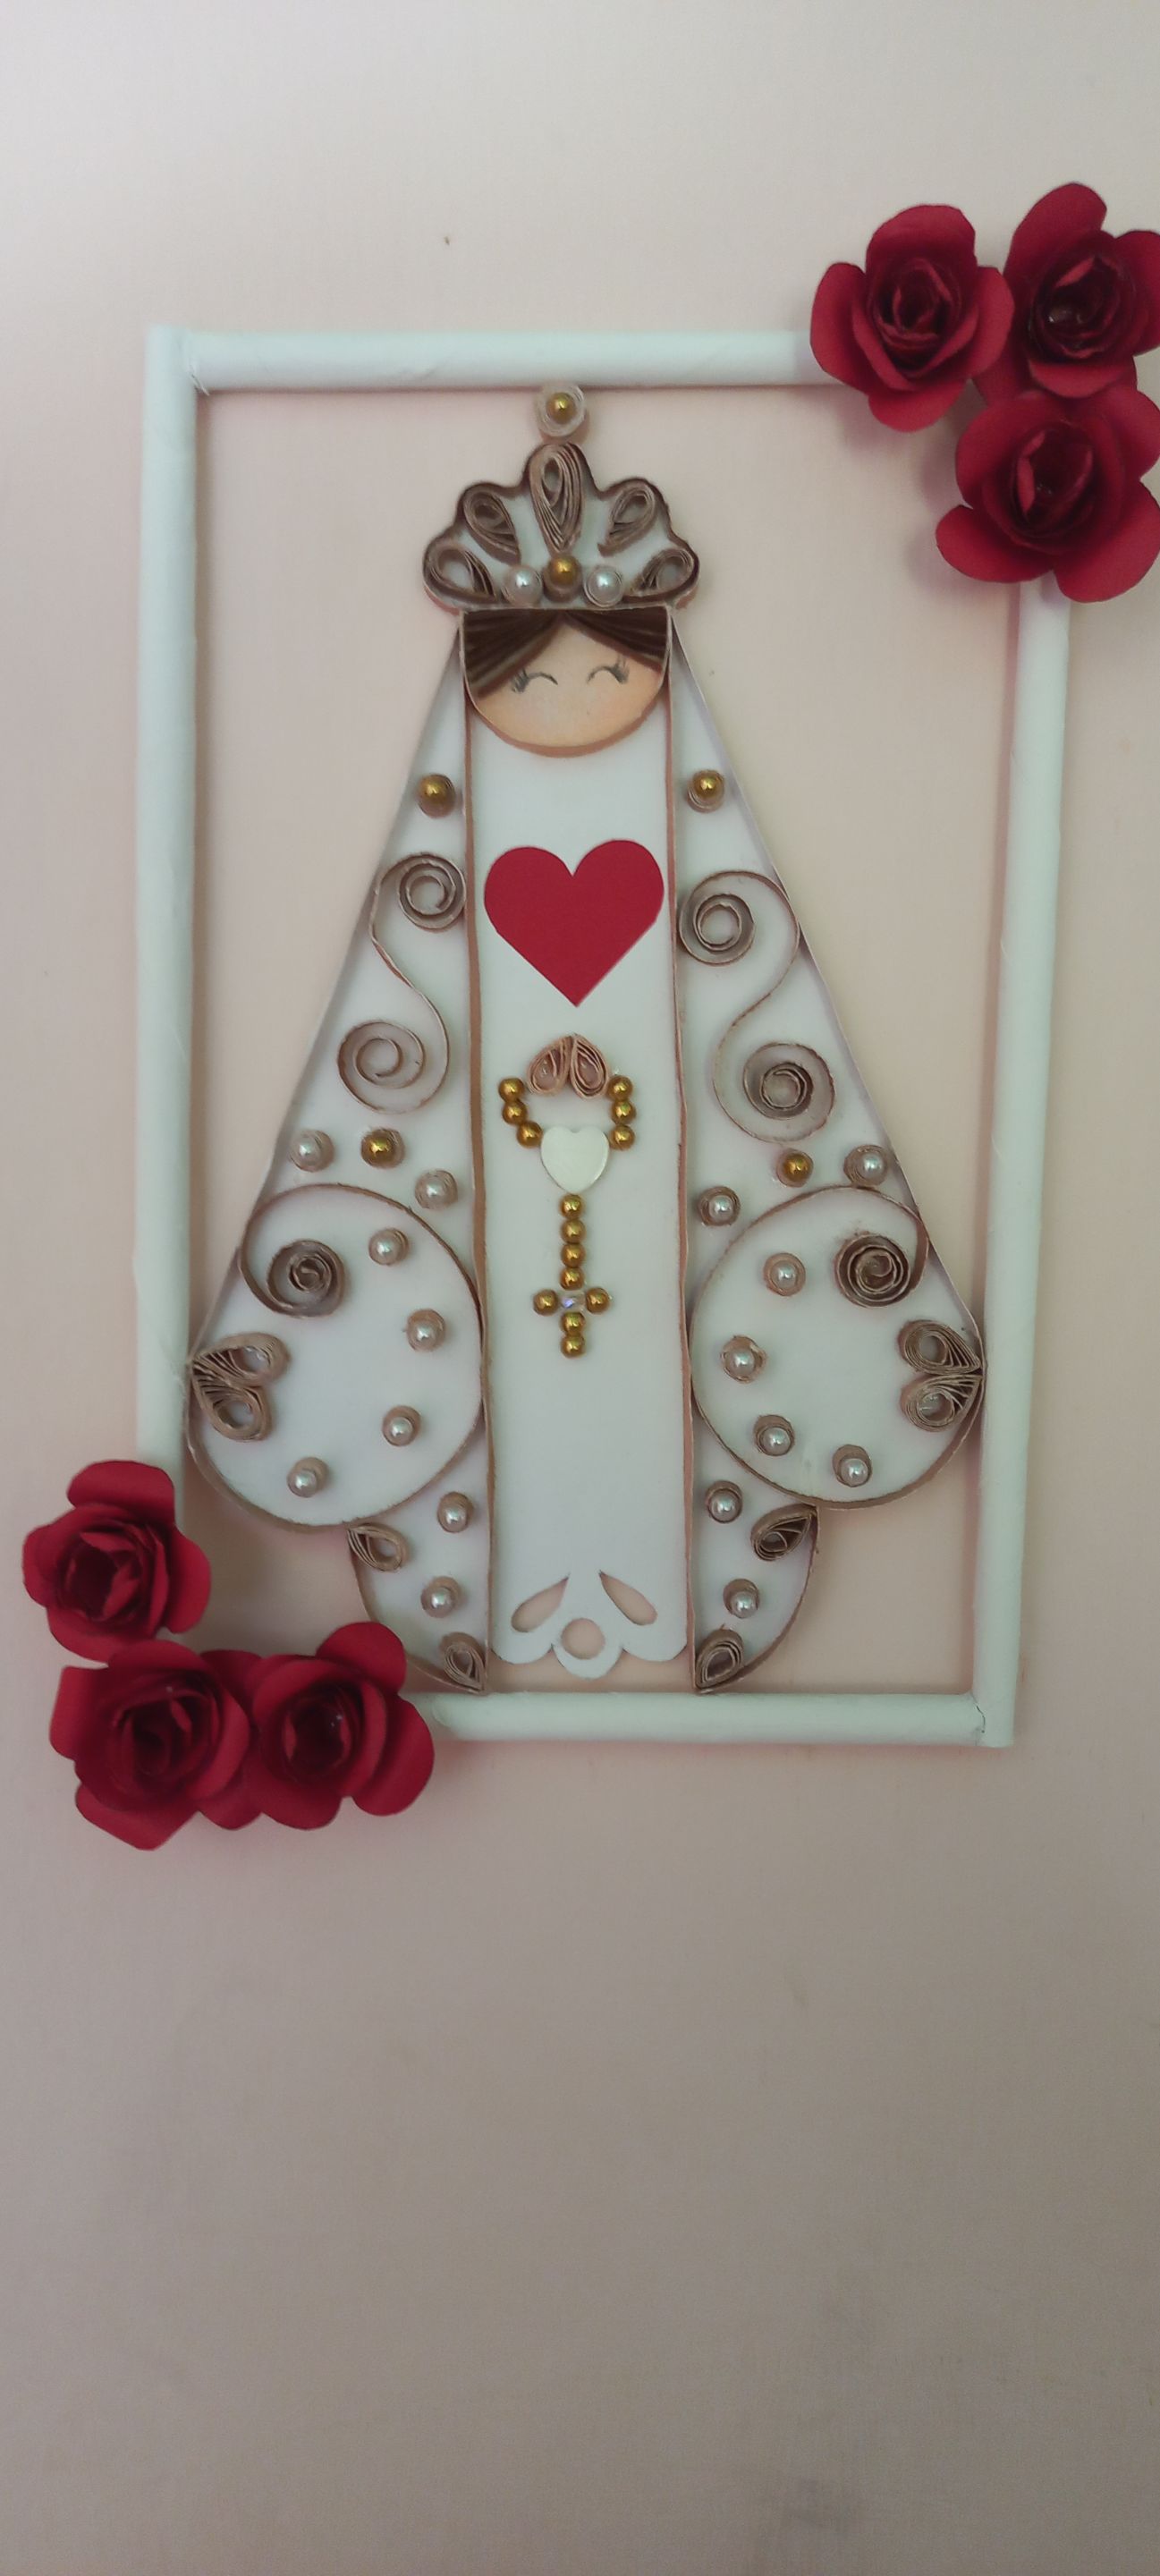
Hola querida comunidad de Creative Papercraftes un gusto compartir con ustedes nuevamente. Me parece una forma muy hermosa y creativa de honrar a la Virgen del Valle, patrona de Oriente, en Venezuela. El 8 de septiembre se celebra su día, y quise sumarme a esta iniciativa, con el siguiente proyecto, sencillo pero lleno de intención. Un cuadro hecho con la técnica de quilling o filigrana, que estoy explorando por primera vez.
Aunque mi trabajo con filigrana es muy básico, cada tirita de papel lleva el deseo de honrar su presencia en nuestra vida. Y mientras creaba, descubrí un detalle poco conocido que llamo mi atención. Y es que, en 1921 la Virgen del Valle fue nombrada oficialmente Patrona de la Armada Venezolana, es sin duda alguna un gesto que refleja cómo su devoción ha trascendido lo espiritual para convertirse en símbolo de protección nacional.
Es por ello que este cuadro es mi forma de agradecer y compartir. Porque cuando creamos con fe y papel, también creamos vínculos con nuestras raíces. Les invito a que me acompañen en el paso a paso.
Hello dear Creative Papercraft community, it's a pleasure to share with you again. I think this is a beautiful and creative way to honor the Virgin of the Valley, patron saint of Oriente, in Venezuela. Her day is celebrated on September 8, and I wanted to join this initiative with the following project, which is simple but full of meaning. It is a picture made using the quilling or filigree technique, which I am exploring for the first time.
Although my filigree work is very basic, each strip of paper carries the desire to honor her presence in our lives. And while I was creating, I discovered a little-known detail that caught my attention. In 1921, the Virgin of the Valley was officially named Patroness of the Venezuelan Navy, a gesture that undoubtedly reflects how devotion to her has transcended the spiritual to become a symbol of national protection.
That is why this painting is my way of giving thanks and sharing. Because when we create with faith and paper, we also create bonds with our roots. I invite you to join me in this step-by-step process.
Materiales:
1. Cartulina fina (blanca.)
2. Tiras de papel de 0,5 cm.
3. Silicon líquido.
4. Pega escolar.
5. Cúter.
6. Lápiz.
7. Palito de brocheta.
8. Regla.
9. Tijera.
10. Borrador.
11. Pintura acrílica blanca.
12. Papel de reciclaje.
13. Pincel.
14. Papel Rojo.
15. Lápiz de color piel.
16. Bisutería para decorar (perlas blancas, doradas y otros).
17. Diseño de rosa.
  ---
1. Cartulina fina (blanca.)
2. Tiras de papel de 0,5 cm.
3. Silicon líquido.
4. Pega escolar.
5. Cúter.
6. Lápiz.
7. Palito de brocheta.
8. Regla.
9. Tijera.
10. Borrador.
11. Pintura acrílica blanca.
12. Papel de reciclaje.
13. Pincel.
14. Papel Rojo.
15. Lápiz de color piel.
16. Bisutería para decorar (perlas blancas, doradas y otros).
17. Diseño de rosa.
Materials: |https://files.peakd.com/file/peakd-hive/mily0202/23tvkkRQ5tAYRtjPgVoYvo6FPKYihnnEuoauafeZ9Jqu53wikUdmGB3RVc1rSkP2GVbeT.jpg|https://files.peakd.com/file/peakd-hive/mily0202/23tSeuk3TqaNLhzM6YbWjJpBatU8Lidj9JXvyMZgMyUS2BLSeN1PYukiGU5Y1rkeL8d3w.jpg| |-|-| ---
1. Thin cardstock (white).
2. 0.5 cm strips of paper.
3. Liquid silicon.
4. School glue.
5. Cutter.
6. Pencil.
7. Skewer stick.
8. Rule.
9. Scissors.
10. Draft.
11. White acrylic paint.
12. Recycled paper.
13. Paintbrush.
14. Red Paper.
15. Skin-colored pencil.
16. Decorative jewelry (white pearls, gold pearls, and others).
17. Rose design.
Para el primer paso, tomare la cartulina y dibujare un rectángulo de 19 cm de alto por 12 cm de ancho. Dichas medidas serán el tamaño del diseño. Ubico el centro y desde ahí comienzo a diseñar la figura de la virgen. Las líneas deben ser muy sutil ellas son las guías para ubicar las tiras de papel. En la parte baja hare un pequeño adorno. Para darle un toque al diseño.

|https://files.peakd.com/file/peakd-hive/mily0202/23tmPwZ5qir64mDUzq7BYhif2cn3QFHmVijonWbEWZU5bNHTg6nVkv4mbT4XT7Qm2jWeD.jpg|https://files.peakd.com/file/peakd-hive/mily0202/23x1FU3eH8VUrpKrBmaKp4Xsq2ZpeSsKMvt36aHpjxxi4xpszP4Us9A9CwhcyYqKzEDmq.jpg|https://files.peakd.com/file/peakd-hive/mily0202/242YBvXZ31DojLMKTky7r1N1JCnevyFxEj562YmVGDrTDucPycbbPb6DtDJNhbp68Xvuj.jpg
|-|-|-|
---
For the first step, I will take the cardboard and draw a rectangle measuring 19 cm high by 12 cm wide. These measurements will be the size of the design. I locate the center and from there I begin to design the figure of the Virgin Mary. The lines should be very subtle; they are the guides for placing the strips of paper. At the bottom, I will make a small decoration to add a touch to the design.
Paso 2: Con el diseño ya trazado, pinto con el color piel suave lo que será la cara de la virgen. Y comienzo a colocar tira de papel tanto a los lados como en la parte central. El largo de la tira dependerá del tamaño del diseño.

|https://files.peakd.com/file/peakd-hive/mily0202/23wCG1M7iZzLg2nczrYsNcSfiWss6beLtTztMqN5U7sPzDTNfwg7YwUs2EdtEkWUSQBvr.jpg|https://files.peakd.com/file/peakd-hive/mily0202/23u69VeRJ1849BSwLmPdeqGB9eeKAsLZ74w6Ax4Uojf5zrxKykfpjw4qv8TUy2B9sUqEg.jpg|
|-|-|
---
Step 2: With the design already traced, I paint what will be the Virgin's face with a soft skin color. Then I begin to place strips of paper on both sides and in the center. The length of the strip will depend on the size of the design.
Paso 3: Es el momento de comenzar a decorar. Tomo una tira de papel y con la ayuda del palito de brocheta enrollo uno de los extremos hasta formar un espiral. Y lo coloco en la parte baja para ir formando lo que es el manto de la virgen.

|https://files.peakd.com/file/peakd-hive/mily0202/23xAe8PEqV6FYEH5htVHN1nN5PTrTyhJjjBCGSUFgDVqNkV1poeGfnkCyJaz8FhJdcg74.jpg|https://files.peakd.com/file/peakd-hive/mily0202/23wMeXua6idPBL6hsKge3Aj9qSn3U5HyVU9JrgpZzEbKJxAyE7wE2GhDwNTg5jnUFUCLa.jpg|
|-|-|
---
Step 3: Now it's time to start decorating. I take a strip of paper and, with the help of a skewer, roll one end into a spiral. I place it at the bottom to form the Virgin's mantle.
Paso 4: Ahora es el turno de crear una de las piezas clave del diseño. La clásica forma de gota. Para eso, tomo una tira de papel de 12 cm de largo (aunque ustedes pueden ajustar el tamaño según su diseño) y la enrollo completamente con ayuda de un palito de brocheta.
Una vez enrollada, la dejo aflojarse un poquito. Luego, con la punta de los dedos, presiono suavemente uno de los extremos para formar esa gota que tanto caracteriza al quilling. Diseño 2 y las voy incorporando al diseño principal.

|https://files.peakd.com/file/peakd-hive/mily0202/23wgPurvqWszPTk4bNHyrJYFdhGJ2ua39WhoL45nKwSX2QBP2wT9kcfBZ4aBRSKKLzg7r.jpg|https://files.peakd.com/file/peakd-hive/mily0202/23y8unV2LH97akz2gVFAmrSKeL6ZfK6rrhYJ6zM83oLezNMgBmzyNCWN5Xd6YoAPJ4DE8.jpg|
|-|-|

|https://files.peakd.com/file/peakd-hive/mily0202/23viA6snMgLgXdeHjk9wXU3nfgFtPb39Sftge2XaZyiJZ48xVNtisu8NX2su6aiZrxtf5.jpg|https://files.peakd.com/file/peakd-hive/mily0202/23wX1YNs8ZDg7aP5tWqXAdjHGftud5tnM9WnTavmCUDJG7XotLMKoyVdrHU4cGMgKuA5P.jpg|
|-|-|
---
Una vez enrollada, la dejo aflojarse un poquito. Luego, con la punta de los dedos, presiono suavemente uno de los extremos para formar esa gota que tanto caracteriza al quilling. Diseño 2 y las voy incorporando al diseño principal.
Step 4: Now it's time to create one of the key pieces of the design: the classic teardrop shape. To do this, take a 12 cm long strip of paper (although you can adjust the size according to your design) and roll it up completely using a skewer.
Once rolled, I let it loosen up a little. Then, with my fingertips, I gently press one end to form that drop shape that is so characteristic of quilling. Design 2 and I incorporate them into the main design.
Paso 5: Para completar las piezas, ahora trabajo con dos formas muy sencillas, pero igual de especiales: el círculo apretado y el espiral doble.
Empiezo con el círculo: tomo una tira de papel y la enrollo con el palito de brocheta, pero esta vez lo hago bien apretadito, sin dejar que se afloje.
Luego paso al espiral doble. Tomo una tira y enrollo uno de los extremos hacia la derecha, y el otro hacia la izquierda. Al hacerlo de esta manera, se forma una especie de S.

|https://files.peakd.com/file/peakd-hive/mily0202/23xKxdmZfQFrCFUZwers8ZjWZXdkFeiiNdRdJy9bwDWYGvjaGgifWXaJYSA8HxXB4D8AC.jpg|https://files.peakd.com/file/peakd-hive/mily0202/23uFTQDaC1q3wi42hsC6MAjCrGVdq5Hz2yR5U2nuyPF4pzfvLQXAWRhzGfQhkXreqJKMW.jpg|
|-|-|

|https://files.peakd.com/file/peakd-hive/mily0202/23uQrGBRE1dWEwXKbrB41jFXNAaCsWy4YGogKN62pf9fMA6rAmYuU6FKxe9JwfyMha8cb.jpg|https://files.peakd.com/file/peakd-hive/mily0202/23yd69Kw6qD3Uq2neH6JCnJ23ErkoMqxgQaGpYEzfivq3385uRzxTQC5Db4SzoEYiMrv3.jpg|
|-|-|
---
Empiezo con el círculo: tomo una tira de papel y la enrollo con el palito de brocheta, pero esta vez lo hago bien apretadito, sin dejar que se afloje.
Luego paso al espiral doble. Tomo una tira y enrollo uno de los extremos hacia la derecha, y el otro hacia la izquierda. Al hacerlo de esta manera, se forma una especie de S.
Step 5: To complete the pieces, I now work with two very simple but equally special shapes: the tight circle and the double spiral.
I start with the circle: I take a strip of paper and roll it up with the skewer stick, but this time I do it very tightly, without letting it loosen.
Then I move on to the double spiral. I take a strip and roll one end to the right and the other to the left. Doing it this way forms a kind of S shape.
Paso 6: Es el turno de la corona y la carita. Comienzo colocando una tira de papel siguiendo el contorno de la corona e igualmente con la cara.
Para el diseño de la corana utilizo 5 pieza en forma de gota y 4 piezas en forma de circulo. Y las ubico según el diseño.
Para la cara cortare pequeños trozos de tira y los coloco a los lados en forma horizontal, para crear el efecto de cabello y Finalmente, con un lápiz de punta muy fina, dibujo los ojos con mucho cuidado.

|https://files.peakd.com/file/peakd-hive/mily0202/23uQy2664EDjfgUv7LH3YVPcqLrm8TqAezJR8NLh8rpUVVjm1hn2ryEcpfoYTuVvjzbpY.jpg|https://files.peakd.com/file/peakd-hive/mily0202/23u69QriVn1JFrdZFCqNHxTLdH9AMr16HkSjLkiCTp99yzKVzLurJtNdYLg2Tha9CHybp.jpg|
|-|-|

|https://files.peakd.com/file/peakd-hive/mily0202/23w2sWAFmh74UvEThuzLn5ZrVotedp1x3vVQNTJ5yMtByEZCMyoYe4dYNe6NXhZYCYBJ7.jpg|https://files.peakd.com/file/peakd-hive/mily0202/23vsSpb25ubFkDJHqov6Wrdtqyjx5tjjfT6n81ExKyg1ccZYs27N52EbBjPdhL1L2UNeu.jpg|
|-|-|
---
Para el diseño de la corana utilizo 5 pieza en forma de gota y 4 piezas en forma de circulo. Y las ubico según el diseño.
Para la cara cortare pequeños trozos de tira y los coloco a los lados en forma horizontal, para crear el efecto de cabello y Finalmente, con un lápiz de punta muy fina, dibujo los ojos con mucho cuidado.
Step 6: Now it's time for the crown and the face. I start by placing a strip of paper along the outline of the crown and do the same with the face.
For the design of the crown, I use five teardrop-shaped pieces and four circular pieces. I arrange them according to the design.
For the face, I cut small pieces of the strip and place them horizontally on the sides to create the effect of hair. Finally, with a very fine-tipped pencil, I carefully draw the eyes.
Paso 7: Llego el momento de resaltar todo el encanto de nuestra virgen. Para ello la adornare con perlitas blanca y dorada. En el pecho, le coloco un corazón hecho en papel, sencillo, pero le dará cierto encanto.
Para finalizar, con el cúter corto toda la silueta de la Virgen, siguiendo con precisión las líneas del diseño.

|https://files.peakd.com/file/peakd-hive/mily0202/23u697rsdEQNU1MavsgKeRgLkBUkQrWPacz5ovCNNuhS8FRX59BKEbhpKqYV2PByKDXxt.jpg|https://files.peakd.com/file/peakd-hive/mily0202/23zGkfXbB35FRWG4feERNbJ5GdMHynY1Kj4rCPb16C8CbJcPM3J6ZUSJzSPr98a7LNtzh.jpg|https://files.peakd.com/file/peakd-hive/mily0202/23xei2FVnAhsFxFscWR478PXAAyUC57rJ27FqFjQufu6UGgTu9CfD12SG4CAj7GYoyssQ.jpg|
|-|-|-|
---
Para finalizar, con el cúter corto toda la silueta de la Virgen, siguiendo con precisión las líneas del diseño.
Step 7: Now it's time to highlight all the charm of our virgin. To do this, I will decorate her with white and gold pearls. On her chest, I will place a simple paper heart, which will give her a certain charm.
Finally, cut out the entire silhouette of the Virgin Mary with the craft knife, following the lines of the design precisely.
Paso 8: Porque la virgen tiene que tener flores sí o sí. Decidí darle un detalle extra al diseño. Seis pequeñas rosas hechas en papel rojo.
Transfiero el diseño de la flor al papel, lo recorto con cuidado y, con ayuda de un pincel o cualquier objeto redondeado, comienzo a enrollar el extremo hasta formar la rosa. Luego, con el palito de brocheta, doblo ligeramente los pétalos para darles más volumen y movimiento.

|https://files.peakd.com/file/peakd-hive/mily0202/23wCG9UU37D8F4TSyQuYrCsHVnivAUMbUam5RoeyoU9ThMwmnzbR6mVbN4jPDNgCX957v.jpg|https://files.peakd.com/file/peakd-hive/mily0202/23xyZhumiQgLyvmiN2QPQkvo4UhtH6dn5Kn5SECowv7c4j12q7WkJmysJvvqW78CGRwL4.jpg|
|-|-|

|https://files.peakd.com/file/peakd-hive/mily0202/23wWxoJu8cgpniWxwZ24WBy6hZjdTWaUuMiboVhvVuHhVnFNiyC6ELXCAtKr2nXPEsXkH.jpg|https://files.peakd.com/file/peakd-hive/mily0202/23yd5qySGq2hjQ5naVLAZZeLsBQzR8c1jKvfEmufPUTnmKDnEAPoCfc5AqjEuG4R8F8dv.jpg|
|-|-|
---
Transfiero el diseño de la flor al papel, lo recorto con cuidado y, con ayuda de un pincel o cualquier objeto redondeado, comienzo a enrollar el extremo hasta formar la rosa. Luego, con el palito de brocheta, doblo ligeramente los pétalos para darles más volumen y movimiento.
Step 8: Because the virgin must have flowers, no matter what. I decided to add an extra detail to the design. Six small roses made of red paper.
I transfer the flower design onto paper, carefully cut it out, and, using a paintbrush or any rounded object, begin to roll up the end to form the rose. Then, using a skewer, I gently bend the petals to give them more volume and movement.
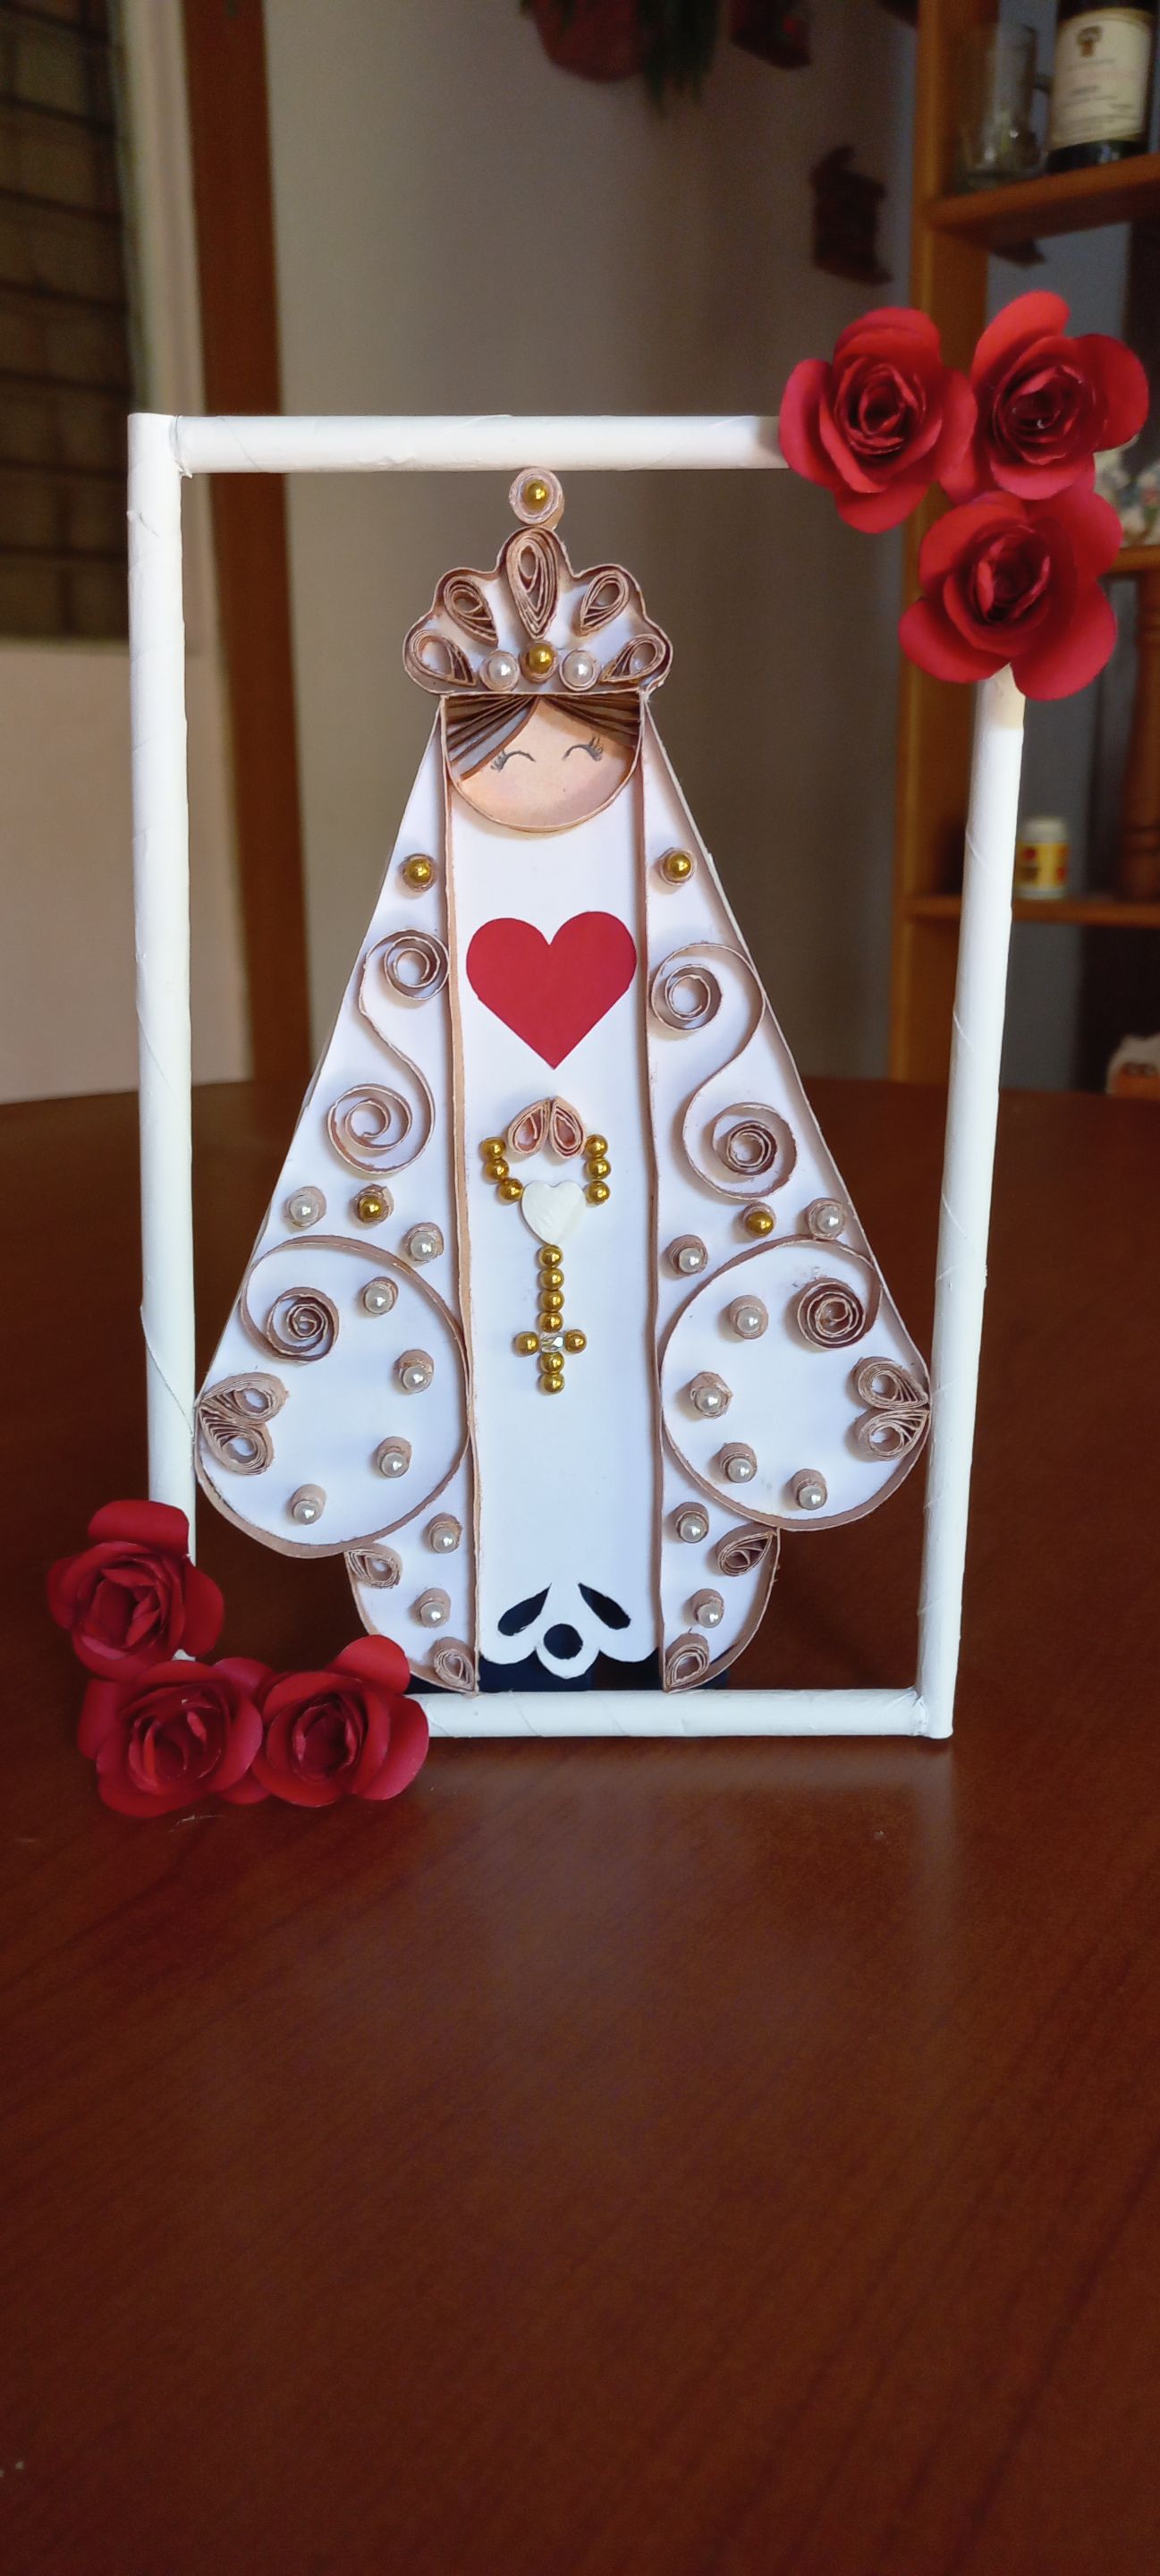
Paso 9: Ya solo queda diseñar el marco. Para ello, tomo hojas reciclables. Inicio enrollando una de las puntas con el palito de brocheta, hasta formar un tubo firme. Repito el proceso hasta obtener dos tubos de 19,8 cm y dos de 12 cm de largo. Los pego con cuidado, formando el marco, y luego los pinto con pintura acrílica blanca. Una vez seco, armo todas las piezas.

|https://files.peakd.com/file/peakd-hive/mily0202/243qFRiJSiiumttTYhGeqBPwtJJfpHHqk5pVMhhso7vnLWzfjmNZ4MynfpUYwMbTJnLbk.jpg|https://files.peakd.com/file/peakd-hive/mily0202/23uFPYAYHto7jbspUA8Ppnq4hkbV3inqPic8k8dVhNZ2F1hVu4xadW67Lv9K7DKwaAZJY.jpg|
|-|-|

|https://files.peakd.com/file/peakd-hive/mily0202/23uFPq1YnfQqRbdhXpZZr4dRoWY1h6Q4j9kuWhp6v8GrnMzhhmd3yxYoNtzWy7DERmcNy.jpg|https://files.peakd.com/file/peakd-hive/mily0202/23uFRmpD2uazL3RVCigkfYr4wxewWaTbMgMn6tMhWZUV9uhehTJSBjE1uib1cWxE7b3yh.jpg|
|-|-|
---
Step 9: Now all that's left is to design the frame. To do this, I take some recyclable sheets. I start by rolling one of the ends with the skewer stick until it forms a firm tube. I repeat the process until I have two tubes measuring 19.8 cm and two measuring 12 cm in length. I carefully glue them together to form the frame, and then paint them with white acrylic paint. Once dry, I assemble all the pieces.
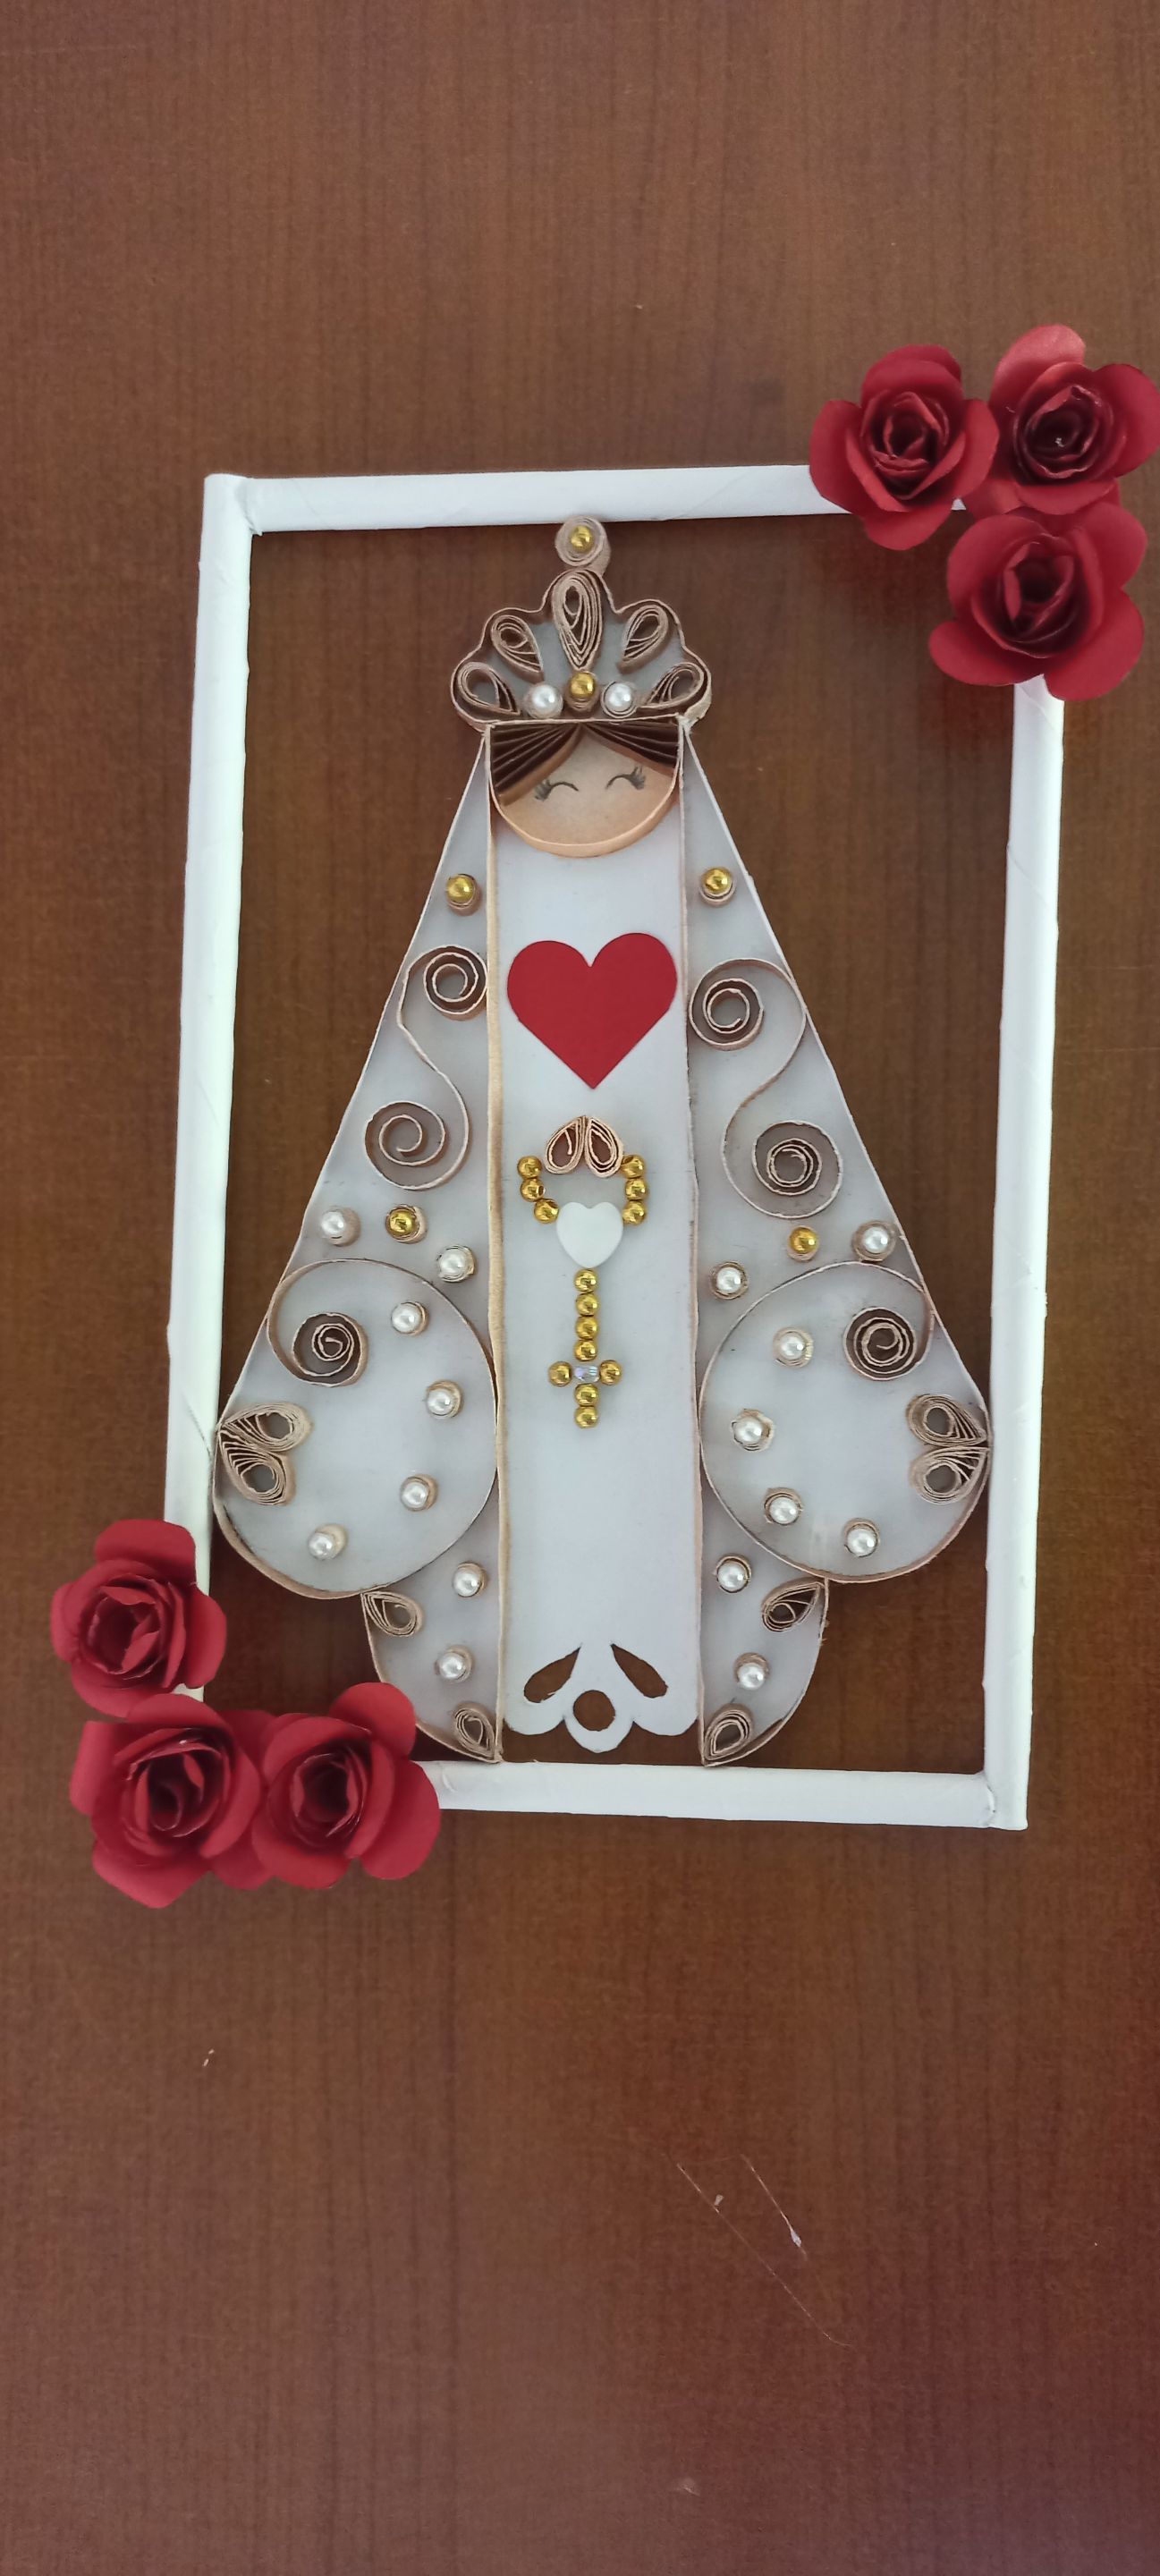
Y listo, así queda mi primer cuadro en técnica quilling o filigrana. Sencillo, emotivo y lleno de fe. Un homenaje hecho con papel, paciencia y corazón para la Virgen del Valle. 🙏
Gracias por acompañarme. Nos seguimos leyendo y creando. Saludos.👋
Gracias por acompañarme. Nos seguimos leyendo y creando. Saludos.👋
And there you have it, my first quilling or filigree picture. Simple, emotional, and full of faith. A tribute made with paper, patience, and heart for the Virgin of the Valley. 🙏
Thank you for joining me. Let's keep reading and creating. Best regards.👋
  ---
Foto de mi autoría / Photo by me
Traducción: DeepL Translate versión gratuita. / Translation: DeepL Translate Free version.
---
Posted Using [INLEO](https://inleo.io/@mily0202/espeng-un-cuadro-sencillo-en-homenaje-a-la-virgen-del-valle-filigranas-de-fe-en-papel-a-simple-painting-in-homage-to-the-virgin-of-the-valley-filigree-of-faith-on-paper-kmk)
Traducción: DeepL Translate versión gratuita. / Translation: DeepL Translate Free version.