Saluditos Artistas Creativos de las manualidades y la Joyería, como siempre deseando que se encuentren llenos de salud, y prosperidad, imagino que con el nuevo regreso a clases deben estar como todos muy atareados con este inicio del nuevo año escolar.
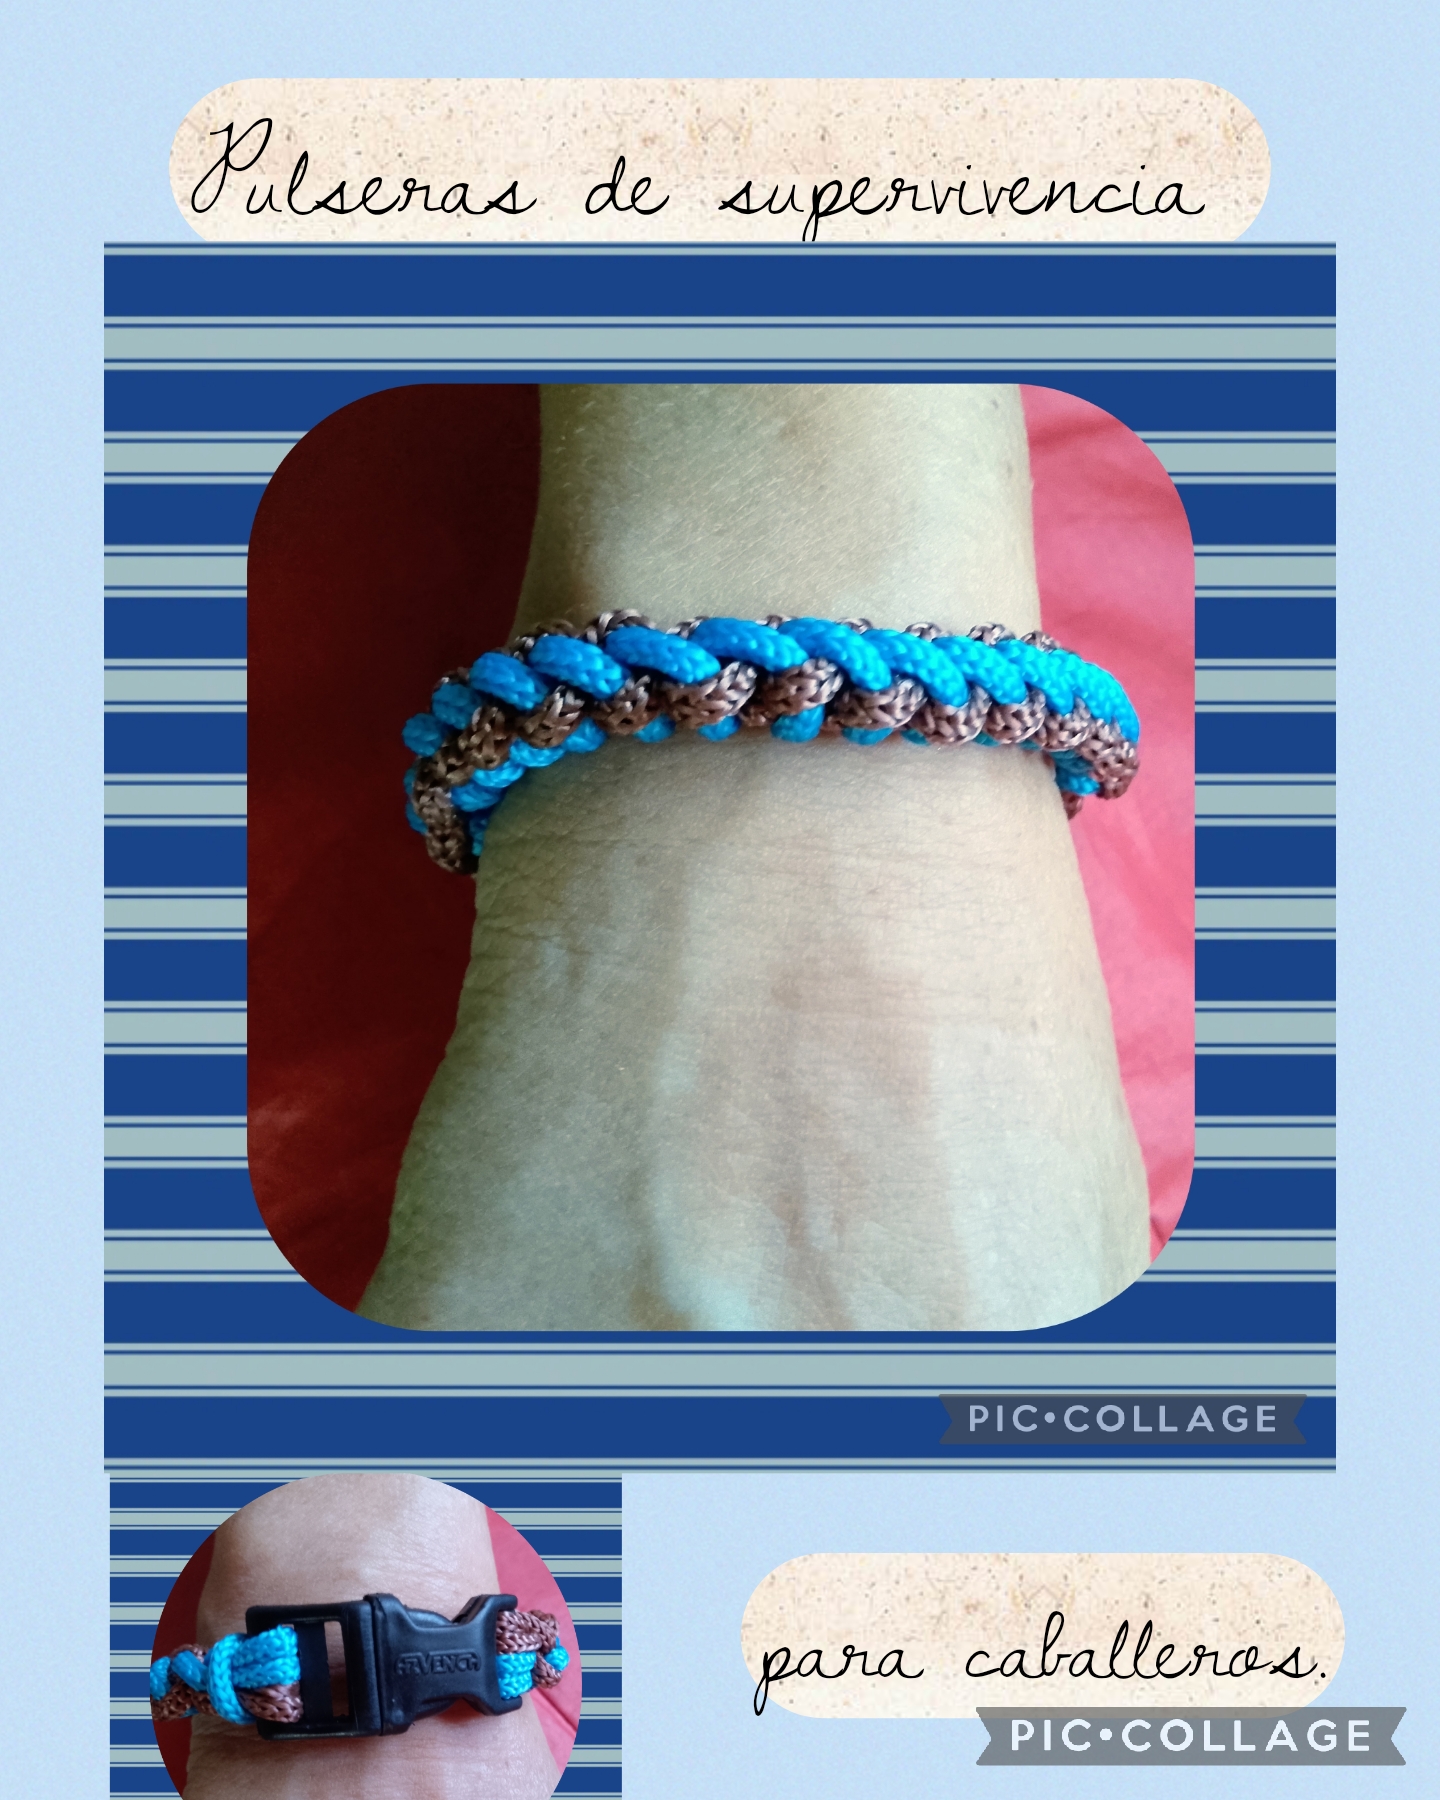
Hoy traigo para compartirles una exclusiva Pulsera para caballeros llamada de supervivencia, ya que su diseño elaborada con la cuerda paracord le permite llevarla en el cuerpo con facilidad y puede ser de mucha ayuda en situaciones difíciles al aire libre.
El diseño que use para su elaboración fue el Nudo de la técnica macramé llamado Nudo de la Amistad.
Los invito a seguir leyendo el paso a paso para que vean cómo la hice:
>Greetings, Creative Craft and Jewelry Artists, as always, I hope you are all filled with health and prosperity. I imagine that with the return to school, you must all be very busy with the start of the new school year.
Today, I'm sharing with you an exclusive men's bracelet called a survival bracelet. Its paracord design makes it easy to wear and can be very helpful in difficult outdoor situations.
The design I used to make it was the macramé knot technique called the Friendship Knot.
I invite you to continue reading the step-by-step instructions to see how I made it:
MATERIALES PARA ELABORAR UNA PULSERA DE SUPERVIVENCIA:
✓ Un metro cincuenta de cordón paracord marrón.
✓ Un metro cincuenta de cordón paracord color azul.
✓ Un clip de color negro para el cierre.
✓ Un encendedor.
✓ Tijeras.
✓ Regla.
>MATERIALS TO MAKE A SURVIVAL BRACELET:
✓ 1.5 meters of brown paracord.
✓ 1.5 meters of blue paracord.
✓ A black clip for the clasp.
✓ A lighter.
✓ Scissors.
✓ Ruler.

USÉ ESTOS SENCILLOS Y POCOS PASOS PARA ELABORAR ÉSTE PROYECTO:
PRIMER PASO:
Voy a comenzar la elaboración de esta Pulsera usando la regla para medir un metro cincuenta centímetros de cordón paracord marrón y un metro cincuenta centímetros de cordón paracord color azul, después de verificar las medidas uso el encendedor y quemando las puntas de cada cordón las uno y sello para hacer el cordón de dos colores y así elaborar la Pulsera como muestro.
>I USED THESE SIMPLE AND FEW STEPS TO MAKE THIS PROJECT:
STEP ONE:
I'm going to start making this bracelet by using a ruler to measure 1.5 meters of brown paracord and 1.5 meters of blue paracord. After checking the measurements, I use a lighter and, burning the ends of each cord, join them together and seal them to make the cord two colors, thus making the bracelet as shown.

SEGUNDO PASO:
Ahora en este paso voy a empezar a elaborar el diseño, paso las puntas del cordón por una de las ranuras del clip y halo hasta dejar una medida de treinta centímetros , ahora tengo cuatro cordones y voy a empezar el nudo que es llamado el Nudo de la Amistad.
Los dos cordones de treinta centímetros van a ser los cordones centrales y los dos cordones de ciento veinte centímetros serán los nudos anudadores, comienzo con el cordón de la derecha que es el de color marrón hago una especie de "S" que coloco encima de los cordones centrales ahora con el cordón color azul paso por encima de la S en forma diagonal luego por debajo de los cordones centrales, luego por debajo del cordón marrón dónde se forma el ojal de la "S"y se saca hacia arriba se halan los cordones anudadores y se renda bien para formar el nudo como muestro.
>STEP TWO:
Now in this step I'm going to start making the design. I pass the ends of the cord through one of the slots in the clip and pull it until it measures 30 centimeters. Now I have four cords and I'm going to start the knot called the Friendship Knot.
The two 30-centimeter cords will be the center cords, and the two 120-centimeter cords will be the knotters. I start with the right cord, which is brown. I make a sort of "S" that I place on top of the center cords. Now with the blue cord, I pass diagonally over the S, then under the center cords, then under the brown cord where the eyelet of the "S" is formed. Pull it up. Pull the knotters and tie them tightly to form the knot as shown.


PASO TRES:
Sigo como en el paso anterior tejiendo el mismo Nudo hasta lograr el largo deseado en esta oportunidad teji diecisiete centímetros que con el clip de cierre tiene un grosor de veinte centímetros pues la pulsera es para un caballero de esa medida.
Una vez que ya tengo el largo, en la ranura de la otra mitad del clip paso los cordones y hago un nudo sobre todos los cordones, y tenso bien para asegurar el remate, tomo las tijeras y corto los excedentes, uso el encendedor para sellar y de esta manera finalizo.
>STEP THREE:
I continue as in the previous step, weaving the same knot until I reach the desired length. This time, I weaved seventeen centimeters, which with the closing clip is twenty centimeters thick, since the bracelet is for a gentleman of that size.
Once I have the length, I thread the cords through the slot in the other half of the clip and knot all the cords. I tighten it tightly to secure the finish. I take the scissors and cut off the excess. I use the lighter to seal it, and that's it.


Artistas Creativos de las Manualidades y la Joyería este es el resultado final de la pulsera de supervivencia como muestra la imagen con otro tipo de cierre se puede usar reversible pues el tejido es muy bonito por ambos lados, espero que les guste y como siempre les muestro está bonita idea que me gustaría la usaran con su toque personal para realizar sus accesorios .
Les deseo que pasen una feliz noche y nos vemos en la próxima manualidad, bye bye.
>Creative Artists of Crafts and Jewelry, this is the final result of the survival bracelet, as shown in the image. With another type of clasp, it can be used reversibly because the fabric is beautiful on both sides. I hope you like it, and as always, I show you this lovely idea. I'd love for you to use it with your own personal touch to make your accessories.
I wish you a happy evening, and I'll see you at the next craft. Bye bye.


Las imágenes y redacción de este tutorial son de mi exclusiva propiedad, las fotos fueron tomadas con mi teléfono celular Tecno Spark Go 20 y las edite con una aplicación gratis del mismo.
Para traducir texto use Google traductor.
>The images and writing in this tutorial are my exclusive property. The photos were taken with my Tecno Spark Go 20 cell phone and edited with a free app.
Use Google Translate to translate the text.
Survival Bracelet for Men Macramé Technique../ [Esp-Eng]
@nhaydu
· 2025-09-13 02:24
· Jewelry
#jewerly
#spanish
#ocd
#ecency
#diyhub
#neoxian
#manualidades
Payout: 0.000 HBD
Votes: 778
More interactions (upvote, reblog, reply) coming soon.