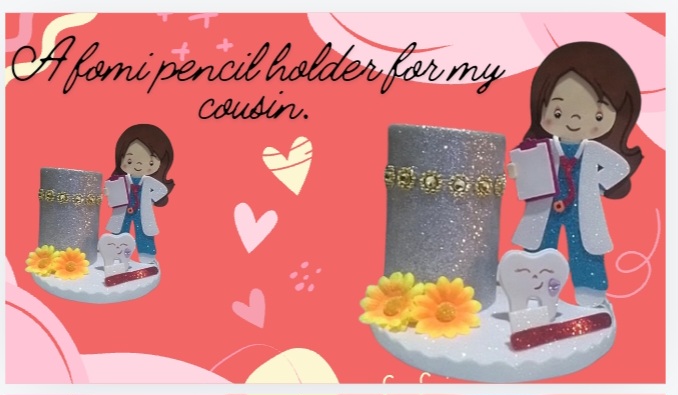
Hello creative friends, my cousin's birthday is coming up and I didn't know what I could give her and I remembered that she is a stomatologist and I thought of making her a personalized pencil holder with a theme related to her specialty.
Hola amigos creativos, se acerca el cumpleaños de mi prima y no sabía qué le podía regalar y me acordé de que ella es estomatóloga y se me ocurrió hacerle un portalápiz personalizado con una temática relacionada con su especialidad.
Soon I will show you the beautiful pencil holder I made with the theme of a stomatologist. I hope you like the result.
En breve le mostraré el bello portalápiz que realicé con la temática de una estomatóloga. Espero que les guste el resultado.
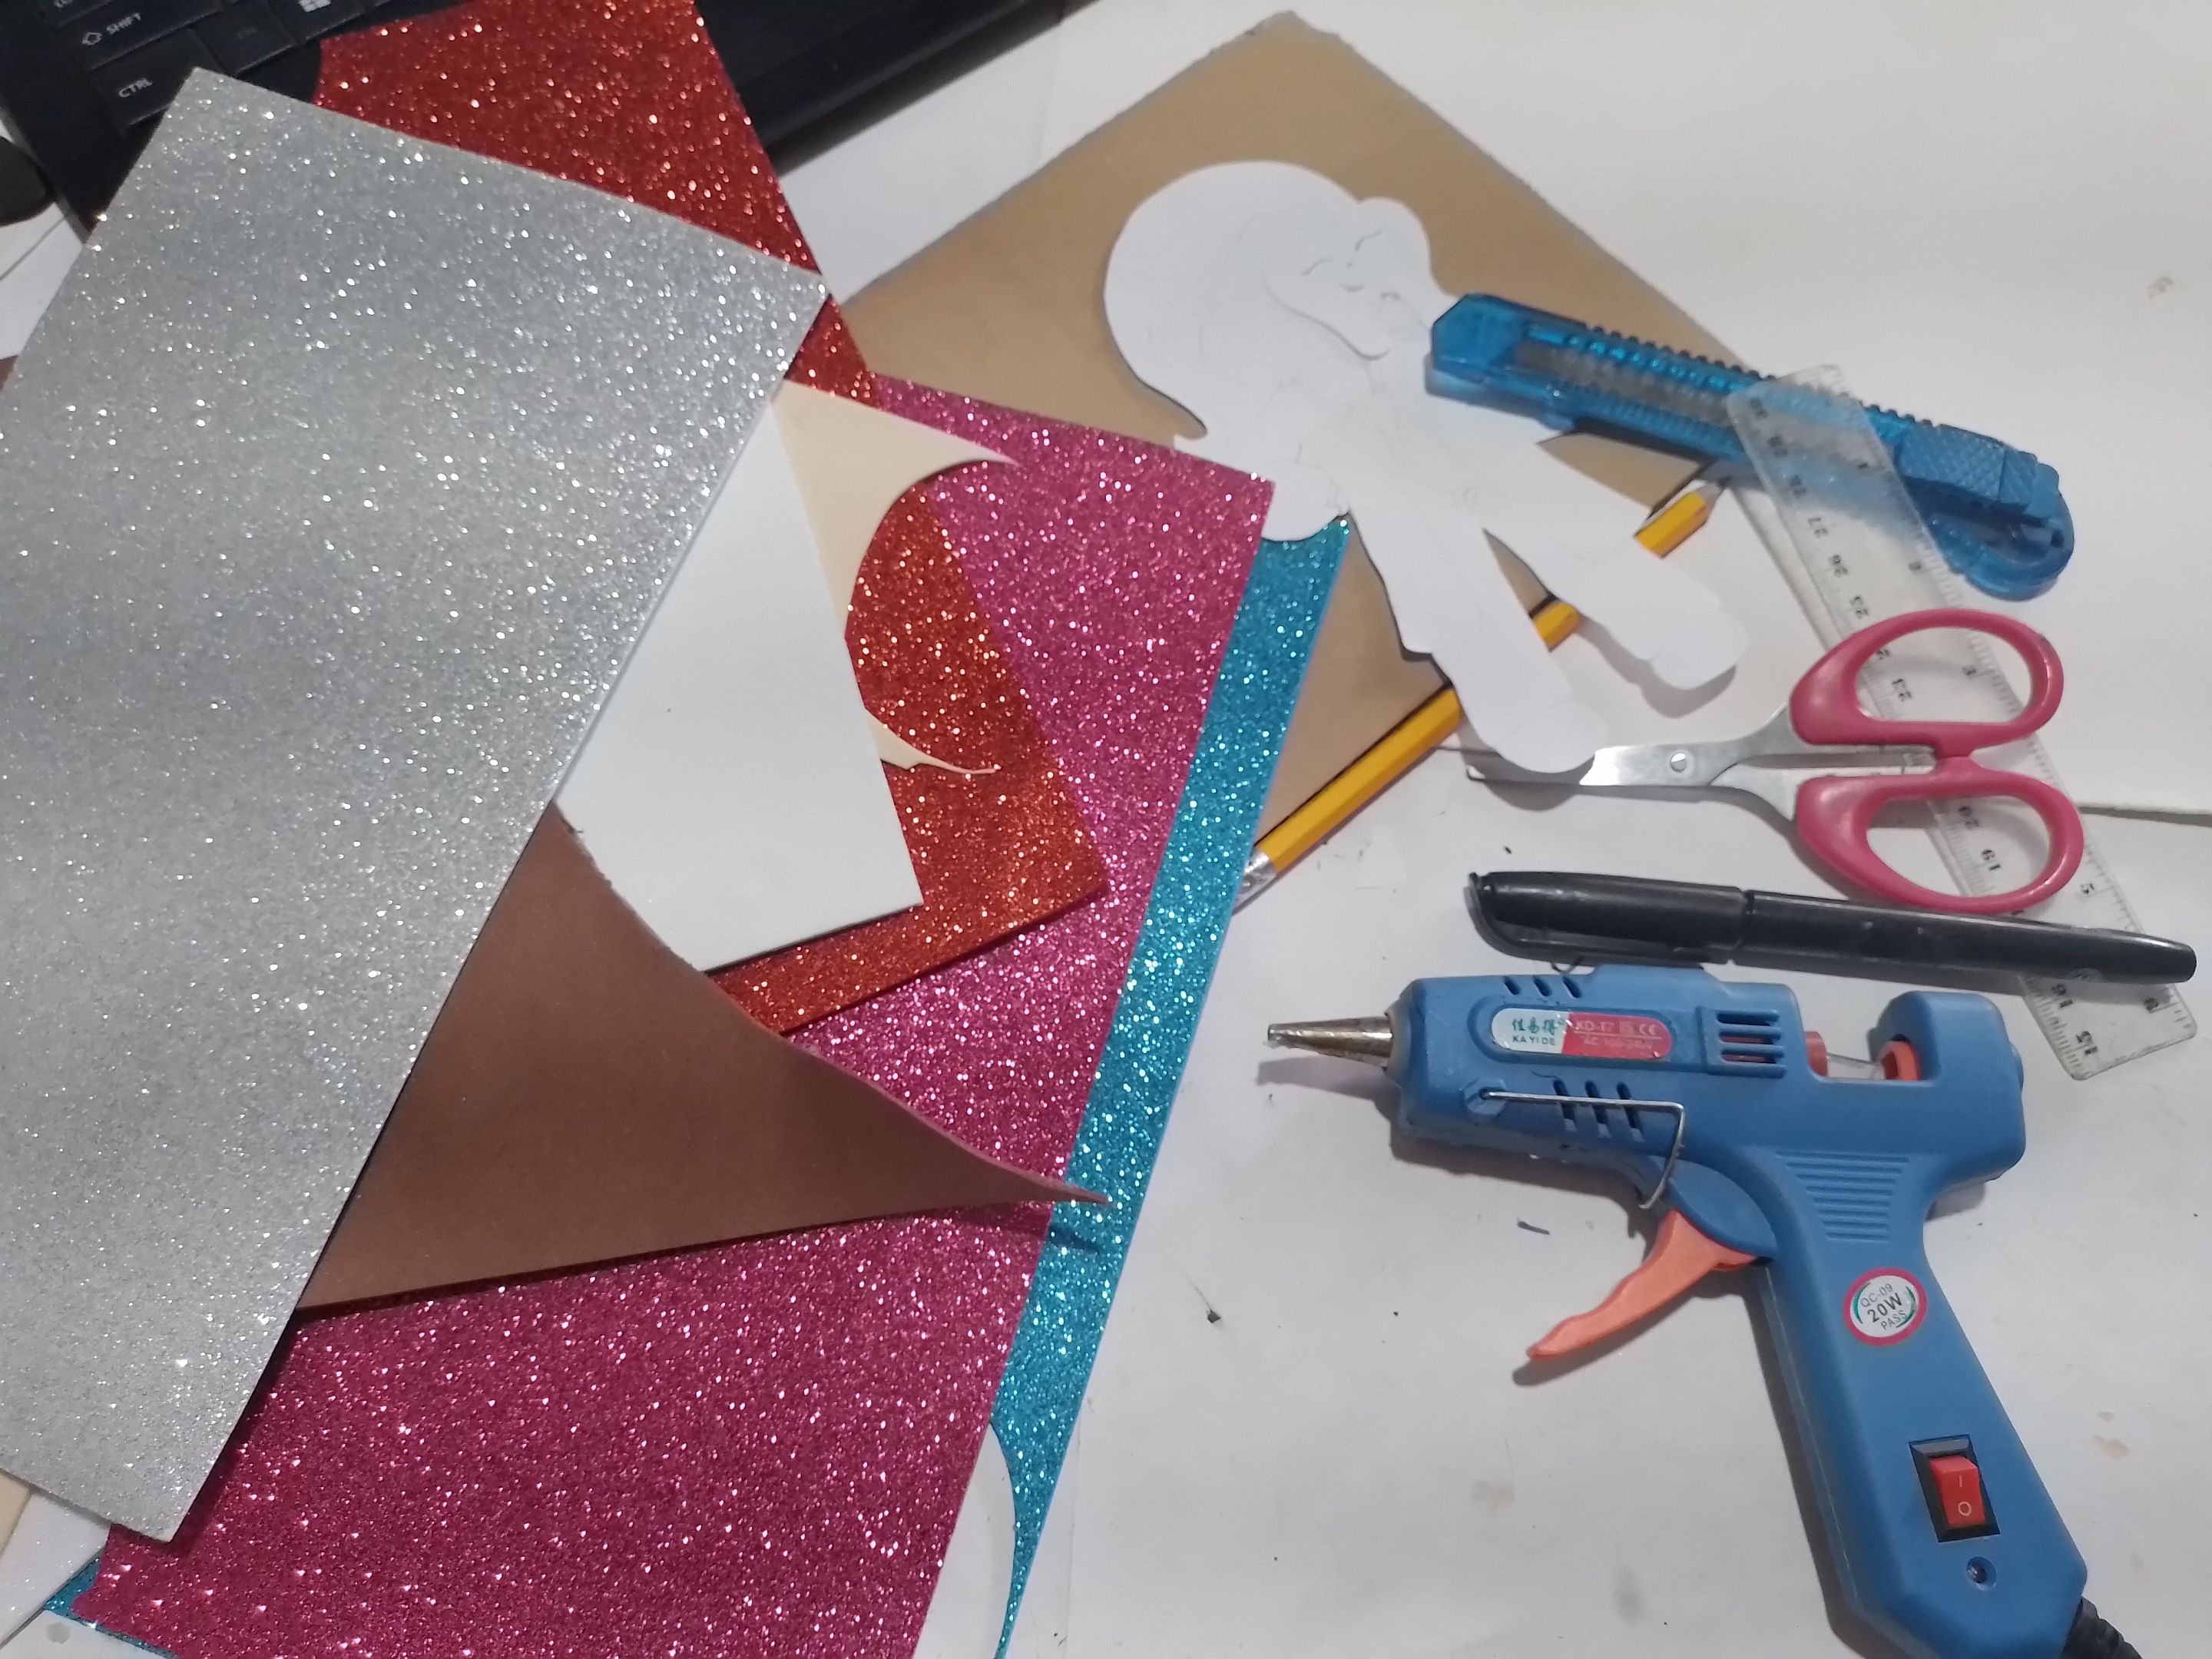
- Cardboard.
- Fomi of different colors.
- Silicone gun.
- Permanent markers.
- Scissors.
- Ruler.
- Cutter.
- Two medium size flowers.
- Pencil.
- Paper molds.
- White cardboard
- Cartón.
- Fomi de baros colores.
- Pistola de silicona.
- Marcadores permanentes.
- Tijera.
- Regla.
- Cúter.
- Dos flores medianas.
- Lápiz.
- Moldes de papel.
- Cartulina blanca
| https://files.peakd.com/file/peakd-hive/norychacon/Ep5oAnqgSL6SirB2B2U5gEmoxKEXJeYm3WXyGZQTPMAuj9P18TDeiwvcSCMzoBU7kZx.jpg | https://files.peakd.com/file/peakd-hive/norychacon/EogQDsPiVAkQhrpcqrV2Z4PE1NSWmvEjSQXAU4pzn1WejpMNKqKS62FFk8zZJrU9HKF.jpg |
Step 1- First, we mark the doctor with the paper molds and cut out all the parts.Glue all the parts where they correspond.
Paso 1- Primeramente, marcamos con los moldes de papel la doctora y recortamos todas las partes.Pegamos todas las partes donde correspondan.
| https://files.peakd.com/file/peakd-hive/norychacon/EpCBRCTXhfnkPcWhhE3YFvJ9AhezJn2XJrbLyVAeuzMS3PEUqAnSkD5QR1Hq4UPKYcY.jpg | https://files.peakd.com/file/peakd-hive/norychacon/EoGzSZGyTS6vv1WqRpGCtfzUG5urjhNC8Z4eB79hH7Me4Nnu8gxPfZgf2Yq1v8xQuG5.jpg |
Step 2- With the permanent marker we make the details of the face and hair.
Paso 2- Con el marcador permanente hacemos los detalles de la cara y el pelo.
| https://files.peakd.com/file/peakd-hive/norychacon/EoCjeAp17eMx7MbCDdoAEU8PaY5CvBRU1Cg1CoUfaqpSXCLqcZXMswVq7vhN5Pi4CxT.jpg | https://files.peakd.com/file/peakd-hive/norychacon/Eo8UqnDnfy4hQ8u2V799NiCybKYYoNP319kXfVDksk6NaTWskcRSCzjf2ZGdEdqtEao.jpg | https://files.peakd.com/file/peakd-hive/norychacon/Ep3fqeNBuY5qTzdULmDNiDi1GU6jrRWpUgrbemo8rkj87dLkEj3kchdsEEP6Sj5o1DH.jpg |
Step 3- On a piece of white fomi we mark a little molar and cut it out.
Paso 3- En un trozo de fomi blanco marcamos una muelita y la recortamos.
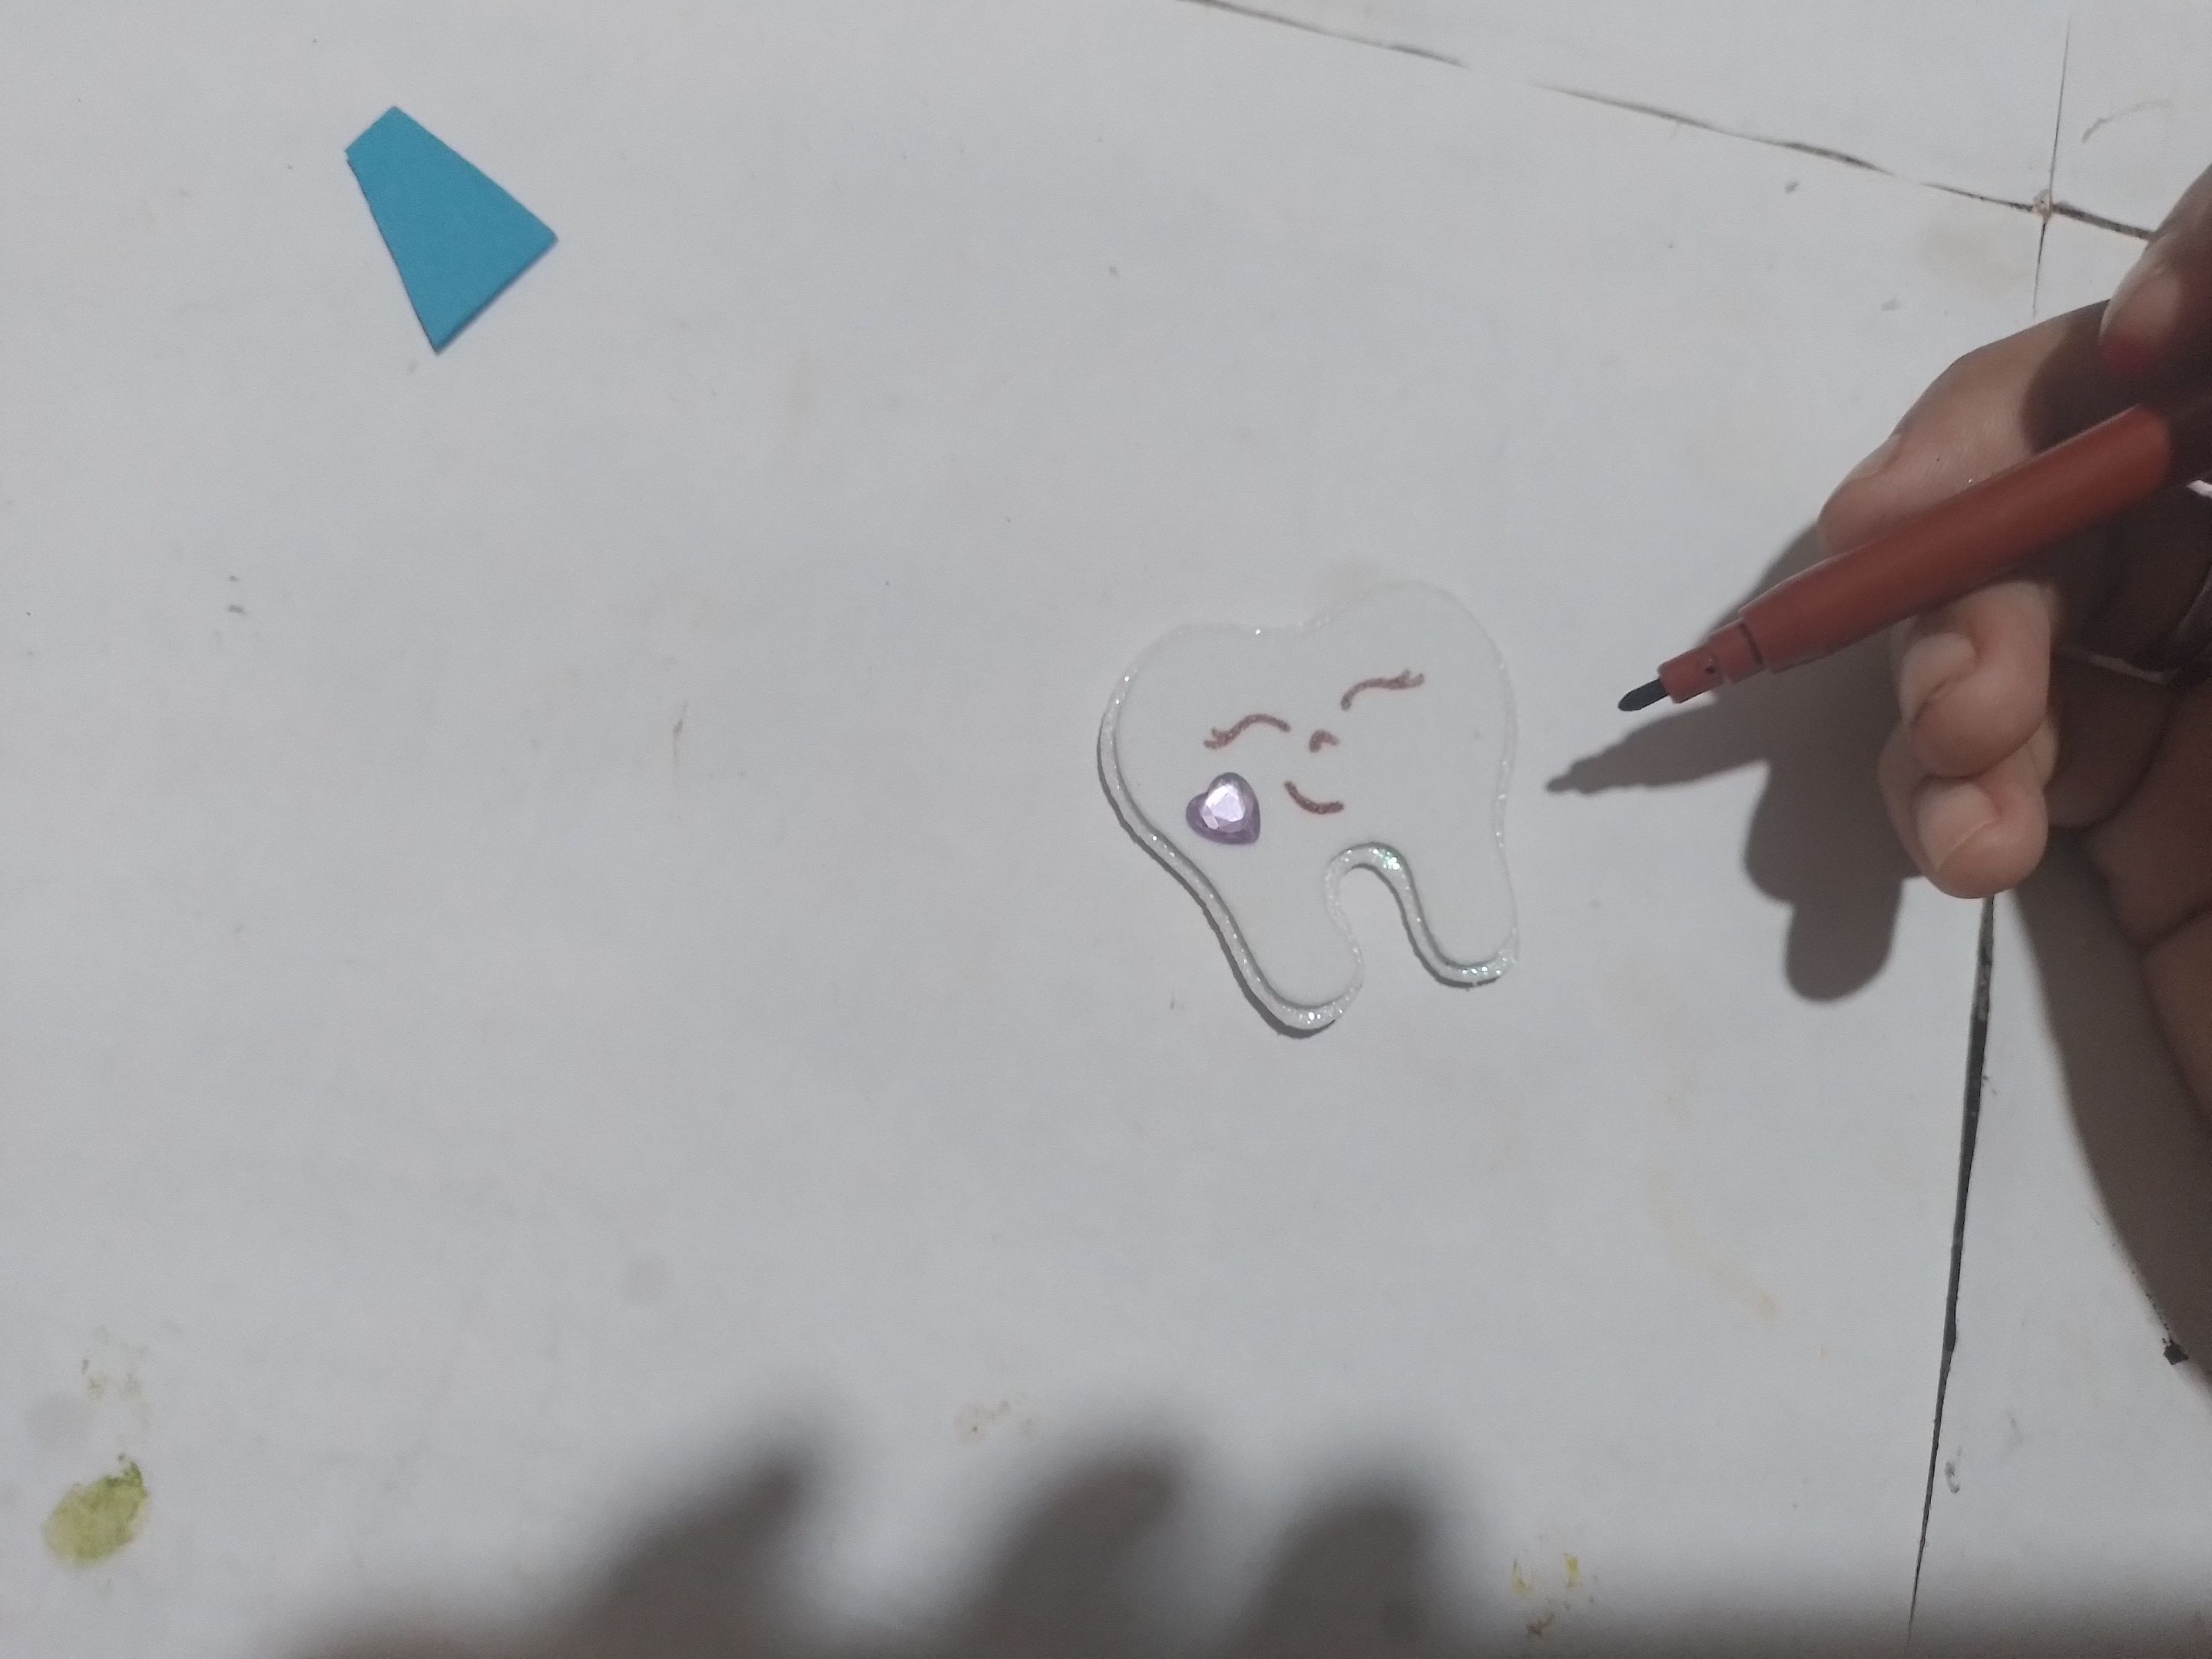
Step 4- With the permanent marker we mark the details and glue a small heart on one side.
Paso 4- Con el marcador permanente marcamos los detalles y le pegamos un corazón pequeño a un lado.
| https://files.peakd.com/file/peakd-hive/norychacon/EonnMXNzgjsG3rVqRbRJG16qRXancCRj2T8by1yA3qw9cQLk8taD793eQrSrRR4R9kN.jpg | https://files.peakd.com/file/peakd-hive/norychacon/EpEKGX2UwHjtjKcLvQEPtm1FLW1PjXsy5s5m7wEAwMusdtm6LxJWMCXLK7tyzwppyEP.jpg | https://files.peakd.com/file/peakd-hive/norychacon/Eoc93HtwCC3tNkjbR8xsR4xmY5XxhCfkSMcsrLmKj3qnP9brR7zUEHcYnUgYsroxfHg.jpg |
| https://files.peakd.com/file/peakd-hive/norychacon/Eokf2EzMjAhiefhccNH7iTLJMTqnjQ5DkFK5fSQbCvvz6kSXR4WfDtYjoHVdAXNoTYt.jpg | https://files.peakd.com/file/peakd-hive/norychacon/EonnPhZbxVBL5Tv8vRxvLJJfVraHVCskxkeF712y9wbnP5F26Buq5syExMwDYknx2cX.jpg | https://files.peakd.com/file/peakd-hive/norychacon/EouAd1Q2o75WY7ZscTDQc3qfqEUgx8Msfz9f1Zvjm3oX82MNSz4BN8F2T8hphsihHVF.jpg |
Step 5- On the red fomi we mark a small strip and cut it out, and with a small piece of white fomi we make a rectangle and glue it with the small piece of the red strip to form a toothbrush.
Paso 5- En el fomi rojo marcamos una tira pequeña y la recortamos, y con un pedacito de fomi blanco asemos un rectángulo y lo pegamos con el pedacito de tirita roja para formar un cepillo de diente.
| https://files.peakd.com/file/peakd-hive/norychacon/EpLgsMsxW7vg1tpjGQGeTB5b4LkYr6xUsE5emjc4Y1EGnqr6VizmWfg5kxPv3byHnWC.jpg | https://files.peakd.com/file/peakd-hive/norychacon/Ep7vUCQhzpMYWVkMGguktSqy2JanRd4yn9RwN11v6ho8ShD8pY2EnvK4MKFjTas62mH.jpg | https://files.peakd.com/file/peakd-hive/norychacon/Ep7w4uk8T9tU1xQARTgGTJ1Tda5CTzdfzcmHJpj1mKxPWzv1tZjan3z55UXjGYCgZ4U.jpg |
Step 6- With the compass we mark a circle on the cardboard and cut it out.
Paso 6- Con el compás marcamos un círculo en el cartón y lo recortamos.
| https://files.peakd.com/file/peakd-hive/norychacon/EpCBsJD7HUGsgeBJEiC1tZYHtvK3D6k62eCmoR49fLGEeidrszE14vtNuhmmukrd9RK.jpg | https://files.peakd.com/file/peakd-hive/norychacon/Ep5obF2oP3qq99MsaczkWNkjrAqpM8oPe5c6xazkDTmmN8HwvMkdqqKLPZNY17r9Euz.jpg |
Step 7- We glue one side of the cardboard circle on a white fomi and cut it out.
Paso 7- Pegamos una cara del círculo de cartón en un fomi blanco y lo recortamos.
| https://files.peakd.com/file/peakd-hive/norychacon/EoeGGepsruhtX7J1ExFKQU4nJhVSnYpdzohCzxQkkuedvo5EYfhn8c1TmCXs2fBCGkp.jpg | https://files.peakd.com/file/peakd-hive/norychacon/EokeX6EUdugooPcPTysygVAZ2wjN2tbiYtE4nWVyvbgsxYQiZded3MvgGCjKFMkdgVN.jpg |
| https://files.peakd.com/file/peakd-hive/norychacon/EowHX4UEbWL16wUK3phgTZJWGuHHkhXwrx9HFTrtahGqcNX7GvMpGvW58s6kkwdLxKn.jpg | https://files.peakd.com/file/peakd-hive/norychacon/Ep3gfGJBqKRsx51C16NRiUum6Gc9rsAZPzoz4eEFam6VJwHmvH6WxWw2Cq4WCBtXtCg.jpg |
Step 8- Then cut out two strips of white fomi and glue them all around the cardboard circle.
Paso 8- Luego recortamos dos tiras de fomi blanco y las pegamos por todo el contorno del círculo de cartón.
| https://files.peakd.com/file/peakd-hive/norychacon/Eo8UioRZFyj4kKPEpL2XK1VQFeQNq64KPiTRwh25Gygwur62MNrcVKiPigb6rvkc4tv.jpg | https://files.peakd.com/file/peakd-hive/norychacon/Eoc9RUvkNFoTkoQHuYxNe5pqAB7c7Y2RvZeMciTt5EKPU9MehzRTpd9zRszNW3Rtuor.jpg | https://files.peakd.com/file/peakd-hive/norychacon/Eokf2EzMSfPkU3P2VS8cw6YjaUC3E17HqpfEXw6DDKLRKhSpw5Q4oHo4rewVteVVXUH.jpg |
Step 9- In a white cardboard cut out a large rectangle and glue it forming a cylinder and with the silver fomi we cover it.
Paso 9- En una cartulina blanca recortamos un rectángulo grande y lo pegamos formando un cilindro y con el fomi plateado lo forramos.
| https://files.peakd.com/file/peakd-hive/norychacon/EoeFr6Czv5xXexhxcvWnkNXuQxxzAQvFQ1otAu7EqyXkw6dQpuHKj7ku5F6WLt7H5f8.jpg | https://files.peakd.com/file/peakd-hive/norychacon/EogPK89iRehXgUGGcDx9ZsLZ2AXzdnBQ8EdkqgFiBi8gUFBr2XyjKUF5SiyKS4XWsDV.jpg | https://files.peakd.com/file/peakd-hive/norychacon/EoeEzjhiYkGKjpKaq4ZPTU8mRve848MhsAAkryWMxgtjwc8RTEVum2tb1Up8dqRjmZz.jpg |
Step 10- We glue all the decorations on top of the circle we made earlier. First we glue the cylinder, then the doctor and, finally, the tooth and the brush.
Paso 10- Vamos pegando todos los adornos encima del círculo que realizamos anteriormente. Primero pegamos el cilindro, después la doctora y, de último, la muela y el cepillo.
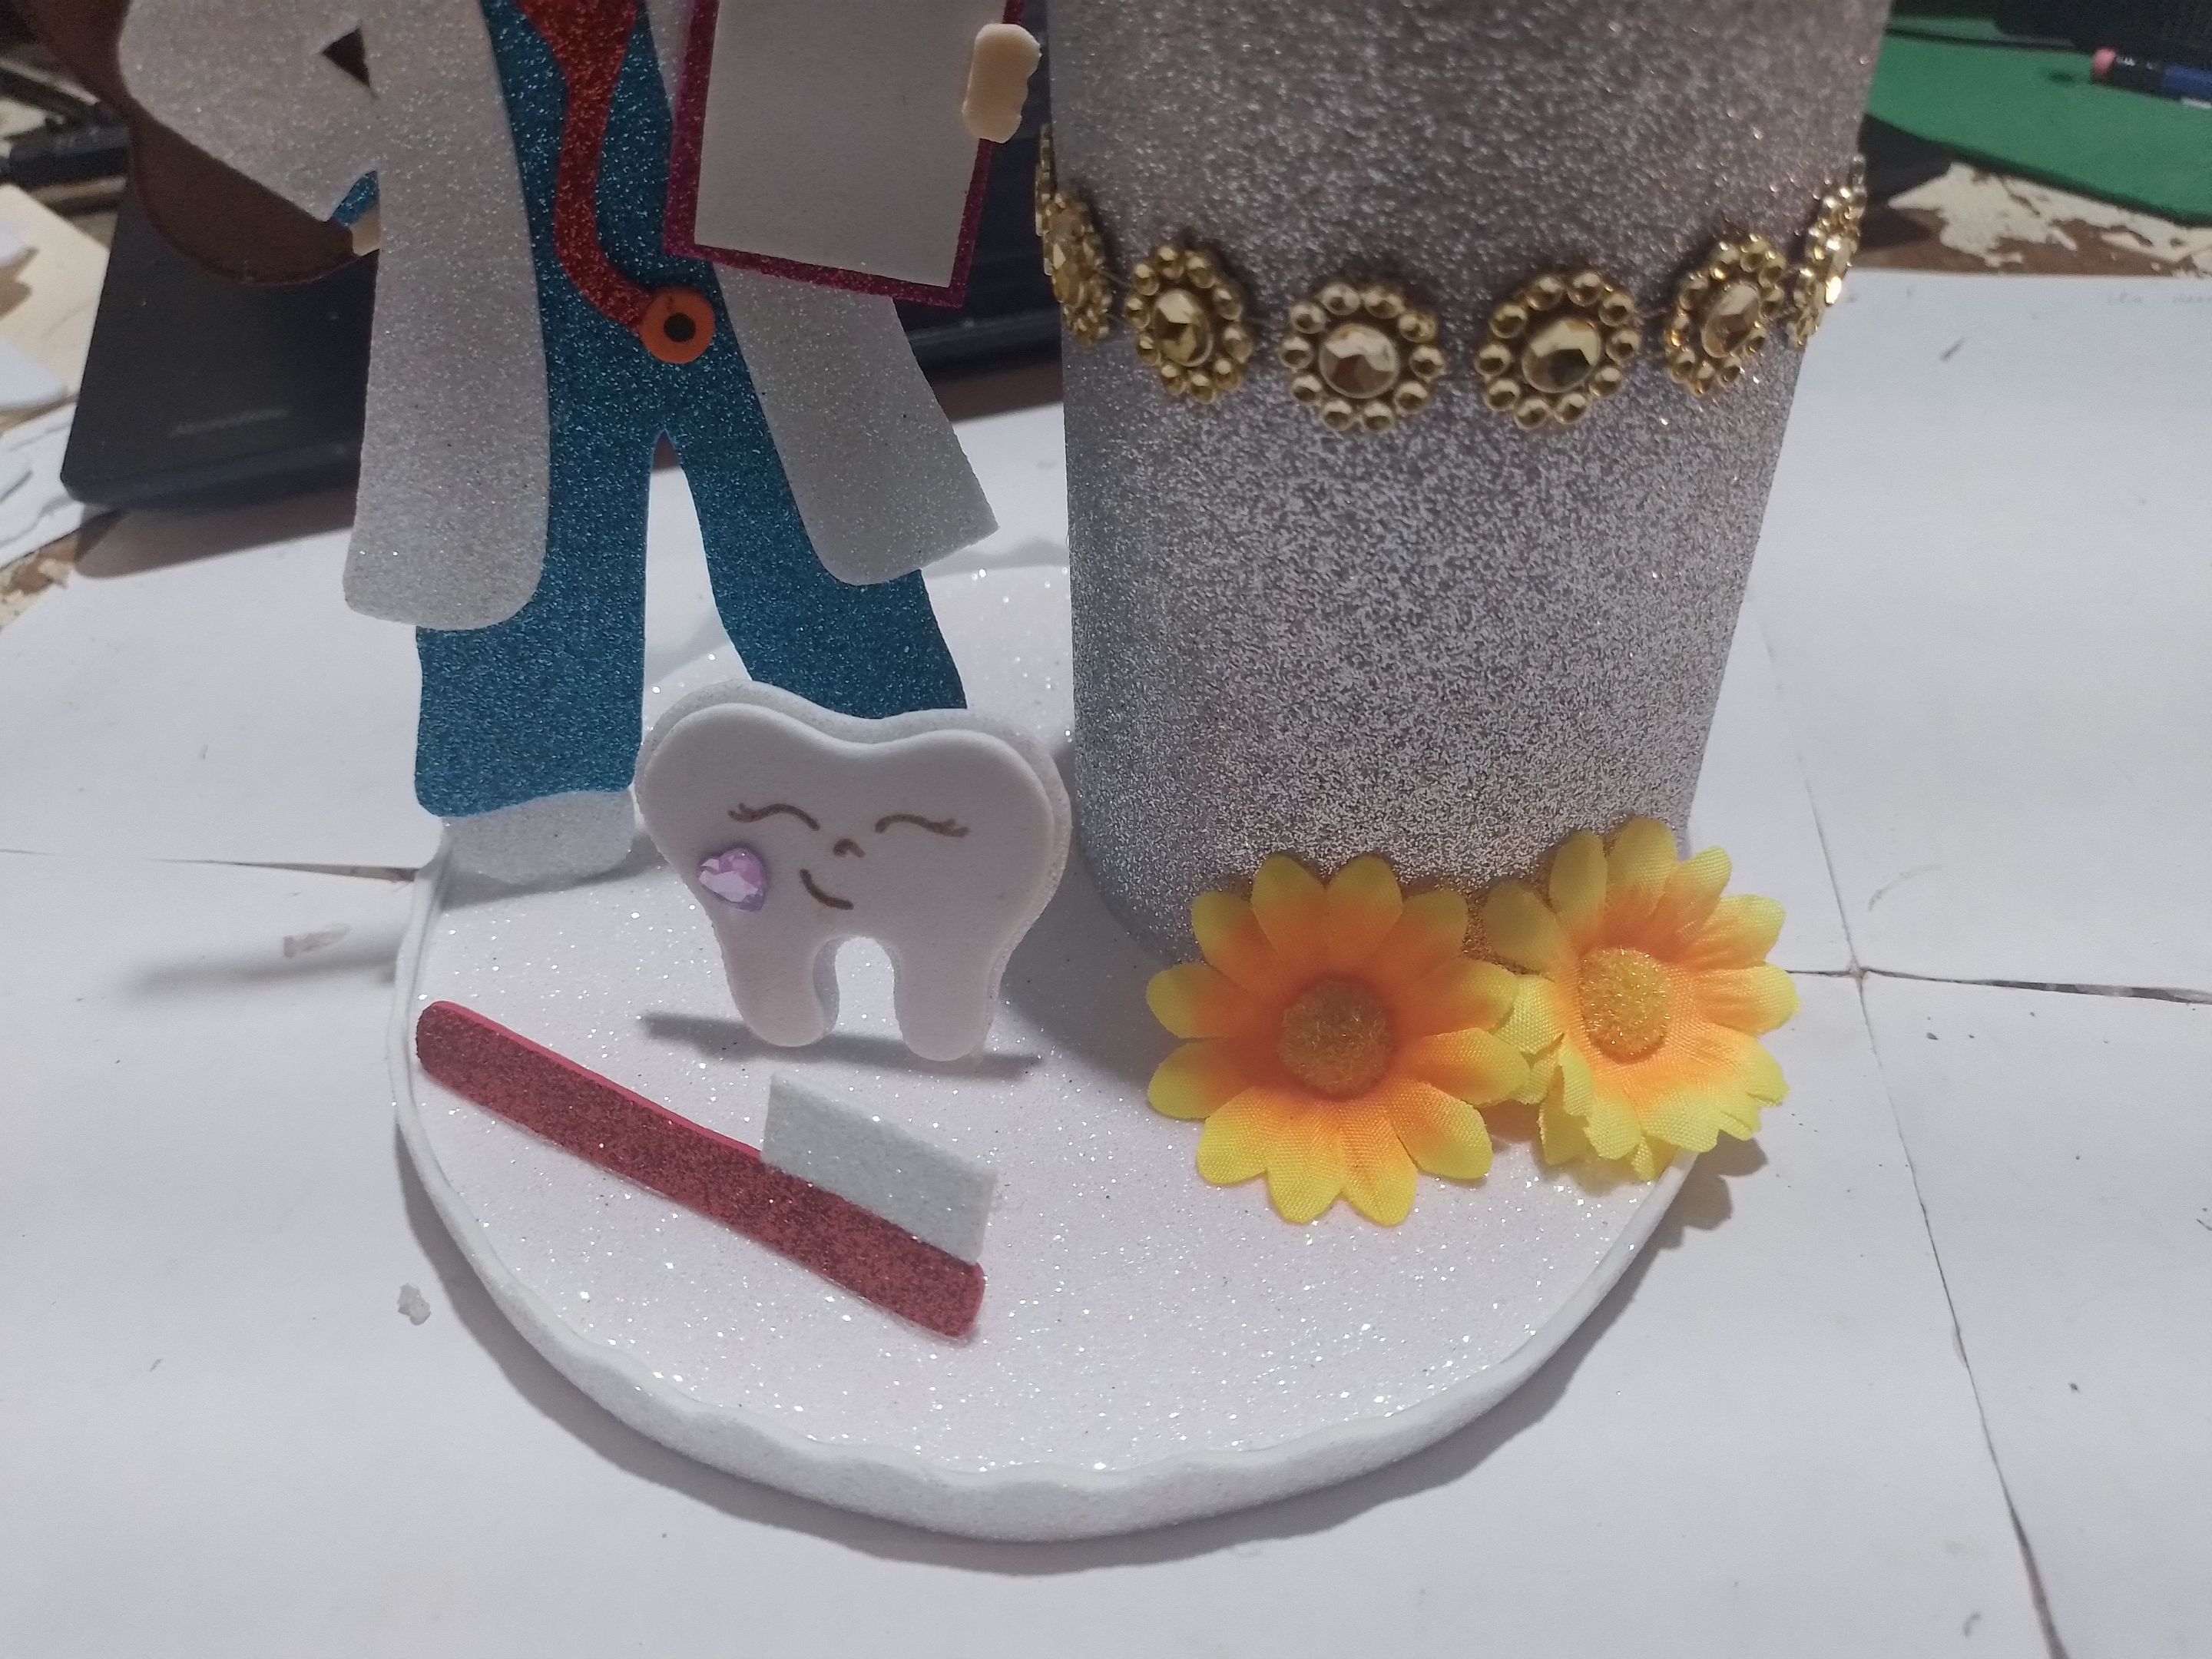
Step 11- To finish, we glue the two little flowers in front of the cylinder, and a decorative strip.
Paso 11- Para terminar, pegamos las dos florecitas delante del cilindro, y una tira decorativa.
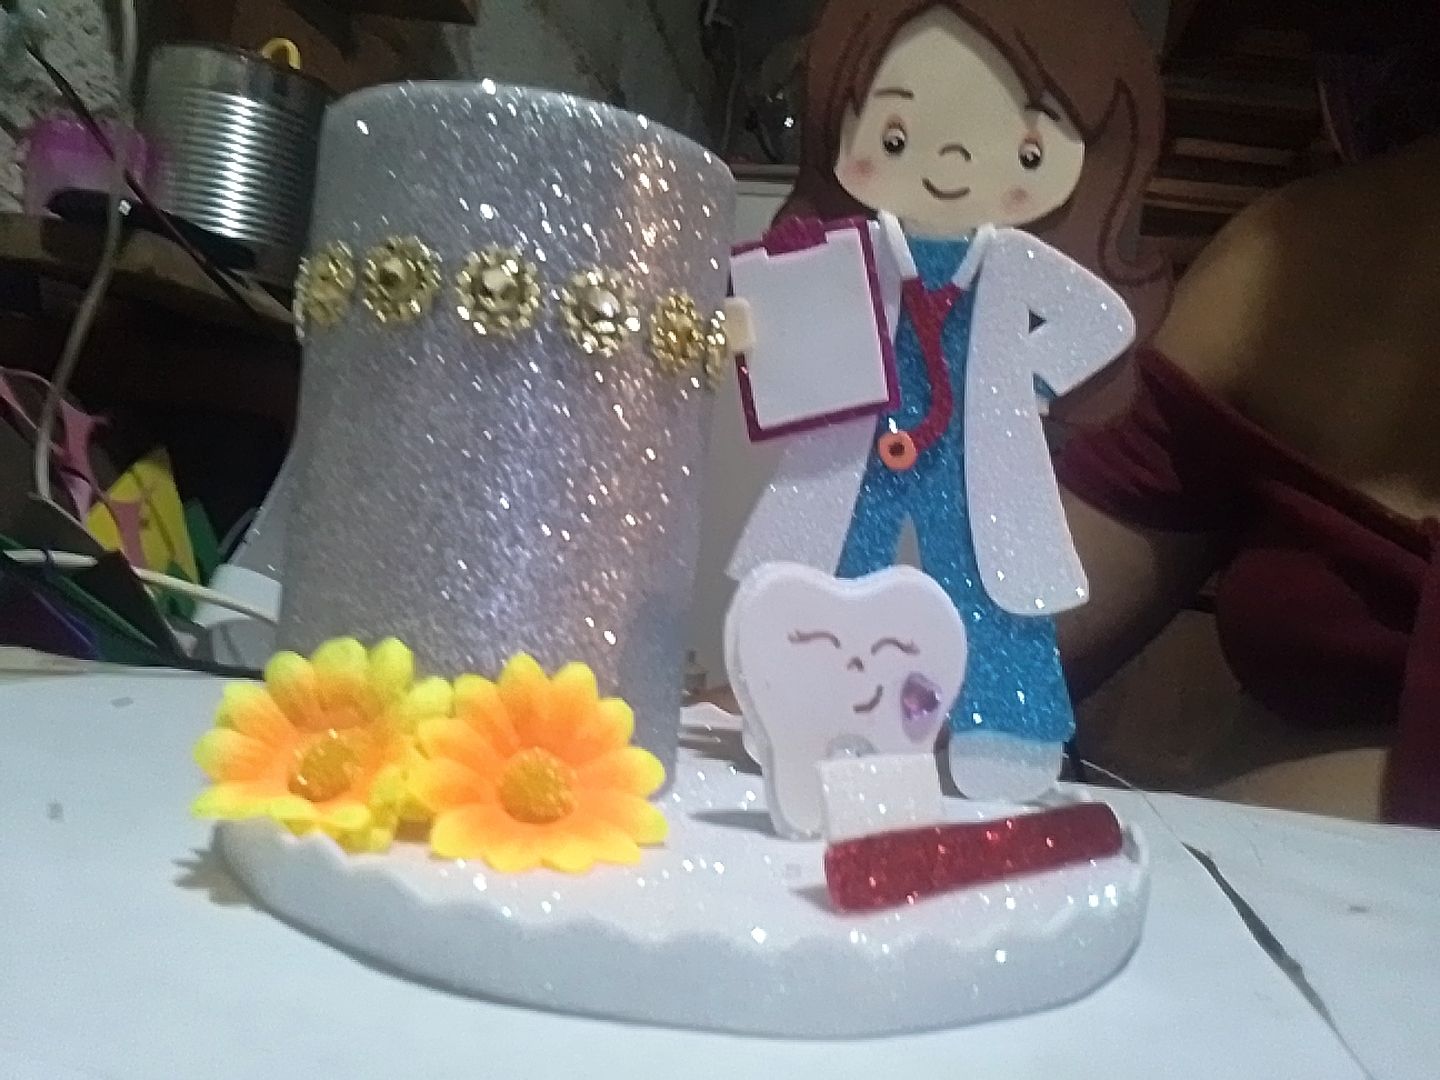
And so we got this beautiful pencil toothbrush holder, which my cousin loved. I hope you liked it.
Y así nos quedó este bello y cepillo de diente portalápiz, el cual le encantó a mi prima. Espero que les haya gustado.
Photos of my property taken with the phone Cover made in Canva Translated by DeepL