
Hello creative friends, today I want to show you the work I did for a client to decorate her room. She decided the theme and I put the decorative touch. She really liked the result and I hope you like it too, because it is a good idea to decorate our homes.
Hola amigos creativos, hoy les quiero mostrar el trabajo que le realicé a una clienta para que adornara su cuarto. Ella decidió la temática y yo le puse el toque decorativo. El cual le gustó mucho su resultado y espero que a ustedes les guste también, ya que es una buena idea para decorar nuestros hogares.

- Silicone gun.
- Scissors.
- Cutter.
- Pencil.
- Cardboard.
- Cardboard.
- Double contact sticker.
- Stamen.
- Fomi of various colors.
- White sheet.
- Beads.
- Pistola de silicona.
- Tijera.
- Cúter.
- Lápiz.
- Cartón.
- Cartulina.
- Pegatina de doble contacto.
- Estambre.
- Fomi de barios de colores.
- Hoja blanca.
- Perlas.
| https://files.peakd.com/file/peakd-hive/norychacon/EoyRWKGcSBL1wpXTYNhtpBZEczYRVdy9cWxH3aGNhQB2UZDVPVjvmJjG9emct7AckEn.jpg | https://files.peakd.com/file/peakd-hive/norychacon/EogQjFWbUEVTFcpUvTJqsezSxerc2x1v38jghCsgA2UptABqH1Wf8vWgkLkzdnnLgRK.jpg |
Step 1- Cut out a moon with the cutter from the cardboard.
Paso 1- Cortamos una luna con el cúter del cartón.
| https://files.peakd.com/file/peakd-hive/norychacon/EouB6L8asz3WcWgwLBvTHj9fkaMycyLVxC7cSXoPDHoL4Xq9SFLM91YTx33SBekkGCH.jpg | https://files.peakd.com/file/peakd-hive/norychacon/EouAZjVkbbDeKsggSPW9si9baoR2ADQAjezvCaT9SePDKDE6FD4My1cc7sMVuLGjaYo.jpg | https://files.peakd.com/file/peakd-hive/norychacon/EokexxzLsfbD8KYT8T5ozEeVz2Zb3VEg5qEHe8UNDgdbfT3QnnLpiaUtxSuCSzY6Dig.jpg |
Step 2- Glue the moon on the silver fomi and cut it out.
Paso 2- Pegamos la luna en el fomi plateado y la recortamos.
| https://files.peakd.com/file/peakd-hive/norychacon/EpVDbKSyTaEzbUokpptcYrRe2QUPxNTtCf7JKyA1A6mPBRtuqX3bDVrwWDY5Zch1w6V.jpg | https://files.peakd.com/file/peakd-hive/norychacon/EogQiFDHm9HkkrcSMo1EDQxpMKobnJuQn6tUziAUDwEfgzsfTzfqGPNAeUJ3ez2iQ8x.jpg |
| https://files.peakd.com/file/peakd-hive/norychacon/Ep5p4RwyccDNr3wUaXgGzMTkcA9QgZCd3bWnEaooVmfDj8WcHHbAGeSAm1sG116ohtv.jpg | https://files.peakd.com/file/peakd-hive/norychacon/EoeGpmbfEgH815NfTWjMS4hsZyf8YdRFrPxG4xsHan9qhNW7LyfKpoHGiNxTcnp5ckQ.jpg |
Step 3- We cut some thin strips from the silver fomi and glue them around the edge of the moon.
Paso 3- Recortamos unas tiras finas del fomi plateado y las pegamos por el borde de la luna.
| https://files.peakd.com/file/peakd-hive/norychacon/EpT5hqcnLhNNjsZ52s8v5tGvfbVKAdZbCrhRn9X6Usk6FmxfF6eV9LWoHxreAFiEJSF.jpg | https://files.peakd.com/file/peakd-hive/norychacon/EoCjaEveDSCVjqrTFKFpuebxa8uzVnfB4yy4GduFy9pg2momZofer14tRm1TPneUrZP.jpg |
Step 4- Cut out 4 stars from the cardboard.
Paso 4- En la cartulina recortamos 4 estrellas.
| https://files.peakd.com/file/peakd-hive/norychacon/Eoke6rPNKXu6Wh5sRfDLzej5s5S5xd8ZMNAfZaN65KwTFJ9CjdKsQnhhiZubYSrZDUg.jpg | https://files.peakd.com/file/peakd-hive/norychacon/Ep1YpcV4ST8i7S3dSN3Q8BABNCvP8hZuDs9WnYCpBpYYTDuUc67JCsFq7DoMnWQZyso.jpg |
Step 5- We glue the stars made of cardboard on a silver fomi and together with some strips of yarn. And cut them out.
Paso 5- Pegamos las estrellas echas de cartulina en un fomi plateado y junto con unas tiras de estambre. Y las recortamos.
| https://files.peakd.com/file/peakd-hive/norychacon/EoptsAzi12wSPCbRKHgo4wuEcJWJ5rrFmviz8zGVkNNAumrVY7JKbyYLDHt3yyTSfLy.jpg | https://files.peakd.com/file/peakd-hive/norychacon/Eou9kLZPpJjf7JM1vf5GQKxWd61PYjspPCzb1vLeqkC8eAmuBSPV3wcLD4H8Z7E44hs.jpg |
| https://files.peakd.com/file/peakd-hive/norychacon/Ep1YpcV3q64bMVoBAqhhRoShAsXA9m94xDrZHMsjsYiJX3PkDsqduEpqEhufgXuWDnE.jpg | https://files.peakd.com/file/peakd-hive/norychacon/EoGzGigAz9pGZVfkM1Fcp7wtPwkvni6CVA3LxJ3C1hYypdspvKFDzihWtfPEyfz38Tv.jpg |
Step 6- Then we glue the stars on the moon by the strips of yarn, and glue a white sheet behind so that the glued strips are not seen.
Paso 6- Luego pegamos las estrellas en la luna por las tiras del estambre, y le pegamos una hoja blanca por detrás para que no se vean las tiritas pegadas.
| https://files.peakd.com/file/peakd-hive/norychacon/EopuNR8C8XMJPiCTVWXewFaJZiZNFyuxpEbKVENjMwcev4bHtnV5EB3Ae63ycjXv9Tv.jpg | https://files.peakd.com/file/peakd-hive/norychacon/Eonn1x9YFtVVs9wq1hX53h2yJY9VFchicZmA2byCiziqyc9gyXT78jjU4HhSYSbDpSB.jpg | https://files.peakd.com/file/peakd-hive/norychacon/EogQC7h9gNPktVwNcZz1KXoxUqQ4Eg6RoTnLMLyxqfkzq81zagoYjGcDTWYWpDYab3V.jpg |
Step 7- On a pink and white fomi we mark some flowers and cut them out.
Paso 7- En un fomi rosado y blanco marcamos unas flores y las recortamos.
| https://files.peakd.com/file/peakd-hive/norychacon/EogQC7h9gNPktVwNcZz1KXoxUqQ4Eg6RoTnLMLyxqfkzq81zagoYjGcDTWYWpDYab3V.jpg | https://files.peakd.com/file/peakd-hive/norychacon/23u6Bn9D5aW6HvYgvY4d2kztsh2eh6fRDz5Y5Up1gs34wKKgCL4oY4VcojYiEHRBGzZMJ.jpg |
Step 8- We glue these flowers on one edge of the moon to decorate it. And we glue some pearls in the center of the flower.
Paso 8- Pegamos estas flores en un borde de la luna para decorarla. Y le pegamos unas perlas en el centro de la flor.
| https://files.peakd.com/file/peakd-hive/norychacon/EoEsyfSgENum394QHHBoQFDvFjvfyLqVzfm38JYSTdUkqHRKe7mBHTxEUGL6w3WYBuY.jpg | https://files.peakd.com/file/peakd-hive/norychacon/EoiY7SSm9jiyjaFfYpjgxJLDrmzCgvhpTjutgkqSh89yYwior4DroSrngtkVNimomQn.jpg |
Step 9- Finally, we glue the double contact sticker on the back of the moon to stick it on the wall.
Paso 9- Por último, le pegamos la pegatina de doble contacto por detrás de la luna para pegarla en la pared.
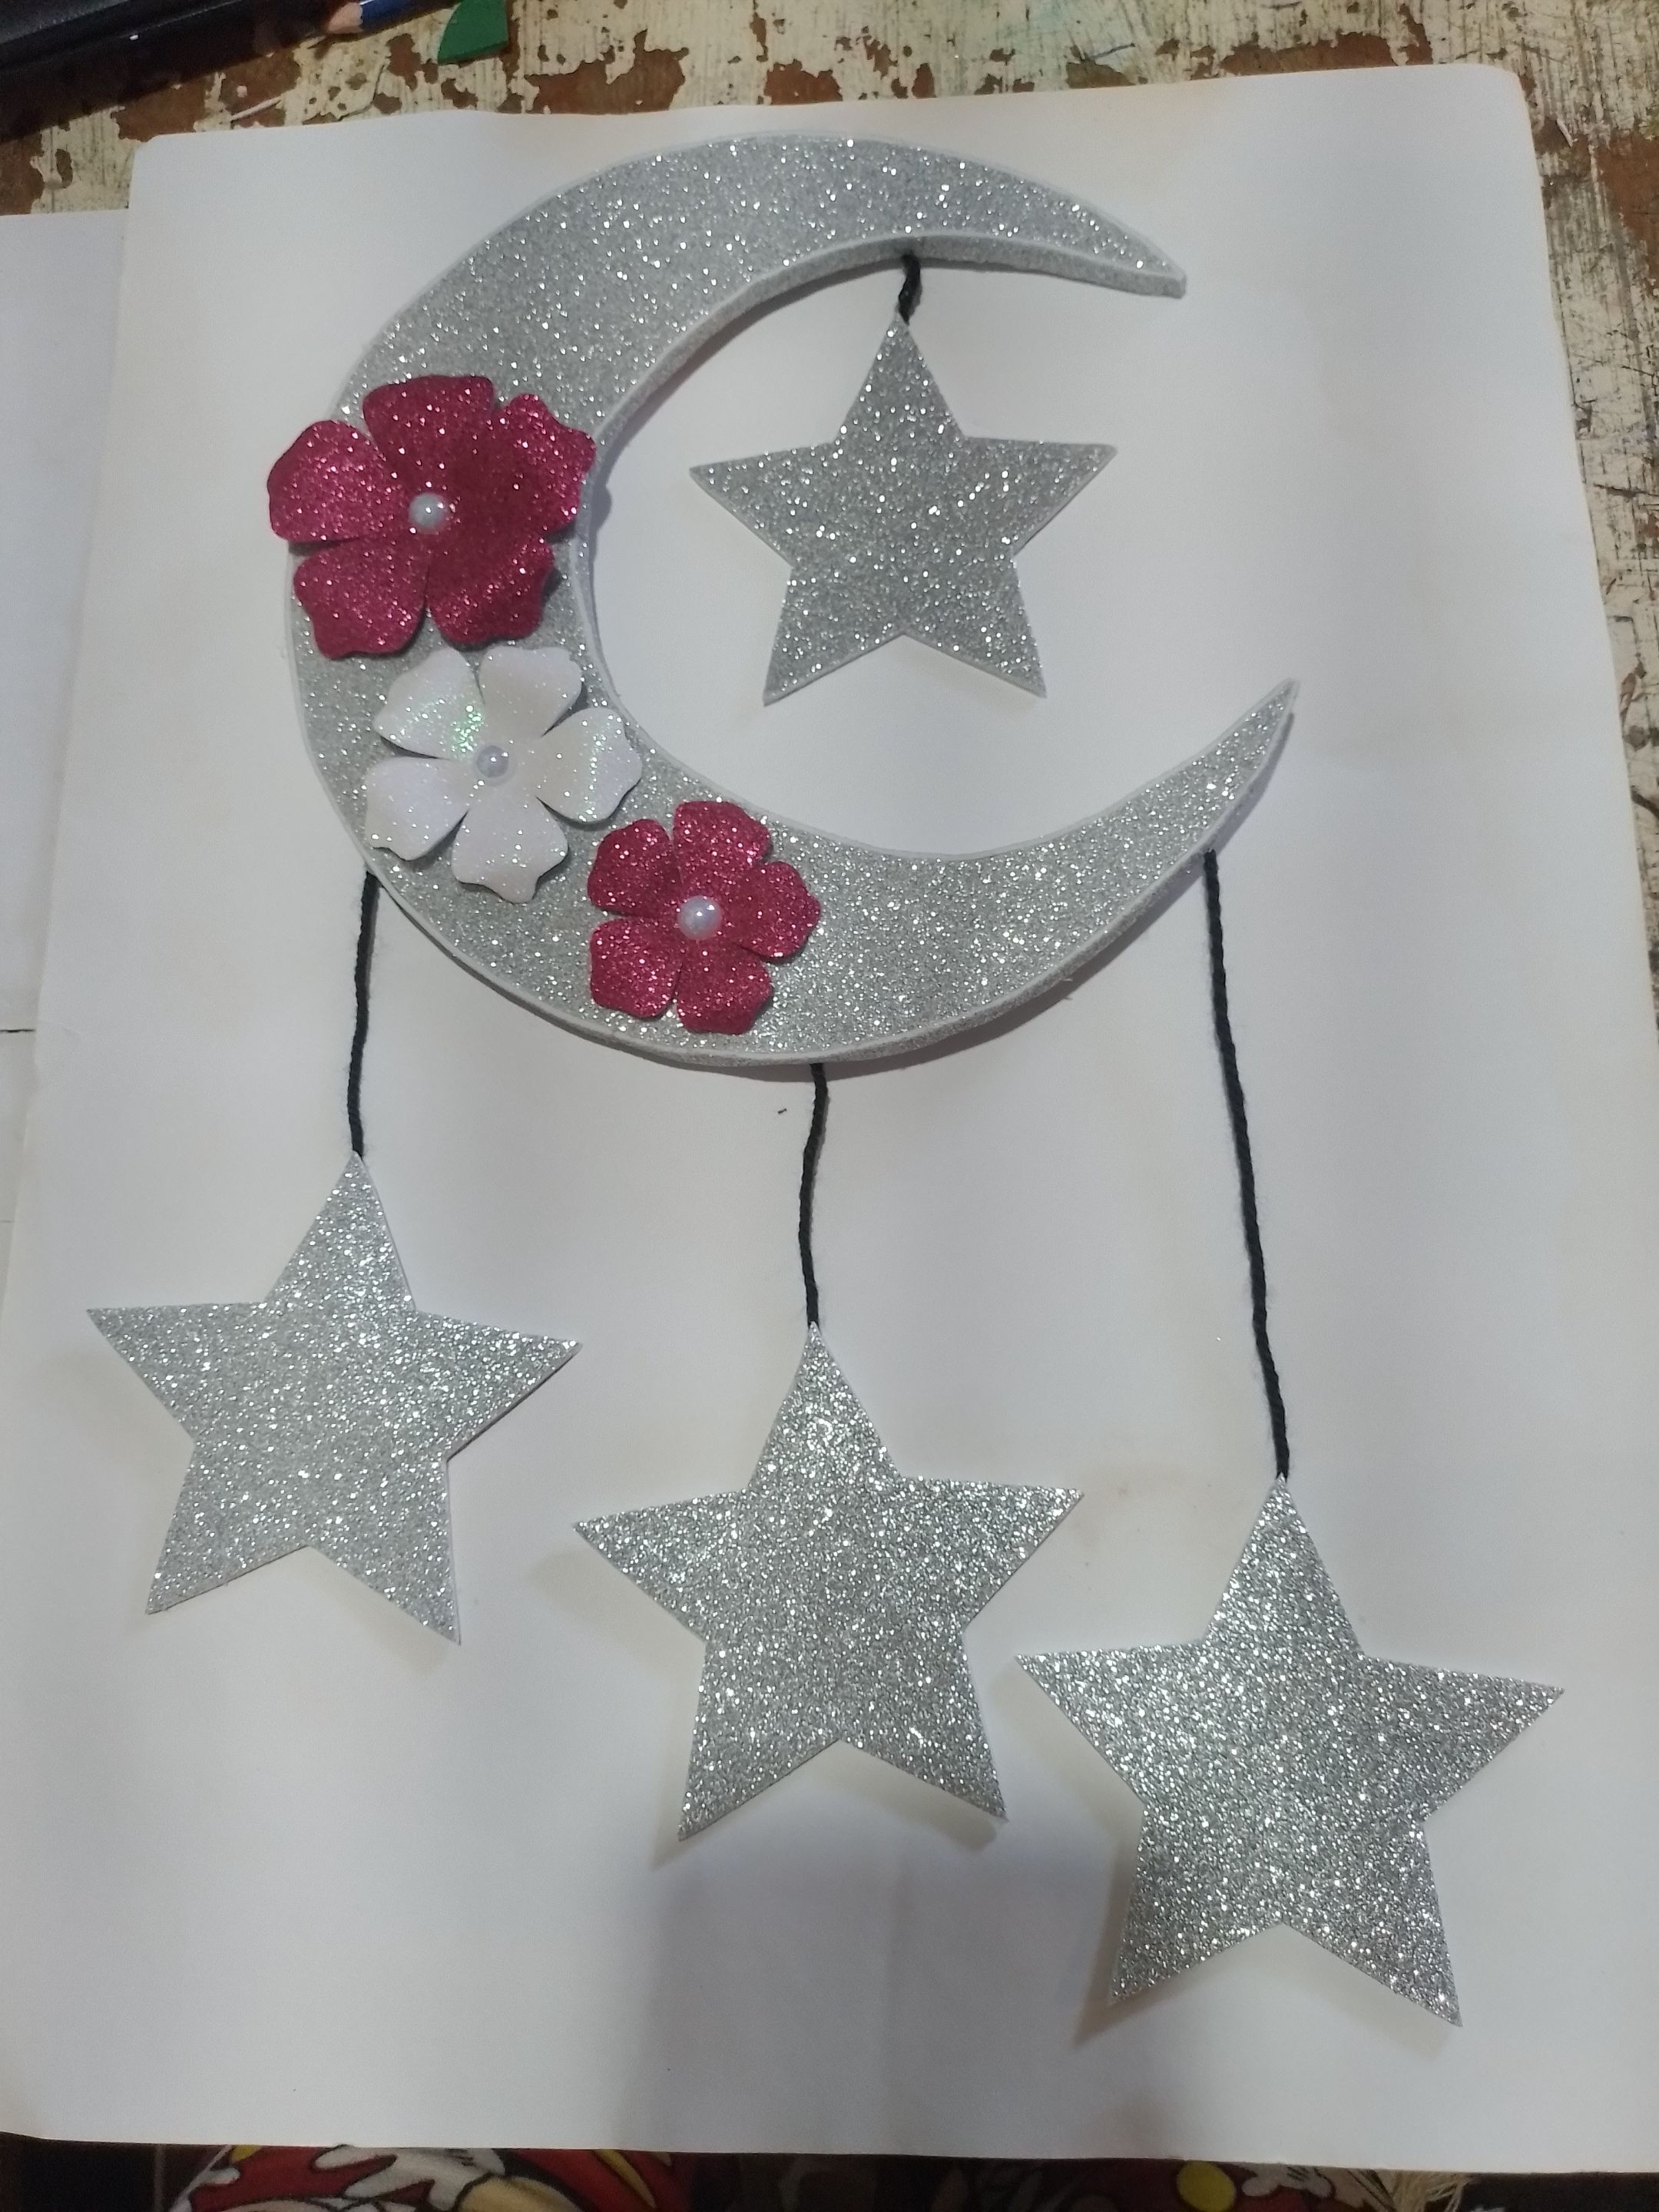
But you can also put a thread of the same yarn to hang it as you wish. I did it this way, because it was the way the customer wanted it.
Pero también le puede poner un hilo del mismo estambre para guindarla como usted desee. Yo lo realicé de esta manera, porque era como lo deseaba la cliente.