
[ENGLISH]
This time it seems to be about tutorials and tips, but I'm struggling with what to write. For starters, since Frontier Mode has been fun lately, I'll try writing some hints for new players to help them boost their ratings.
Well, obviously, leveling up and just smashing them with firepower is the strongest strategy, so the best way to boost your win rate is to prepare higher-level cards than your opponent and overwhelm them with high damage. 🤣
Now, setting aside those who can just smash everything with high firepower, here are some tips for those grinding it out with Level 1 cards.
I've got about three points ready, but if you're thinking “Well, duh, that's obvious,” you probably already know your stuff—feel free to skip ahead and read on.
1. Set up decoys to prevent important cards from being attacked.
Surprisingly, this factor significantly impacts win rates. Every element has those powerful cards that affect win rates. You definitely want to include them because they're strong, but if that card gets taken out, your entire strategy often collapses and you lose.

For example, in this battle, I placed KANAAQ MINER third. This is to protect the SORROW HARVESTER and LITTLE SISTER behind it.
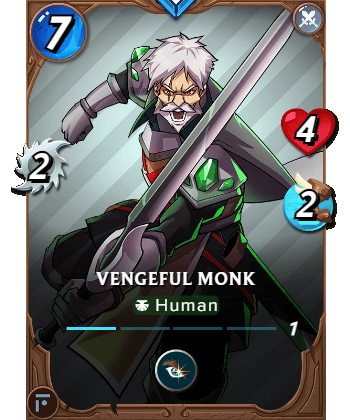
In Frontier Mode, this VENGEFUL MONK is frequently used. With 2 Attack and an Opportunity ability, it's extremely easy to play. To counter this card, position the KANAAQ MINER so it gets targeted first.
When you're teaming up with the Death Element, the Sorrow Harvester becomes a key card. By preventing it from being targeted and destroyed, you avoid losing your advantage right from Round 1.
Incidentally, while I think SPELLMONGER is more effective against VENGEFUL MONK, I've been using KANAAQ MINER more often lately because I worry it'll become a useless ornament if VENGEFUL MONK isn't in the deck.
In this battle, in round 1, the VENGEFUL MONK was targeted as planned, and then the leading NIM GUARD CAPTAIN took damage until his HP was reduced to 3, so in round 2, SORROW HARVESTER was able to unleash two magic attacks without being targeted.
In the case of low cost, not placing a SORROW HARVESTER at the back to guard against KANAAQ MINER's Sneak is also a decoy tactic.
2. Organize your troops with the order of attack in mind.
In fact, this is extremely difficult in Frontier Mode. There are very few Speed 3 cards at Level 1. You often end up fighting at Speed 2.
Even so, there is a specific order depending on the attack type, so magic attacks are definitely advantageous. Remember that they come first in the order of magic attacks > ranged attacks > melee attacks.

If you look at the battle in the link above, it looks like I bought it with ease, but that's not actually the case. I can't shake the feeling that I won this battle by luck. But I guess luck is also a part of skill.
The key point is that the rules for this battle include Reverse Speed, and LENORE NEVERMORE and SORROW HARVESTER have a speed of 1. Since these two have a speed of 1, they can attack at the fastest speed in Reverse Speed.
Furthermore, because of the aimless rules, magic attacks and long-range attacks are targeted at random, and luckily this allowed me to take out two of my opponent's magic attackers with a preemptive attack.

It's a good idea to remember the attack order.😉
Normally, this is not a HP level that can be defeated in one hit. However, lowering HP is Death's specialty. After lowering the HP to 2 with HP-1 x 2, he successfully sniped the two enemies.
It may seem like you won easily because you had the advantage of defeating two enemies first. Keep the priority of your attacks in the back of your mind.
There are only a few cards that can be used in Frontier Mode, so it's quite easy to memorize the card abilities, and it's a good idea to just remember the most commonly used cards.
3. Have you calculated the total HP and armor values?
Naturally, the higher the total HP, the greater the durability. The same goes for armor value. You win if you can defeat the enemy before they defeat you.
In Frontier, attack power is basically 2 points. So the next thing is to figure out how to defeat them before they defeat you.

In this battle, my opponent has three magic attackers and one long-range attacker. Their total attack power is 8 points. My attack power is 7 points, which puts me at a disadvantage.
However, when calculating durability, my opponent has 18 HP and no armor, while I have 19 HP and 8 armor.
I have an overwhelming advantage in durability. (In reality, magic ignores armor, and even 1 point of armor will completely block attacks, so there will be some margin of error.)
Just paying attention to these little things when organizing your team will increase your win rate. It's very difficult to think of everything as perfect, but if you pay attention to even a little bit and remember your favorite patterns, it will make a difference.😏
The images below include the BATTLE URL with a referral link. If you are thinking of getting started, take a look at the BATTLE before you sign up.


[日本語]
今回はチュートリアルとヒントらしいですが、何を書けばいいのか悩みますね。とりあえず最近はフロンティアモードが楽しいので始めたばかりの方向けにレートを上げるためのヒント的なものを書いてみましょう。
まぁ、結局レベルを上げて火力で殴るのが最強なのは当たり前なので最も勝率を上げるのは相手より高レベルのカードを用意して高火力で押し切ることだったりしますけど。🤣
さて、高火力でぶん殴れる人は置いておいて、レベル1カードで頑張ってる人に向けたちょっとしたヒントをいかに書きますね。
3つほど用意してきましたけどそんなんあたりまえじゃん?って思う人は結構慣れてそうなのでスルーして読み飛ばしといてくださいね。
1. 重要なカードが殴られないように囮を設置する。
意外と勝率にかかわってくるのがこれです。どのエレメントでもそうなんですけど勝率にかかわる強カードっていうのがあります。強いので必ず入れたいんだけど、そのカードは倒されちゃうと一気に崩れて負けてしまう事も多いですよね。
例えばこのバトルでは KANAAQ MINER を3番目に入れています。これはその後ろの SORROW HARVESTER と LITTLE SISTER を守るためですね。
フロンティアモードだとこの VENGEFUL MONK がよく使われます。攻撃力が2点で Oppotunity アビリティ持ちだからとても使いやすい。このカードの対策で KANAAQ MINER が先に狙われるようにしてるんですね。
Deathでチームを組んでると SORROW HARVESTER がキーカードになるんですけど、このカードを狙い撃ちで倒されないようにすることでラウンド1でいきなり優位性を失うことが無いように工夫してるわけです。
ちなみに、 VENGEFUL MONK 対策としては SPELLMONGER のほうが優秀だと思いますが、 VENGEFUL MONK が入ってなかったときに置物になるのを危惧して最近は KANAAQ MINER を使うことが多いですね。
このバトルではラウンド1は作戦通り VENGEFUL MONK が狙われた後、先頭の NIM GUARD CAPTAIN がHP3になるまでダメージを受けたのでラウンド2でも SORROW HARVESTER は狙われることなく魔法攻撃2点をぶっ放しています。
低コストの場合だと、 KANAAQ MINER の Sneak を警戒して一番後ろに SORROW HARVESTER を置かないなんて事も同じく囮作戦ですね。
2. 攻撃順序を意識して編成する。
じつはフロンティアモードだとこれが凄く難しい。レベル1ではスピード3のカードが少ないんですよね。どうしてもスピード2で殴り合いになることが多いです。
それでも、攻撃種別の違いで順番があるので魔法攻撃が確実に有利ですね。魔法攻撃>遠距離攻撃>近接攻撃 の順で先になるので覚えておきましょう。
上記のリンクからバトルを見ると超余裕で買っているように見えますが、実はそうでもなくて。 このバトルは運で勝利したような感じがどうしてもぬぐえないんですが。まぁ運も実力のうちという事にしましょう。
ポイントはこのバトルのルールに Reverse Speed が含まれていて、 LENORE NEVERMORE と SORROW HARVESTER のスピードが1であること。この2体はスピードが1なので Reverse Speed では最速で攻撃できます。
さらに、 Aimless ルールなので魔法攻撃と遠距離攻撃がランダムターゲットになるんですが、これが運よく先制攻撃で対戦相手の魔法アタッカー2体を倒してくれました。
攻撃順序は覚えておくといいですよ。😉
通常であれば1撃で倒せるHPじゃないんですが、そこはDeathの十八番です。 HP-1 x 2 でHPが2になった2体を運よくスナイプしてくれています。
このように先に2体を倒してアドバンテージがあったために余裕で勝てたように見えたんですね。攻撃の優先順序は頭の片隅に入れておきましょう。
フロンティアモードで使えるカードは少ないのでカードの性能を暗記するにしてもかなり楽ですし、よく使われるカードだけでも覚えておくといいですよ。
3. HPとアーマーの合計値は計算してる?
当たり前ですが、HPの合計が高い方が耐久力が高くなります。アーマーの値も同じ。倒される前に倒しきれば勝利です。
フロンティアでは攻撃力は基本2点。となると、あとはいかにして倒される前に倒すかですね。
このバトルを見てもらうと、対戦相手は魔法攻撃が3体、遠距離が1体。攻撃力の合計は8点です。私は攻撃力が7点で不利になります。
しかし、耐久力を計算すると対戦相手はHPが18点でアーマー無し。対して私はHPが19点にアーマーが8点です。
耐久力は圧倒的に私が有利ですね。(じっさいには魔法はアーマーを無視しますし、アーマーは1点でもあれば攻撃を完全に防いでくれるので多少誤差は出ますけど。)
このようにちょっとしたことを気にかけて編成するだけでも勝率は上がります。すべてを完璧になんて思うととっても大変ですけど、ちょっとだけでも気にしておいて得意なパターンを覚えておくと違いますよ。😏
以下の画像をは紹介リンク付きBATTLE URLを含みます。 これから始めようと思っているなら、バトルを見てから登録してみてね。