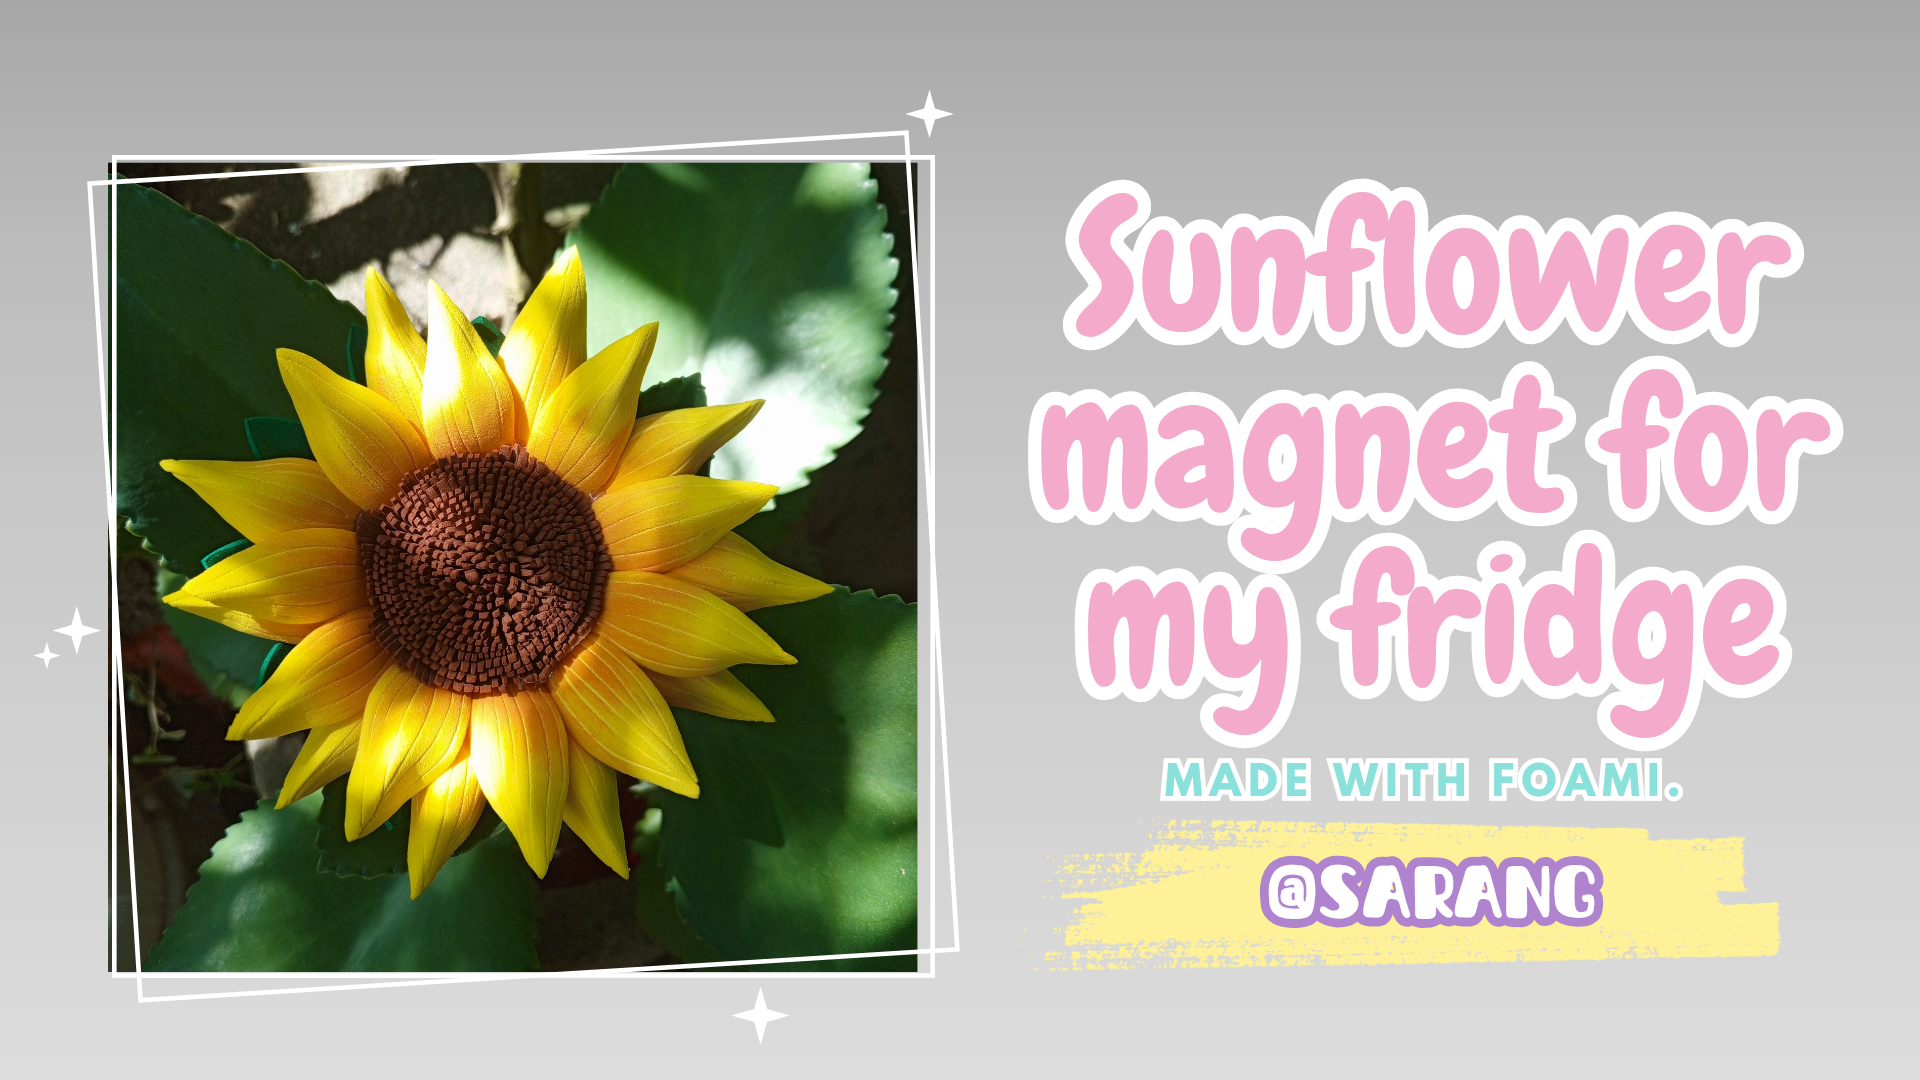
**Holis gente bonita|Hello beautiful people**🥰
Bienvenidos sean todos nuevamente a mi blog o como me gusta también llarmarle ***"mi burbuja creativa"*** el espacio en el que puedo compartir con todos ustedes mi pasión por el arte y mi proceso como artista en formación, en esta oportunidad quiero compartirles un imán de girasol 🌻 que hice hace poco con foami, me gustan mucho los girasoles así que tengo planeado hacerlos en varios formatos y materiales, quise empezar por el foami porque es el material que tengo más a la mano ahorita.
>Welcome back to my blog or as I like to call it ***"my creative bubble "*** the space where I can share with you all my passion for art and my process as an artist in training, this time I want to share with you a sunflower magnet 🌻 I recently made with foami, I really like sunflowers so I plan to make them in various formats and materials, I wanted to start with foami because it is the material I have more at hand right now.
Hace meses atrás intenté aprender a hacer este girasol 🌻 y lamentablemente no me salió bien, tuve un error en el pistilo que arruinó todo al final, pero como dicen por allí cuando te caes del caballo tienes que volverte a montar, así que lo volví a intentar corrigiendo el error anterior y quedé bastante feliz y satisfecha con él resultado 🥰🌻😍 sigue leyendo para que no te pierdas ningún detalle.
>Months ago I tried to learn how to make this sunflower 🌻 and unfortunately it didn't turn out well, I had a mistake in the pistil that ruined everything at the end, but as they say over there when you fall off the horse you have to get back on, so I tried again correcting the previous mistake and I was quite happy and satisfied with the result 🥰🌻😍 keep reading so you don't miss any details.

🌻**Materiales|Materials**🌻
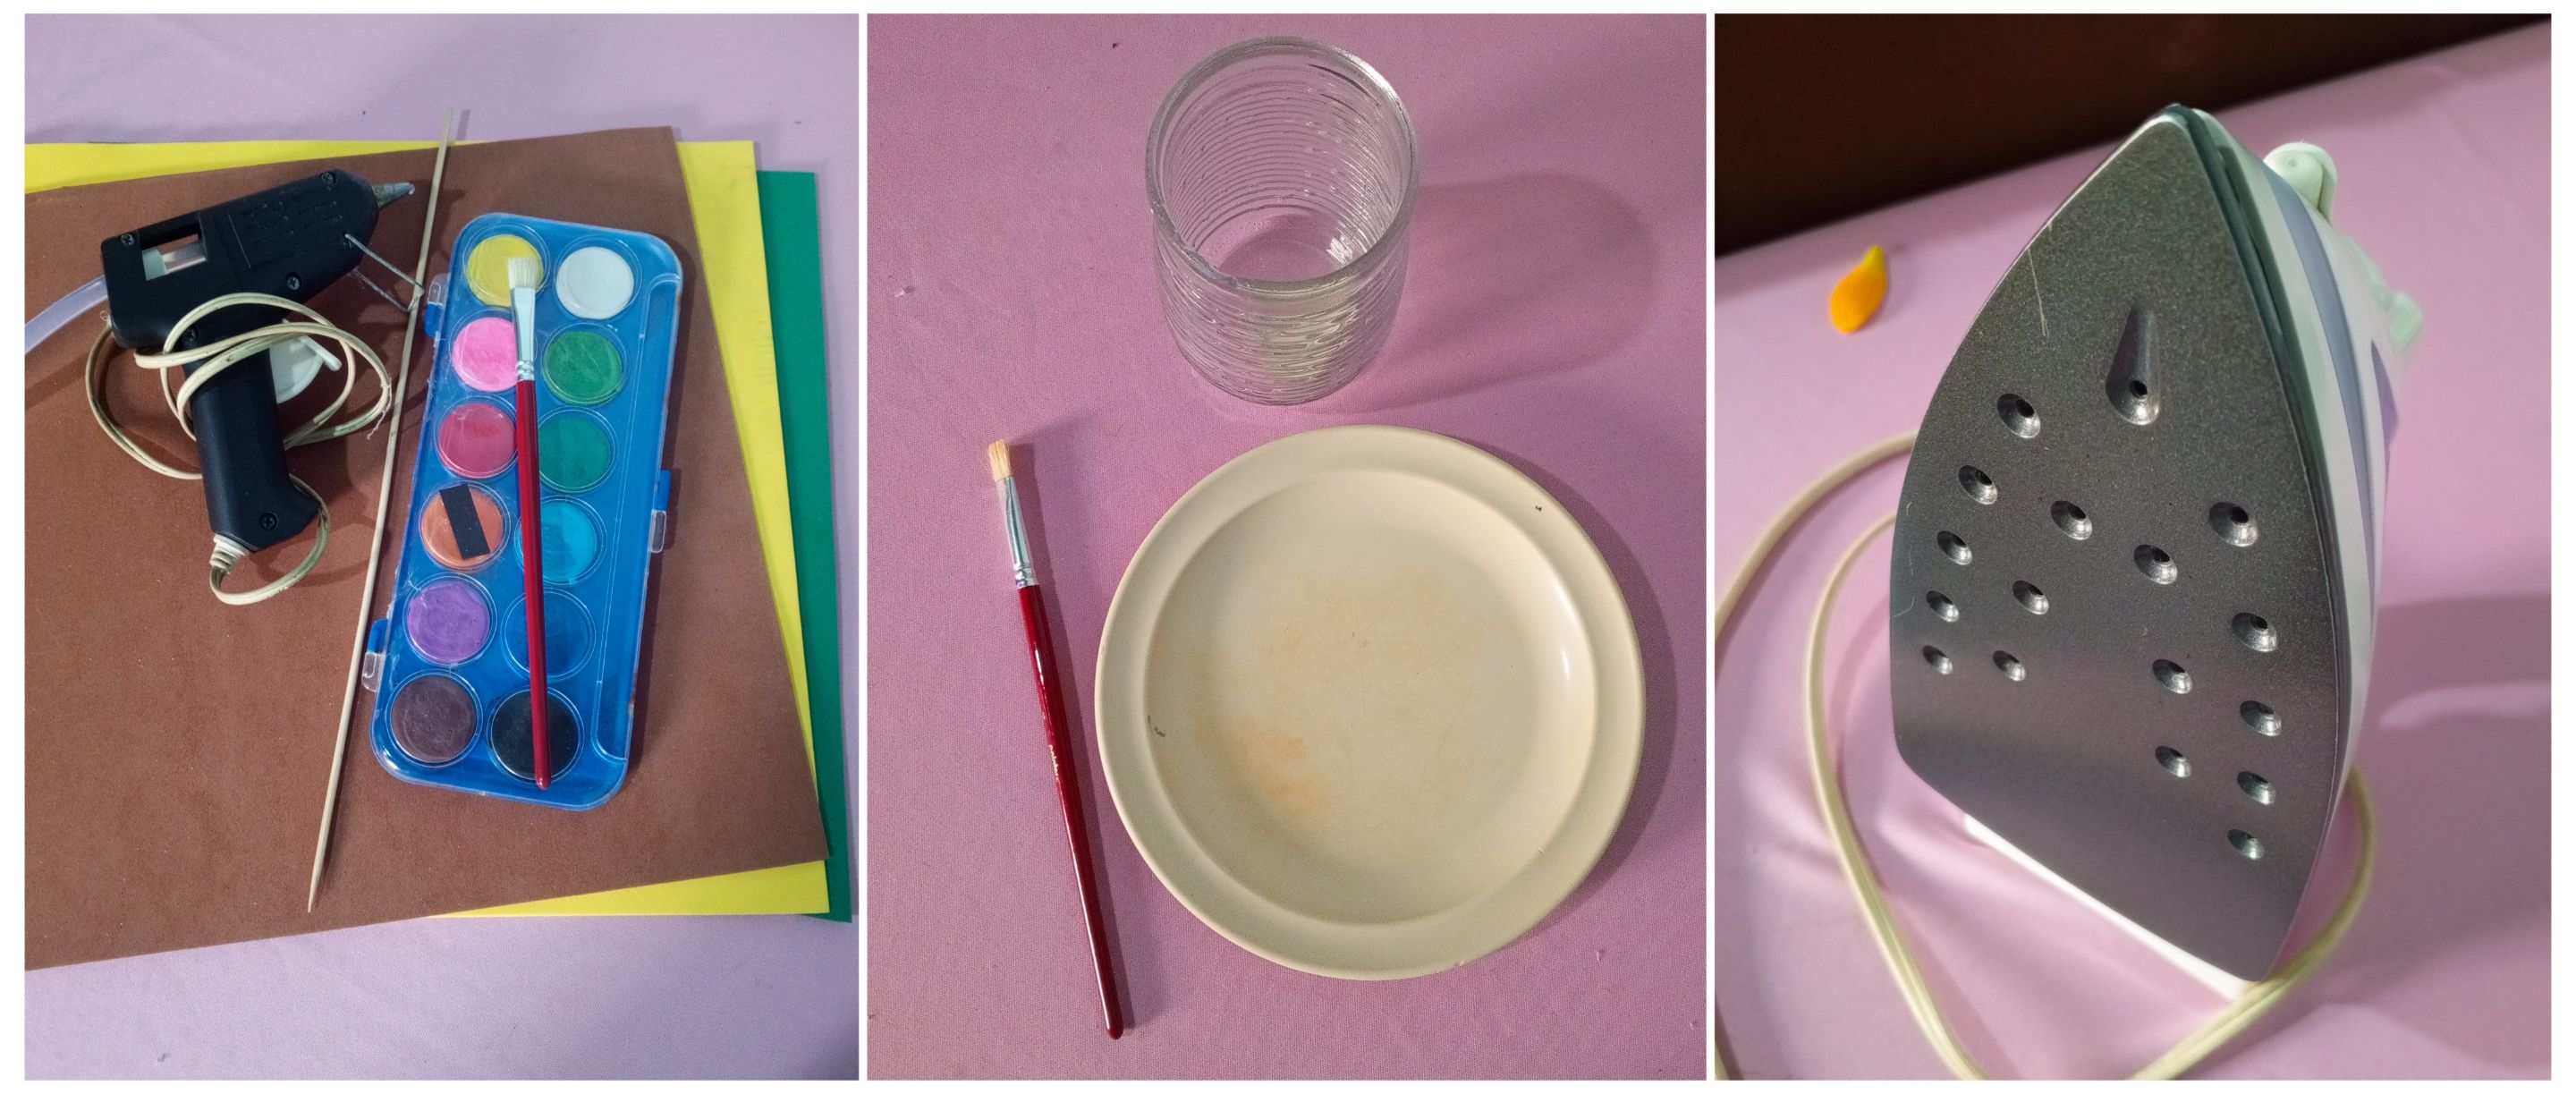
* Foami sencillo, Marrón, amarillo y verde.
* Tijera. (olvide incluirla en las imágenes)
* Silicón.
* Pistola de silicón.
* Palillo de altura.
* Acuarelas.
* Pincel.
* Plato.(para descargar la pintura del pincel)
* Vaso con agua ( para activar la acuarela y lavar el pincel)
* Plancha ( para darle volumen a las piezas de foami)
* Lamina de imán. 🧲
- - -
* Plain Foami, Brown, yellow and green.
* Scissors (forget to include it in the images).
* Silicone.
* Silicone gun.
* Height stick.
* Watercolors.
* Brush.
* Dish (to unload the paint from the brush).
* Glass with water (to activate the watercolor and wash the brush).
* Iron (to give volume to the foami pieces).
* Magnet sheet. 🧲

🌻**Paso a paso**|**Step-by-step**🌻
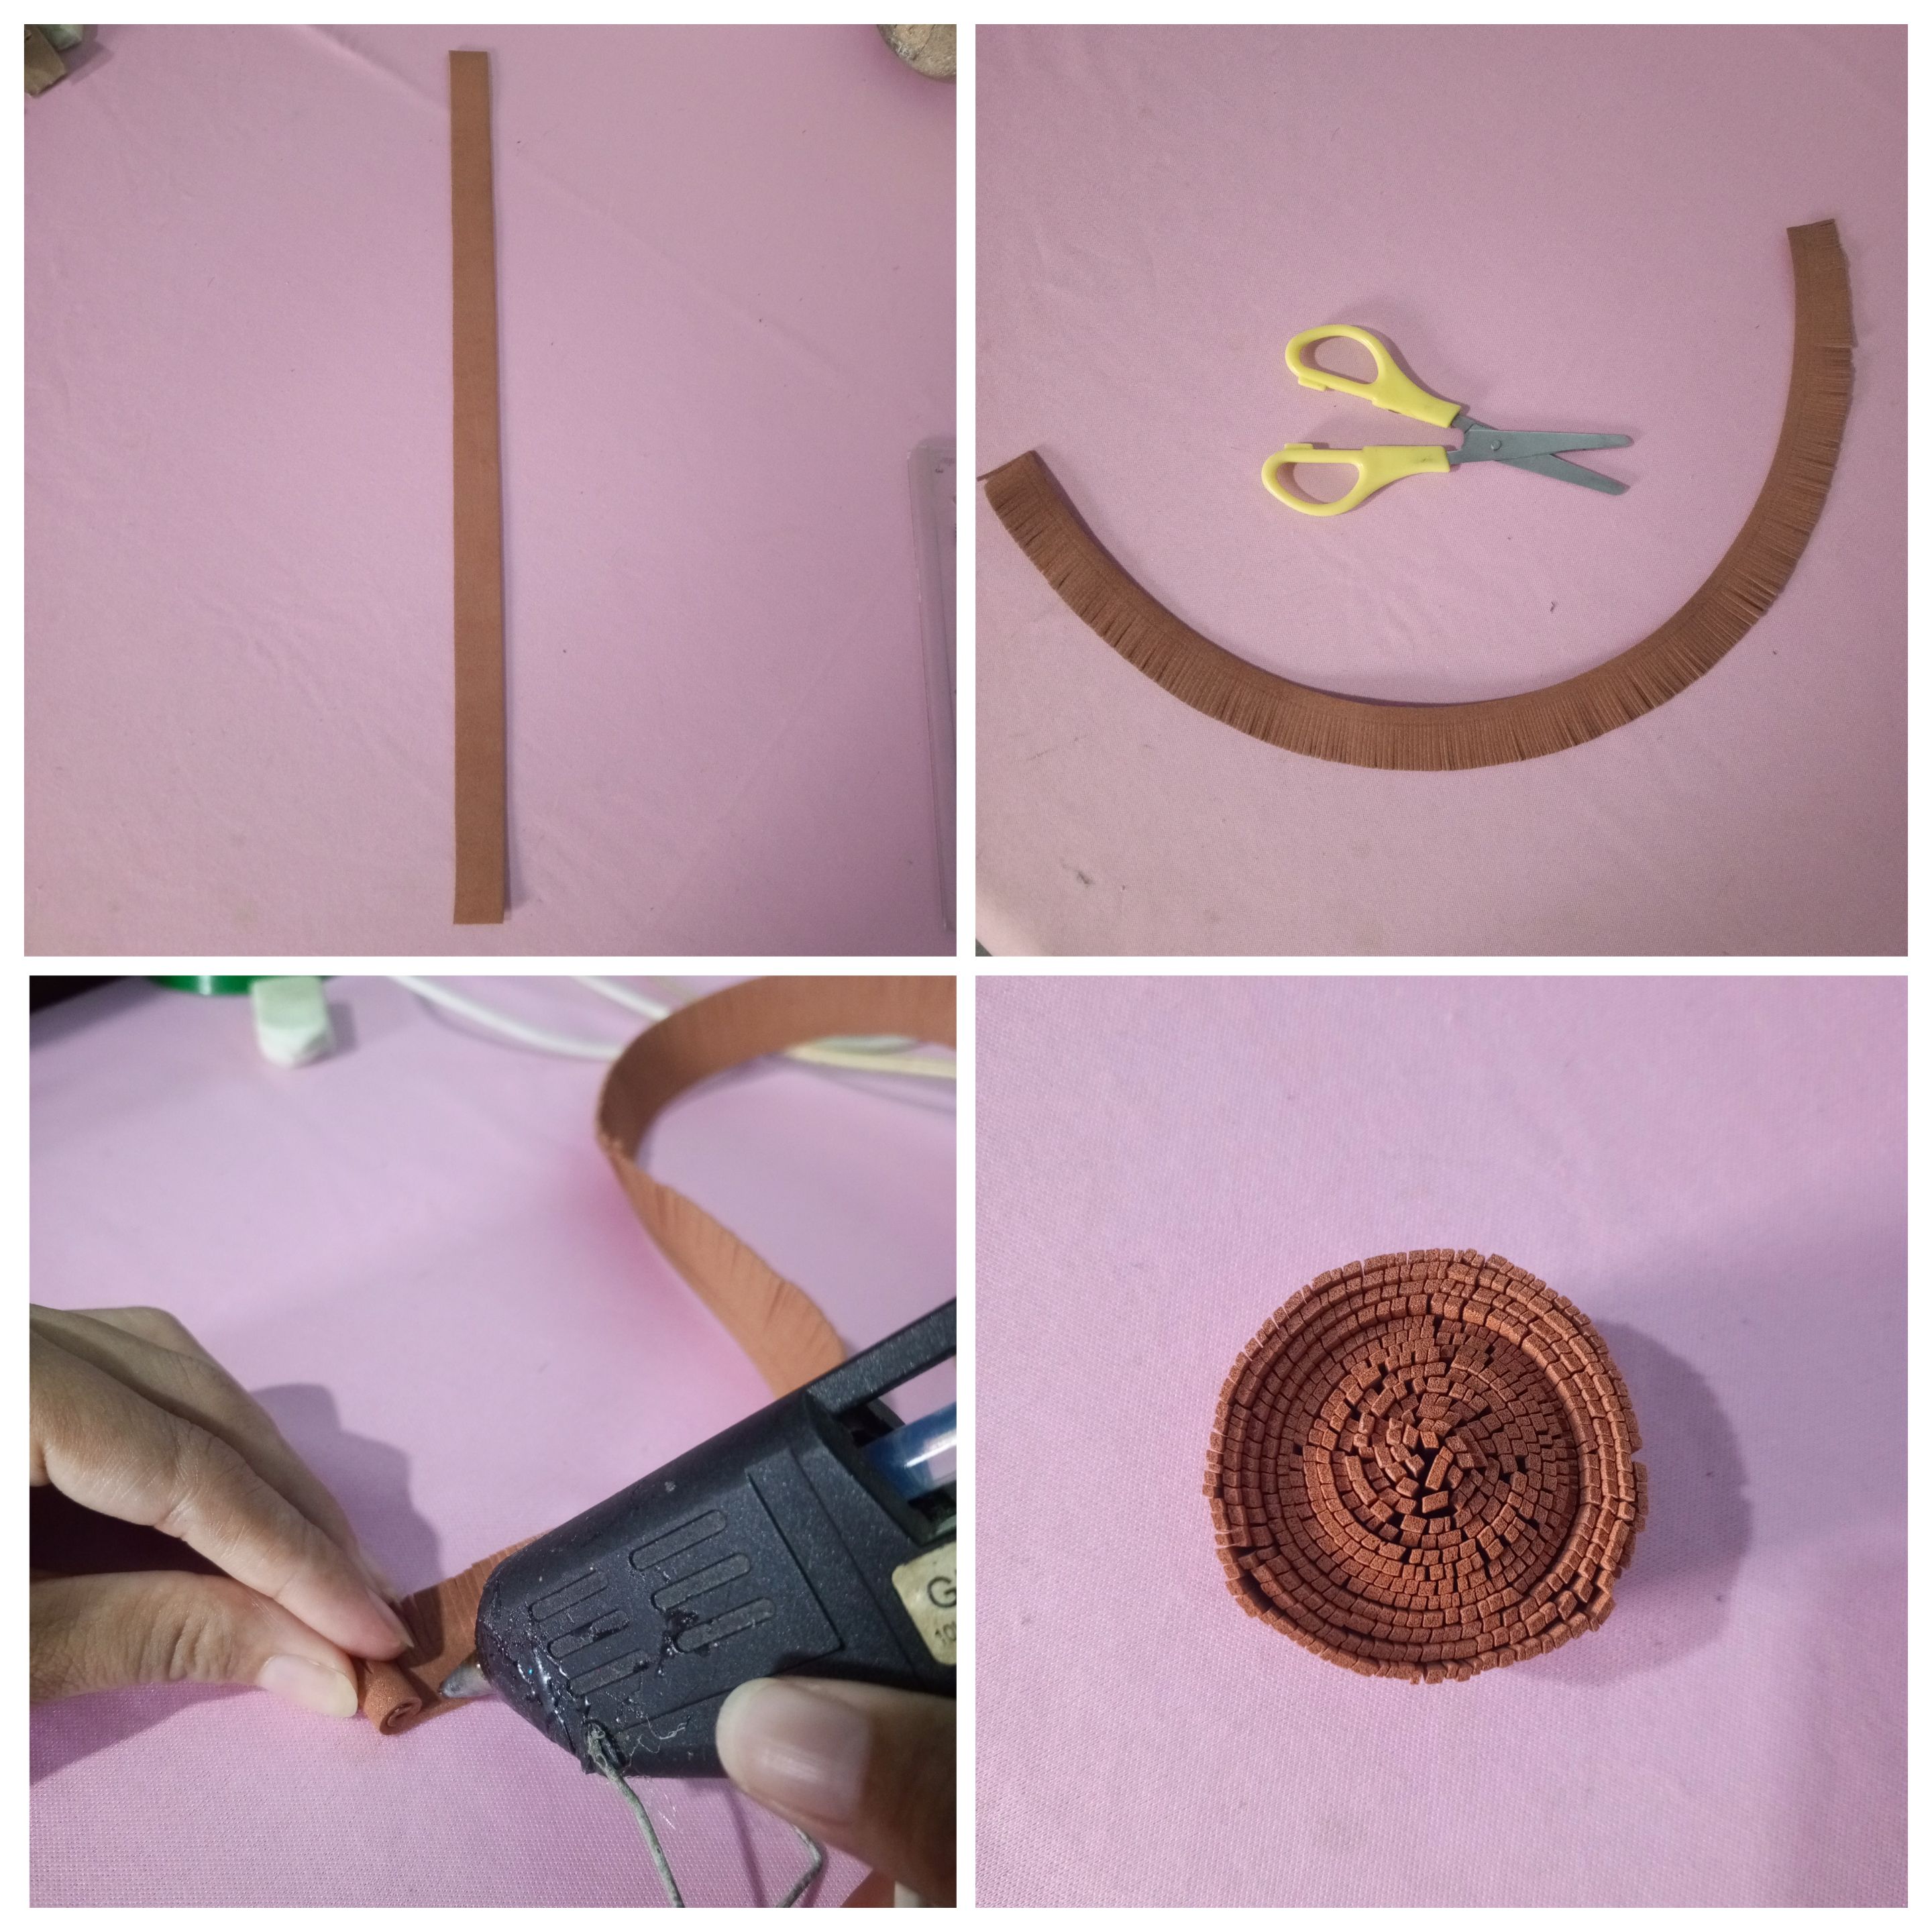
Primero hice el pistilo y para eso pique dos tiras de foami marrón de 2 Cm de ancho y 43 Cm de largo que es lo que mide mi lámina de foami, al principio solo saque una pieza pero luego me di cuenta de que el pistilo iba a quedar muy pequeño así que terminé sacando dos tiras, con la tijera comencé a hacerle pequeños cortes por toda la tira, luego comencé a arrollar la tira usando silicón caliente para que quede bien firme, mi error con el primero que intente hacer fue no ponerle suficiente silicón y entonces el pistilo se comenzo a desarmar.
>First I made the pistil and for that I cut two strips of brown foami 2 cm wide and 43 cm long which is what my foami sheet measures, at first I only took out one piece but then I realized that the pistil was going to be very small so I ended up taking out two strips, with the scissors I started to make small cuts all over the strip, then I started to roll the strip using hot silicone to make it firm, my mistake with the first one I tried to do was not to put enough silicone and then the pistil started to fall apart.
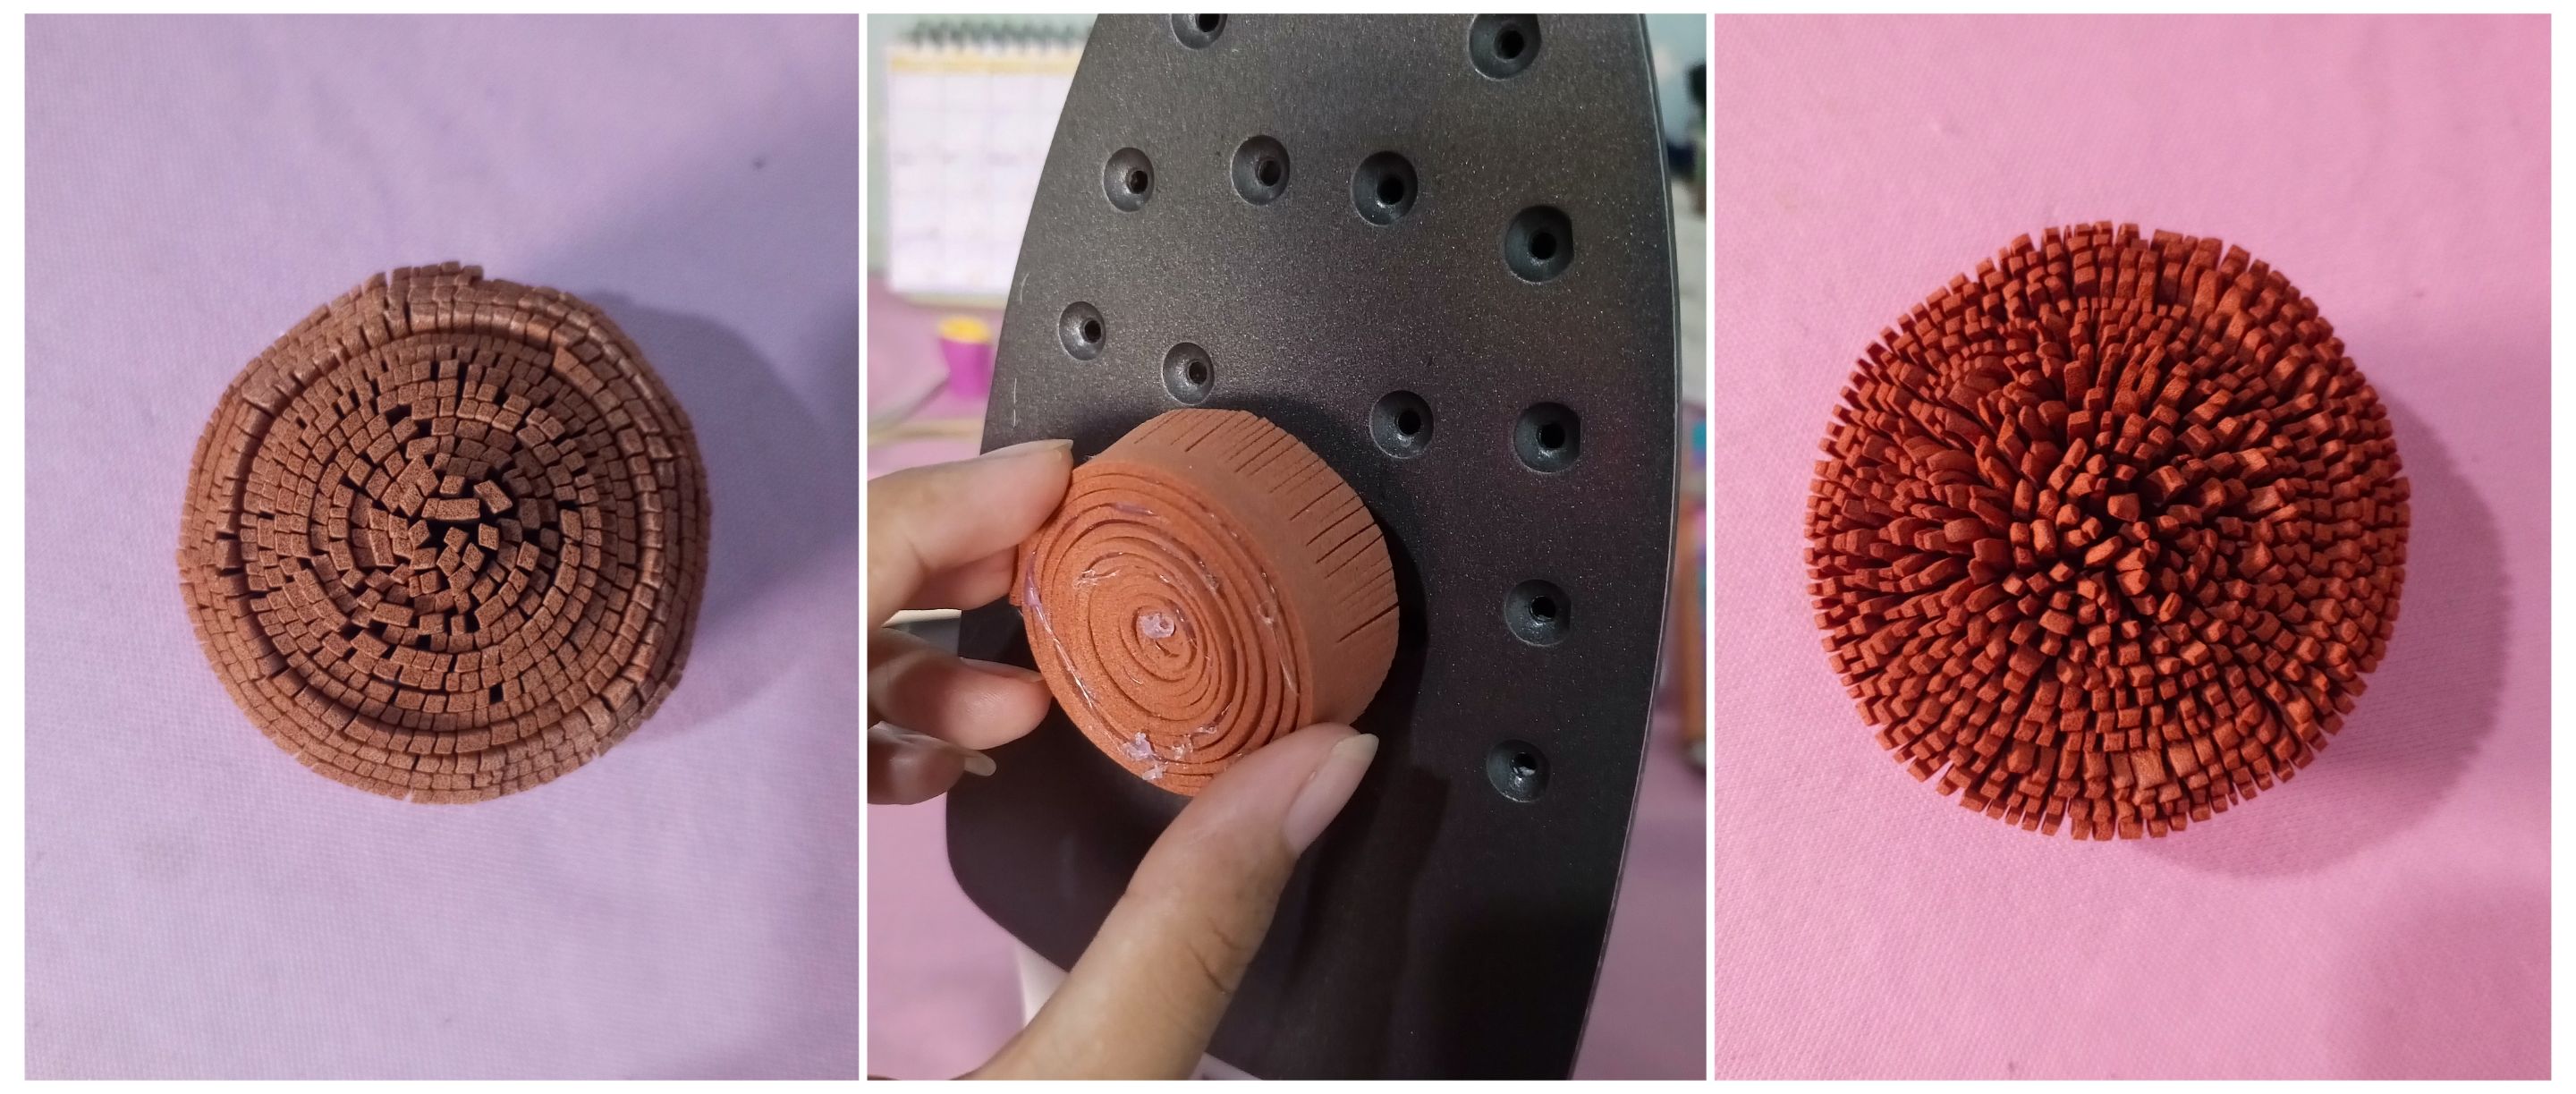
Cuando estuvo armada la pieza solo le quite el exceso de los bordes con la tijera y luego use la plancha a temperatura 🌡️ media alta, para darle un poco de volumen y textura al pistilo.
>When the piece was assembled, just remove the excess of the edges with the scissors and then use the iron at 🌡️ medium high temperature, to give a little volume and texture to the pistil.

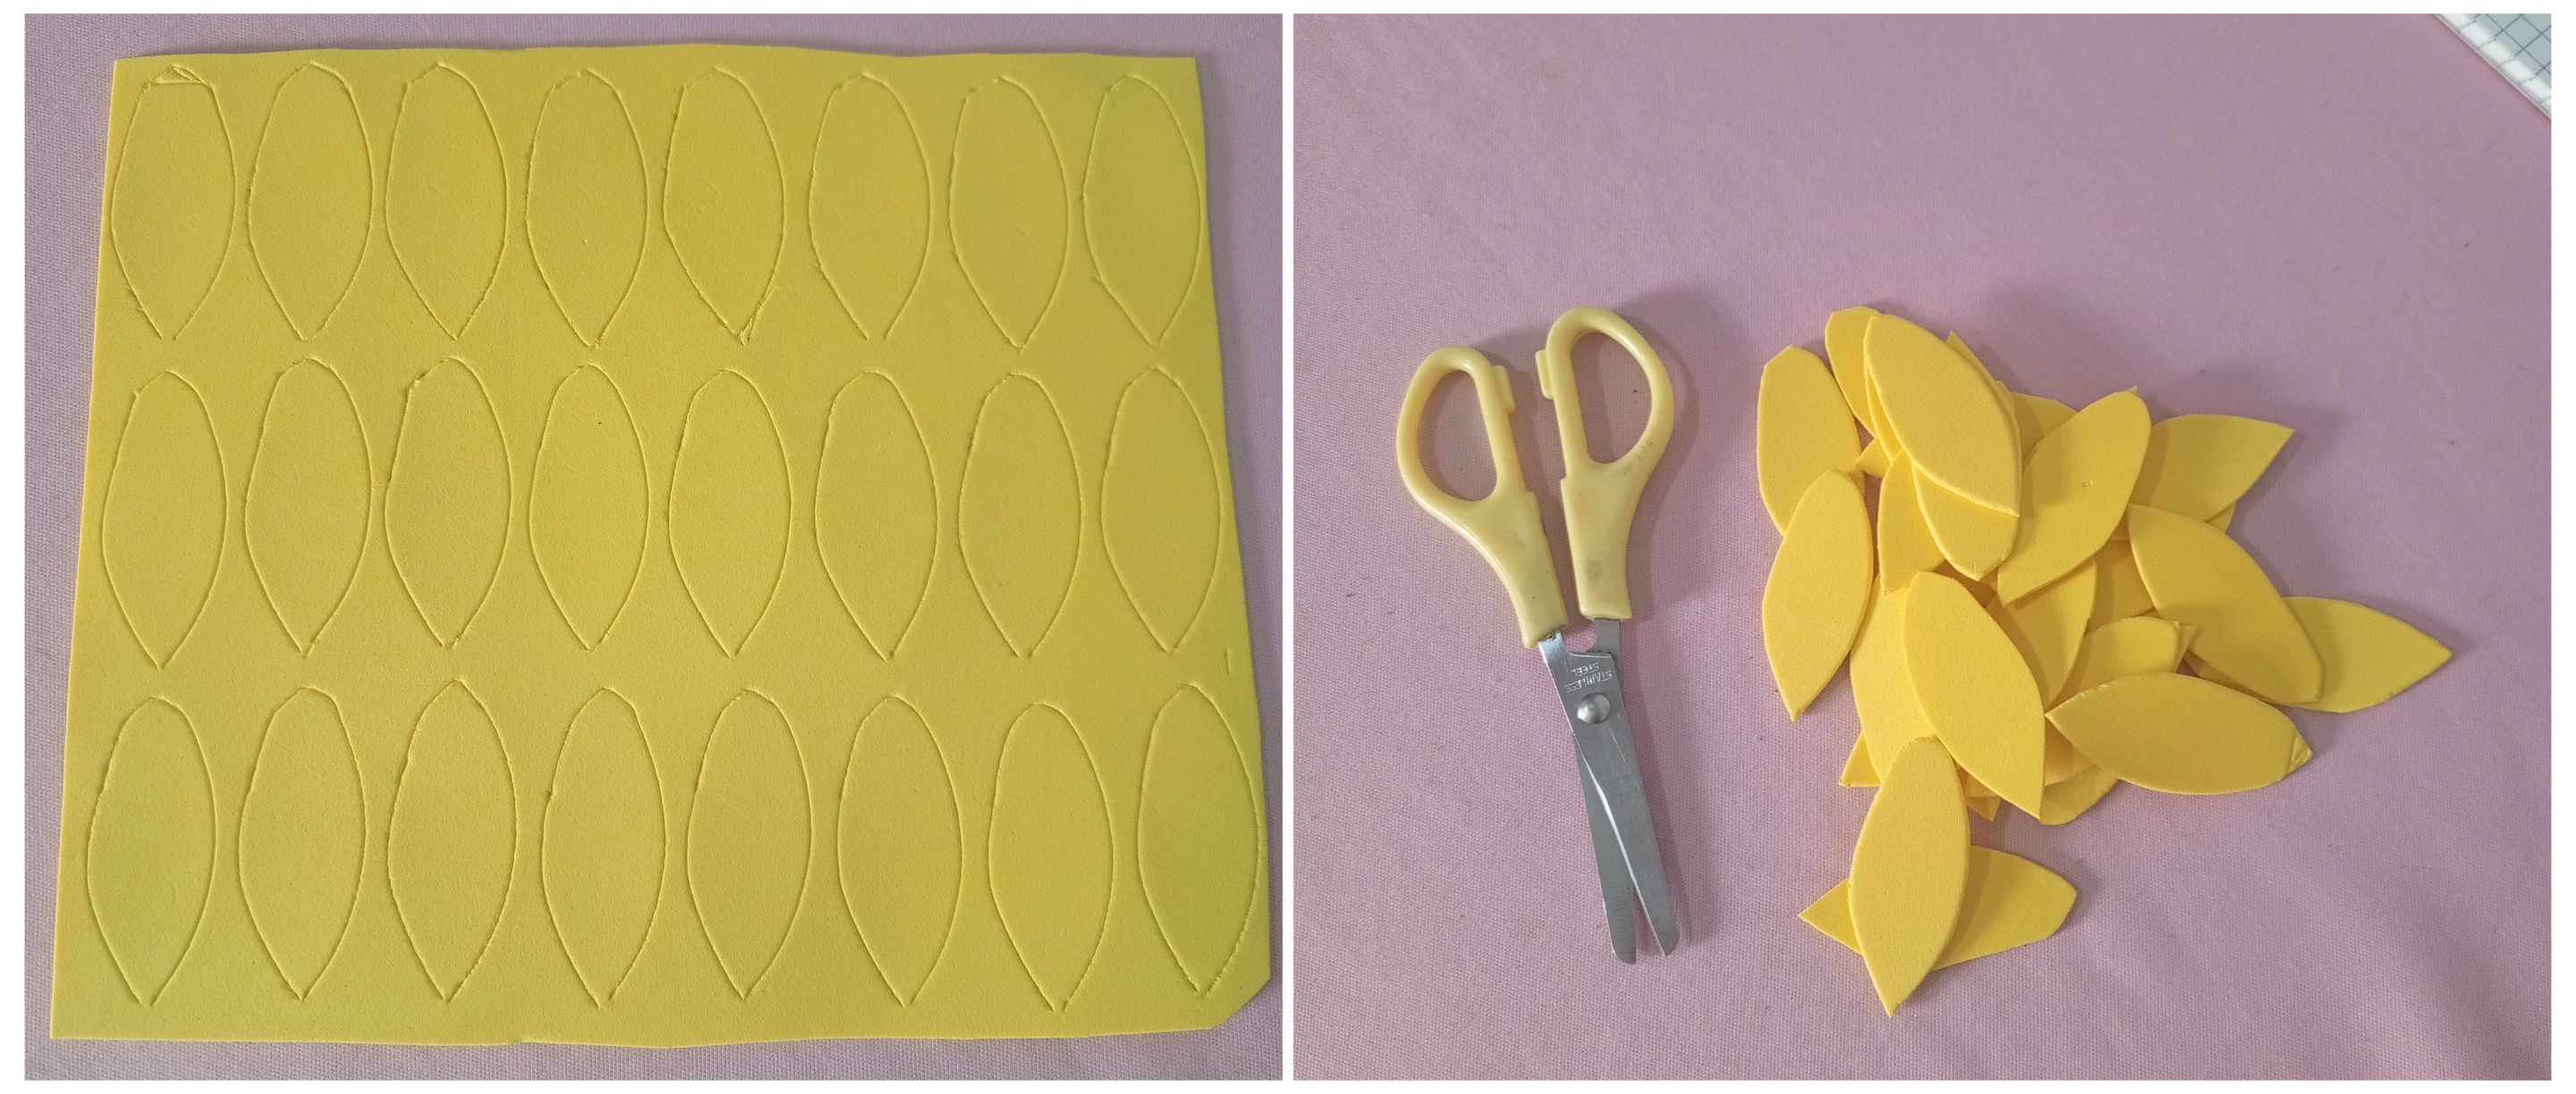
Luego hice los pétalos, con la ayuda de un palillo de altura los dibuje directamente en la lámina de foami amarillo, normalmente lo hago con lápiz ✏️ pero realmente no quería ensuciar el foami con el grafito, para está manualidad no estoy usando moldes como normalmente hago porque quiero practicar hacer manualidades de forma un poco más relajada a ver cómo me salen. Luego recorte cada pétalo, inicialmente pensé que necetaria 30 pétalos, pero terminé usando solo 20. 😆🤭
>Then I made the petals, with the help of a height stick I drew them directly on the yellow foami sheet, normally I do it with pencil ✏️ but I really did not want to dirty the foami with the graphite, for this craft I am not using molds as I normally do because I want to practice making crafts in a more relaxed way to see how they come out. Then I cut out each petal, initially I thought I would need 30 petals, but I ended up using only 20.😆🤭
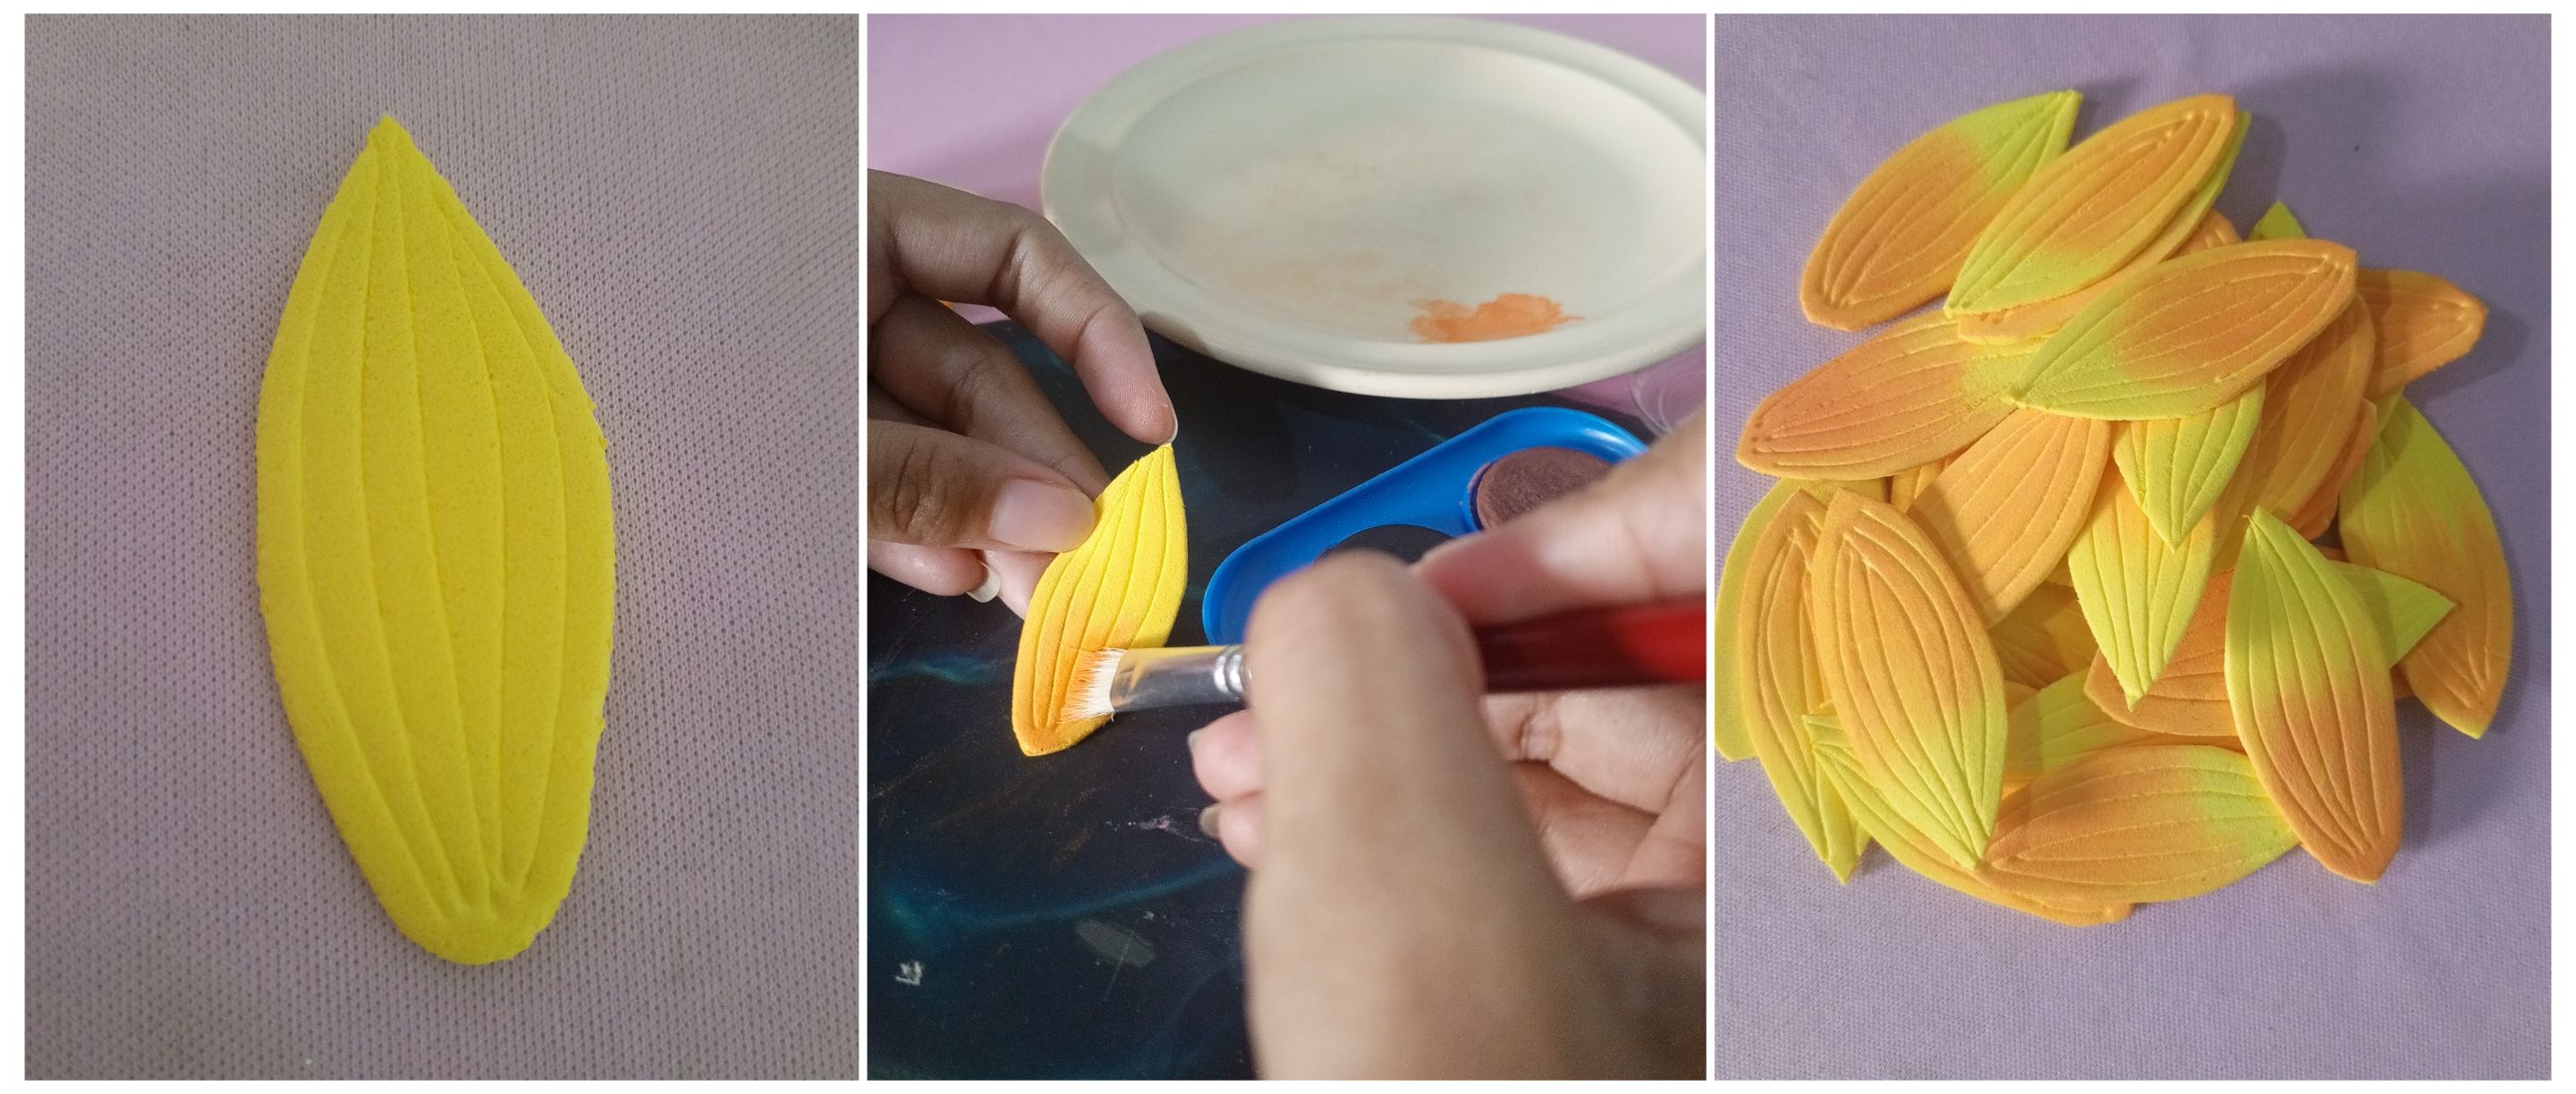
Con el palillo de altura le hice unas líneas a cada pétalo para darle más textura y apariencia de pétalo real y para darle aún más realismo y volumen les dí color con acuarela anaranjada, esto normalmente se hace con pintura al frio o acrílica, pero en mi burbuja creativa siempre intento resolver con lo que tengo. 😊
>With the height stick I made some lines to each petal to give it more texture and appearance of real petal and to give it even more realism and volume I gave them color with orange watercolor, this is usually done with cold paint or acrylic, but in my creative bubble I always try to solve with what I have. 😊
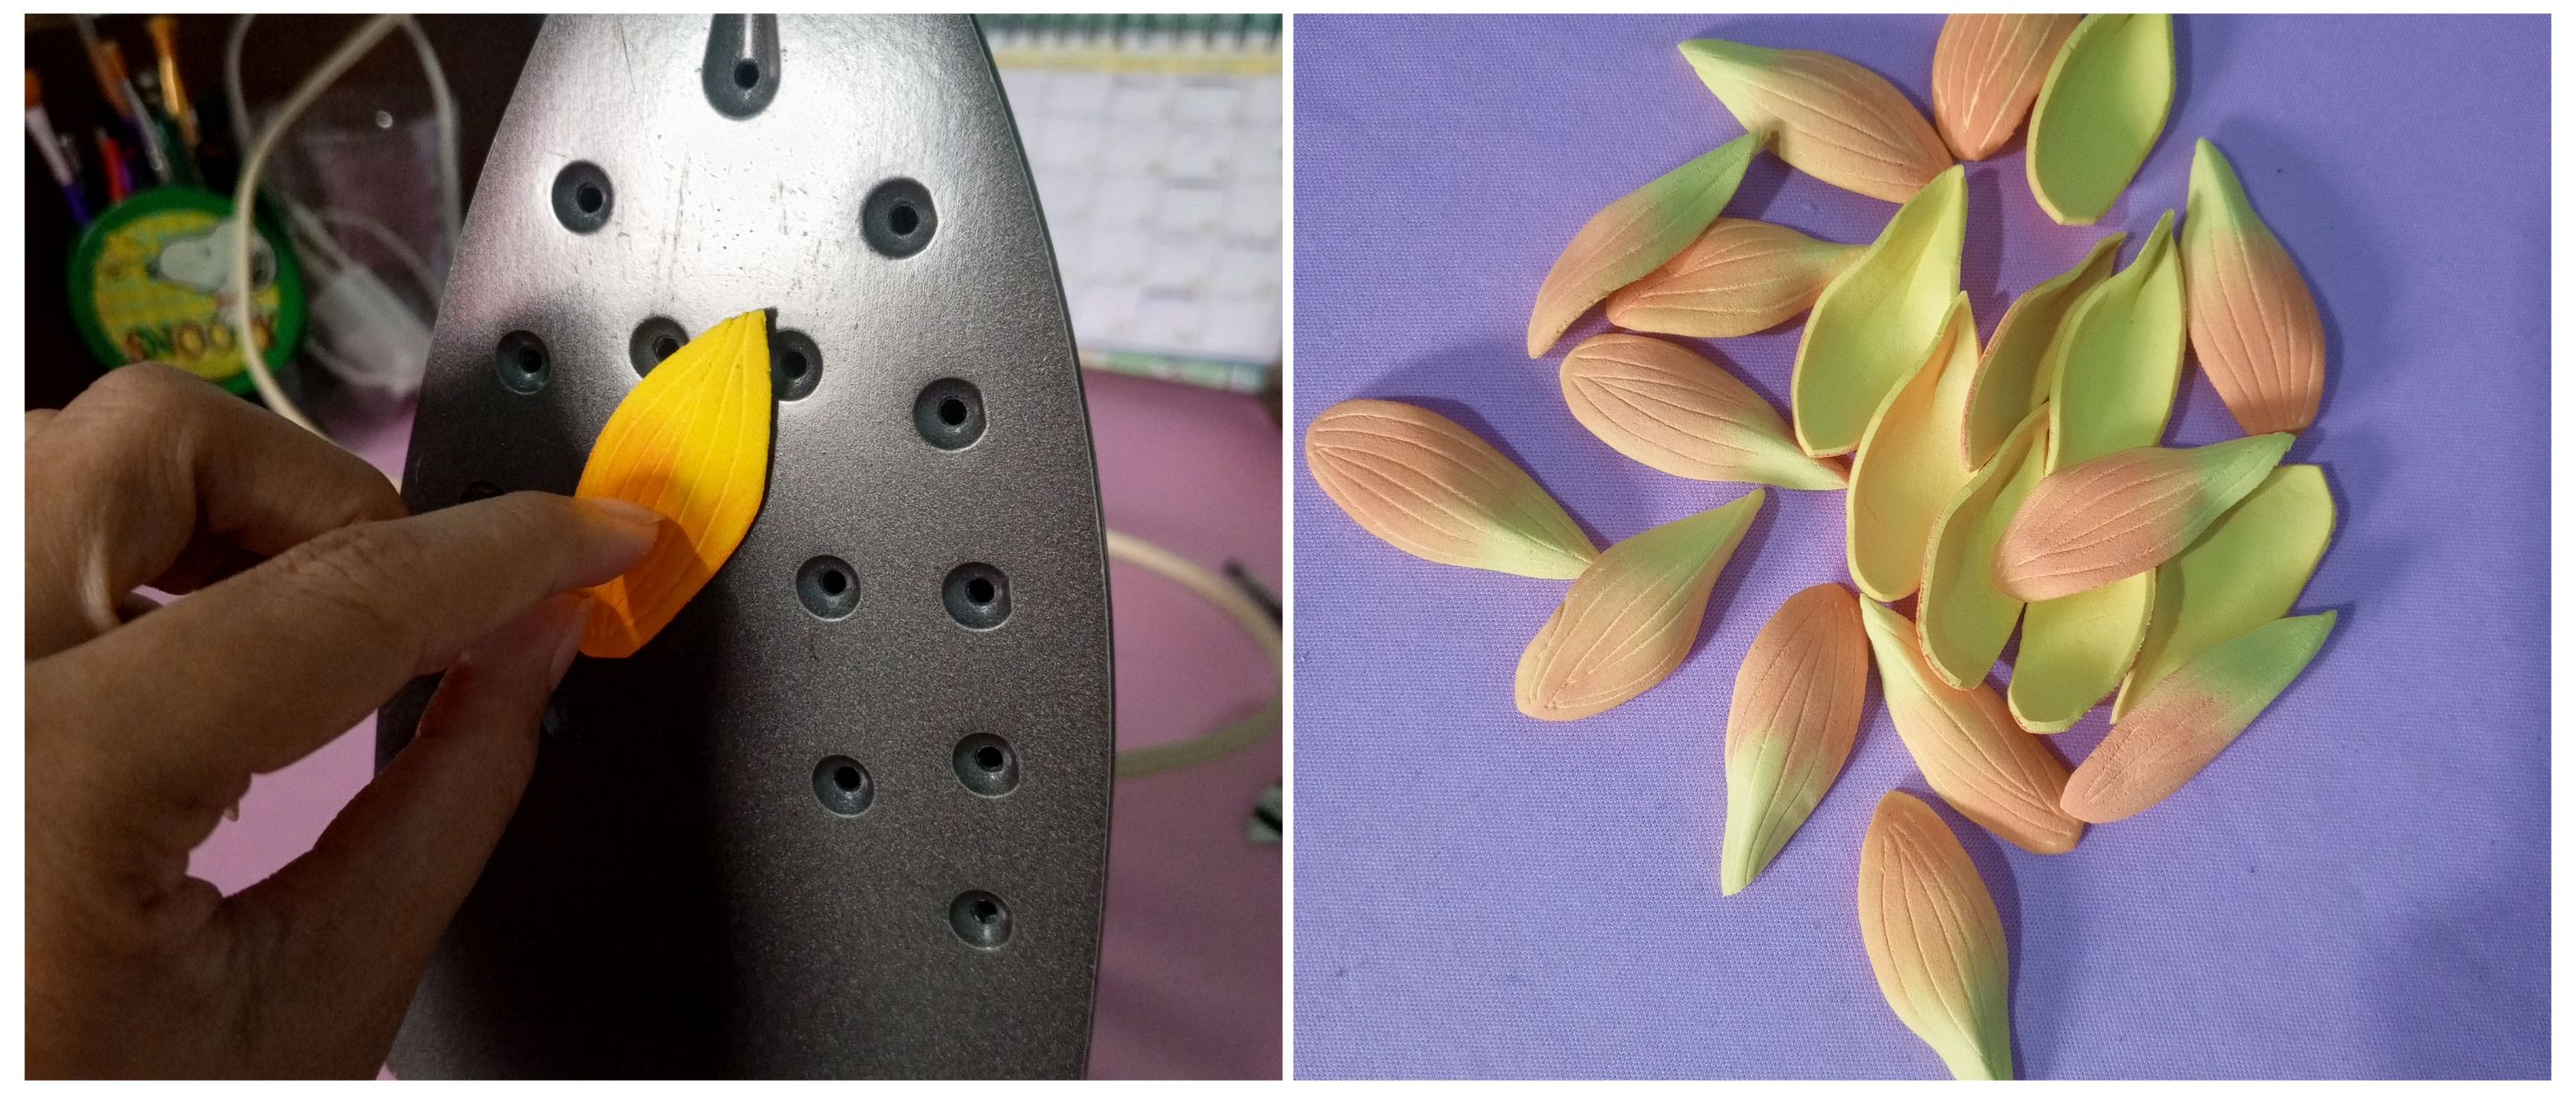
Luego fue el turno de la plancha, para darle aún más realismo a los pétalos y que no quedarán planos sino con más volumen, antes no me gustaba eso de usar la plancha , me daba flojera, pero al ver el efecto tan bonito que hace el calor en el foami ahora no dudo en buscar la plancha las veces que sea necesario. 🥰
>Then it was the turn of the iron, to give even more realism to the petals and that they will not be flat but with more volume, before I did not like that to use the iron, I was lazy, but seeing the beautiful effect that makes the heat in the foami now I do not hesitate to look for the iron as many times as necessary. 🥰

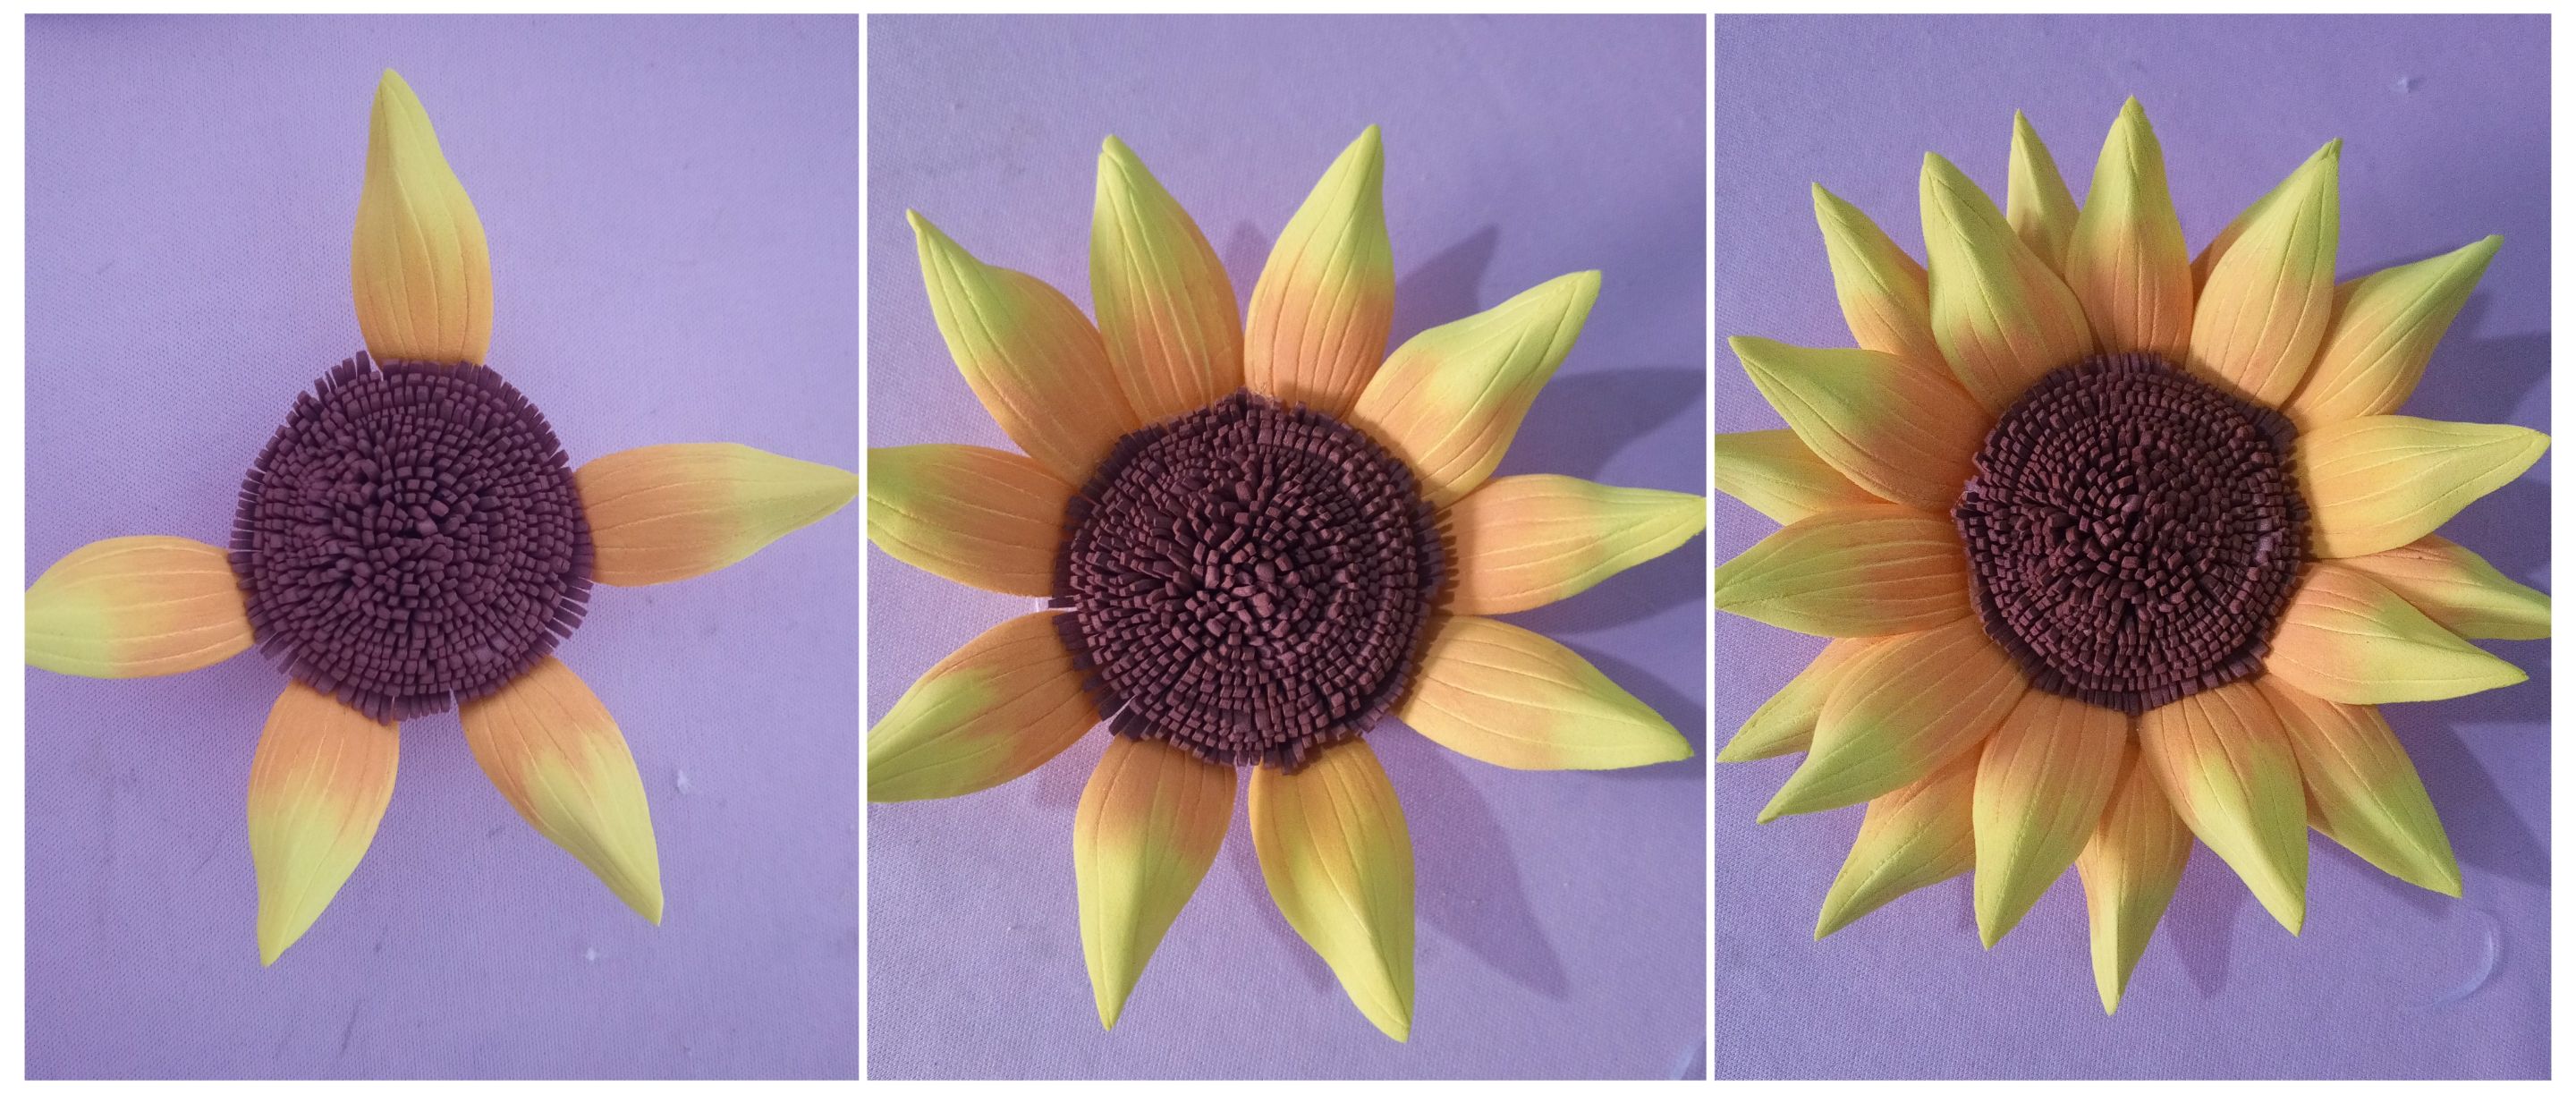
Ahora es el turno de armar el girasol 🌻 primero ubique cinco petalos al rededor del pistilo, trate de que fuese de forma pareja, aunque no lo logre del todo, en el espacio entre los cinco primeros pétalos coloque cinco petalos más y así forme la primera hilera de 10 pétalos. Luego por la parte de atrás coloque 10 pétalos más ubicandolos entre medio de cada pétalo de la primera fila. En total use 20 pétalos, he visto videos donde usan 30 pétalos pero a mi me pareció que con 20 se ve bastante bien.
>Now it is the turn to assemble the sunflower 🌻 first place five petals around the pistil, try to make it evenly, although I did not succeed at all, in the space between the first five petals place five more petals and thus form the first row of 10 petals. Then on the back side place 10 more petals in the middle of each petal of the first row. In total I used 20 petals, I have seen videos where they use 30 petals but I thought that with 20 it looks pretty good.

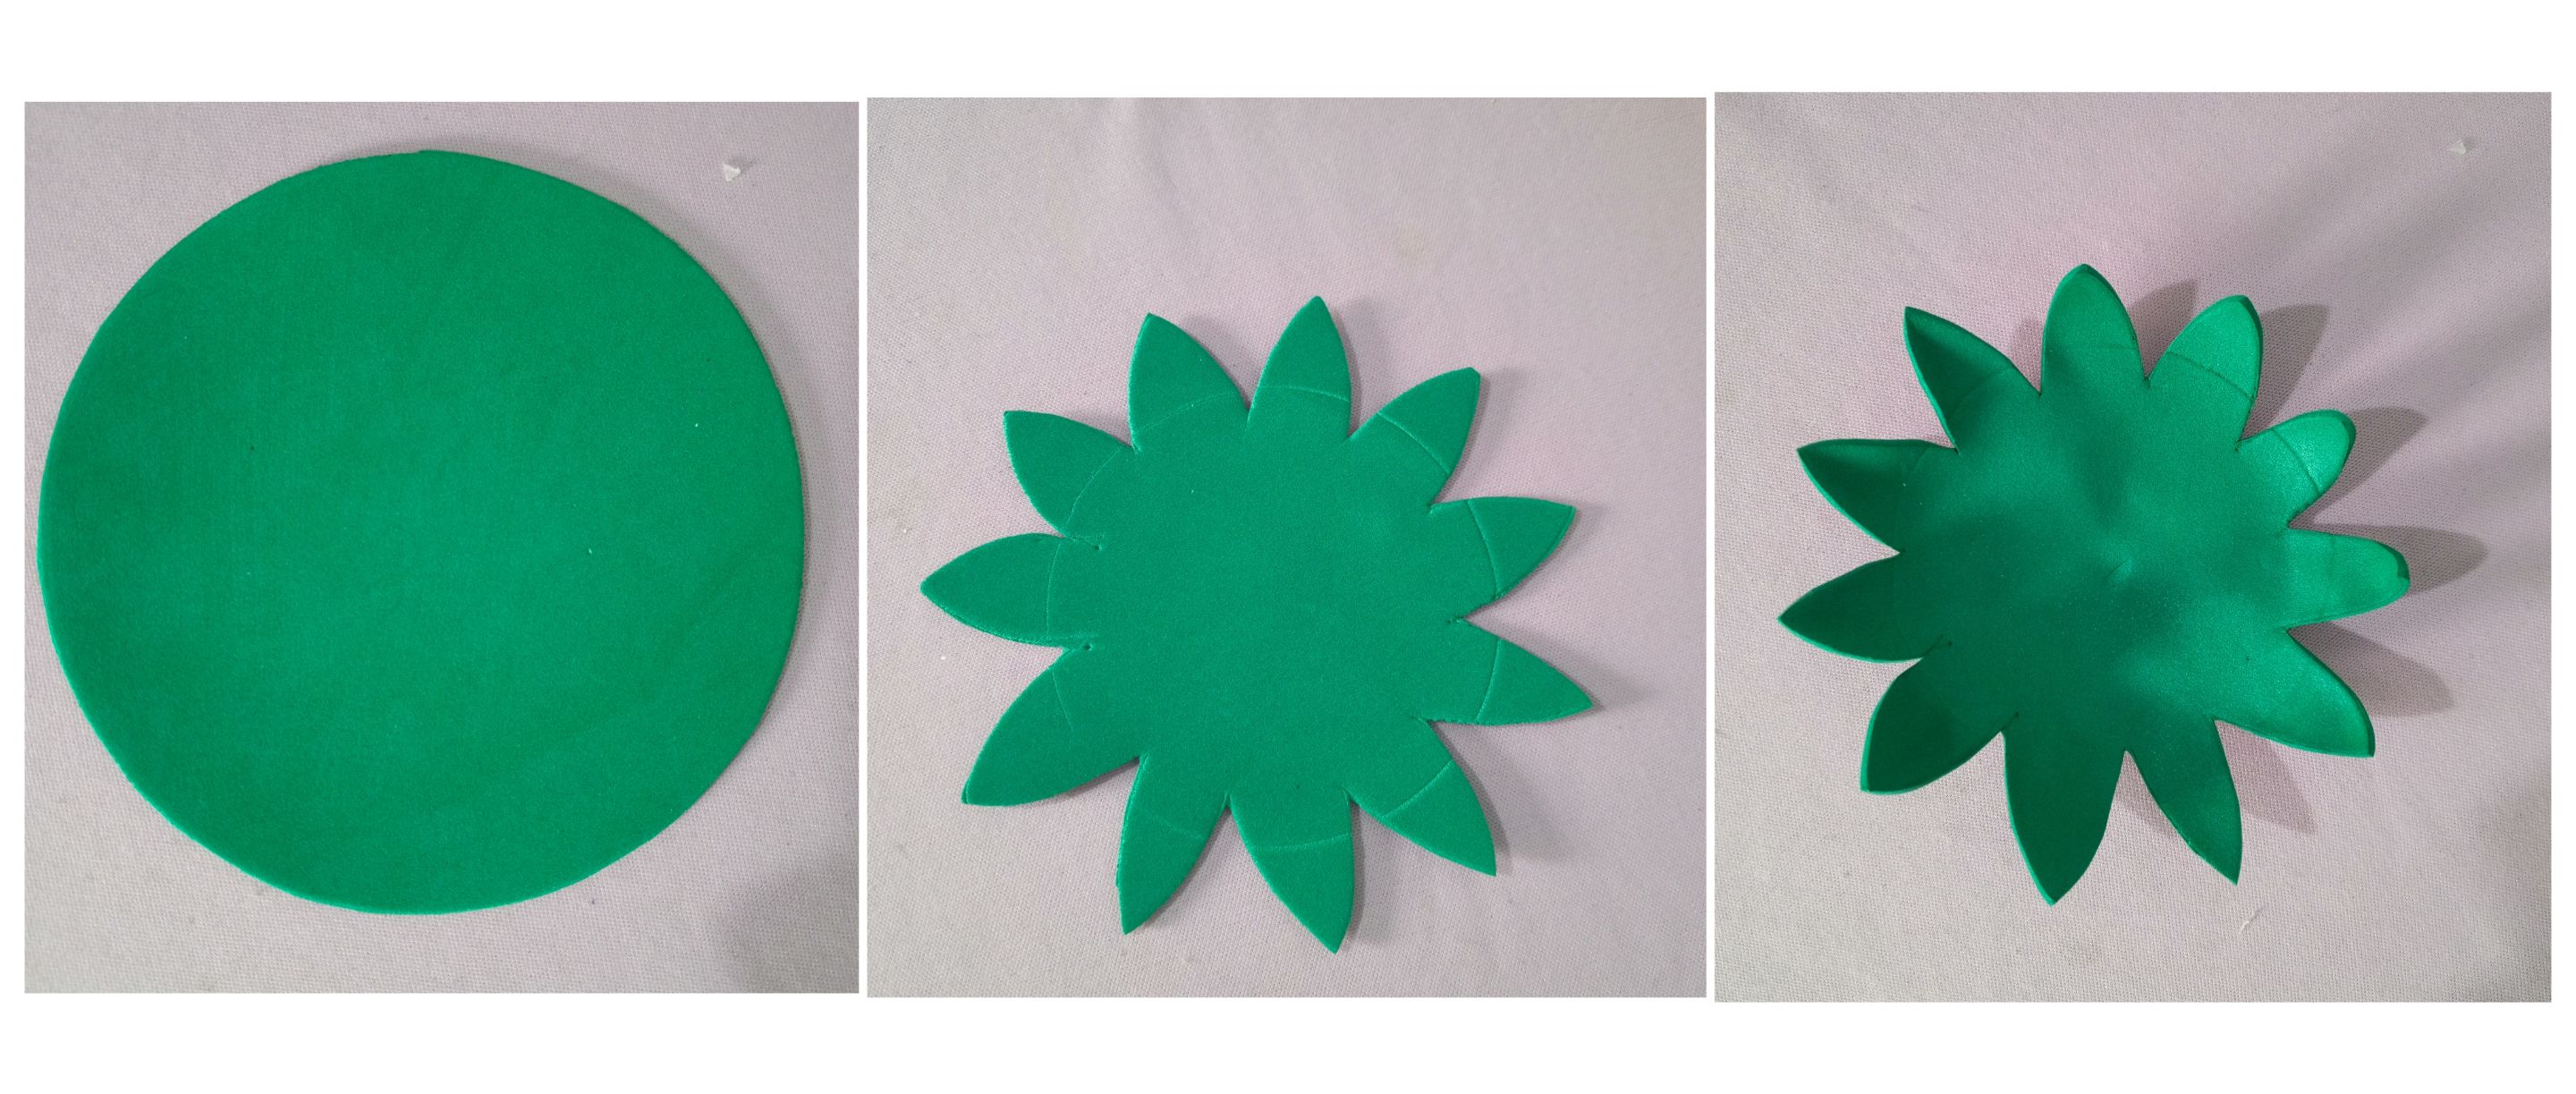
Luego hice el cáliz, o sea la hoja verde que el girasol 🌻 tiene atrás, y aquí admito que falle en el cálculo y lo hice muy pequeño, pero bueno para la próxima ya lo sé 🤭 está pieza la hice primero trazando un círculo y luego con las tijeras le di esa forma como de pétalos al rededor. Y para darle volumen obviamente también use la plancha.
>Then I made the calyx, that is the green leaf that the sunflower 🌻 has at the back, and here I admit that I failed in the calculation and I made it very small, but well for the next time I know 🤭 this piece I did it first by tracing a circle and then with the scissors I gave it that shape like petals around it. And to give it volume obviously I also used the iron.
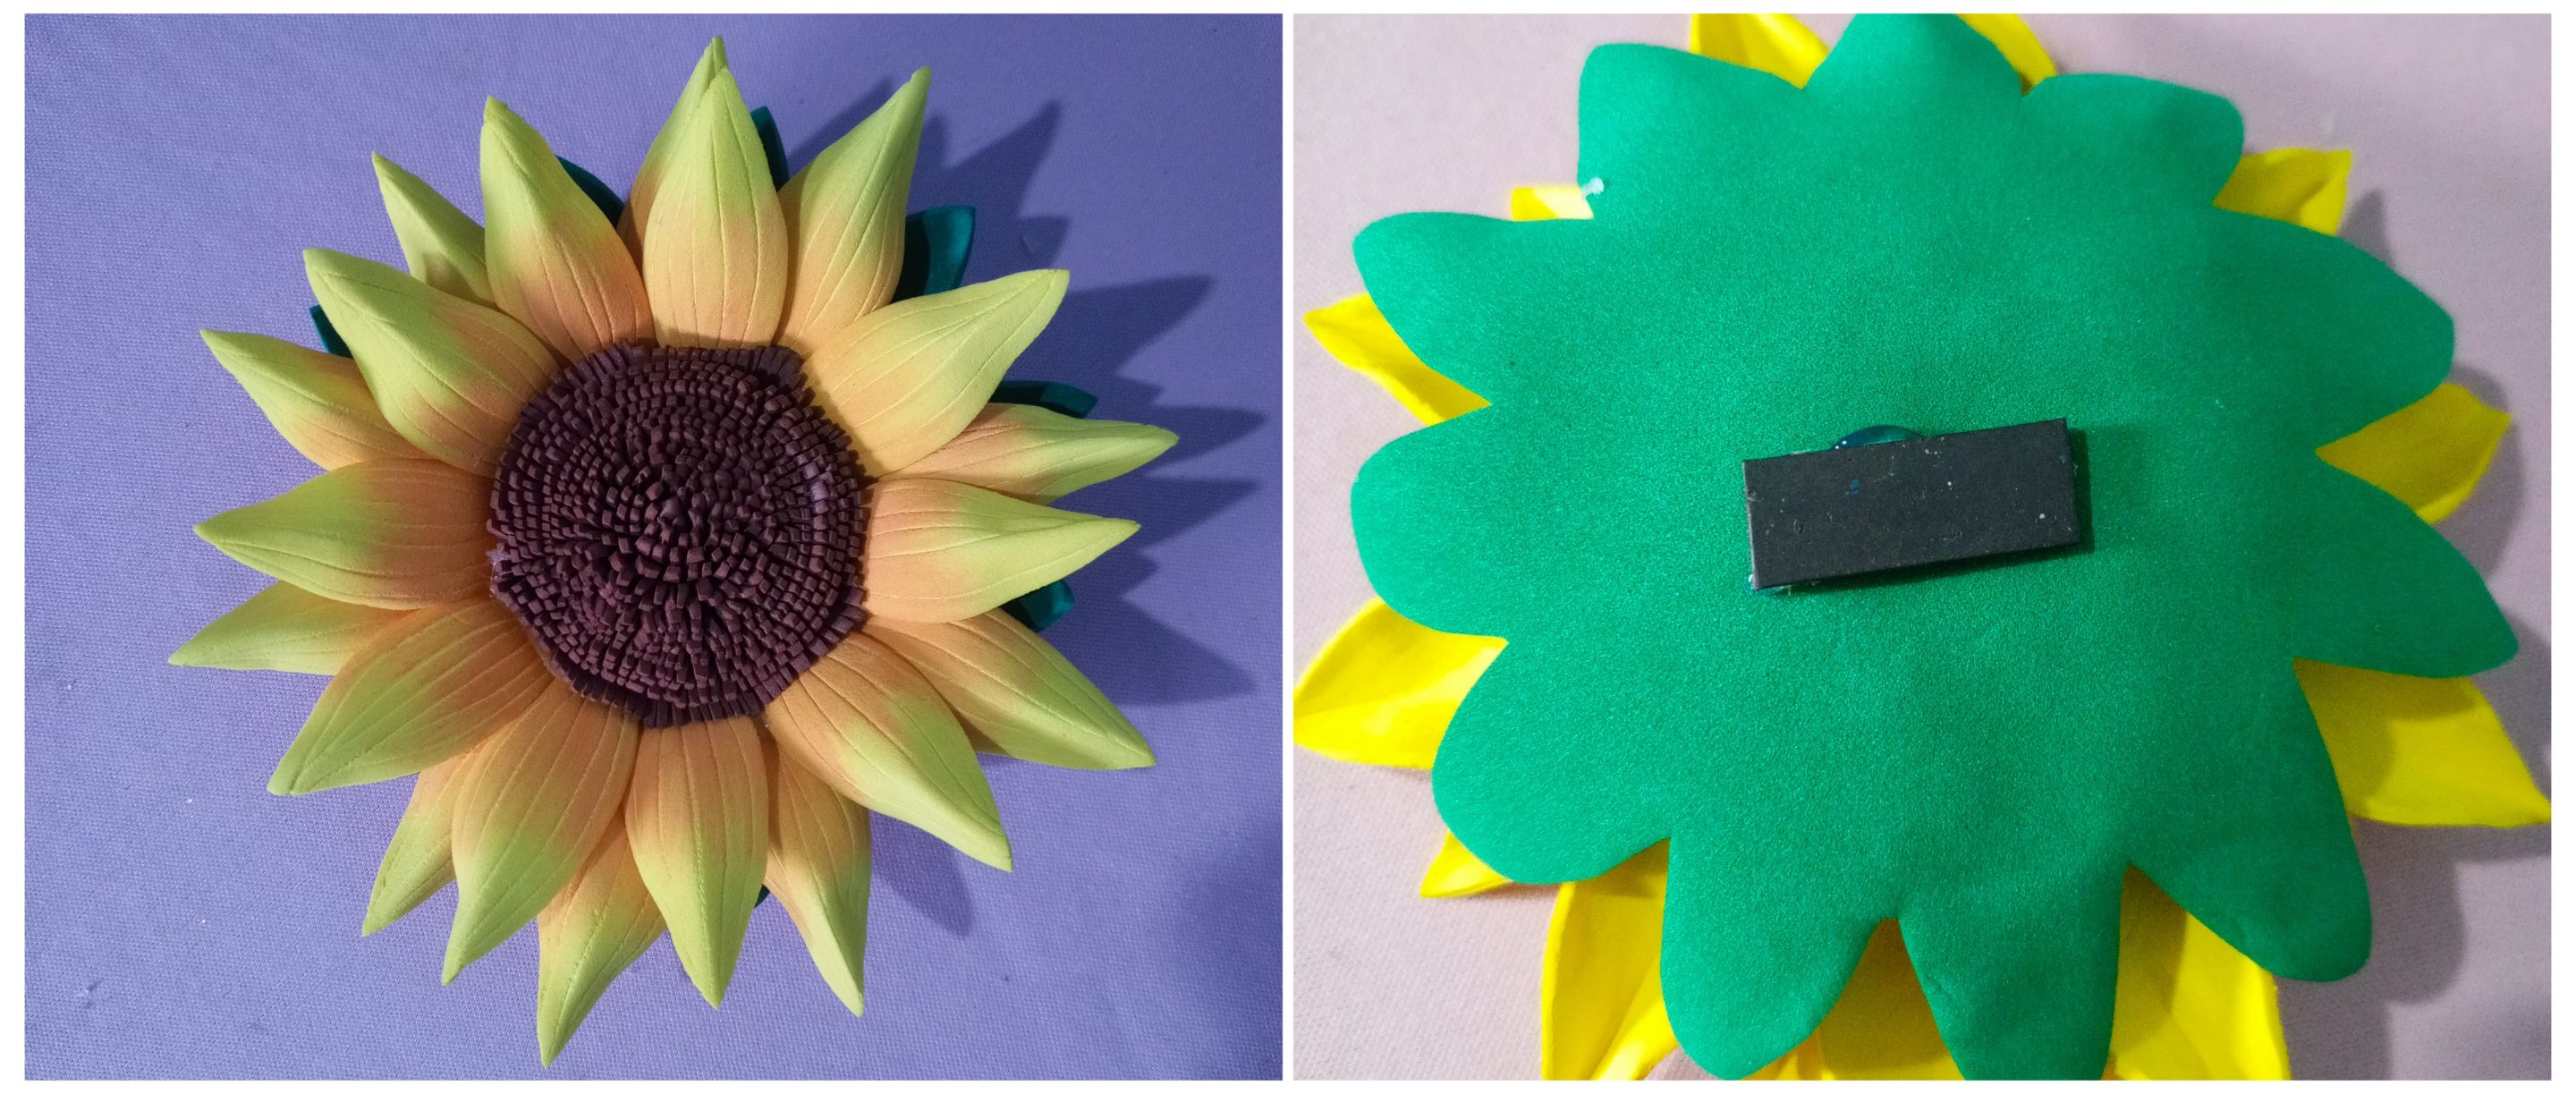
La pegue a la parte de atrás del girasol 🌻 y me arrepentí de no haber hecho la piezas más grande para resaltará más el color rojo, pero bueno, está es la vida de los que estamos aprendiendo, ensayo y error. Para finalizar, también con silicón peque la lámina de imán por la parte de atrás y listo.
>I glued it to the back of the sunflower 🌻 and I regretted not having made the pieces bigger to highlight the red color more, but well, this is the life of those who are learning, trial and error. Finally, I also used silicone to stick the magnet sheet on the back and that's it.

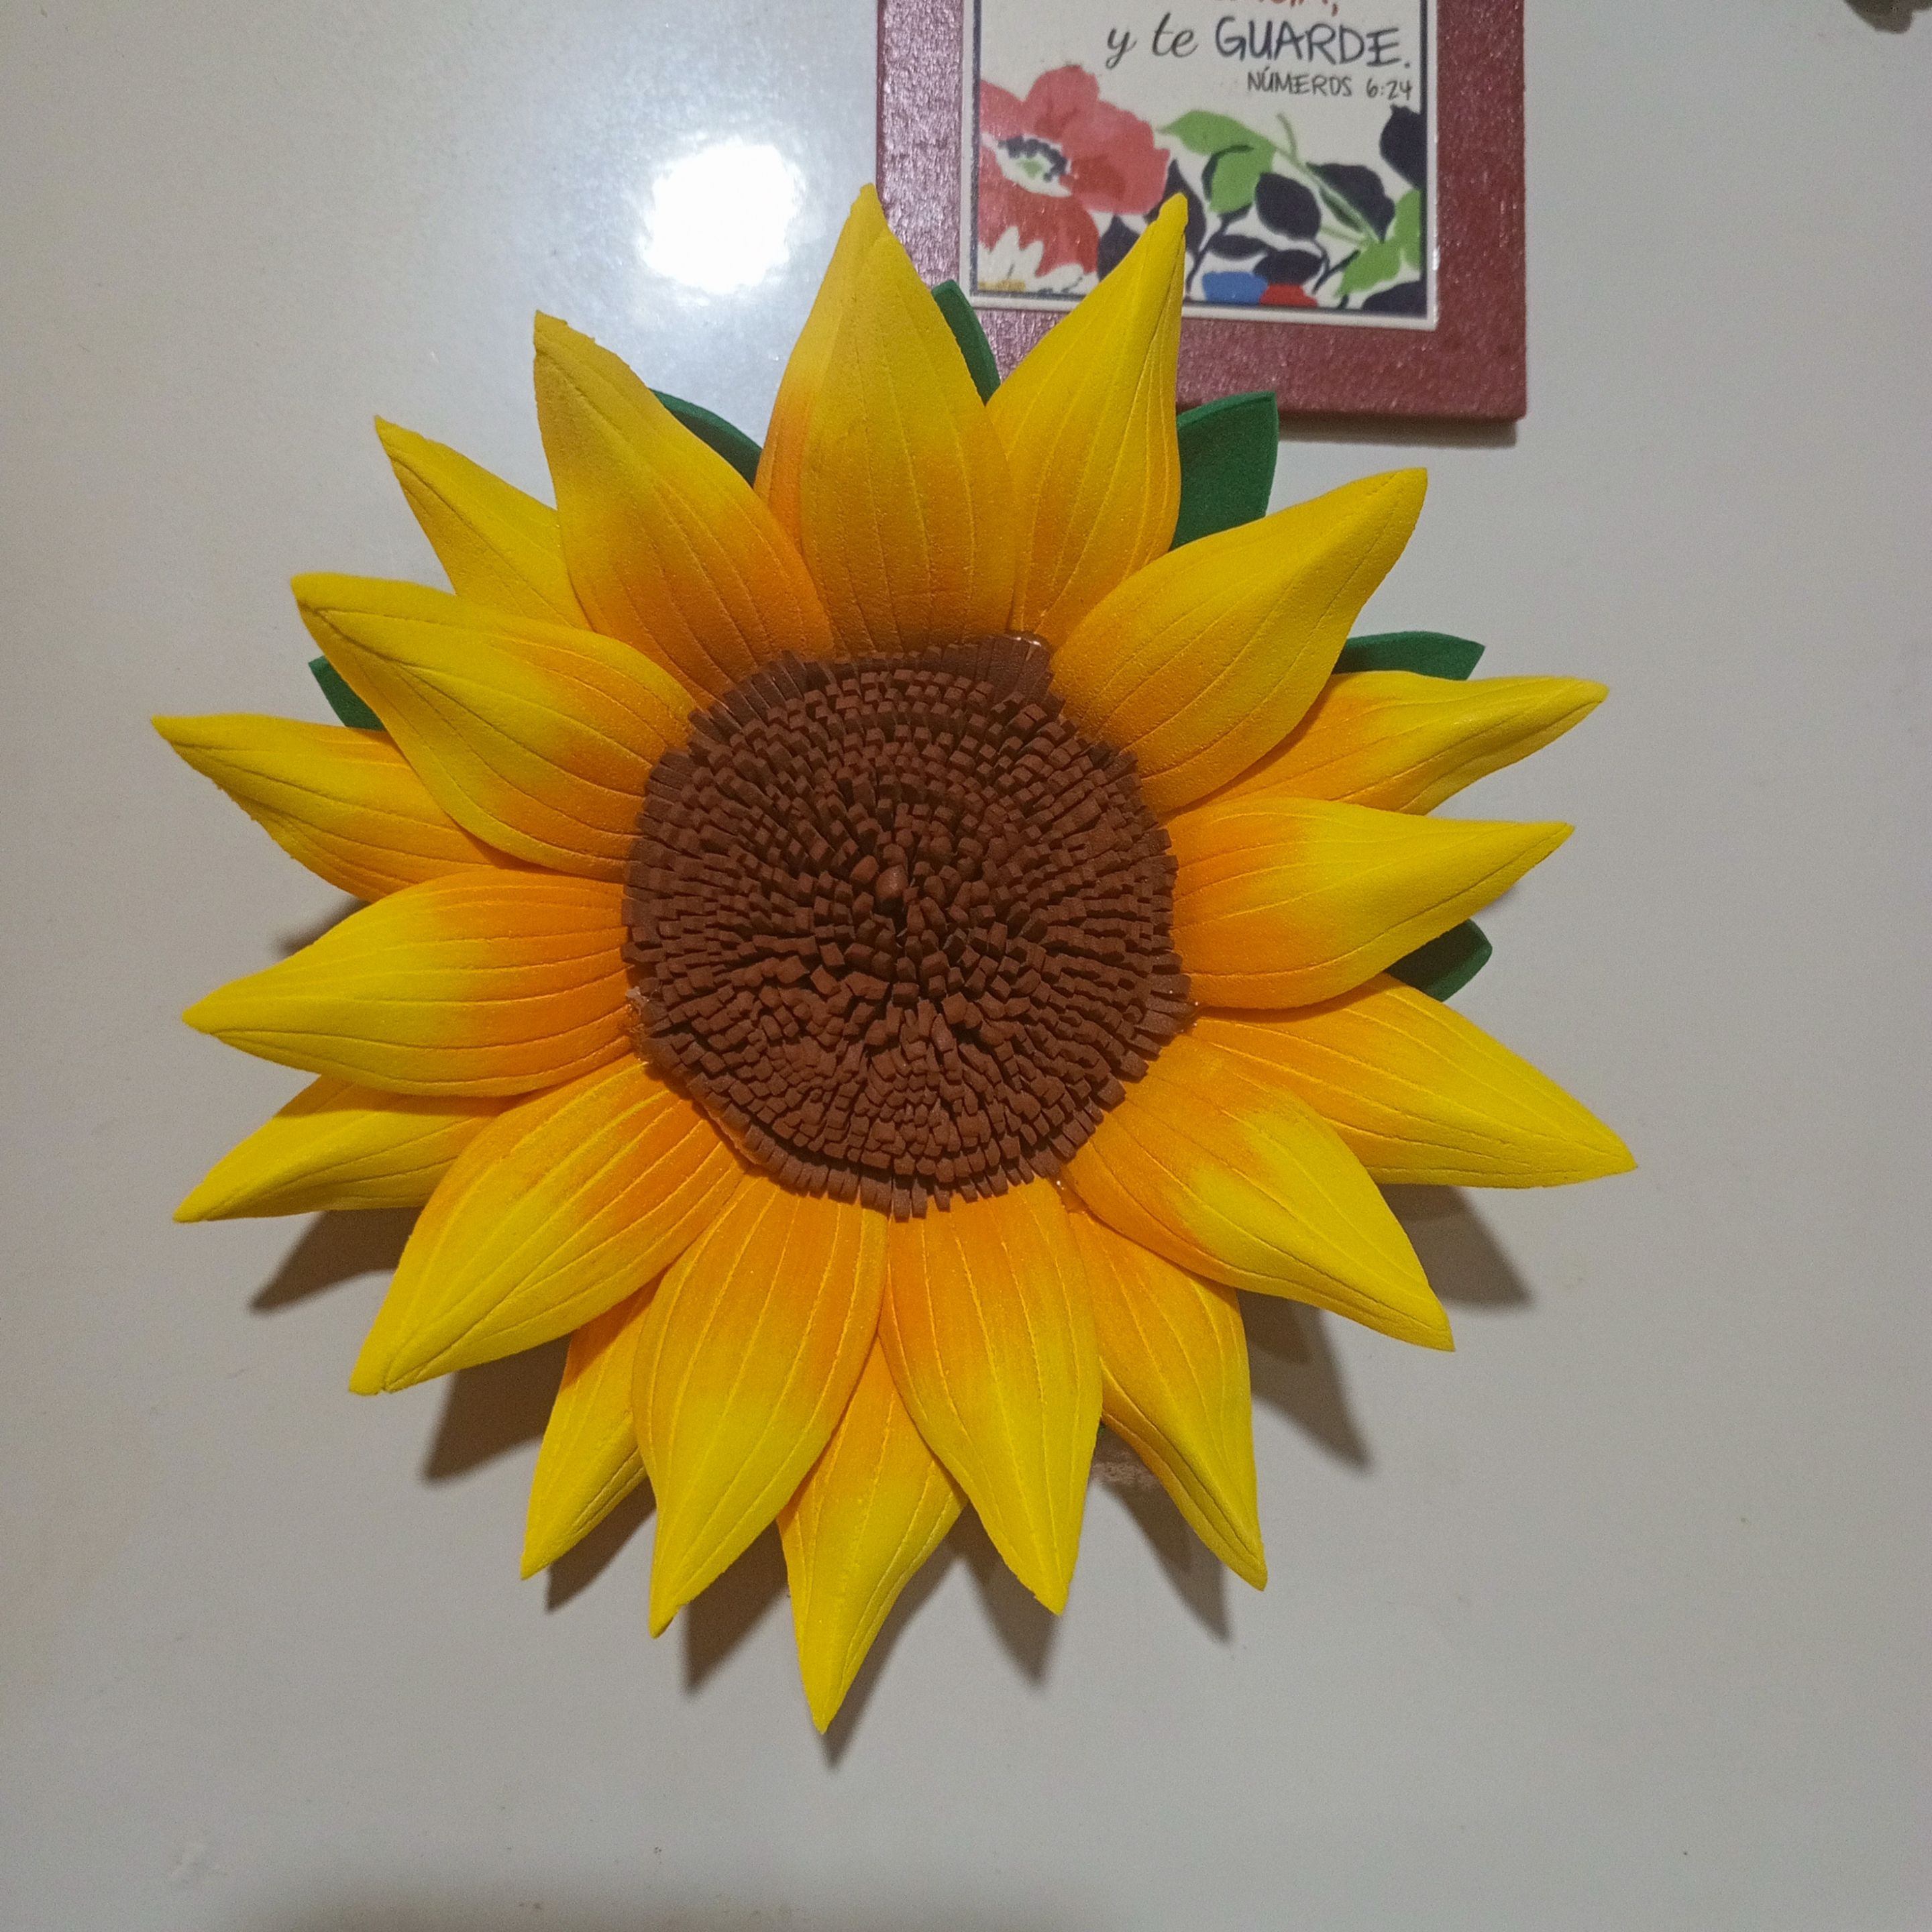
Así de hermoso quedó mi imán de girasol, a mi mamá le encantó y se emociono cuando lo vió puesto en la nevera 🥰 espero que a ustedes también les haya gustado.
>That's how beautiful my sunflower magnet turned out, my mom loved it and was thrilled when she saw it placed on the fridge 🥰 I hope you liked it too.

**Y esto es todo por hoy, sí les gusto no olviden darle amorshito a mi post dejando un lindo comentario o dando click en el corazoncito. 💜😉😊🤭🥰
Nos vemos en un próximo post, que estén bien y Dios los bendiga, bye.**🥰😘💜🌹🪷
>**And that's all for today, if you like me don't forget to give love to my post by leaving a nice comment or clicking on the little heart. 💜😉😊🤭🥰
See you in a next post, be well and God bless you, bye.**🥰😘💜🌹🪷

***Fotografías propias, tomadas con mi Tecno Spark 10 Pro editadas en incollage/ portada creada en Canva. Traducción al inglés con DeepL.***
>***Own photos, taken with my Tecno Spark 10 Pro edited in incollage/ cover created in Canva. Translation to English with DeepL.***

(ESP-ENG) Sunflower magnet for my fridge made with foami. 🌻🥰🧲😍✂️
@sarangzg7
· 2025-09-29 10:00
· Hive Diy
#hivediy
#manualidades
#spanish
#crafts
#handmade
#sunflower
Payout: 4.772 HBD
Votes: 283
More interactions (upvote, reblog, reply) coming soon.