Strategic Victory: How Smart Positioning and Taunt Can Overcome Higher-Level Opponents
The Setup: David vs. Goliath
Facing a higher-level opponent, I knew I needed to be creative with my lineup. Working within my mana constraints, I crafted a formation that would maximize synergies while creating multiple layers of protection and offense.
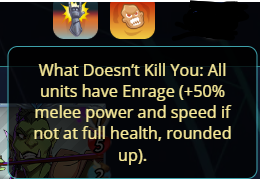
Rulesets
The Lineup Breakdown
My Formation (sirsmokesalot96)
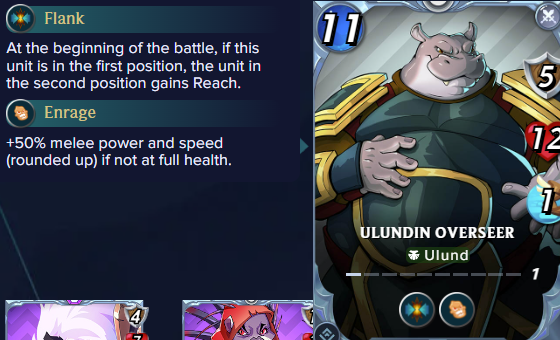
Position 1: Ulundin Overseer (Tank)
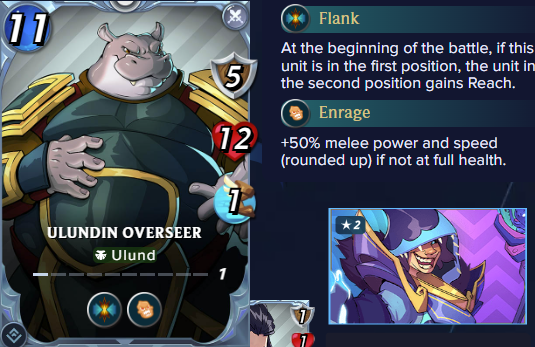
Mana Cost: 11
Level 1, Flank Ability
Enhanced Stats: 1 Magic Attack, 12 Health, 5 Armor
Starting with Ulundin Overseer as my tank was a calculated risk. While expensive at 11 mana, the Flank ability allows for additional attacks when adjacent enemies are eliminated. But here's the kicker – thanks to my support positioning, this tank got a significant boost.

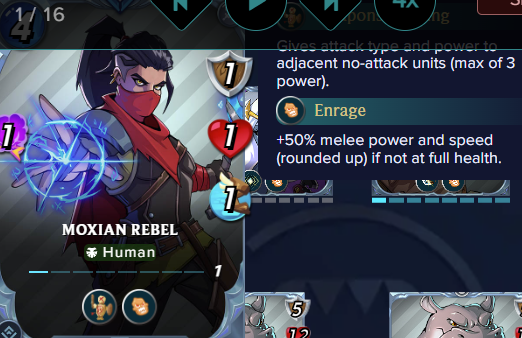
Position 2: Noxian Rebel (The Enabler)
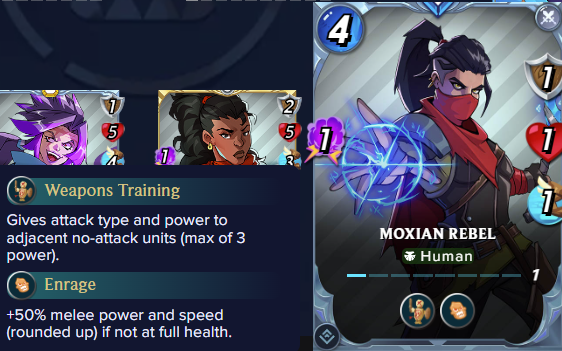
Mana Cost: 3
Level 1, Weapons Training
Stats: 1 Health, 1 Armor, 1 Speed
This is where strategy shines over stats. Noxian Rebel's Weapons Training ability gave my Ulundin Overseer that crucial +1 Magic Attack, transforming a defensive tank into a legitimate threat. Sometimes the weakest card in your lineup creates the biggest impact.
Position 3: Conclave Tracker (Gold Foil Level 2)
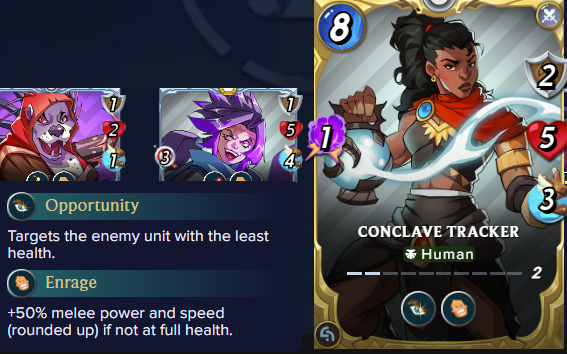
Mana Cost: 8
Opportunity Ability
Stats: 5 Health, 2 Armor, 3 Speed
The Opportunity ability is a game-changer, especially in Fog of War rulesets where Sneak and Snipe are disabled. This monster could still target the back row, picking off weakened enemies regardless of position – a crucial advantage that many opponents overlook.

Position 4: Chaos Battle Mage
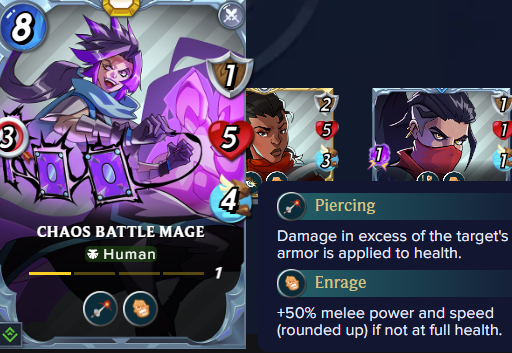
Mana Cost: 8
Level 1
Stats: 5 HP, 1 Armor, 4 Speed
Solid mid-lineup support providing consistent ranged damage with piercing for any armor!

Position 5: Bristleborn Brigand
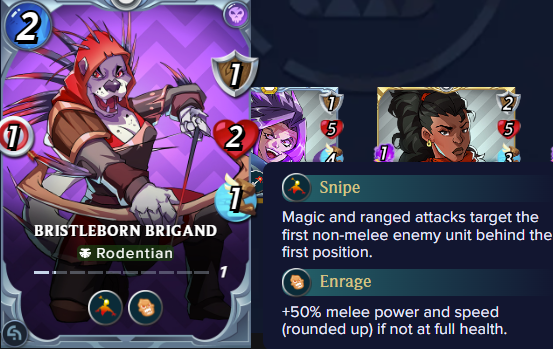
Mana Cost: 2
Snipe Ability
Stats: 1 Damage, 1 Armor, 1 Speed, 2 HP
A budget sniper that punches above its weight class. The Snipe ability targets ranged, magic, or non-attacking monsters not in first position – perfect for eliminating key support units.
Position 6: Umbral Elemental (The Game Changer)
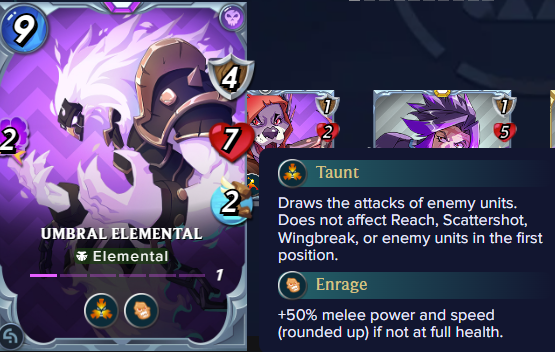
Mana Cost: 9
Taunt Ability
Stats: 2 Magic Damage, 4 Armor, 7 Health, 2 Speed
Here's where the real strategy comes into play. The Taunt ability forces all enemy attacks to target this monster instead of my tank, essentially giving me two layers of protection.
Total Team Mana Cost: 41
LOSER/Opponent's Team Summoner: Dolfar Darlak (Level 4)
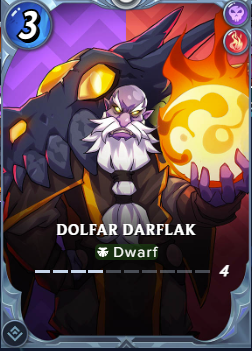
Death/Fire Summoner
Higher-level summoner providing potential stat boosts
Position 1: Ulundin Overseer (Tank)
Level 1, Flank Ability
Enhanced Stats: 1 Magic Attack, 12 Health, 5 Armor
Interestingly, my opponent chose the same tank and support with Noxian Rebel.
Position 2: Noxian Rebel
Mana Cost: 3
Level 1, Weapons Training
Stats: 1 Health, 1 Armor, 1 Speed
Mirror pick, but positioned to enhance their own tank rather than create strategic depth.
Position 3: Chaos Animator

Mana Cost: 4
Level 1, Amplify Ability
Stats: 1 Magic Damage, 1 Armor, 1 Speed, 4 HP
The Amplify ability increases magic damage from Noxian Rebel, but with limited base damage, the impact was minimal compared to my multi-layered approach.
Position 4: Mad Ogre Anarchist
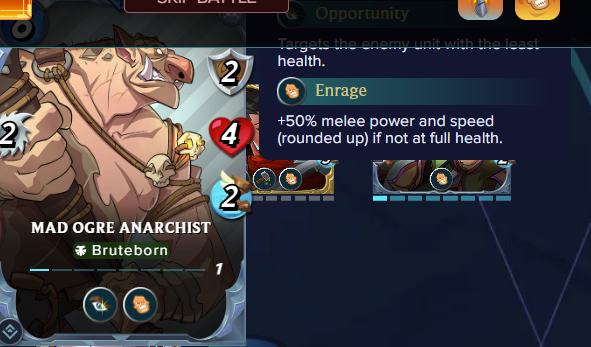
Mana Cost: 6
Level 1, Opportunity Ability
Stats: 2 Melee Damage, 2 Armor, 4 Health
A solid mid-range threat with Opportunity, but positioned where it couldn't maximize its targeting potential against my formation.
Position 5: Conclave Tracker (Gold Foil Level 3)
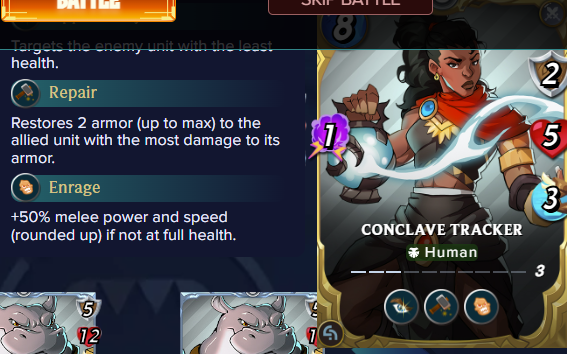
Mana Cost: 8
Opportunity Ability, 10% GLINT/SPS Boost
Stats: 1 Magic Damage, 2 Armor, 5 Health
Higher level than mine but still lost sucker.
Position 6: Grimward Ruinshot

Mana Cost: 7
Level 1
Stats: 2 Ranged Attack, 6 Health, 1 Armor, 2 Speed
A ranged attacker in the back row, vulnerable to my Opportunity and Snipe abilities.
Opponent's Total Team Mana Cost: 39
Strategic Comparison: Mirror Matches with Different Outcomes
What makes this battle particularly fascinating is how similar cards in different positions and with different strategic approaches led to vastly different results. Both teams used Ulundin Overseer tanks and Noxian Rebel support, but the execution varied significantly.
My opponent relied heavily on their Level 4 Dolfar Darlak summoner advantage, likely expecting the stat boosts to carry them through. However, they positioned their threats conventionally, making them predictable targets for my Opportunity and Snipe abilities.
The key difference was my use of Umbral Elemental's Taunt in the final position, creating an unexpected defensive layer that disrupted their entire attack sequence. While they focused on building a straightforward damage progression, I created multiple decision points that forced their formation to attack suboptimally.
The Strategic Genius: Double-Tank Protection
The key to this victory was understanding how Taunt mechanics create a "double-tank" scenario. While most opponents focus their strategy around breaking through one tank, my formation presented them with a dilemma:
First Target: Umbral Elemental - With 7 health and 4 armor, plus 2 magic damage output, this wasn't just a damage sponge – it was a legitimate threat.
Second Target: Ulundin Overseer - By the time enemies broke through the Taunt, my actual tank had been enhanced by Weapons Training and was ready to dominate.
Mana Efficiency Analysis
One crucial aspect often overlooked is mana efficiency. My formation used 41 mana compared to my opponent's 39, but achieved superior positioning:
My Advantage: Taunt positioning created double-tank value
Opponent's Limitation: Higher-level summoner couldn't overcome positioning flaws
Key Insight: Strategic placement often outweighs raw mana efficiency
Why This Strategy Works Against Higher-Level Players
Higher-level players often rely on straightforward, high-stat approaches. They expect to steamroll through your front line quickly. However, this double-protection strategy forces them to:
Waste damage on the "wrong" target (due to Taunt)
Deal with multiple threats simultaneously (Opportunity attacks from behind)
Face enhanced abilities they didn't account for (Weapons Training boost)
Monster Placement Lessons
This battle highlights several key positioning principles:
Support in Position 2: Placing Noxian Rebel directly behind the tank ensured maximum benefit from Weapons Training while keeping the enhancer relatively safe.
Opportunity in Mid-Formation: Conclave Tracker's position allowed it to survive initial exchanges while consistently targeting weakened enemies.
Taunt as Rear Guard: Positioning Umbral Elemental last created an unexpected second tank that opponents weren't prepared for.
The Takeaway
Splinterlands isn't just about having the highest-level cards – it's about understanding synergies, abilities, and strategic positioning. This victory proves that with clever planning, even lower-level players can compete with and defeat higher-level opponents.
The combination of Taunt mechanics, ability synergies, and smart positioning created a formation that was greater than the sum of its parts. Sometimes the most powerful strategy isn't the most obvious one.
What unconventional strategies have you used to overcome stronger opponents? Share your tactical victories in the comments below!
Battle Link: https://splinterlands.com/battle/sl_048a0f69281f52d140ba2927e1ed7973?ref=sirsmokesalot96
Keep strategizing, and may your battles be ever victorious!
Victoria Estratégica: Cómo el Posicionamiento Inteligente y las Mecánicas de Provocación Pueden Superar a Oponentes de Mayor Nivel
Un Análisis de Batalla de Splinterlands por sirsmokesalot96
En el meta en constante evolución de Splinterlands, los niveles brutos de las cartas no siempre garantizan la victoria. A veces, las victorias más satisfactorias provienen de superar en inteligencia a los oponentes a través de una estrategia superior, posicionamiento inteligente y comprensión de las mecánicas fundamentales del juego. Hoy quiero desglosar una batalla reciente que demuestra perfectamente cómo el pensamiento táctico puede triunfar sobre la fuerza bruta.
La Configuración: David vs. Goliath
Enfrentando a un oponente de mayor nivel, sabía que necesitaba ser creativo con mi alineación. Trabajando dentro de mis restricciones de maná, creé una formación que maximizaría las sinergias mientras creaba múltiples capas de protección y ofensiva.
Desglose de la Alineación
Mi Formación (sirsmokesalot96)
Posición 1: Ulundin Overseer (Tanque)
Costo de Maná: 11
Nivel 1, Habilidad Flank
Estadísticas Mejoradas: 1 Ataque Mágico, 12 Salud, 5 Armadura
Comenzar con Ulundin Overseer como mi tanque fue un riesgo calculado. Aunque costoso a 11 maná, la habilidad Flank permite ataques adicionales cuando se eliminan enemigos adyacentes. Pero aquí está el truco: gracias a mi posicionamiento de apoyo, este tanque obtuvo un impulso significativo.
Posición 2: Noxian Rebel (El Potenciador)
Costo de Maná: 3
Nivel 1, Weapons Training
Estadísticas: 1 Salud, 1 Armadura, 1 Velocidad
Aquí es donde la estrategia brilla sobre las estadísticas. La habilidad Weapons Training de Noxian Rebel le dio a mi Ulundin Overseer ese crucial +1 Ataque Mágico, transformando un tanque defensivo en una amenaza legítima. A veces la carta más débil en tu alineación crea el mayor impacto.
Posición 3: Conclave Tracker (Lámina Dorada Nivel 2)
Costo de Maná: 8
Habilidad Opportunity
Estadísticas: 5 Salud, 2 Armadura, 3 Velocidad
La habilidad Opportunity es un cambio de juego, especialmente en rulesets de Fog of War donde Sneak y Snipe están deshabilitadas. Este monstruo aún podía apuntar a la fila trasera, eliminando enemigos debilitados independientemente de la posición.
Posición 4: Chaos Battle Mage
Costo de Maná: 8
Nivel 1
Estadísticas: 5 HP, 1 Armadura, 4 Velocidad
Apoyo sólido de línea media proporcionando daño mágico consistente mientras mantiene una supervivencia decente.
Posición 5: Bristleborn Brigand
Costo de Maná: 2
Habilidad Snipe
Estadísticas: 1 Daño, 1 Armadura, 1 Velocidad, 2 HP
Un francotirador económico que golpea por encima de su categoría de peso. La habilidad Snipe apunta a monstruos a distancia, mágicos o sin ataque que no están en primera posición.
Posición 6: Umbral Elemental (El Cambio de Juego)
Costo de Maná: 9
Habilidad Taunt
Estadísticas: 2 Daño Mágico, 4 Armadura, 7 Salud, 2 Velocidad
Aquí es donde entra en juego la estrategia real. La habilidad Taunt fuerza todos los ataques enemigos a apuntar a este monstruo en lugar de mi tanque, esencialmente dándome dos capas de protección.
Costo Total de Maná del Equipo: 41
Análisis de la Formación del Oponente
Invocador: Dolfar Darlak (Nivel 4)
Invocador Muerte/Fuego
Invocador de mayor nivel proporcionando potenciales impulsos de estadísticas
Posición 1: Ulundin Overseer (Tanque)
Costo de Maná: 11
Nivel 1, Habilidad Flank
Estadísticas: Igual que el mío (estadísticas base)
Interesantemente, mi oponente eligió el mismo tanque pero sin la mejora de Weapons Training.
Posición 2: Noxian Rebel
Costo de Maná: 3
Nivel 1, Weapons Training
Estadísticas: 1 Salud, 1 Armadura, 1 Velocidad
Elección espejo, pero posicionado para mejorar su propio tanque.
Posición 3: Chaos Animator
Costo de Maná: 4
Nivel 1, Habilidad Amplify
Estadísticas: 1 Daño Mágico, 1 Armadura, 1 Velocidad, 4 HP
La habilidad Amplify aumenta el daño mágico de Noxian Rebel, pero con daño base limitado.
Posición 4: Mad Ogre Anarchist
Costo de Maná: 6
Nivel 1, Habilidad Opportunity
Estadísticas: 2 Daño Cuerpo a Cuerpo, 2 Armadura, 4 Salud
Una amenaza sólida de rango medio con Opportunity, pero mal posicionada.
Posición 5: Conclave Tracker (Lámina Dorada Nivel 3)
Costo de Maná: 8
Habilidad Opportunity, 10% Boost GLINT/SPS
Estadísticas: 1 Daño Mágico, 2 Armadura, 5 Salud
Mayor nivel que el mío pero posicionado menos estratégicamente.
Posición 6: Grimward Ruinshot
Costo de Maná: 7
Nivel 1
Estadísticas: 2 Ataque a Distancia, 6 Salud, 1 Armadura, 2 Velocidad
Un atacante a distancia en la fila trasera, vulnerable a mis habilidades Opportunity y Snipe.
Costo Total de Maná del Oponente: 39
Comparación Estratégica: Batallas Espejo con Diferentes Resultados
Lo que hace esta batalla particularmente fascinante es cómo cartas similares en diferentes posiciones y con diferentes enfoques estratégicos llevaron a resultados vastamente diferentes. Ambos equipos usaron tanques Ulundin Overseer y apoyo Noxian Rebel, pero la ejecución varió significativamente.
Mi oponente se basó fuertemente en su ventaja del invocador Dolfar Darlak Nivel 4, probablemente esperando que los impulsos de estadísticas los llevaran adelante. Sin embargo, posicionaron sus amenazas convencionalmente, haciéndolas objetivos predecibles para mis habilidades Opportunity y Snipe.
La diferencia clave fue mi uso del Taunt de Umbral Elemental en la posición final, creando una capa defensiva inesperada que interrumpió toda su secuencia de ataque. Mientras se enfocaron en construir una progresión de daño directa, creé múltiples puntos de decisión que forzaron a su formación a atacar de manera subóptima.
El Genio Estratégico: Protección de Doble Tanque
La clave de esta victoria fue enten