


*
 Dont worry bee happy
*
Hola bienvenid@s a un nuevo Blog.
Hello, welcome to a new blog.
Hello friends of diyhub, I am here again to show you one more craft, handmade and the best thing is that it will be very useful, for today I decided to make a pincushion in the shape of a honeycomb, for those of us who love sewing this pincushion would be a great sewing accessory and will give a unique touch to your work desk, without a doubt pincushions are the accessory with the most different shapes and sizes that I have seen in my entire life, I have seen from turtle-shaped to house-shaped, and now I am going to show you the honeycomb shape, I hope you are ready and will join me on this new craft adventure.
When I was organizing the materials I was going to use, an animated movie I saw a while ago came to mind and I remembered the song don't worry bee happy, that is a song that I could not get out of my mind today and even my mom was singing it 🤭. This craft made me think that bees are one of the greatest workers in the animal kingdom, they do not have rest, because they are the ones that give life to plants, because they are great pollinators, it must be very hard work since I read that they actually cannot fly because of the size of their body and their wings are small, but they do not know it 🤫, so if they try hard, and then they not only pollinate, they are also the ones who build the honeycomb, that is a sign that we should not give up, bees are very important in our lives, the honeycomb as we know is their home, and after a long day they return to the honeycomb. We here at Hive Blog are like bees, we all form a Hive family, and we keep the honeycomb alive, spreading common interests and creativity like pollen spreads on plants, so let's be like the bees that don't give up despite their defect.

(Materiales:)||(Materials:)
- La mitad de una esfera de anime
- Telas de colores
- Tijeras
- Algodón de relleno
- Mostacillas de colores (amarillo, negro y blanco)
- Cuentas de letras
- Botones
- Hilo y aguja
- Pega blanca
- Half of an anime sphere
- Colored fabric
- Scissors
- Cotton filler
- Colored beads (yellow, black, and white)
- Letter beads
- Buttons
- Needle and thread
- White glue
(Procedimiento:)||(Procedure:)

-
Paso nro 1
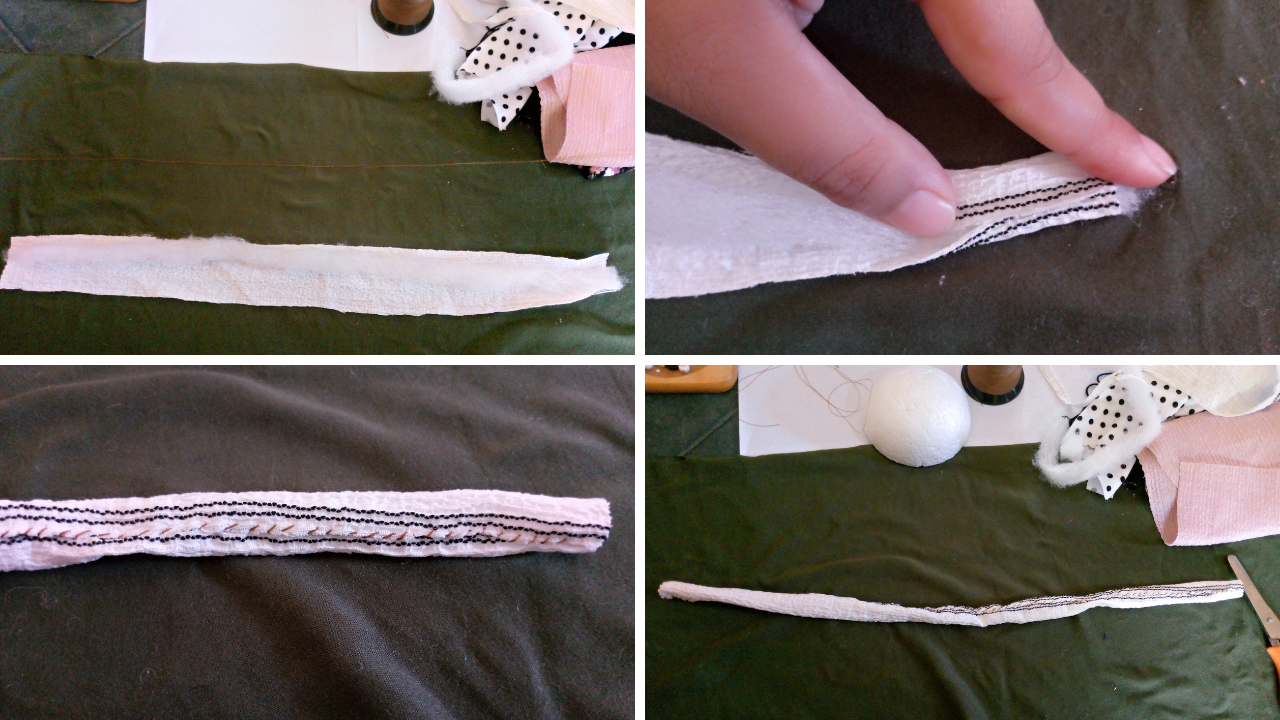
Comencé, cortando de un pedazo de tela de color blanca con líneas negras, varias tiras, y también corte tiras del algodón de relleno,luego coloque el relleno sobre la tela y comencé a coser,coci un mínimo de tres tiras,ya luego empecé a colocarle todas las tiras de manera que rodeé la media esferas de anime, utilice pega blanca para colocar las tiras,coloque las tiras desde abajo hacia arriba,le coloque alfileres para que ayude a la tela adherirse con la pega,por último le coloque el la parte que faltó de arriba un pegaso de tela que corte de forma circular y lo cosi por las orillas y rellene con el relleno, también lo pegue y dejé que se secará un poco.
Paso nro 1
I started by cutting several strips from a piece of white fabric with black lines, and also cut strips of the cotton filling, then I placed the filling on the fabric and began to sew, I sewed at least three strips, and then I began to place all the strips so that they surrounded the half spheres of anime, I used white glue to place the strips, I placed the strips from the bottom up, I put pins to help the fabric adhere with the glue, finally I placed the missing part of the top a fabric pegasus that I cut in a circular shape and sewed it along the edges and filled it with the filling, I also glued it and let it dry a little.

-
Paso nro 2
Ahora le voy a hacer la entrada del panal,corte un pedacito de tela negra,y le hice una forma de puerta arqueada,luego empecé a coserla,ya ahora el panal tiene la entrada.
Paso nro 2
Now I'm going to make the entrance to the honeycomb. I cut a small piece of black fabric and made it into an arched door shape. Then I started sewing it. Now the honeycomb has the entrance.
-
Paso nro 3
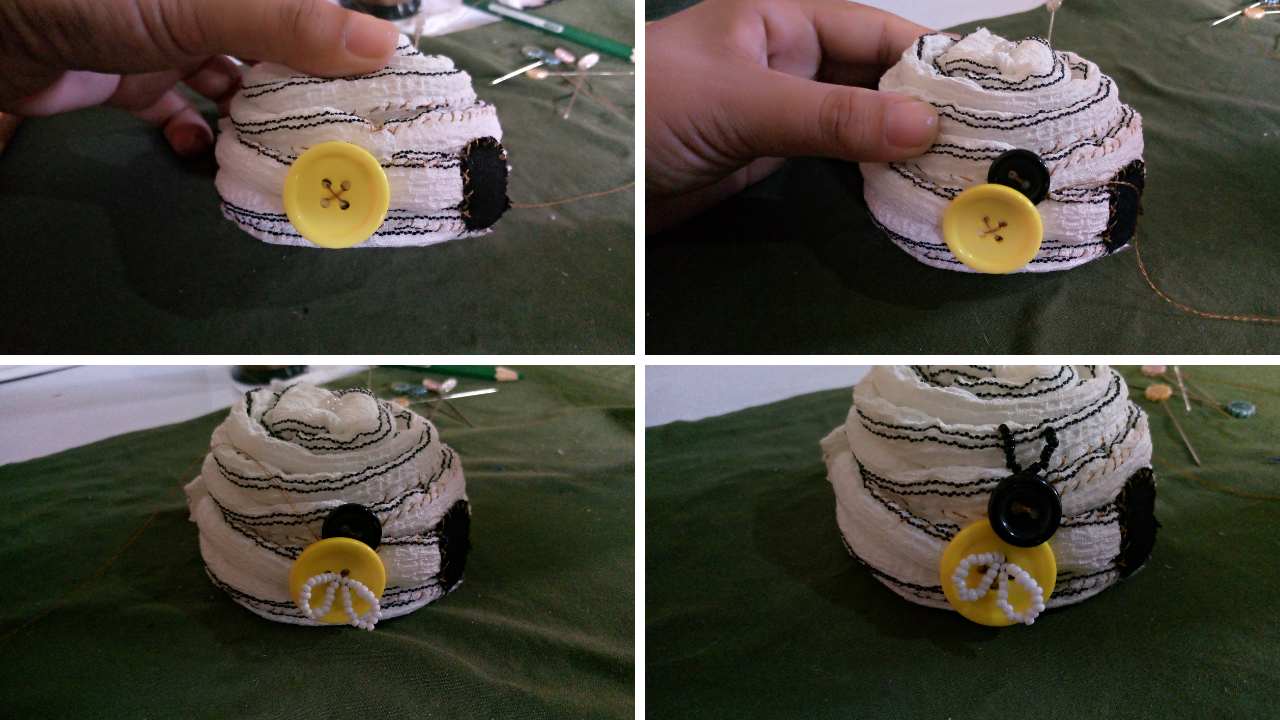
En este paso se me ocurrió hacer una abeja con botones y justo tenía los colores,le coloque y cosí un botón amarillo para el cuerpo,y el botón negro para la cabeza,con las mostacillas blancas le hice las alitas,y con las mostacillas negras le hice sus dos antenistas.
Paso nro 3
In this step I decided to make a bee with buttons and I just had the right colors, I placed and sewed a yellow button for the body, and the black button for the head, with the white beads I made the wings, and with the black beads I made its two antennae.

-
Paso nro 4
Luego con unos retazos de tela le hice unas flores,solo dos porque ya veía todo sobrecargado,corte unos 5 pequeños círculos que doble la mitad y luego volvi a doblar a la mitad para así formar un triángulo,y empecé a coser por la orilla,solo mismo hice con cada pétalo,ya una vez lista las flores se las coloque al alfiletero cosidas a mano.
Paso nro 4
Then with some scraps of fabric I made some flowers, just two because everything looked overloaded. I cut about 5 small circles that I folded in half and then folded in half again to form a triangle, and I started sewing along the edge, I did the same with each petal. Once the flowers were ready I placed them on the pincushion, sewn by hand.

-
Paso nro 5
Con las cuentas de letras forme las palabras Hive Blog,y las voy a colocar en la entrada del panal, también las cosí mano en todo el alrededor de la puerta.
Paso nro 5
With the letter beads I formed the words Hive Blog, and I'm going to place them at the entrance of the hive. I also hand-stitched them all around the door.

-
Paso nro 6
Por último le coloque algunos detalles para darle un toqué más de vida,como unos botones en el centro de las flores,una pequeña abejita sobre la flor y unos botones en forma de flores que tenía también se las coloque y así queda lista el panal.
Paso nro 6
Finally, I added some details to give it a touch more life, such as some buttons in the center of the flowers, a small bee on the flower and some flower-shaped buttons that I also had, and that's how the honeycomb is ready.
(Resultado final:)||(Bottom line:)
Thanks again for joining me today for this beautiful craft. I hope it gives you some ideas. I hope to show you another craft another time. Thanks for joining me ☺️.


*
Las fotos de este blog son de mi propiedad|Las imágenes son editadas en canva|Fotografías tomadas en mi celular infinix Smart 7|El contenido está traducido en el traductor de Firefox.
*
*
The photos on this blog are my property | The images are edited in Canva | Photos taken on my Infinix Smart 7 cell phone | The content is translated in Firefox Translate.
*