


*
Hola bienvenid@s a un nuevo Blog.
*
*
Hello, welcome to a new blog.
*
Hello...dear friends of this incredible community, welcome to my blog. Today I want to show you an easy way to make a charm to decorate your bracelets and necklaces, even rings and keychains. This is a way to learn how to personalize your accessories with just a few materials. I invite you to join this creative idea, so let's get started.
I'm going to make the charm in the shape of a flower, in the colors that I like the most, which are those shades of metallic pink. Sometimes I only make jewelry that is in fashion or a model that I saw and liked and from there I guide myself to make one like it, but sometimes I do start making some invention, especially in the moments when I have nothing to do, then I get a little creative with the materials that I have at hand. I don't dedicate myself to making jewelry, it's just costume jewelry since jewelry is something more complex, but in the art of costume jewelry you can say that a knot bracelet is art, and that's what I like about costume jewelry because you can be creative without borders. In addition to making the charm, I'm also going to take advantage and make a bracelet with that charm since I want a simple bracelet that I can use to make combinations.

(Materiales:)||(Materials:)
- Perlas de color rosado y plateado metálico
- Tijeras
- Hilo nilon
- Pinzas
- Aros
- Poco de loro
- Tapa nudo
- Hilo chino de color negro
- Aguja de mostacillas
- Pink and metallic silver pearls
- Scissors
- Nylon thread
- Tweezers
- Hoop earrings
- Parrot beads
- Knot cap
- Black Chinese thread
- Beading needle
(Procedimiento:)||(Procedure:)
Paso a paso de la flor 🌸
Step by step of the flower 🌸


To make the little flower, I'm going to use five pink pearls, one silver pearl, and a bit of nylon thread. Place four pink pearls first, then place the silver pearl and the thread has to go through the middle of the pearl, then each side of the thread goes through the two pearls on the sides, then with the fifth pink pearl pass the thread between the pearl, each side goes through a side and then pull a little and tie a knot.
Paso a paso de la pulsera.
Step by step of the bracelet.
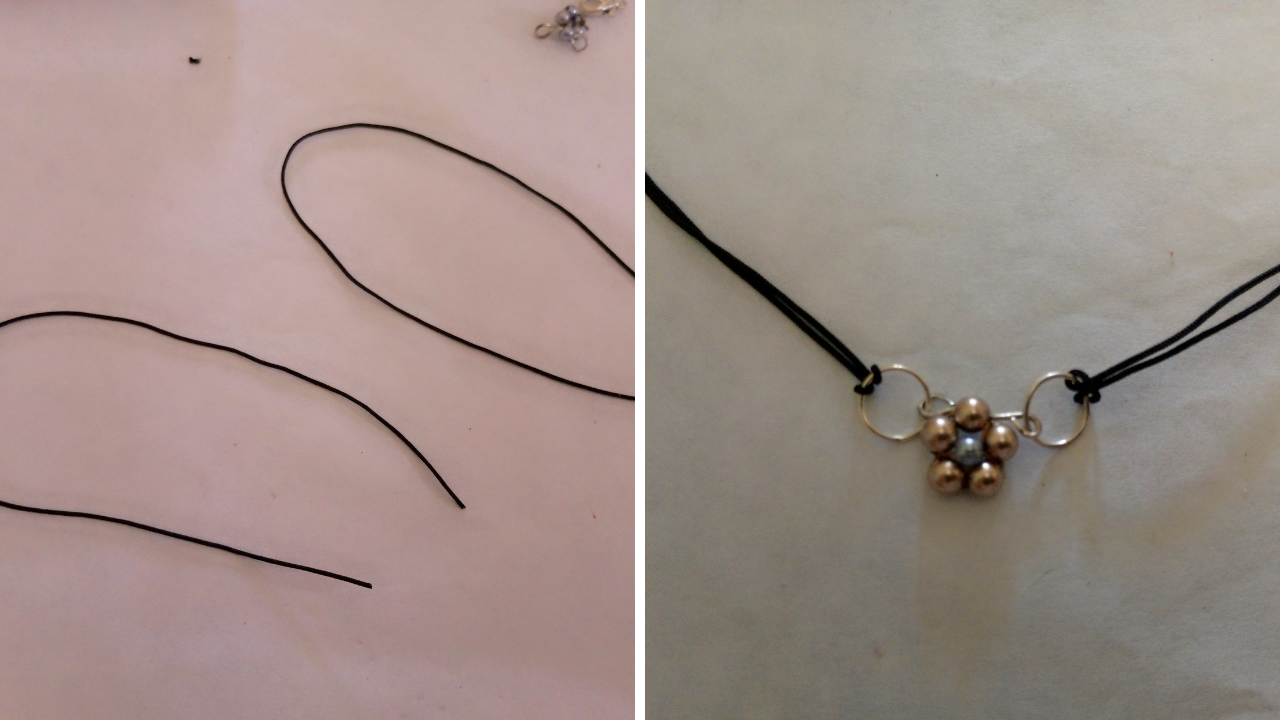
Now we go with the bracelet part, I placed a ring on the flower with the help of pliers in such a way that I could pass it through the pearl on top of the flower, then I made some turns forming a ring, then I placed two normal rings on each side, then I placed a part of the Chinese thread on each side, on that part I placed the thread tied with knots. The measurement of the bracelet is my measurement.

In this step I placed the knot covers, one on each side. These knot covers are smaller and give it a delicate style. Before placing the knot covers, I tied some knots at the end of the bracelet to serve as a support for the knot covers and thus prevent them from coming loose.

Finally, I added two more rings and a little bit of parrot, and the bracelet was ready to be worn with incredible combinations.
(Resultado final:)||(Bottom line:)
Thank you for following along and reading. I hope you enjoyed it and that you can also use some of these ideas to make your own personalized accessories. I hope to share another craft idea again soon.


**
Las fotos de este blog son de mi propiedad|Las imágenes son editadas en canva|Fotografías tomadas en mi celular infinix Smart 7|El contenido está traducido en el traductor de Firefox.
**
**
The photos on this blog are my property | The images are edited in Canva | Photos taken on my Infinix Smart 7 cell phone | The content is translated in Firefox Translate.
**