Steps to produce a 3D animation using sinoceratops as a model | Pasos para producir una animación 3D usando un sinoceratops como modelo
 I want to dedicate this post to @joelsegovia who showed a lot of interest in this work. In my last post he inquire me about my proceed on this, so I think that would be so useful to make a post dedicated to describe in detail the workflow for 3D animation.
The workflow is the systematization of processes, so not all designers apply the same because there are many ways to reach the same result. In my first post I wrote a general 3D animation workflow, now, I want to expand it because having a defined workflow you can save your time a lot 😅
Quiero dedicar éste post a @joelsegovia que mostró mucho interés en este trabajo. En mi último post él me preguntó sobre mi proceder en ésto, así que pensé cuan util sería describir en mayor detalle el workflow o flujo de trabajo para la animación 3D.
El workflow, es la sistematización de procesos, así que no todos los diseñadores aplican el mismo ya que hay muchas formas de llegar a un mismo resultado. En mi primer post escribí de forma general el flujo para crear animación 3D, ahora, quiero ampliarlo porque tener un flujo de trabajo definido puede ahorrarte mucho tiempo 😅
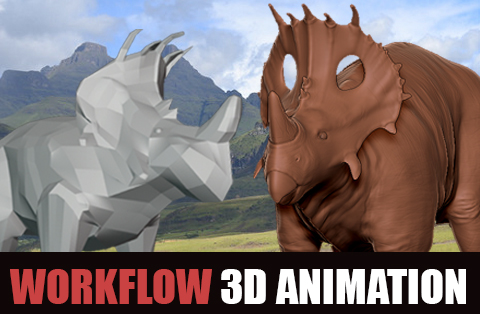
As you already know my modeling process started from a simple blockout in Blender. So you knew in my first and second post the primitive result of modeling. But, although Blender is a very powerful 3D animation program that achieves very professional results, my computer was unable to run it correctly and I migrated to zbrush.
Now follow the textured process, but first a retopology of the mesh needs to be done. That is the act of recreating an existing mesh with more optimal geometry. It's necessary for texturing and animated correctly, because during sculpting the mesh geometry is created out of order. Let's look at an example:
Como ya saben mi proceso de modelado inició con un simple blockout en Blender. Conocieron en mi primer y segundo post el resultado primitivo del modelado. Pero, aunque Blender es un muy potente programa para animación 3D que logra resultados muy profesionales, mi computador no pudo correrlo correctamente y migré a Zbrush.
Ahora sigue el proceso de texturizado, pero primero necesitas hacer una retopología de la malla que es el proceso de recrear la existente con una geometría más óptima. Esto es necesario para un correcto texturizado y animación porque durante el esculpido la geometría de la malla se crea de forma desordenada. Veamos con un ejemplo:
https://files.peakd.com/file/peakd-hive/sthephany/qhOkFN1q-sin20zremesher.png Unreported model | Modelo sin retopolizar
https://files.peakd.com/file/peakd-hive/sthephany/4weO7s21-connzremesher.png Model with retopology | Modelo con retopología
Adding material and colors, light effects and surface details is the act of texturing. To start this, you can to unwrap the model; which basically means unfolding a 3D mesh creating a UV map. UVs are 2D representations of 3D models so, you can work texturizing on your UV map and this will wrap around the 3D object. On the other hand you can work first directly on your 3D model and then project the UV that will contain this texture information.
Agregar material y colores, efectos de luz y detalles de superficie es el acto de texturizar. Para iniciar esto, puedes desenvolver el modelo; lo que básicamente significa desplegar una malla 3D creando un mapa UV. Los UV son representaciones 2D de modelos 3D, por lo que puedes trabajar texturizando en tu mapa UV y esto envolverá el objeto 3D. Por otro lado, puedes trabajar directamente en tu modelo 3D y luego proyectar el UV que contendrá esta información de textura.
Here we can add sculpted details that we want using traditional brushes and combining them with alfas that are 2D greyscale textures that can change the surface elevation on your sculpt in a positive or negative direction. Alfas can be created or modified in any type of 2D editor like Photoshop or download it from the internet.
Aquí podemos agregar los detalles de esculpido que queremos usando pinceles tradicionales combinándolos con alfas que son texturas en escala de grises 2D que pueden cambiar la elevación de la superficie de su escultura en una dirección positiva o negativa. Los alfas se pueden crear o modificar en cualquier tipo de editor 2D como Photoshop o descargarlo de Internet.
We are getting closer to the animation so now we must do the Rigging and Skinning of the model. In case you work all your workflow in the same program you can start creating skeleton, but if you will to export your model you must create the texture, displacement and normal maps.
The first one will transfer the details of colors and textures to the new program. The second gives surfaces a great sense of depth and detail. The last allows much more detailed illumination and relief to an object's surface.
Ya nos vamos acercando a la animación así que ahora debemos hacer el Rigging y el Skinning del modelo. En caso de que lleves a cabo todo tu flujo de trabajo en un mismo programa puedes empezar a crear el esqueleto, pero si vas a exportar tu modelo debes crear el mapa de textura, desplazamiento y normales.
El primero transferirá los detalles de color y textura al nuevo programa. El segundo transferirá a las superficies una gran sensación de profundidad y detalle. El último permite una iluminación y relieve mucho más acentuado en la superficie de un objeto.
https://files.peakd.com/file/peakd-hive/sthephany/ZycfePB2-mapas.jpg Maps of texture, displacement and normal | Mapas de textura, desplazamiento y normal
Yes! When you have the model skeleton and you have attached it to the mesh, you can make your animations. I will be talking about this process and others in greater depth latter.
Ahora si! Cuando tengas el esqueleto del modelo y lo hayas adherido a la malla podrás realizar tus animaciones. De éste proceso y otros estaré hablando en mayor profundidad próximamente.