Forest Healer Chibi on Standee - Chibi Forest Healer en Standee
@yennysferm71
· 2025-09-15 03:12
· Holozing Community
I love my Holozing illustrations. They truly are some of my creations that have a great personal meaning, perhaps because drawing has been something I've done since I was a child, but it's only now that I'm creating Fanart, and this is truly new to me, and I find it satisfying to do so.
To display my illustrations, done using traditional techniques with cardboard, colors, markers, eyeliners, etc., I place them in frames I make with other materials. However, I had in mind the idea of having these illustrated characters also as they would appear on the back, so that they could be displayed like those acrylic awards or trophies. Today I want to show you how to simulate acrylic at home and have this Standee-style display... Welcome.
Mis ilustraciones de Holozing las amo, realmente son de mis Creaciones que tienen un gran significado personal, tal vez porque dibujar es algo que hago desde niña, pero es ahora que creo Fanart y eso si es realmente nuevo para mi y me satisface lograrlo.
Para exhibir mis ilustraciones realizadas en técnica tradicional con cartulina, colores, marcadores, delineadores, etc. las coloco en algunos marcos que hago con otros materiales. Sin embargo, tenía en mi mente rondando la idea de tener a estos personajes ilustrados también como se verían por el reverso y que se pudiesen exhibir como esos reconocimientos o trofeos acrílicos. Hoy les quiero mostrar cómo simular el acrílico en casa y tener esta Exhibición tipo Standee... Bienvenidos.
From Frame Illustration to Standee
De Ilustración en Marco a Standee
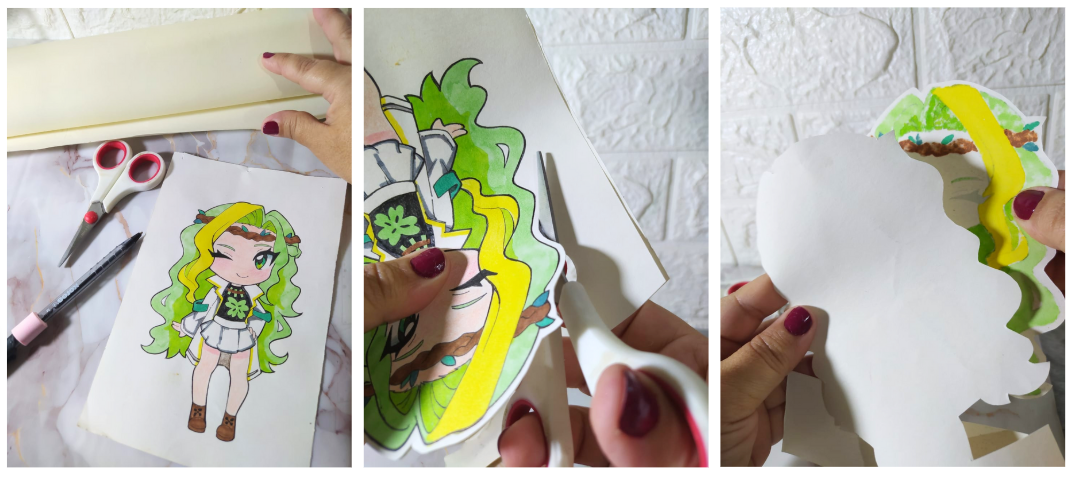
I took my Forest Healer illustration out of the gold frame where it hung on my desk wall.
Luckily, I still had the same cardstock I used when I made [Forest Healer Chibi and Flirty](https://peakd.com/hive-131131/@yennysferm71/forest-healer-chibi-and-flirty-forest-healer-chibi-y-coqueta). So I cut a rectangle of the same size, placed it underneath my illustration, and cut both at the same time, leaving a white border to add interest or highlight the illustration.
Saqué mi Ilustración de Forest Healer del marco dorado donde la tenía en mi pared del escritorio.
Afortunadamente, aún tenía la misma cartulina que utilicé cuando hice [Forest Healer Chibi and flirty ](https://peakd.com/hive-131131/@yennysferm71/forest-healer-chibi-and-flirty-forest-healer-chibi-y-coqueta). Así que corté un rectángulo de la misma medida, lo coloqué debajo de mi ilustración y recorté ambas al mismo tiempo, dejando un borde blanco para darle más interés o resaltar la ilustración.
I sketched and colored my Forest Healer, as I think it would look on the back with that same pose, outfit and accessories.
Realicé el boceto y coloreé a mi Forest Healer, como creo que se vería por el reverso con esa misma pose, aduendo y accesorios.
Using a glue stick, I glued both illustrations together, ensuring the outer edges I had outlined when cutting them out in the previous step match perfectly.
You can see that, at the base of my Forest Healer, I left a rectangular, horizontal base of cardboard. I did this so it could be easily attached later. I'll explain more about this later.
Con un pegamento en barra pegué ambas ilustraciones haciendo que coincidan muy bien los bordes externos que había contemplado cuando la recorté en el paso anterior.
Pueden apreciar que, en la base de mi Forest Healer dejé un base de la cartulina en forma rectangular y horizontal, esto lo hice para que posteriormente se pueda anclar, eso lo explicaré más adelante.
To simulate the acrylic, I'm going to use a thick, transparent acetate. Although it's rolled and fairly firm, I can flatten and join it with heat. For this, I'll need greaseproof paper and an iron.
I cut the greaseproof paper to a size that fits the illustration and is well-spaced and comfortable to work with. I'm not going to throw this material away; after using it in this project, I can save it for future projects.
Simular el Acrílico
---
Para simular el Acrílico voy a utilizar un Acetato Transparente y grueso, y aunque está enrollado y es bastante firme en mantener la forma, con calor lograré aplanarlo y unirlo. Para esto voy a necesitar Papel Antigrasa y una plancha de ropa.
Corté el Papel Antigrasa con una medida que pueda meter la ilustración y que quede bien espaciada o cómoda para trabajar. Este material no lo voy a desechar, luego de usarlo en este proyecto lo puedo guardar para futuros trabajos.
The illustration, which is glued on the front and back, I place an acetate sheet on top and bottom, creating a sandwich. Now I place this sandwich in the greaseproof paper. I just have to be careful not to move the pieces.
To ensure the iron doesn't damage the acetate, I place a piece of fabric over everything I've assembled. The way to apply heat with the iron is as shown in the GIF, pressing several times without dragging the iron. You can do this with confidence because we've taken all the precautions; there's no chance of burning the acetate.
La Ilustración que está pegada el frente y el reverso, le coloco un acetato por encima y por debajo, que quede como un sándwich. Y ahora meto este sándwich en el Papel Antigrasa, solo debo tener cuidado de no mover las piezas.
Para garantizar que la plancha no vaya a estropear el acetato, coloco un tela encima de todo lo que armé. La forma de aplicar el calor con la plancha es como lo muestro en el gif, presionando varias veces "sin arrastrar" la plancha. Esto lo puedes hacer con toda confianza porque ya tomamos todas las previsiones, no hay la posibilidad de quemar el acetato.
Since I used greaseproof paper, the acetate, even though it's warm, won't stick. Just open the paper and it can be easily removed. Just be careful because it's warm. You can see that the acetate has yielded to its shape and is completely flat.
This cools very quickly, but I like to let it cool for a few minutes inside a heavy book, just a little while. When I take it out, I trim the shape a little around it, but always leaving a good margin of acetate. If it starts to come loose again, you can repeat the ironing process as many times as you like. I only did it twice, and it stuck very well. Look how beautiful the Forest Healer looks on both sides and how strong the acetate is, given that I used a very thick one.
Dado que utilicé Papel Antigrasa el acetato aunque está caliente no se va a pegar, solo abrir el papel ya se puede desprender con facilidad, solo ten cuidado porque está caliente. Puedes ver que el acetato cedió en su forma y está totalmente plano.
Esto enfría muy rápido, pero me gusta darle unos minutos dentro de un libro pesado, solo un ratito. Al sacarlo de ahí, recorto un poco la forma alrededor pero siempre dejando un buen margen de acetato. Si se te vuelve a despegar, puedes repetir el proceso del planchado las veces que quieras, yo lo hice solo dos veces y me pegó muy bien. Fíjate lo bella que se ve Forest Healer por ambos lados y lo fuerte del acetato, dado que utilicé uno muy grueso.
For the base I used a headphone box, which I adjusted its size by cutting it with an exacto knife or cutter, and then I opened a center line to introduce Forest Healer, considering the size of the cardboard base I had left before, which also has acetate of course.
Para la base utilicé una caja de unos audífonos, que ajusté su tamaño cortándola con un exacto o cúter, y luego abrí una línea central para introducir a Forest Healer, considerando el tamaño de la base de cartulina que había dejado antes que también tiene acetato por supuesto.
Finally, a little cold white paint on the box that is now the base of this Standee.
Para finalizar, un poco de pintura al frío de color blanco en la caja que ahora es la base de este Standee.
I loved this way of displaying the illustrations. What I like most is that it looks great on both the front and back; the figure looks beautiful.
On the left, you can see how it looks in the gold frame I had it in, and on the right, how it now looks on a standee. I can move it wherever I want, confident that it will look beautiful and perfectly suited to other items I place around it.
Amé esta forma de Exhibir las ilustraciones, lo que más me gusta es que luce muy bien por el frente y por el reverso, la figura se ve hermosa.
A la izquierda pueden ver cómo se ve en el marco dorado donde la tenía, y a la derecha, ahora cómo se ve en Standee, puedo moverla a donde quiera con la seguridad de que se va a ver preciosa y muy feliz con otros elementos que le coloque alrededor.
To debut it, I placed it on my desktop, so I can see it here, since it makes me very happy. Although, as you can imagine, I'd love to see it with some of my other fan art of the beautiful Holozing characters I've created so far.
Para estrenarla la coloqué en mi escritorio, para verla aquí ya que me hace muy feliz. Aunque como se imaginaran ya quiero que la acompañen otros de mis Fanart de los hermosos personajes de Holozing que he realizado hasta ahora.
Let me know if you liked my idea and if you knew you could simulate acrylic with acetate. I have other ideas to further enhance my illustrations, and I'll share them with you in another post.
See you in the next post. Thanks for reading.
Cuéntame si te gustó mi idea y si sabías que podías simular el acrílico con acetato. Tengo otras ideas para tener más cerca mis ilustraciones y te las contaré en otra de mis publicaciones.
Nos leemos en la próxima publicación, gracias por leerme.
I took the photos with my phone Redmi Note 8
Apps I used:
Canva Pro for Cover, Collage and Banners
I used Deepl Translator
My social networks:
Discord: YennysYaneth#0189
Twitter: @yennysferm
Instagram: @yennysyaneth
Las fotos las tomé con mi teléfono Redmi Note 8
Apps que utilicé:
Canva Pro para la Portada, Collage y Banners
Utilicé el Traductor Deepl
Mi redes sociales:
Discord: YennysYaneth#0189
Twitter: @yennysferm
Instagram: @yennysyaneth