¡Saludos 👋 Queridos 💞 Amigos de #needleworkmonday😘! // Greetings 👋 Dear 💞 Friends of #needleworkmonday😘!
Hola, espero se encuentre muy bien ☺️, me llamo Yurimar como mi nombre de usuario aquí en Hive, hace un tiempo publique mis trabajos de costura a mano aquí en esta maravillosa comunidad pero por problemas personales me tuve que ausentar un tiempo y todos mis proyectos se paralizaron, mi vida ha tomado un giro diferente y estoy feliz de que nuevamente 😁 pueda estar aquí con ustedes.
Hello, I hope you are very well ☺️, my name is Yurimar as my username here in Hive, some time ago I published my hand sewing works here in this wonderful community but due to personal problems I had to be absent for a while and all my projects were paralyzed, my life has taken a different turn and I am happy that again 😁 I can be here with you.

Agradecida con mi familia que me brindaron su apoyo 🥰 Dios es grande 🙏. Ahora estoy aquí para mostrarle cómo elaborar una hermosa 😍 Cartuchera en forma de Lápiz ✏️ para este nuevo año escolar 😃 ya verán que sus pequeños les va a encantar, mi hija Camila está emocionada ya que son varias las cartucheras que le he elaborado de formas muy divertidas.
Grateful to my family who gave me their support 🥰 God is great 🙏. Now I'm here to show you how to make a beautiful 😍 Pencil Shaped Pencil Case ✏️ for this new school year 😃 you will see that your little ones will love it, my daughter Camila is excited since there are several pencil cases that I have made for her in very funny shapes.
Les cuento que todos mis trabajos son cosidos a mano ya que es un arte que me gusta mucho, además me ayuda mucho a relajarme, este proyecto en particular lo elabore con retazos de tela los cuales uni cosiendo a mano para darle un toque maravilloso.
I tell you that all my works are sewn by hand because it is an art that I like very much, it also helps me to relax a lot, this particular project I made it with scraps of fabric which I joined by hand sewing to give it a wonderful touch.
Antes de comenzar este tutorial les voy a detallar los materiales que utilicé para la elaboración de esta Cartuchera en forma de Lápiz ✏️.
Before I begin this tutorial I am going to detail the materials I used to make this Pencil Shaped Pencil Case ✏️.

✏️ Materiales:✏️
- Retazos de tela de cualquier color deseado.
- Retazo de tela negro y blanco para los ojos.
- Tela blanca para el forro.
- Hilo blanco, negro y rojo.
- Un cierre de 30 cm.
- Aguja de coser.
- Tijera.
- Cartulina.
- Lápiz.
- Regla.
✏️ Materials:✏️
- Fabric scraps of any desired color.
- Black and white fabric for the eyes.
- White fabric for the lining.
- White, black and red thread.
- A 30 cm zipper.
- Sewing needle.
- Scissors.
- Cardboard.
- Pencil.
- Ruler.
✏️ Patrón:✏️ // ✏️ Pattern:✏️
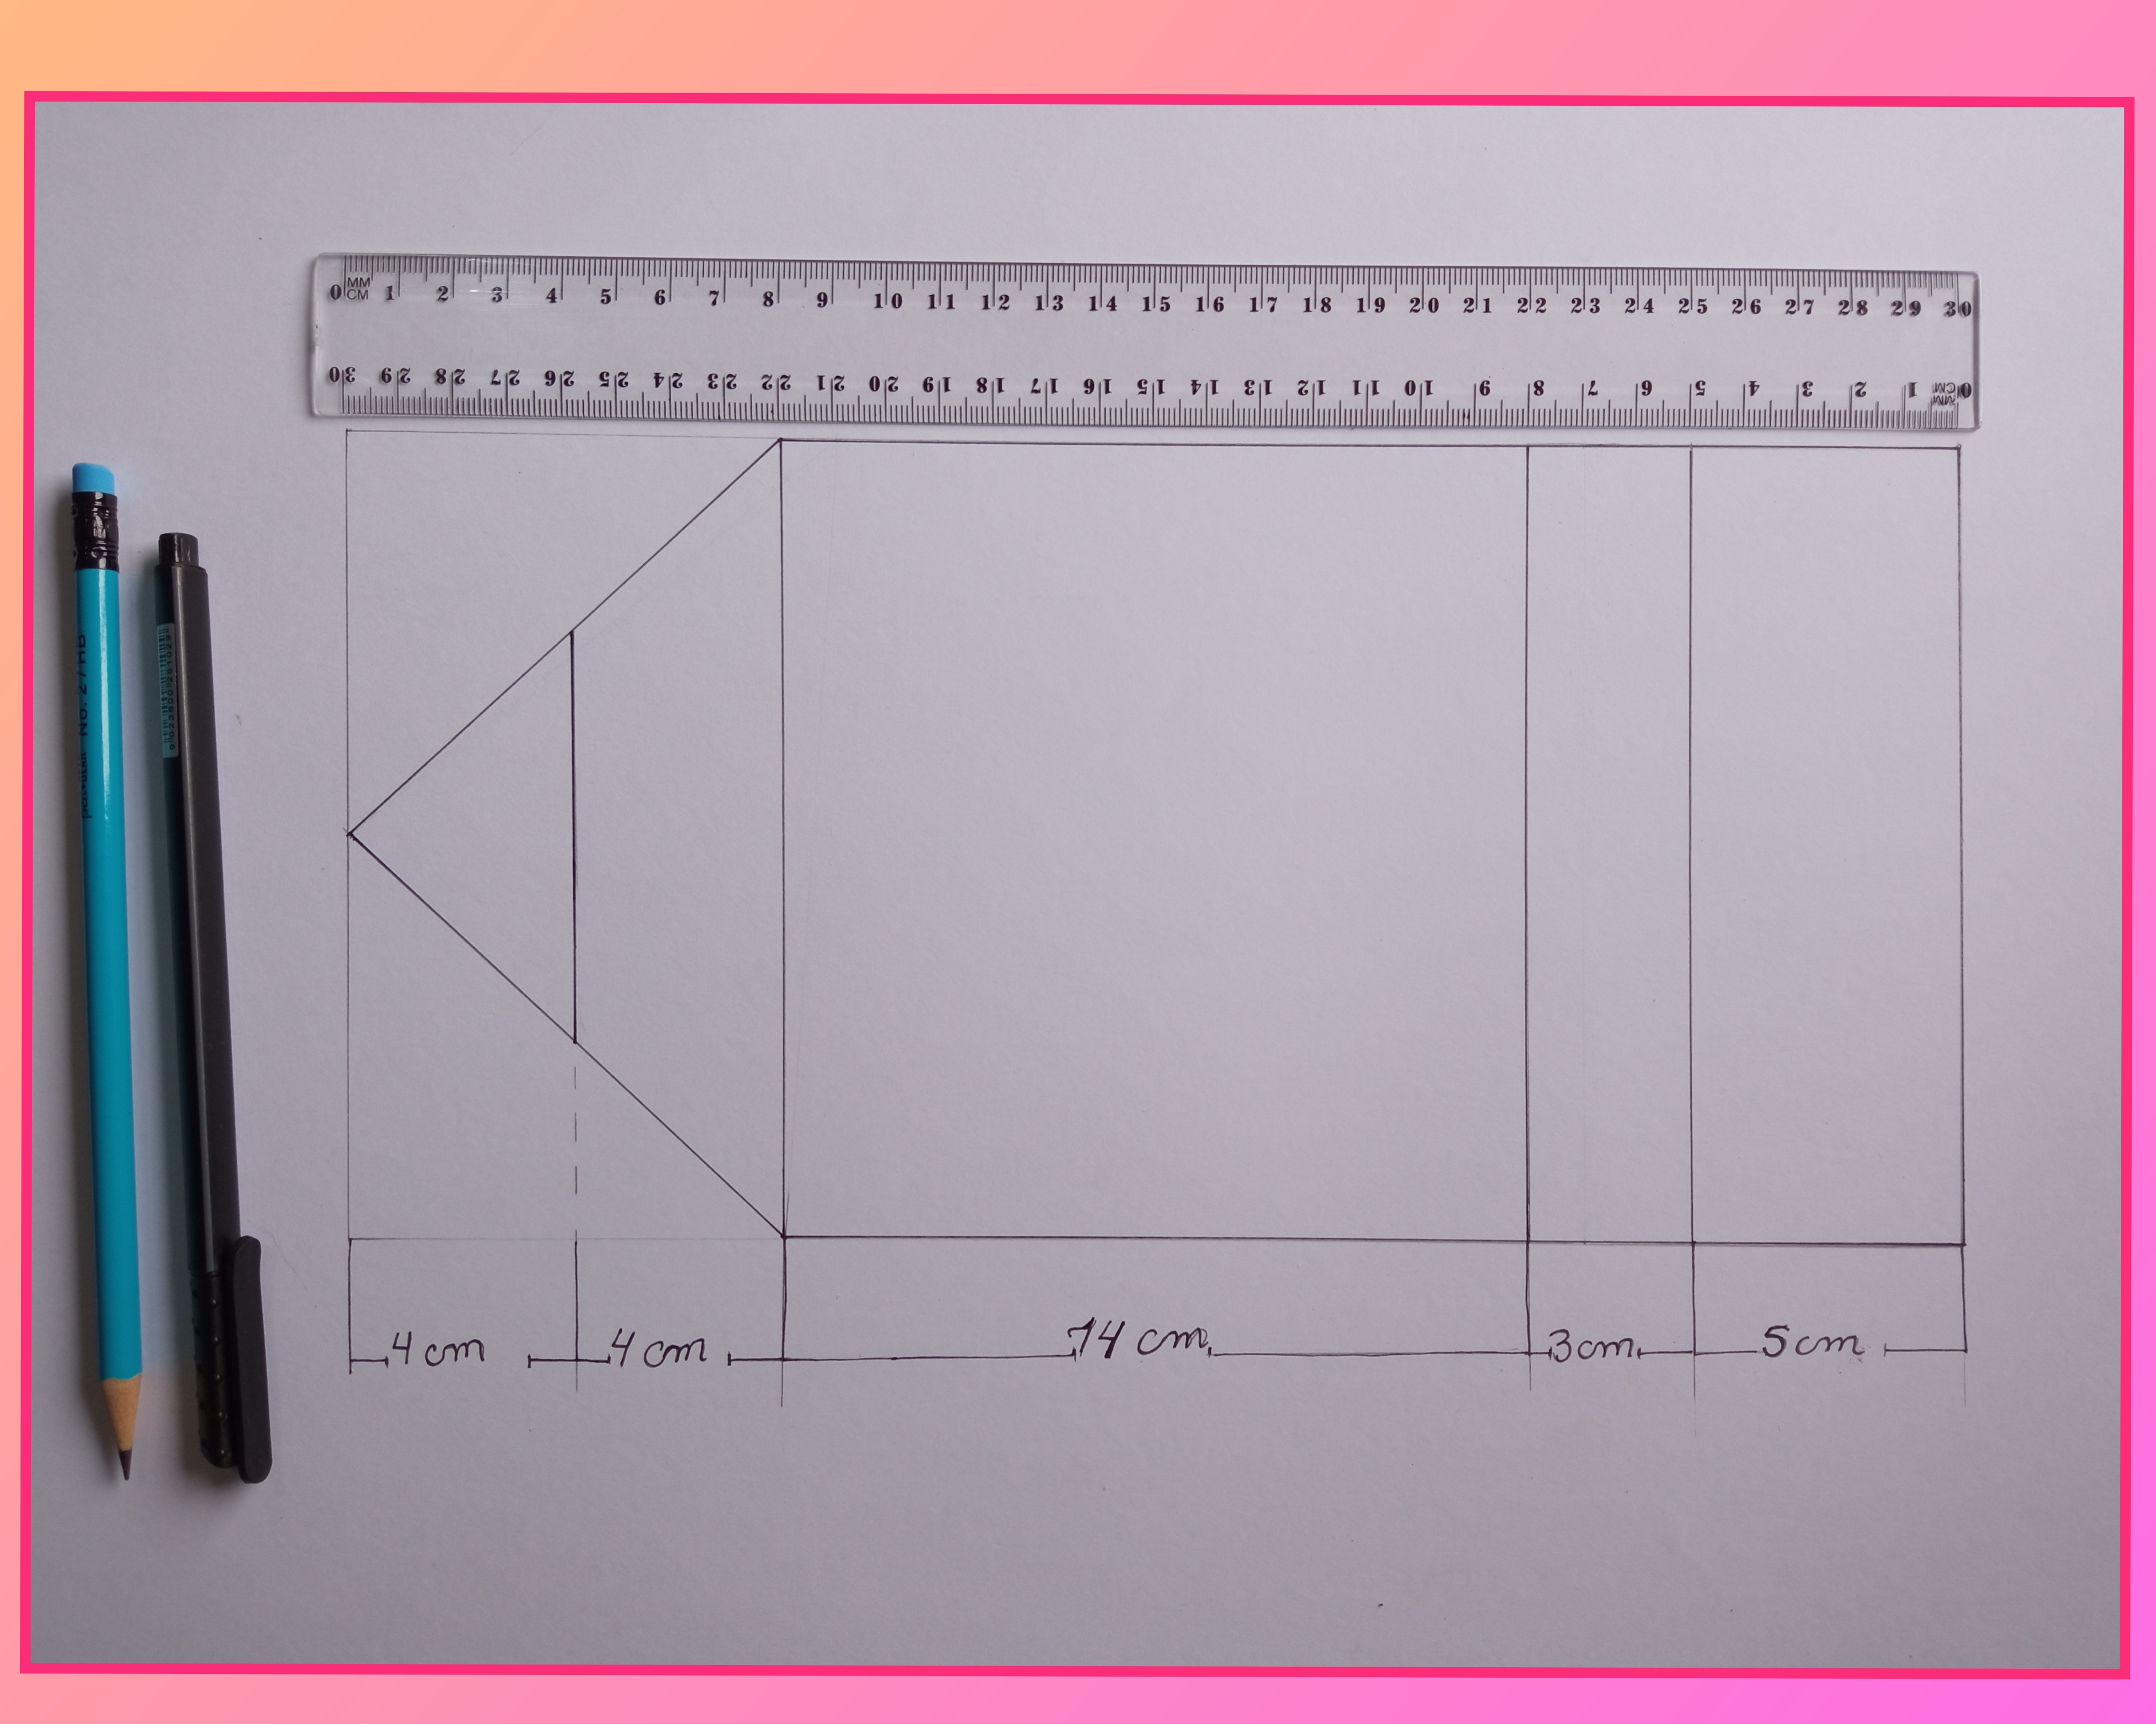
A continuación les voy a compartir el patrón de la Cartuchera en forma de Lápiz ✏️ que yo diseñe con medidas para que sea más fácil para ustedes.
Below I am going to share with you the Pencil Pencil Case pattern ✏️ that I designed with measurements to make it easier for you.
✏️ Elaboración:✏️ // ✏️ Elaboration:✏️
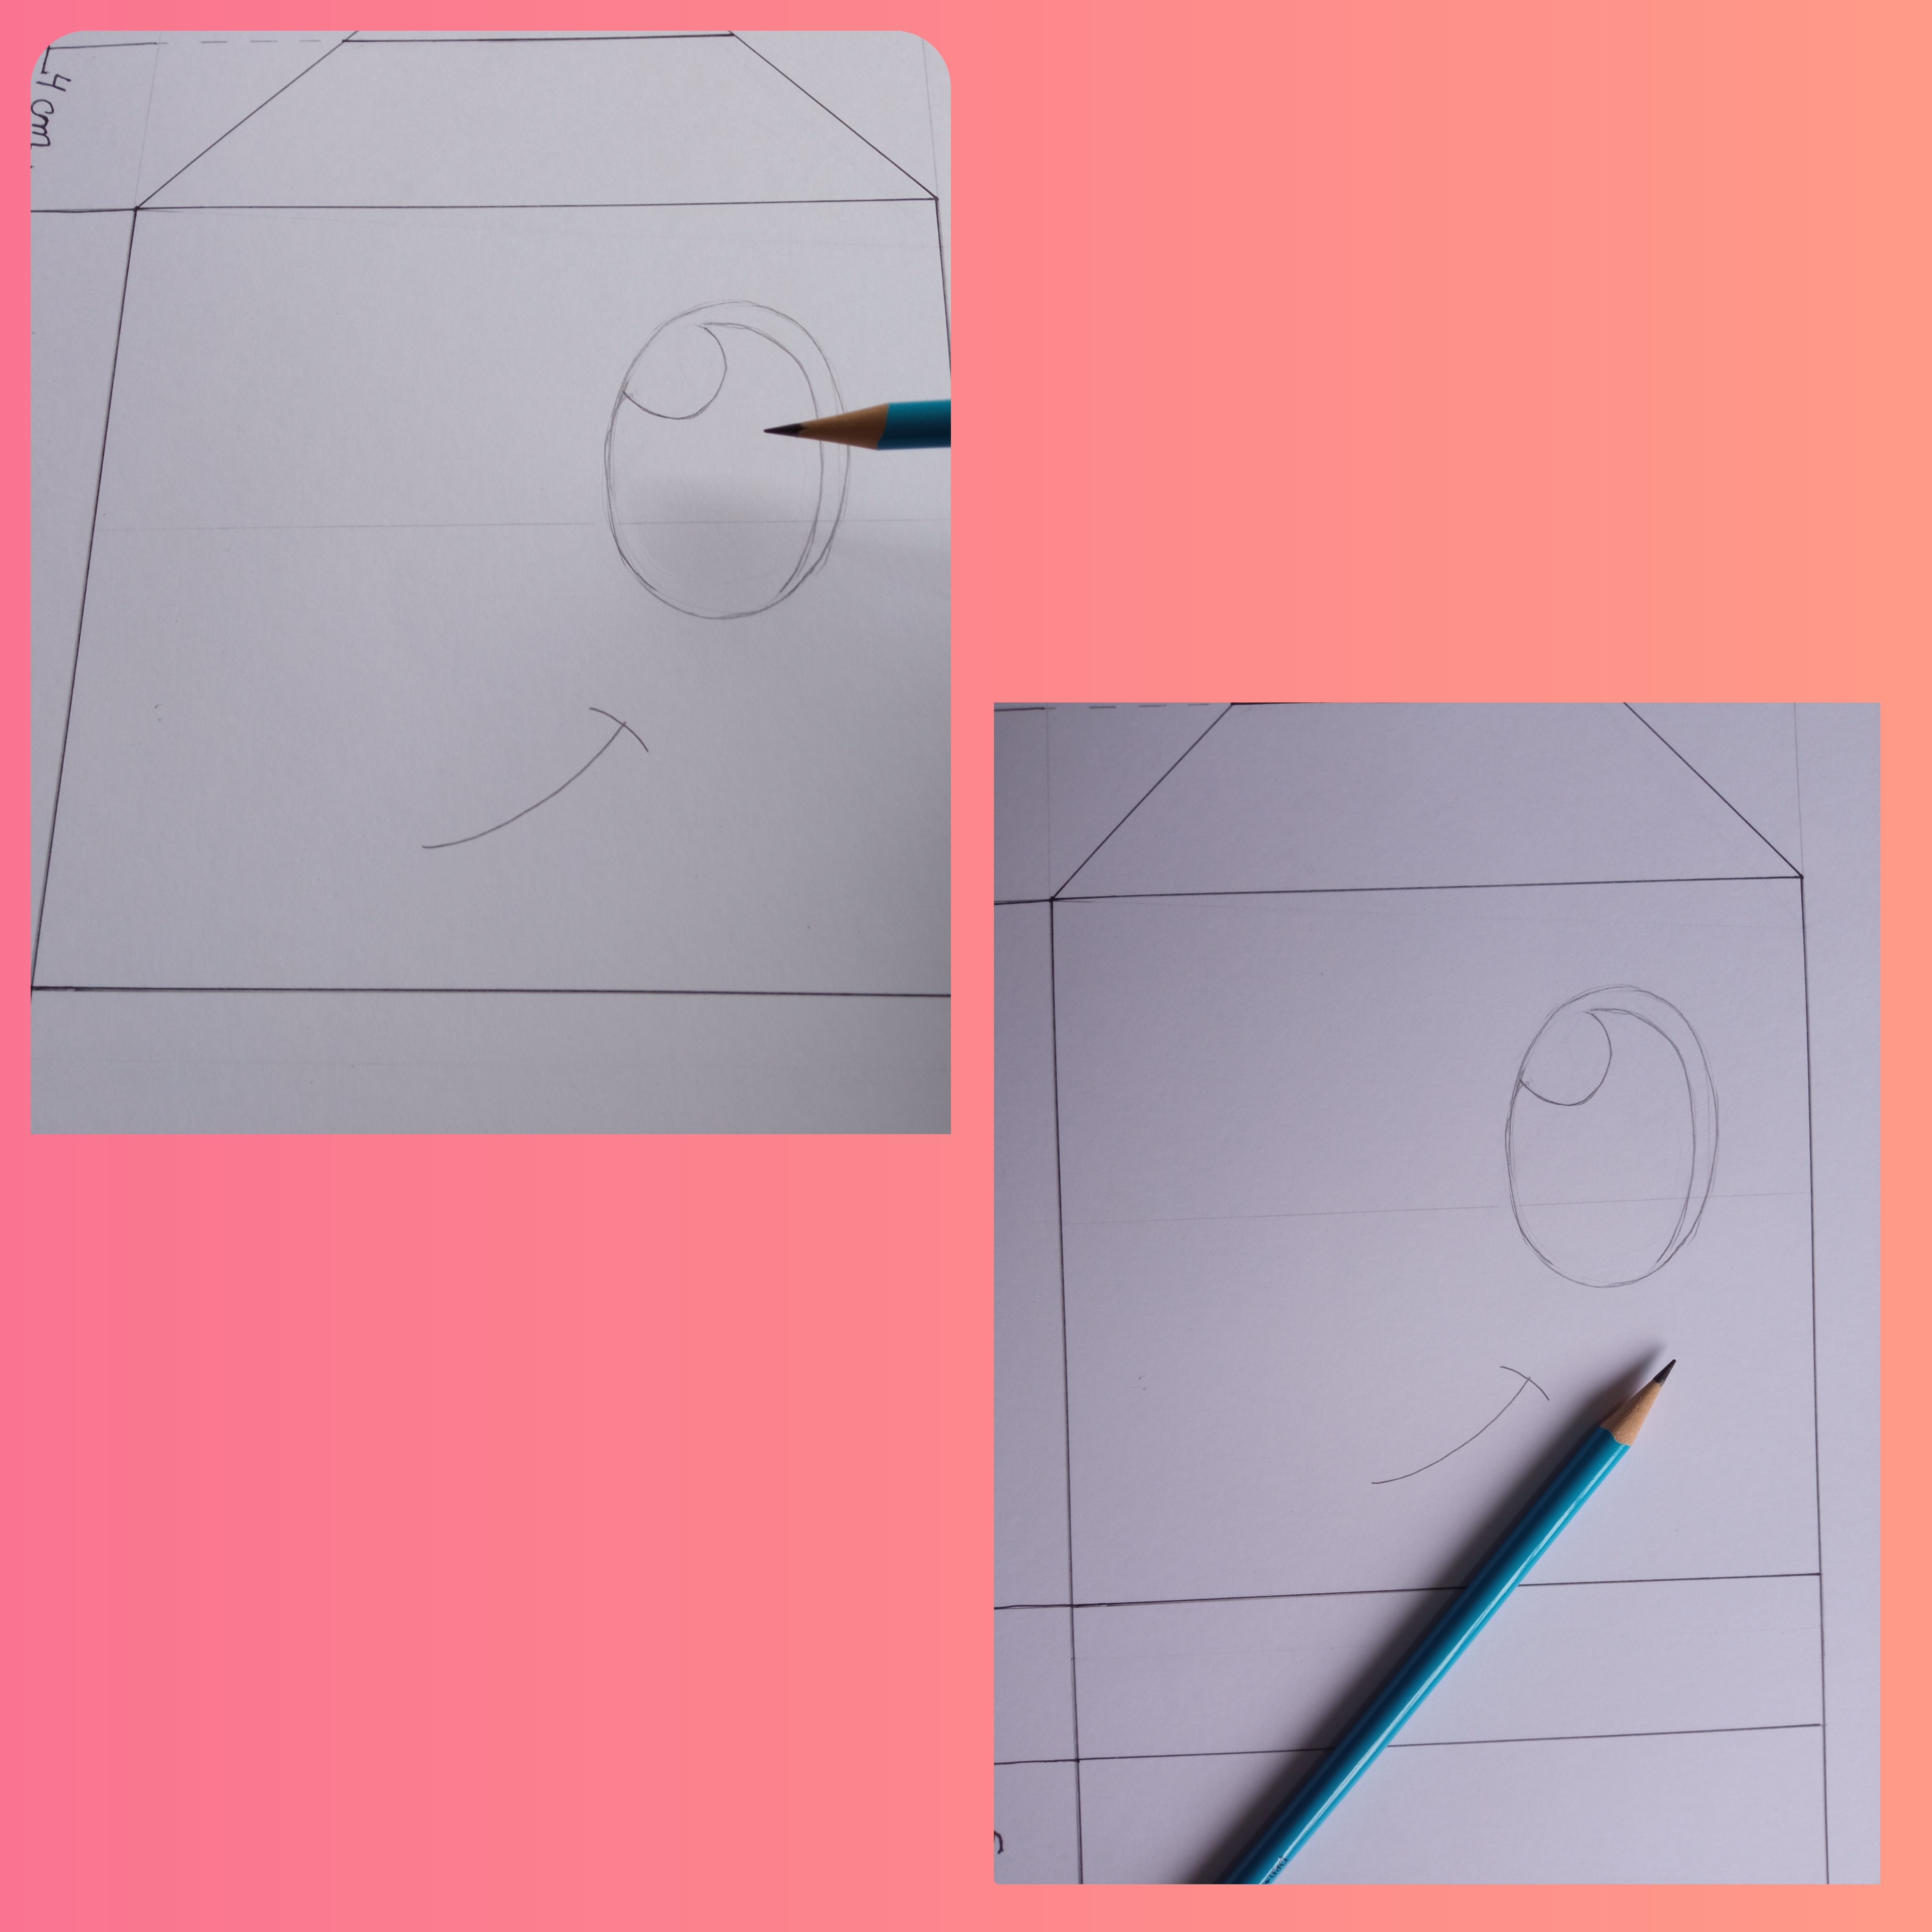
Paso 1:
Después de tener mi patrón terminado quise dibujarle unos ojos y una boca para darle personalidad a mi Cartuchera.
Step 1:
After I had my pattern finished I wanted to draw some eyes and a mouth to give personality to my pencil case.
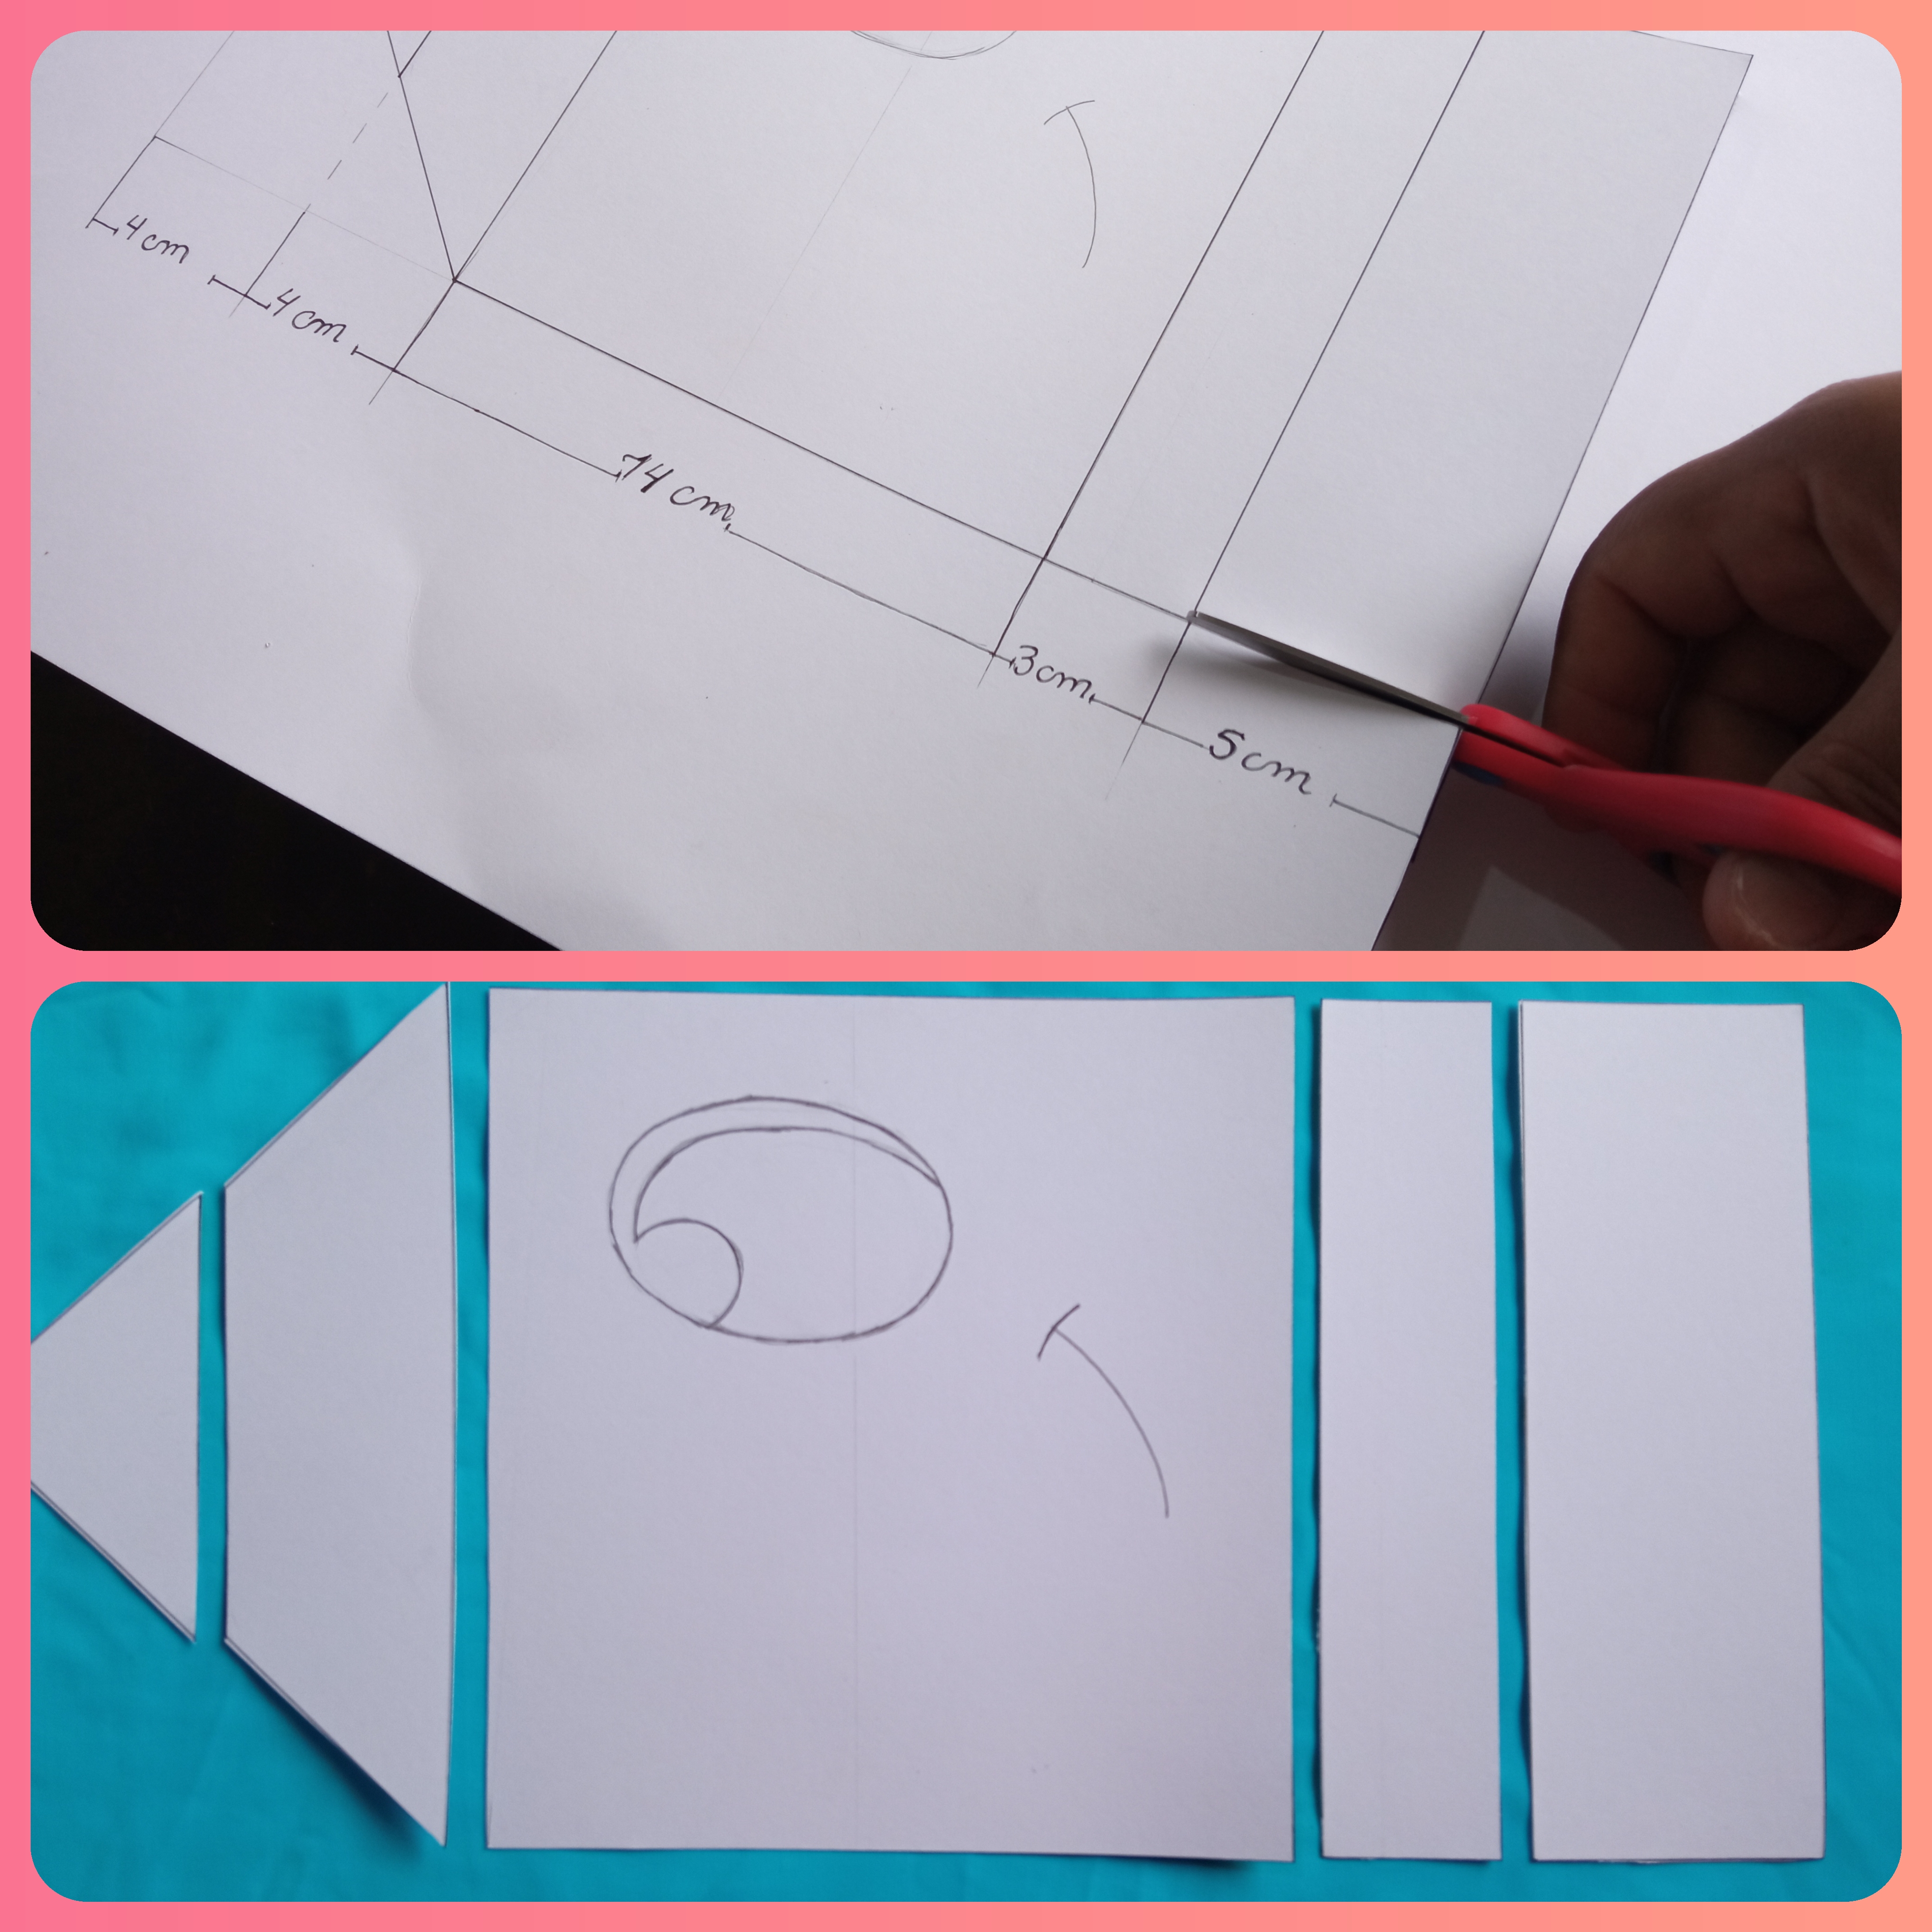
Paso 2:
Ahora recortó cada pieza del Lápiz ✏️ para que me sirva de patrón a la hora de córtalo en las telas.
Step 2:
I now cut out each piece from the Pencil ✏️ so that it will serve as a pattern for me when cutting it out of the fabrics.
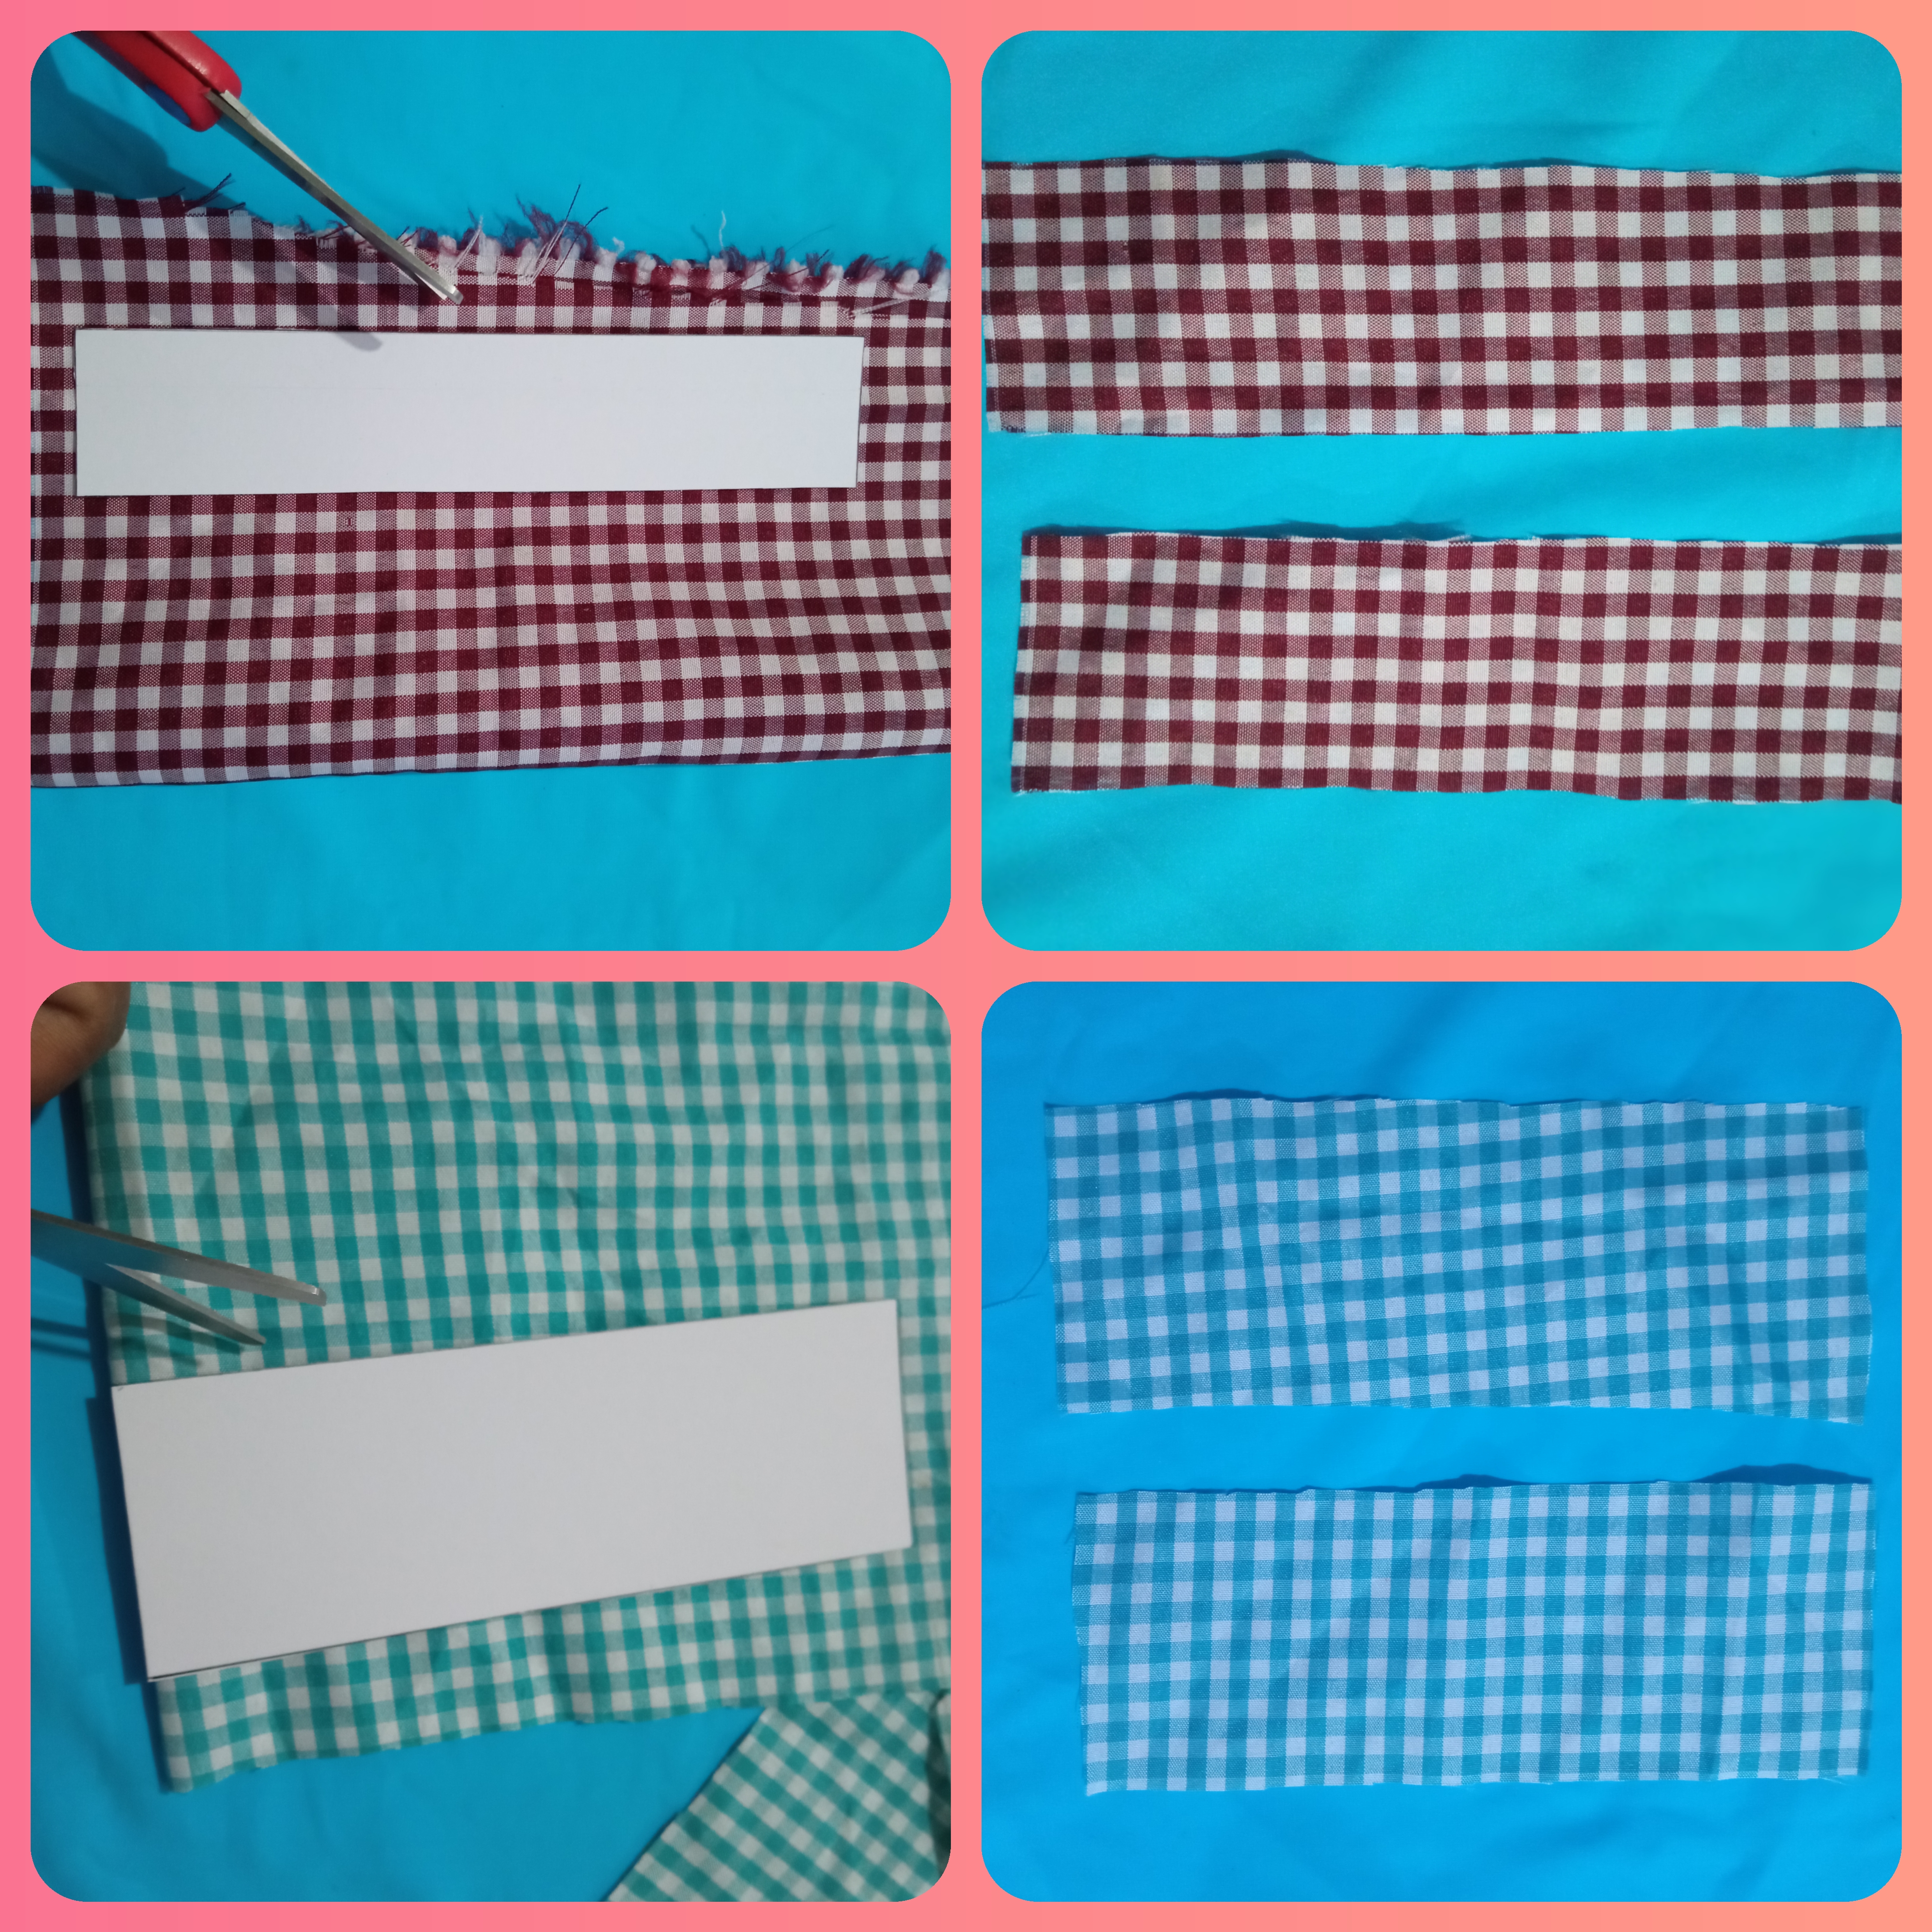
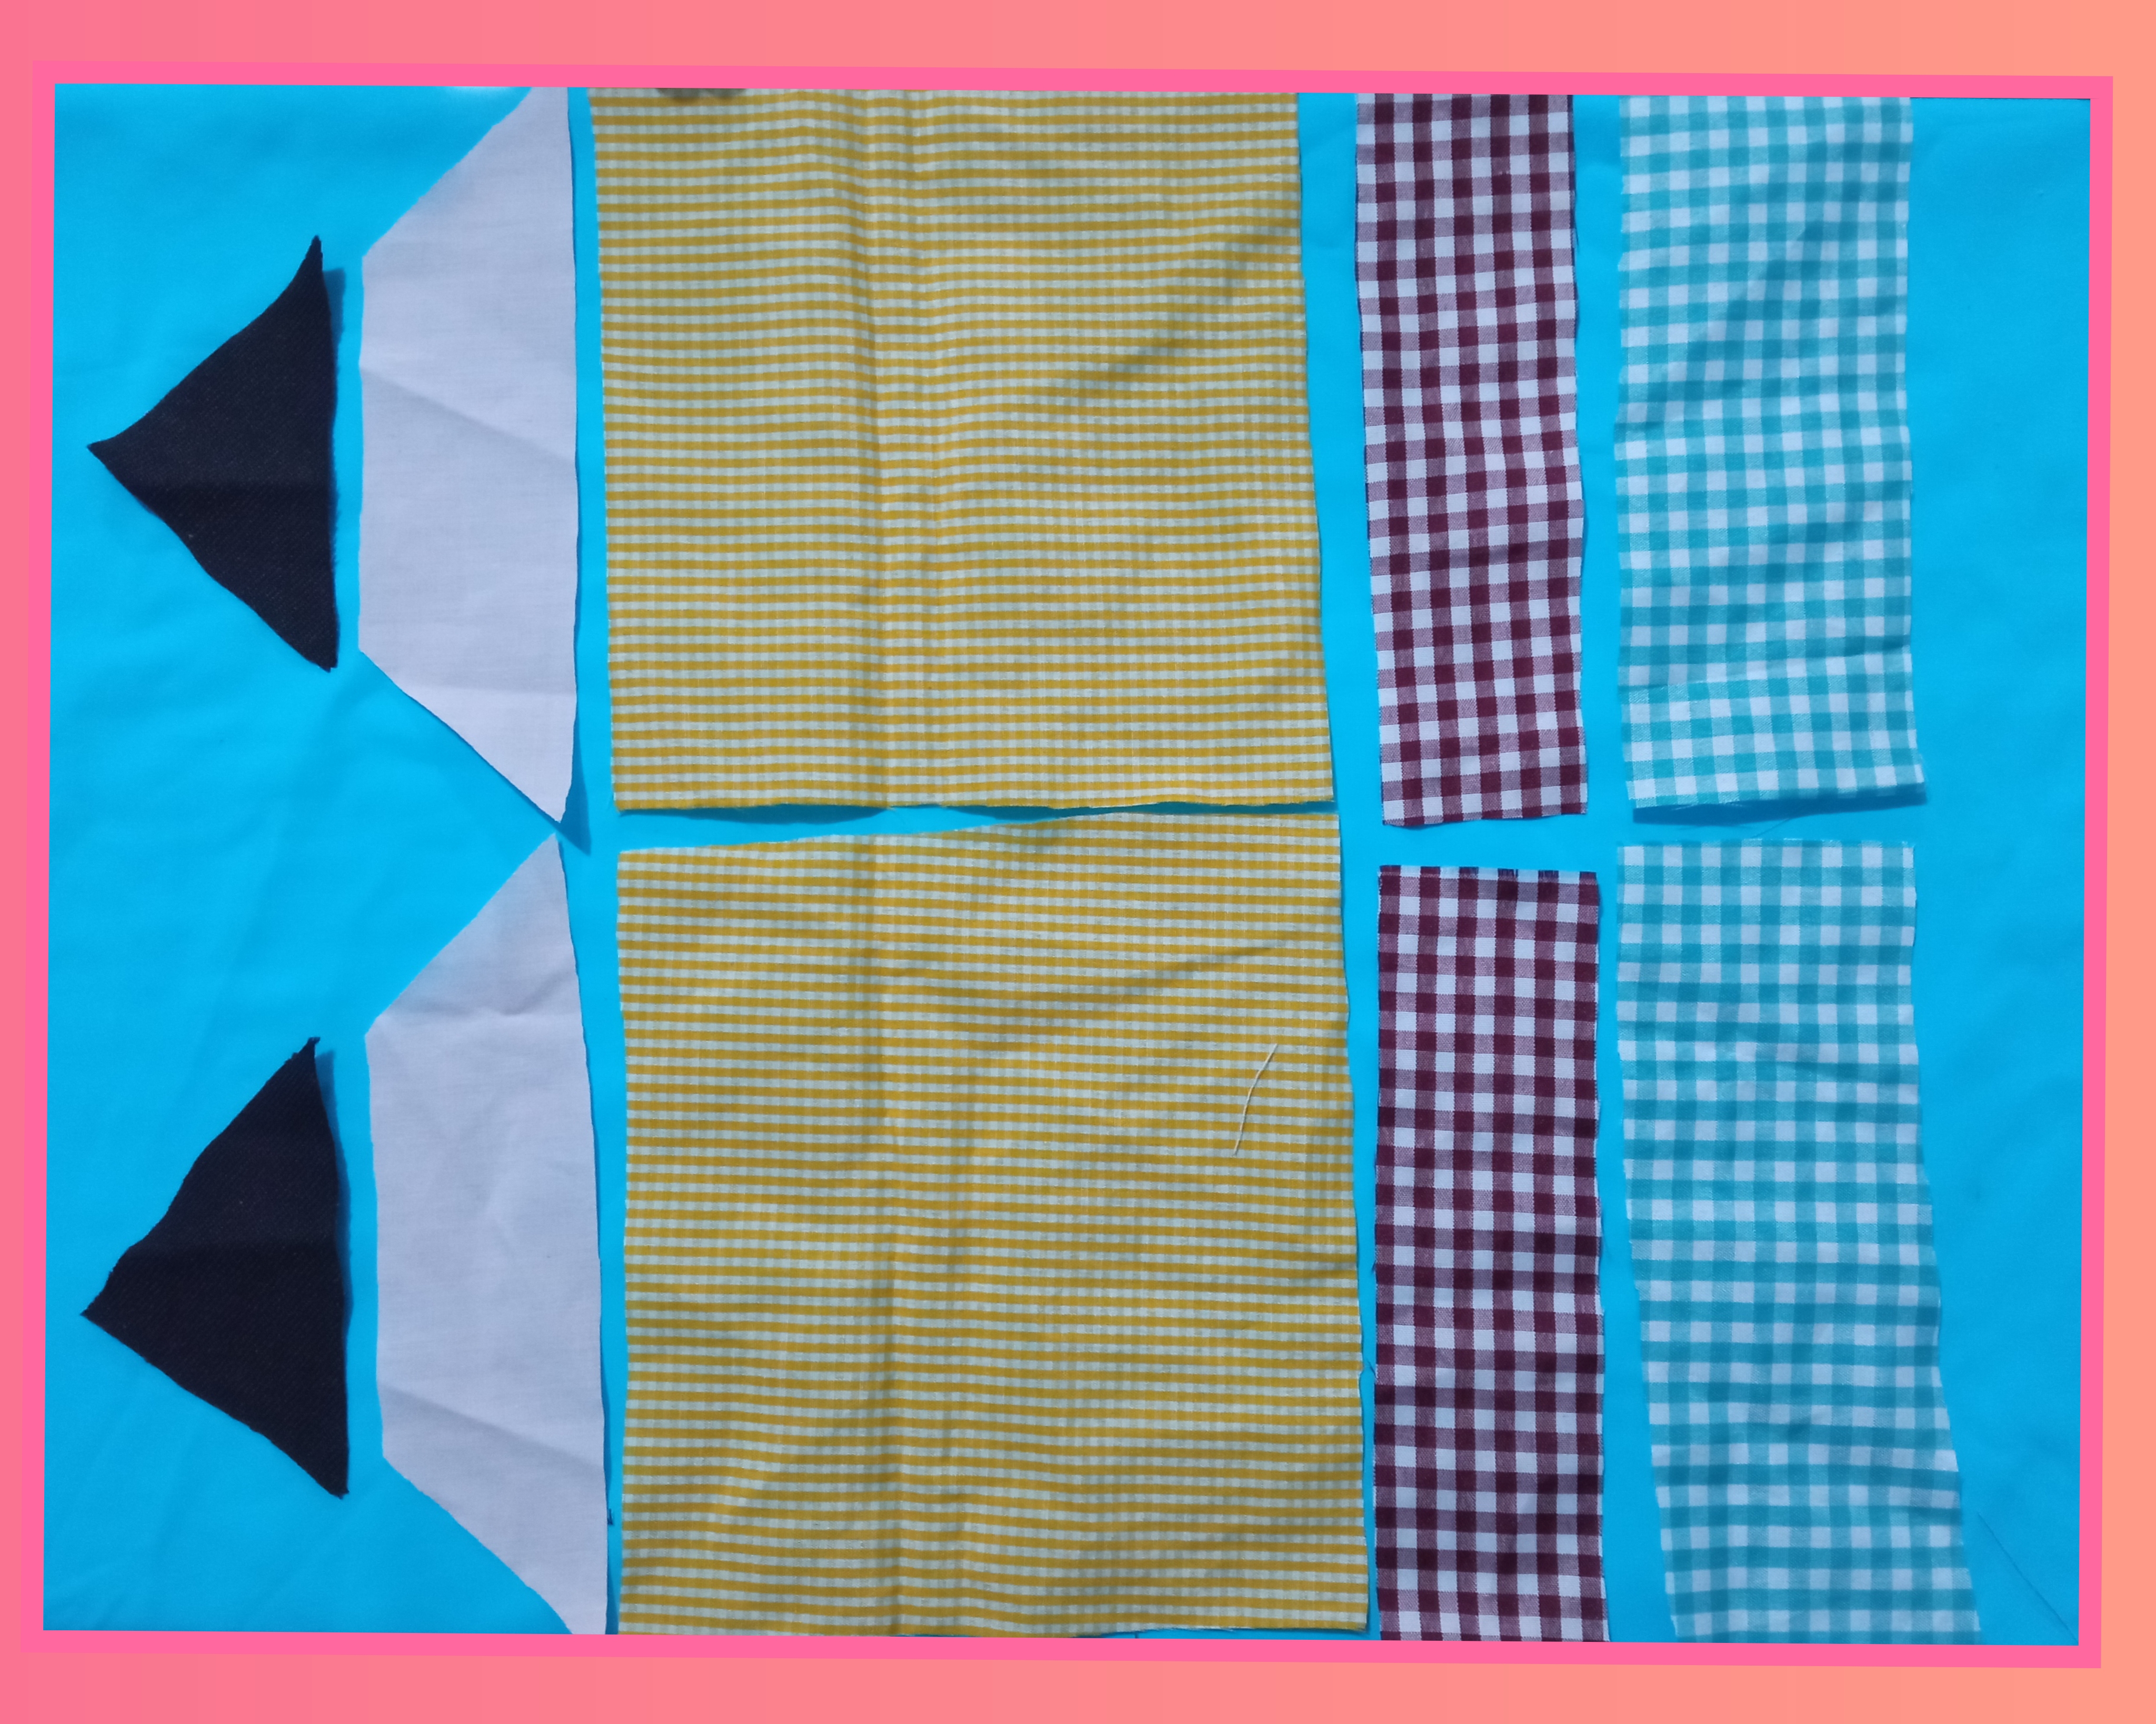
Paso 3:
Como podrán observar con la ayuda del patrón fui cortando 2 piezas de cada uno ya que mi cartuchera debe de tener dos caras.
Step 3:
As you can see, with the help of the pattern I cut 2 pieces of each one, since my pencil case must have two sides.

Paso 4:
Como ven ya corte cada pieza con la ayuda del patrón, organizamos para luego coser.
Step 4:
As you can see, I have already cut each piece with the help of the pattern, we organize it for later sewing.
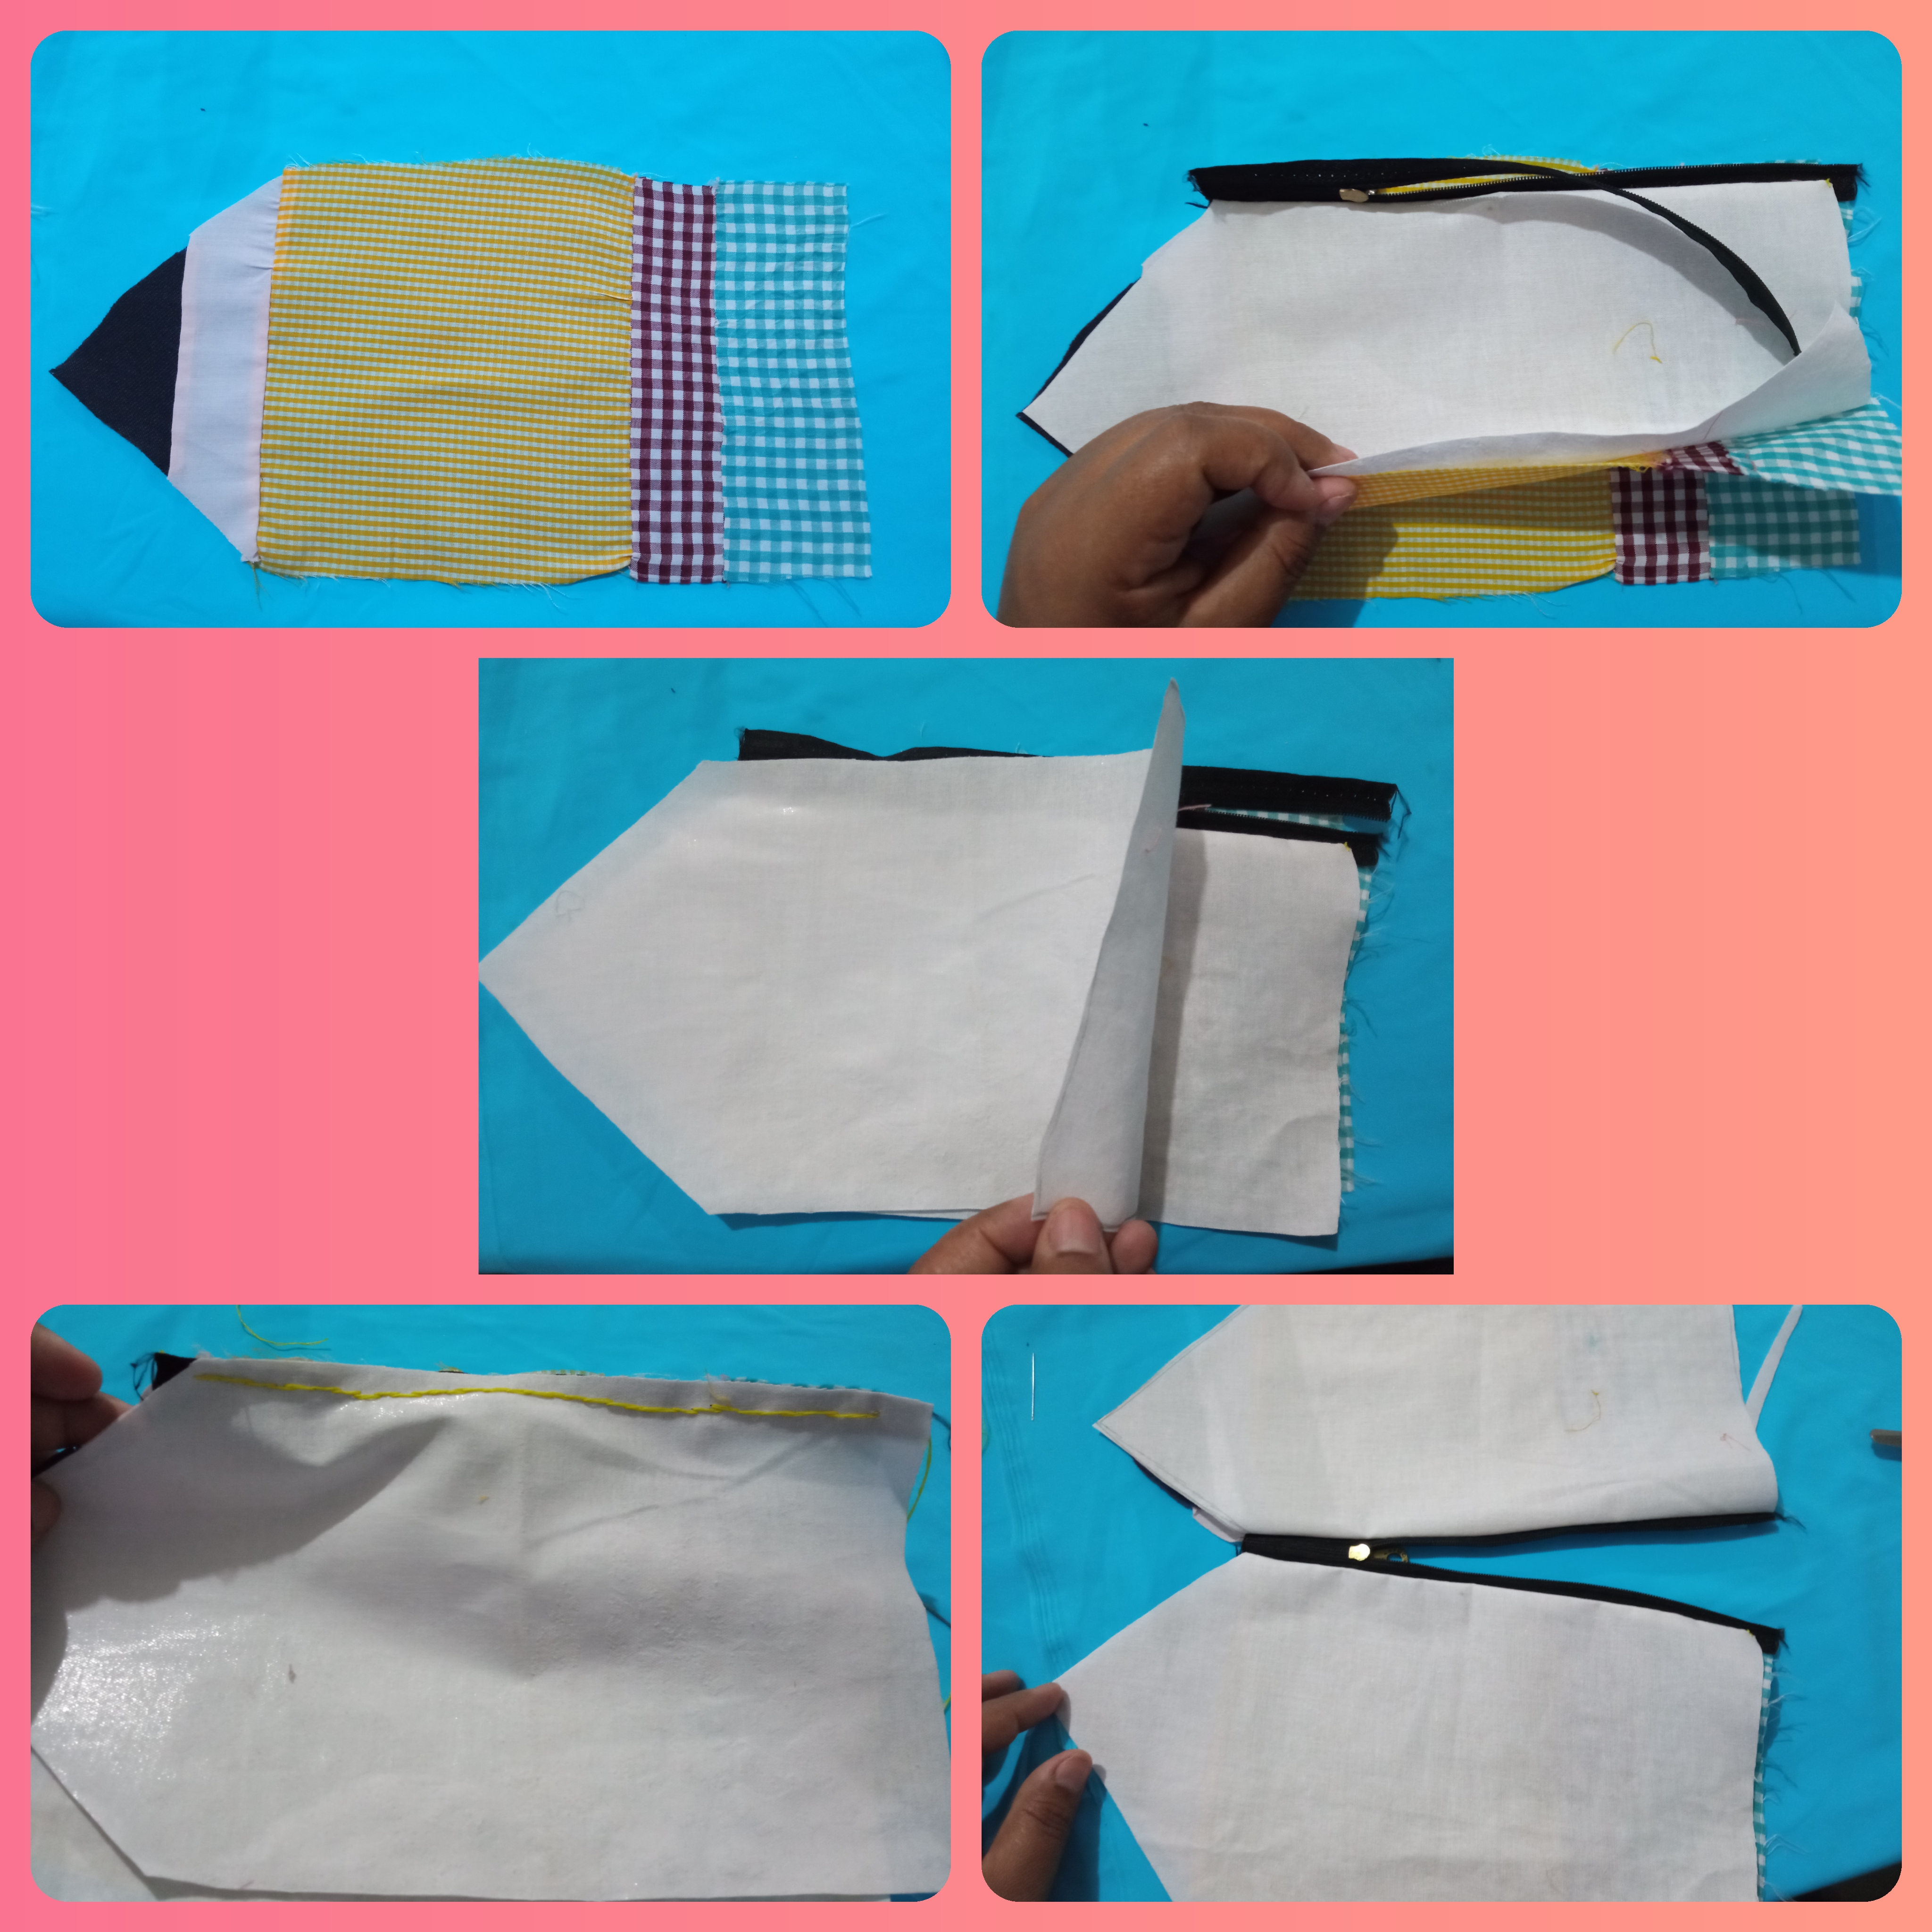
Paso 5:
Tomamos cada pieza unimos y cosemos una a una hasta formar nuestro Lápiz ✏️, luego repetimos el proceso para obtener la otra cara del Lápiz ✏️.
Step 5:
We take each piece we join and sew one by one until we form our ✏️ Pencil, then we repeat the process to get the other side of the ✏️ Pencil.


Paso 6:
Con la ayuda del patrón cortamos dos piezas en la tela blanca que nos servirá de forro, tomamos una pieza del Lápiz ✏️ montamos el cierre luego montamos una pieza del forro y cosemos horizontal harta terminar de coser el cierre así como le muestro en la imagen. Luego pasamos el forro hacia atrás.
Step 6:
With the help of the pattern we cut two pieces in the white fabric that will serve us as lining, we take a piece of the Pencil ✏️ we assemble the zipper then we assemble a piece of the lining and sew horizontal harta finish sewing the zipper as I show you in the image. Then we pass the lining backwards.


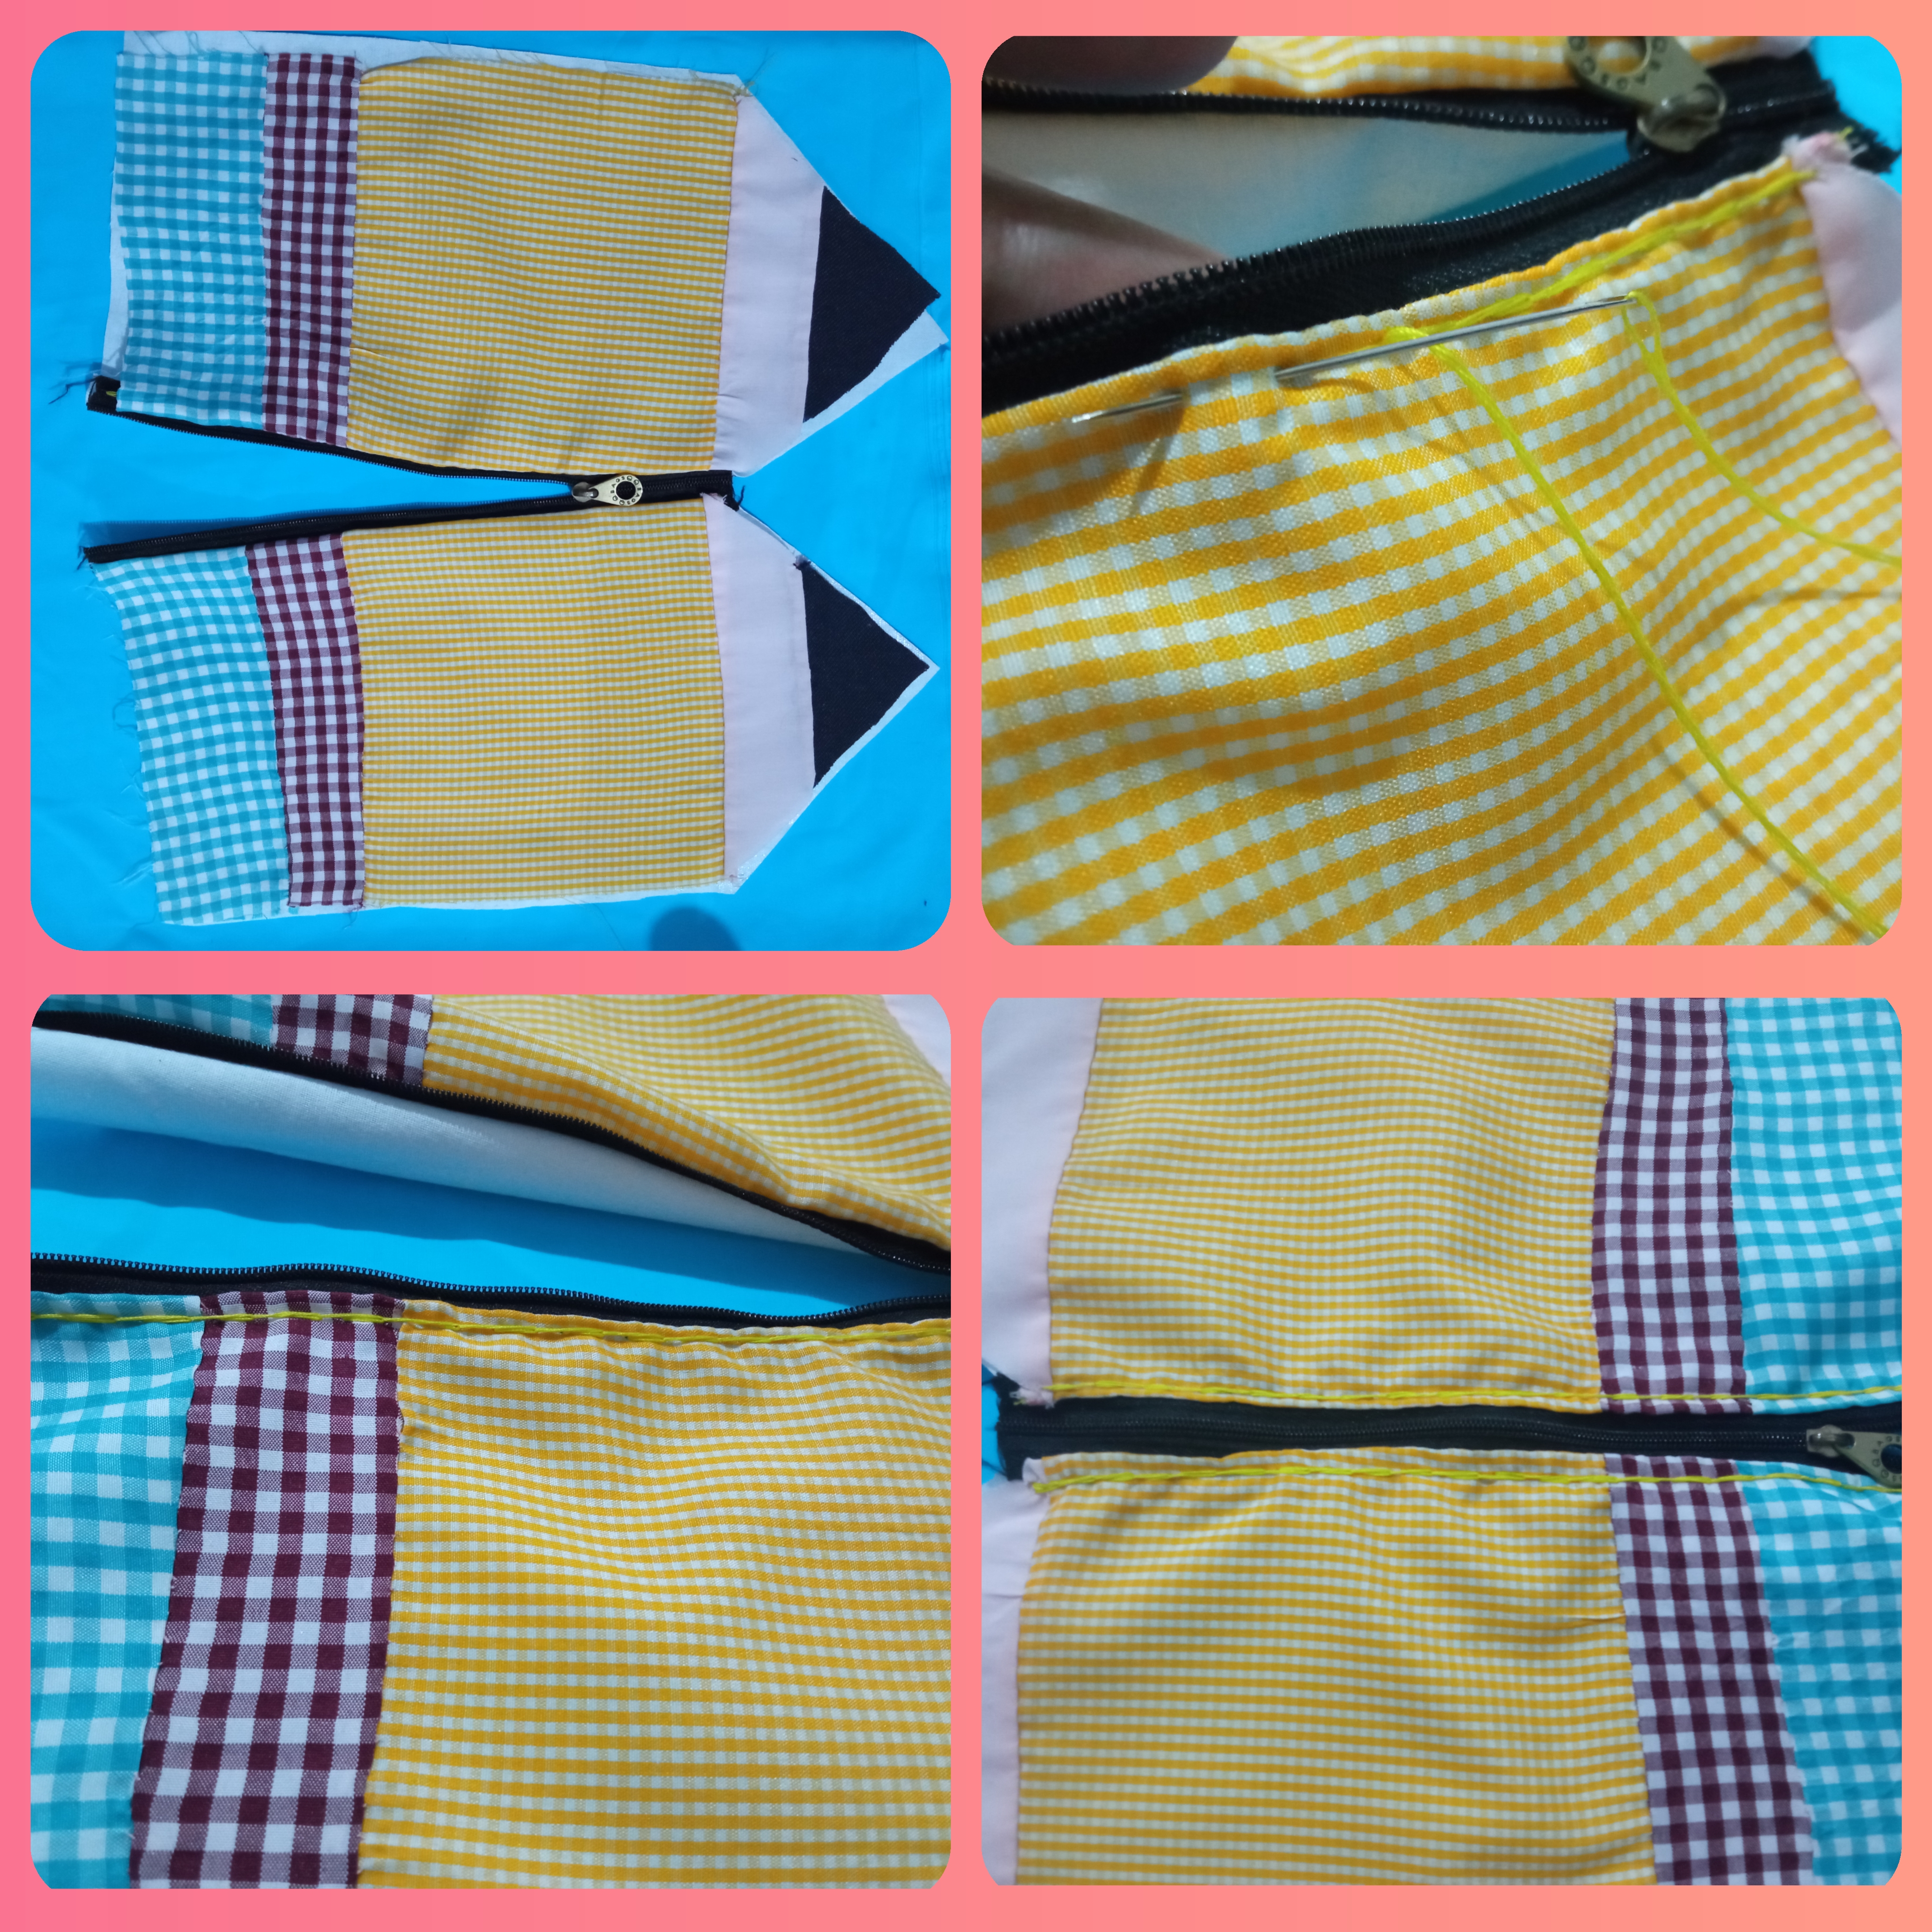
Paso 7:
Ya cosida la primera cara más forro a mi cierre monto la otra cara del Lápiz a la otra parte del cierre luego el forro y cosemos, como ven ya las dos caras están cosida al cierre.
Step 7:
Once the first side plus lining is sewn to my zipper, I sew the other side of the pencil to the other side of the zipper, then the lining and we sew, as you can see the two sides are already sewn to the zipper.
Paso 8:
Volteamos al lado derecho y pisamos la tela del cierre cociendo de ambos lados así como le muestro en la imagen.
Step 8:
We flip it to the right side and step on the fabric of the zipper by sewing on both sides as shown in the picture.
Paso 9:
Vamos a cerrar nuestra cartuchera así que unimos con el derecho de frente hacia dentro y cosemos, luego volteamos la cartuchera por la parte del cierre y como pueden ver está casi terminada.
Step 9:
We are going to close our pencil case so we join with the right side facing in and sew, then we flip the pencil case over on the zipper side and as you can see it is almost finished.

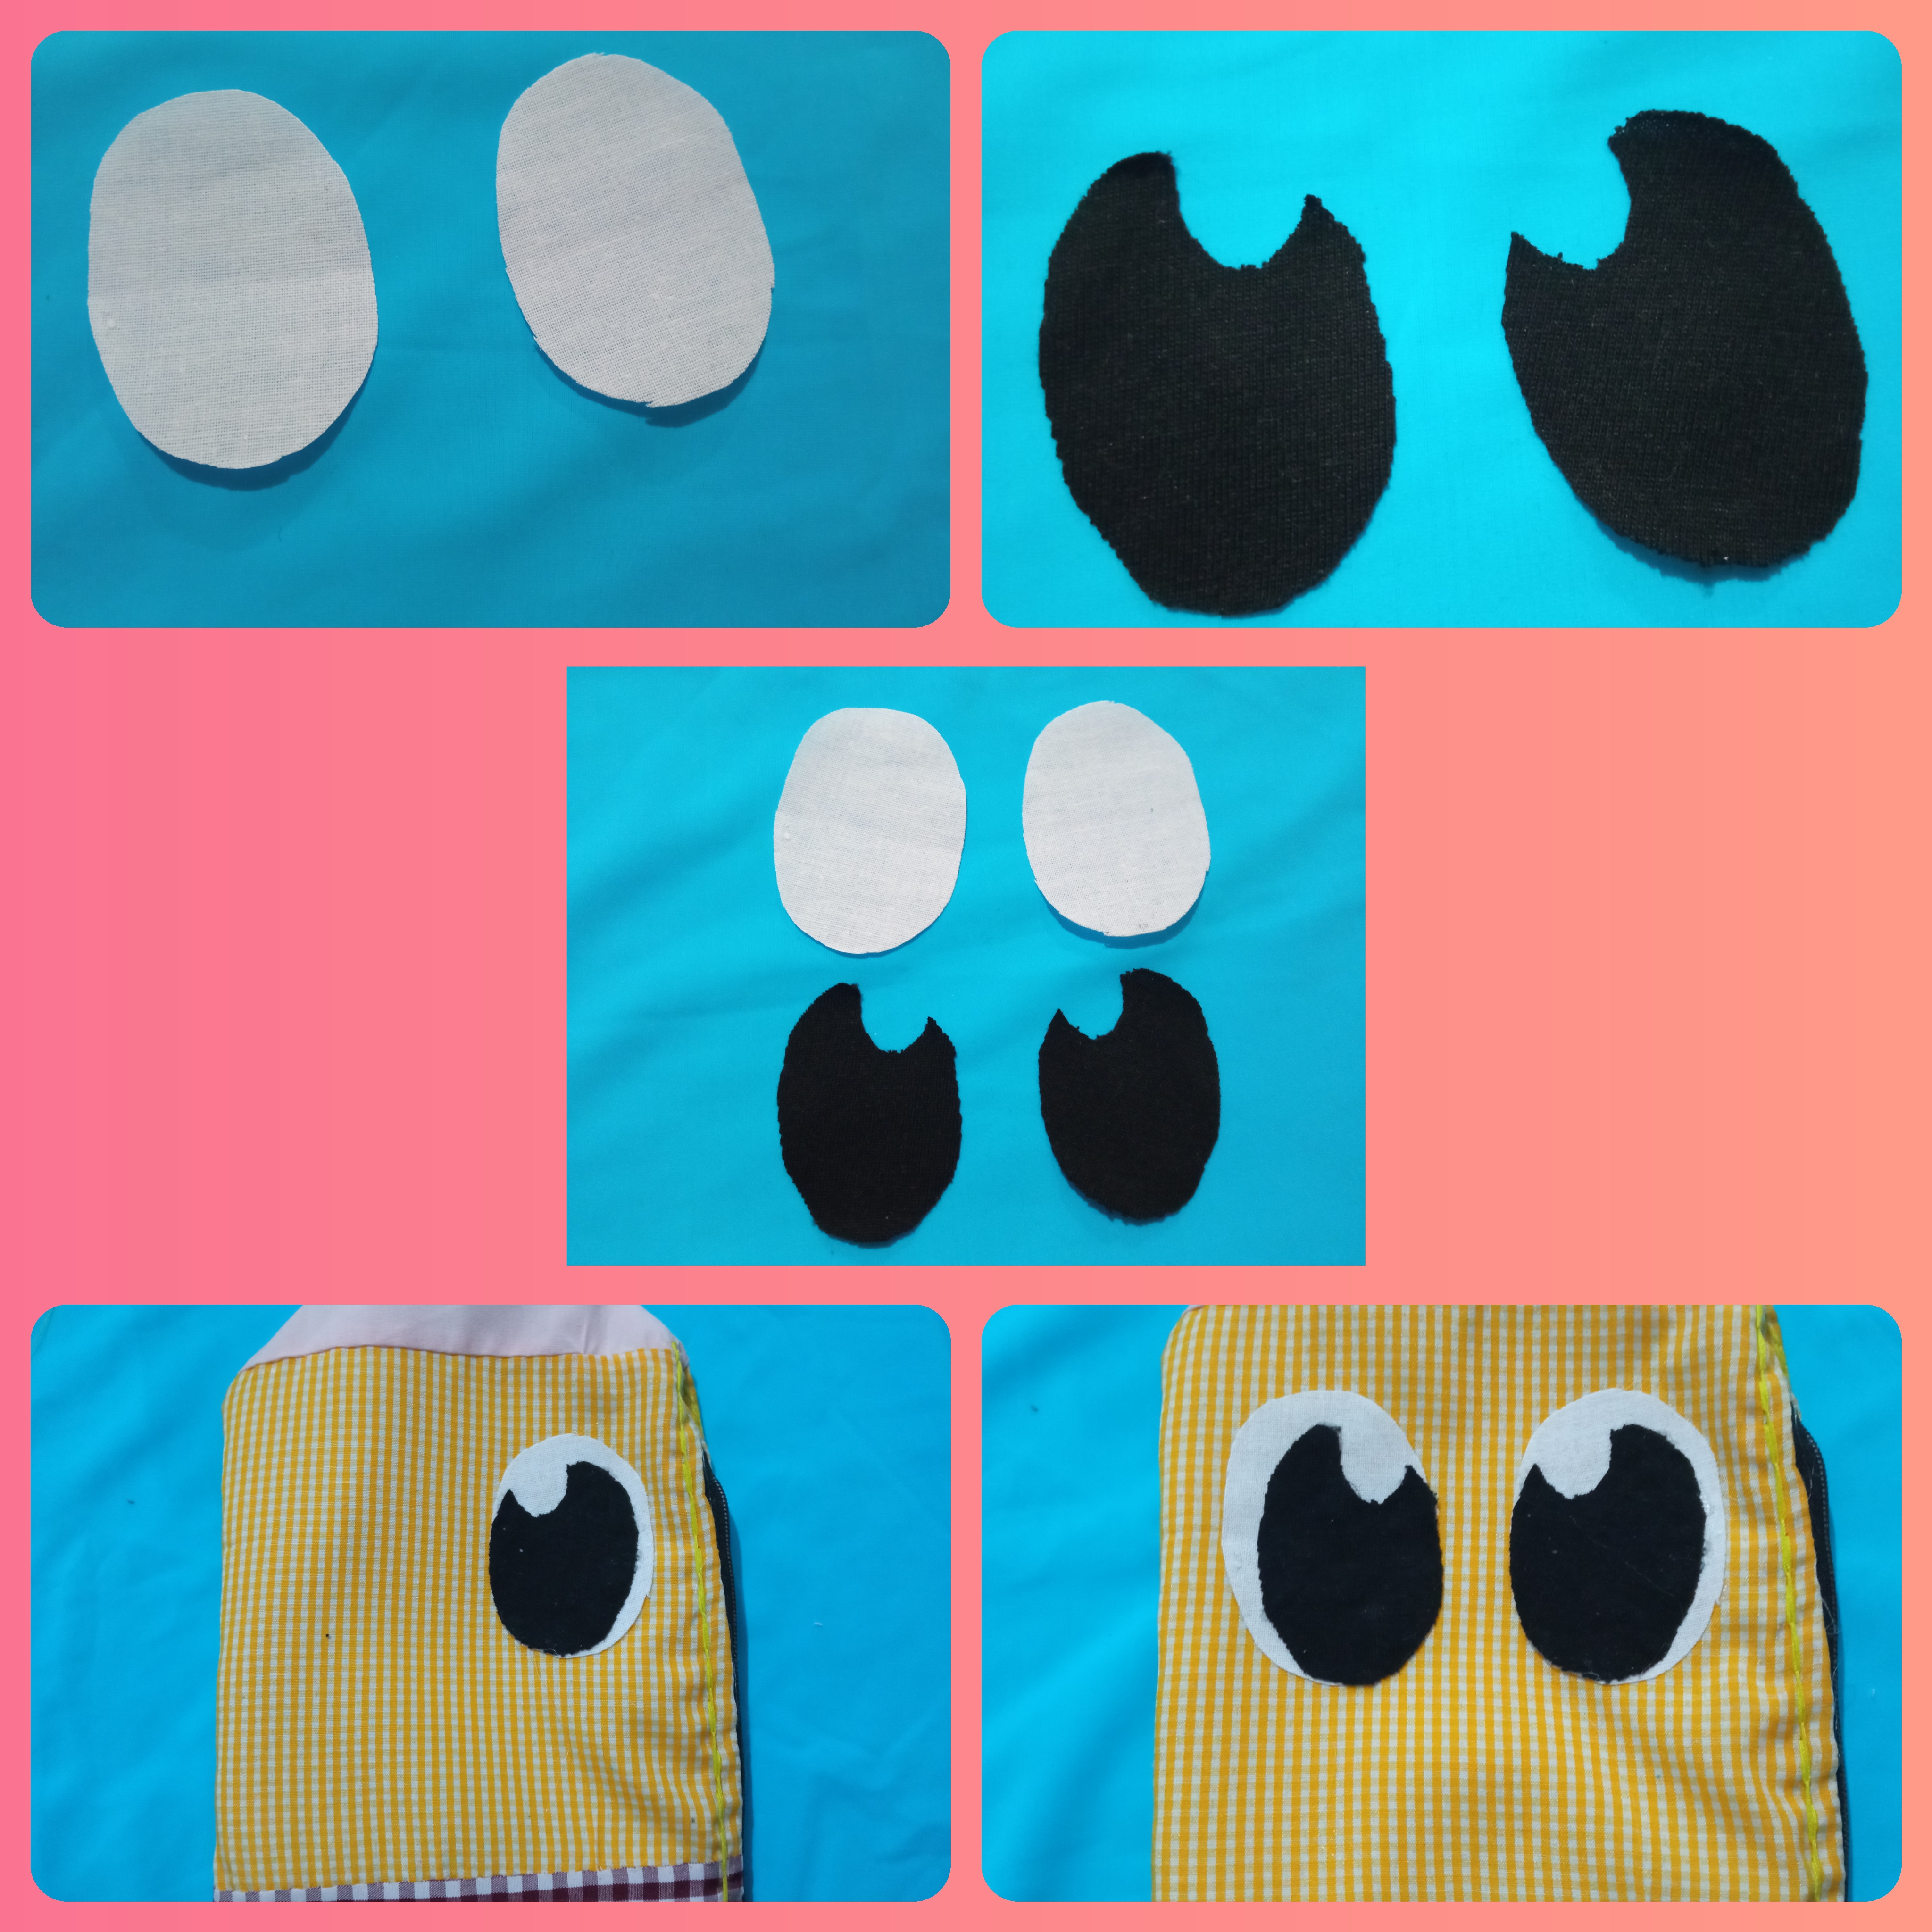
Paso 10:
Con la ayuda de los patrones cortamos los ojos, luego lo ubicamos en la cara del Lápiz ✏️ cosemos con puntadas pequeñas para que no se vea, pero si prefieren pegarlo con silicon caliente es válido.
Step 10:
With the help of the patterns we cut out the eyes, then we place it on the face of the Pencil ✏️ we sew with small stitches so that it is not visible, but if you prefer to glue it with hot silicon it is valid.
Paso 11:
Para finalizar dibujamos la boca con un lápiz luego bordamos con hilo rojo.
Step 11:
Finally, we draw the mouth with a pencil and then embroider it with red thread.

¡Ya mi Hermosa 😍 Cartuchera en Forma de Lápiz ✏️ está Terminada! // My beautiful 😍 Pencil Case ✏️ is finished!
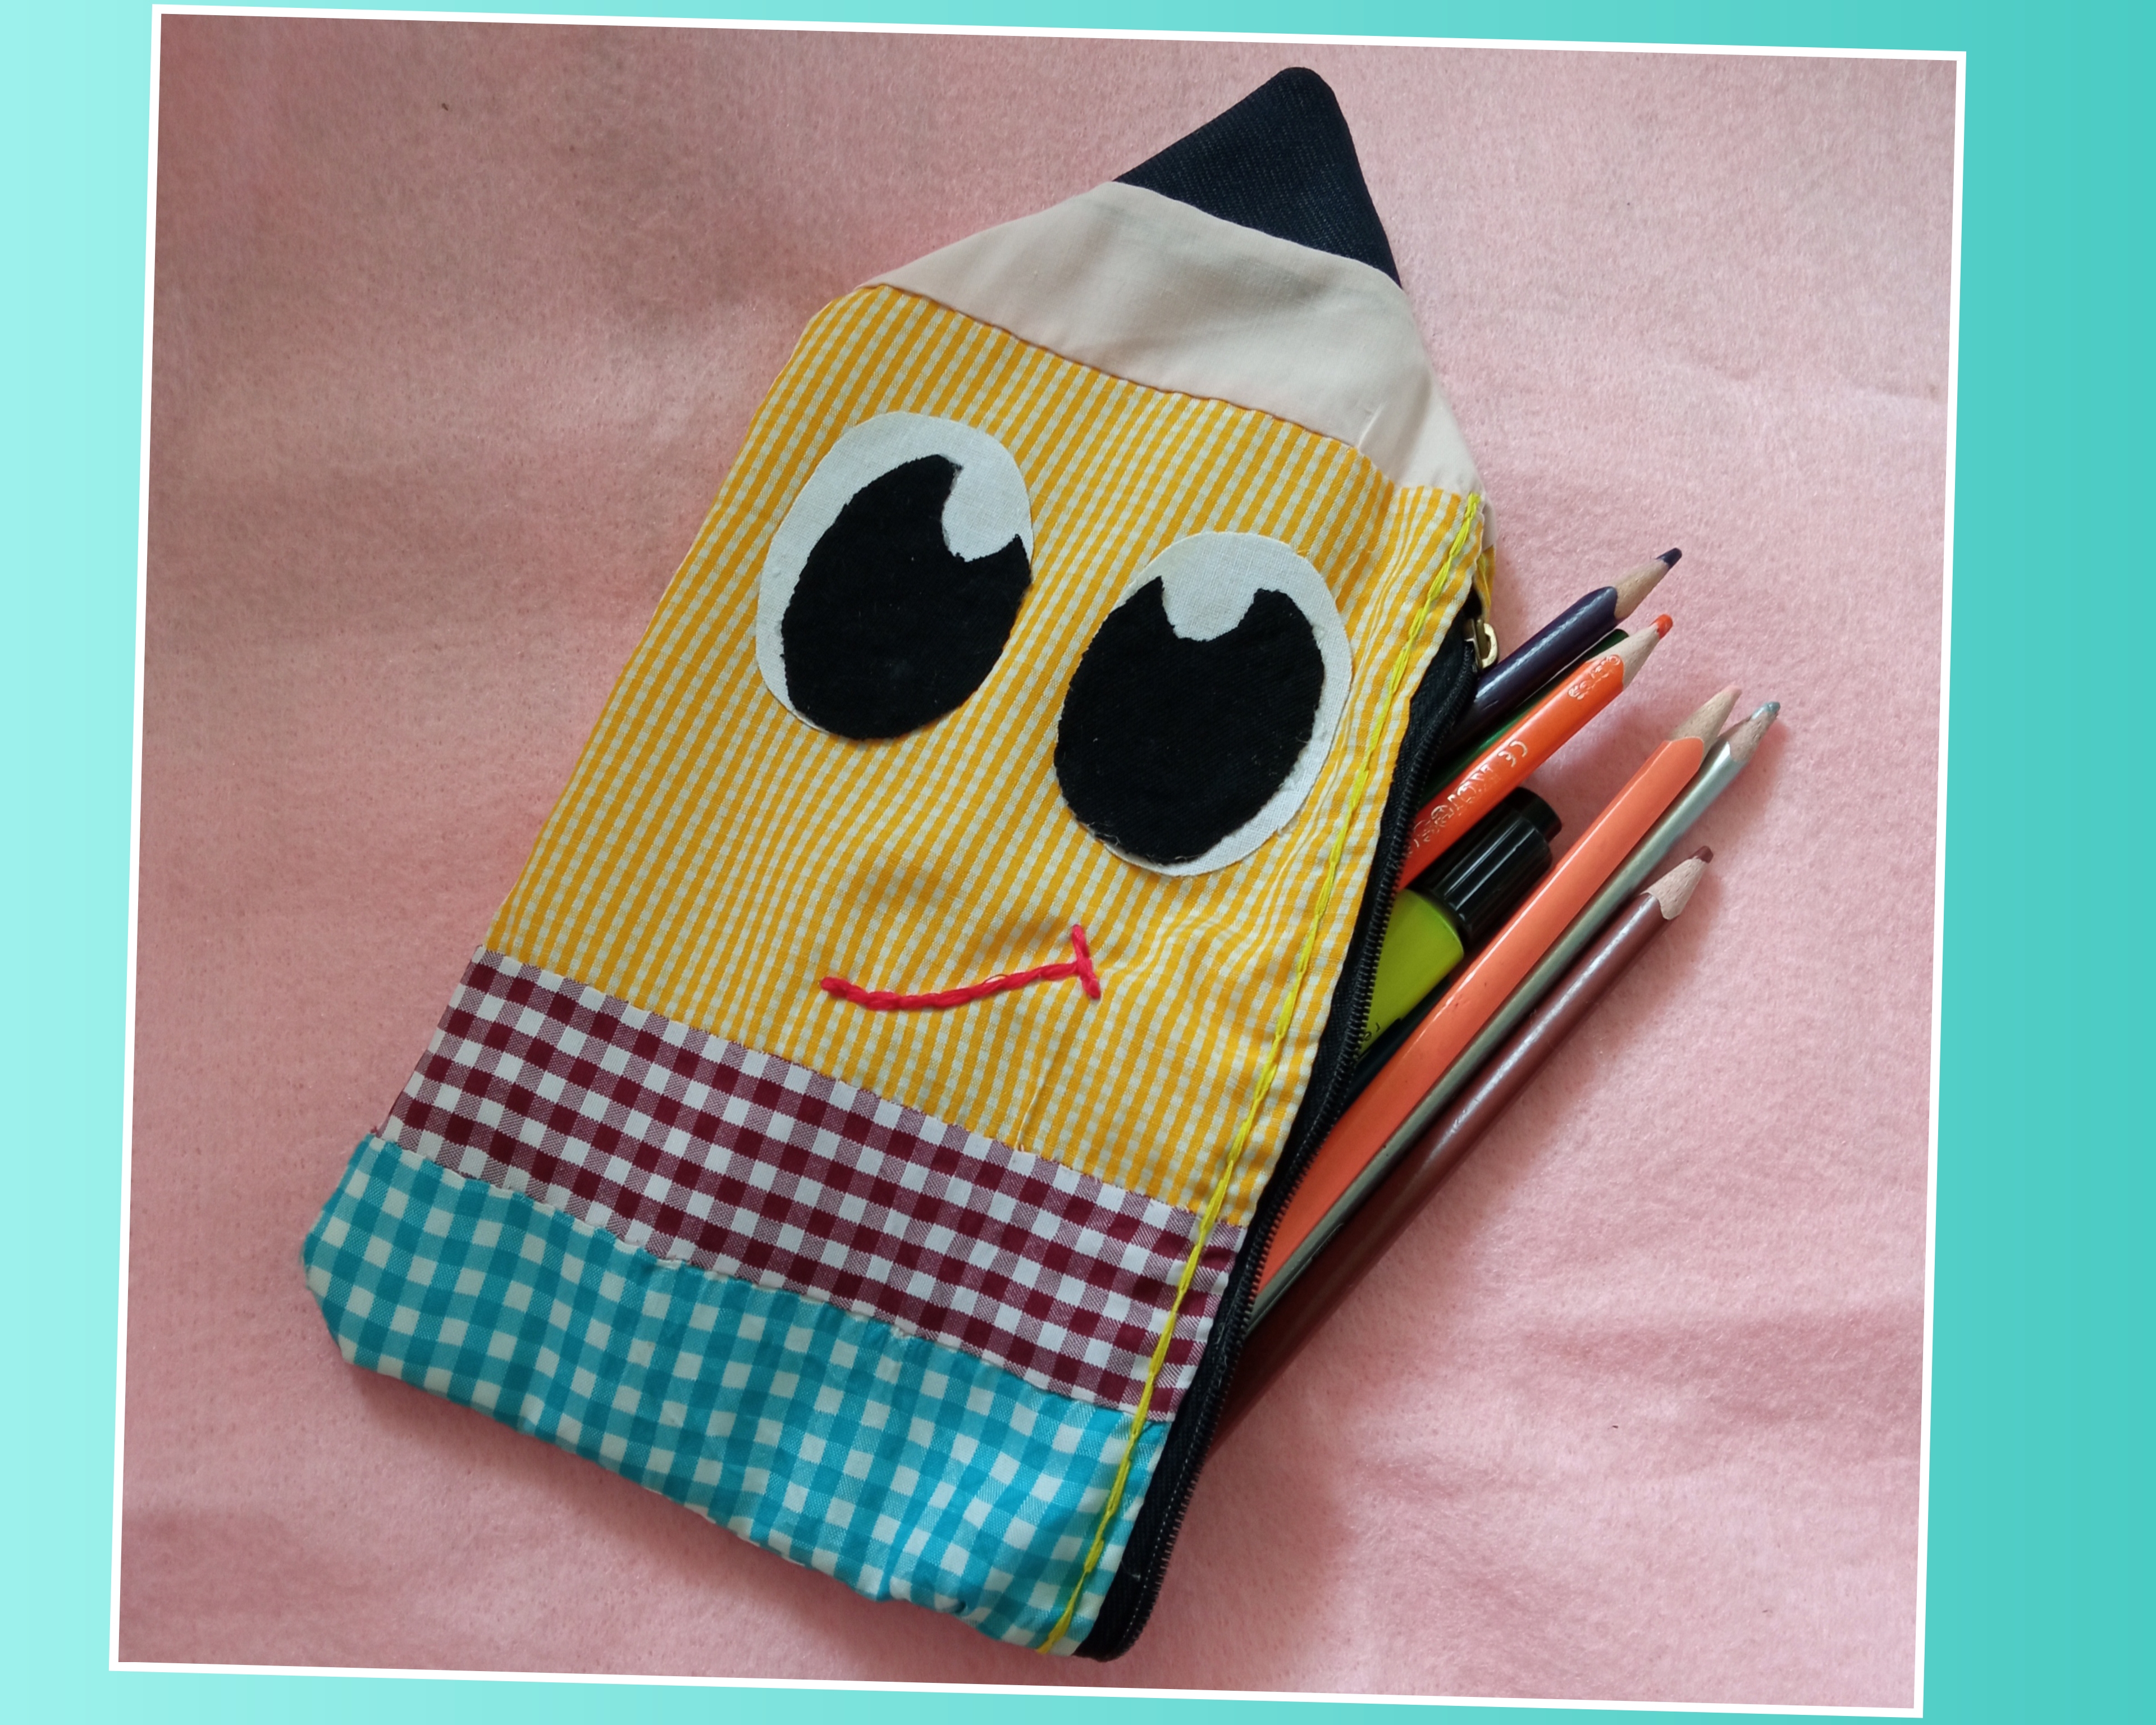


Muchas gracias por acompañarme hasta el final de este Tutorial espero que les haya gustado como quedó 😃 está hermosa 😍 Cartuchera en forma de Lápiz ✏️. Solo me queda decirles que se animen en hacer cosas maravillosas y siempre compartan para que aprendamos.
Thank you very much for joining me until the end of this Tutorial I hope you liked how it turned out 😃 this beautiful 😍 Pencil case ✏️. It only remains for me to tell you to be encouraged to make wonderful things and always share so that we can learn.
Agradecida con esta comunidad por su gran apoyo y con sus usuarios que no dudan en darme su apoyo 🥰 y dejarme un lindo comentario.
Grateful to this community for its great support and to its users who don't hesitate to give me their support 🥰 and leave me a nice comment.