Good day, everyone, and Splinterlands community, I'll be sharing another interesting Modern Format battle today, this time concentrating on Arachne Weaver's Corrupted Healing ability and how I successfully used it to my advantage. In contrast to normal Healing or Tank Heal, which normally restore roughly one-third of a unit's maximum health (with Triage focusing on backline units and Tank Heal only supporting the front-line tank), Corrupted Healing completely an overall healing mechanic, converting healing effects into 70% heals all friendly units, but once healed, it reduces 1 max health. Using Arachne Weaver's special take on healing can have a far greater advantage than traditional sustain in this battle, especially when facing opponents who heavily rely on healers.
Note that each healing-related ability has its own condition and necessitates careful timing and strategic placement.
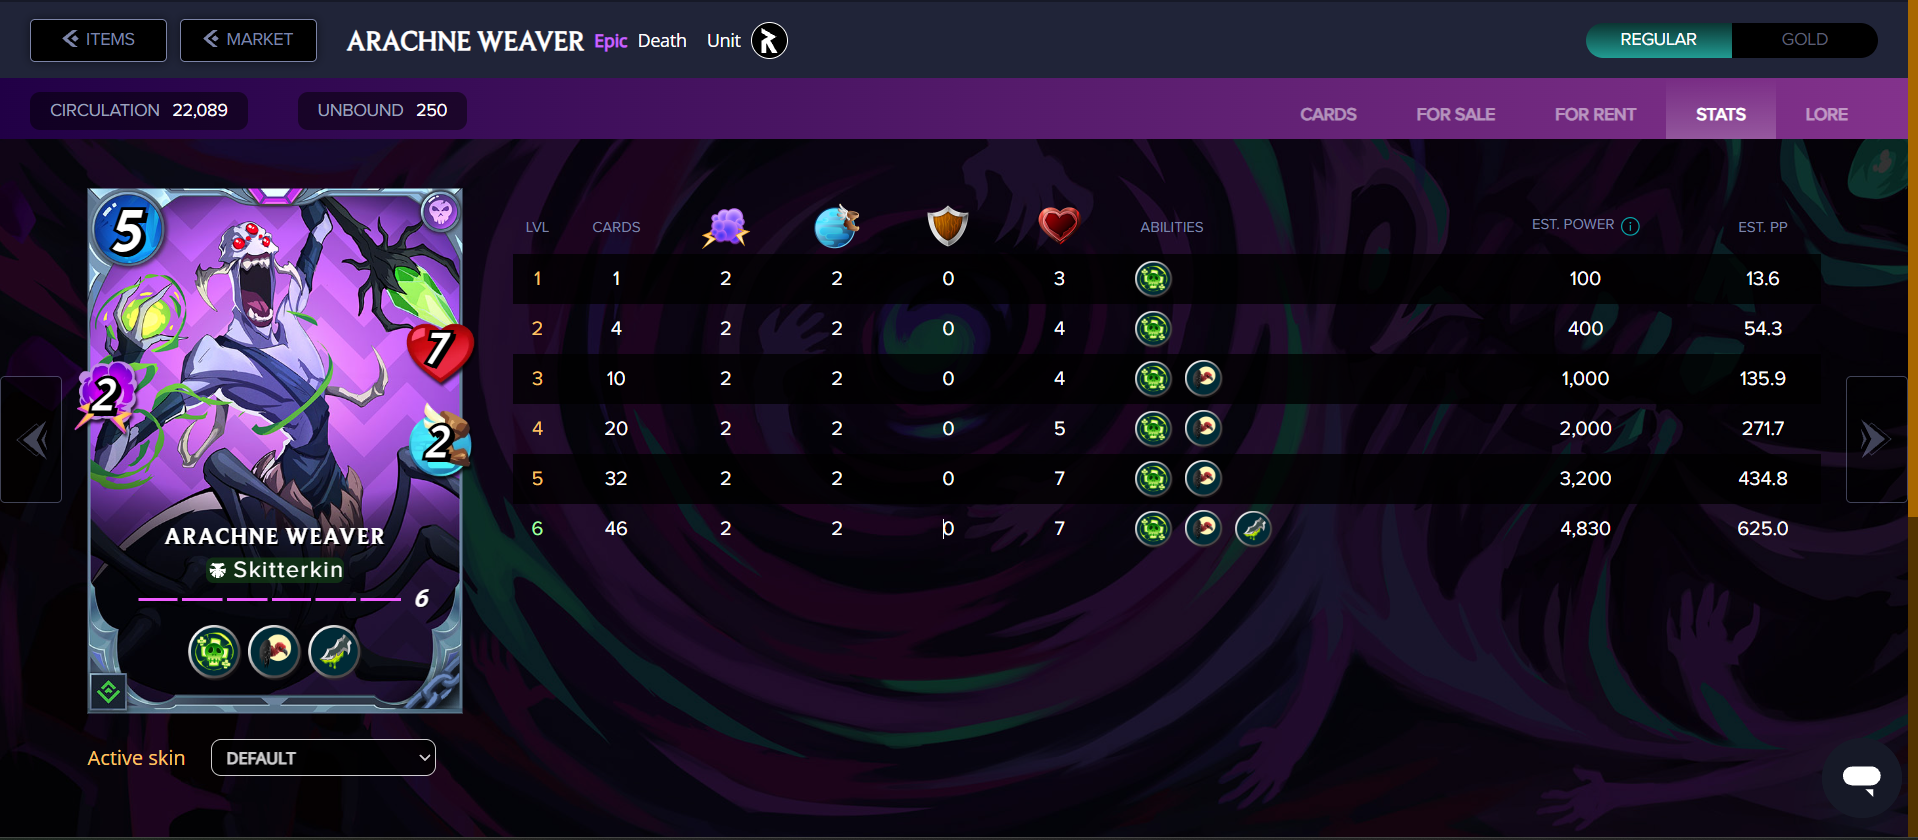
With two magic damage, seven health, and two speed, as well as the skills Corrupted Healing, Scavenger, and Poison, Arachne Weaver is an Epic card from the Rebellion set that falls under the Death element. When combined with the appropriate units, this card's special ability to drastically alter the course of combat makes the Death element particularly potent. In rule sets like Equaliser, Keep Your Distance, and Wands Out, where magic damage frequently dominates and Corrupted Healing has the ability to turn an opponent's sustain into their downfall, it becomes even more useful.
Although there are other units with the Corrupted Healing ability, most of them are rare and costly to purchase or rent because of their strength. Arachne Weaver, on the other hand, provides a more convenient choice because it can be acquired for free by simply grinding Glints and buying it from the rewards shop, allowing players an equal opportunity to add this potent card to their collection.

Into the battle: https://splinterlands.com/battle/sl_7d5aec499d66b3e4b71b657149b4add0

Equalizer, Wands Out, and Equal Opportunity were the rulesets used in this battle; Earth and Life elements were disabled, and there was a 48-mana cap. Since Akane is the only fully maxed card I have rented from the market, I chose it as my summoner. Additionally, because it is a Dragon element summoner, I was able to pair it with the Death element for a powerful synergy. My plan was to use Barashkukor in conjunction with Arachne Weaver's Corrupted Healing. Because of its Magic Reflect, I put Dark Arborist in the front line, Arachne Weaver in the second slot to help with healing, and Night Reaper in the third slot to deal magic damage and counter any possible enemy flying units. Helheim Demon's Taunt ability anchored the backline and ensured that enemy attacks were deflected away from my core lineup, while Barashkukor's impressive 5 magic damage placed him in the fourth slot as a secondary powerhouse. With this configuration, I was able to withstand pressure while successfully safeguarding my main damage dealers.

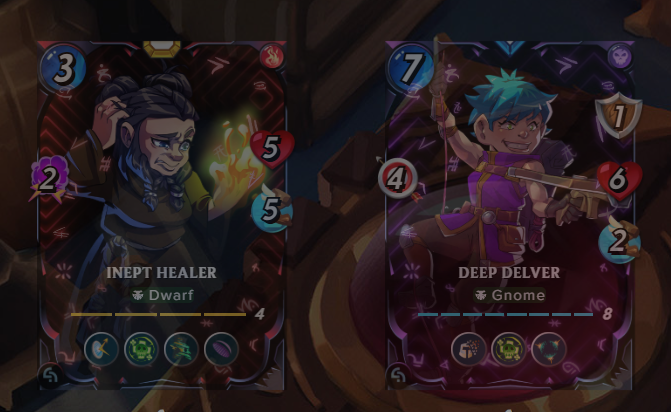
Whereas the opponent summoned Fithe Bladestone and used a lineup that included Infernal Firestorm, Gramel the Hunger, Arcane Skinwalker, Ashen Cindergim, Inept Healer, and Chaos Evoker. Fithe Bladestone's ability to grant Void, which gave Arcane Skinwalker, Ashen Cindergim, and Inept Healer additional protection against magic damage, was fully utilised by their well-organized formation. Furthermore, Ashen Cindergim's Silence further weakened my team by lowering all of my magic damage by 1, strengthening their strategy against my magic-focused lineup. The opponent also carefully combined Corrupted Healing with Inept Healer to create a powerful sustain mechanic.
Looking at the opponent’s lineup, it already seemed like the odds were against me, and I expected this match to be a tough one. The question was, would my Barashkukor as the primary magic damage dealer, supported by Arachne Weaver, be enough to break through and overcome their well-structured team? Let’s dive into the battle to find out.

Even though the opponent's void ability is not enough to defend itself, or perhaps it's just a misplacement of void, it would be advised to place it in first and second position instead of the middle or backline, as your team will give enough time and deal damage to the opposing team. Overall, it was a great and interesting battle, and I won. This is why my strategy worked so well as the battle progressed in round 12.

I hope that by using the Arachne Weaver's card in this way, you were able to learn more and get more experience with the battle modern format.

A Big Thanks! For supporting me, being here, and coming this far. I hope this strategy assists you with some of your battles with these rule sets in modern format conclave and rebellion sets.
If you haven’t played Splinterlands, now is a great opportunity to sign up for Splinterlands and earn.
Use my referral link: Click Here
Credits:
Thumbnail is generated using Microsoft Edge Copilot and Edited the Design photo Splinterlands Modern League using PicsArt Screenshot In-game splinterlands