Un gran saludo para toda la comunidad deHive Motors de manera especial a todo los profesionales y aficionados de la mecánica automotriz y oficios afines, que cada día nos muestran sus experiencias, esto es lo bueno de HiveMotors porque esto nos ayuda a resolver problemas no solo con el Auto, sino en cosas del hogar como lo son los equipos electrodomésticos entre tantas cosas más, y precisamente hoy quiero compartir una nueva experiencia que se me presentó hoy en la mañana con el equipo hidroneumatico de agua potable de mi casa.

Reparación de Vacum de mi hidroneumatico, el agua perdió la presión
Si amigos, ayer la presión del chorro de agua de los grifos salió muy débil, generalmente cuando esto pasa, lo que hago es purgar el tanque del hidroneumatico, procurando que contenga un poquito menos de la mitad de agua y el resto aire, esto lo he venido haciendo desde hace mucho tiempo, pero esta vez lo hice y en menos de una hora, comenzó de nuevo a perder poco a poco la presión.
Como esta compuesto mi equipo hidroneumatico:
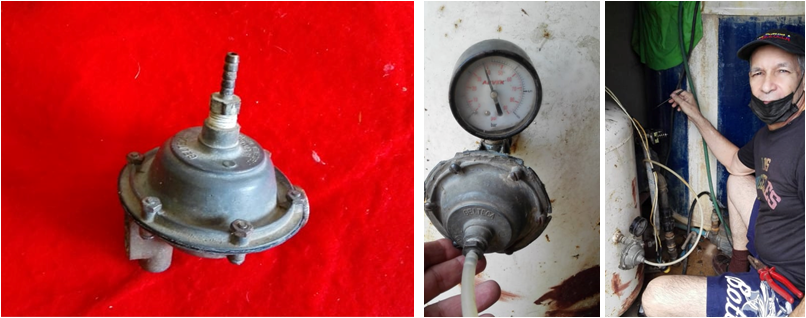
Este es equipo formado por el tanque o pulmón como muchos lo llaman, una electrobomba de 1 hp, el Vacum de vació, el manómetro, el presostato y las manqueras, les cuento que este equipo lo compré hacen 28 años, imagínense ustedes lo que ha durado este equipo, eso si siempre le hago el mantenimiento a la electrobomba, sobre todo a sus rodamientos, porque son las piezas que más se dañan, y generalmente cuando se dañan le ocasionan daños al motor.
Revisión y diagnostico:
Como les comentaba, este equipo lo conozco bastante, porque son 28 años con este equipo, generalmente cuando el chorro pierde presión enseguida purgo al tanque y listo, recuerdo que en una oportunidad se presentó una falla similar y era una fuga de agua por el conector del vacum, esta vez revise todas las conexiones y no observé fugas de agua, también revisé la válvula check, porque si esta válvula se daña va a permitir que la presión se regrese por la tubería de succión que esta conectada con la electrobomba y el tanque de almacenamiento de agua, lo cierto fue que revisé esta válvula check y estaba buena.
Logré detectar lo que ocasionaba la perdida de la presión del agua
Después de revisar los diferentes componentes del sistema hidroneumatico, pude constatar que el problema lo estaba ocasionando el vacum de control de vacio, el cual es el que controla el nivel de agua y aire dentro del tanque hidroneumatico.
Si amigos, el problema lo estaba causando el vacum de vacio, esta pieza trae un respiradero tipo compuerta, que se abre y se cierra con la acción de una pequeña bolita, cuando el equipo se activa con la señal del presostato, la bomba comienza a introducir el agua en el tanque hasta alcanzar cierta presión para que el presostato desactive la electrobomba, en este caso, la presión es de 40 psi y mínimo es de 20 psi, ahora, si el respiradero de carga o compuerta, del en el vacum no cierra, logicamente que el aire se perderá y el tanque comenzaré a llenarse de agua, y por consiguiente perderá presión, porque el aire al estar comprimido dentro del tanque ejerce la presión para impulsar el agua, de manera que, en la medida que el agua desplace el aire, habrá menos presión.
Reparación del vacum de control de aire del hidroneumatico:
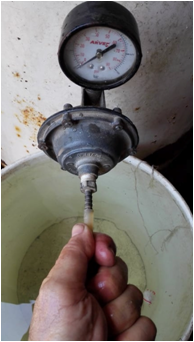
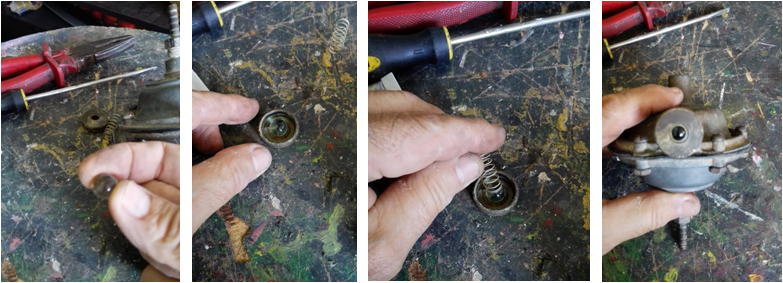
- Retirar el vacum: Esto es algo sencillo, simplemente quitamos la manguera delgada y giramos la pieza y listo.
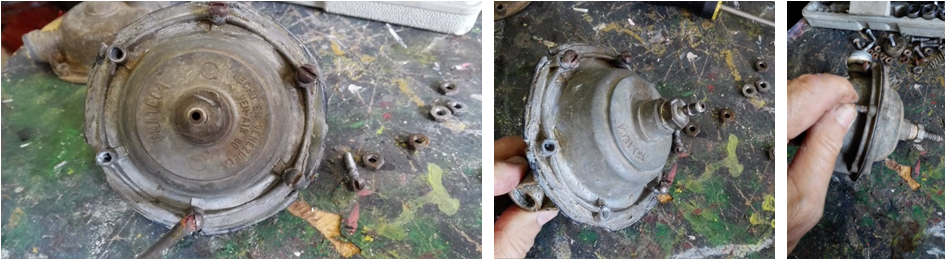
- Una vez que retirada la pieza del tanque, comenzaré a desarmarla, esta pieza consta de 6 tornillos
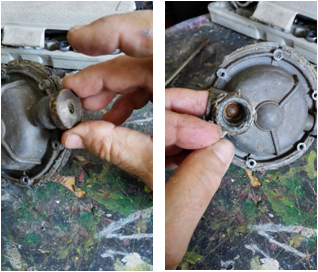
- Antes de separar las dos tapas del vacum, le voy a quitar la tapa de la compuerta para que ustedes vean la bolita que controla la entrada y salida del aire, allí pueden observar que esta bolita esta llena de oxido y suciedad que quizás es lo que impide que se asiente bien en el oring de goma:
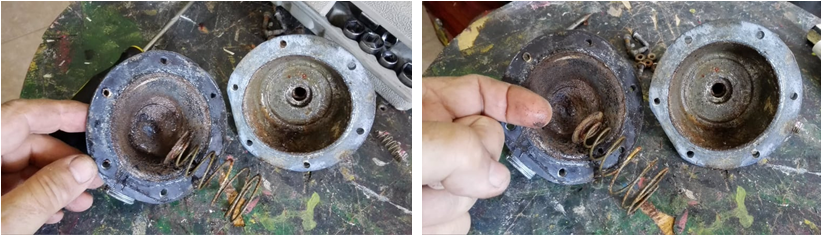
- Ahora voy a separar las dos tapas para limpiar toda la parte interna, por lo menos el resorte se ve bien, porque la mayoría de las veces se oxida y se rompe:
- Después de limpiar bien la parte interna del vacum, ahora voy a colocar nuevamente las piezas, tal cual como estaban, pero antes de unir las dos tapas, le voy a untar sellador de silicon a la membrana de goma para evitar alguna fuga de agua o aire:

- En en el tercer ítem, pudieron observar que la bolita del respiradero estaba oxidada, bueno amigos yo pensé que al quitarle el oxido iba a quedar bien, pero no fue así, la bolita estaba careada, ya que es plástica, así que tuve que buscar otra, entonces pensando y pensando, se me ocurrió colocar una bolita de las que traen las botellas de whishy, así que busque una de estas y quedó perfecta y mejor que la que traía porque es más resistente, así que anoten este dato:
- Ya tengo listo el Vacum de vacio, lo siguiente será instalarlo nuevamente en el tanque o pulmon del hidroneumatico:
Bueno amigos, después de instalar el Vacum, encendí la electrobomba y apreté la bolita del respiradero hasta que saliera agua, luego solté la bolita y listo, esto me indica el nivel del agua que debe tener el tanque, el resto será aire, Gracias a Dios el problema ya lo solucioné simplemente limpiando el Vacum y reemplazando la bolita del respiradero de carga, espero que esta experiencia les sea de gran utilidad, porque no sabemos en que momento la podemos poner en práctica, hasta pronto, Dios les bendiga.
----------------------------0------------------------------
IN ENGLISH: A big greeting to the entire community of Hive Motors, especially to all the professionals and amateurs of automotive mechanics and related trades, who each day they show us their experiences, this is the good thing about HiveMotors because it helps us solve problems not only with the Car, but also with household items such as electrical appliances among many other things, and precisely today I want to share a new experience that I was presented this morning with the hydropneumatic equipment for drinking water in my house.
Vacum repair of my hydropneumatic, the water lost pressure
Yes friends, yesterday the pressure of the water jet from the taps came out very weak, generally when this happens, what I do is purge the hydropneumatic tank, making sure that it contains a little less than half of water and the rest air, this I've been doing it for a long time, but this time I did it and in less than an hour, it started to slowly lose pressure again.
How is my hydropneumatic equipment composed:
This is equipment made up of the tank or lung as many call it, a 1 hp electric pump, the vacuum vacuum, the pressure gauge, the pressure switch and the hoses, I tell you that I bought this equipment 28 years ago, imagine what it has This equipment has lasted, that is if I always do maintenance on the electric pump, especially its bearings, because they are the parts that are most damaged, and generally when they are damaged they cause damage to the motor.
Review and diagnosis:
As I was telling you, I know this equipment quite a bit, because it's been 28 years with this equipment, generally when the jet loses pressure I immediately bleed the tank and that's it, I remember that on one occasion a similar failure occurred and it was a water leak through the connector of the vacum, this time I checked all the connections and I did not observe water leaks, I also checked the check valve, because if this valve is damaged it will allow the pressure to return through the suction pipe that is connected to the electric pump and the tank of water storage, the truth was that I checked this check valve and it was good.
I managed to detect what caused the loss of water pressure
After reviewing the different components of the hydropneumatic system, I was able to verify that the problem was being caused by the vacuum control vacuum, which is the one that controls the level of water and air inside the hydropneumatic tank.
Yes friends, the problem was due to the vacuum control piece, this piece has a gate-type vent, which opens and closes with the action of a ball, when the equipment is activated with the pressure switch signal, the pump begins to introduce the water inside the tank until it reaches a certain pressure so that the pressure switch deactivates the electropump, in this case the pressure is 40 psi and a minimum of 20 psi, now if the load vent or gate, the vacuum does not close, logically it will lose the air and the tank will begin to fill with water, and consequently it will lose pressure, because the air when compressed inside the tank exerts pressure to push the water, so that, to the extent that the water displaces the air, there will be less Pressure.
Hydropneumatic air control vacuum repair:
- Remove the vacuum: This is something simple, we simply remove the thin hose and turn the part and that's it.
- Once the part of the tank is removed, I will start to disassemble it, this part consists of 6 screws
- Before separating the two covers of the vacuum, I am going to remove the cover of the hatch so that you can see the little ball that controls the entrance and exit of the air, there you can see that this little ball is full of rust and dirt that perhaps is what that prevents it from seating properly in the rubber o-ring:
- Now I am going to separate the two covers to clean all the internal part, at least the spring looks good, because most of the time it rusts and breaks:
- After cleaning the internal part of the vacuum well, now I am going to put the pieces back, just as they were, but before joining the two covers, I am going to spread silicone sealant on the rubber membrane to avoid any water leakage or air:
- In the third item, you could see that the vent ball was rusty, well friends, I thought that by removing the rust it would look good, but it wasn't like that, the ball was tarnished, since it is plastic, so I had to look for another one, then thinking and thinking, it occurred to me to place a small ball that comes with the whishy bottles, so I looked for one of these and it was perfect and better than the one I brought because it is more resistant, so write down this information:
- I already have the vacuum vacuum ready, the next thing will be to install it again in the tank or lung of the hydropneumatic:
Well folks, after installing the Vacum, I turned on the electric pump and pressed the ball on the vent until water came out, then I released the ball and that's it, this tells me the level of water that the tank should have, the rest will be air, thanks to God, I already solved the problem simply by cleaning the Vacum and replacing the charge vent ball, I hope this experience will be very useful to you, because we don't know when we can put it into practice, see you soon, God bless you.