Hola amigos!! ¡Reviví! 🤣 Estas últimas semanas he estado bastante ocupada con actividades de la universidad y obligaciones en casa. Además, me atrapó una enfermedad viral: fiebre, dolor de cuerpo, gripe y demás.
Hi friends!! I’m back from the dead! 🤣 These past few weeks I’ve been super busy with university activities and responsibilities at home. On top of that, I got caught by a viral illness—fever, body aches, a cold, and all that fun stuff.
Pero también han pasado muchas cosas buenas. Les presento:
But lots of good things have happened too. Let me introduce you to:
✨• MI ESCRITORIO •✨
✨• MY DESK •✨
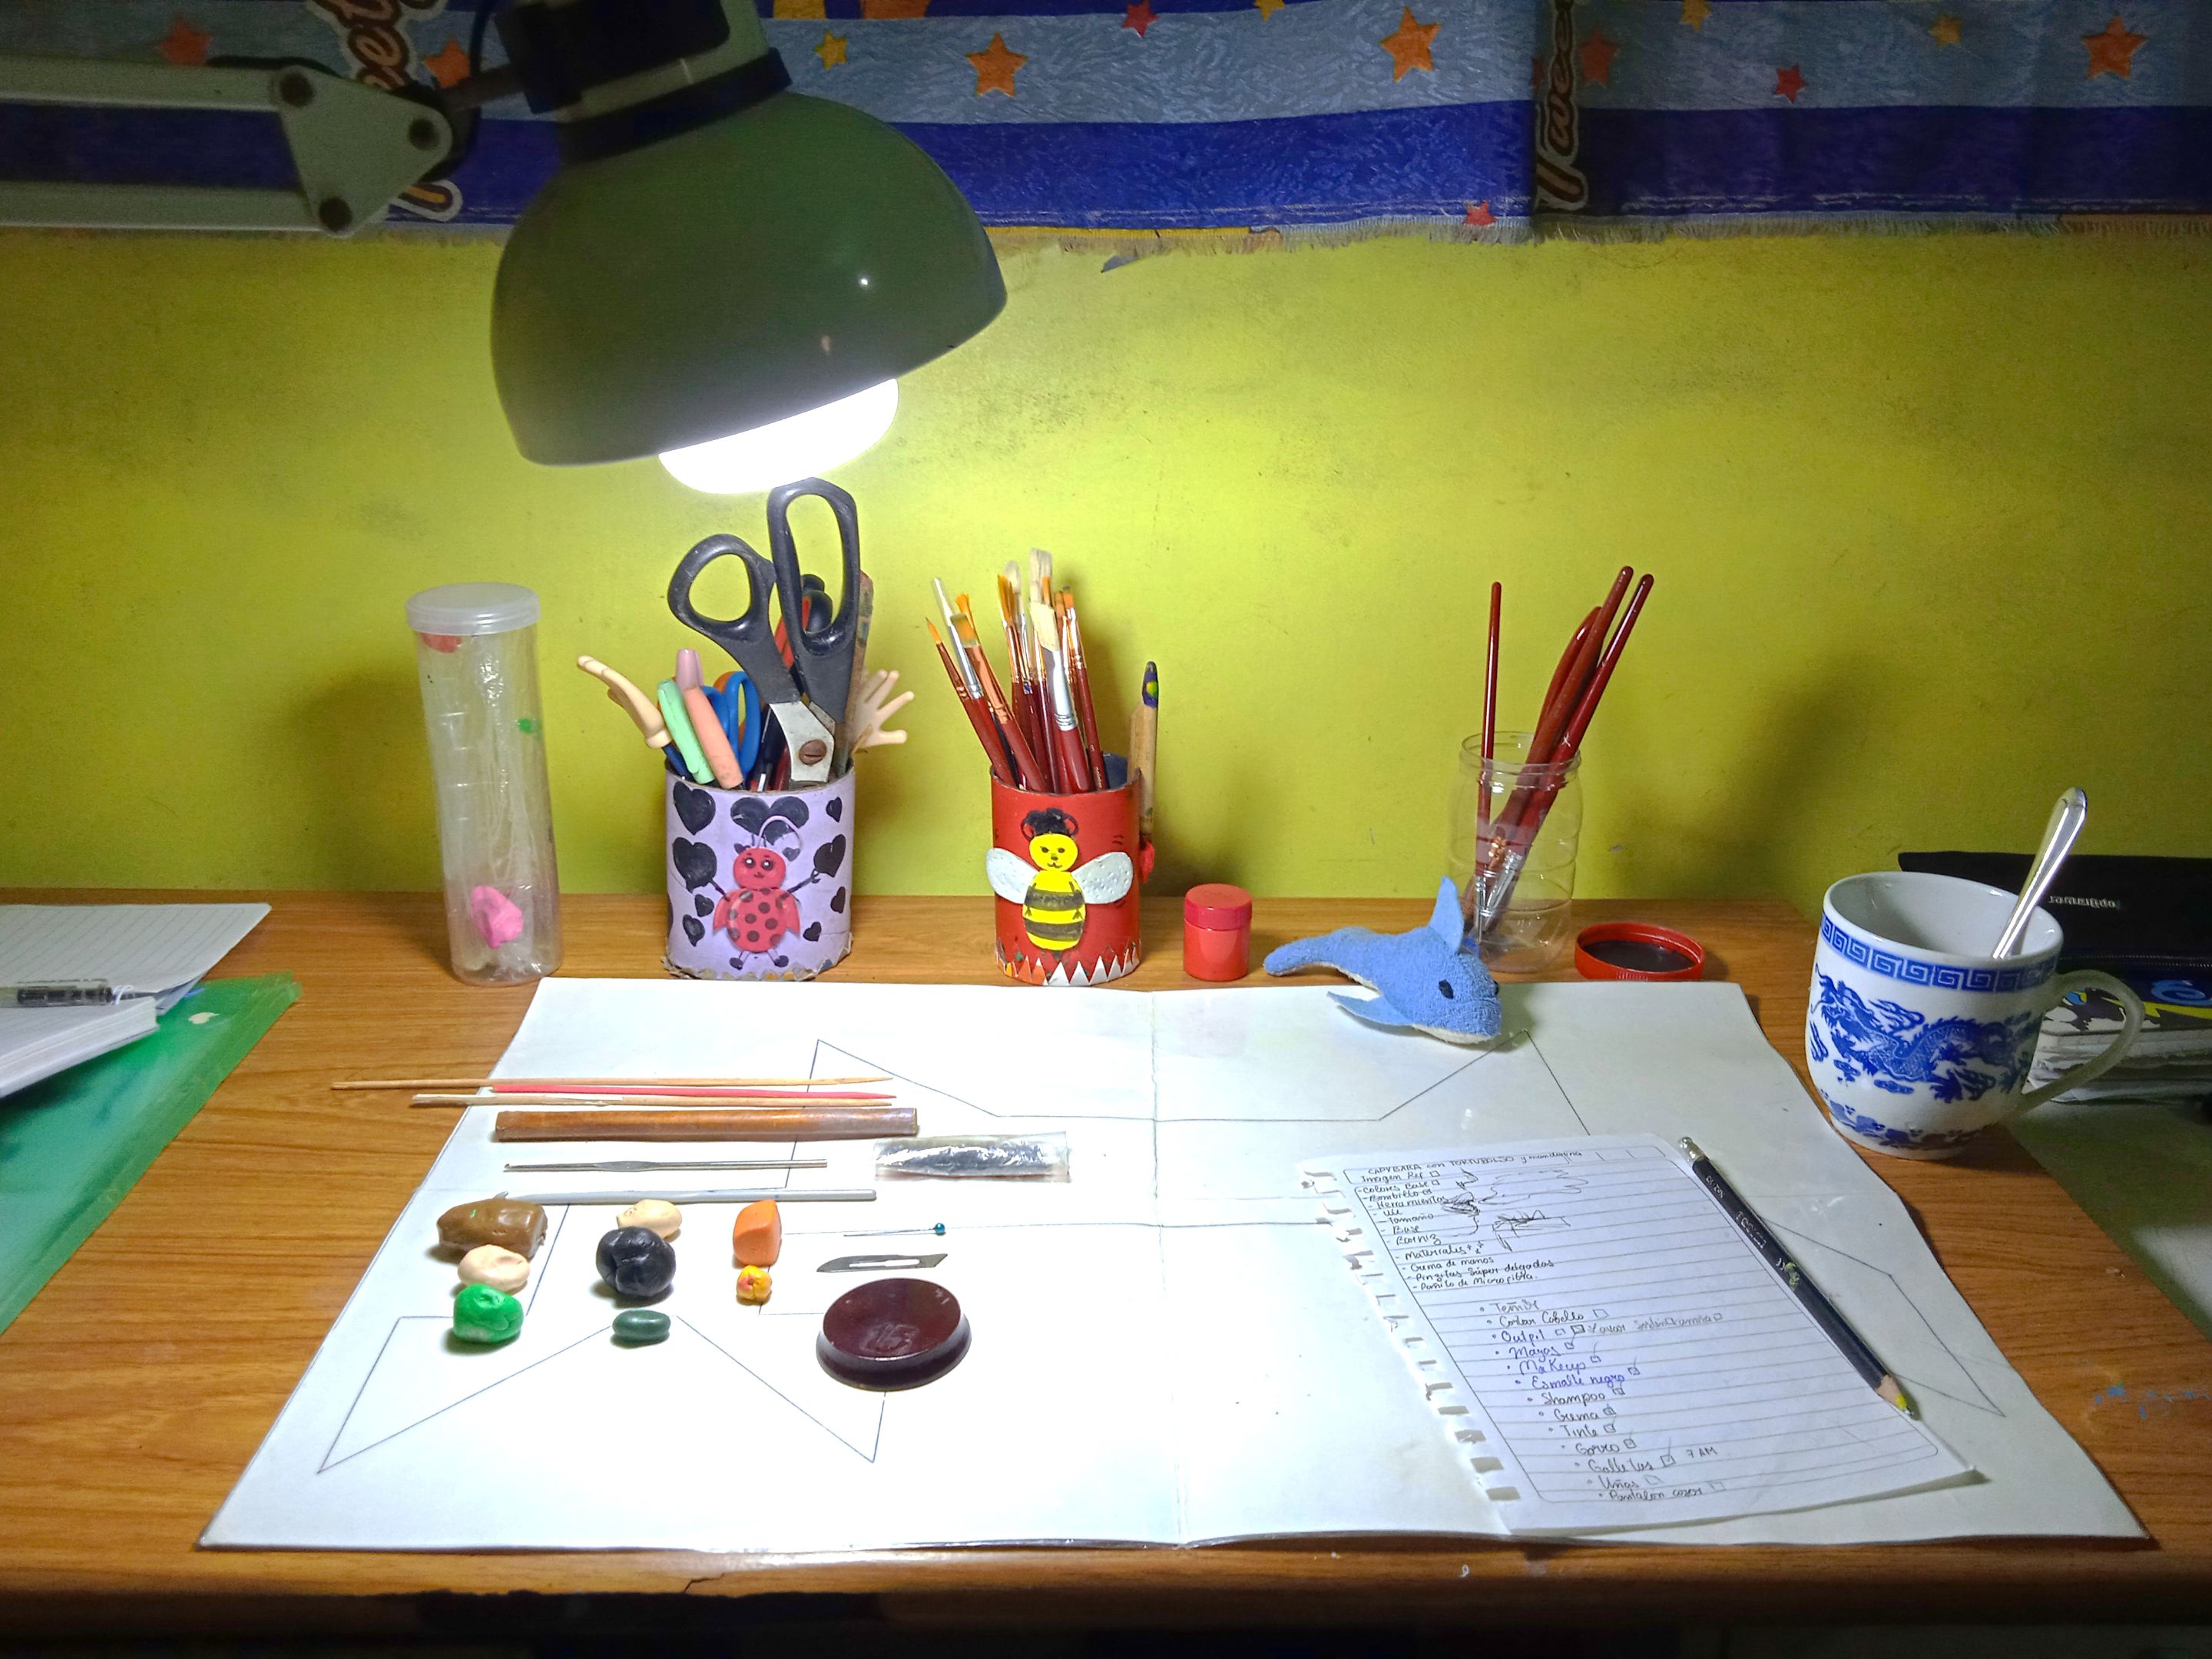
¡Así es! Por fin tengo escritorio, y no solo eso: también tengo una lámpara para poder tener buena iluminación al momento de hacer mis creaciones. Estoy más feliz que cien felices por eso. Siempre he tenido que dibujar, moldear, pintar y demás en ubicaciones clandestinas que oscilaban entre el mesón de la cocina, una mesita de un juego de muebles, mi cama o el suelo... incluso llegué a estar en el jardín de mi casa. Era demasiado incómodo y desgastante trabajar así, así que este cambio me hacía falta con carácter de urgencia. Ahí están mis pinturas, los materiales, mi taza de té de jengibre y Baby Can, mi peluchito de apoyo emocional 🤣
That’s right! I finally have a desk—and not just that, I also have a lamp so I can have proper lighting when I’m working on my creations. I’m happier than a hundred happies about it. I’ve always had to draw, sculpt, paint, and more in super random spots: the kitchen counter, a tiny side table, my bed, the floor... I even ended up working in my garden at one point. It was way too uncomfortable and exhausting, so this change was urgently needed. Now I’ve got my paints, my materials, my cup of ginger tea, and Baby Can, my emotional support plushie 🤣
Fin del anuncio✨
End of the advertisement✨
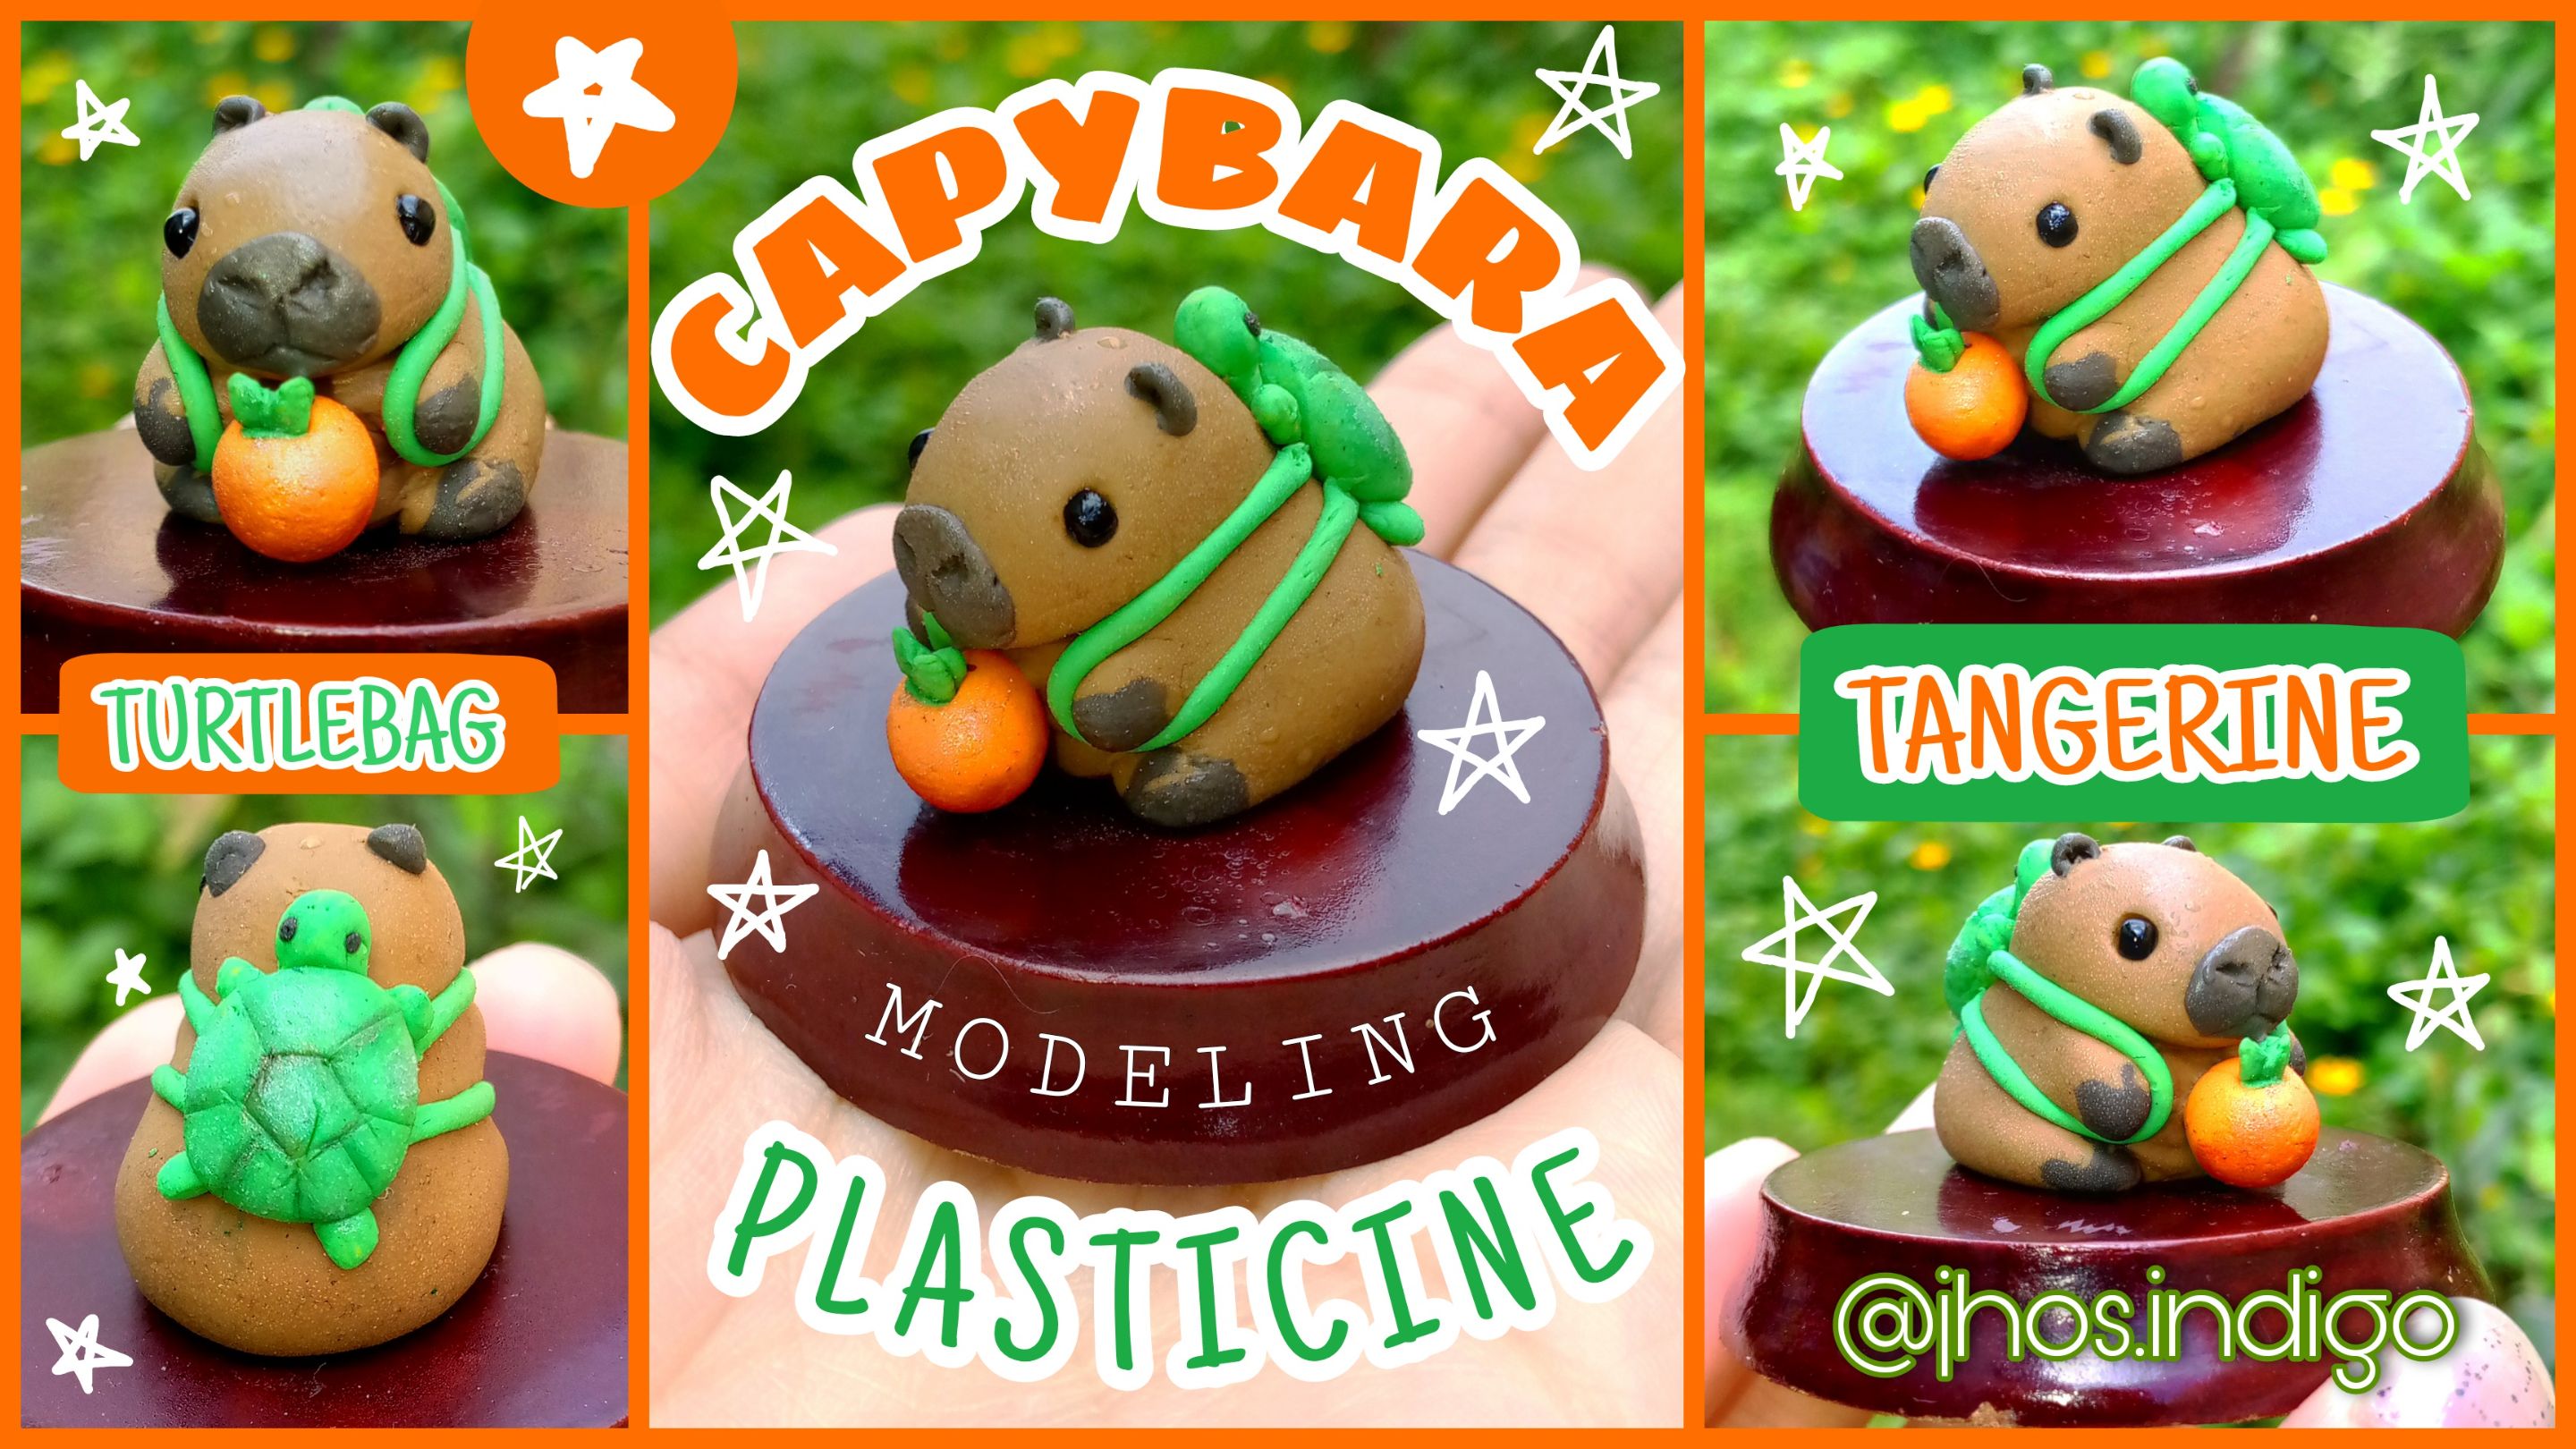
Estos últimos días, que he estado más en la calle, en centros comerciales y demás, me he encontrado con mucha merchandising de capibaras, entre ellos los tan recurrentes y anhelados peluches. Y la verdad, me he quedado enamorada de uno en particular que tenía un pequeño bolso de tortuga. Para mí, fue una de las cosas más tiernas que he visto en la vida. Y como aún no tengo conocimientos de costura como para intentar replicar ese peluche en casa, decidí valerme de lo que sí sé: hacer cositas en plasticina.
Lately, I’ve been out and about more, in malls and other places, and I’ve come across tons of capybara-themed merchandise, including the ever-popular and highly coveted plushies. And honestly, I fell in love with one in particular that had a tiny turtle backpack. For me, it was one of the cutest things I’ve ever seen. Since I still don’t have sewing skills to try and recreate that plushie at home, I decided to rely on what I do know: making little things out of modeling clay.
✩°𓏲⋆🌿𝙼𝙰𝚃𝙴𝚁𝙸𝙰𝙻𝙴𝚂. ⋆⸜ 🍵✮˚𝙼𝙰𝚃𝙴𝚁𝙸𝙰𝙻𝚂✩°𓏲⋆🌿. ⋆
✦ Plasticina 🌈 Plasticine ✦
- Café/castaño claro. 🤎
- Negro. 🖤
- Naranja. 🧡
- Verde. 💚
- Amarillo. 💛
- Light brown/chestnut. 🤎
- Black. 🖤
- Orange. 🧡
- Green. 💚
- Yellow. 💛
✦ HERRAMIENTAS PARA PLASTICINA 🧷 MODELING TOOLS ✦
- Palillos o mondadientes de madera.
- Agujas de tejer.
- Alfiler de costura.
- Bisturí o cúter.
- Palito o rodillo para estirar la masa.
- 2 Mostacillas negras pequeñas.
- Wooden toothpicks.
- Knitting needles.
- Sewing pin.
- Craft knife or cutter.
- Stick or rolling pin to flatten the clay.
- 2 small black beads.
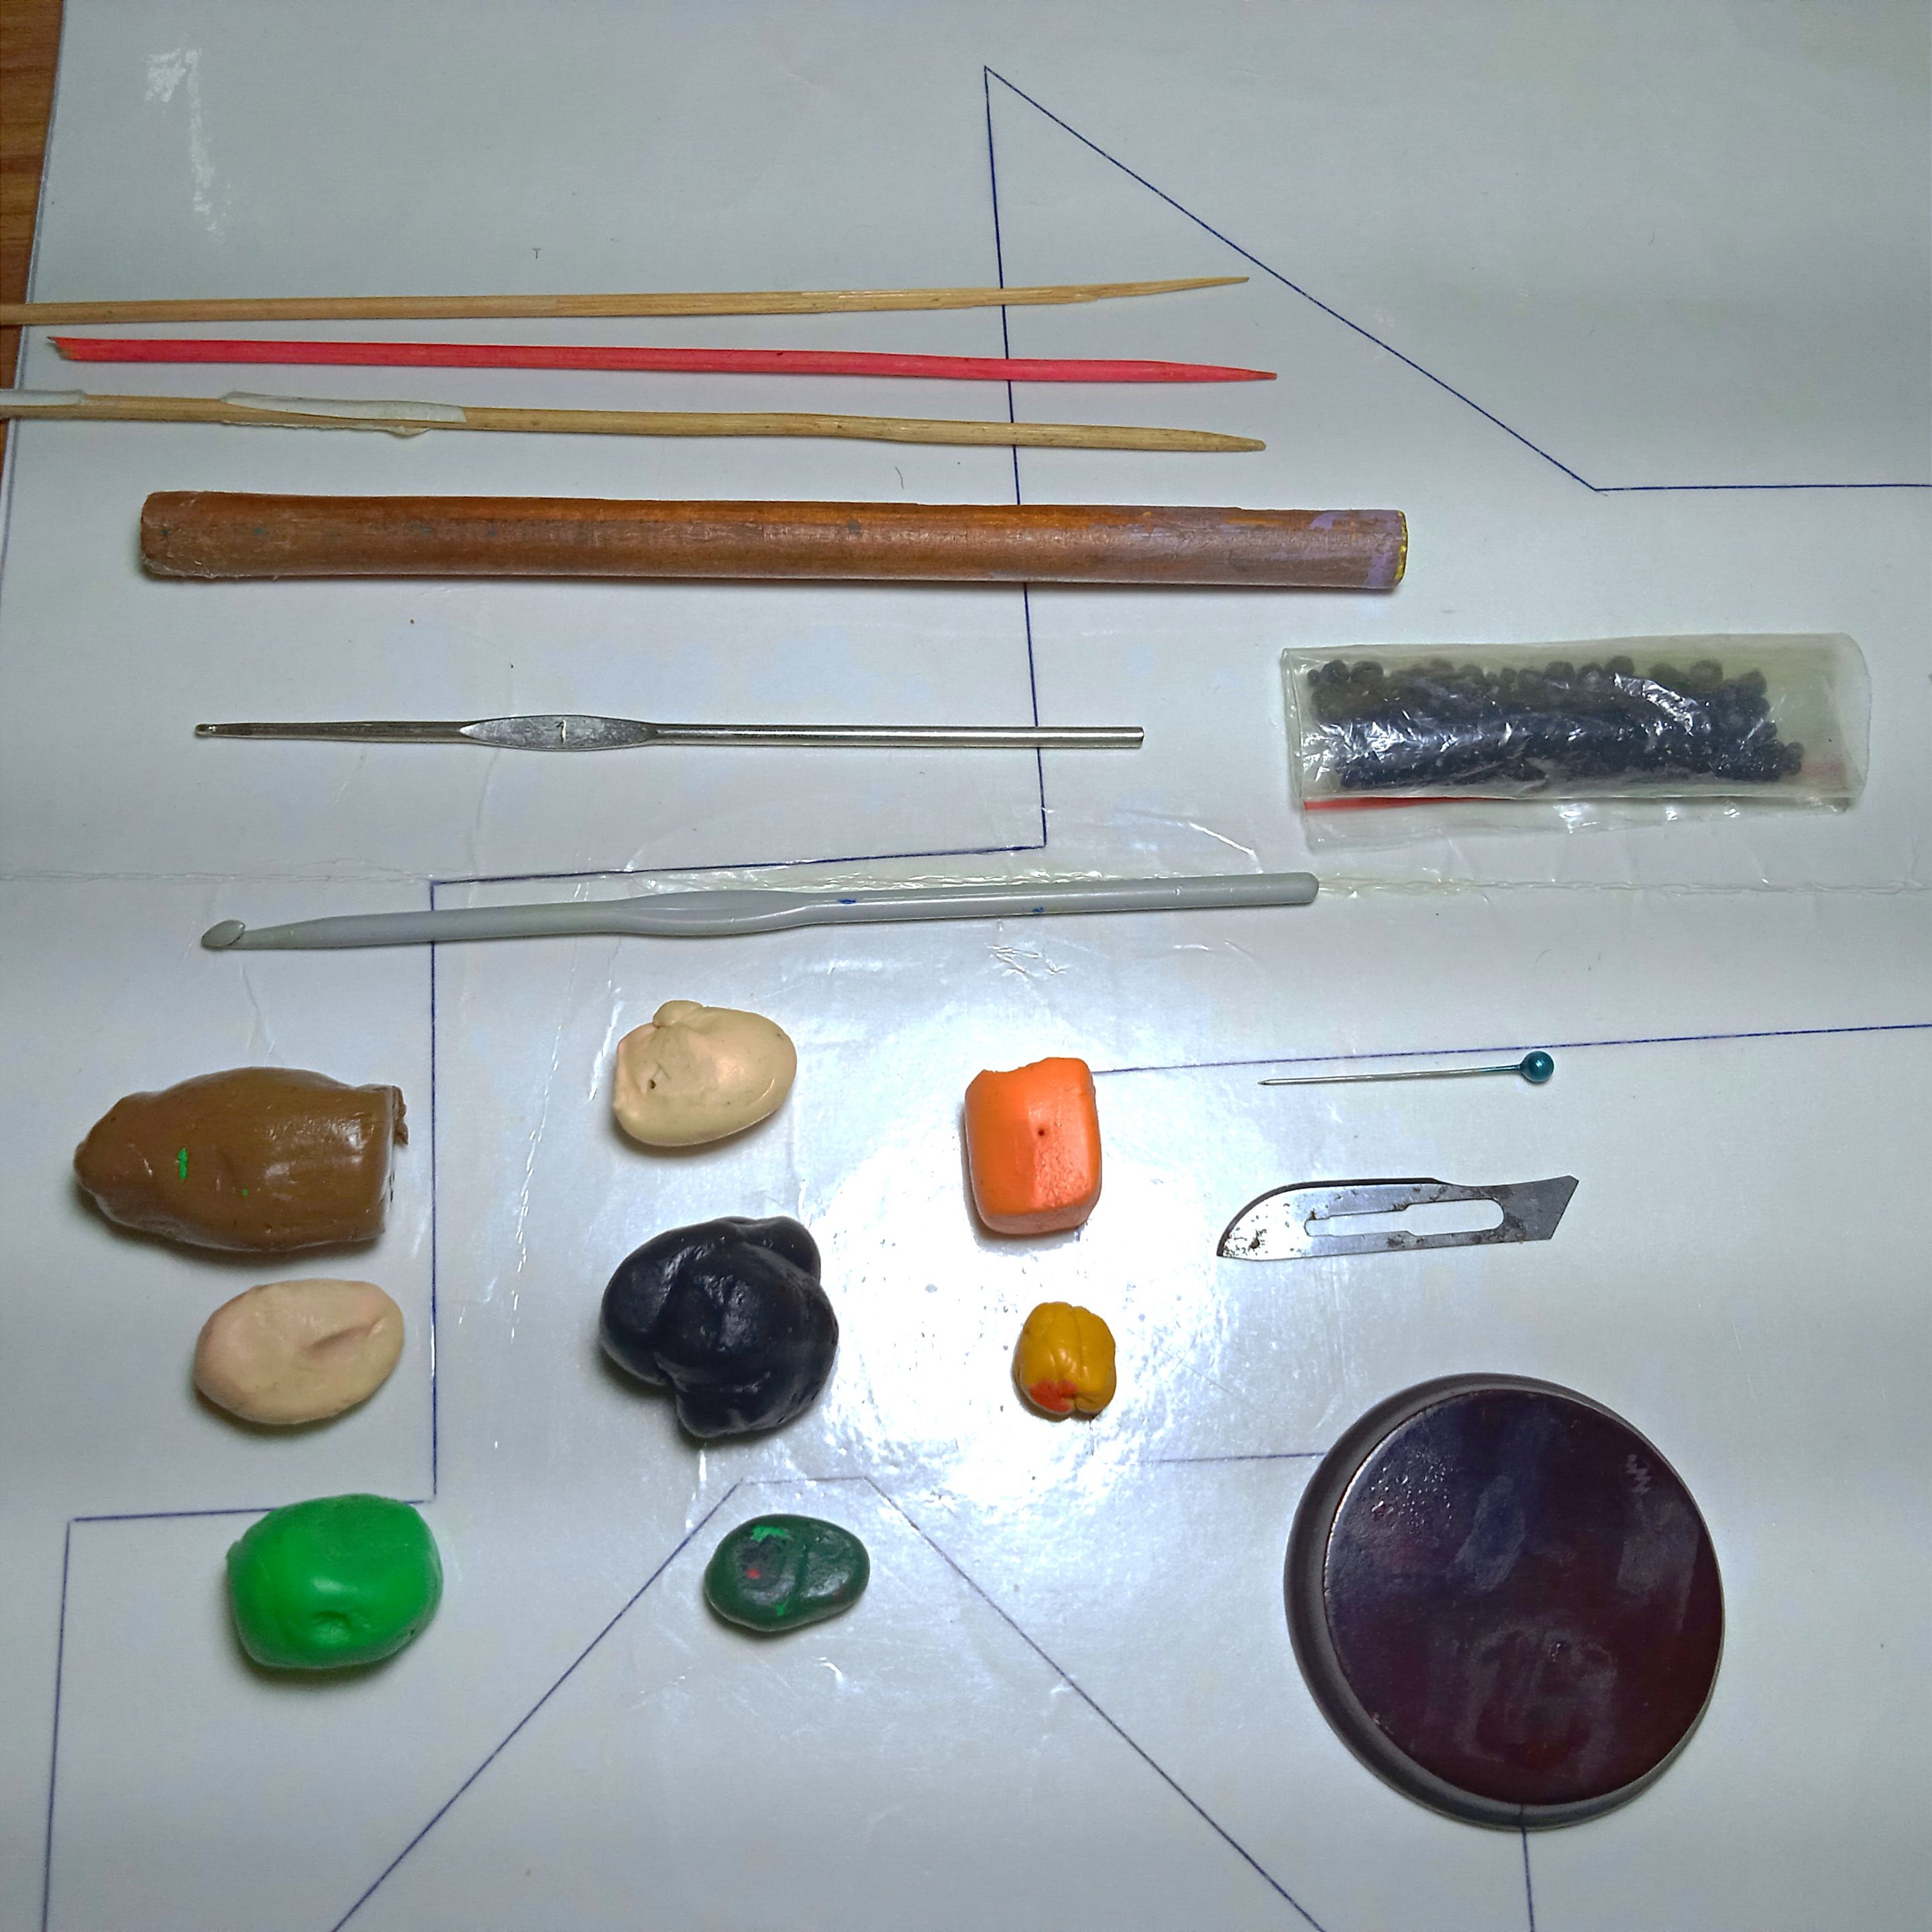
✦ PARA DETALLES ✨ FOR DETAILS ✦
- Lápiz de color verde oscuro. 💚
- Pincel fino. 🖌️
- Sombras de maquillaje: Acqua, verde oscuro, beige y terracota. 🍂
- Dark green colored pencil. 💚
- Fine brush. 🖌️
- Makeup eyeshadows: Aqua, dark green, beige, and terracotta. 🍂
✦•┈๑⋅𝐏𝐀𝐒𝐎 𝐀 𝐏𝐀𝐒𝐎 •✦• 𝐒𝐓𝐄𝐏 𝐁𝐘 𝐒𝐓𝐄𝐏๑┈•✦
⭒₊ ⊹ 𝙲𝚄𝙴𝚁𝙿𝙾 ⭒₊ ⊹🤎₊ ⊹⭒ 𝙱𝙾𝙳𝚈⭒₊ ⊹
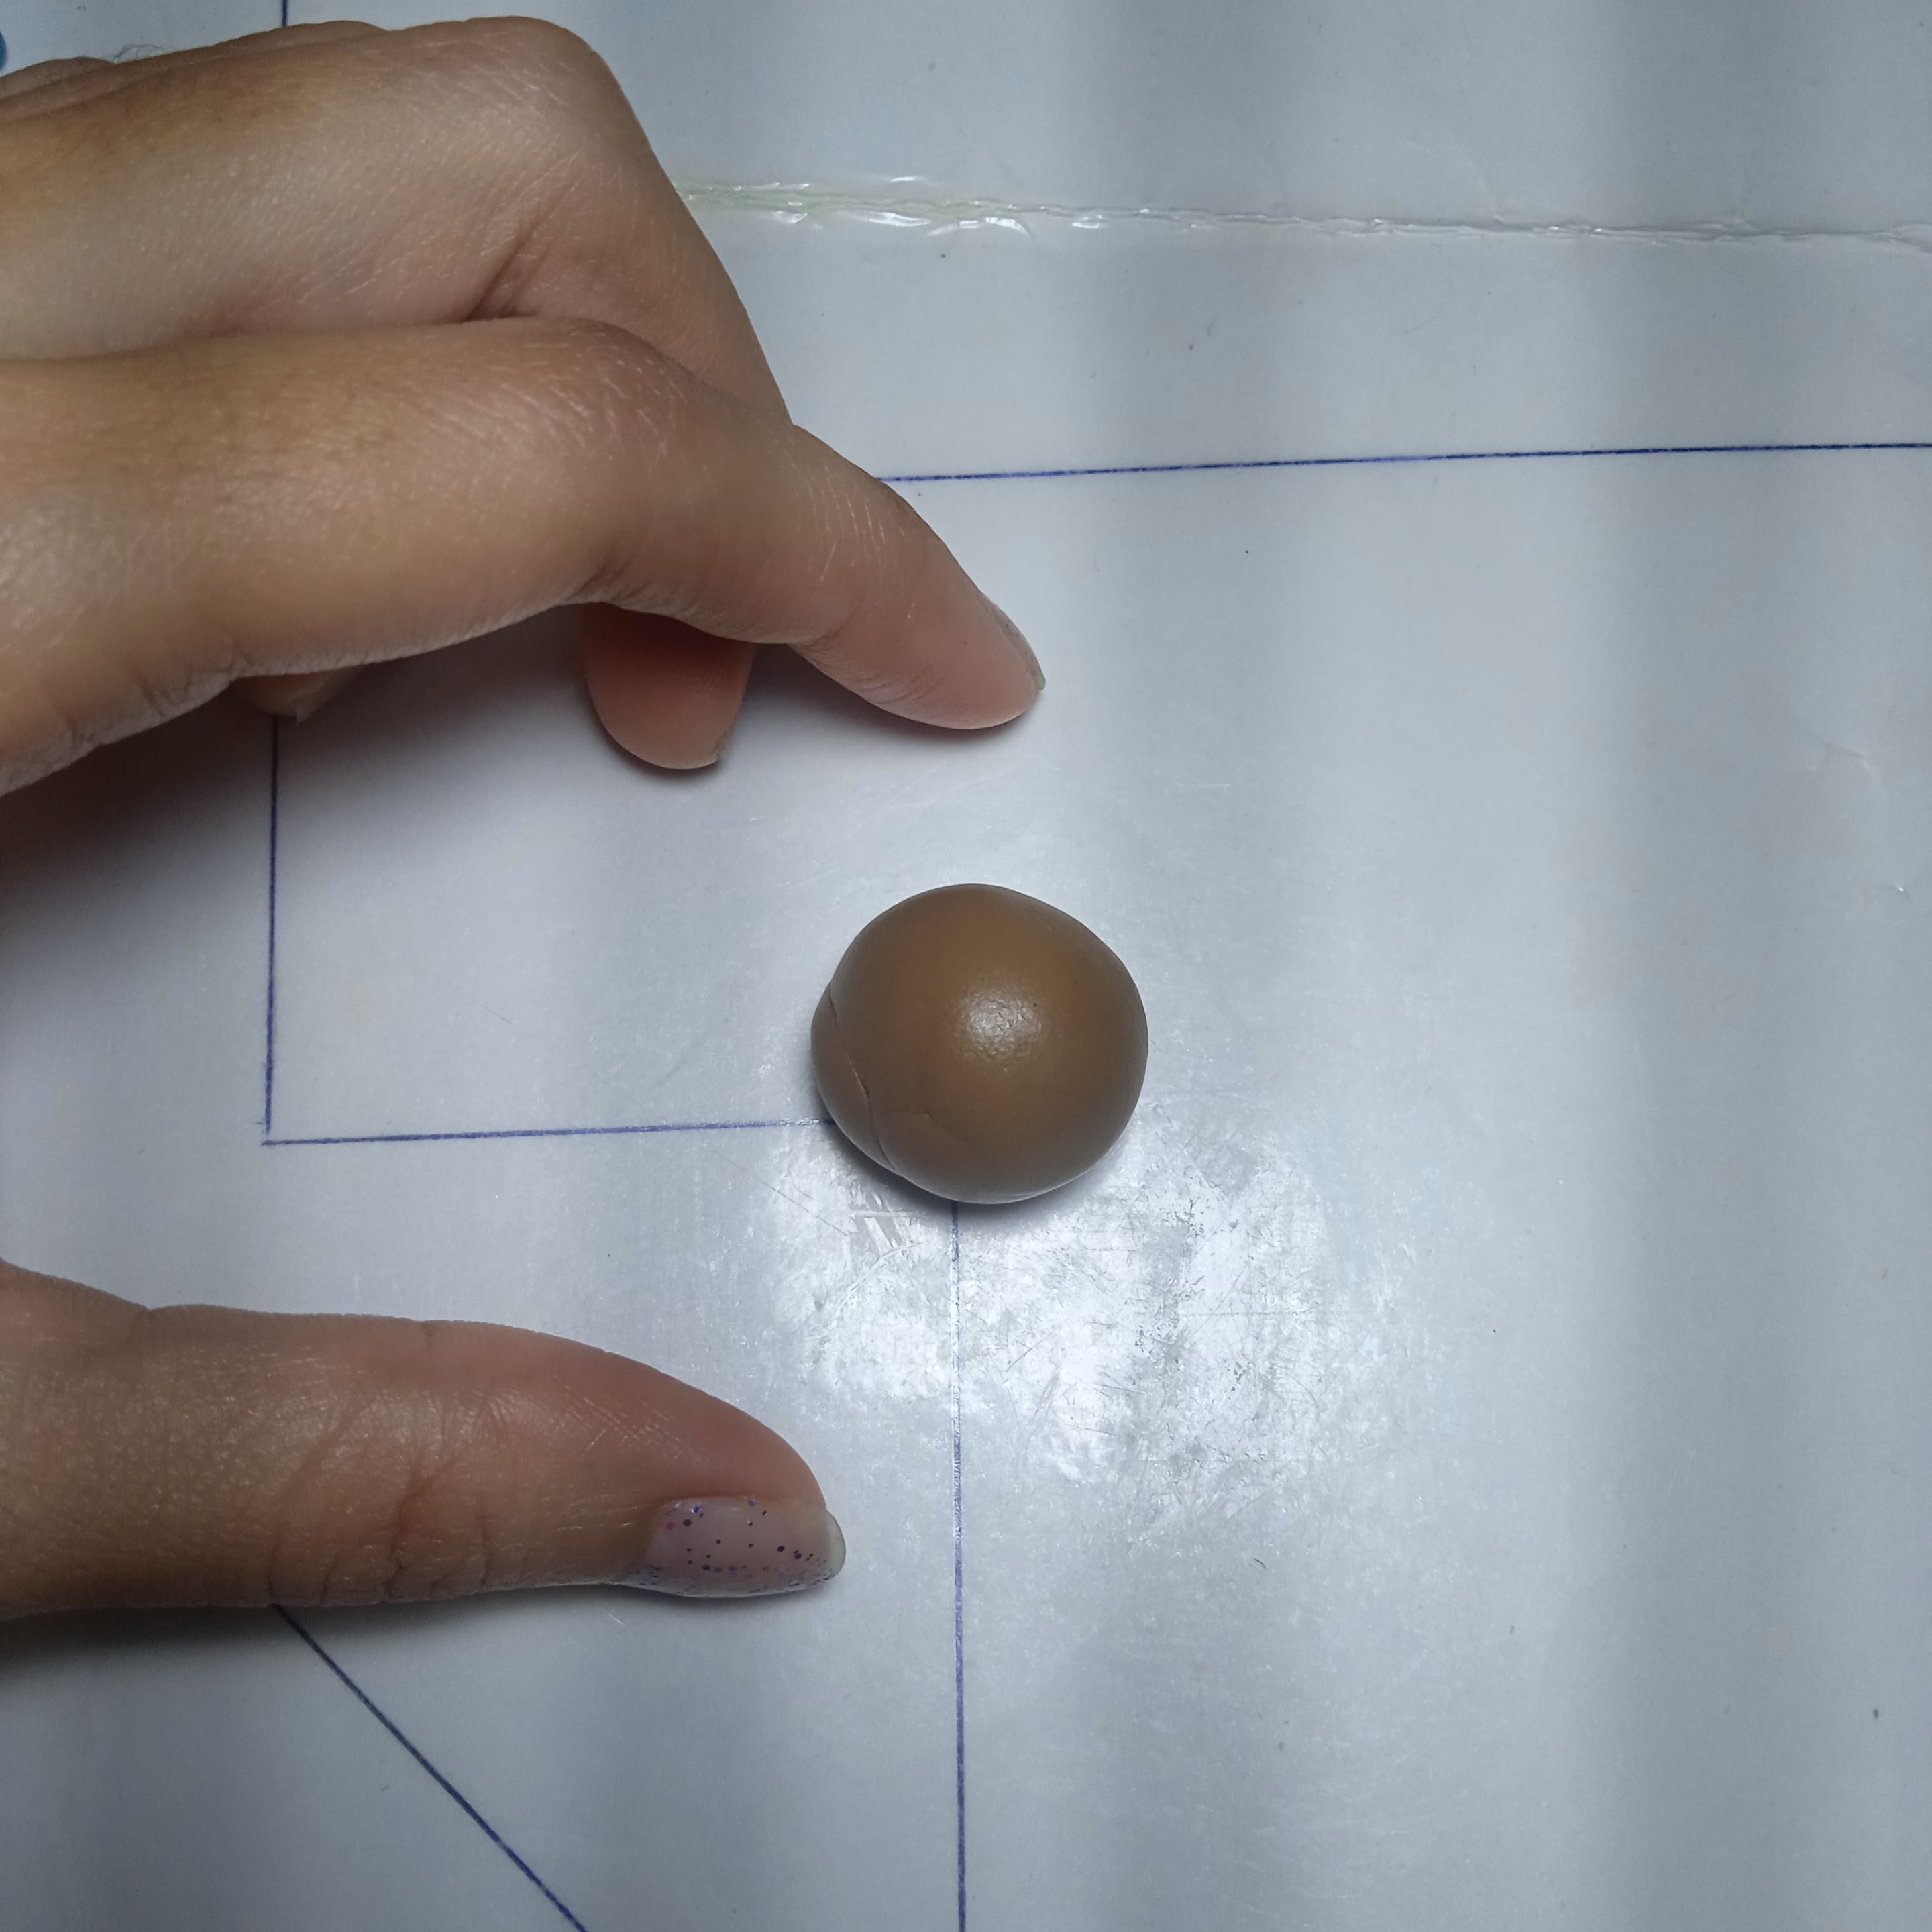
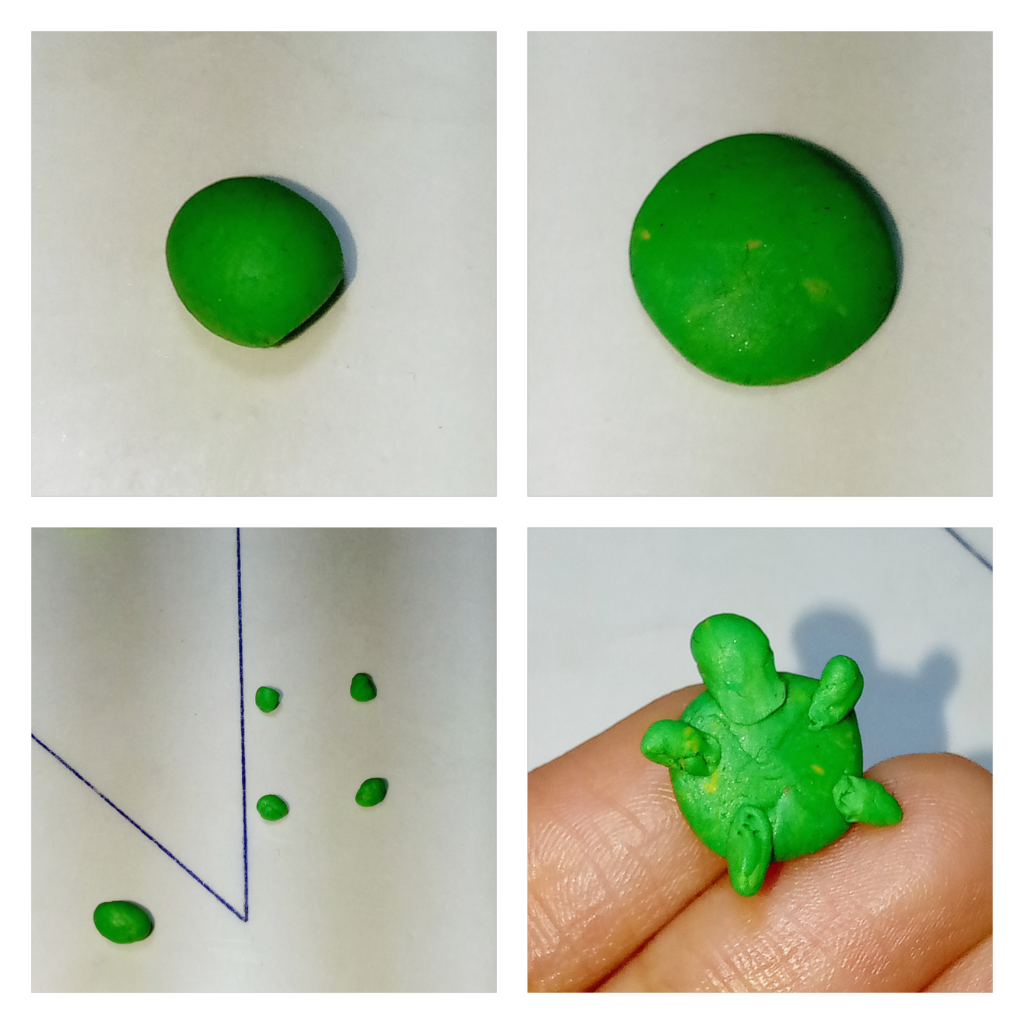
Tomaremos la masa color café y haremos una bolita que convertiremos en un óvalo. Luego iremos amasando en la sección donde queremos separar la cabeza del cuerpo, es decir, donde ubicaremos el cuello, y comenzaremos a amasar mientras aplicamos presión. Yo me ayudé con el mango de un pincel.
Take the brown-colored clay and roll it into a ball, then shape it into an oval. Next, begin kneading the section where you want to separate the head from the body that is, where the neck will go, and start pressing gently as you knead. I used the handle of a paintbrush to help with this.
 |
 |
|---|---|
 |
 |
|---|---|
Doblaremos esa punta hacia adelante para formar la cabeza y su respectivo hocico. Si queremos volver a remarcar el espacio del cuello, podemos presionar un poco con el mango del pincel o con la parte trasera de una aguja. Posteriormente, alisaremos y perfeccionaremos con nuestros dedos tanto la zona del cuello como la parte posterior de la cabeza, la espalda y la espalda baja. Al final, quedará este pequeño frijolito café.
Bend that tip forward to form the head and its little snout. If you want to further define the neck area, you can press a bit with the paintbrush handle or the back end of a needle. Then, smooth and refine the surface with your fingers, working on the neck, the back of the head, the spine, and the lower back. In the end, you’ll have a cute little brown bean.

⭒₊ ⊹ 𝙿𝙰𝚃𝙸𝚃𝙰𝚂⭒₊ ⊹🤎₊ ⊹⭒𝙿𝙰𝚆𝚂 ⭒₊ ⊹
Dividiremos una porción de masa en cuatro partes, haremos bolitas y luego les daremos forma de gotitas. Las colocaremos a los costados, por la parte más delgada, a la altura correspondiente para cada par de patas.
Divide a portion of clay into four parts, roll them into small balls, and then shape them into little droplets. Place them on the sides, with the thinner end facing out, at the appropriate height for each pair of legs.
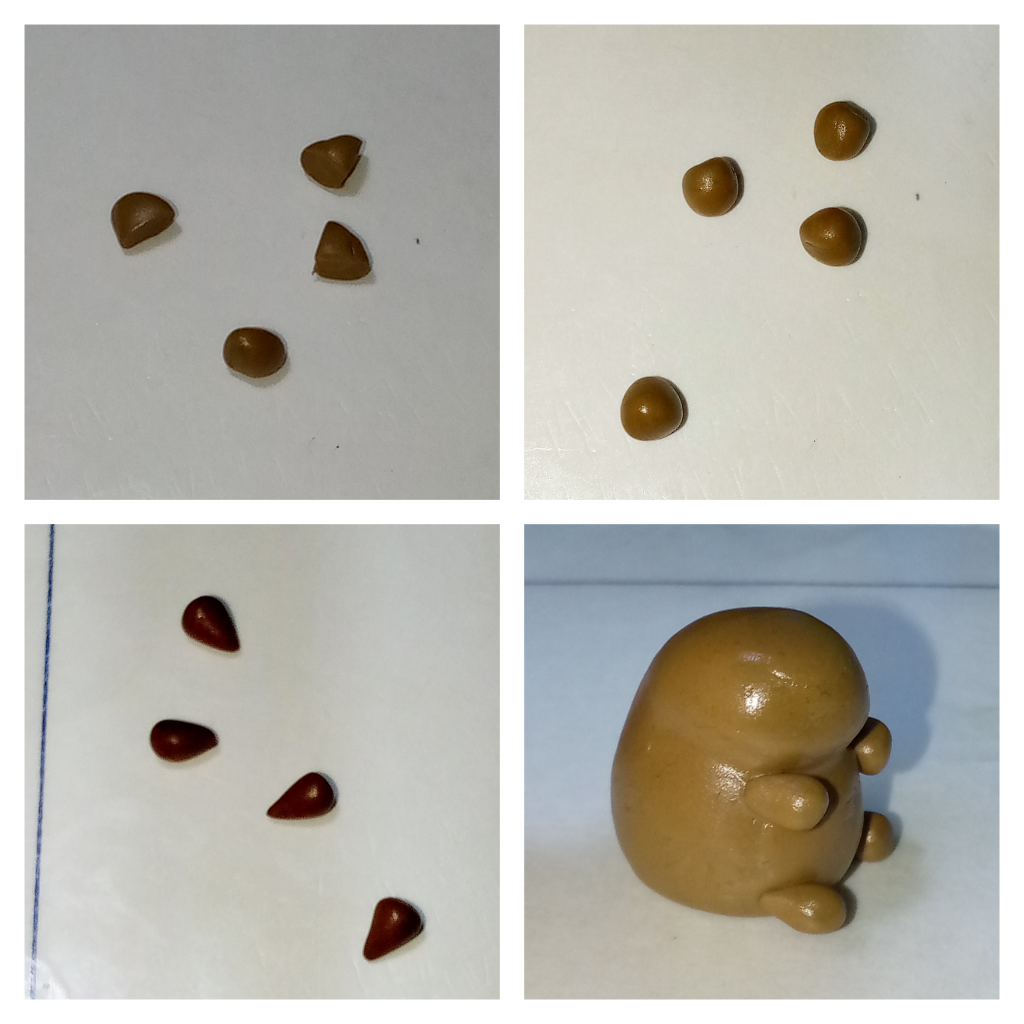
Con ayuda de una aguja de tejer, vamos a alisar o arrastrar la superficie de las patitas hacia el cuerpo para lograr una mejor integración entre ambas piezas de plasticina. Luego, con nuestros dedos, alisaremos y perfeccionaremos lo más posible la superficie para mejorar su aspecto y que se vea más prolijo y continuo.
Using a knitting needle, gently drag or smooth the surface of the paws toward the body to help blend and attach the clay pieces more seamlessly. Then, use your fingers to smooth and refine the surface as much as possible so it looks neat and continuous.

Para la parte de los deditos de la capibara, uniremos una porción de masa café con una pequeña cantidad de masa negra para obtener un tono castaño oscuro. Separaremos cuatro porciones súper pequeñas de esa mezcla y repetiremos el proceso anterior: bolitas, gotitas, pero esta vez las uniremos al inicio de cada pata, dejando la parte más delgada mirando hacia afuera. Las fijaremos bien usando nuestros dedos, sobando y apretándolas suavemente.
For the capybara’s little toes, mix a bit of brown clay with a tiny amount of black clay to get a dark chestnut color. Separate four tiny portions of that mix and repeat the same process: roll into balls, shape into droplets, but this time attach them to the base of each paw, with the thinner ends pointing outward. Press and smooth them gently with your fingers to secure them in place.
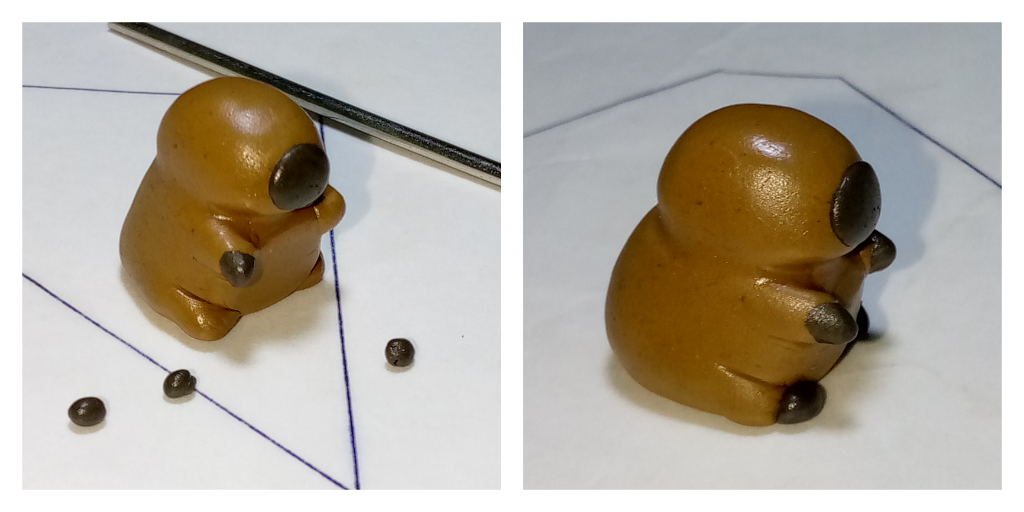
⭒₊ ⊹ 𝙷𝙾𝙲𝙸𝙲𝙾⭒₊ ⊹🤎₊ ⊹⭒𝚂𝙽𝙾𝚄𝚃 ⭒₊ ⊹
Amasaremos un óvalo, lo aplanaremos con el dedo lo más posible, con mucho cuidado, y lo colocaremos en el frente de su carita.
Knead an oval shape, flatten it gently with your finger as much as possible, and carefully place it on the front of the little face.

Para definir la nariz y la boca, usaremos un palillo o incluso un alfiler para hacer las hendiduras: dos para la nariz, una que va de la nariz a la boca, y dos más en forma de V invertida en la parte inferior, que representarán la boquita.
To define the nose and mouth, use a toothpick or even a pin to make the indentations: two for the nose, one that goes from the nose to the mouth, and two more in an upside-down V shape at the bottom to represent the little mouth.
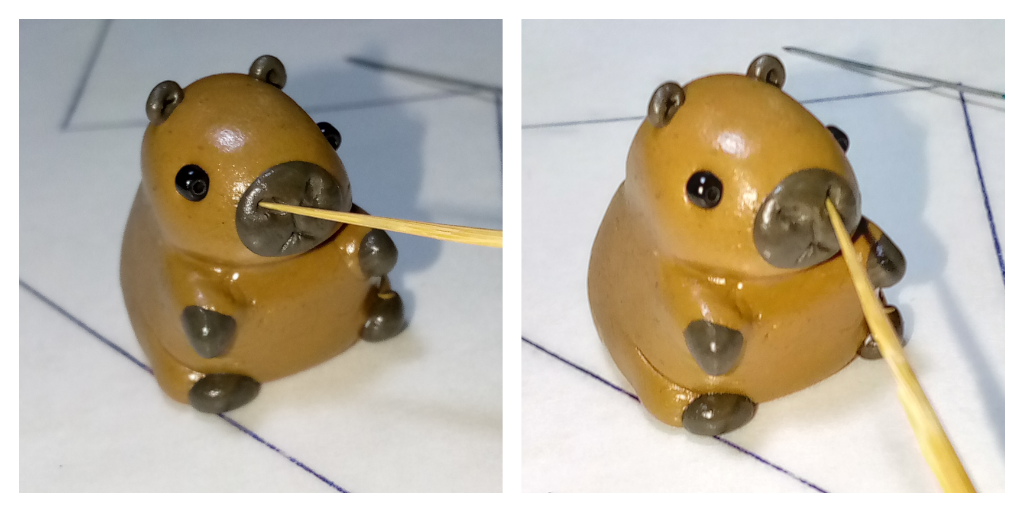
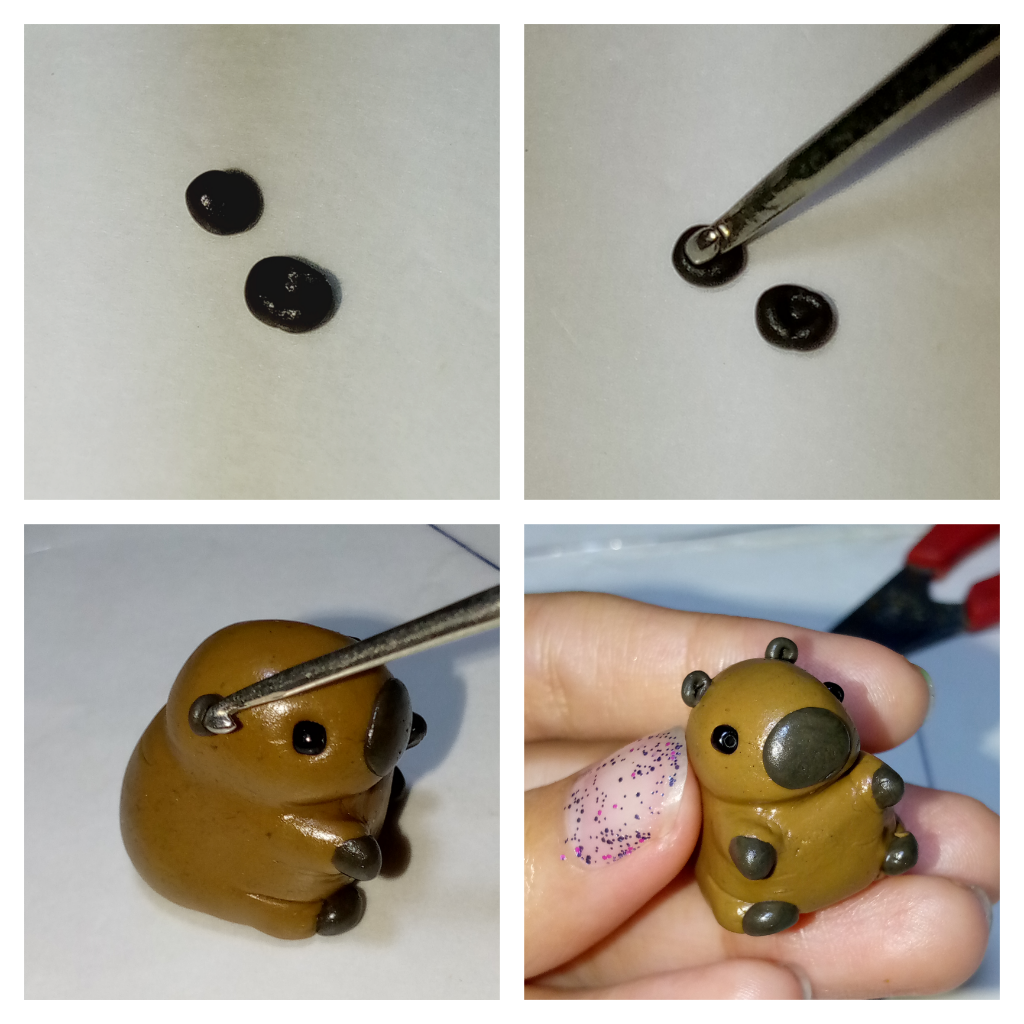
⭒₊ ⊹ 𝙾𝙹𝙸𝚃𝙾𝚂⭒₊ ⊹🤎₊ ⊹⭒𝙴𝚈𝙴𝚂 ⭒₊ ⊹
Con la aguja de tejer haremos dos espacios en la cara de nuestro roedor, y con ayuda del alfiler colocaremos las mostacillas en cada uno.
Use a knitting needle to make two small spaces on the face of our little rodent, and with the help of a pin, place the beads in each one.

⭒₊ ⊹ 𝙾𝚁𝙴𝙹𝙰𝚂⭒₊ ⊹🤎₊ ⊹⭒𝙴𝙰𝚁𝚂 ⭒₊ ⊹
Haremos dos pelotitas pequeñas, las presionaremos en el centro con la aguja de tejer, y las colocaremos directamente en la cabeza.
Make two small balls, press them in the center with a knitting needle, and place them directly on the head.
⭒₊ ⊹ 𝚃𝙾𝚁𝚃𝚄𝙼𝙾𝙲𝙷𝙸𝙻𝙰⭒₊ ⊹🐢₊ ⊹⭒𝚃𝚄𝚁𝚃𝙻𝙴𝙿𝙰𝙲𝙺⭒₊ ⊹
En mi caso, tomé una porción de plastilina verde y otra de plastilina amarilla para obtener un tono más claro.
Un my case, I took a portion of green clay and another of yellow clay to create a lighter shade.
Haremos una bolita y, con ayuda de nuestro dedo, la presionaremos contra la superficie para aplanarla. Procuren no hundir demasiado el centro, ya que lo que queremos es que quede como una especie de pancita o montañita que simule la forma del caparazón de la tortuga.
Roll it into a ball and gently press it against the surface with your finger to flatten it. Try not to press too much in the center—we want it to have a little bump or dome that mimics the shape of a turtle shell.
Separaremos cuatro trocitos pequeños que amasaremos en forma de pequeños arrocitos. Luego, tomaremos un último trocito, más grande que los anteriores, y también lo moldearemos en forma de arroz: esa será la cabeza de la tortuga. Ahora solo uniremos todas estas piezas por debajo del caparazón que hicimos anteriormente.
Separate four small pieces and shape them into tiny rice grains. Then take one last piece, slightly larger than the others, and shape it the same way—this will be the turtle’s head. Now simply attach all these pieces underneath the shell we made earlier.
Colocamos la tortuguita en la espalda de nuestra amiga capibara.
Place the little turtle on the back of our capybara friend.

Para las asas de la mochila, tomaremos una porción de masa, la estiraremos y amasaremos hasta formar pequeñas lombrices, lo más delgadas posible, para que queden proporcionadas al tamaño de la capibara y del bolso. Ubicaremos estas tiras rodeando los brazos de la capibara y regresando al caparazón de la tortuga.
For the backpack straps, take a portion of clay and stretch and roll it until you form thin little worms, as slim as possible so they match the size of the capybara and the backpack. Position these strips so they wrap around the capybara’s arms and return to the turtle shell.
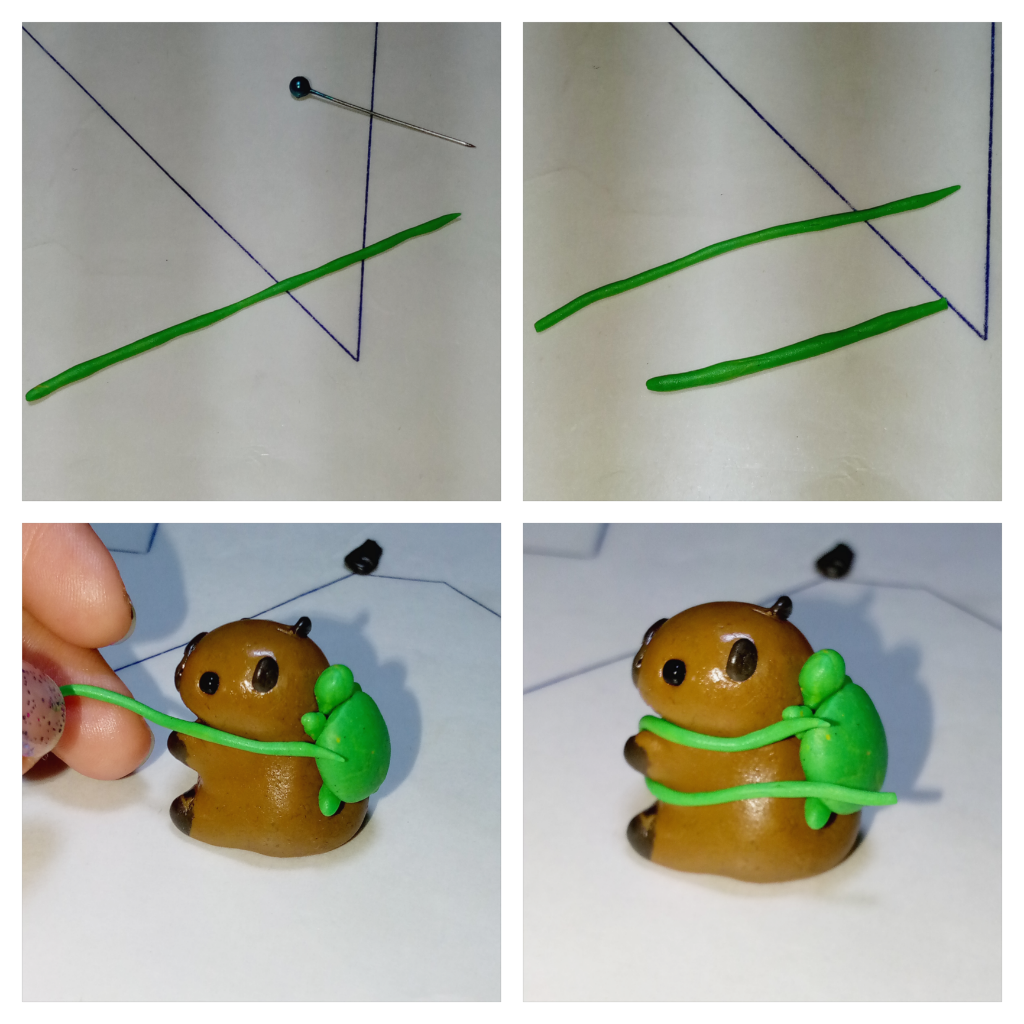
Cortamos el excedente de las tiras y, con ayuda de la aguja de tejer, las acoplamos lo mejor posible a los costados del caparazón, tal como se muestra en las fotografías.
Trim the excess from the strips and, using a knitting needle, blend them as neatly as possible into the sides of the shell, just like in the photos.

Haremos dos micro bolitas negras y, con ayuda del alfiler, marcaremos el lugar donde pondremos los ojitos de la tortuga. Para el diseño del caparazón, dibujaremos hexágonos: uno en el centro y los demás alrededor, hasta la mitad, siguiendo el patrón. Para dar profundidad y definición a este diseño, decidí tomar un lápiz de color verde oscuro, marcarlo sobre una hoja de papel, tomar un pincel fino húmedo, frotarlo ahí para que adquiriera el pigmento, y luego aplicarlo sobre el patrón del caparazón.
Make two tiny black balls and, with the help of a pin, mark the spots where the turtle’s eyes will go. For the shell design, draw hexagons—one in the center and the rest around it, halfway across, following the pattern. To add depth and definition to the design, I used a dark green colored pencil, marked it on a sheet of paper, dipped a fine wet brush into the pigment, and then applied it over the shell pattern.

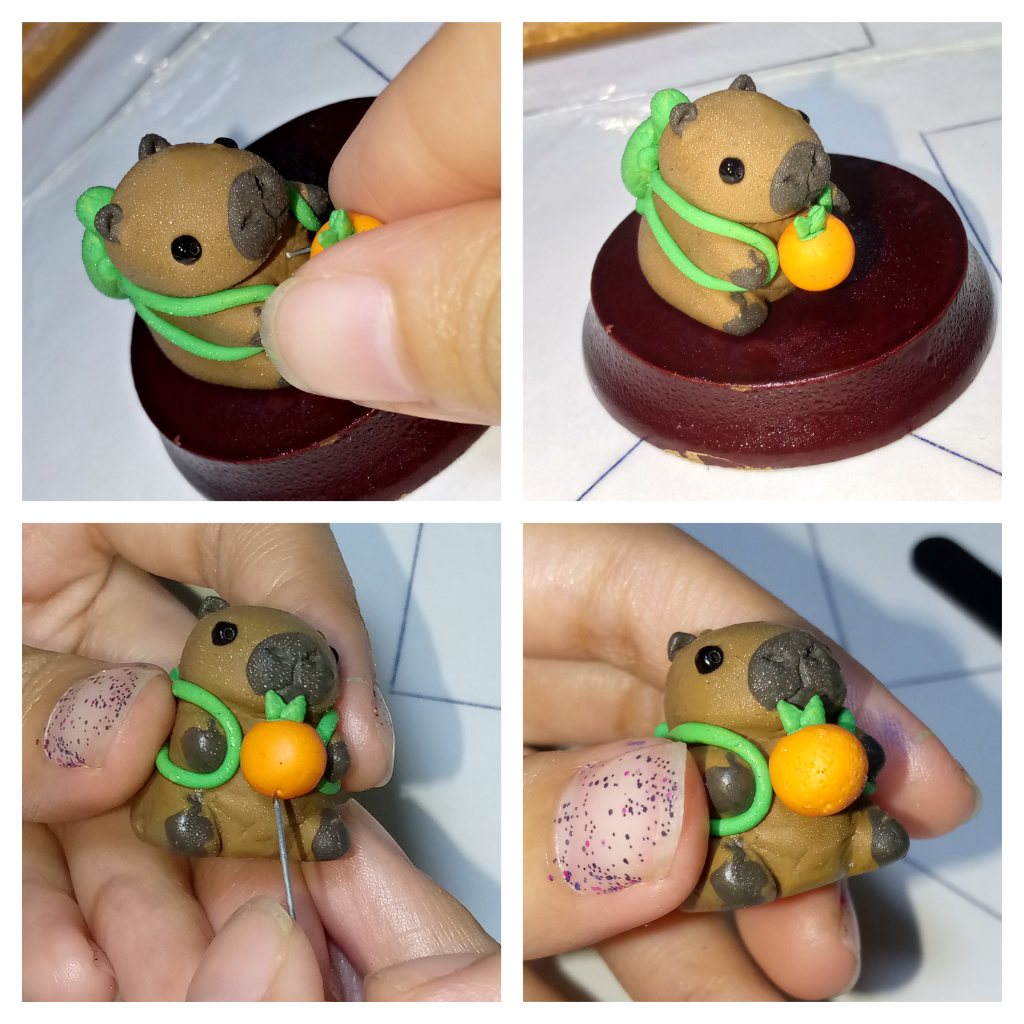
⭒₊ ⊹ 𝙼𝙰𝙽𝙳𝙰𝚁𝙸𝙽𝙰⭒₊ ⊹🍊₊ ⊹⭒𝙼𝙰𝙽𝙳𝙰𝚁𝙸𝙽𝙴 ⭒₊ ⊹
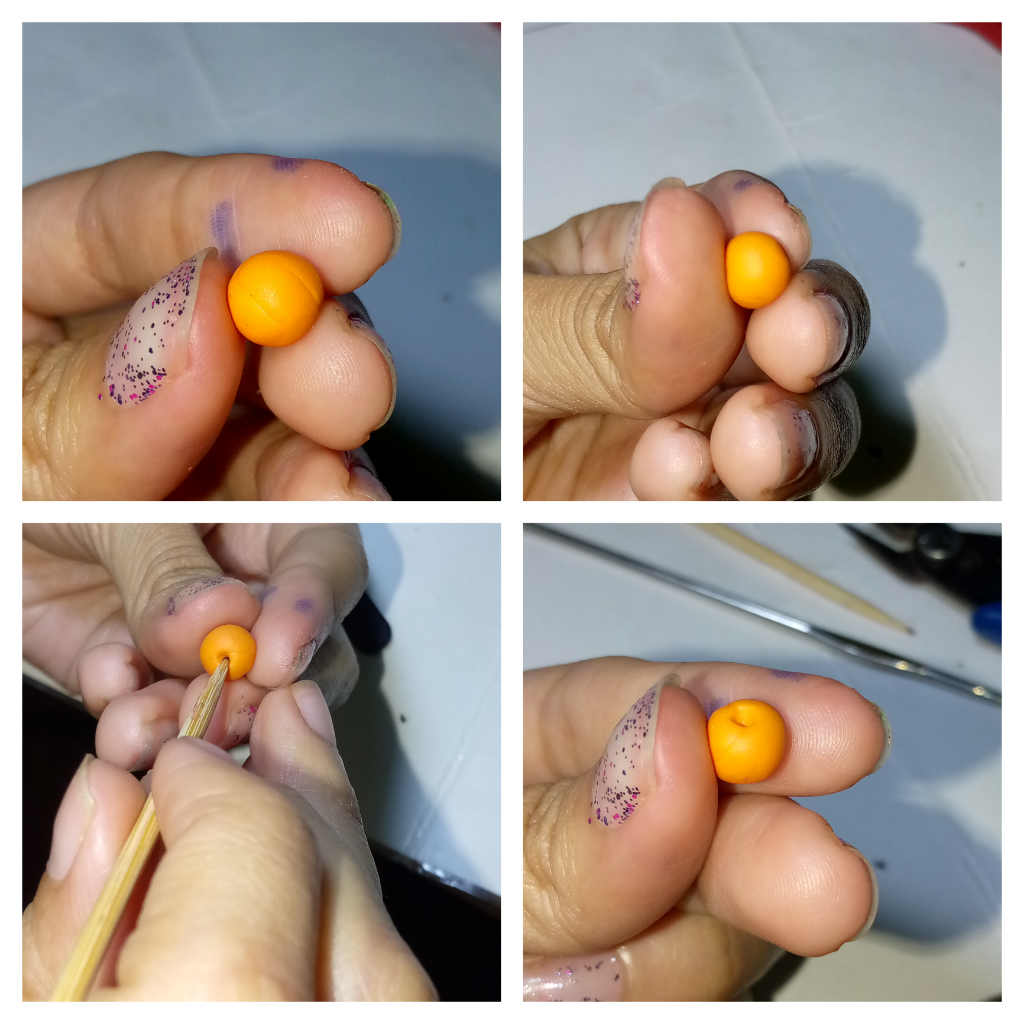
Tomamos una porción de plastilina naranja, haremos una pelotita, la aplastaremos y, con ayuda de un palillo, hundiremos ligeramente el centro hasta formar un pequeño agujero.
Take a portion of orange clay, roll it into a ball, flatten it, and with the help of a toothpick, gently press the center to create a small hole.
Luego tomaremos una pequeña porción de masa verde, haremos dos pelotitas pequeñas, les daremos forma de gotitas, las aplanaremos, y esas serán las hojitas que colocaremos en el agujero que hicimos anteriormente en nuestra mandarina. Tomaremos un pequeño trozo de alambre delgado y lo colocaremos en el centro, en el costado de la mandarina.
Next, take a small portion of green clay, make two tiny balls, shape them into little droplets, flatten them, and those will be the leaves we’ll place in the hole we made earlier in our mandarin. Take a small piece of thin wire and insert it into the center, on the side of the mandarin.
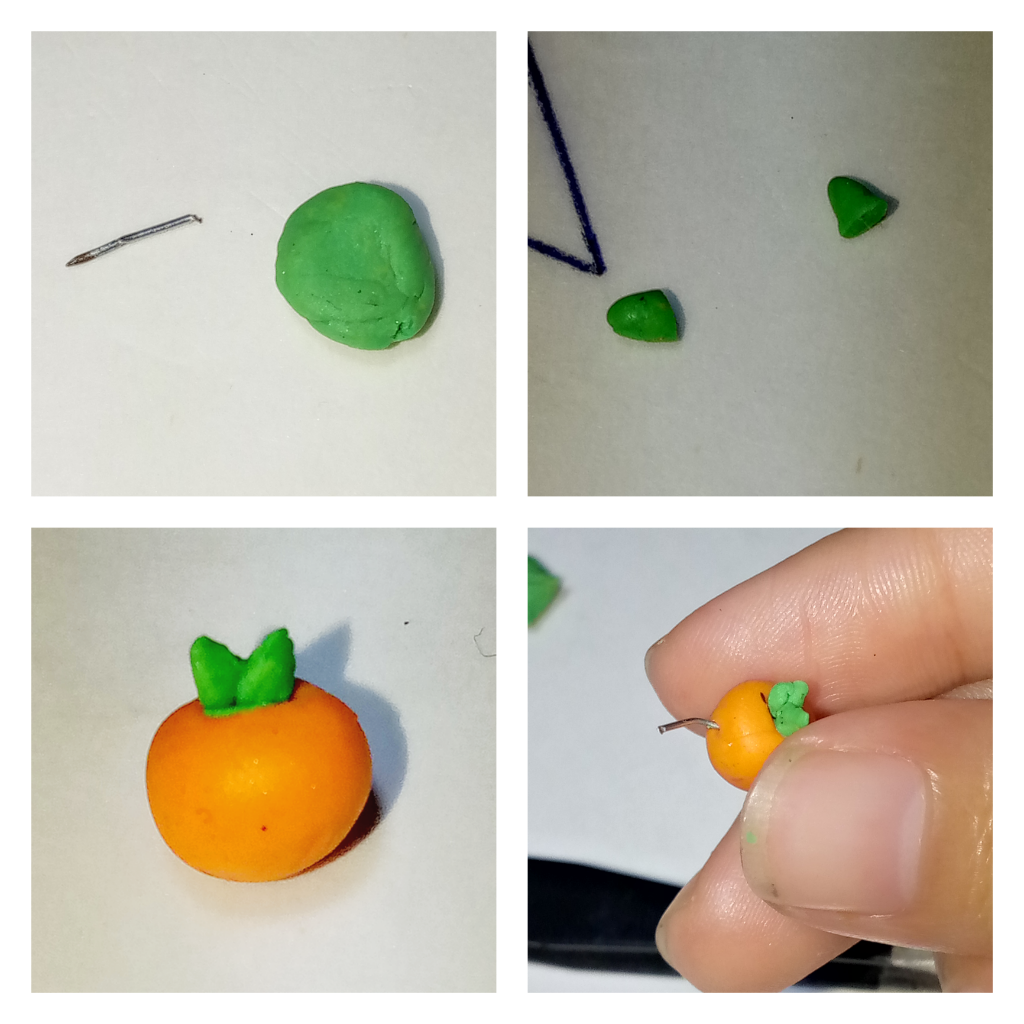
Con ayuda de este alambre, uniremos la mandarina a la pancita de la capibara para que parezca que la está sosteniendo.Por último, con ayuda de un alfiler, quise darle textura a la cáscara de la mandarina, así que empecé a pincharla levemente hasta que quedó bastante porosa.
Using this wire, attach the mandarin to the capybara’s belly so it looks like she’s holding it. Finally, with the help of a pin, I wanted to give the mandarin’s peel some texture, so I gently poked it until it looked nice and porous.
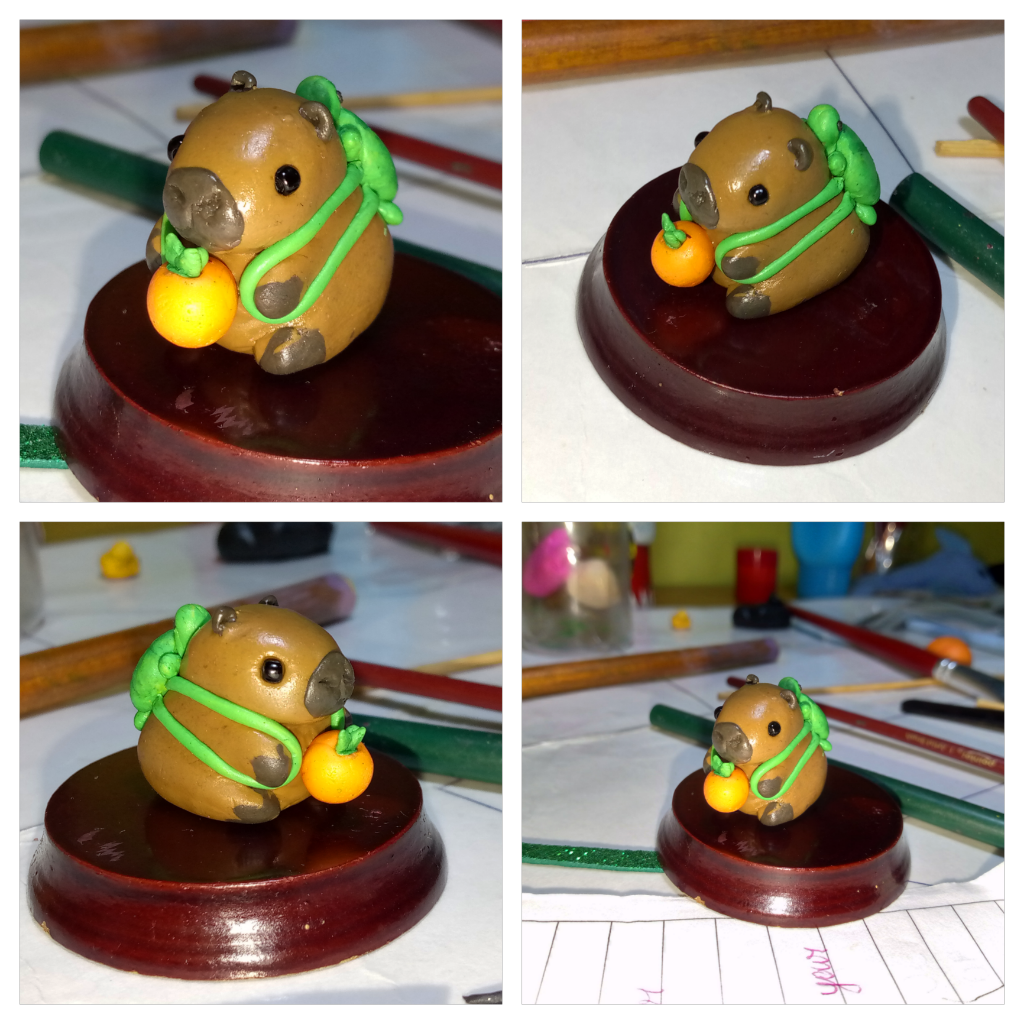
En mi caso, tuve la suerte de encontrar una base que me permitió trabajar más cómoda con este amiguito. Ustedes también pueden hacerlo si tienen en casa una tapa de algún frasco o un trozo de cartón firme.
In my case, I was lucky to find a base that made working with this little friend more comfortable. You can do the same if you have a jar lid or a piece of sturdy cardboard at home.
⭒₊ ⊹𝑫𝑬𝑻𝑨𝑳𝑳𝑬𝑺⭒₊ ⊹🌿₊ ⊹⭒ 𝑫𝑬𝑻𝑨𝑰𝑳𝑺⭒₊ ⊹
Con ayuda de un pincel delgado, tomaremos sombra verde clara y la aplicaremos en los puntos donde el caparazón y la tortuga reciben más luz. Con sombra verde oscura, marcaremos las zonas donde queremos generar mayor profundidad.
Using a thin brush, apply light green eyeshadow to the areas where the turtle and its shell catch the most light. Then, use dark green eyeshadow to mark the spots where you want to add depth.
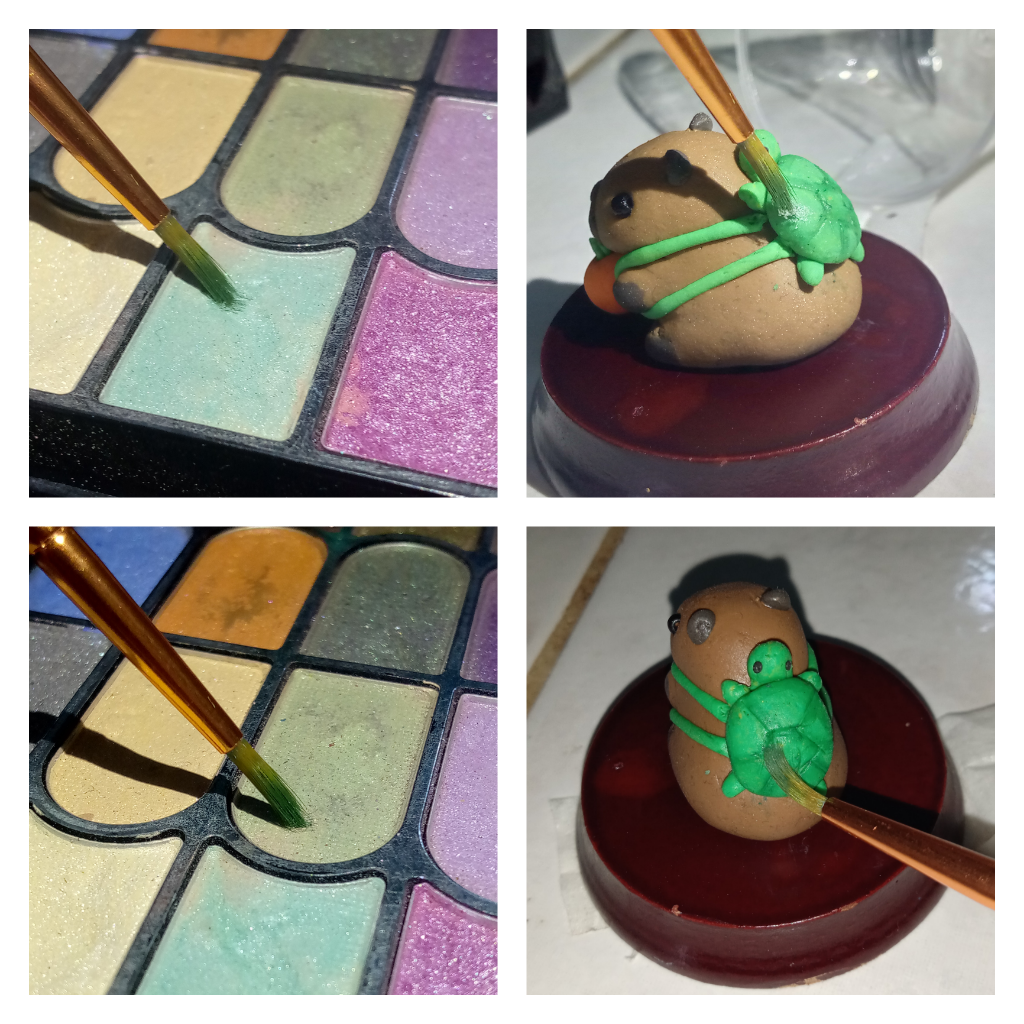
Cargaremos el pincel con sombra satinada beige y la aplicaremos en la parte superior. Para la parte inferior, pigmenté con sombra color terracota.
Load the brush with satin beige eyeshadow and apply it to the top area. For the bottom, I used terracotta-colored eyeshadow.

Este es nuestro adorable resultado final. ¡Espero que les haya gustado! Y que se estén derritiendo de amor como yo. Pronto encontraré una manera de endurecer estas piezas para asegurarnos de que duren y duren, e incluso podamos usarlas como llaveros. Pronto, pronto aprenderé y lo compartiré con ustedes.
This is our adorable final result. I hope you liked it! And I hope you’re melting with love just like I am. Soon I’ll find a way to harden these pieces so they last and last—and maybe even turn them into keychains. I’ll learn how soon and share it with you all.

Nos vemos muy pronto en una próxima publicación, espero poder trabajar pronto en ella con mucho cariño como siempre trato de hacerlo ✨🧡🍊🌿💚 ¡Muchas gracias por todo su apoyo, chicos! 💙🍁✨
I’ll see you again very soon in an upcoming post. I hope to start working on it soon, with the same care and love I always try to put into everything ✨💚 Thank you so much for all your support, guys! 💙🍁✨
◈ Todas las imágenes me pertenecen - Fotografías de mi autoría tomadas con un Redmi 9C.📱
◈ Traducción al inglés - English translation ➼ Chat GPT en Telegram