


El Día de la Madre ya casi está aquí y, obviamente, he hecho una tarjeta. Esta tarjeta es muy colorida y tiene muchos elementos, como frases muy lindas que expresan un poco lo que se siente por una madre.
Toma nota de estos sencillos materiales:
- Cartulina de tres colores a elegir
- Cartulina blanca
- Cartulina negra
- Rotulador negro
- Pegamento
- Regla
- Tijera
Mother's Day is just around the corner and obviously I made a card. This card is very colorful and has many elements, such as very cute phrases that express a little bit of how you feel about a mother.
Take note of these simple materials:
- Card stock in three colors of your choice.
- White card stock
- Black cardboard
- Black marker pen
- Glue
- Ruler
- Scissors

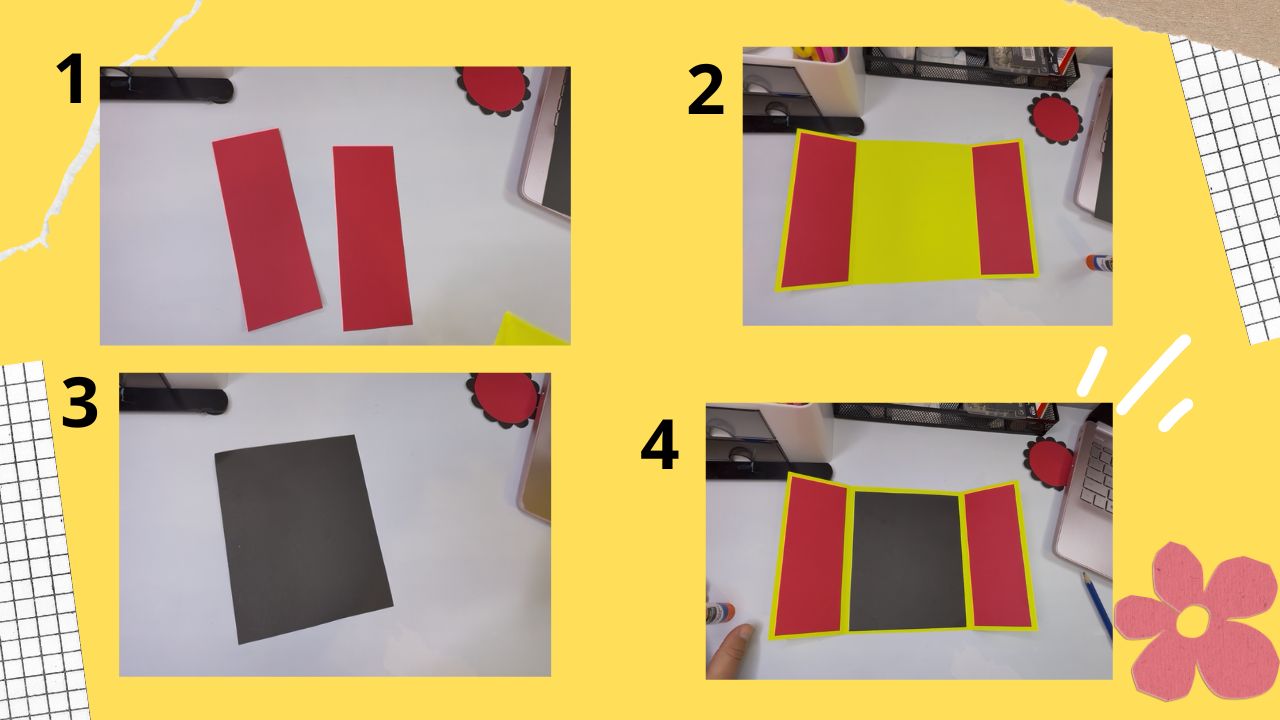
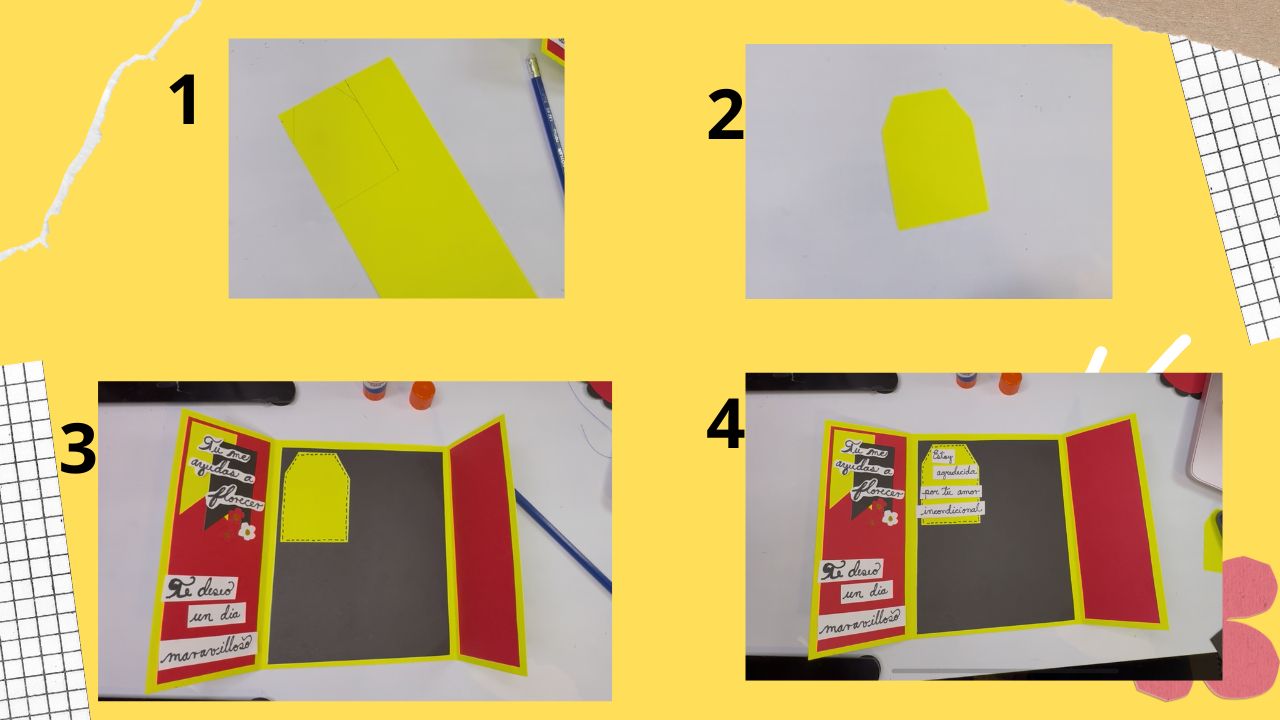
- Una Hoja de cartulina de 27 cm de ancho por 17 cm de largo la divido en tres secciones de 7 cm, 14cm , 7 cm.
- A sheet of cardboard 27 cm wide by 17 cm long I divide it into three sections of 7 cm, 14 cm, 7 cm.

- Voy a empezar por el interior de la tarjeta. Con cartulina de otro color, yo elegí rojo, hice dos cuadrados de 6 cm de ancho por 16 cm de largo y pegué uno en la primera cuadrícula y el otro en la tercera. Con cartulina negra hice un cuadrado de 13 cm por 16 cm y lo pegué en la cuadrícula del medio.
- I'm going to start with the inside of the card. With card stock of a different color, I chose red, I made two squares 6 cm wide by 16 cm long and glued one in the first grid and the other in the third grid. With black cardstock I made a square 13 cm by 16 cm and glued it in the middle grid.
- Con cartulina amarilla y negra hice banderines de cada color y los pegué en la primera cuadrícula. Pegue el amarillo en la esquina superior y el negro encima del amarillo.
- With yellow and black cardstock I made pennants of each color and glued them on the first grid. Glue the yellow in the top corner and the black on top of the yellow.
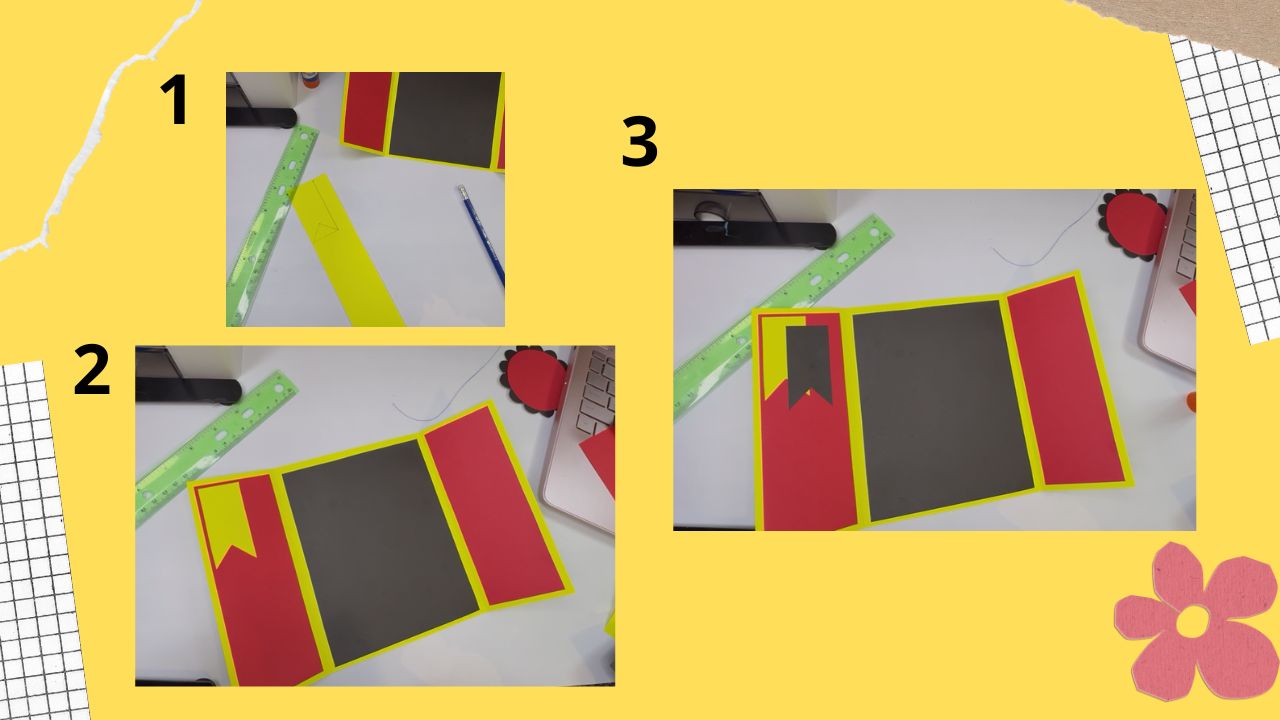
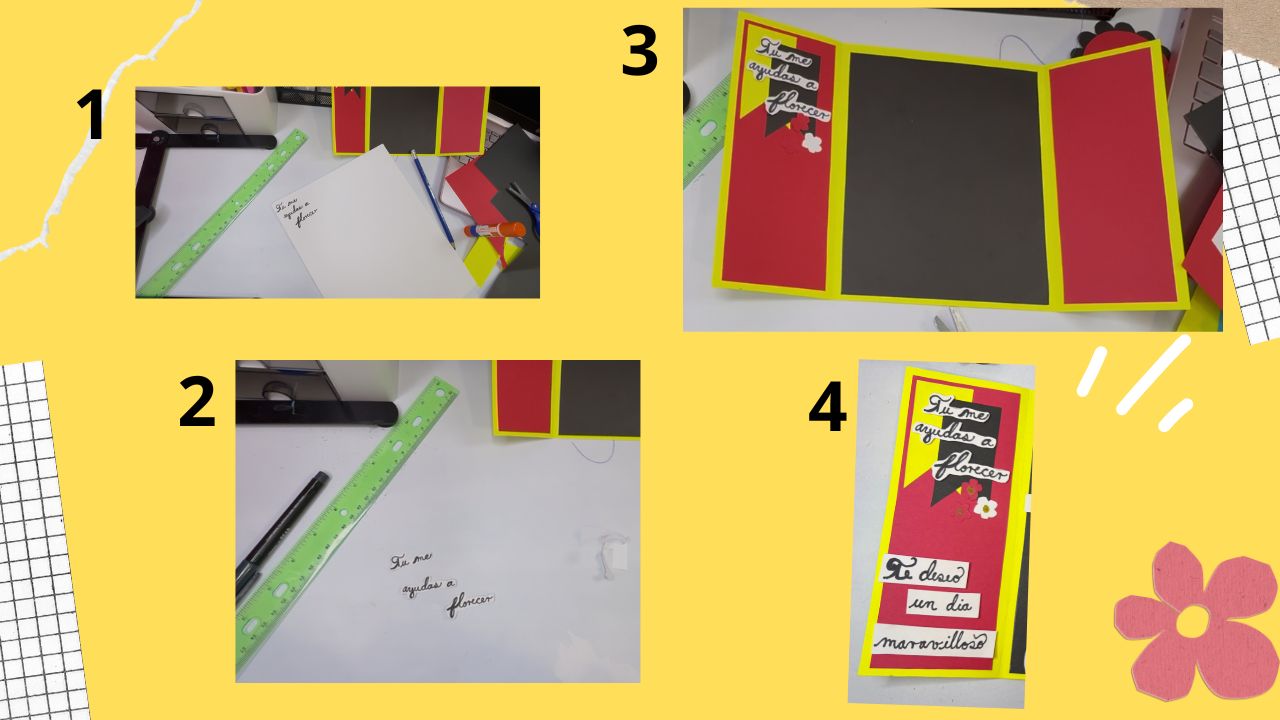
- Luego, en cartulina blanca y con rotulador negro escribí la frase «Tú me ayudas a florecer». Recorté cada palabra por todo el borde y las pegué en los banderines con cinta de doble cara. Hice y pegué dos florecitas.
- También escribí la frase «Te deseo un día maravilloso», que corté en tres partes y pegué más abajo de esta misma cuadrícula.
- Then, on white cardstock and with black marker I wrote the phrase “You help me bloom”. I cut out each word all around the edge and glued them to the banners with double-sided tape. I made and glued on two little flowers.
- I also wrote the phrase “I wish you a wonderful day,” which I cut into three parts and glued further down this same grid.
- Utilicé cartulina amarilla para hacer una etiqueta, para ello hice un rectángulo de 7 cm por 5 cm y corté en diagonal las puntas de la parte superior. Con un rotulador negro hice pequeñas rayas por todo el borde y las pegué en la esquina superior de la cuadrícula negra.
- En la cartulina blanca y con un rotulador negro escribí «Aprecio tu amor incondicional». Corté la frase en cuatro partes y la pegué a la etiqueta amarilla.
- I used yellow cardstock to make a tag, for this I made a 7 cm by 5 cm rectangle and cut diagonally the ends of the top. With a black marker pen I made small stripes all around the edge and glued them in the upper corner of the black grid.
- On the white cardstock and with a black marker I wrote “I appreciate your unconditional love”. I cut the phrase into four parts and glued it to the yellow label.
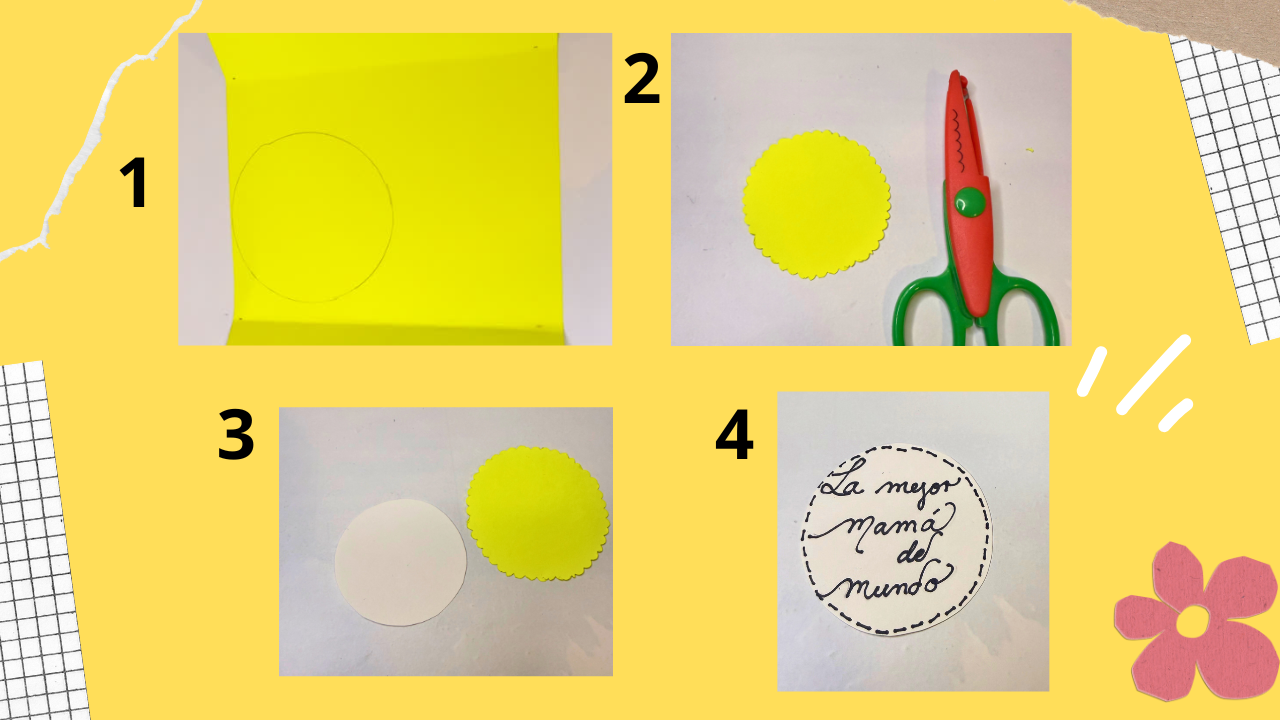
- En cartulina amarilla hice un círculo que recorté con tijeras con figuras y en cartulina blanca hice otro círculo un centímetro más pequeño, en este círculo blanco escribí «La mejor mamá del mundo» y con rotulador negro hice pequeñas líneas por todo el borde del círculo.
- In yellow cardboard I made a circle that I cut out with scissors with figures and in white cardboard I made another circle one centimeter smaller, in this white circle I wrote “The best mom in the world” and with black marker I made small lines all around the edge of the circle.
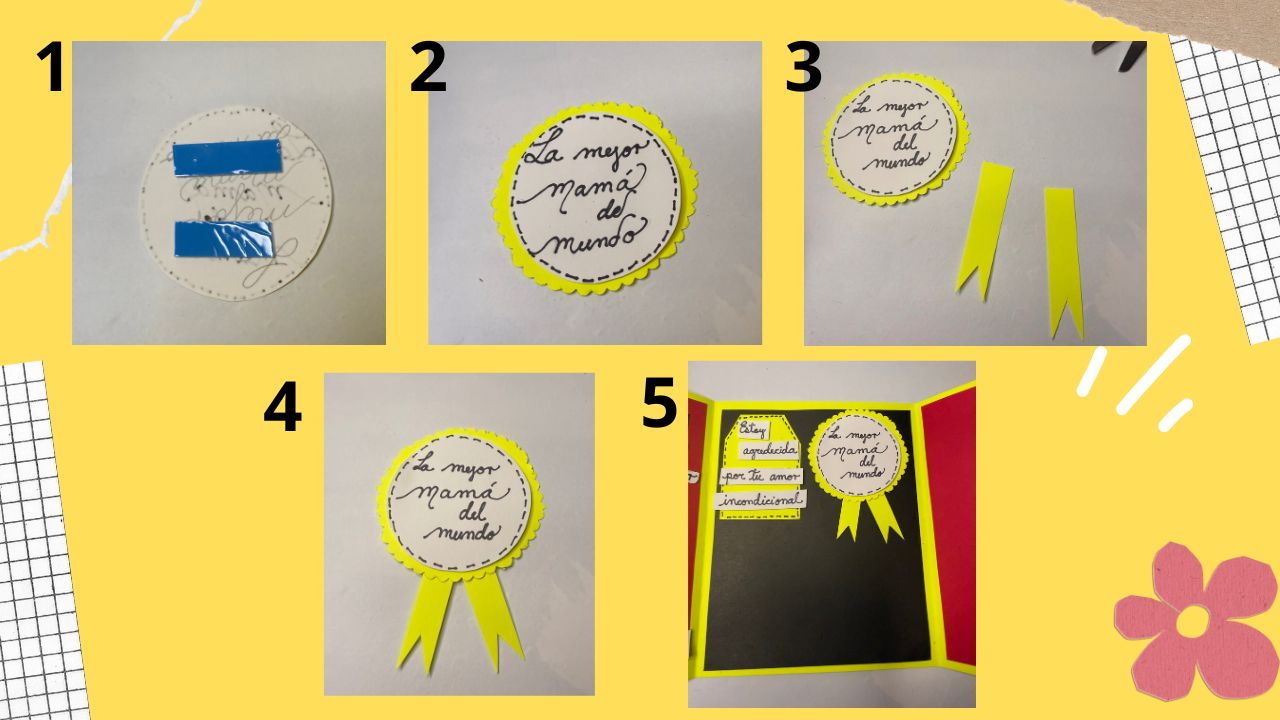
- Con cinta de doble cara pegué el círculo blanco sobre el amarillo, y con cartulina amarilla hice dos cintas para hacer una insignia de reconocimiento.
- With double-sided tape I glued the white circle over the yellow one, and with yellow cardboard I made two ribbons to make a recognition badge.
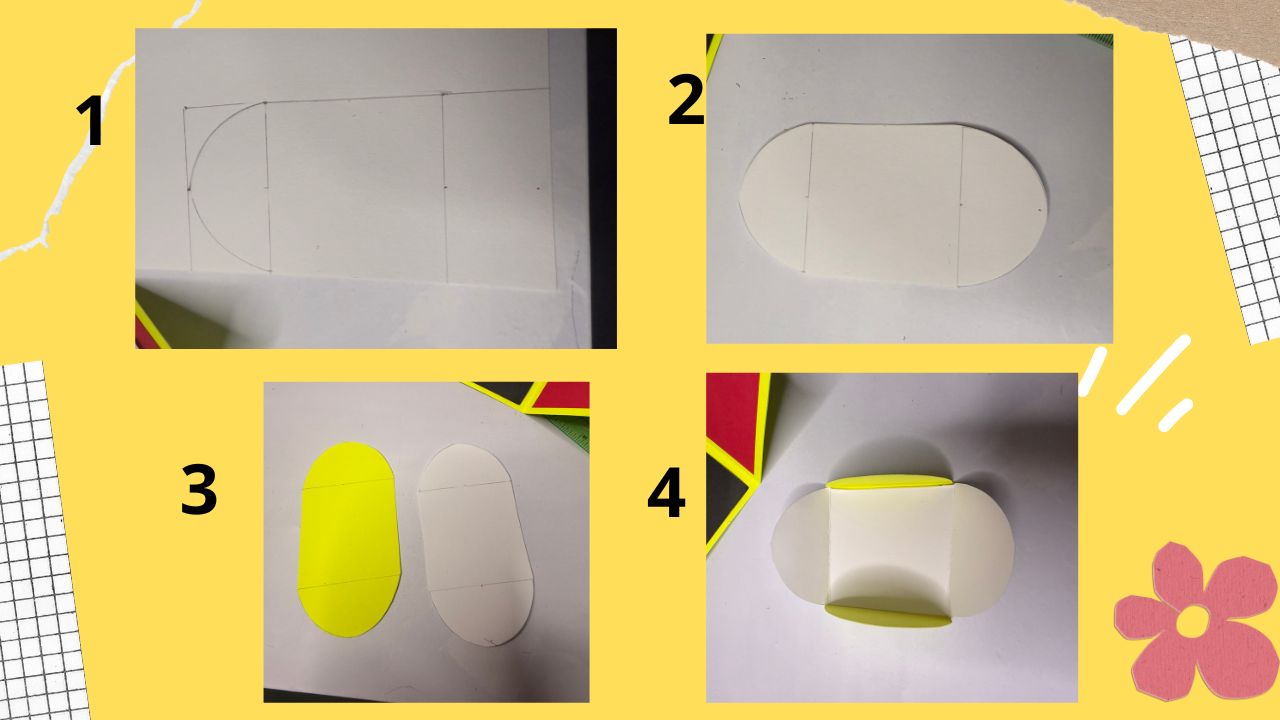
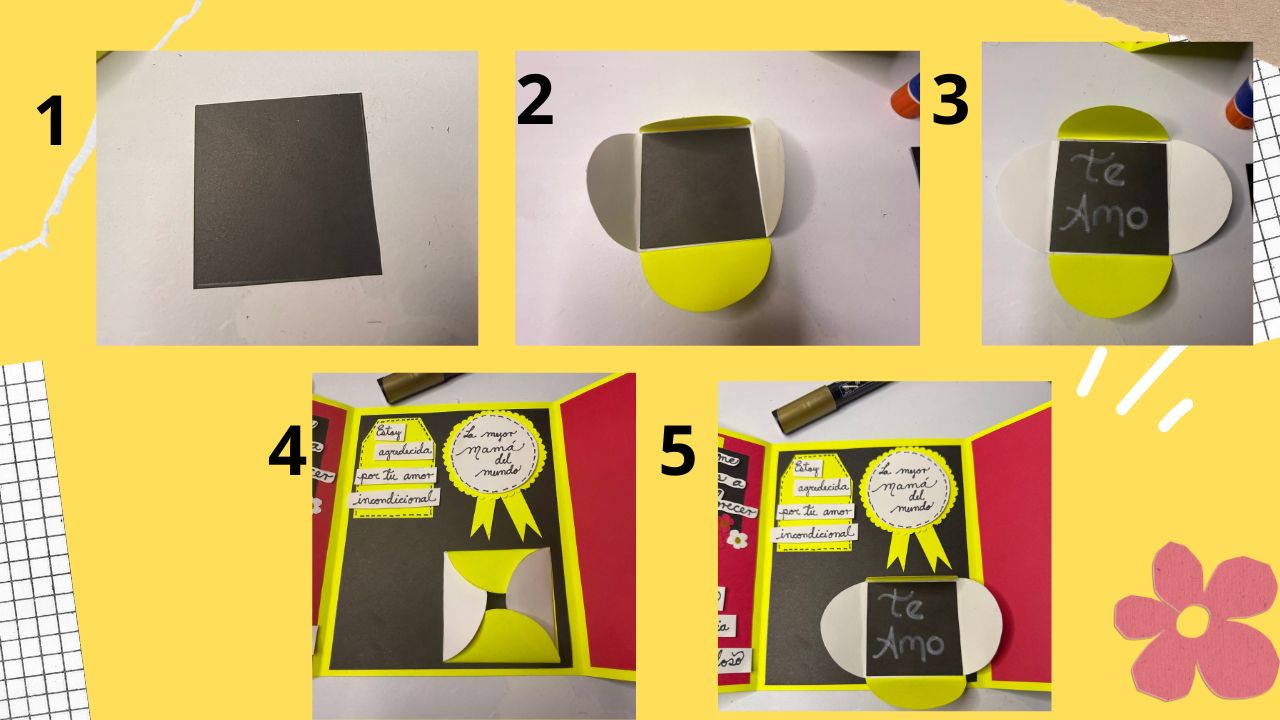
- Hice un rectángulo de 12 cm con cartulina blanca, luego lo dividí en tres partes de 3 cm, 6 cm, 3 cm, las esquinas de los cuadrados de 3 cm las redondeé. Repite el proceso en la cartulina amarilla y pégala en el centro con la cartulina blanca.
- I made a 12 cm rectangle with white cardstock, then divided it into three parts of 3 cm, 6 cm, 3 cm, the corners of the 3 cm squares I rounded. Repeat the process on the yellow cardboard and glue it in the center with the white cardboard.
- En cartulina negra hice un cuadrado de 6 cm por 6 cm y lo pegué en el centro donde escribí «Te quiero». Lo coloqué y lo pegué en la cuadrícula central debajo de la insignia.
- On black cardstock I made a 6 cm by 6 cm square and glued it in the center where I wrote “I love you”. I placed it and glued it in the center grid below the badge.
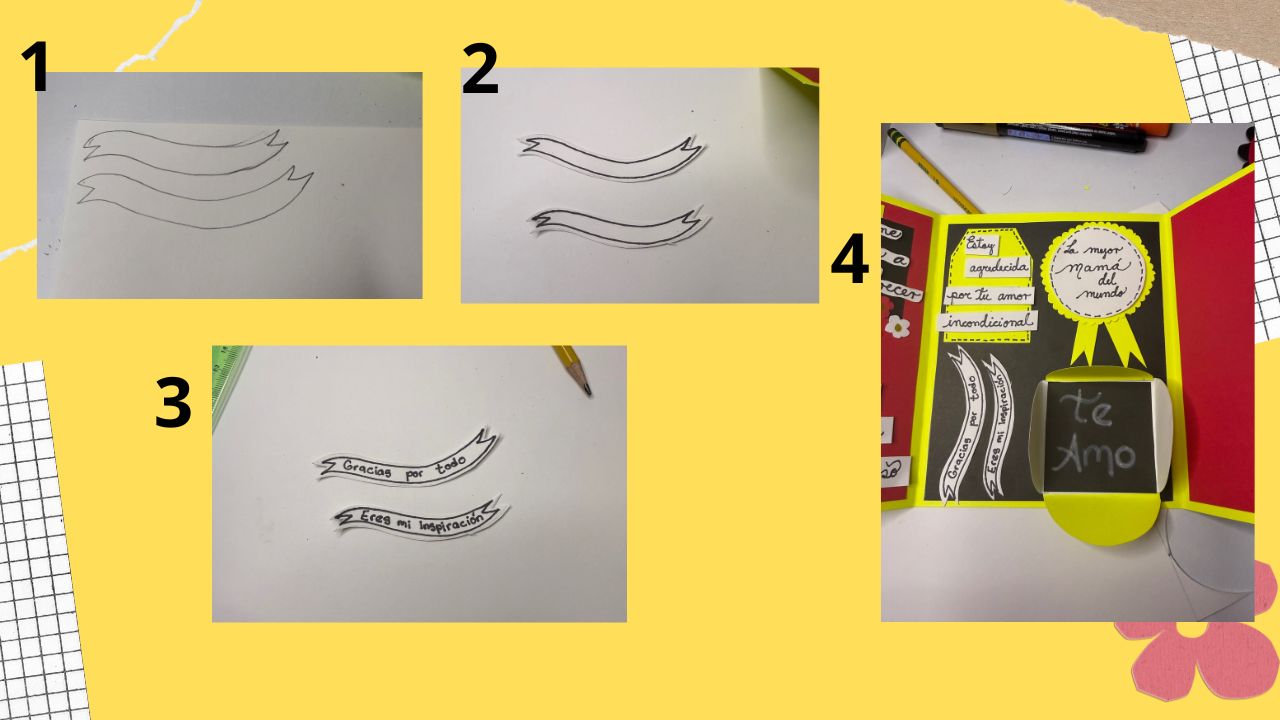
- En cartulina blanca hice dos banderines, con rotulador negro hice un borde alrededor y escribí en un banderín «Gracias por todo» y en el otro «Eres mi inspiración». Los pegué en la misma cuadrícula negra.
- On white cardstock I made two pennants, with black marker I made a border around them and wrote on one pennant “Thank you for everything” and on the other “You are my inspiration”. I glued them on the same black grid.
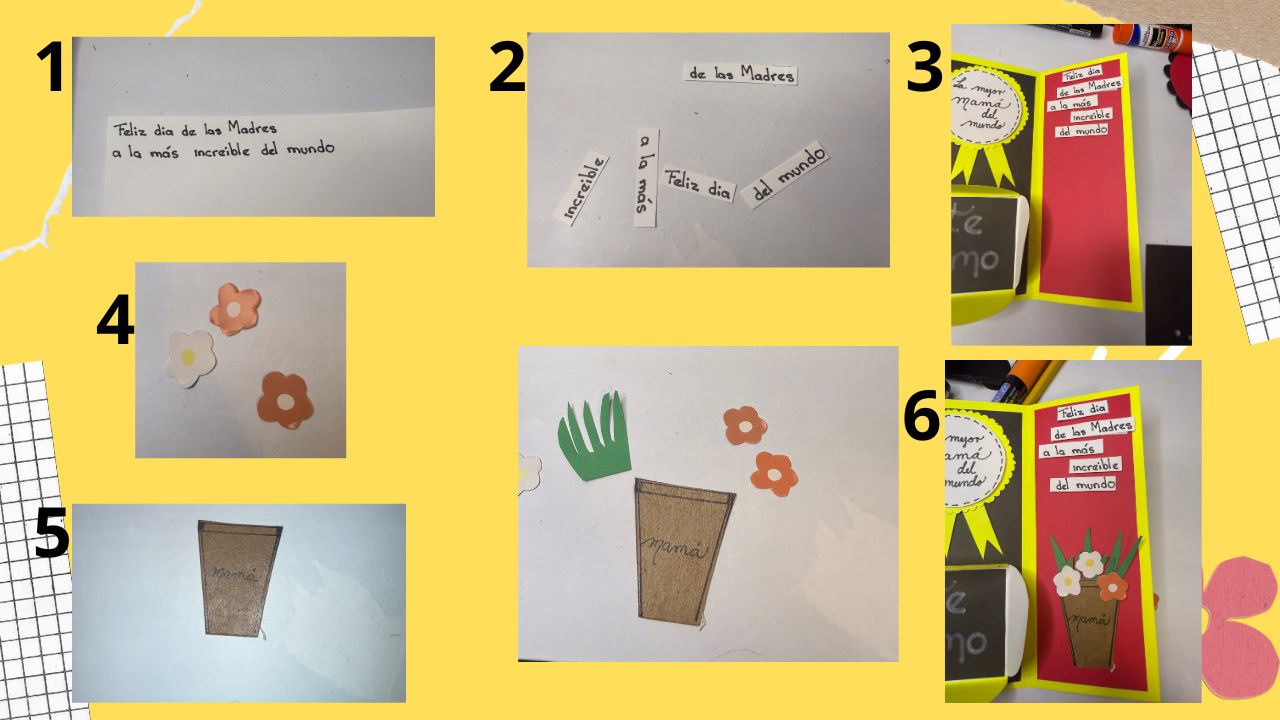
- Procedí a decorar la última cuadrícula del interior de la tarjeta. Para ello escribí en cartulina blanca «Feliz día de las madres a la más increíble del mundo» Dividí esta frase en 5 partes y la pegué con cinta de doble cara.
- Para terminar esta parte hice un jarrón, en el que utilicé cartulina marrón, unas florecitas y unas ramitas en cartulina verde.
- I proceeded to decorate the last grid on the inside of the card. To do this I wrote on white cardboard “Happy Mother's Day to the most amazing mother in the world” I divided this phrase into 5 parts and glued it with double-sided tape.
- To finish this part I made a vase, in which I used brown cardboard, some little flowers and some twigs in green cardboard.
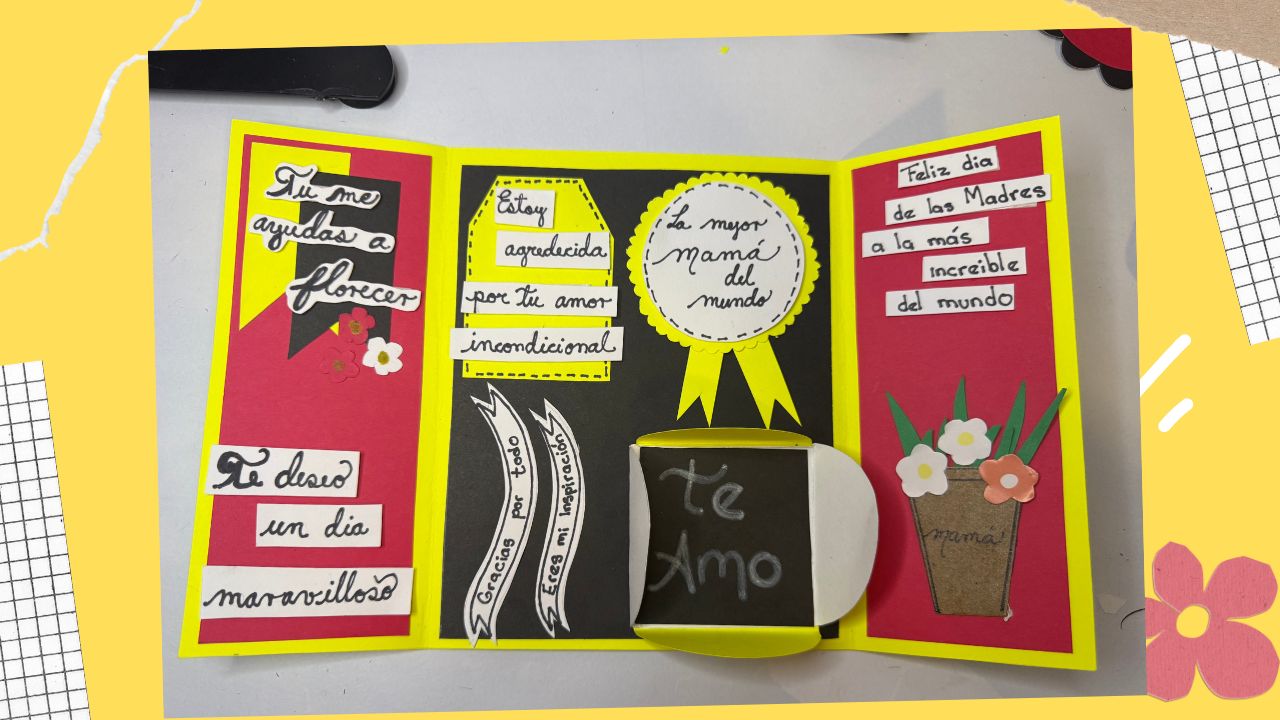
- Este es el resultado de la parte interna, que me encanta, tiene muchos detalles y frases hermosas donde expreso un poco de lo mucho que siento por mi mamá.
- This is the result of the inner part, which I love, it has many details and beautiful phrases where I express a little of how much I feel for my mom.
- Para la portada de la tarjeta hice un círculo de 7 cm de diámetro en cartulina roja.
- For the card cover I made a circle 7 cm in diameter out of red card stock.
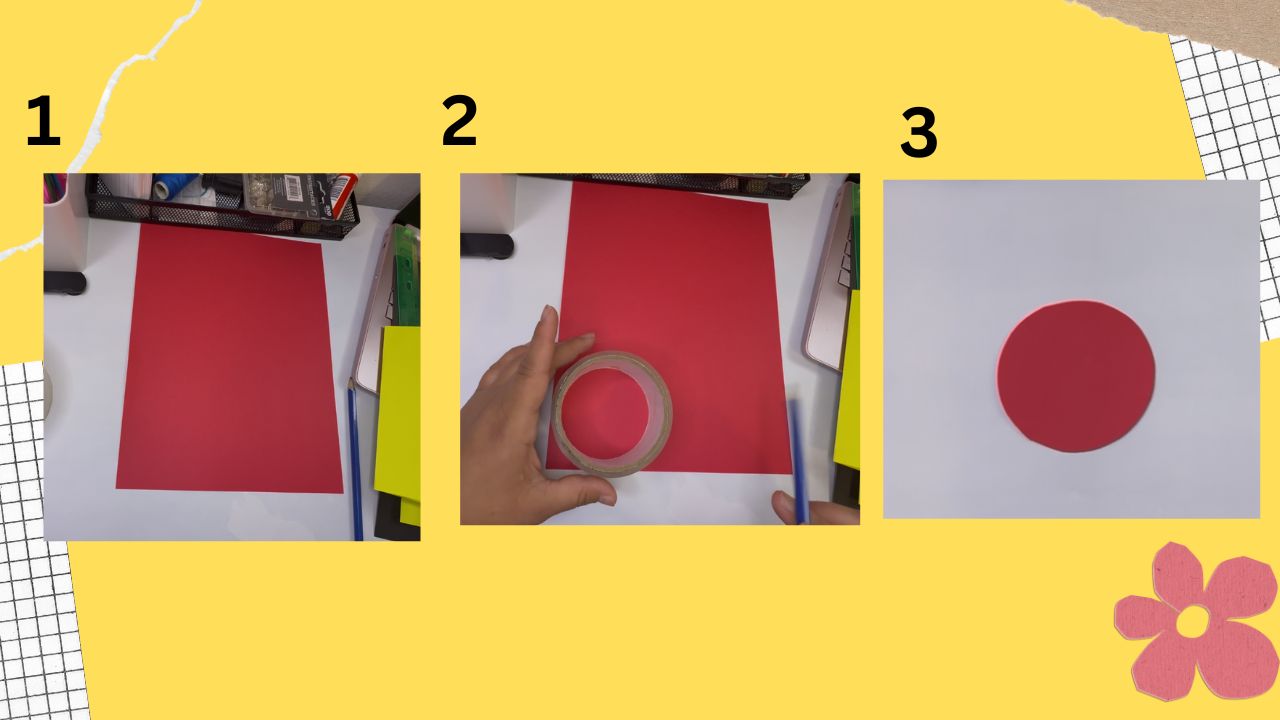
- Con la medida del círculo rojo hice otro círculo negro y alrededor hice medios círculos para hacer una flor, pegué el círculo rojo sobre el negro y esta pieza la pegué en el centro de la tarjeta sólo poniendo pegamento en la mitad de la flor para que se pueda abrir la tarjeta.
- En la cartulina blanca escribí «Feliz día mama'». Recorté cada palabra por todo el borde y la pegué en el centro de la flor.
- With the measure of the red circle I made another black circle and around it I made half circles to make a flower, I glued the red circle over the black one and this piece I glued it in the center of the card just putting glue in the center of the flower so that the card can be opened.
- On the white card stock I wrote “Happy Mother's Day”. I cut out each word all the way around the edge and glued it in the center of the flower.
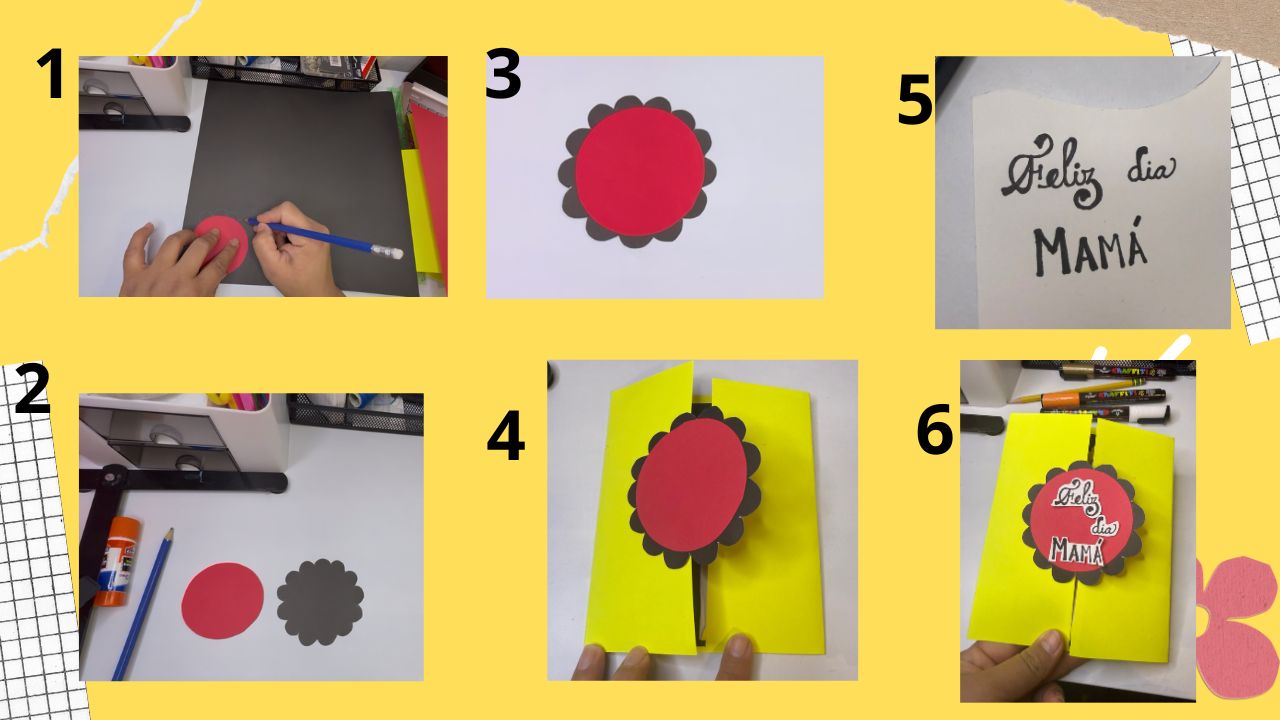
- Este es el resultado de esta bonita y creativa tarjeta para el Día de la Madre.
- This is the result of this beautiful and creative Mother's Day card.

Estaré encantada de leer y responder a sus comentarios. Gracias totales a todos los que aprecian mi contenido, y que se toman el tiempo de leer y dejar un comentario, gracias, muchas gracias. Les deseo lo mejor.
Hasta pronto.
I will be happy to read and respond to your comments. Total thanks to all of you who appreciate my content, and who take the time to read and leave a comment, thank you, thank you very much. I wish you all the best.
See you soon.
Otros trabajos similares :
| DIY - Creative card for mom ENG/SPA | DIY - Surprise gift box ENG/ESP | DIY "A card dedicated to my favorite hiver " ENG/ESP | Creative wedding anniversary card ENG/SPA | DIY- Tarjeta creativa de cumpleaños 🧁 |
|---|---|---|---|---|
| https://images.hive.blog/0x0/https://files.peakd.com/file/peakd-hive/kellyrsa/EowKvD1pvgxCaws64x1xgU2RJRMFWAZAzvXWEv9JfUkc91dFxBa5XYP6gTg4Zk1qY1j.gif | https://images.hive.blog/0x0/https://files.peakd.com/file/peakd-hive/kellyrsa/23zGq37p2bHoU7rsqQmGP1wH4nx92hkBYkzzRjcgU7gbXLPgfrorSDbxubFmGPLrCReZZ.gif | https://images.hive.blog/0x0/https://files.peakd.com/file/peakd-hive/kellyrsa/Ep1Zm1NajzYUtrAtYh6iMwmmYkpAFVgbegRRjp9WdmbovrV3B6R1PyvahRQsMyVL4Ua.gif | https://images.hive.blog/0x0/https://files.peakd.com/file/peakd-hive/kellyrsa/48PwLvzUMNNRJ4mmZknvHrzxZx58RRifC2VvpgDB36zjF8SUUXpMdbd7DqWSUyYHgc.gif |  |
Fotografías de mi propiedad tomadas con el celular iPhone 📲 16 pro max, editadas en [canva](https://www.canva.com/)
Traducción realizada con la versión gratuita del [
traductor DeepL](https://www.deepl.com/)
Todos los diseños fueron creados en [canva](https://www.canva.com/)