###### ✨¡Hola amigos amantes de la creatividad! Espero que estén todos bien.✨
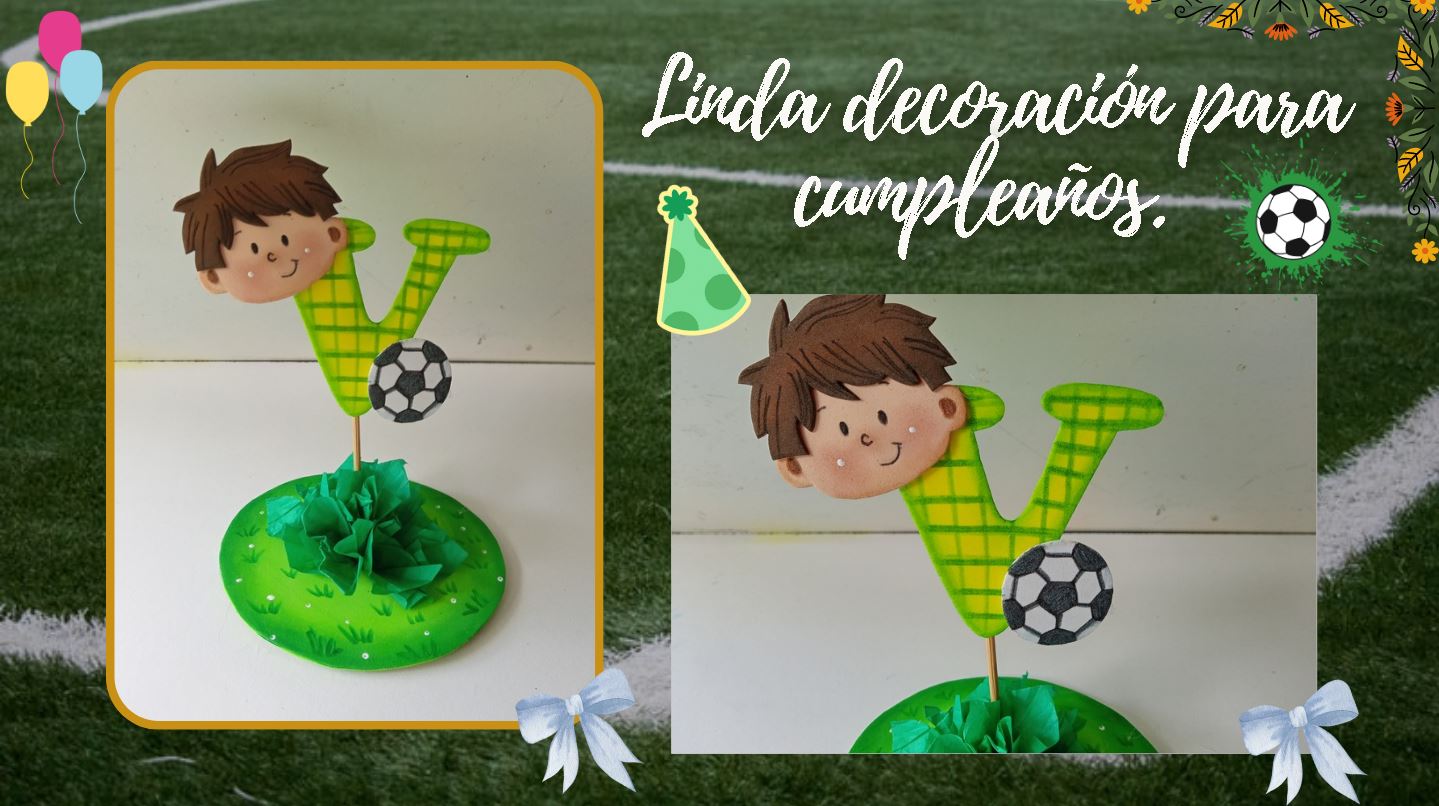
¡Buenas tardes, amigos! Espero estén pasando una excelente semana. Por mi parte, contenta de pasar por acá a compartir una linda idea con ustedes. En esta ocasión les comparto el paso a paso para elaborar una linda decoración para cumpleaños. Esta idea la pensé como topper para un pastel, pero luego pensé que también se vería muy bien como parte del centro de mesa, así que depende de cada uno el uso que le quiera dar a esta linda decoración.
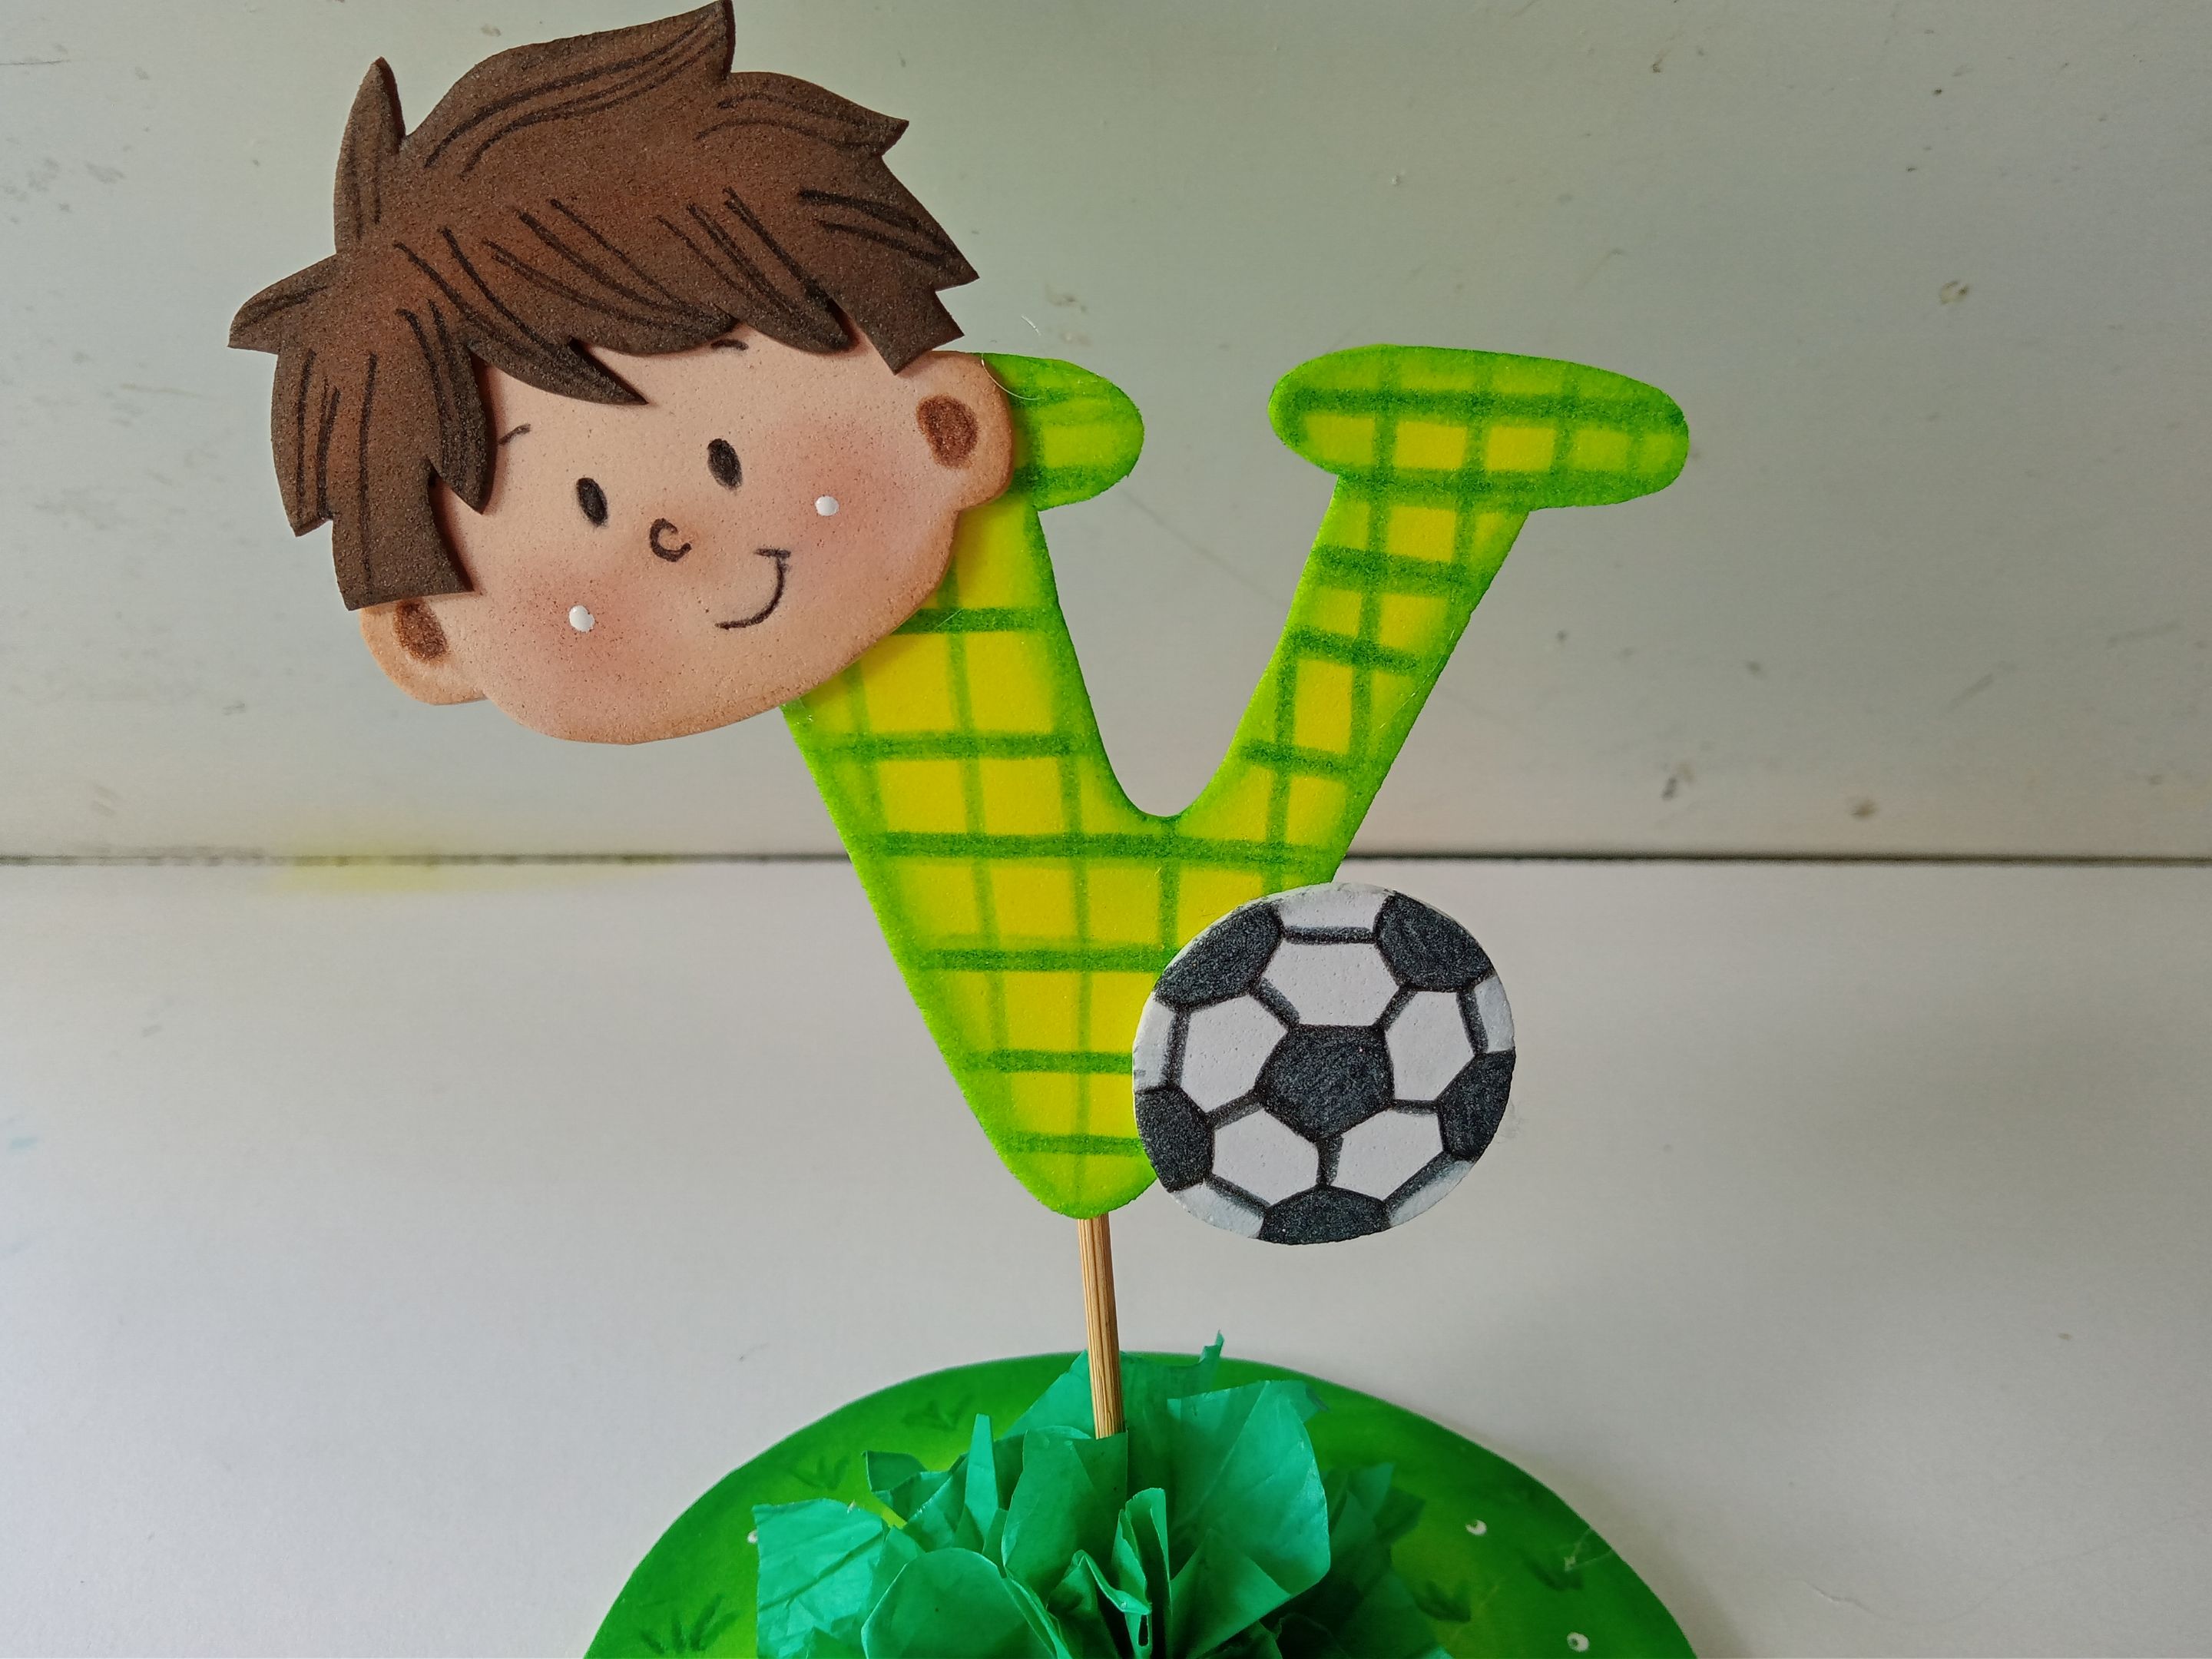
Quise trabajar con tonos amarillos y verdes para que hubiera un lindo contraste; además, a la base le quise dar apariencia de campo, ya que la temática es de fútbol.
**🔸Sin más que añadir, a continuación los dejo con el paso a paso:**
> ###### ✨¡Hello friends who love creativity! I hope you are all well.✨
> Good afternoon, friends! I hope you're having a great week. For my part, I'm happy to stop by to share a lovely idea with you. This time, I'm sharing the step-by-step instructions for making a cute birthday decoration. I originally intended this idea as a cake topper, but then I thought it would also look great as a centerpiece, so it's up to each person how they want to use this lovely decoration.
> I wanted to work with yellow and green tones to create a nice contrast. I also wanted to give the base a field-like appearance, since the theme is soccer.
> **🔸Without more to add, then I leave you with the step by step:**
---
---


|||
|-|-|


|||
|-|-|


|||
|-|-|


|||
|-|-|


||||
|-|-|-|

✨Así es como pueden elaborar una bonita decoración para un cumpleaños, ya sea como topper para el pastel o para decorar algún otro lugar de la mesa o, si se ponen mucho más creativos, para elaborar una inicial enorme o lo que deseen. Espero que les haya gustado el tutorial y se animen a elaborarlo.
❤️Hasta la próxima publicación.
> ✨This is how you can make a beautiful decoration for a birthday party, either as a topper for the cake or to decorate another part of the table. Or, if you're feeling extra creative, to make a huge initial or whatever you'd like. I hope you enjoyed the tutorial and are inspired to try it out!
> ❤️Until the next post.


|||
|-|-|
---
https://img.inleo.io/DQmUT3hN2sUD6hkDacVDeWh6cxJbEXreWY9qypQ1qJJTLGT/gracias%20por%20leer.png
---
**!TE DESEO UN GRAN DÏA¡**
Todas las fotografías son de mi propiedad.
Separador y Fotos editadas en [Canva](https://www.canva.com/)
**!I WISH YOU A GOOD DAY**
All photographs are my property.
Photos edited in [Canva](https://www.canva.com/)
Posted Using [INLEO](https://inleo.io/@valenpba/espeng-linda-decoracin-para-cumpleaos-nice-decoration-for-birthdays-kuf)
**♥️ESPERO QUE TE GUSTE,
¡Empecemos!**
**♥️I HOPE YOU LIKE IT,
Let's start!**
---
# ✂️ MATERIALES | ✂️ MATERIALS
- Foami verde.
- Foami amarillo.
- Foami crema.
- Foami marrón.
- Foami blanco.
- Papel de seda.
- Palito de altura.
- Pinturas y marcadores.
- Pegamento.
- Tijeras.
- Regla.
- Hoja blanca.
- Lápiz.
- Green foam.
- Yellow foam.
- Cream foam.
- Brown foam.
- White foam.
- Tissue paper.
- Stick.
- Paint and markers.
- Glue.
- Scissors.
- Ruler.
- White paper.
- Pencil.
# 🌟 PROCEDIMIENTO | 🌟 PROCESS
###### ✨PASO 1:
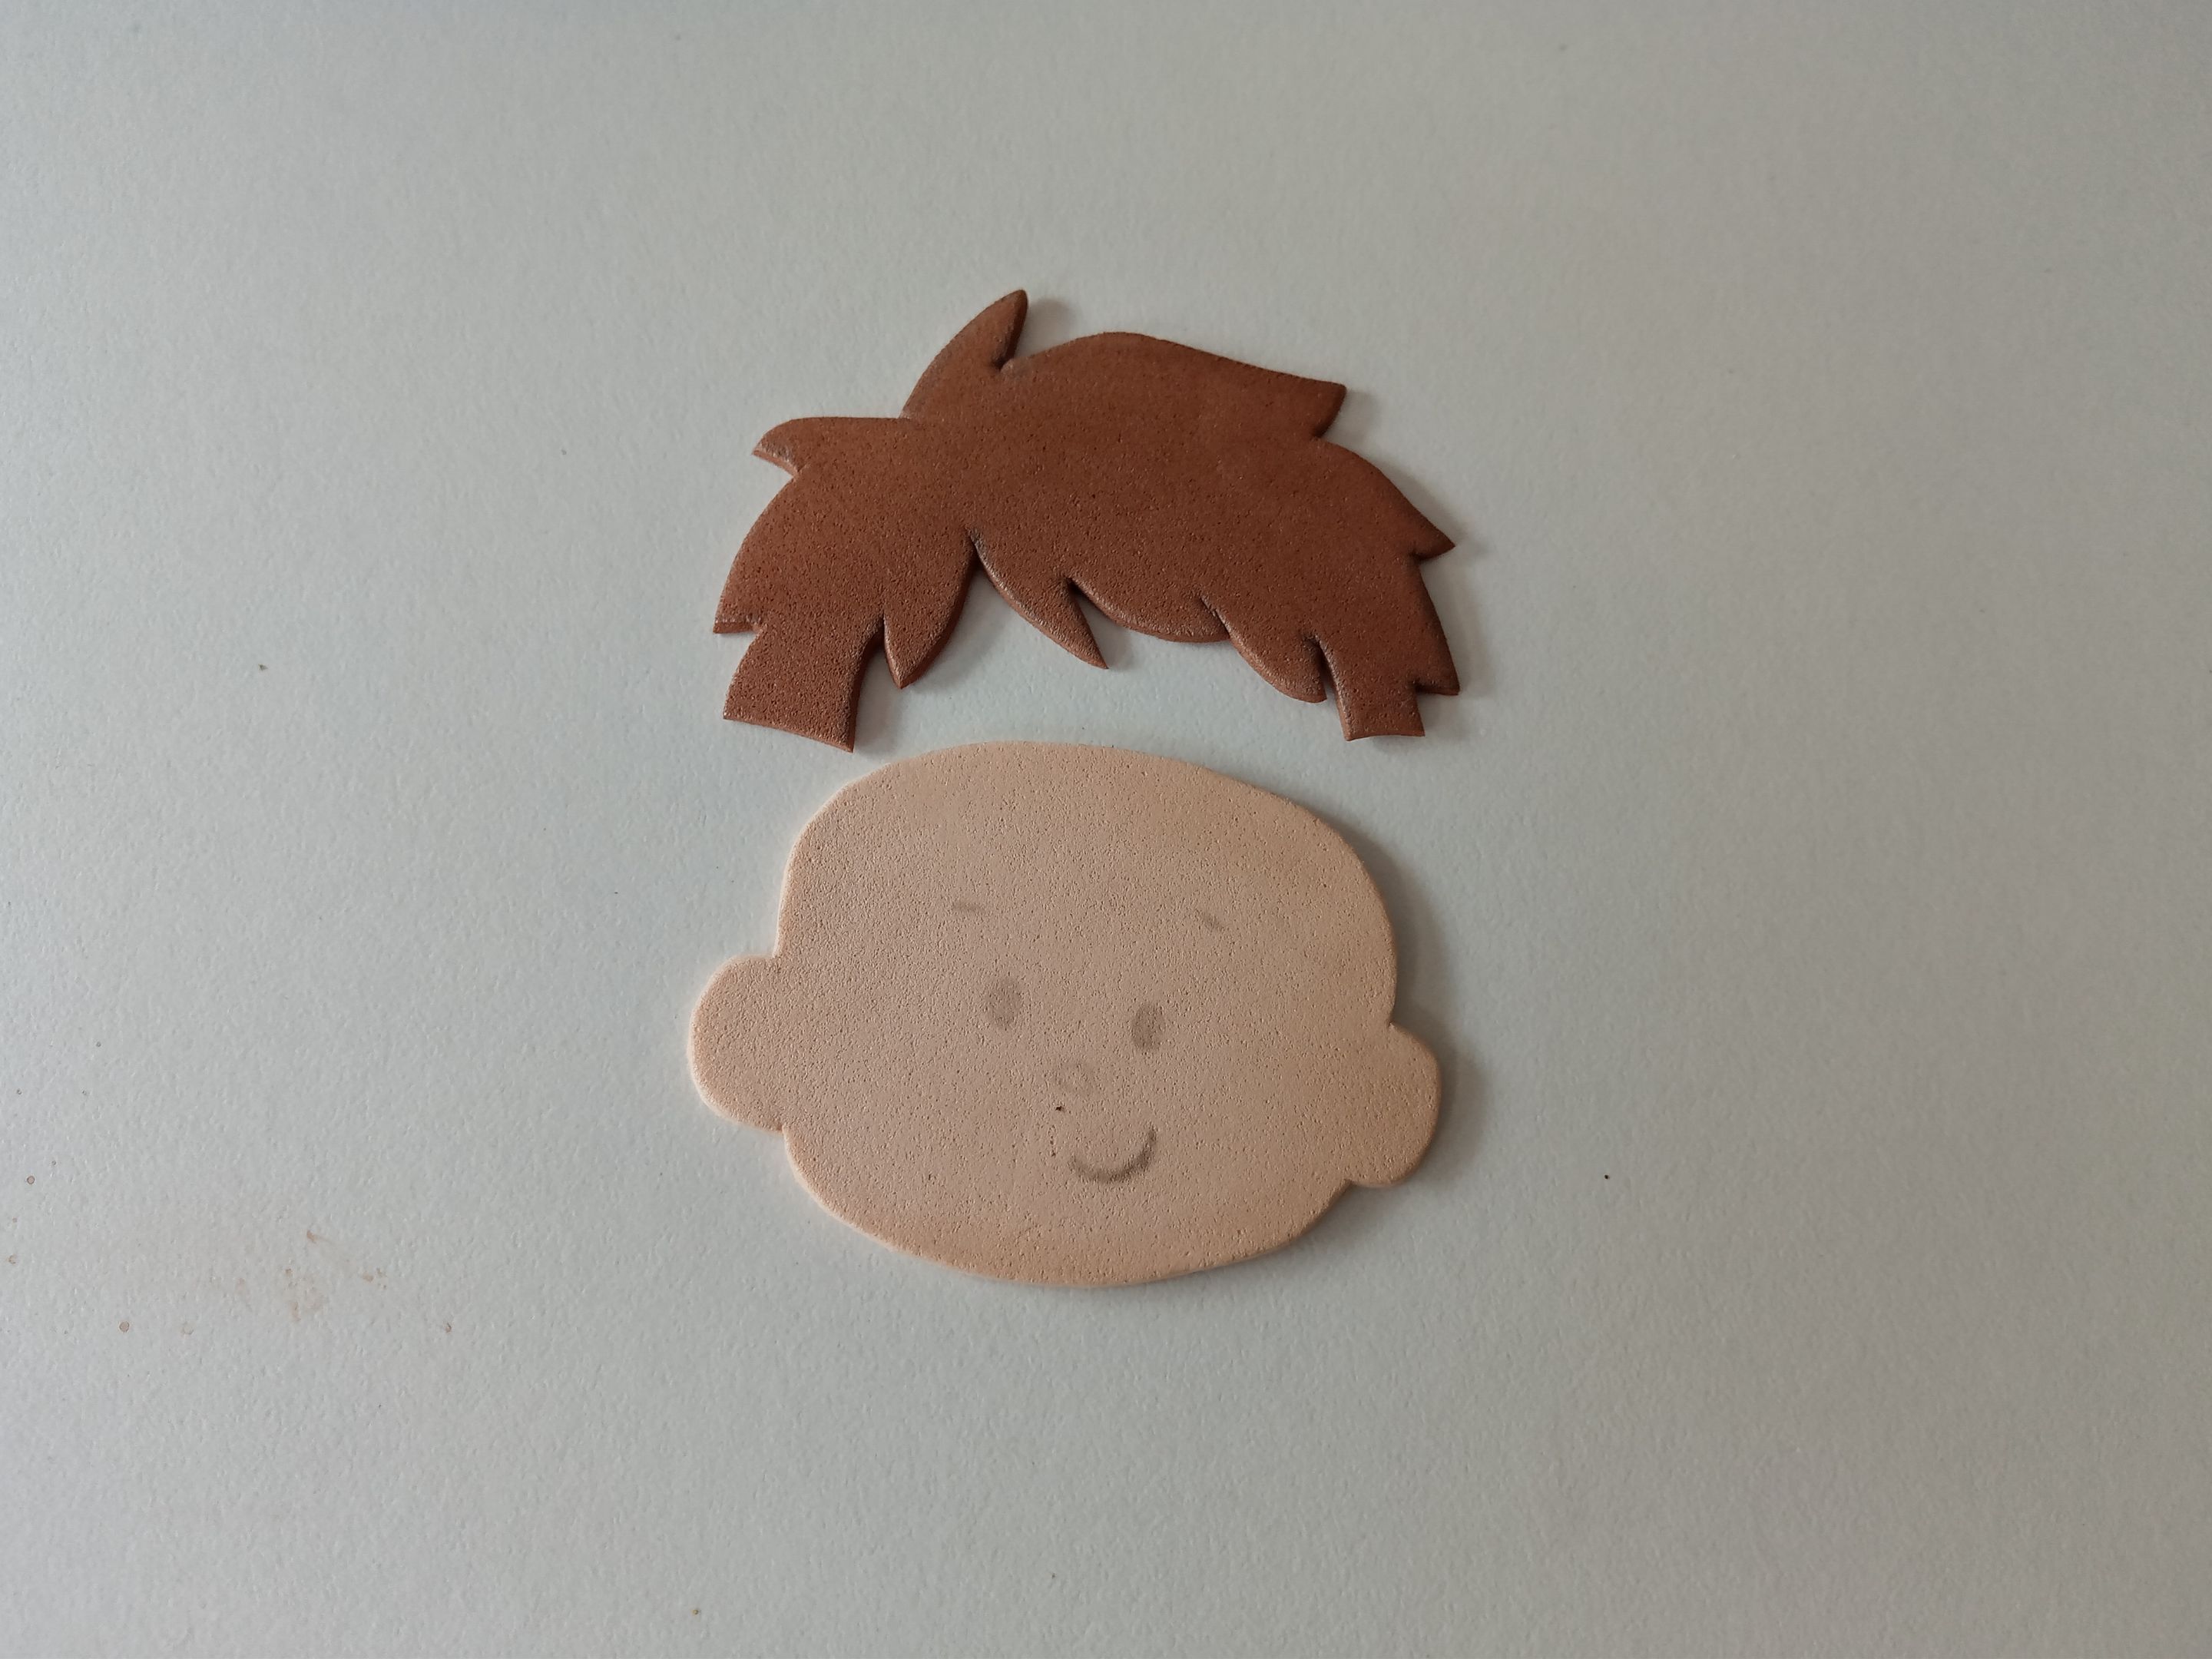
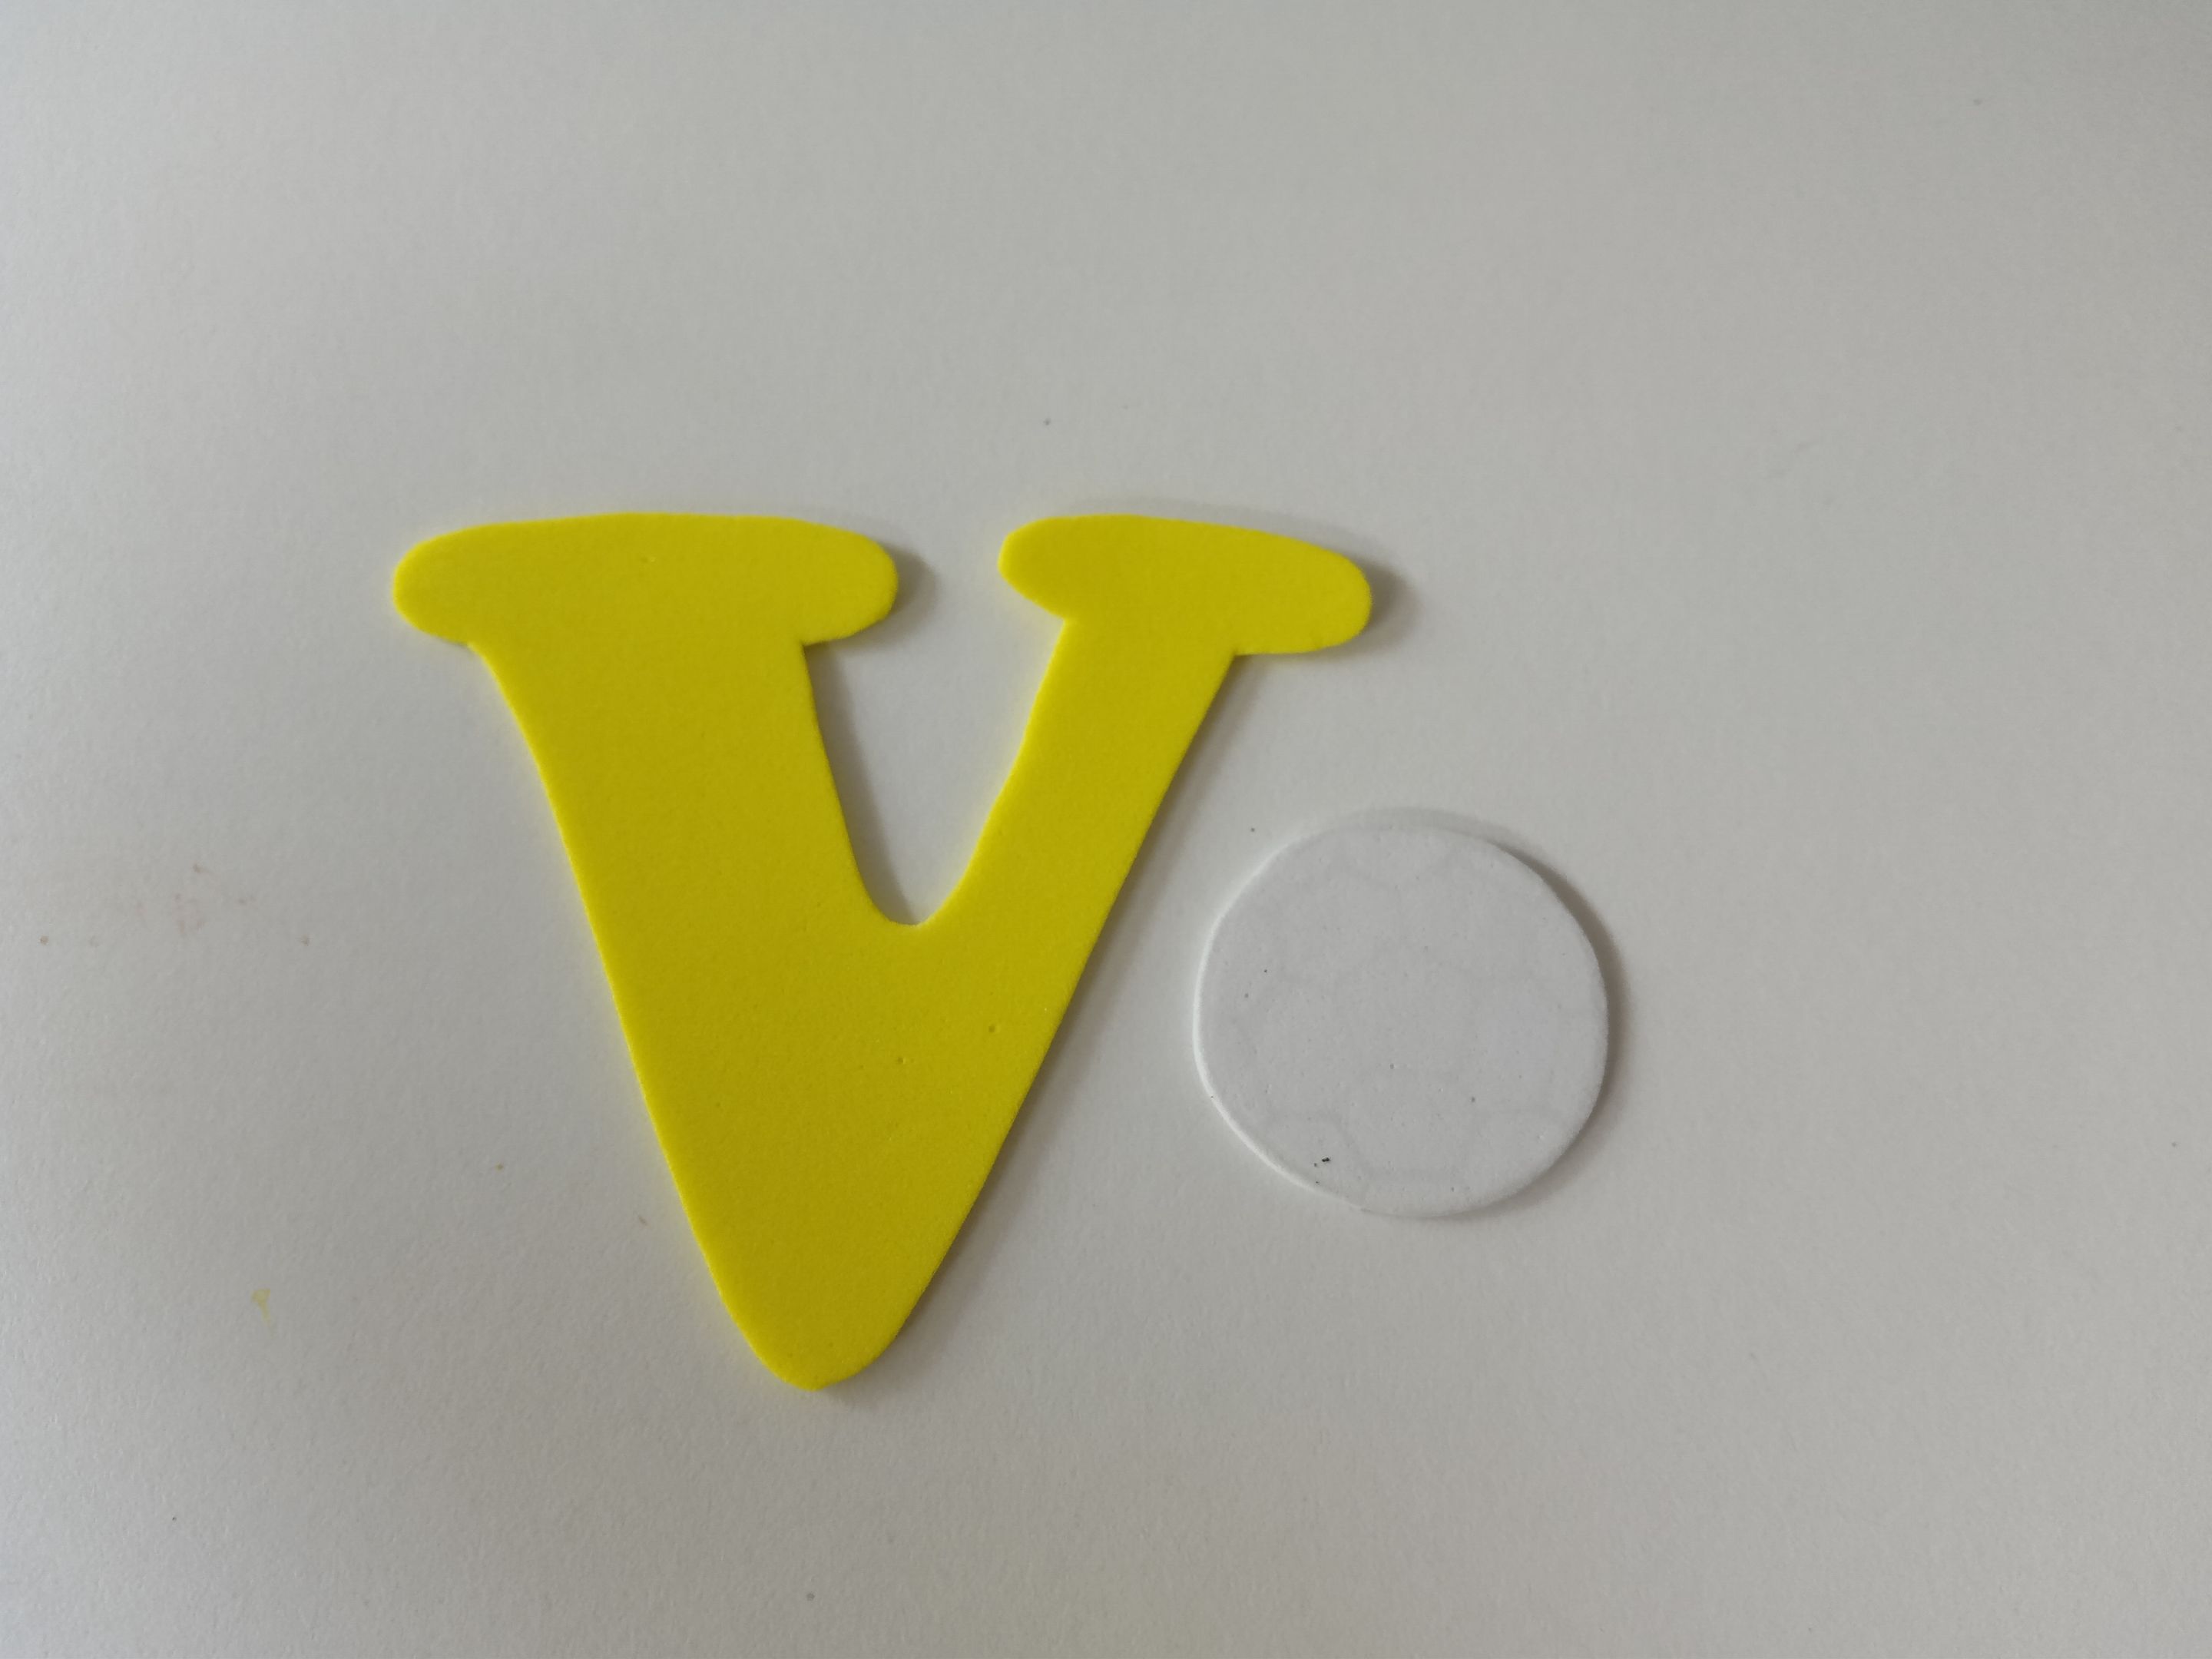
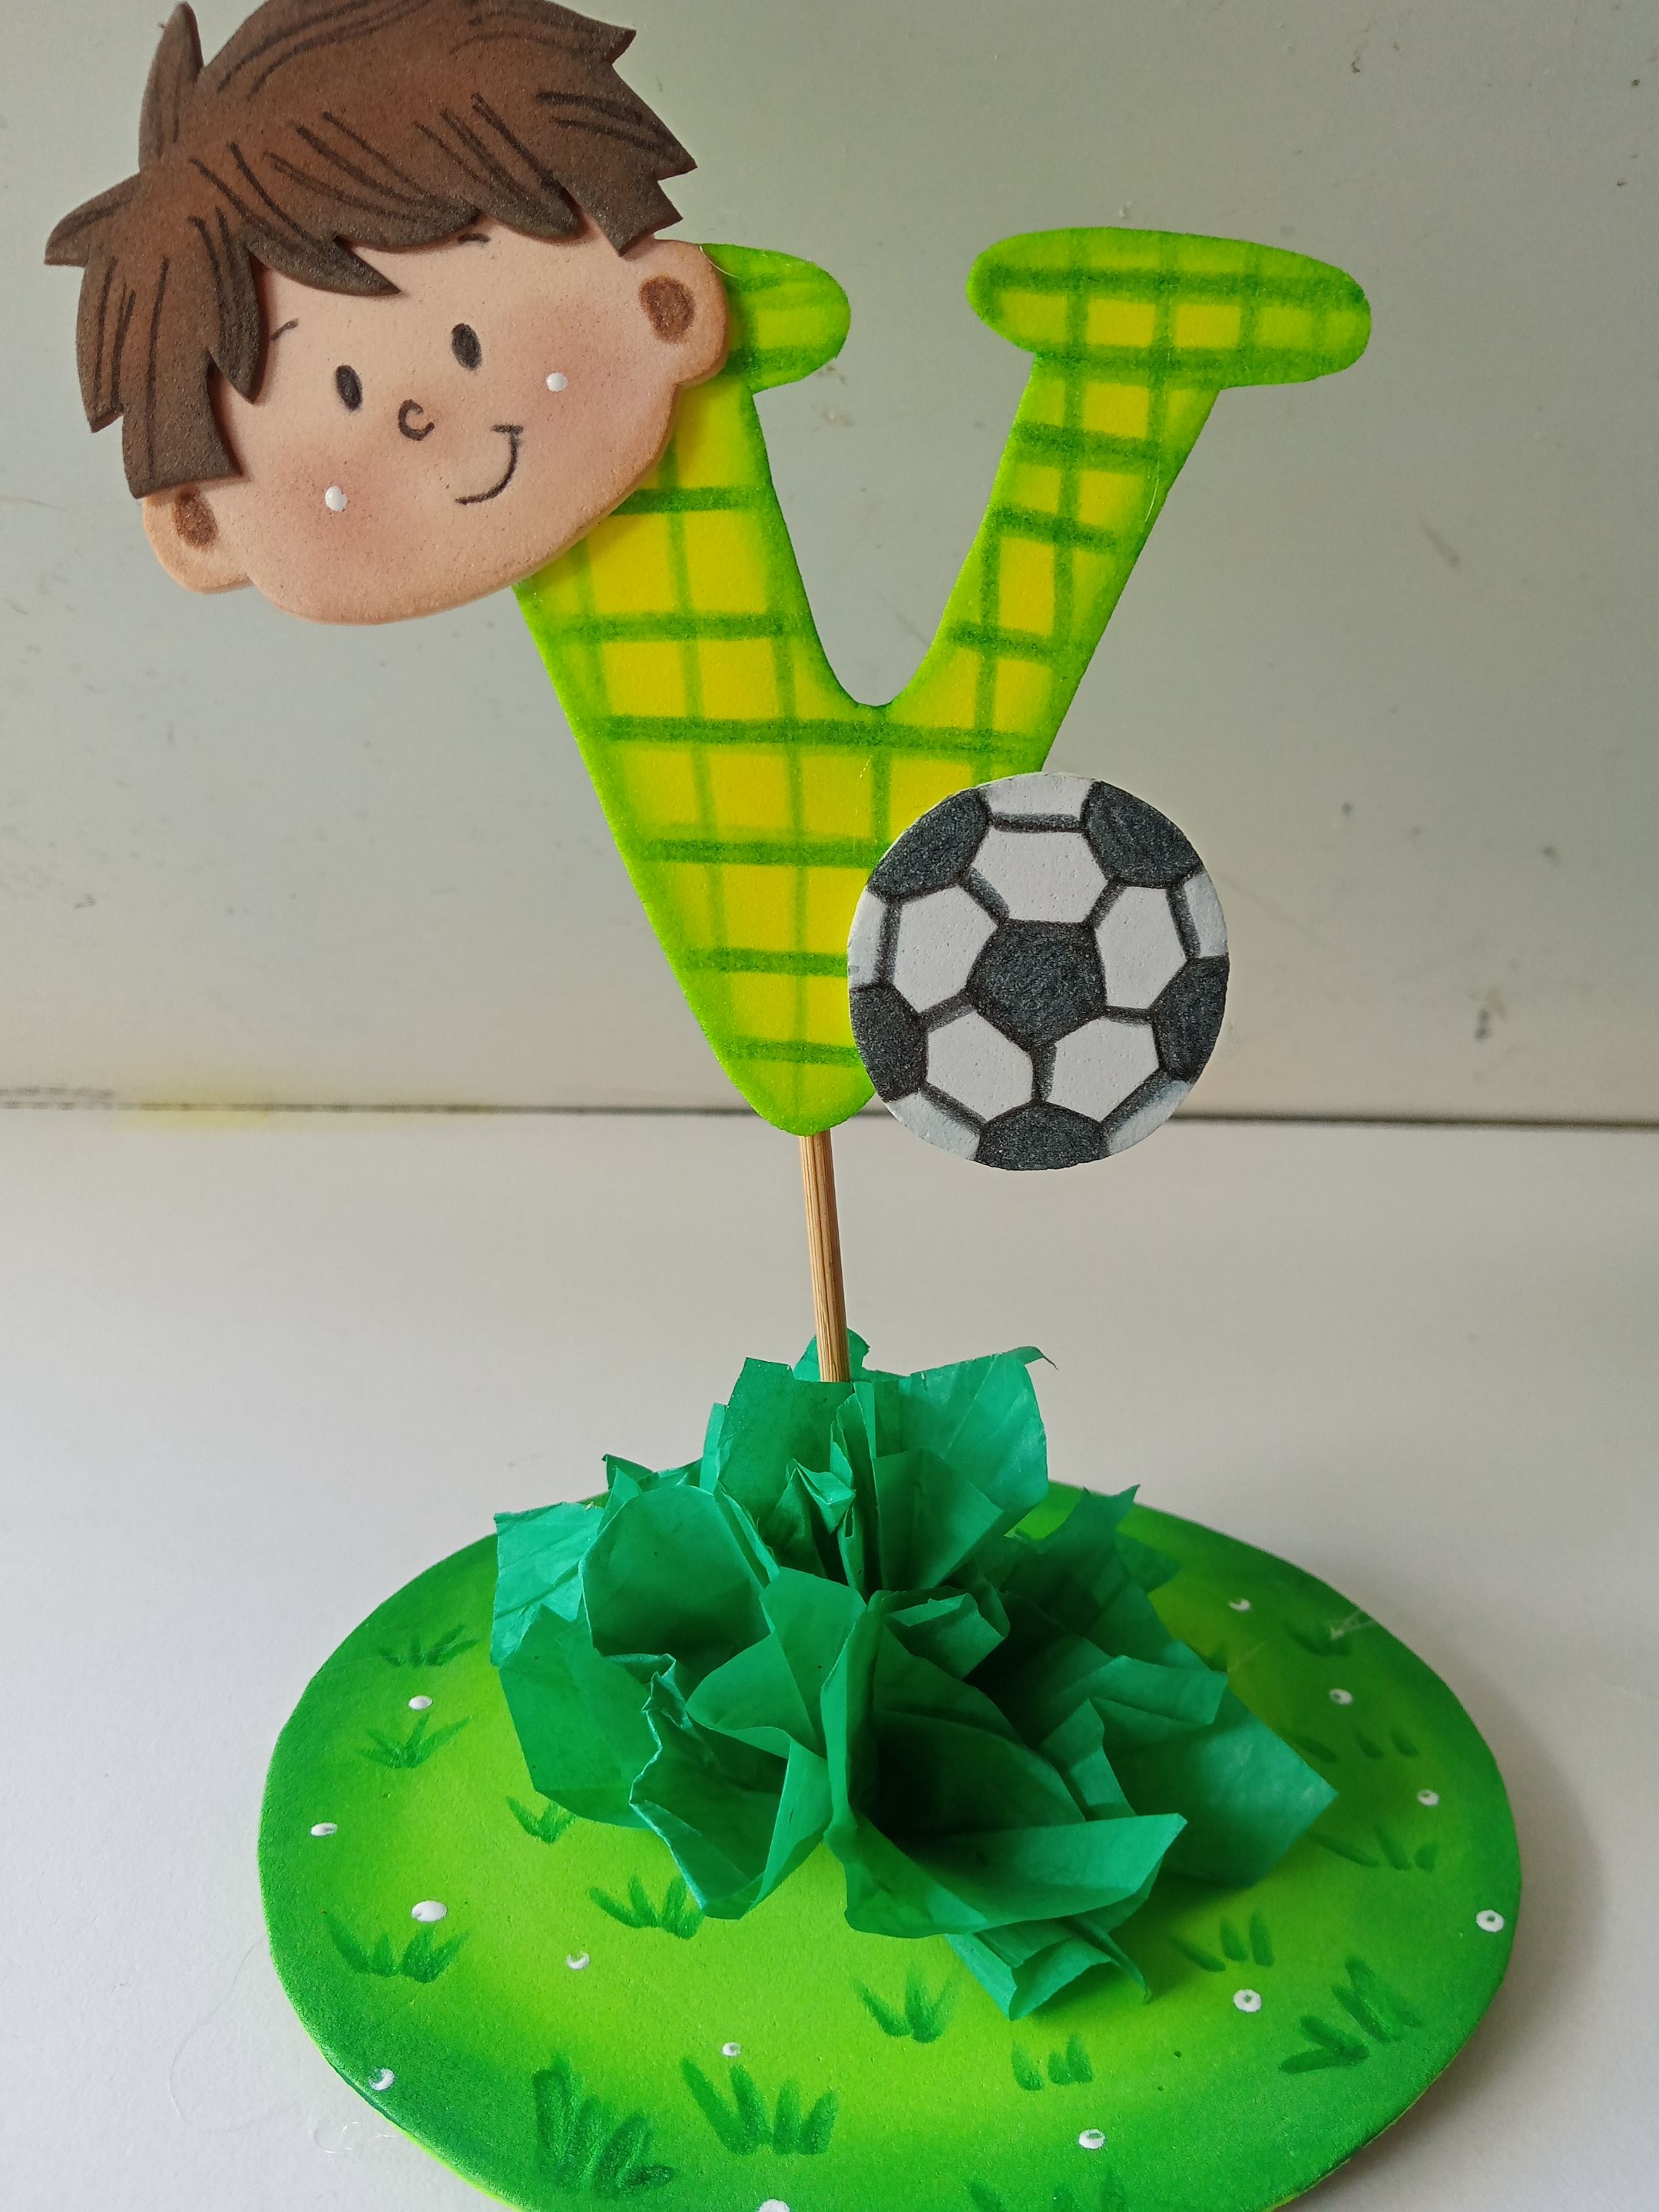
Lo primero que hice fue dibujar en una hoja blanca un muñequito con la apariencia de la persona a la que se le va a celebrar el cumpleaños; además, hice también la inicial en la hoja blanca y el círculo para el balón. Al tener lista la idea en la hoja blanca, es momento de transferir a los colores correspondientes de foami, como explico a continuación:
✨Cabello: 6 cm x 3 cm en foami marrón.
✨Cabeza: 5.5 cm x 4 cm en foami crema.
✨Inicial: 9 cm x 7 cm en foami amarillo.
✨Balón: 3.5 cm de circunferencia en foami blanco.
###### ✨STEP 1:
The first thing I did was draw a little figure on a white sheet of paper that resembled the person whose birthday we're celebrating. I also drew the initial on the white sheet of paper and the circle for the ball. Once I had the idea ready on the white sheet of paper, it was time to transfer it to the corresponding colors of foam, as explained below:
✨Hair: 6 cm x 3 cm in brown foam.
✨Head: 5.5 cm x 4 cm in cream foam.
✨Initial: 9 cm x 7 cm in yellow foam.
✨Ball: 3.5 cm in circumference in white foam.
###### ✨PASO 2:
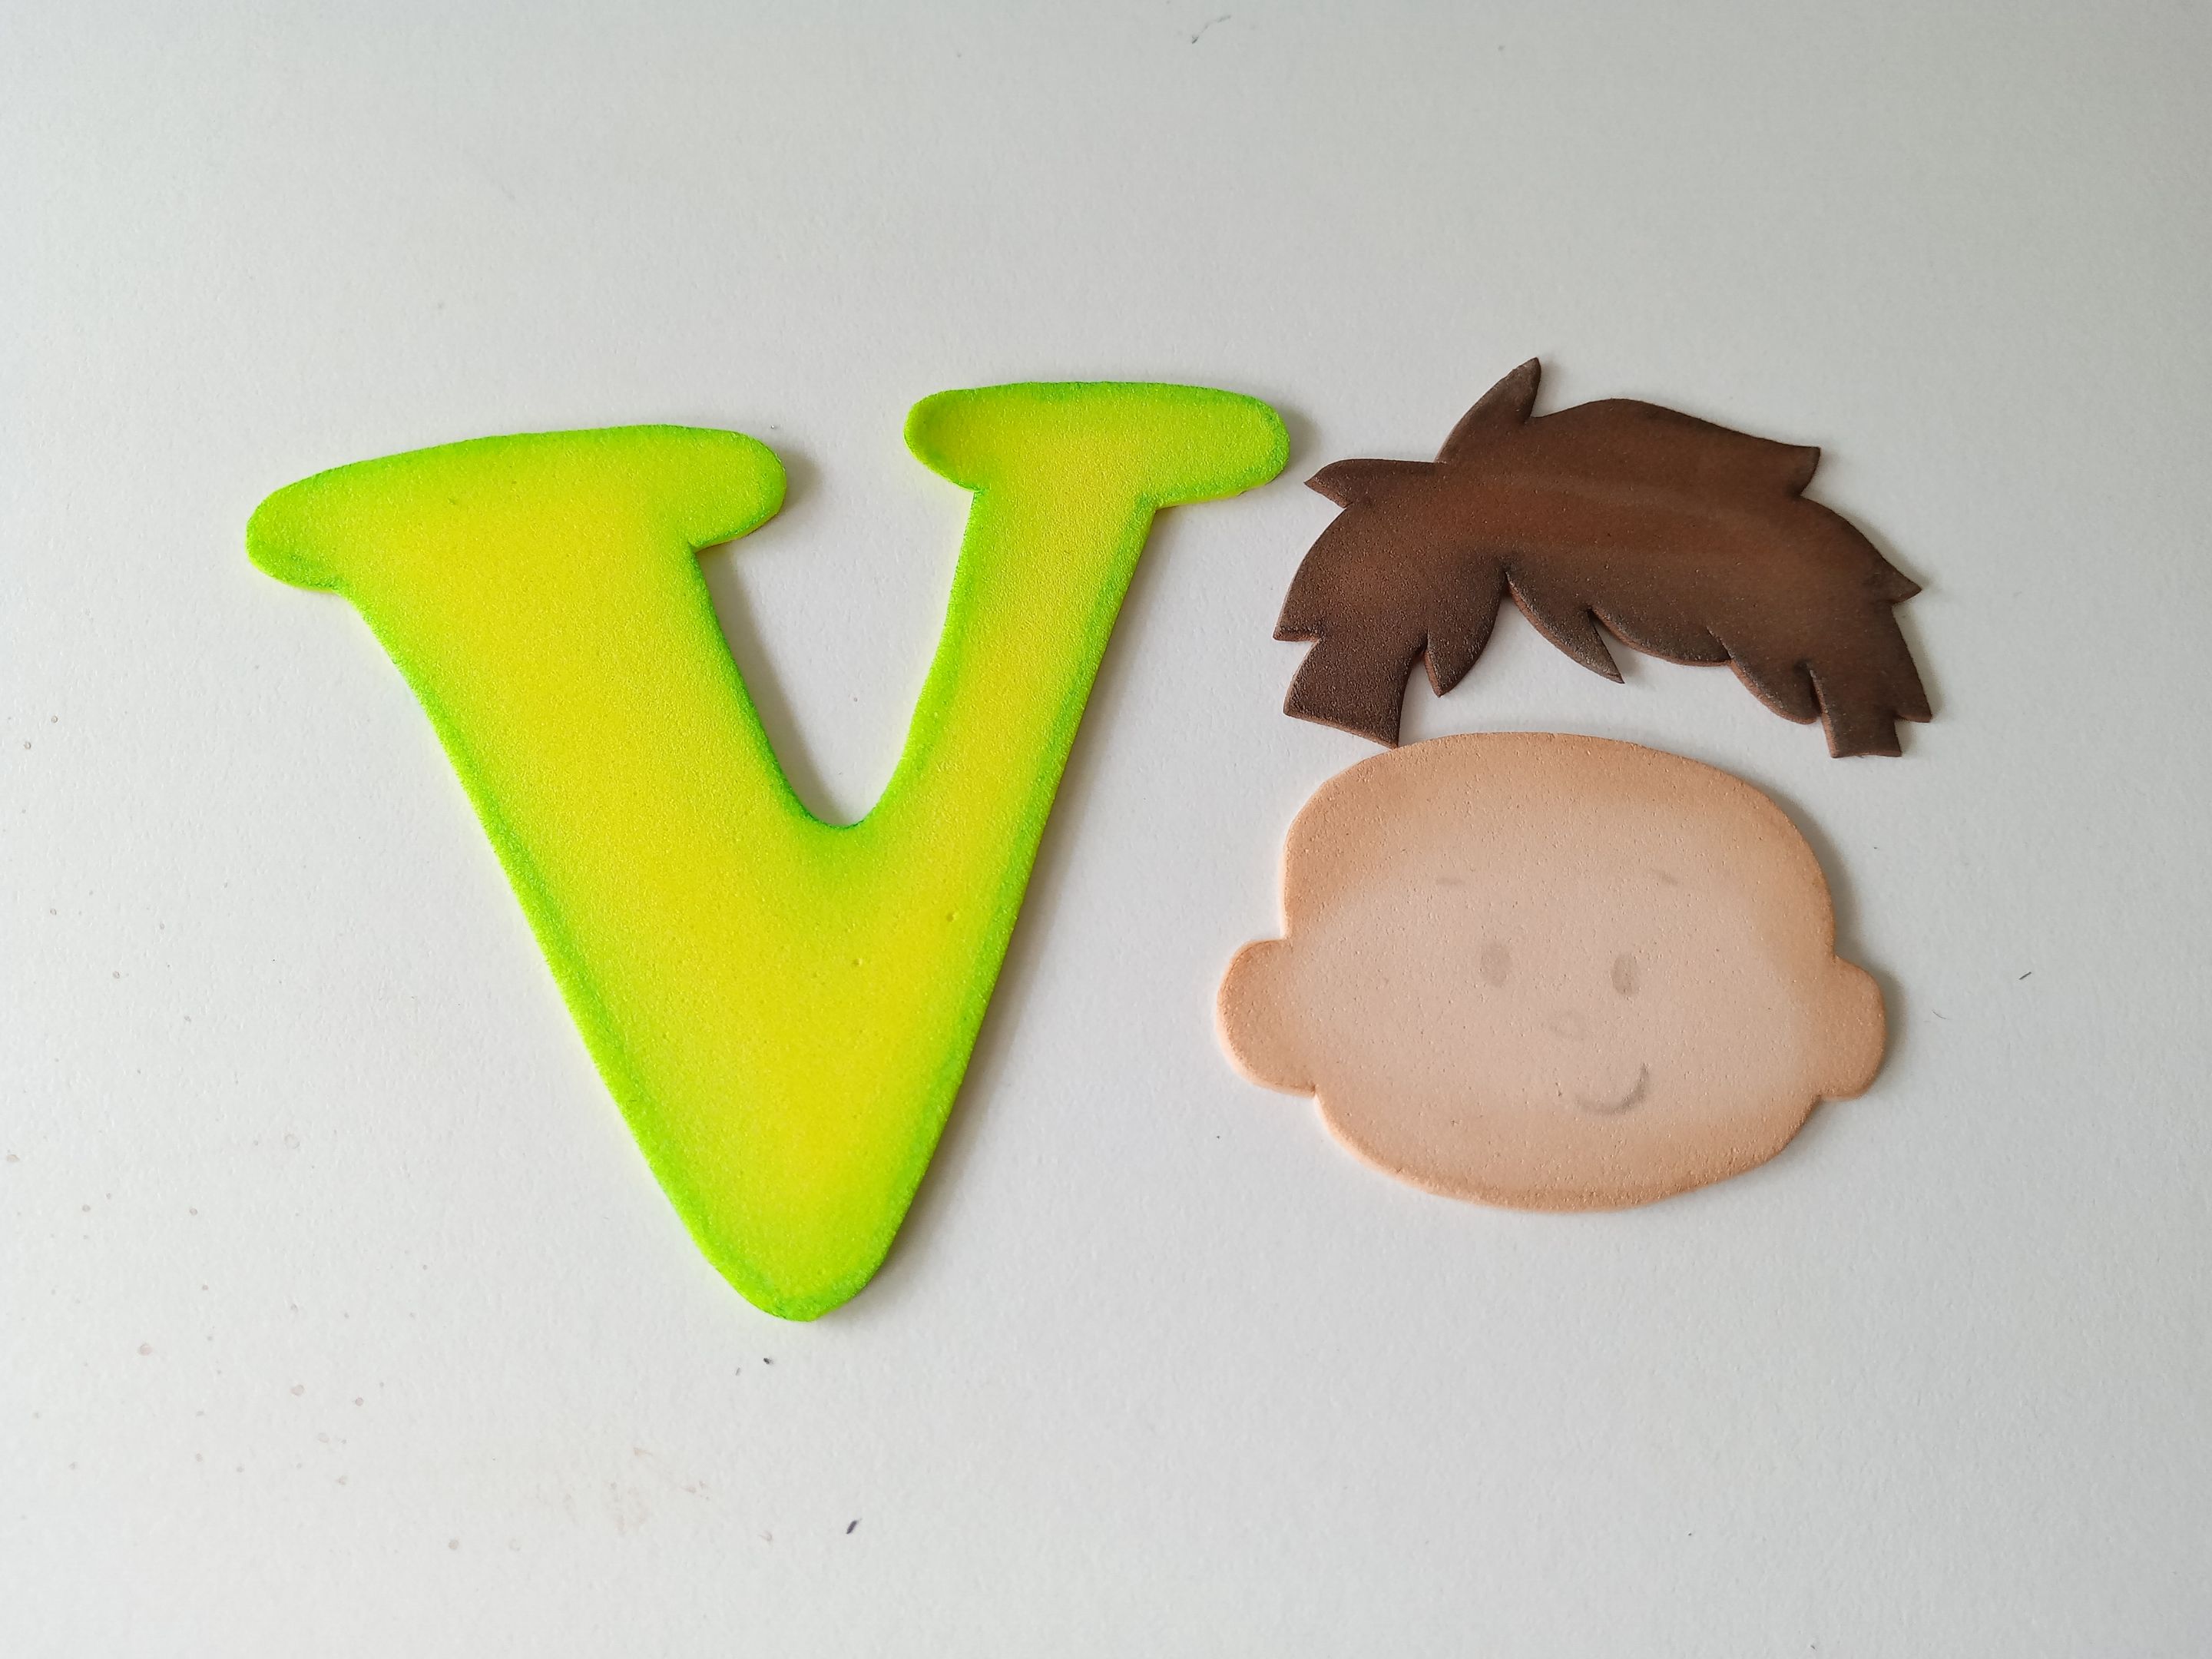
Al tener recortadas todas las piezas, es momento de dar vida y color. Así que con pinturas que hicieran contraste (en mi caso me gusta utilizar tonos un poco más oscuros) di color a los bordes, difuminando con ayuda de un pañito. Para la cabeza, utilicé un marrón; para el cabello, un negro y para la inicial, un tono verde. Al estar secas las piezas, es momento de dar más detalles con marcadores a lo que sería el rostro, al balón de fútbol y a la inicial; le hice un diseño cuadriculado con el mismo tono del borde.
###### ✨STEP 2:
Once all the pieces are cut out, it's time to add life and color. So, using contrasting paints (in my case, I like to use slightly darker tones), I colored the edges, blending them with a cloth. For the head, I used brown; for the hair, black; and for the initial, a green shade. Once the pieces are dry, it's time to add more detail with markers to what would become the face, the soccer ball, and the initial; I made a grid design in the same shade as the border.
###### ✨PASO 3:
Luego, comencé a pegar la cabeza del cabello; esta la pegué en la parte superior izquierda de la inicial y el balón de fútbol en la esquina inferior derecha de la misma. Al estar lista la decoración, por la parte trasera de la inicial pegué el palito de altura y en foami verde, una tira de 5 cm x 1 cm, la cual enrollé y pegué en la punta que queda libre.
###### ✨STEP 3:
Then, I began gluing the head of hair; I glued it to the top left of the initial and the soccer ball to the bottom right corner. Once the decoration was ready, I glued the tall stick to the back of the initial and a 5 cm x 1 cm strip of green foam, which I rolled up and glued to the free end.
###### ✨PASO 4:
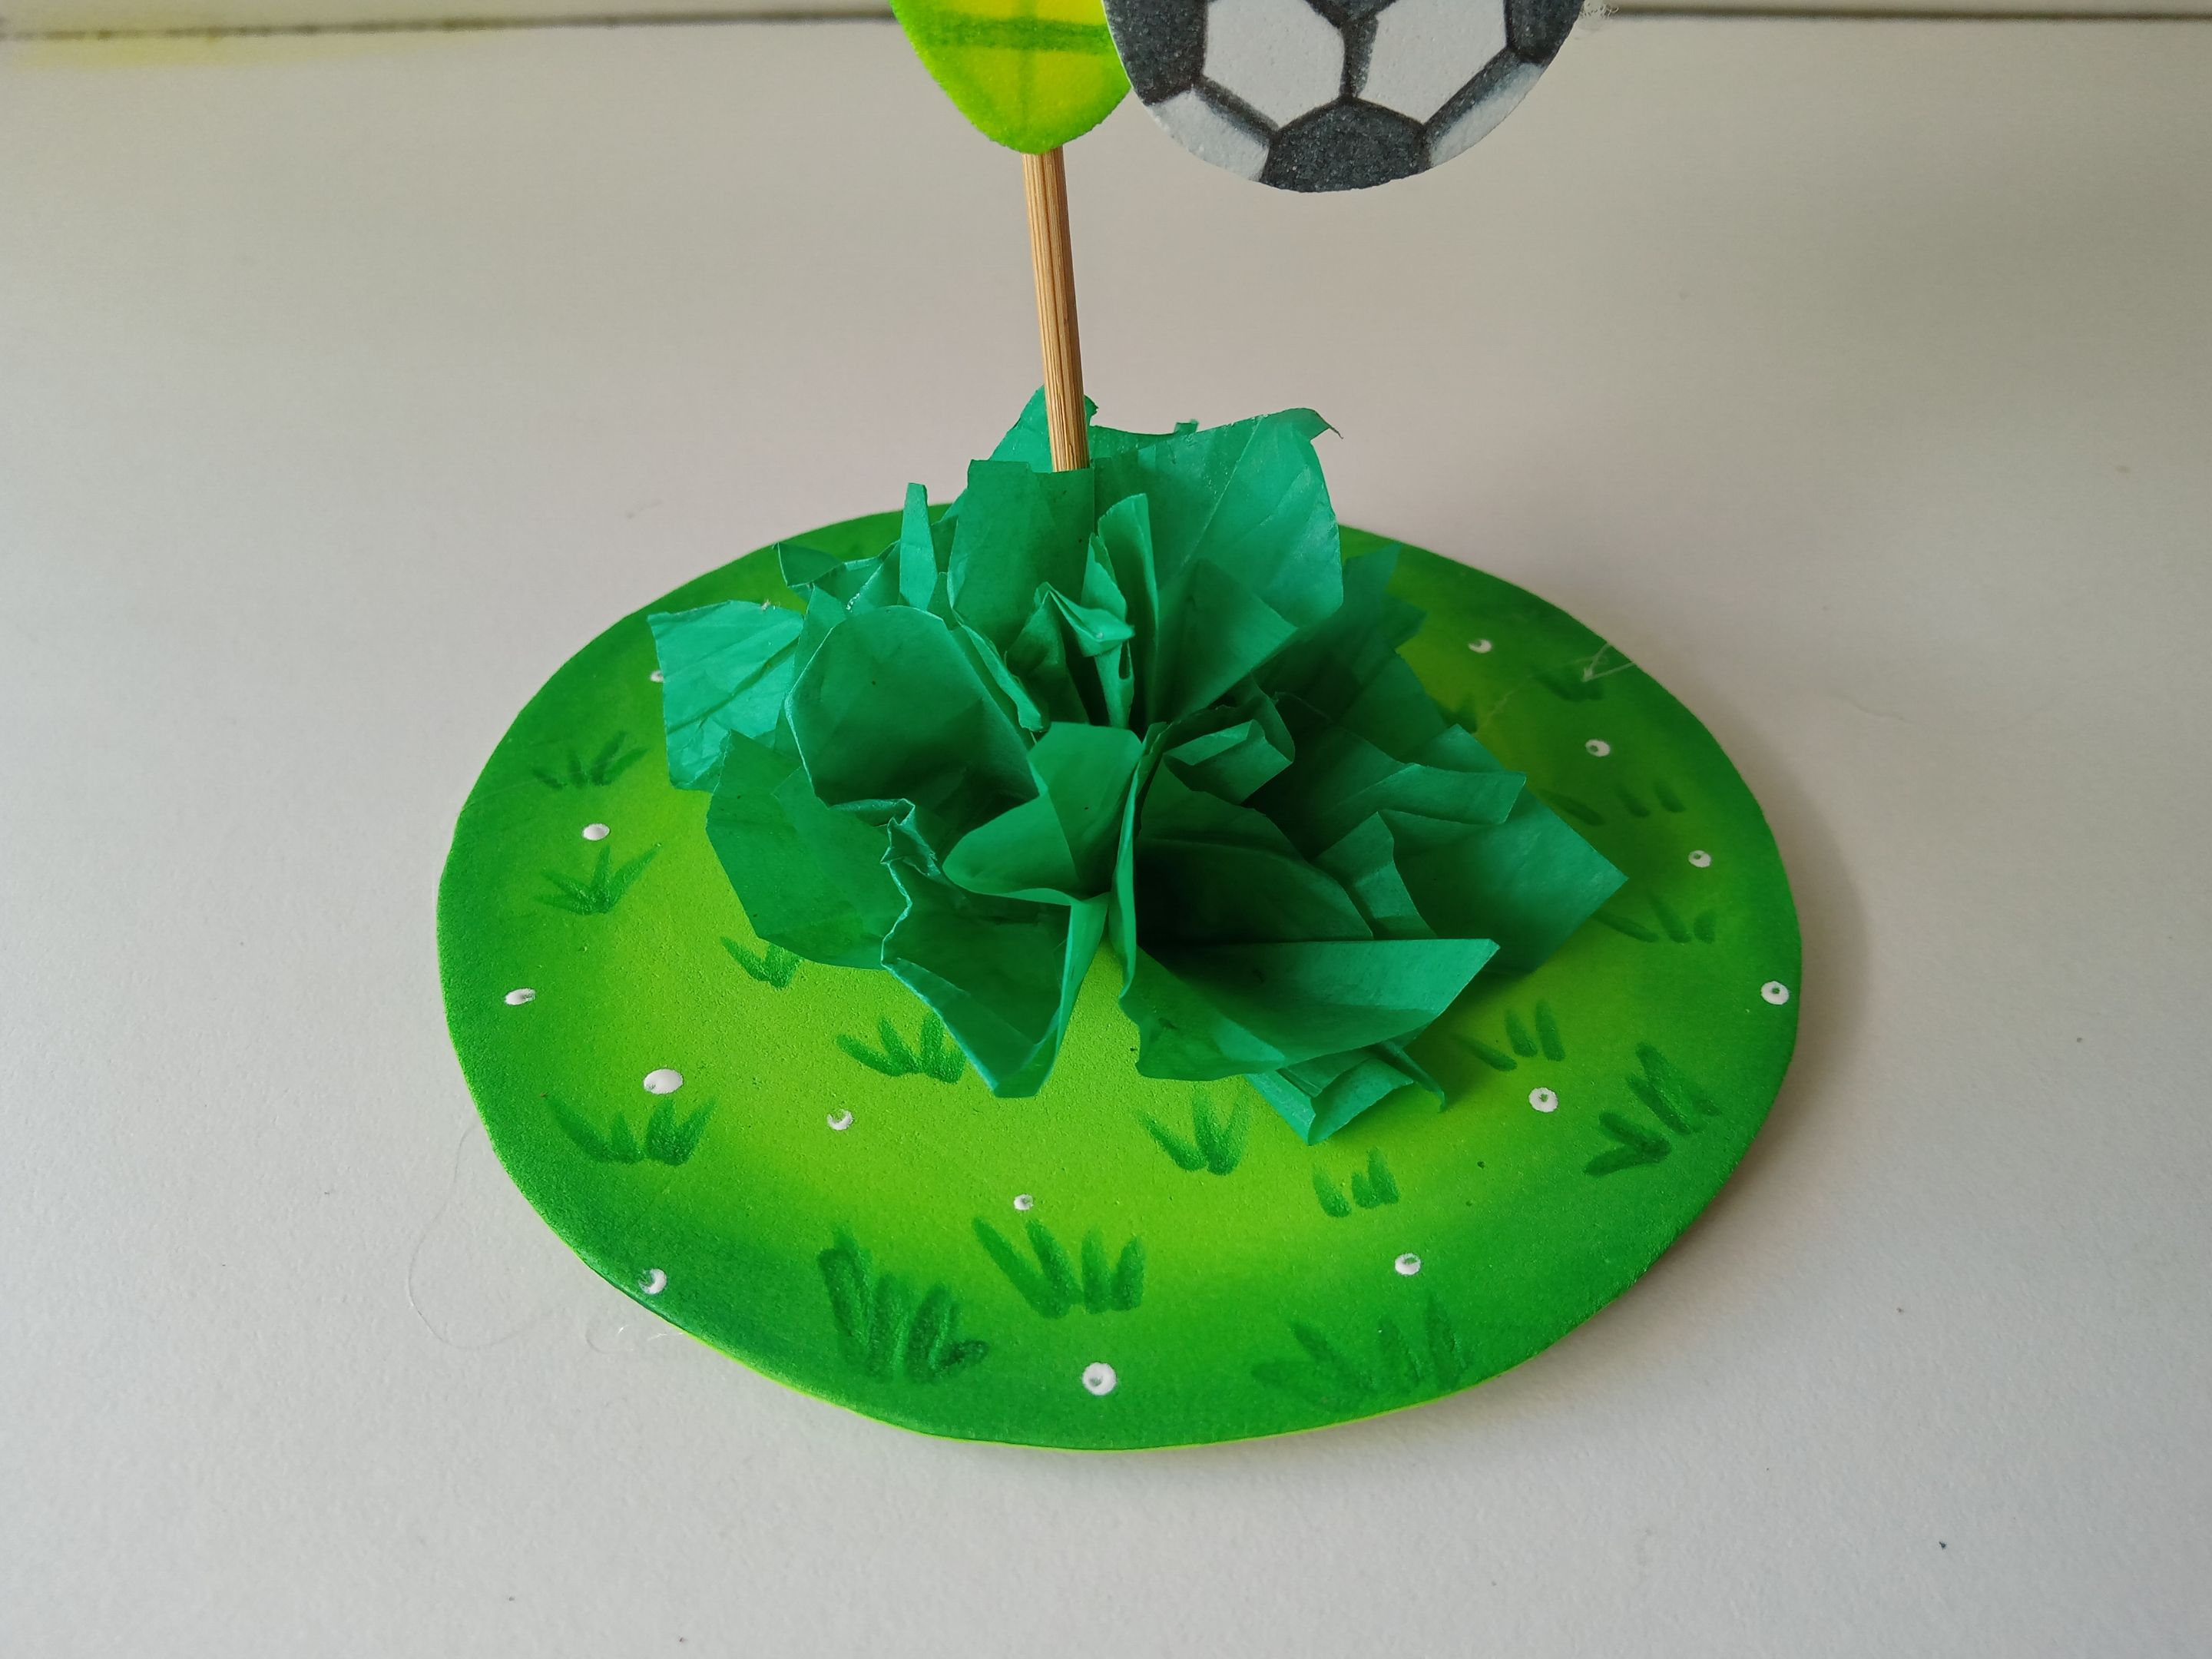
Seguidamente, vamos con la base que consiste en recortar un cilindro de 12 cm de circunferencia en foami verde. Repetimos el mismo proceso de dar color a los bordes con pintura de un tono más oscuro que el tono del foami y, al estar seco, dibujé como pasto por toda la base que, si desean y depende de para qué lo van a utilizar, les viene bien. Para hacer algo de peso en la base, utilizar un cartón o, si es para colocar sobre el pastel, pueden utilizar una base para torta de las típicas y pegarla por debajo del foami.
###### ✨STEP 4:
Next, we started the base, which consists of cutting a 12 cm circumference cylinder out of green foam. We repeated the same process of coloring the edges with paint in a darker shade than the foam. Once it was dry, I drew grass-like shapes all over the base, which, if desired and depending on what you're going to use it for, is a good idea. To add some weight to the base, use cardboard, or if you're placing it on the cake, you can use a traditional cake board and glue it underneath the foam.
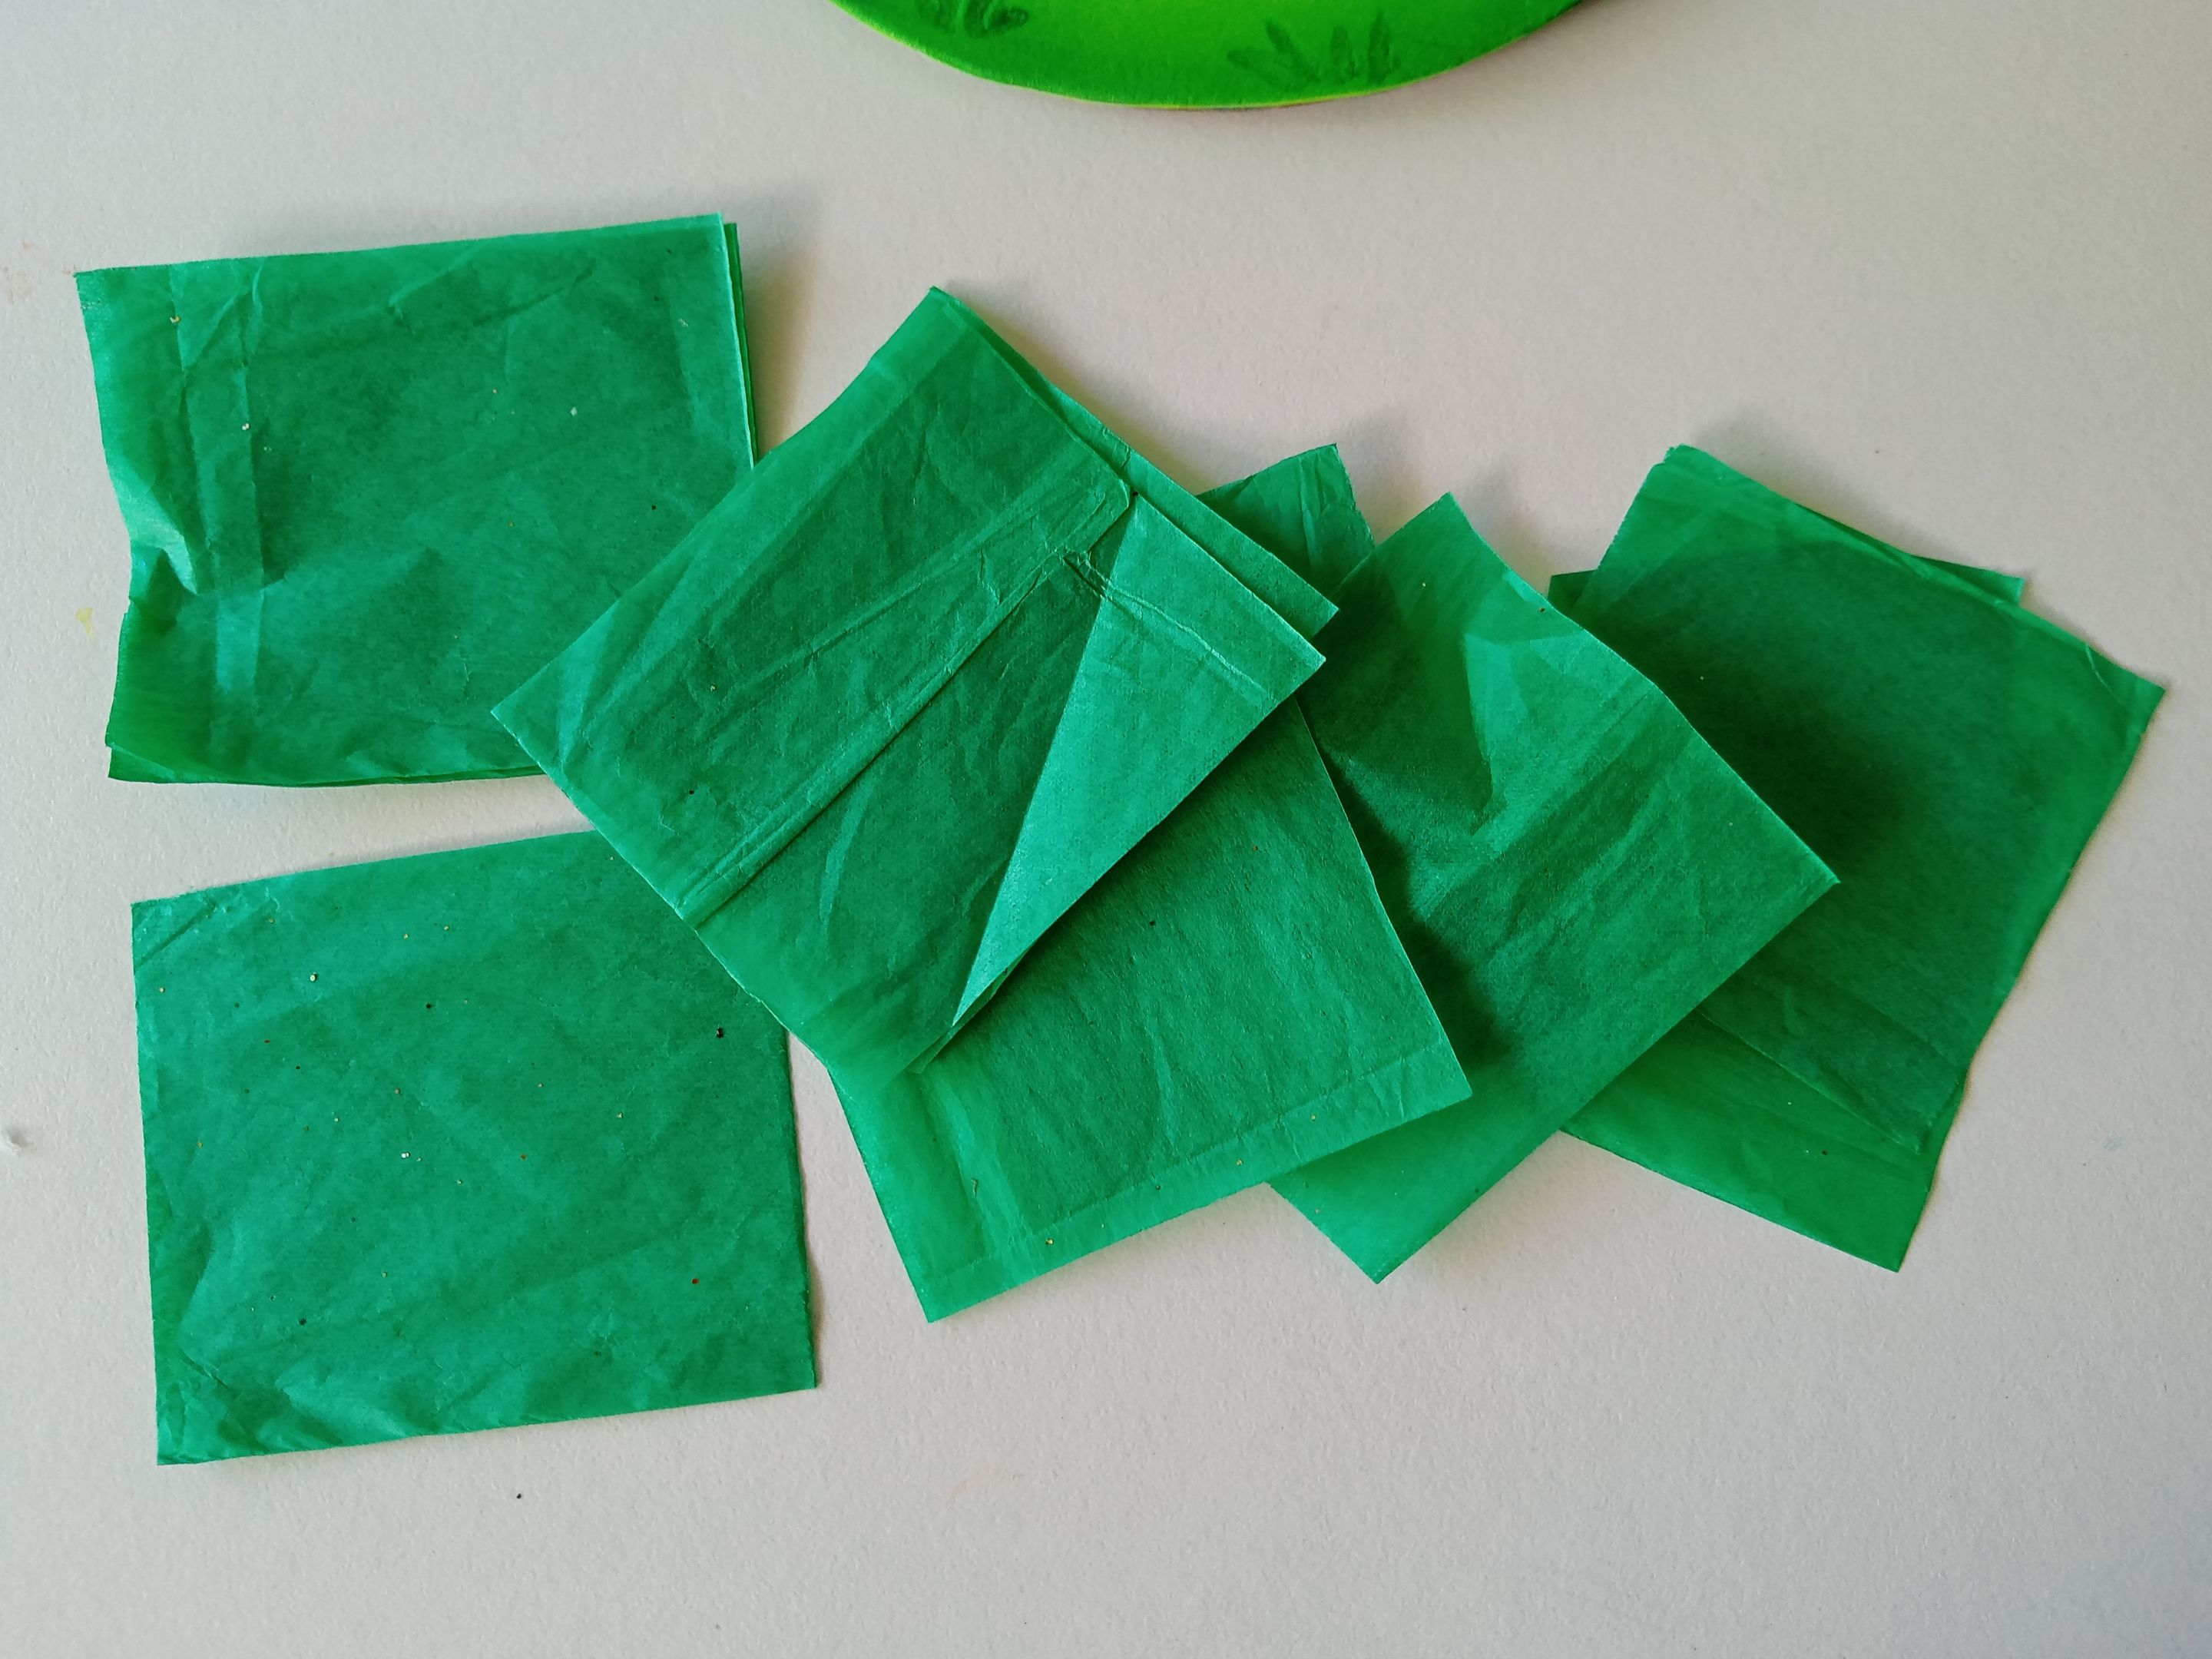
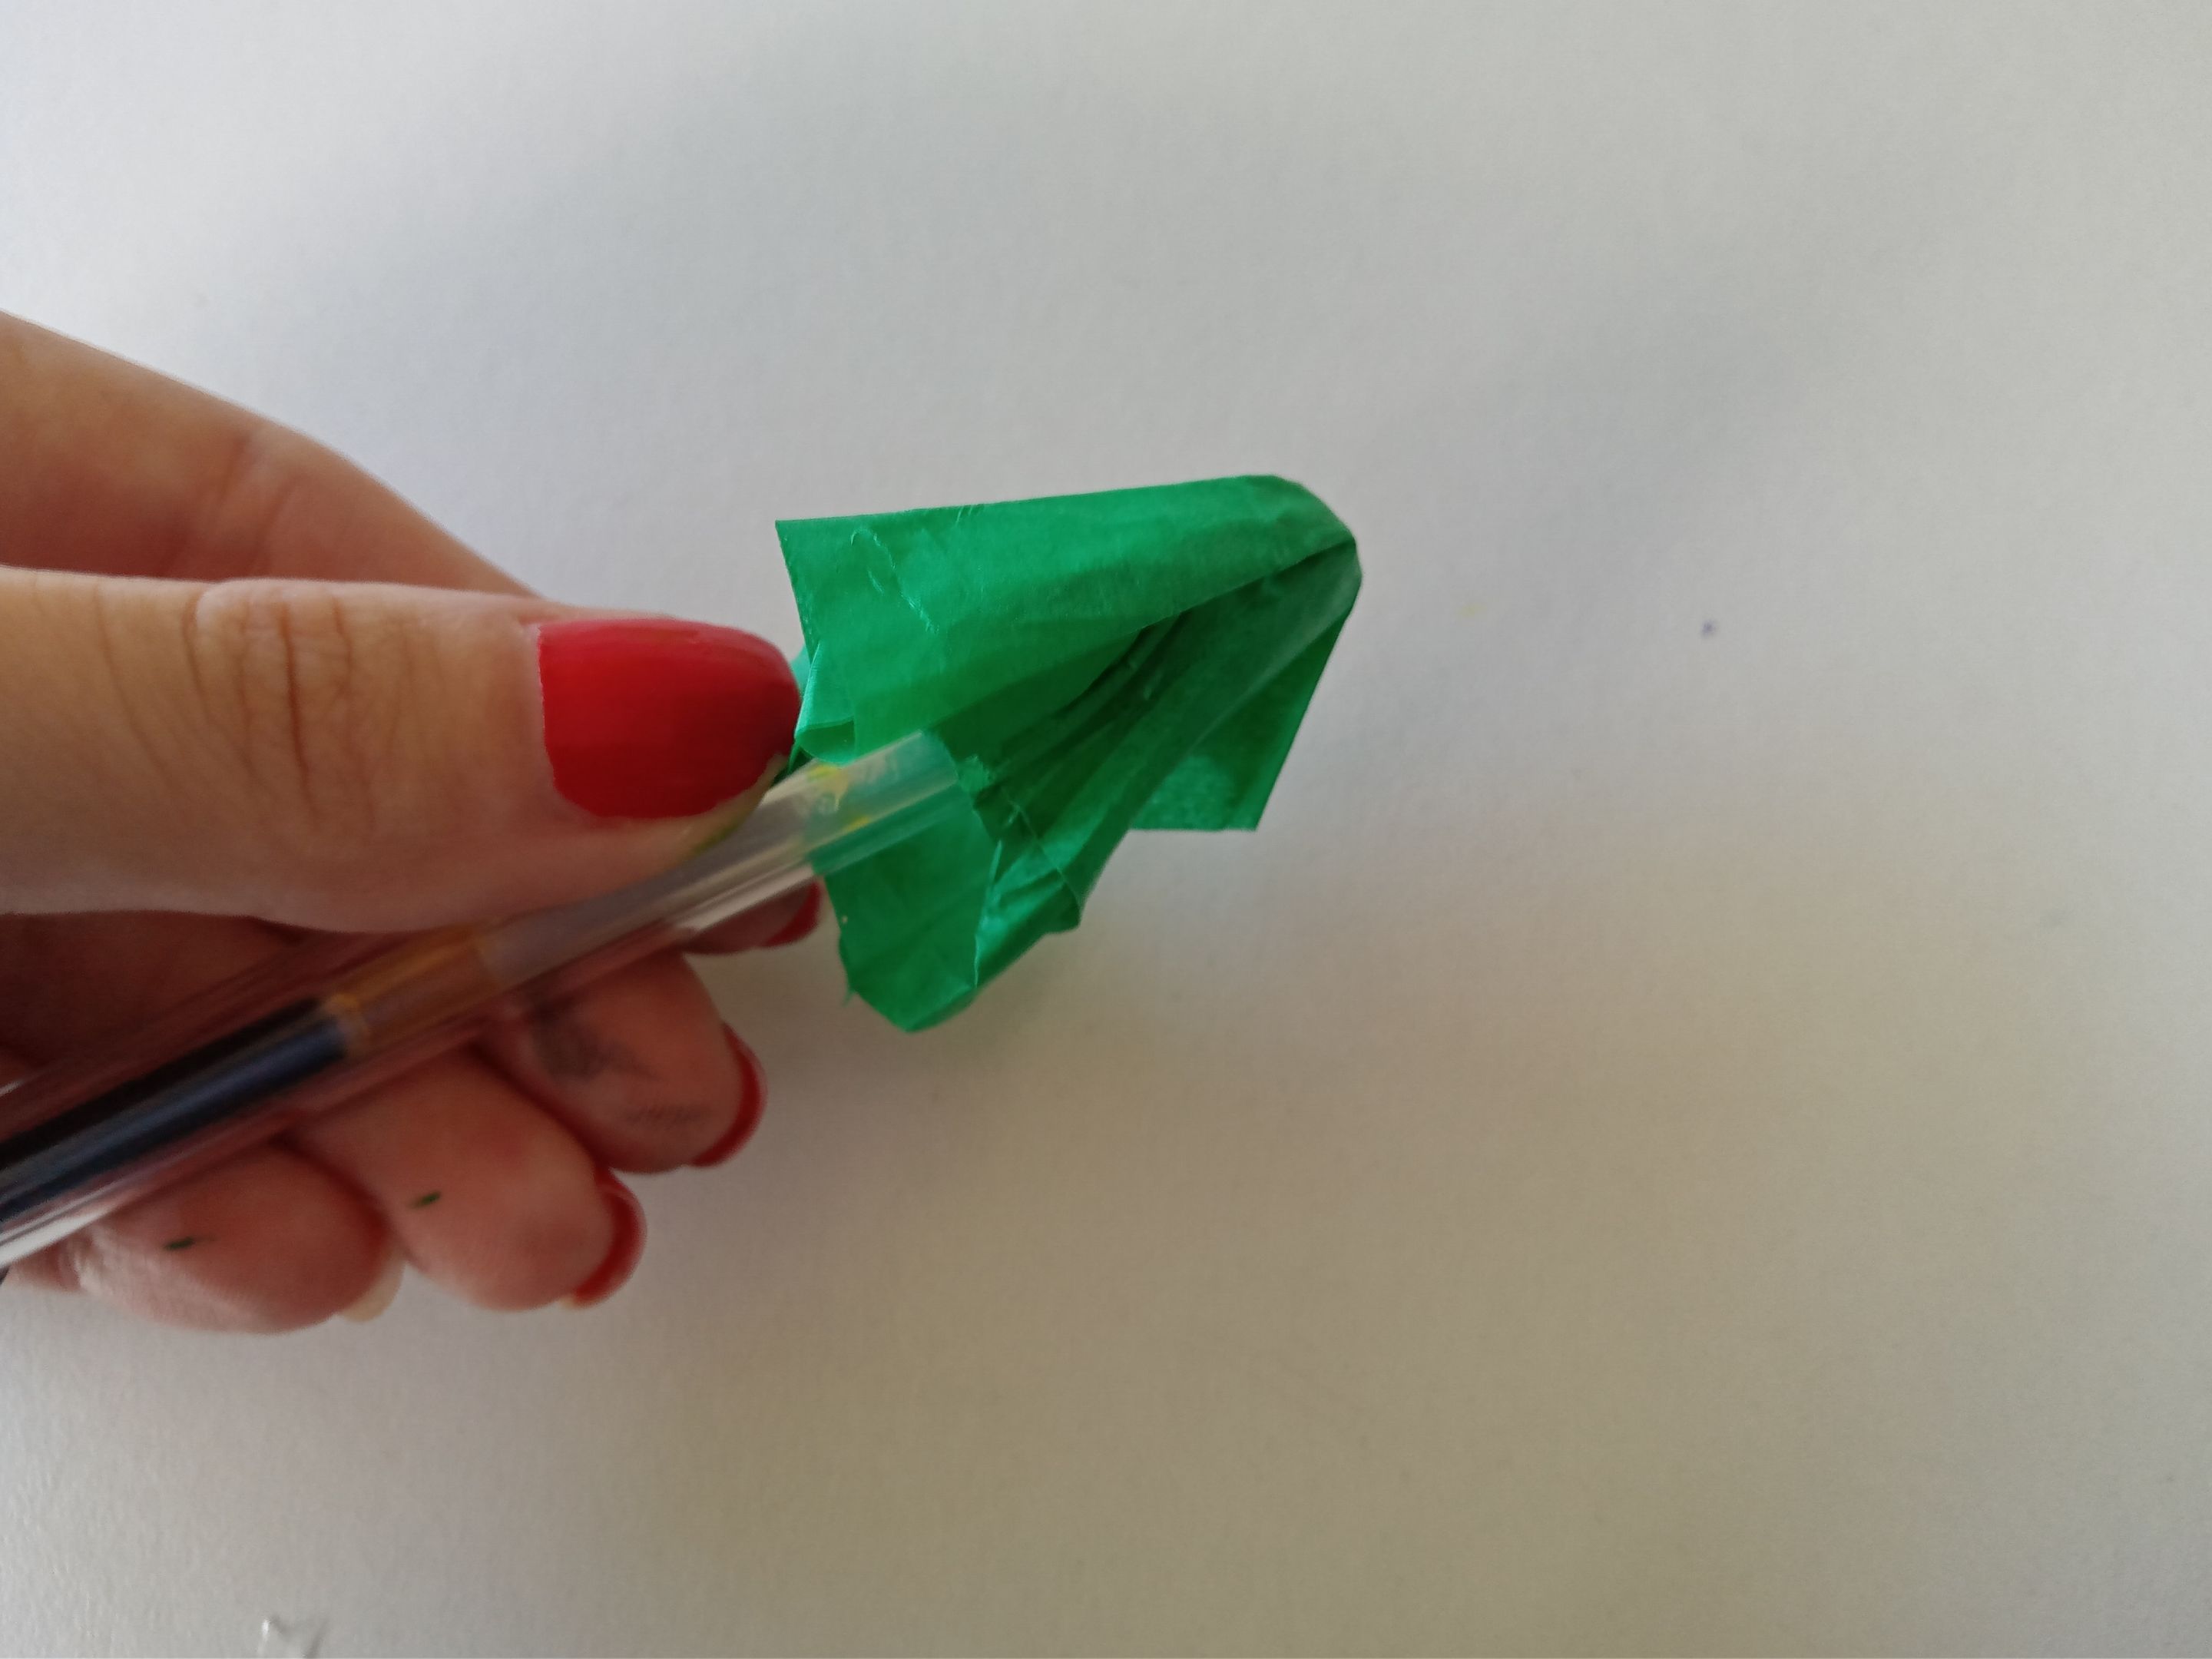
###### ✨PASO 5:
Para finalizar, pegué la decoración en medio de la base. Luego, recorté cuadrados de 5 x 5 cm en papel de seda, tomé cada uno,coloqué en medio un lápiz para darle le la forma que se muestra en las siguientes imágenes y fui pegando justo en medio de la base para tapar un poco el palito y que se vea más prolijo. Por último, di algunos puntos de luz con pintura blanca a las mejillas y a la base.
###### ✨STEP 5:
To finish, I glued the decoration to the middle of the base. Then, I cut 5 x 5 cm squares out of tissue paper. I took each one, placed a pencil in the middle to give it the shape shown in the following images, and glued it right in the middle of the base to hide the stick a bit and make it look neater. Finally, I added some highlights with white paint to the cheeks and base.
# ✨RESULTADO: | ✨RESULT: