
**✨¡Buenas tardes, amigos de holozing!✨** Espero estén pasando una excelente semana. Por mi parte, contenta de pasar por acá a compartir una linda idea con ustedes. En esta ocasión les comparto el paso a paso para elaborar una linda decoración inspirada en Ermy. Esta nueva criatura se convirtió en mi criatura favorita, pues además de ser muy adorable, está inspirada en un armiño de montaña y no sabía, no conocía este animal y el cambio de pelaje cuando cambia el clima. ¡Son tan tiernos! Además, me encanta su colita peluda y su pecho. Me parece que el diseño de este nuevo personaje quedó espectacular; es por eso que lo quise elaborar la primera vez tal cual para hacer una linda decoración.
**🔸Sin más que añadir, a continuación los dejo con el paso a paso:**
>
**✨Good afternoon, holozing friends!✨** I hope you're having a great week. For my part, I'm happy to stop by to share a lovely idea with you. This time, I'm sharing the step-by-step instructions for making a cute Ermy-inspired decoration. This new creature has become my favorite because, in addition to being adorable, it's inspired by a mountain stoat, and I didn't know this animal and how it changes its fur when the weather changes. They're so cute! Plus, I love its furry tail and chest. I think the design of this new character turned out spectacular; that's why I wanted to make it the first time just like that, to make a cute decoration.
> **🔸Without more to add, then I leave you with the step by step:**
---

|||
|-|-|


|||
|-|-|


|||
|-|-|


||||
|-|-|-|

---
❤️ Hasta la próxima publicación.
❤️ Until the next post.
---
🐦 [Twitter](https://twitter.com/valpba)
---

---
**!TE DESEO UN GRAN DÏA¡**
Todas las fotografías son de mi propiedad.
Separador y Fotos editadas en [Canva](https://www.canva.com/)
**!I WISH YOU A GOOD DAY**
All photographs are my property.
Photos edited in [Canva](https://www.canva.com/)
**♥️ESPERO QUE TE GUSTE,
¡Empecemos!**
**♥️I HOPE YOU LIKE IT,
Let's start!**
---

# ✂️ *MATERIALES* | ✂️ *MATERIALS*

- Foami escarchado blanco.
- Foami blanco.
- Foami azul.
- Foami azul claro.
- Cinta delgada.
- Pinturas y marcadores.
- Pegamento.
- Tijeras.
- Regla.
- Hoja blanca.
- Lápiz.
- White frosted foam.
- White foam.
- Blue foam.
- Light blue foam.
- Thin ribbon.
- Paints and markers.
- Glue.
- Scissors.
- Ruler.
- White paper.
- Pencil.

# ✨ *PROCEDIMIENTO* | ✨ *PROCESS*

###### ✨ PASO 1:
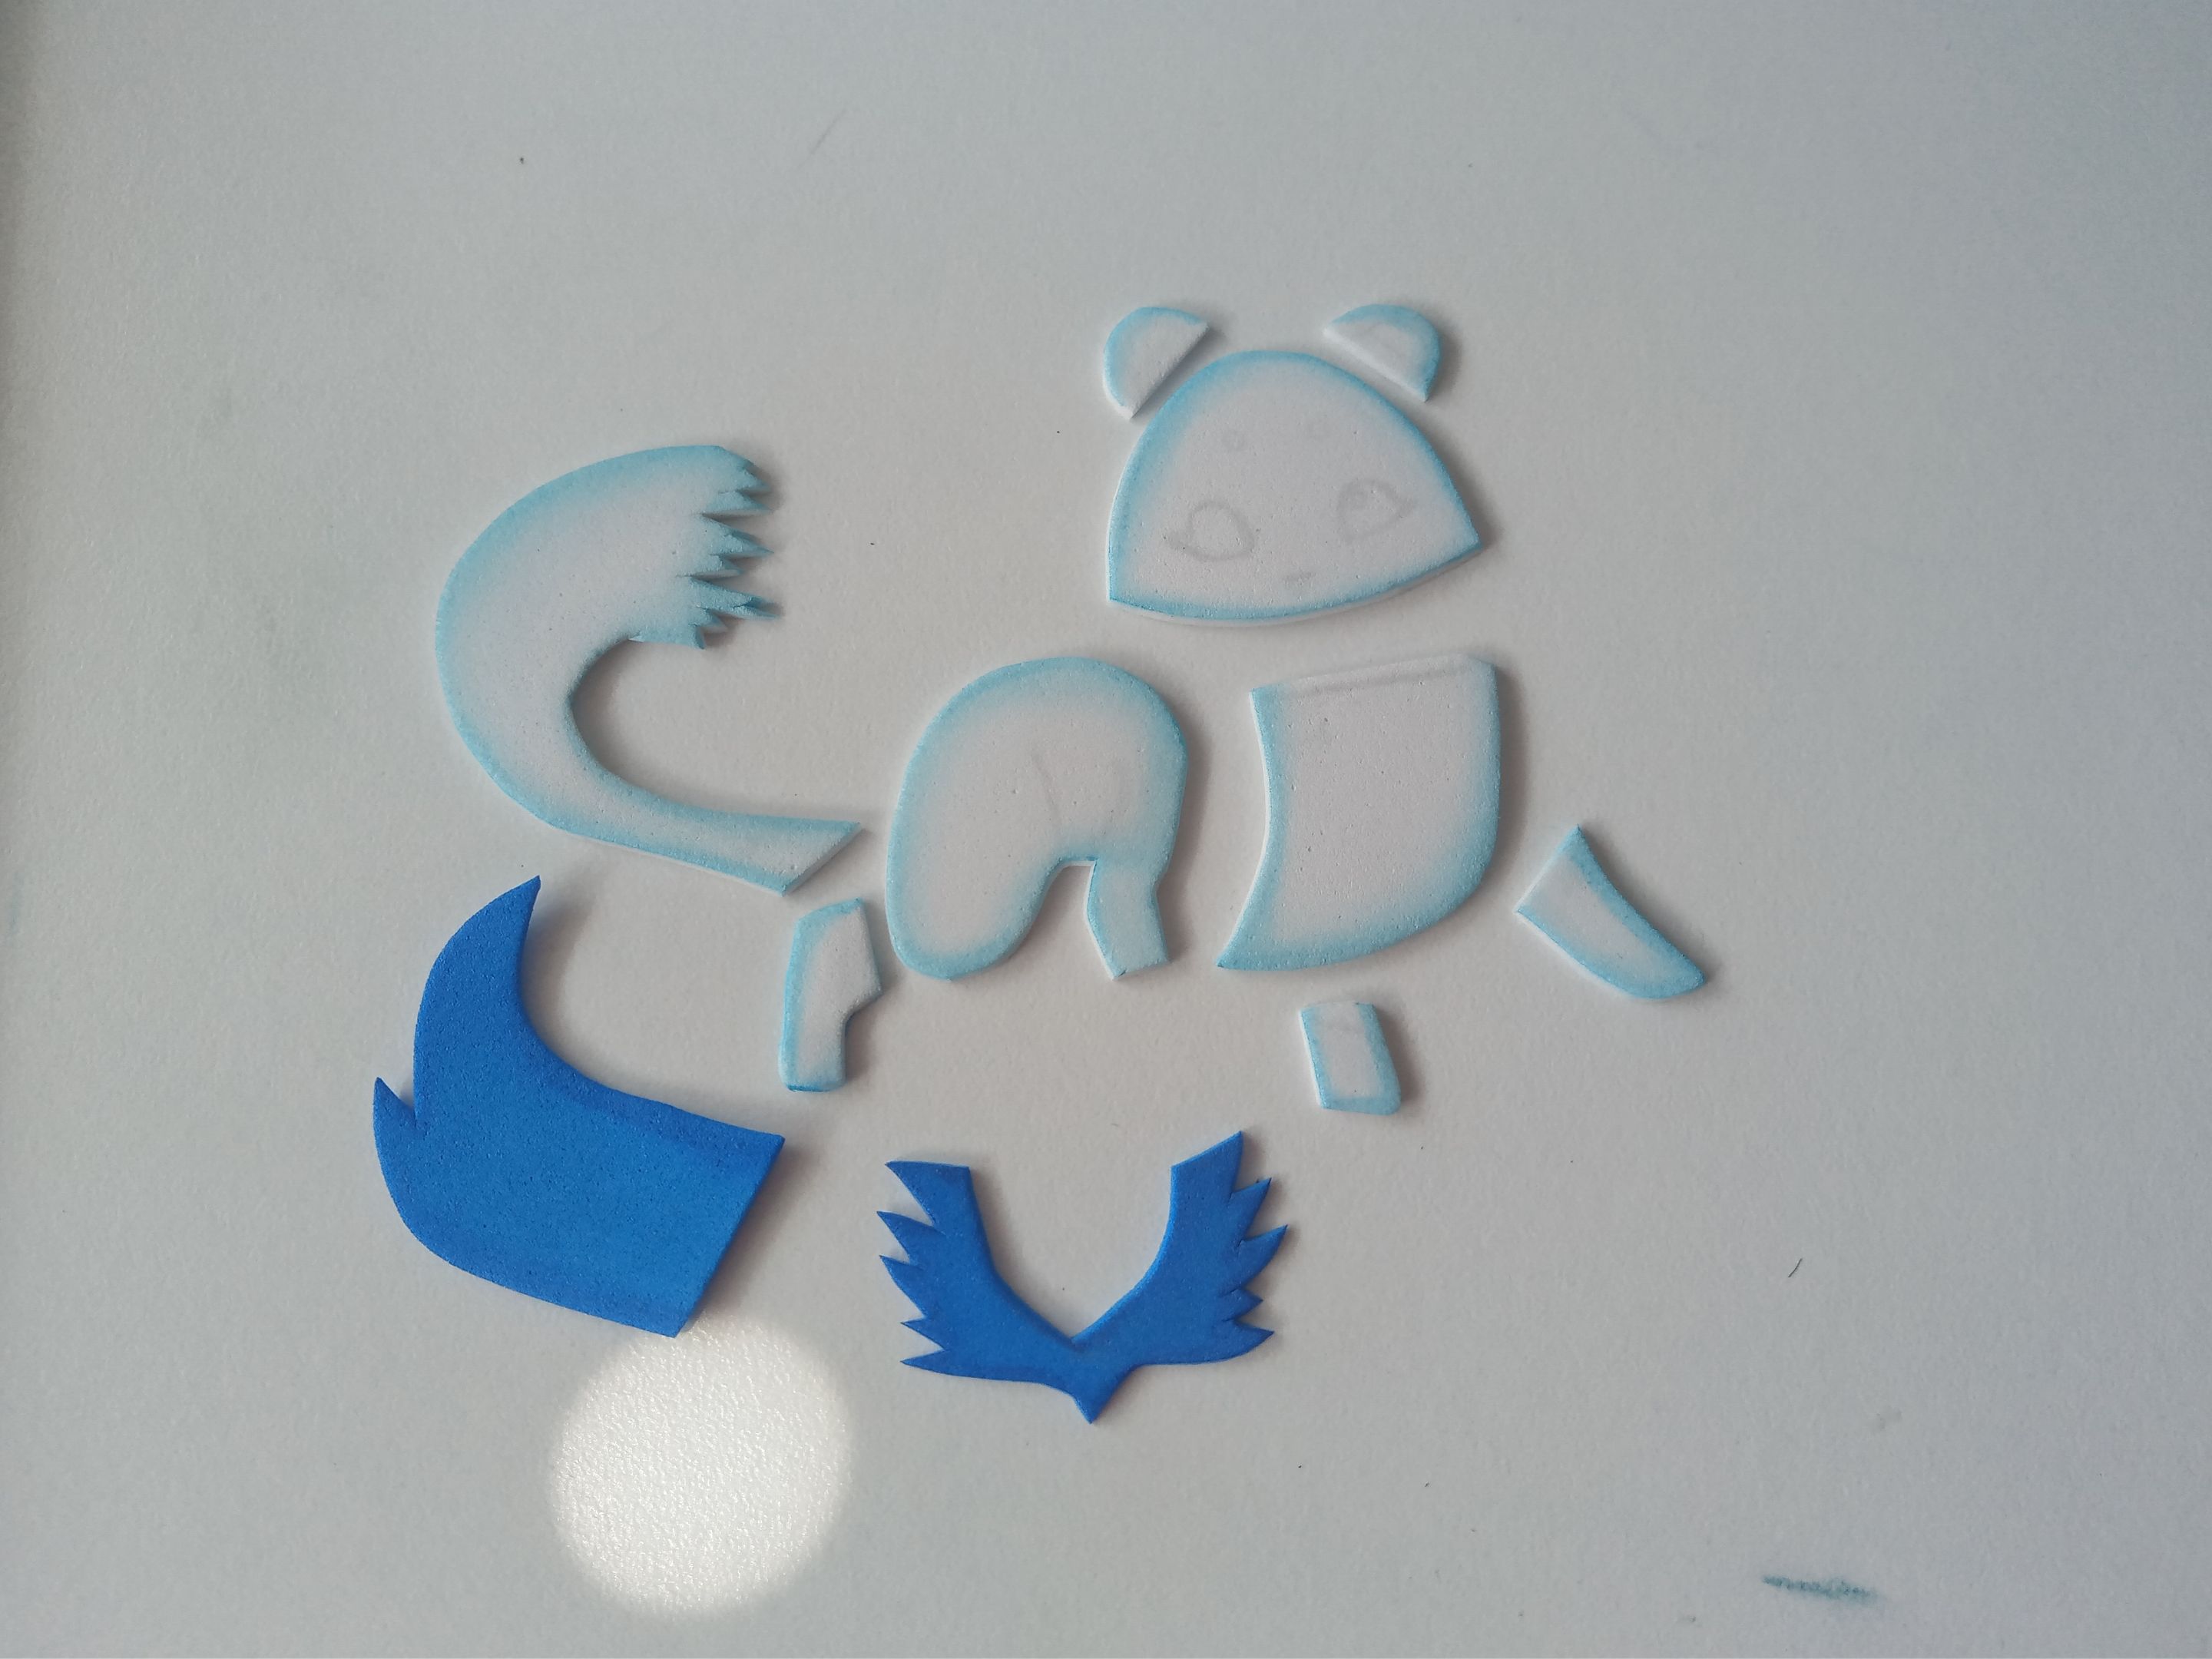
Lo primero que hice fue dibujar el diseño de Ermy en una hoja blanca, pero, como dije al inicio, lo quise elaborar tal cual el personaje original; luego lo intentaré elaborar a mi estilo a ver cómo sale, pero dudo que pueda superar este diseño tan precioso; quizá puedo hacerlo un poco más esponjoso, jaja, no lo sé. Al tener listo el diseño en la hoja blanca, es momento de transferir a los colores correspondientes de foami, como explico a continuación:
✨Orejas: 1 cm x 0.6 mm en foami blanco.
✨Cabeza: 3.3 cm x 2 cm en foami blanco.
✨Parte delantera del cuerpo: 3.5 cm x 3 cm en foami blanco.
✨Parte trasera junto con una pata delantera: 3 cm x 2.5 cm en foami blanco.
✨Pata delantera: 1.5 cm x 0.7 mm en foami blanco.
✨Patas traseras: 1 cm x 0.6 mm y 1.5 cm x 0.8 mm en foami blanco.
✨Cola: 4.5 cm x 1.5 cm en foami blanco.
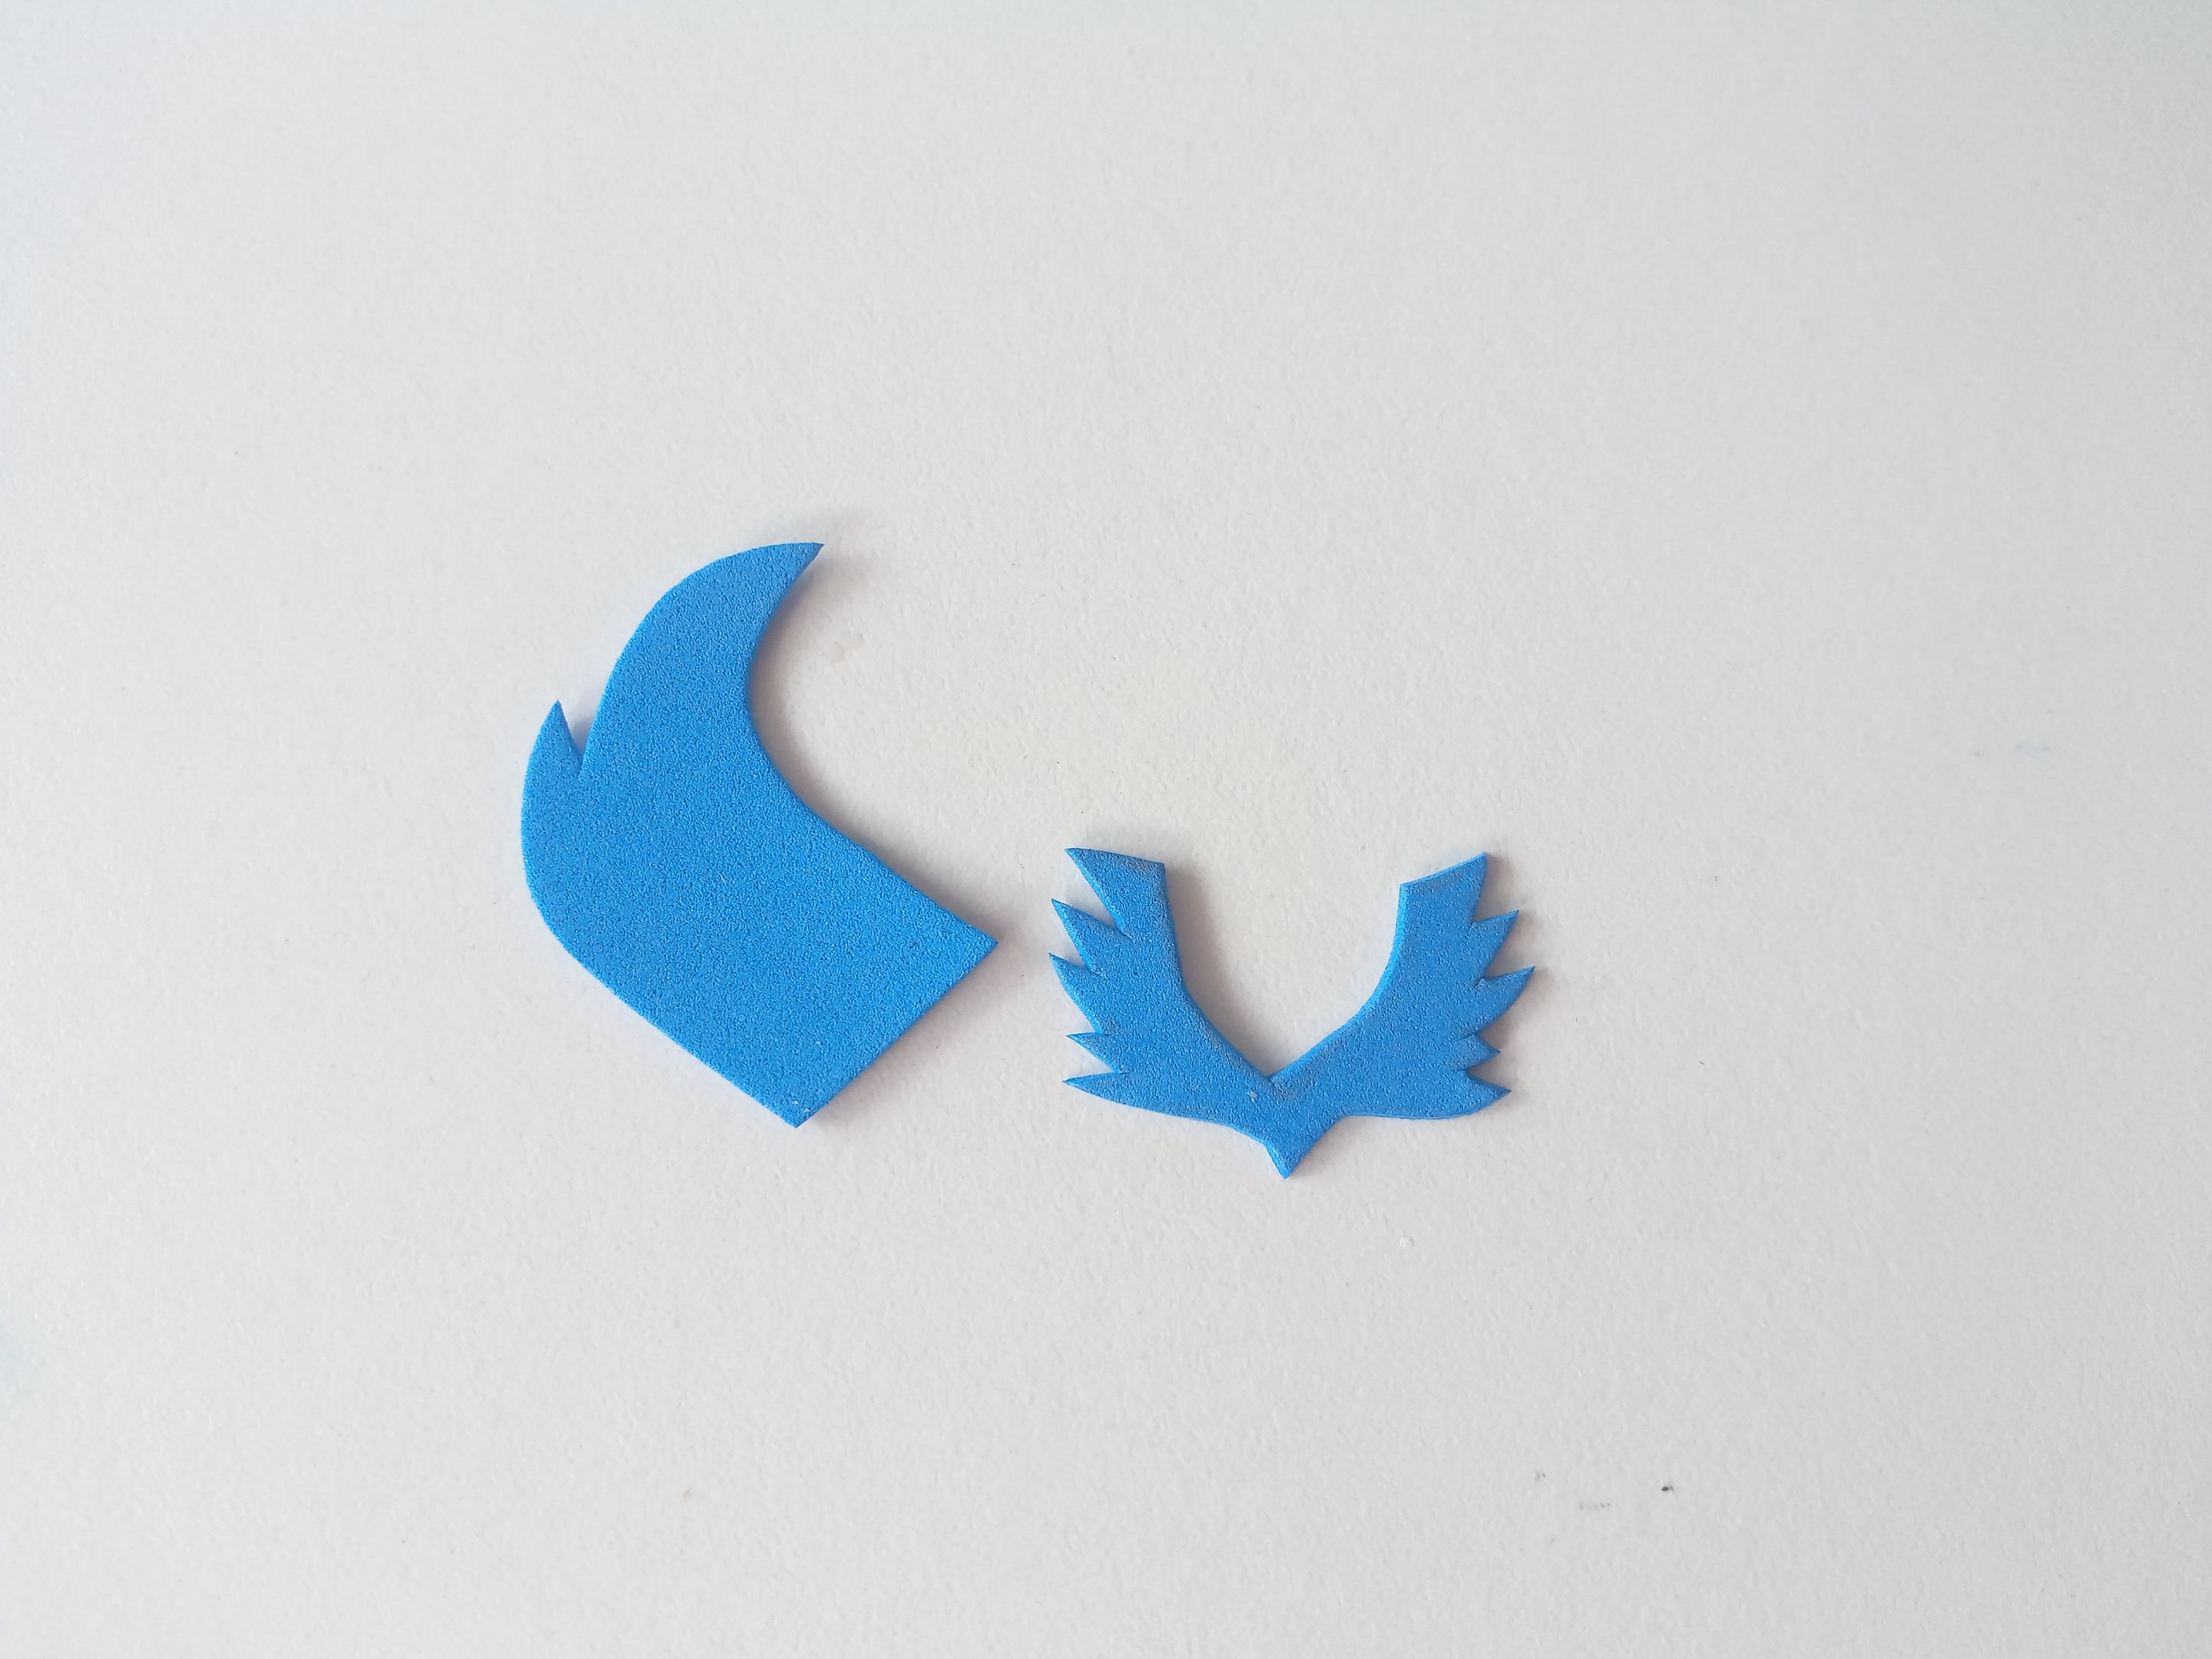
✨Pecho: 3 cm x 1 cm en foami azul.
✨Punta de la cola: 3 cm x 1.5 cm en foami azul.
###### ✨ STEP 1:
The first thing I did was draw Ermy's design on a white sheet of paper, but, as I said at the beginning, I wanted to make it just like the original character. Later, I'll try to make it my own and see how it turns out, but I doubt I can top this gorgeous design. Maybe I can make it a little fluffier, haha, I don't know. Once I have the design ready on the white sheet of paper, it's time to transfer it to the corresponding colors of foam, as explained below:
✨Ears: 1 cm x 0.6 mm in white foam.
✨Head: 3.3 cm x 2 cm in white foam.
✨Front part of the body: 3.5 cm x 3 cm in white foam.
✨Rear part with one front leg: 3 cm x 2.5 cm in white foam.
✨Front leg: 1.5 cm x 0.7 mm in white foam.
✨Rear legs: 1 cm x 0.6 mm and 1.5 cm x 0.8 mm in white foam.
✨Tail: 4.5 cm x 1.5 cm in white foam.
✨Chest: 3 cm x 1 cm in blue foam.
✨Tip of tail: 3 cm x 1.5 cm in blue foam.
###### ✨ PASO 2:
Al tener listas todas las piezas, es momento de dar color a los bordes con pinturas o marcadores y difuminamos con ayuda de un pañito. A este caso, quise darle un tono azul clarito a los bordes de las piezas en fomi blanco y a las piezas en foami azul, un tono de azul más oscuro para que haga contraste. Al estar secas las piezas, es momento de detalles más específicos con marcadores, como pelaje de la cola, definir un poco mejor las divisiones de las patas, los ojos, detalles superiores de la cabeza, nariz y parte interna de las orejas.
###### ✨ STEP 2:
Once all the pieces are ready, it's time to color the edges with paints or markers and blend them with a cloth. In this case, I wanted to give the edges of the white foam pieces a light blue shade, and the blue foam pieces a darker shade of blue for contrast. Once the pieces are dry, it's time to add more specific details with markers, such as the tail fur, and better define the divisions of the legs, eyes, upper details of the head, nose, and inner parts of the ears.
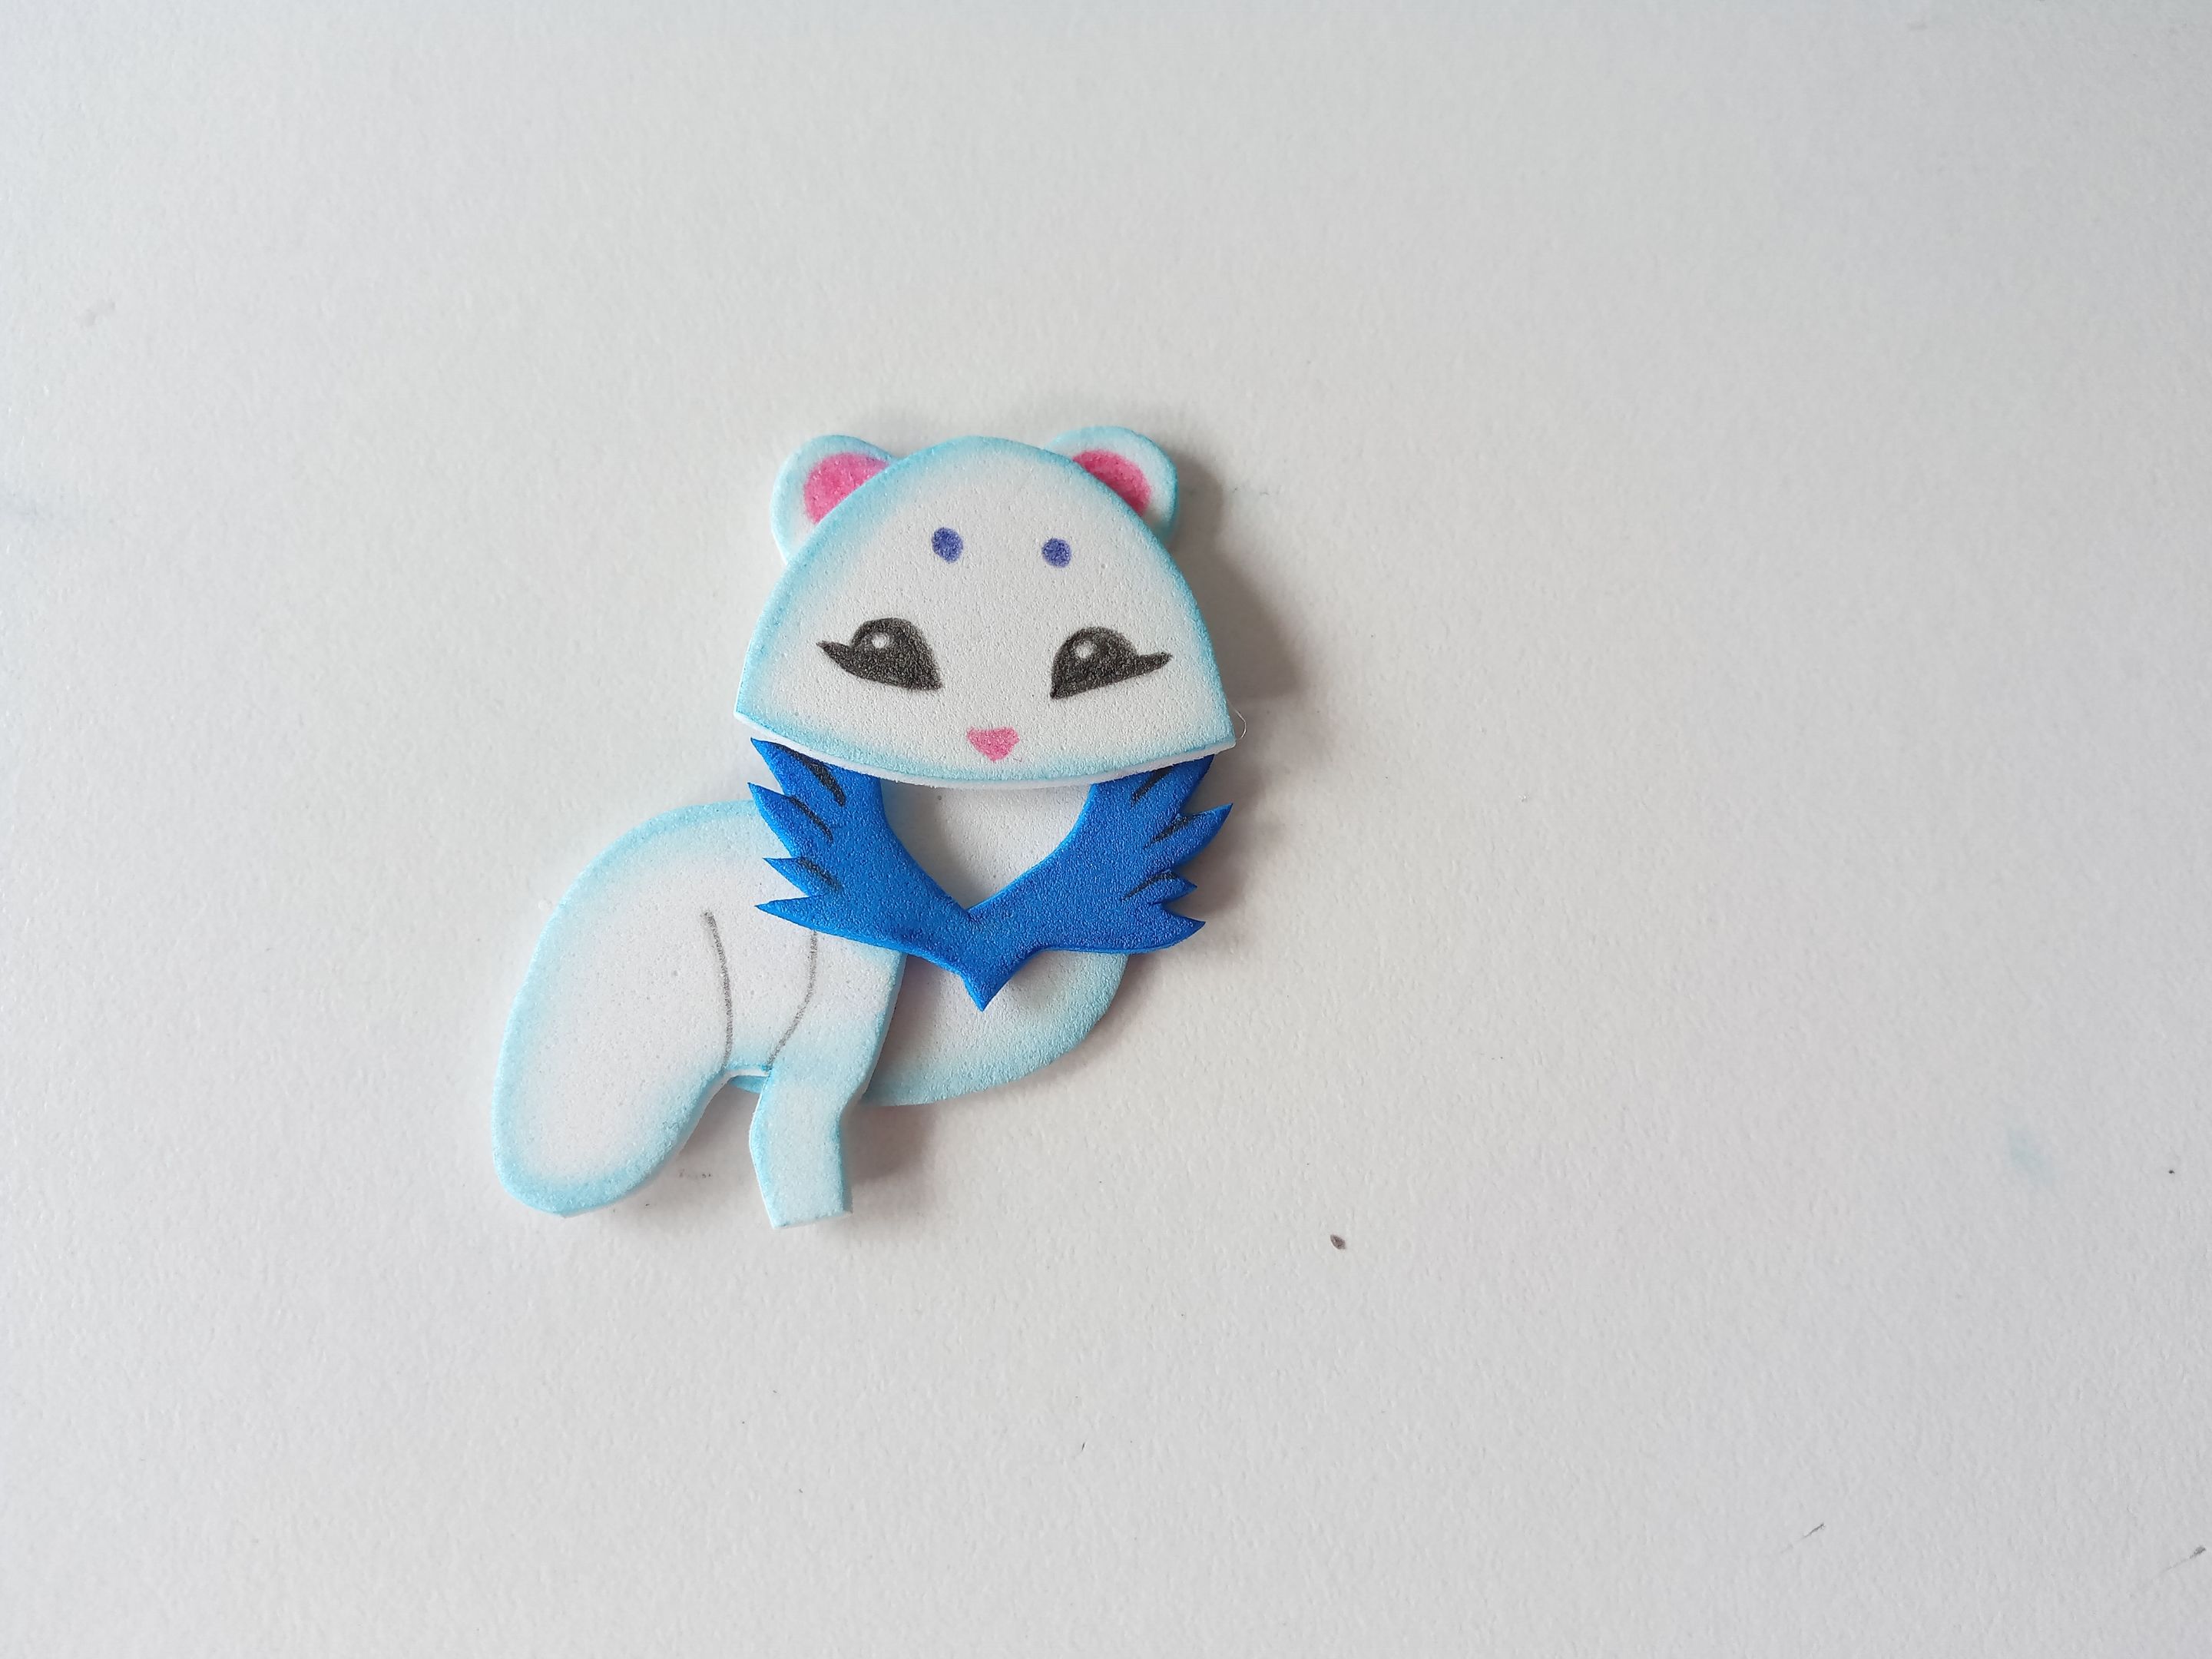
###### ✨ PASO 3:
Al estar secas las piezas, es momento de comenzar a pegar. Esta vez no empecé pegando la cabeza, pues lo mejor era primero pegar el pelaje del pecho en la parte delantera del cuerpo, digamos que la zona del pecho como tal y la parte trasera del cuerpo. Seguidamente, pegué la cabeza de Ermy, junto con las orejas y, por último, las patas en su lugar correspondiente y la cola.
###### ✨ STEP 3:
Once the pieces are dry, it's time to start gluing. This time I didn't start by gluing the head, as it was best to first glue the chest fur to the front of the body—the chest area itself and the back of the body. Next, I glued Ermy's head, along with the ears, and finally, the legs and tail in their corresponding places.
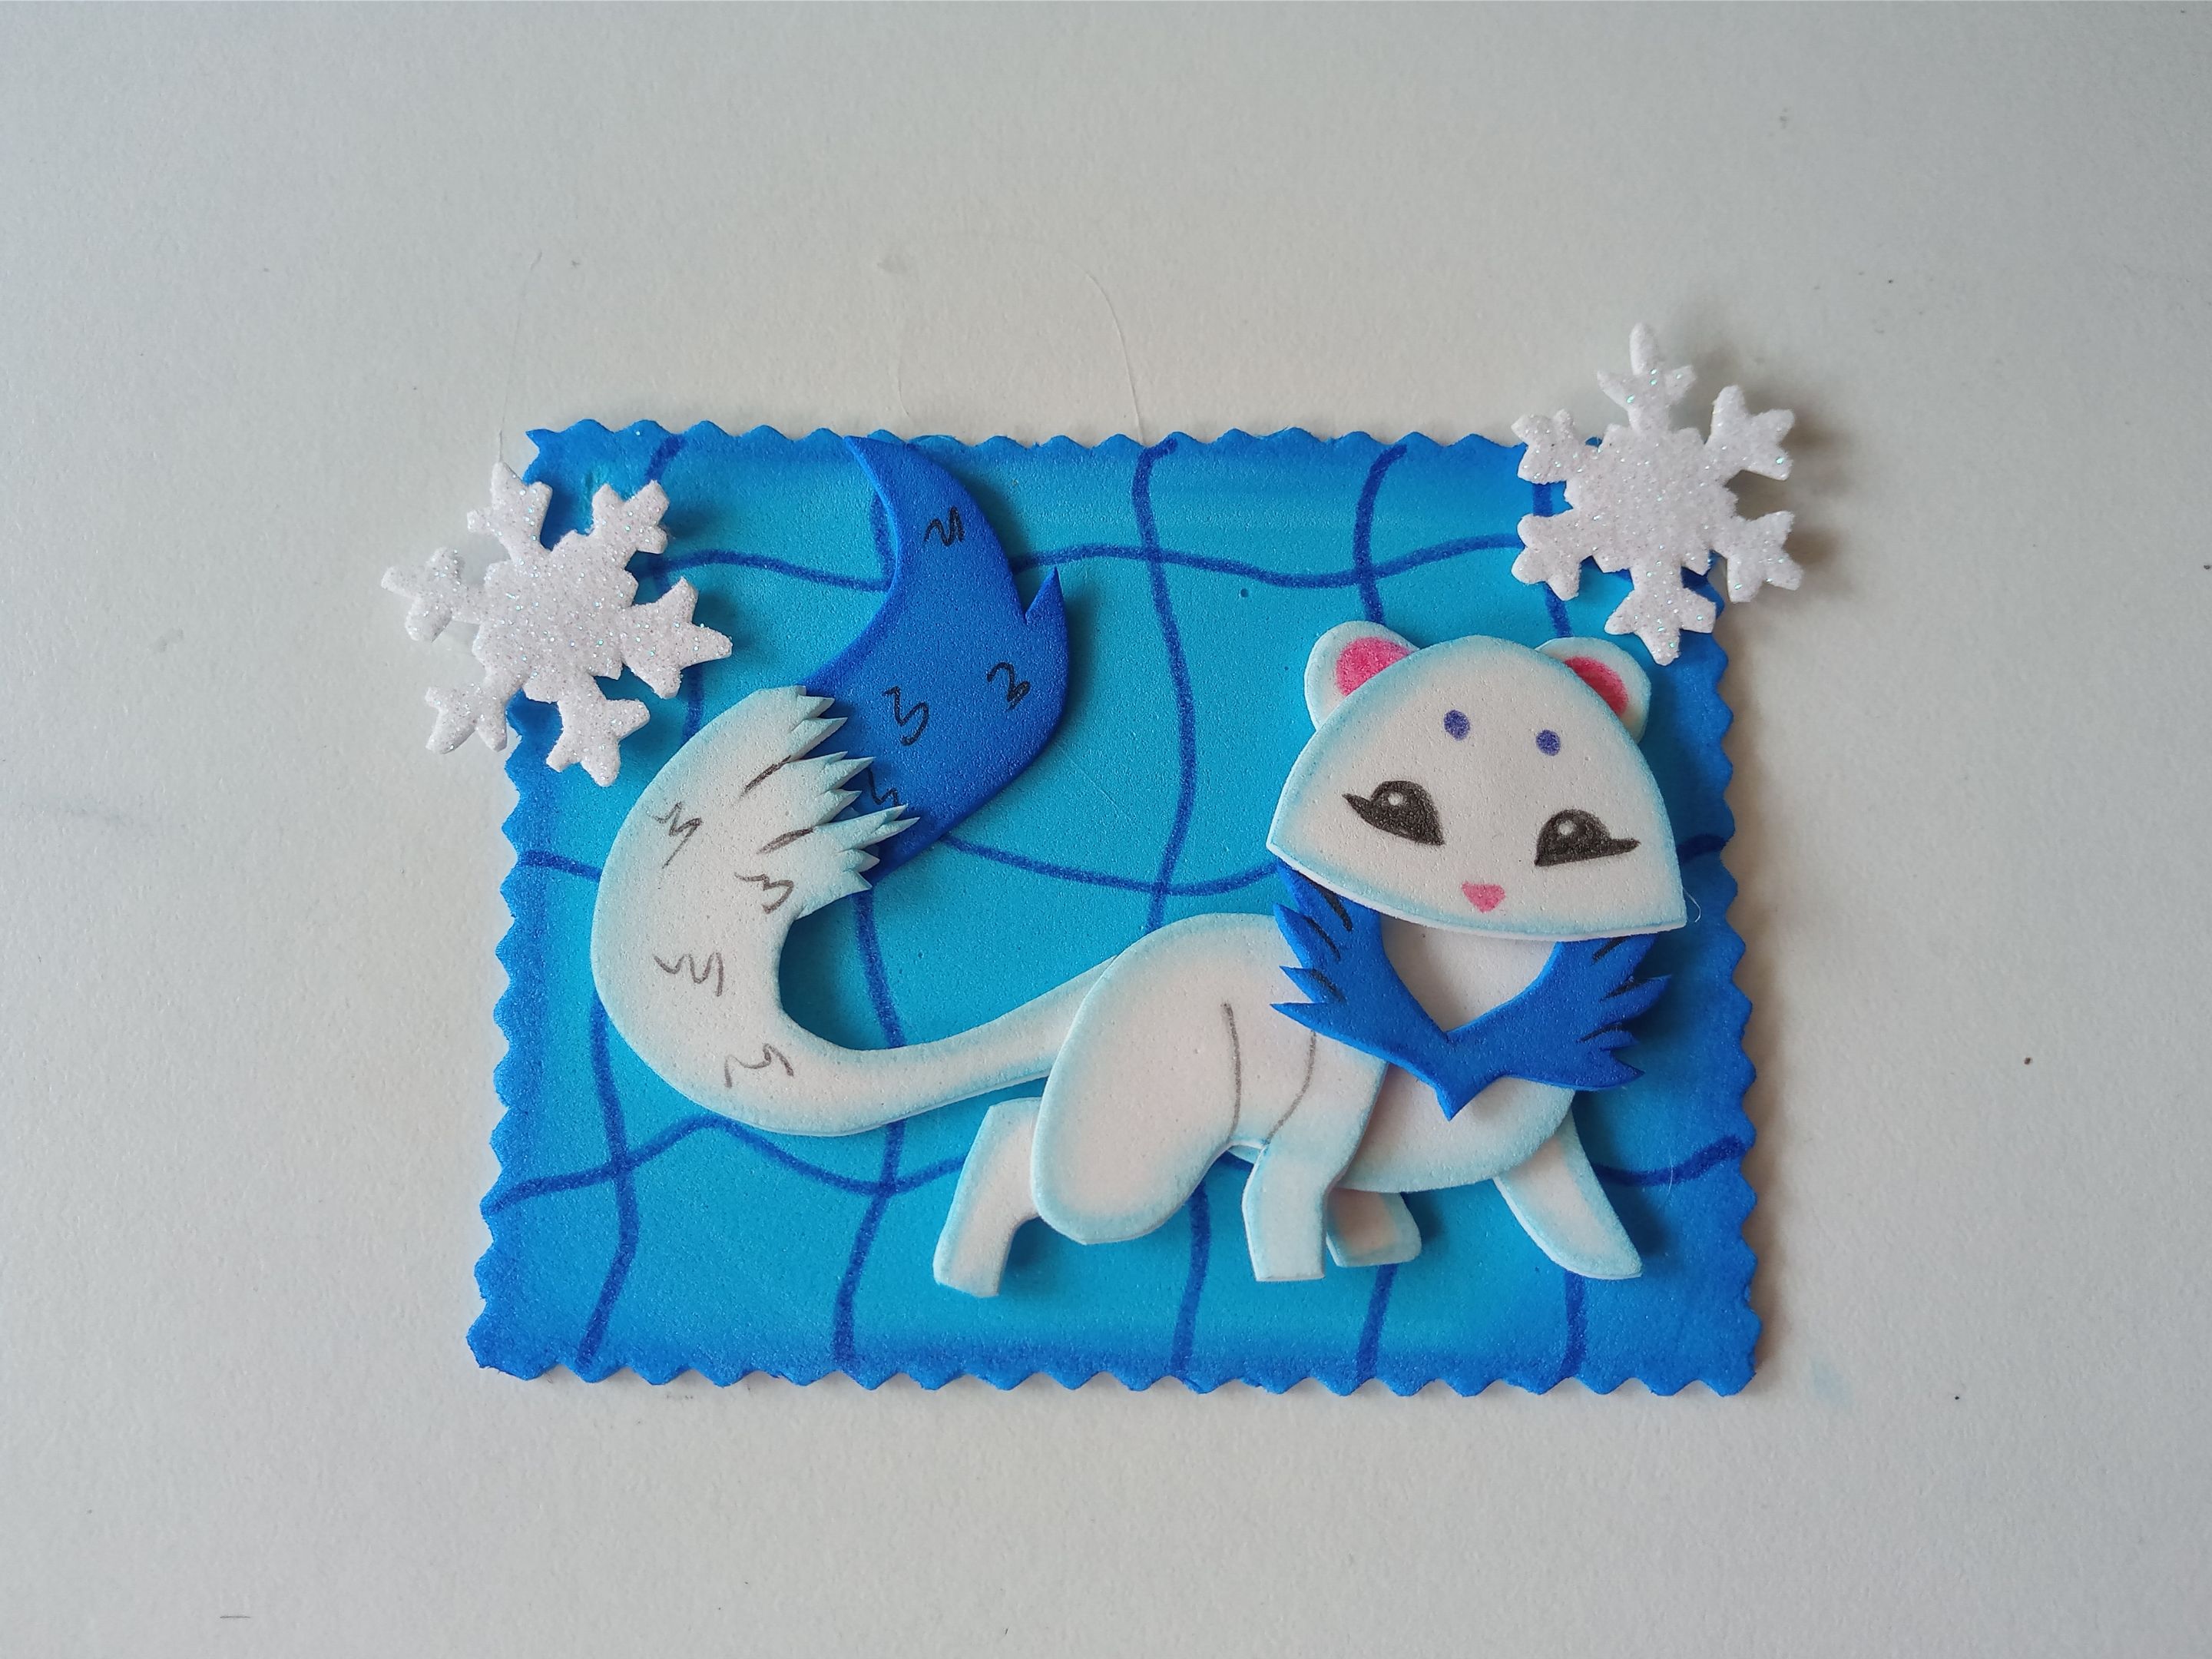
###### ✨ PASO 4:
Ahora vamos con el fondo de esta decoración, la cual elaboré recortando una pieza rectangular en foami azul claro de 10 cm x 8 cm, a la cual le recorté los bordes con tijeras decoradas. Seguidamente, di color a los bordes con un tono de pintura más oscuro e hice un diseño con marcador. Ya casi para finalizar, pegué a Ermy en el centro, recorté unos lindos copos de nieve en foami escarchado blanco y pegué en las esquinas del fondo.
###### ✨ STEP 4:
Now for the background of this decoration, which I made by cutting a rectangular piece of light blue foam measuring 10 cm x 8 cm, and trimming the edges with decorative scissors. Next, I colored the edges with a darker shade of paint and made a design with a marker. Almost to finish, I glued Ermy in the center, cut out some cute snowflakes from white frosted foam, and glued them to the corners of the background.