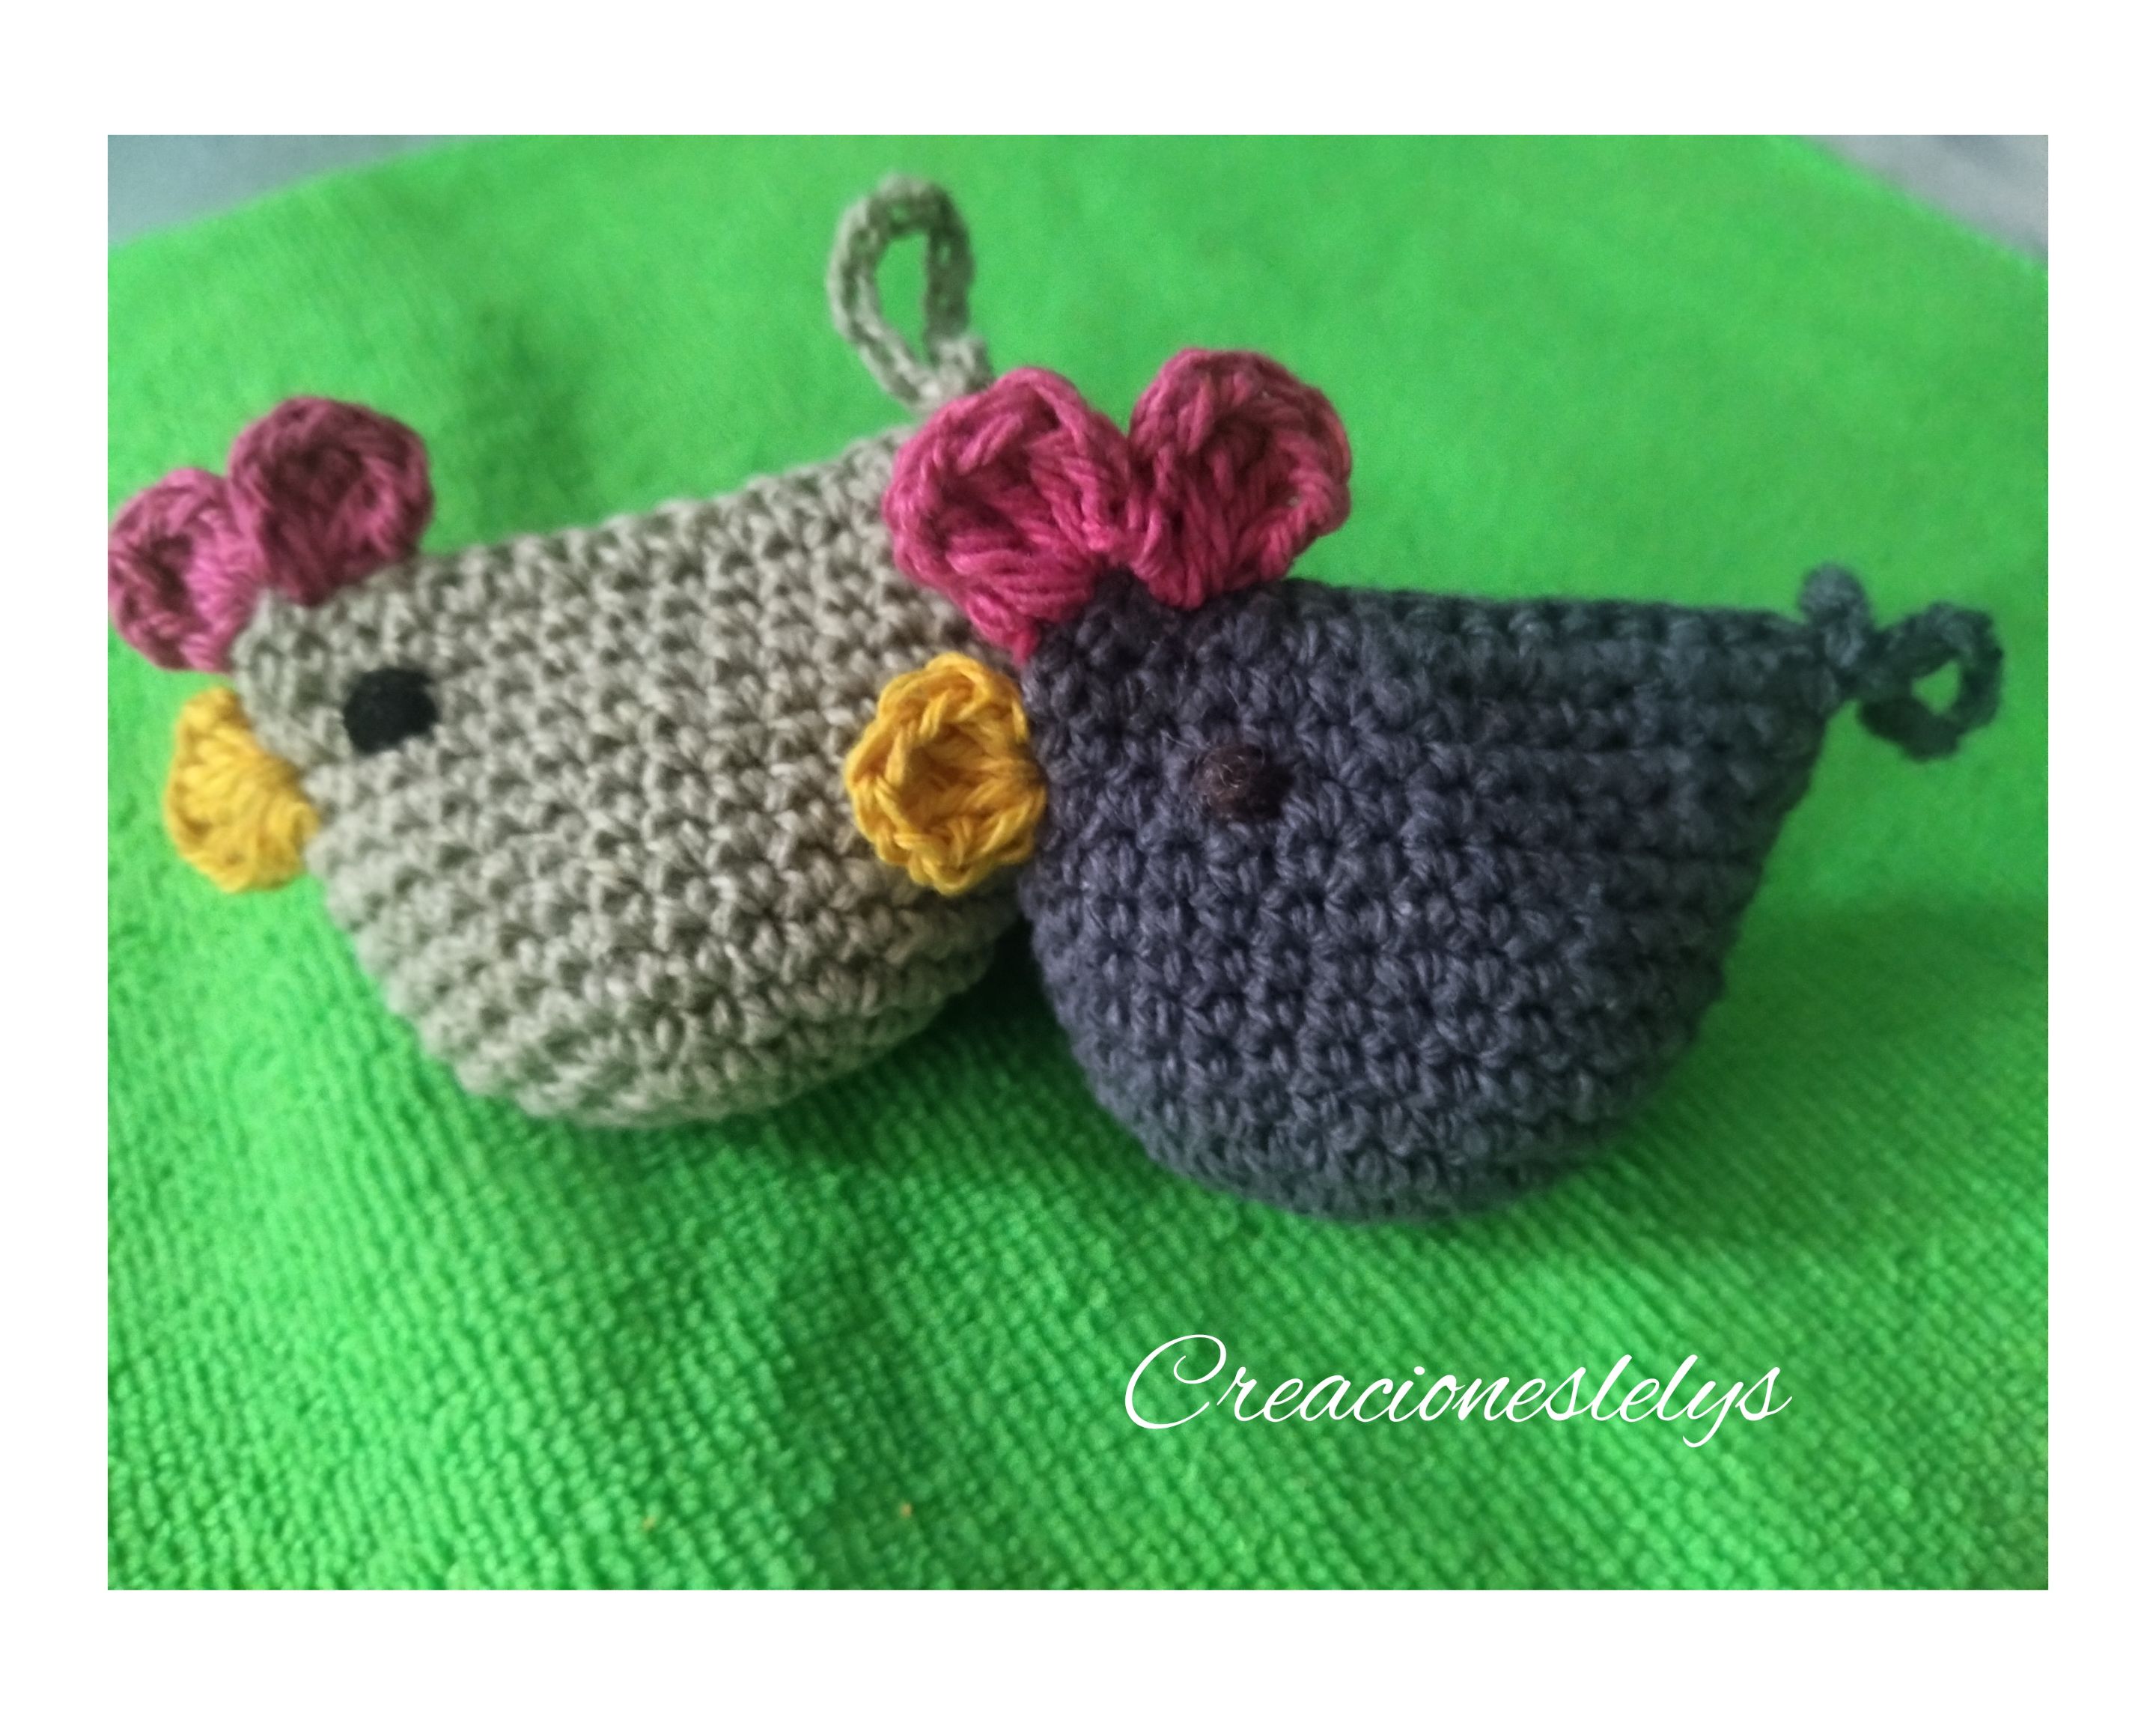
Gallinita para llaveros.
Little hen for keychains.
Hola queridos y apreciados amigos de la comunidad. Bienvenidos a mi blog, yo soy Lelys 🙎🏽♀️ me gusta compartir cada una de las creaciones que elaboro. El día de hoy vengo a mostrarles el resultado final y algunos detalles del proceso para la elaboración de una linda gallinita tejida a crochet. Ojalá les guste y si saben tejer 🧶 se animen a realizarla. ¡Empecemos!
Hello dear and appreciated friends of the community. Welcome to my blog, I am Lelys 🙎🏽♀️ I like to share each of the creations I make. Today I come to show you the final result and some details of the process for the elaboration of a cute crochet knitted gallinita. I hope you like it and if you know how to crochet 🧶 I encourage you to make it. Let's start!

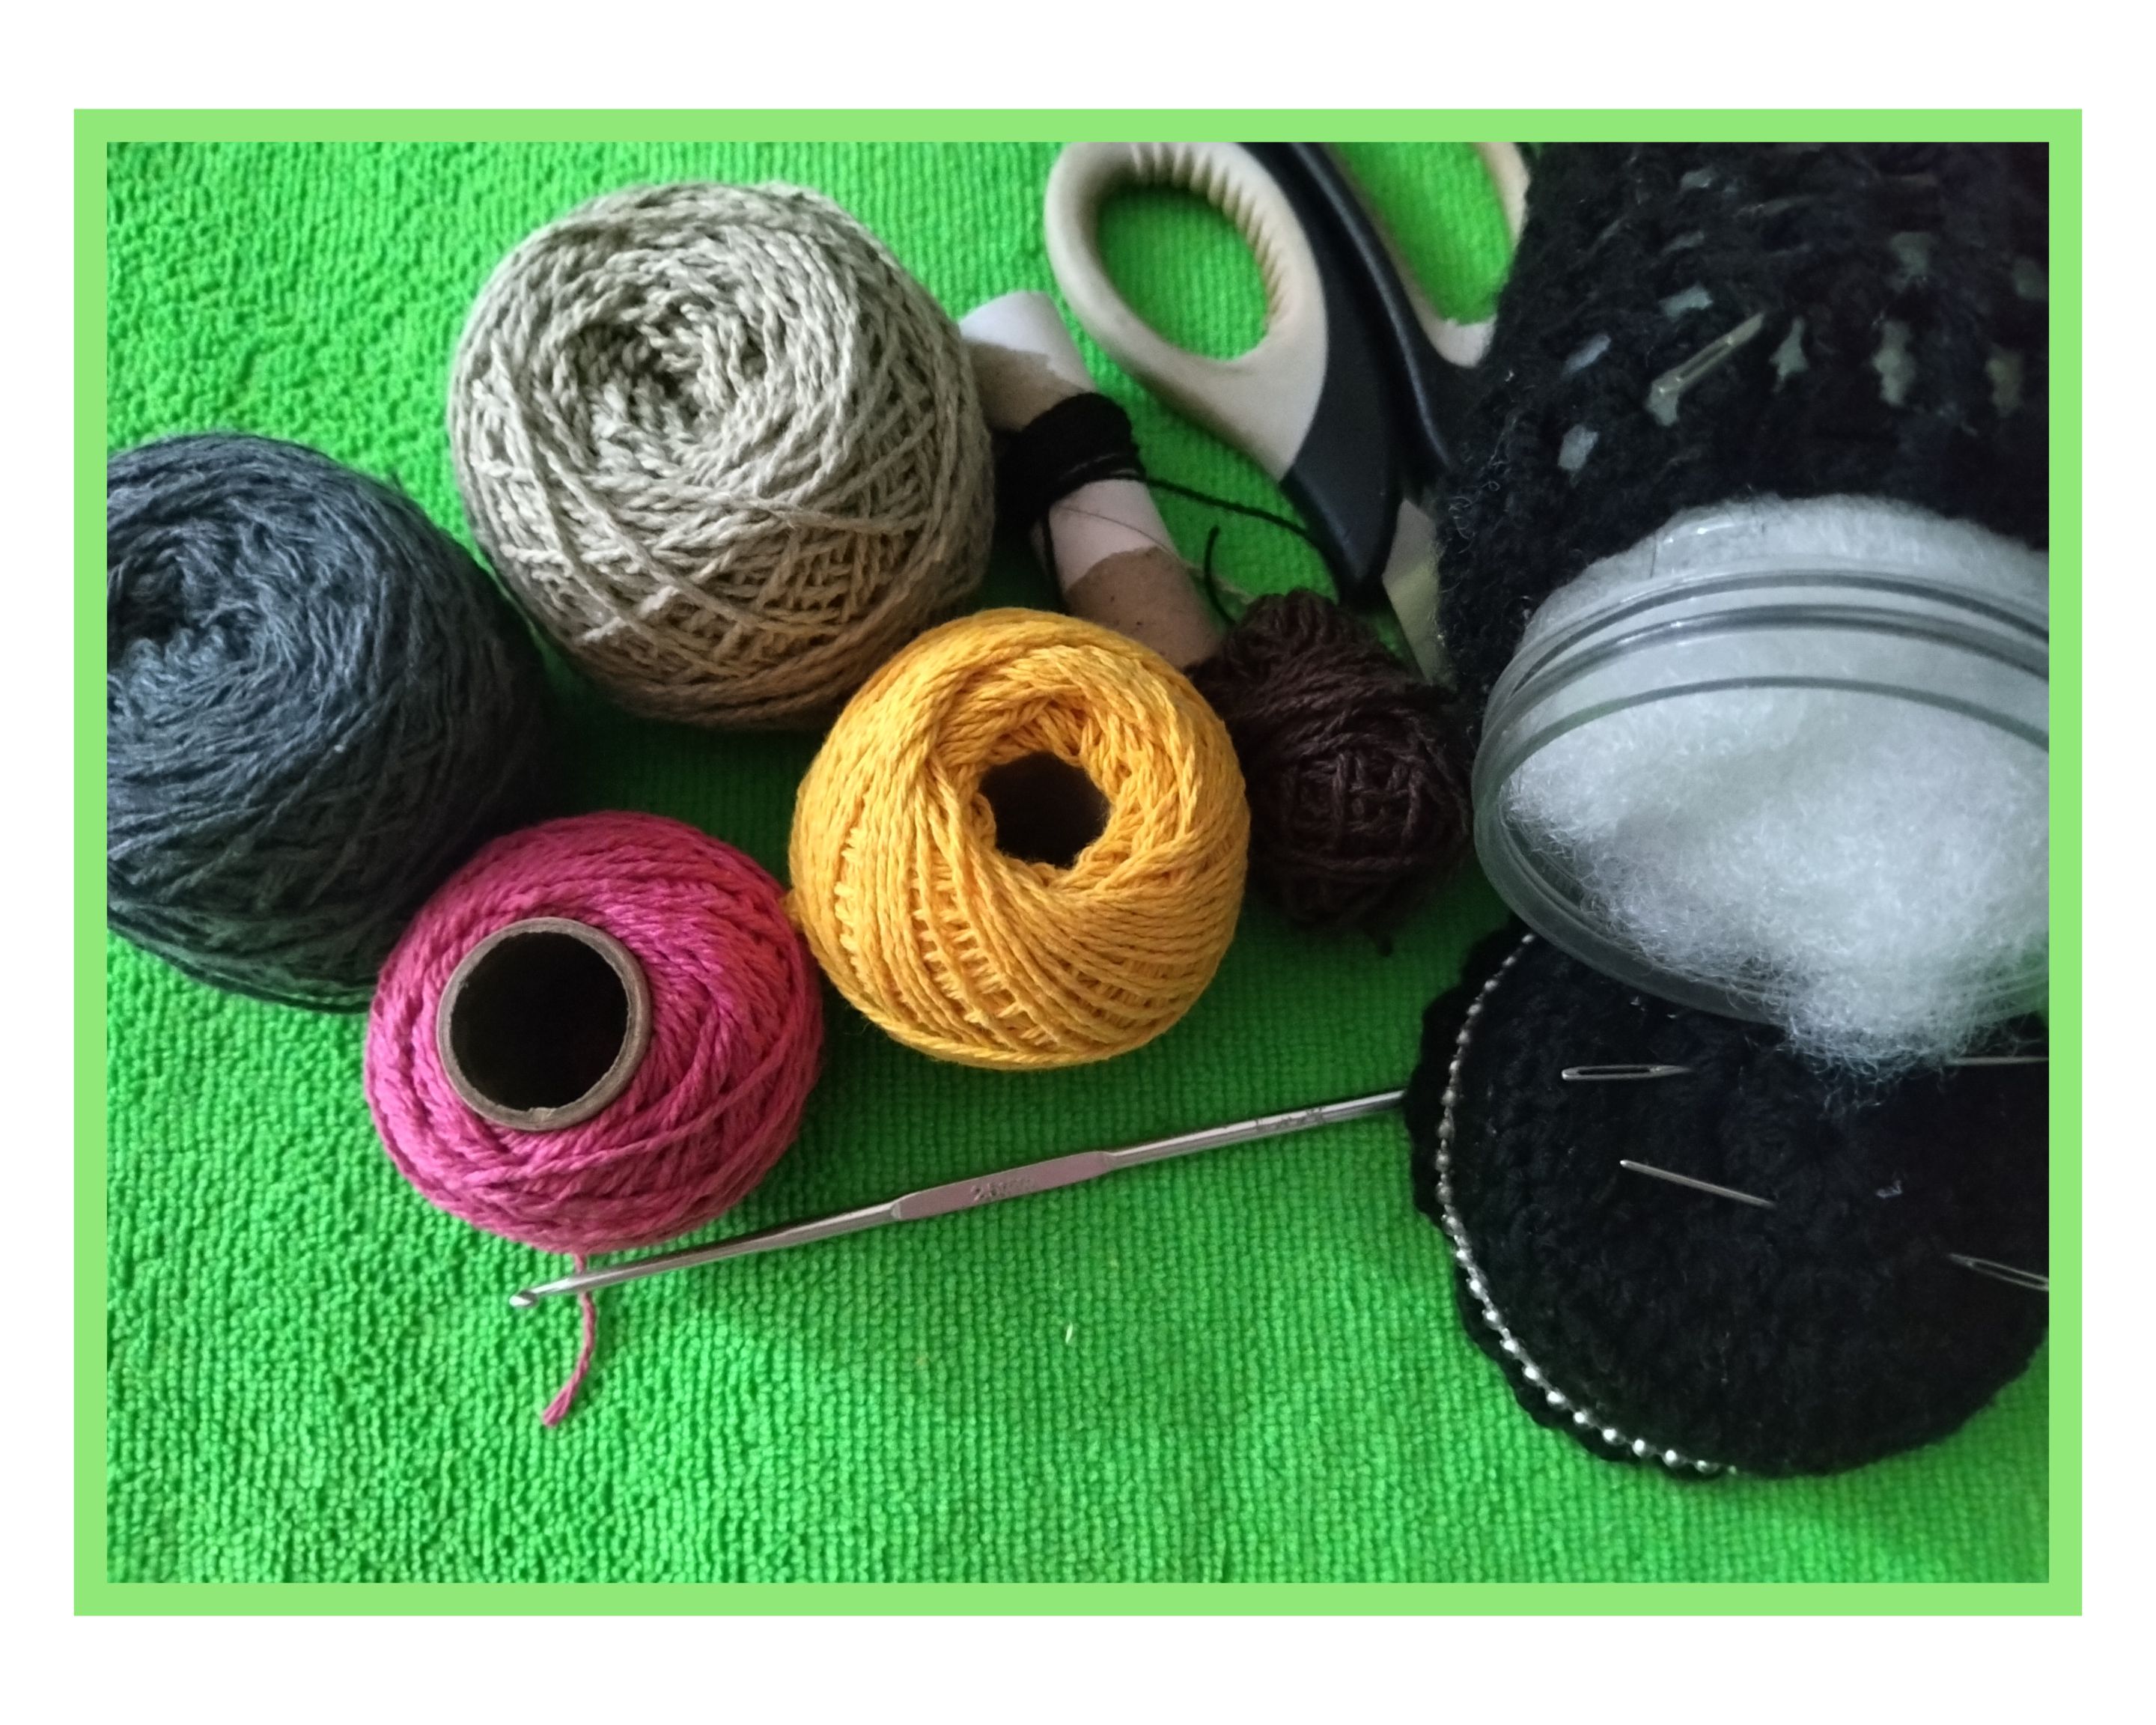
Materiales/Materials.
🐔 Para realizar estas lindas gallinitas tejidas usé los siguientes materiales:
- Hilos pabilos.
- Aguja de crochet de 2,25mm.
- Algodón sintético.
- Aguja lanera.
- Tijeras.
🐔 To make these cute little knitted hens I used the following materials:
- Pabilo yarns.
- Crochet needle of 2,25mm.
- Synthetic cotton.
- Wool needle.
- Scissors.
Procedimiento/Procedure.
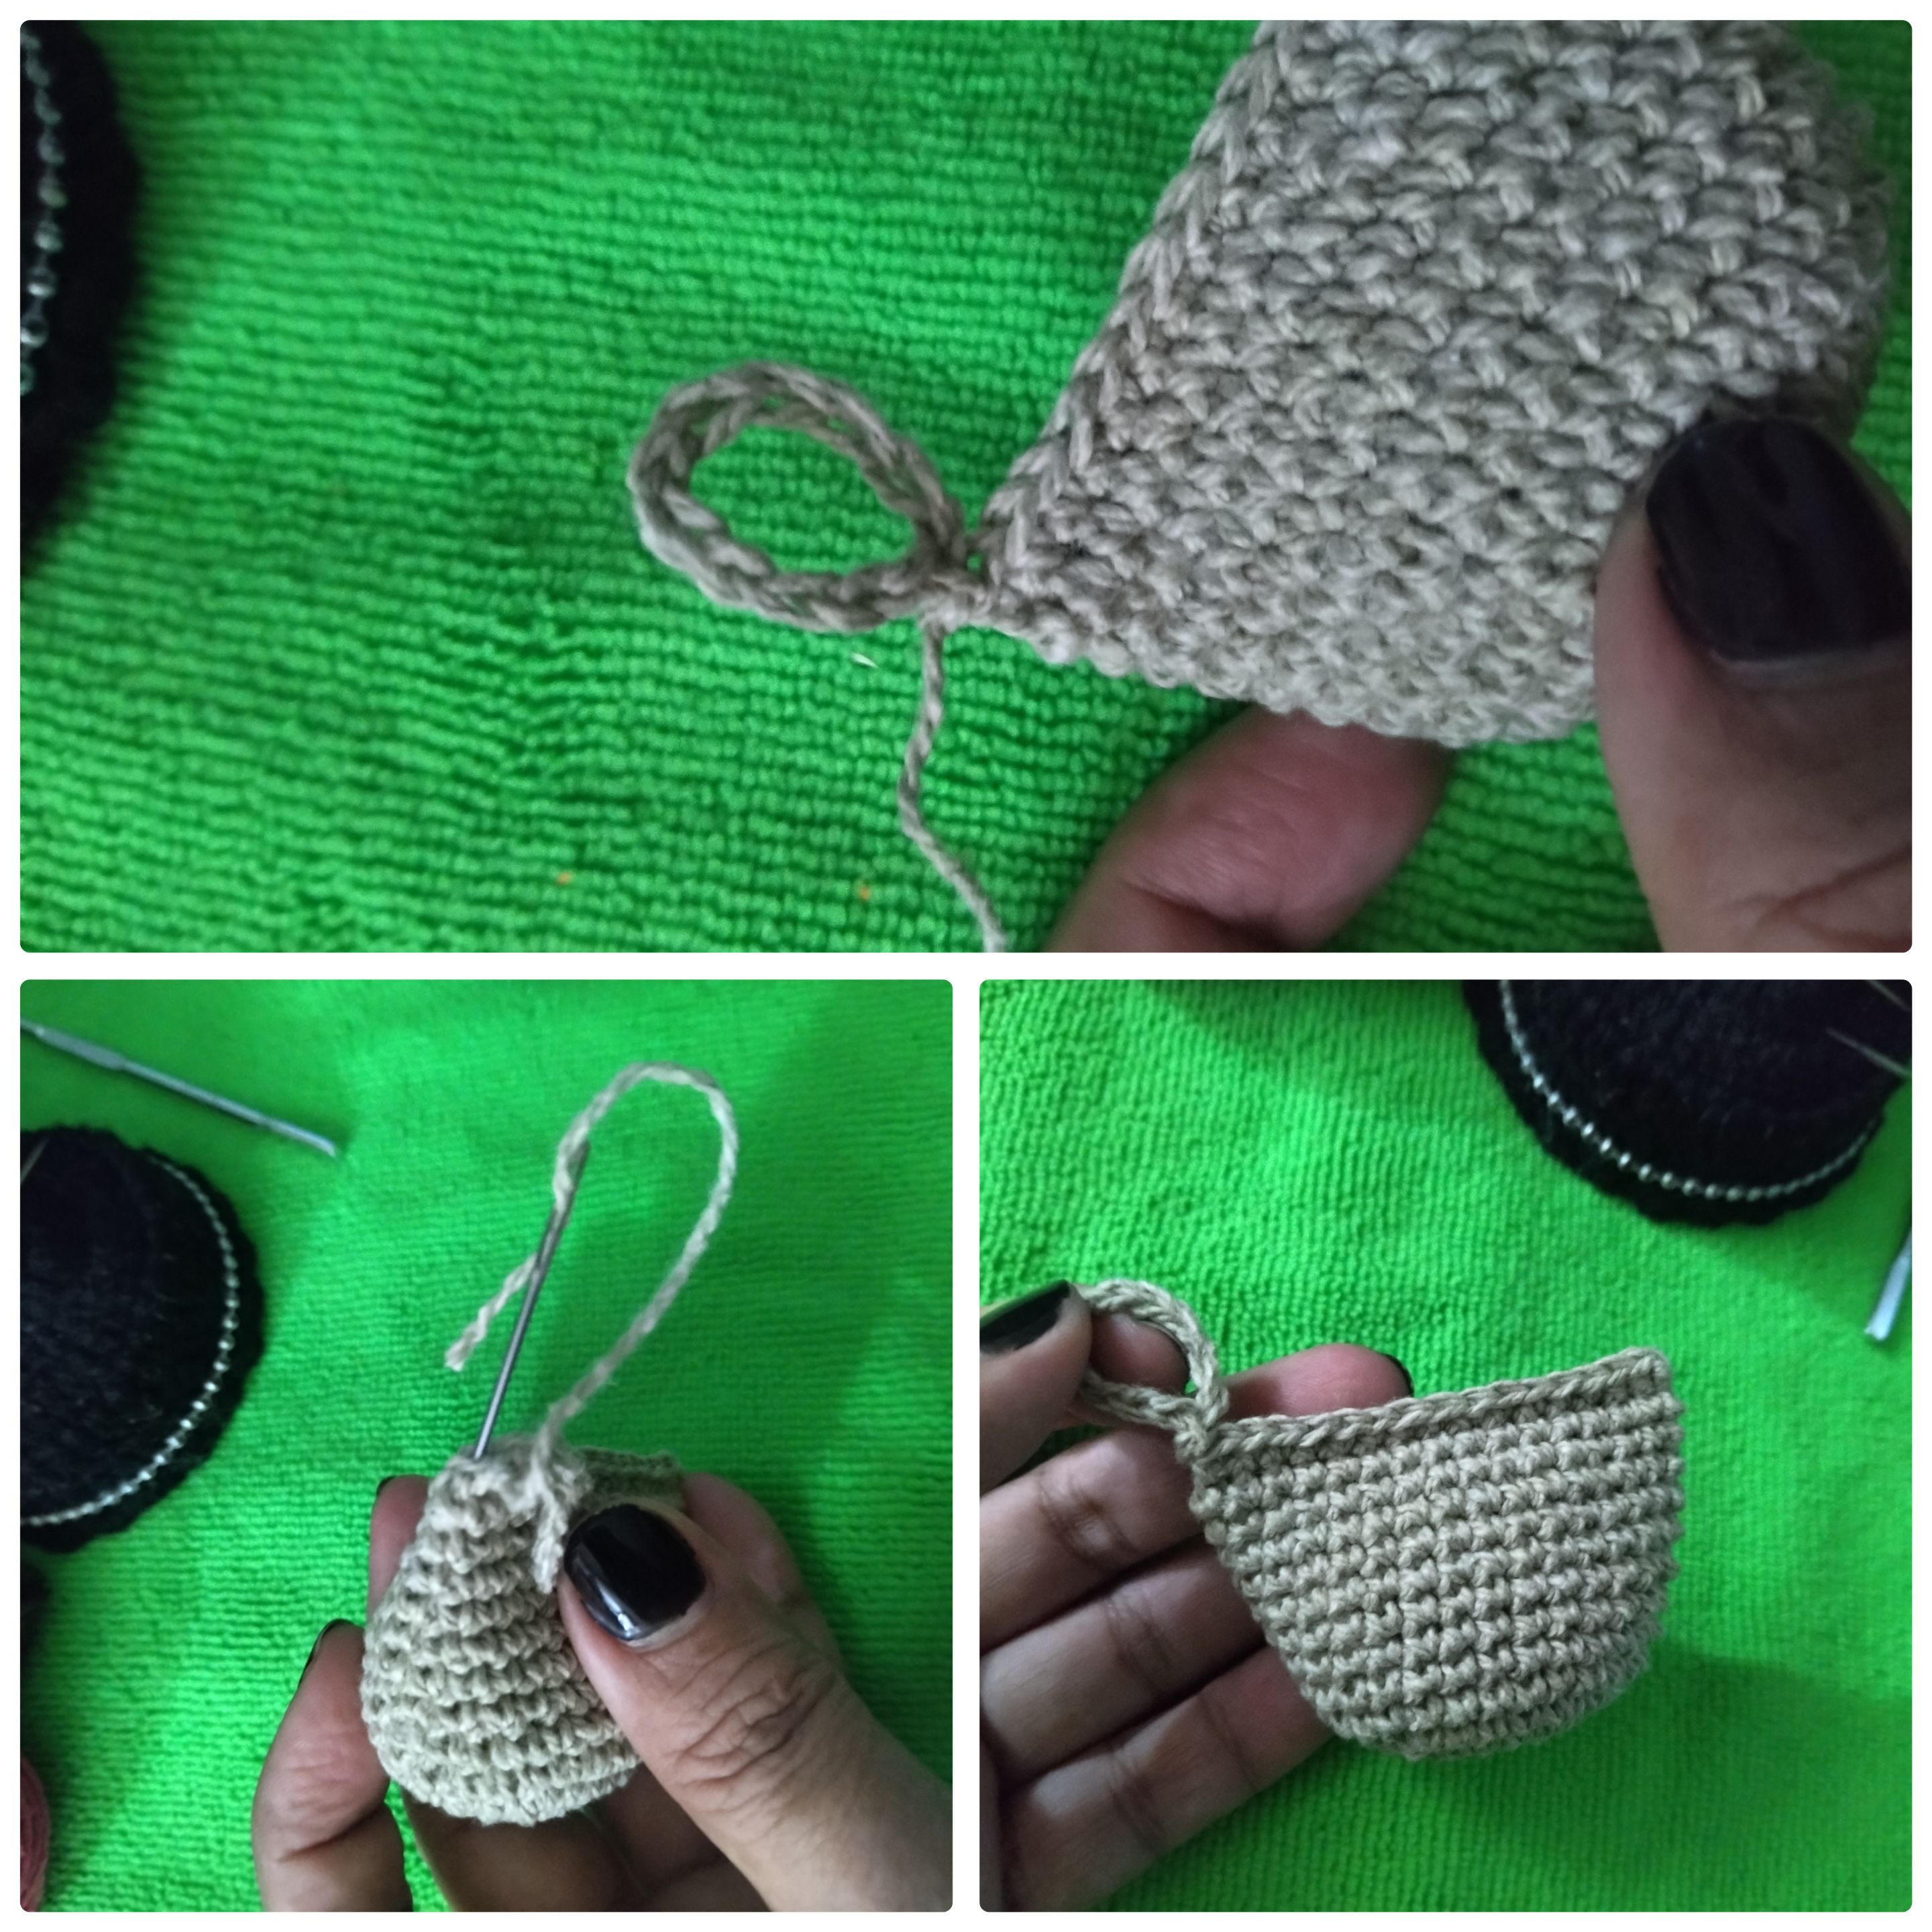
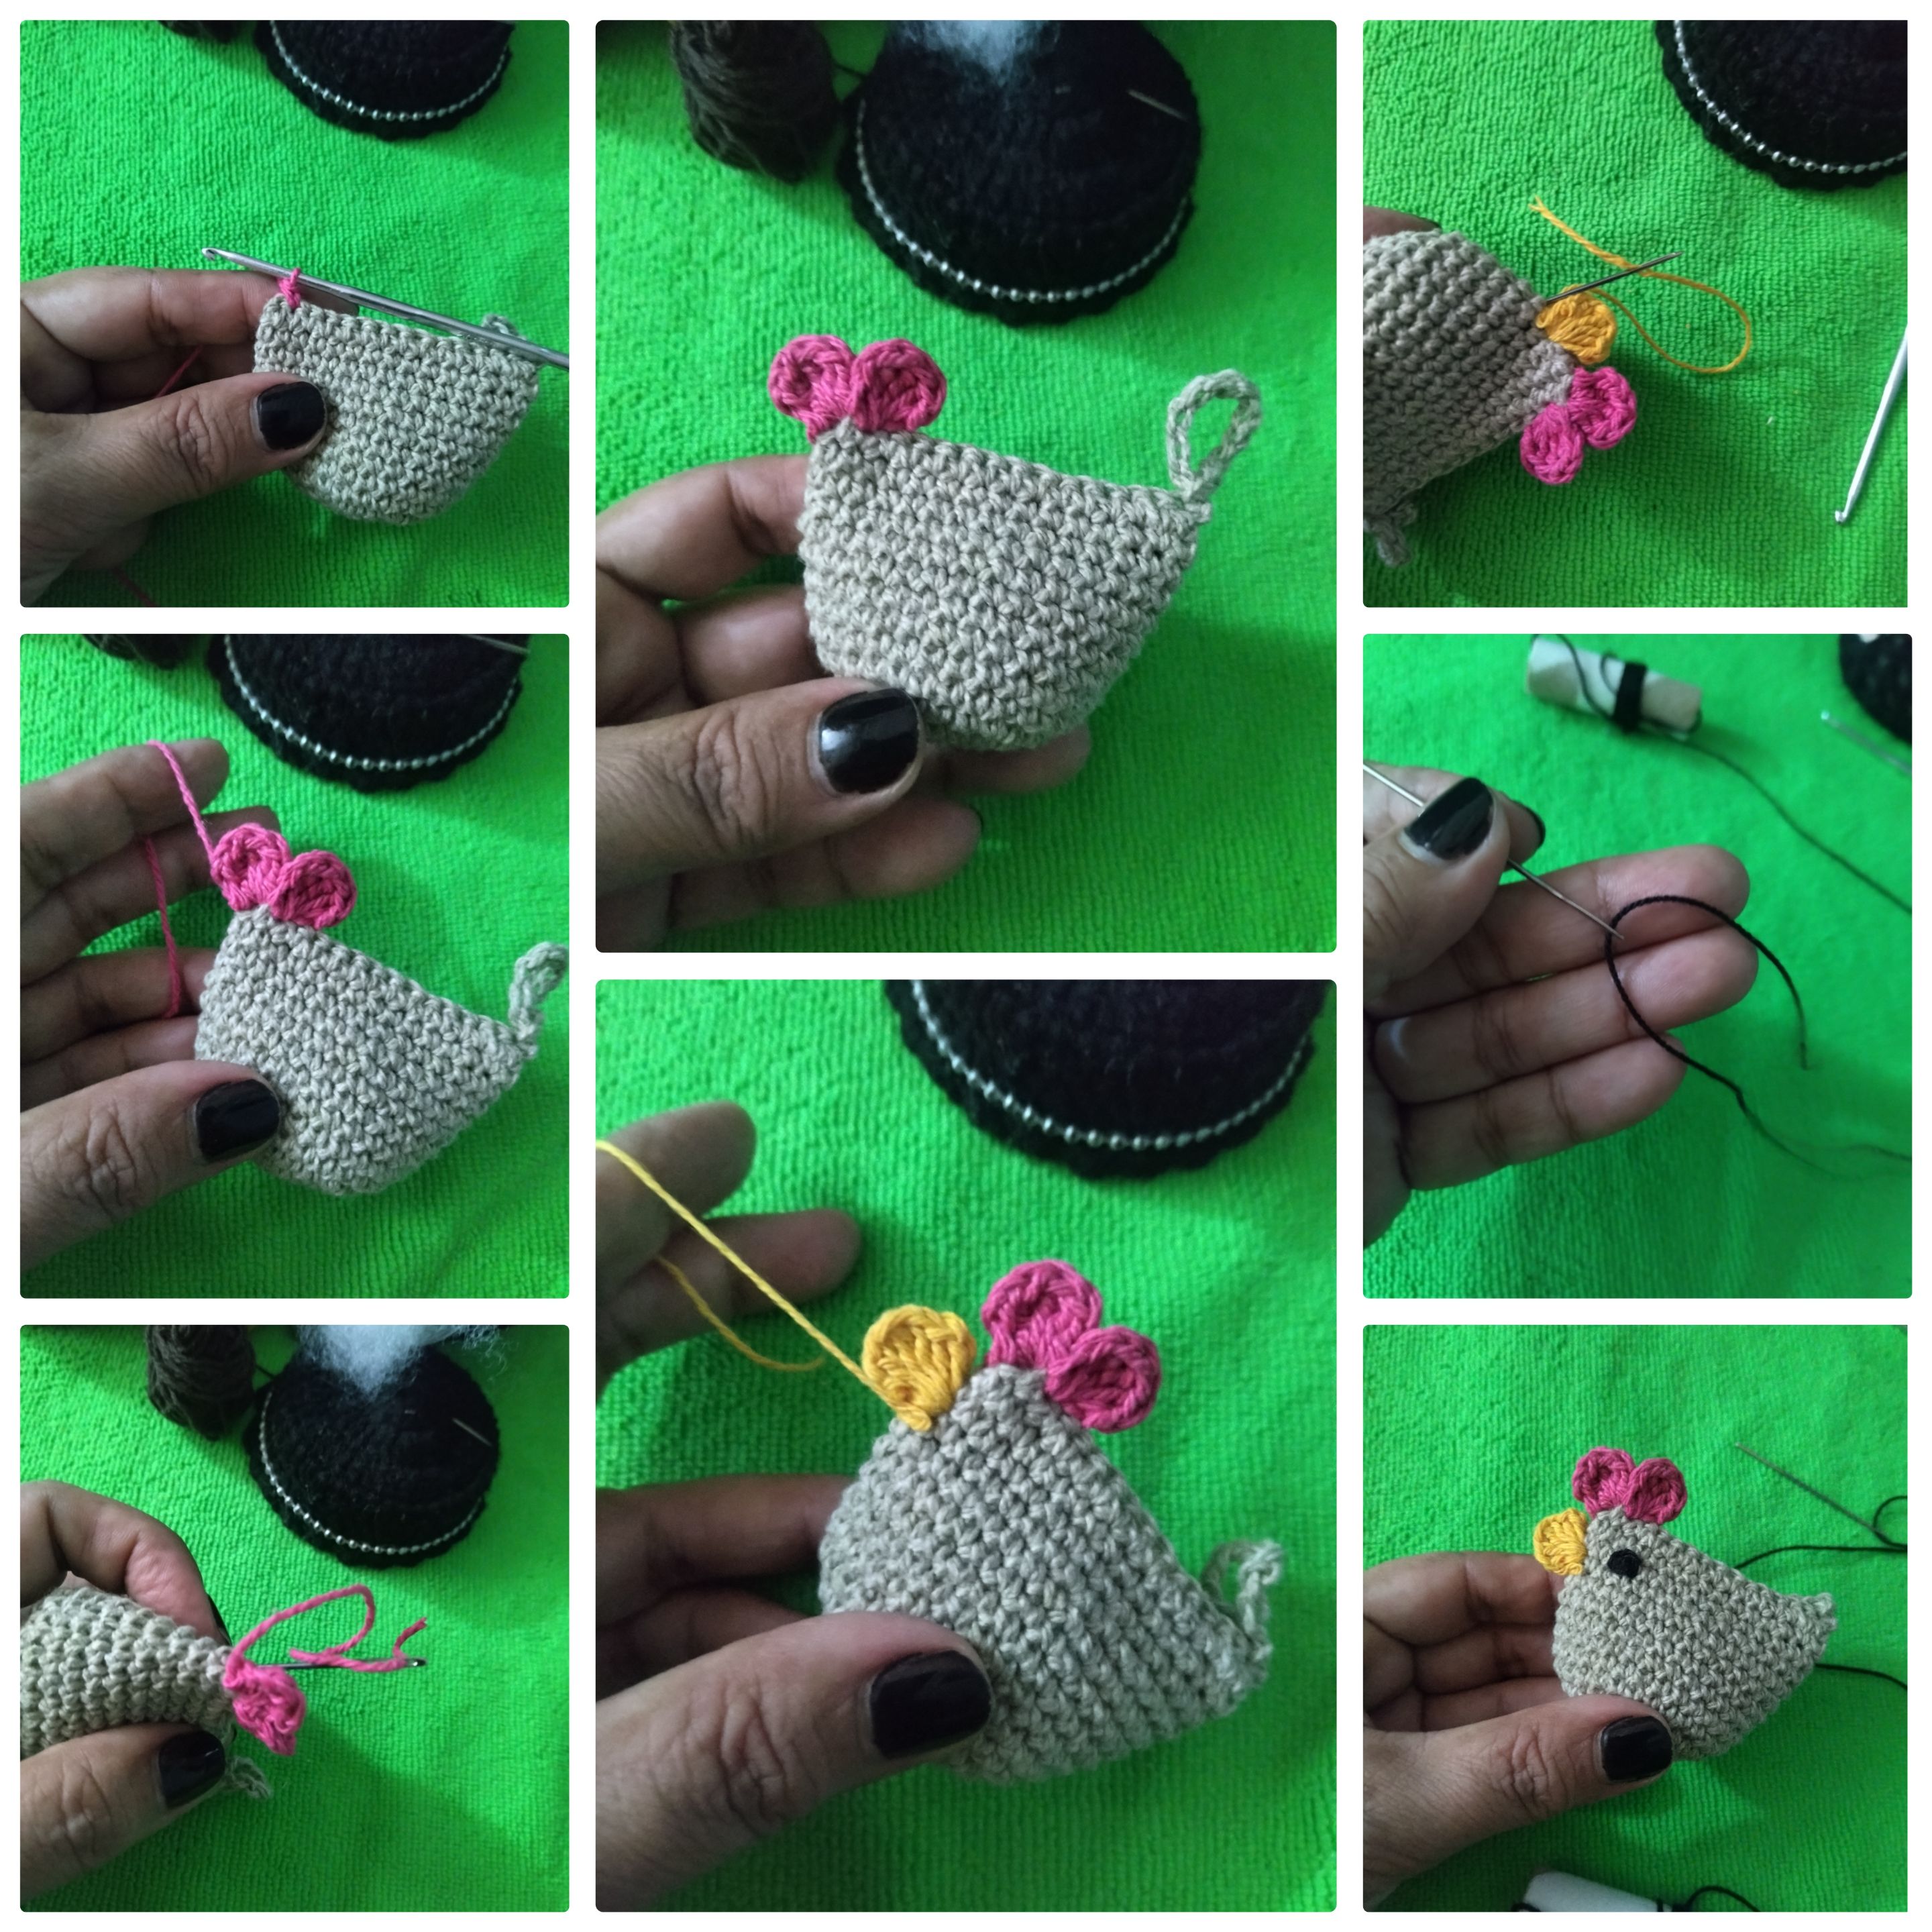
🐔 Empecé tejiendo el cuerpo de la gallinita. Inicié desde un anillo mágico de 6pb. La vuelta siguiente la tejí de 6aum de pb. Después tejí tres vueltas de aumentos: 1pb-1aum, 2pb-1aum y 3pb-1aum. 🐔 Seguí tejiendo 9 vueltas de punto sobre punto (30pb). 🐔 Coloqué el algodón siliconado solamente hasta la mitad del cuerpo. 🐔 En la vuelta 10, la última, tejí puntos (15) para cerrar el tejido, tal como puedes verlo en la foto 👇🏽 🐔 Al terminar el último punto tejí 12 cadenas.
🐔 I started by knitting the body of the little hen. I started from a magic ring of 6bp. The next round I knitted from 6aum of bp. Then I knit three rounds of increases: 1pb-1aum, 2pb-1aum and 3pb-1aum. 🐔 I continued knitting 9 rounds of knit over knit (30bp). 🐔 I placed the silicon cotton only up to the middle of the body. 🐔 In round 10, the last round, I knitted stitches (15) to close the knitting, as you can see in the picture 👇🏽 🐔 At the end of the last stitch I knitted 12 chains.
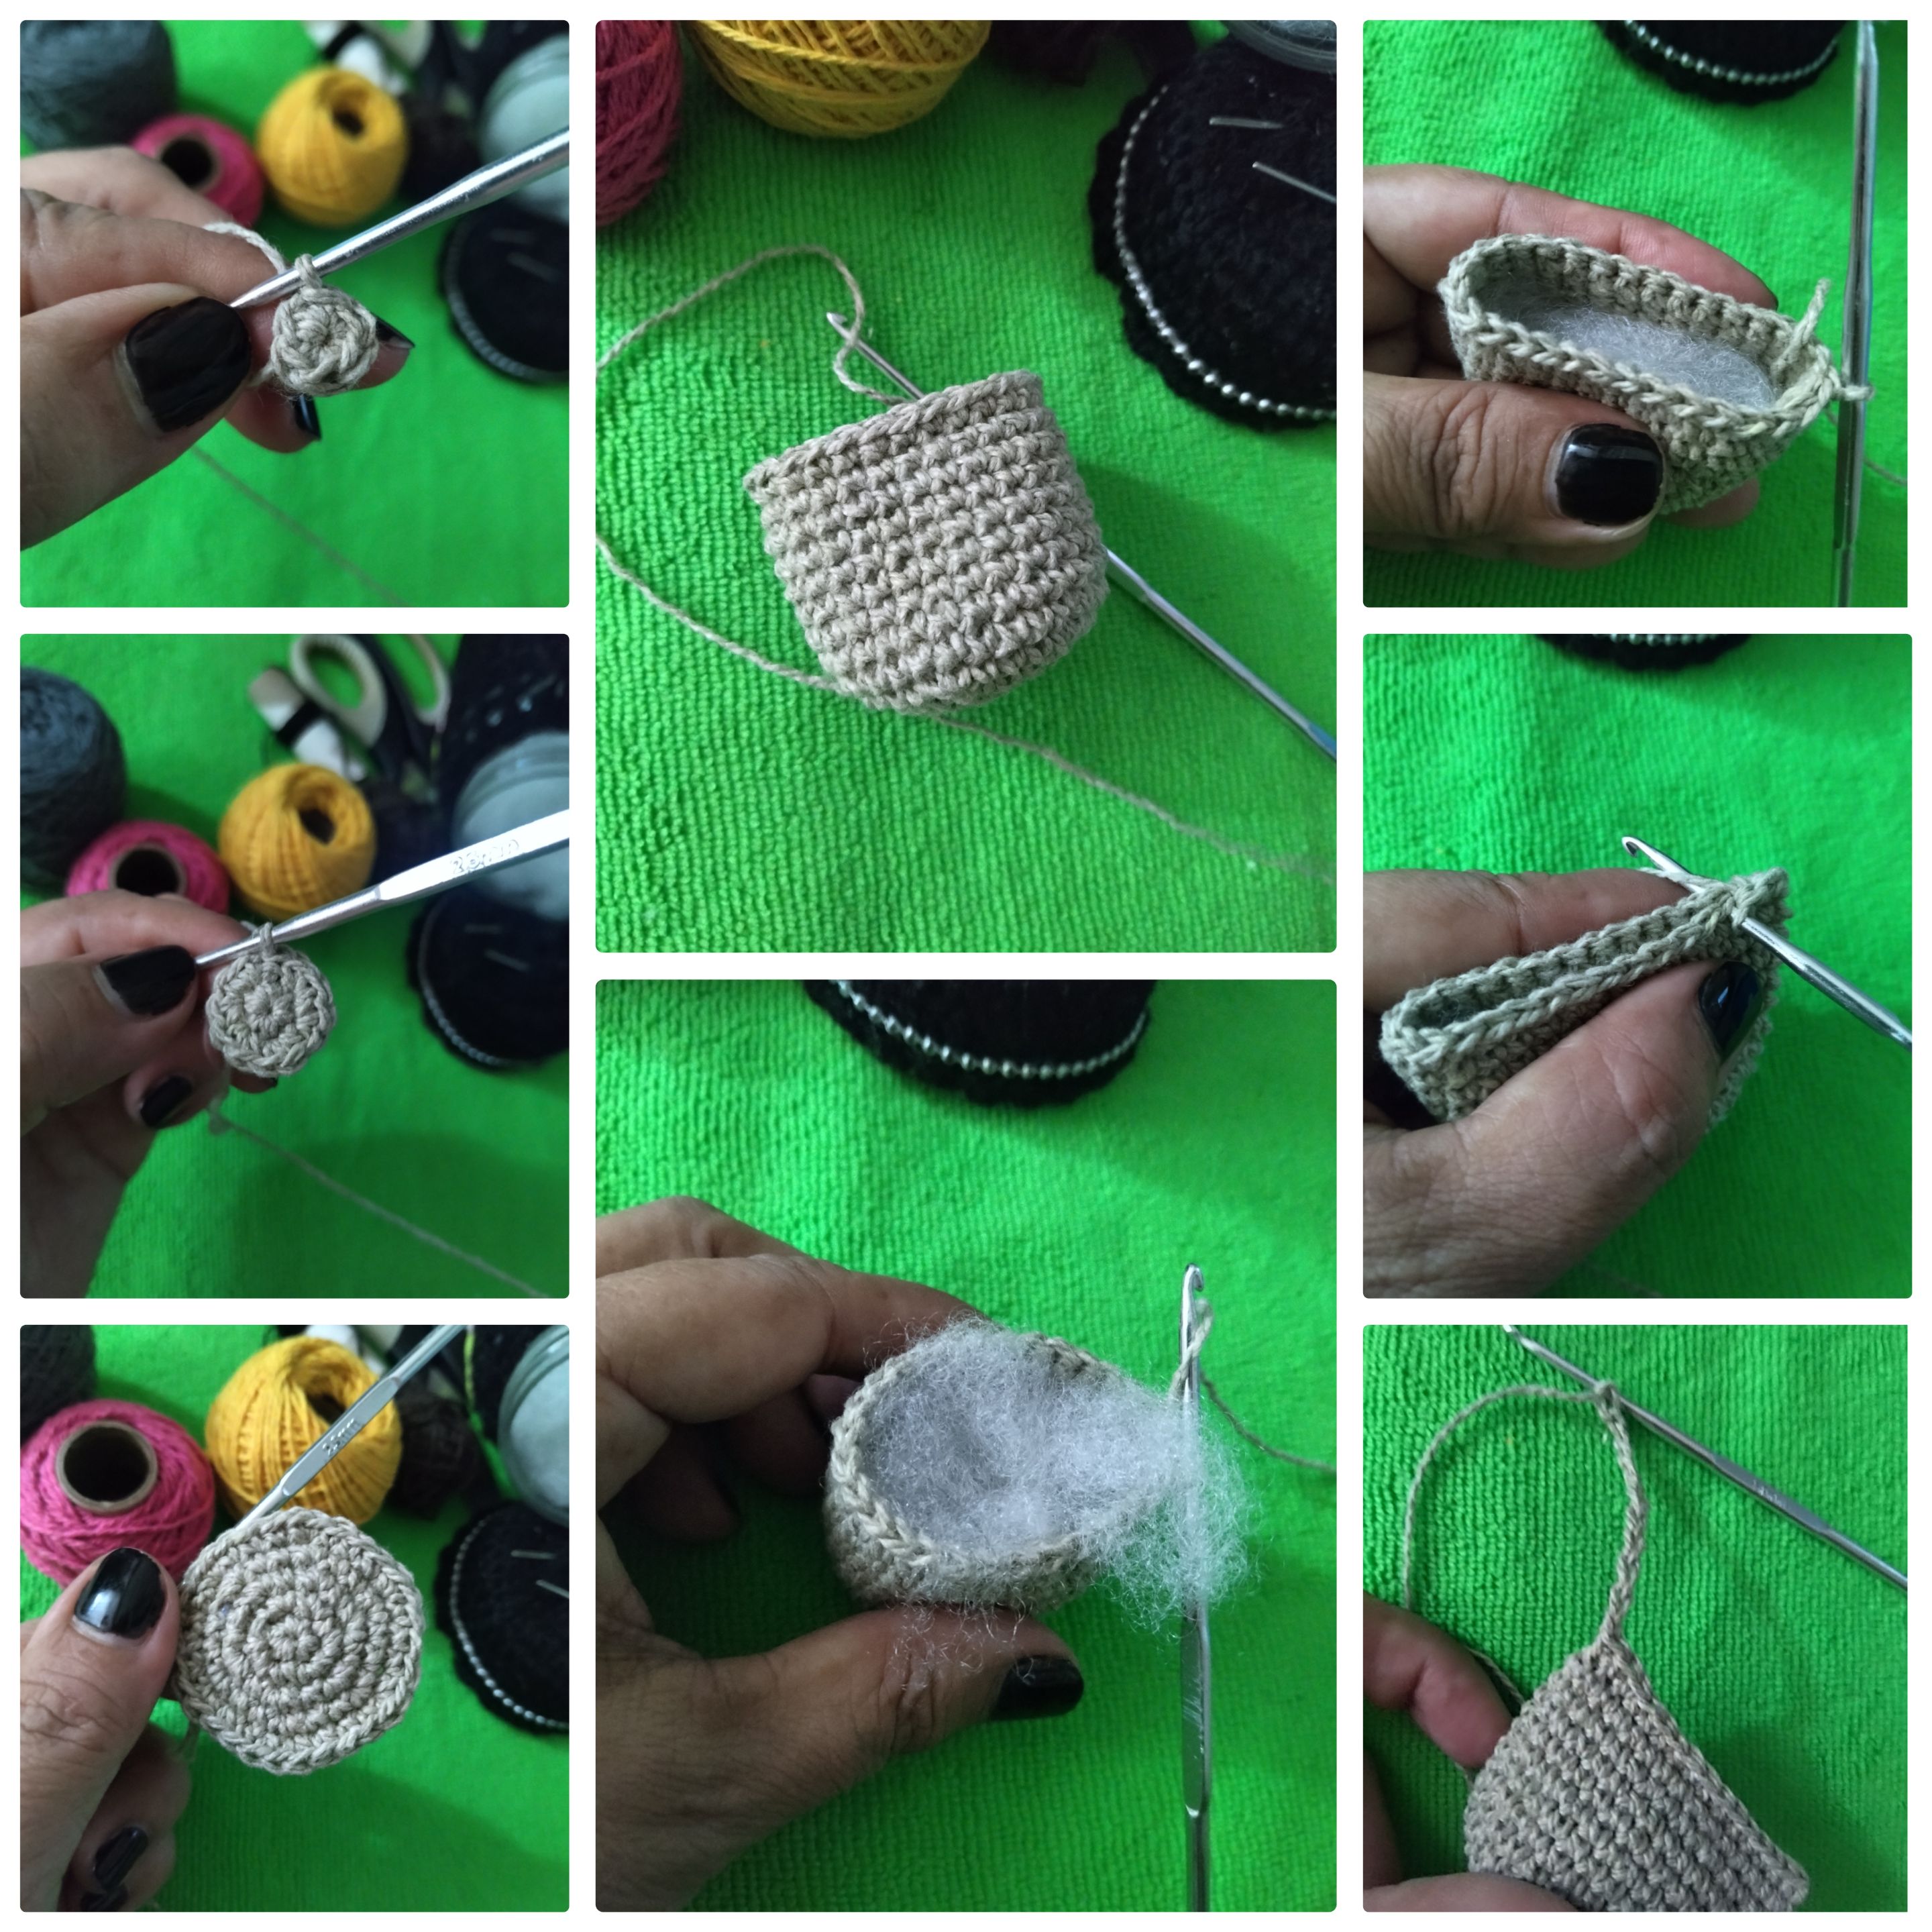
🐔 Con las 12 cadenas le hice el asa para colgar. Deslicé el punto sobre el punto bajo dónde inicié las cadenas. Luego corté el hilo y escondí la hebra. 🐔 De esta manera quedó terminado el cuerpo de la gallinita. Está la podemos tejer de los colores que más nos gusten, incluso de colores pasteles, hay que ser creativo y poner a volar la imaginación.
🐔 With the 12 chains I made the handle for hanging. I slipped the stitch over the low stitch where I started the chains. Then I cut the yarn and hid the strand. 🐔 This is how the body of the hen was finished. We can knit it in any color we like, even in pastel colors, you have to be creative and let your imagination fly.
🐔 Con el hilo fucsia tejí la cresta de la 🐔 gallinita. En dos puntos tejí 2cadenas, 3puntos altos, 2cadenas y 1punto deslizado en el mismo punto. 🐔 Con el hilo color amarillo tejí el pico de la gallinita. En un punto tejí 2cadenas, 1punto medio alto, 1punto alto, 1punto alto doble, 1punto alto, 1punto medio alto, 2cadenas y 1punto deslizado. Se corta el hilo y se esconde la hebra sobrante. 🐔 Con el hilo negro (más delgado) bordé los ojos de la gallinita. Realicé una x sobre un punto y lo fui rellenando con el hilo hasta formar un pequeño círculo. Luego corté el hilo y escondí la hebra entre el tejido.
🐔 With the fuchsia yarn I knit the crest of the 🐔 little hen. In two stitches I knitted 2 chains, 3tall stitches, 2 chains and 1 slipped stitch in the same stitch. 🐔 With the yellow colored yarn I knitted the beak of the little hen. In one stitch I knitted 2chains, 1 half-high stitch, 1 double high stitch, 1 high stitch, 1 half-high stitch, 2chains and 1 slipped stitch. The yarn is cut off and the excess yarn is hidden. 🐔 With the black yarn (thinner) I embroidered the eyes of the little hen. I made an x over a stitch and filled it in with the yarn until I formed a small circle. Then I cut the thread and hid the thread in the fabric.
Es la primera vez que tejo este tipo de gallinas, me pareció bastante fácil y se tejen rápido. Este proyecto es ideal para utilizar aquellos trozos, sobrantes o retazos de hilos que nos van quedando de otros. Yo la verdad es que aprovecho lo máximo posible cada hebra. No suelo comprar hilos con frecuencia ya que no todo lo que tejo lo vendo. Aqui en la casa tengo mucho hilo, pero ya convertido en alguna creación. Espero algún día vender todo para irme a comprar muchos hilos y poder tejer proyectos grandes.
This is the first time I knit this type of hens, I found it quite easy and they knit quickly. This project is ideal to use those pieces, leftovers or scraps of yarn that we have left over from other projects. The truth is that I take advantage of each strand as much as possible. I don't buy yarn very often since I don't sell everything I knit. Here in the house I have a lot of yarn, but already converted into some creation. I hope someday to sell everything so I can buy a lot of yarn and knit big projects.

¿Qué les ha parecido esta creación? Muchísimas gracias por el apoyo. Todas las fotos son de mi propiedad. Edité con Polish. Usé el traductor de Deelp. Hasta pronto. Bendiciones 🙏🏽
What did you think of this creation? Thank you very much for your support. All photos are my property. I edited with Polish. I used Deelp translator. See you soon. Blessings 🙏🏽